|
Thread Number: 25520
/ Tag: Vintage Automatic Washers
Changing a Maytag tub bearing and seal: A how to... |
[Down to Last] |
| Post# 392895 11/12/2009 at 22:28 (5,272 days old) by redcarpetdrew (Fairfield, CA) | ||

Recently, Dan wanted me to show him the steps on changing a Maytag Dependable Care platform tub bearing and seal on his HA806 that I gave him. What we here at the shop call a 'stem and boot job'. There has been interest expressed on my possibly sharing that with all of you. In the interests of saving a few more Maytags and passing on what was taught to me by my mentor for future repairmen, I will do so. Everybody has a different style of doing it. I will show you mine with some pics and helpful hints and some possible pitfalls to avoid. I also hope if our wonderful Robert finds this useful, it can be archived somewhere easily found for future reference. I also hope you folks find this useful and interesting as well. Here goes... | ||

|
| Post# 392897 , Reply# 1 11/12/2009 at 22:34 (5,272 days old) by redcarpetdrew (Fairfield, CA) | ||
|
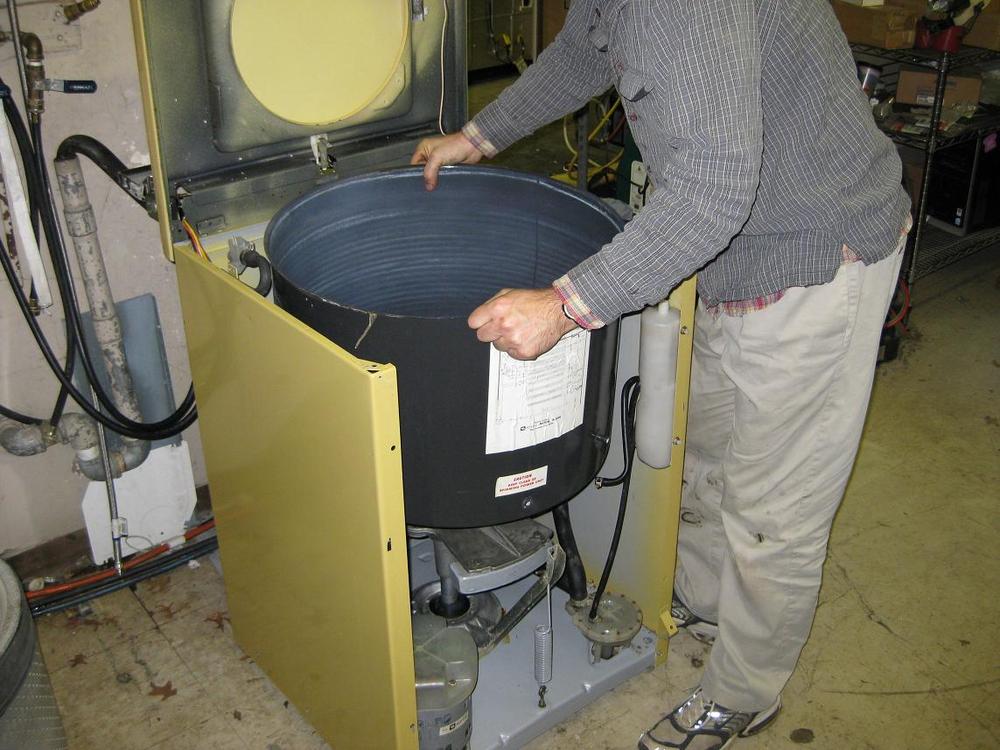
Yah gotta start somewhere!
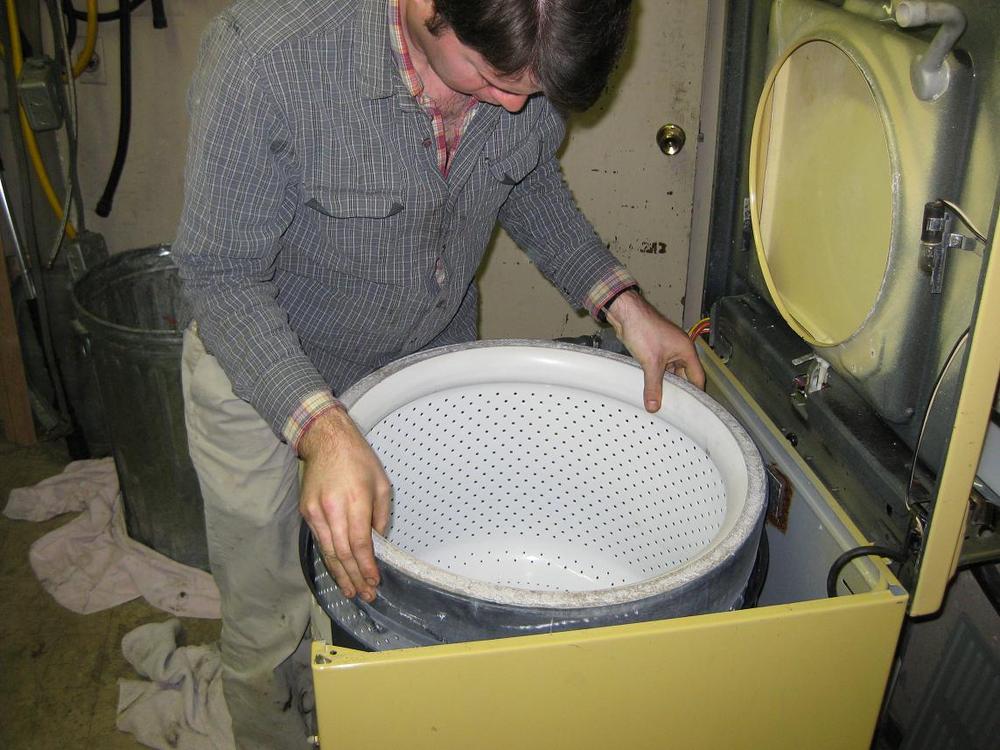
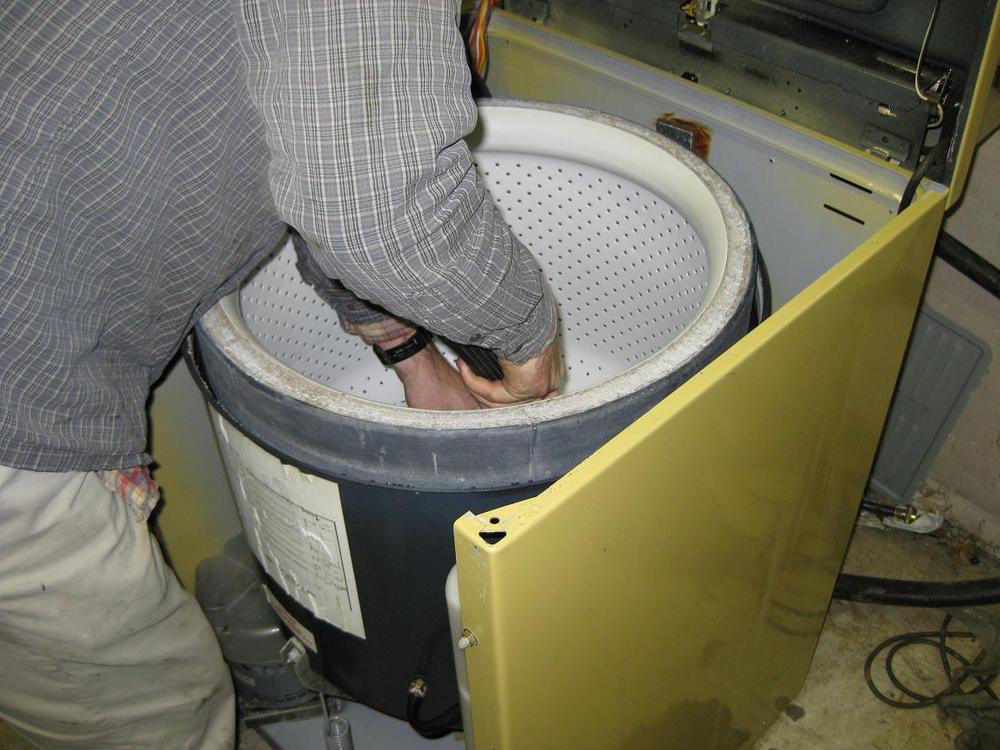
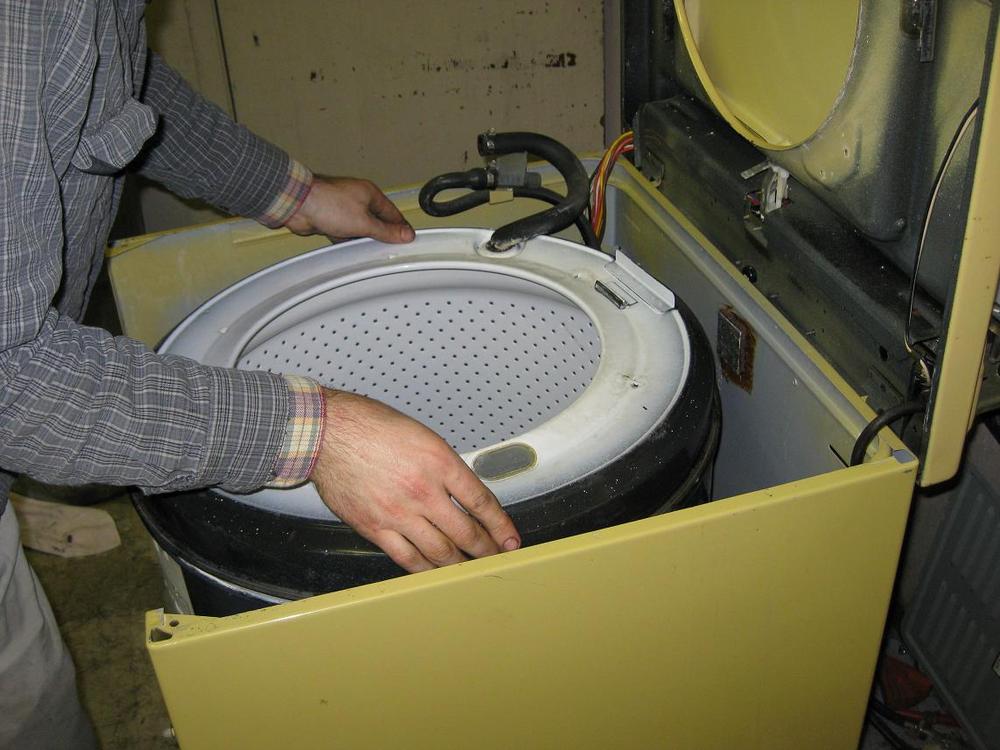
You have to pull the front panel and lift the main top. It doesn't matter if you have a old critter or a newer model with the plastic tub cover. You undo the tub cover to expose the inner tub. If you have the old metal cover with the band clamp and gasket, CAREFULLY loosen both bolts and slide the ring off being careful not to damage the lip on the outer tub. There can be rust spots on that lip. As long as the lip is intact, try to gently remove the rust to prevent future issues. Remove the agitator. Old models usually will pop off (some will fight you) and newer models (read orbital transmission models, usually) will have a 1/4 headed set screw to back out.
| ||
| Post# 392898 , Reply# 2 11/12/2009 at 22:37 (5,272 days old) by redcarpetdrew (Fairfield, CA) | ||
|
| ||
| Post# 392899 , Reply# 3 11/12/2009 at 22:40 (5,272 days old) by redcarpetdrew (Fairfield, CA) | ||
|
| ||
| Post# 392901 , Reply# 4 11/12/2009 at 22:46 (5,272 days old) by redcarpetdrew (Fairfield, CA) | ||
|
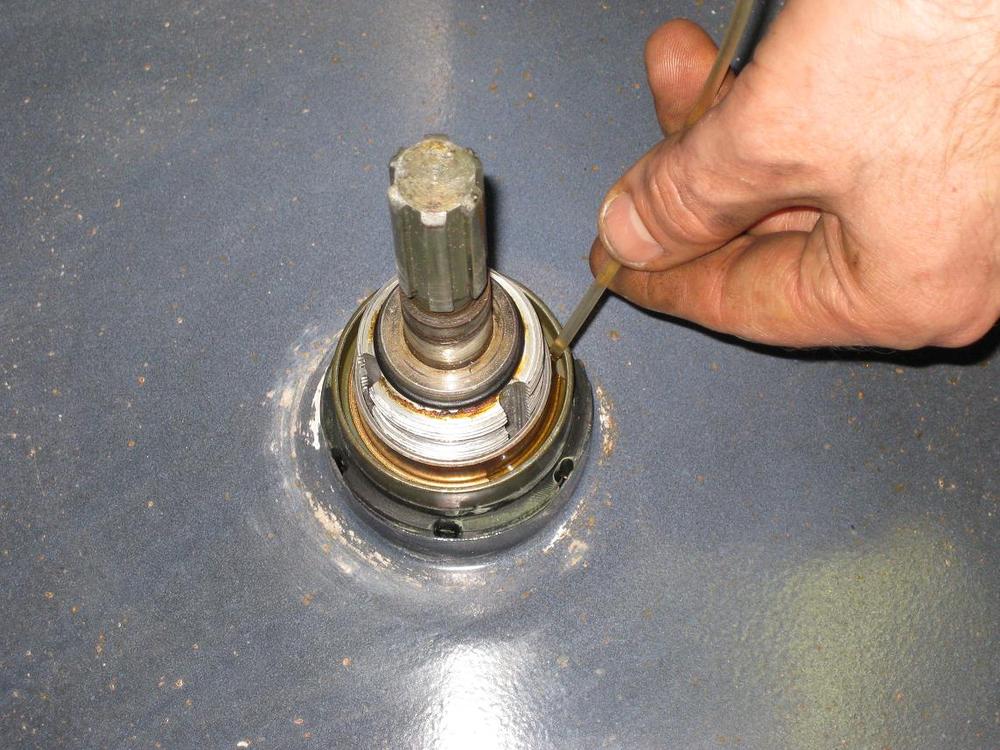
The neat stuff...
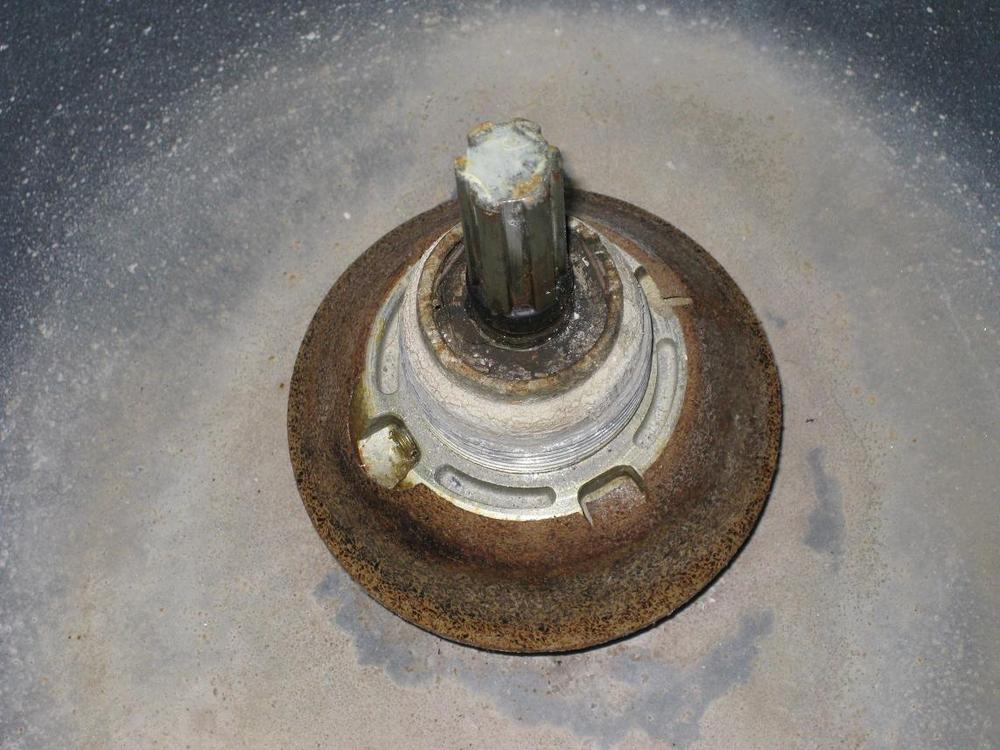
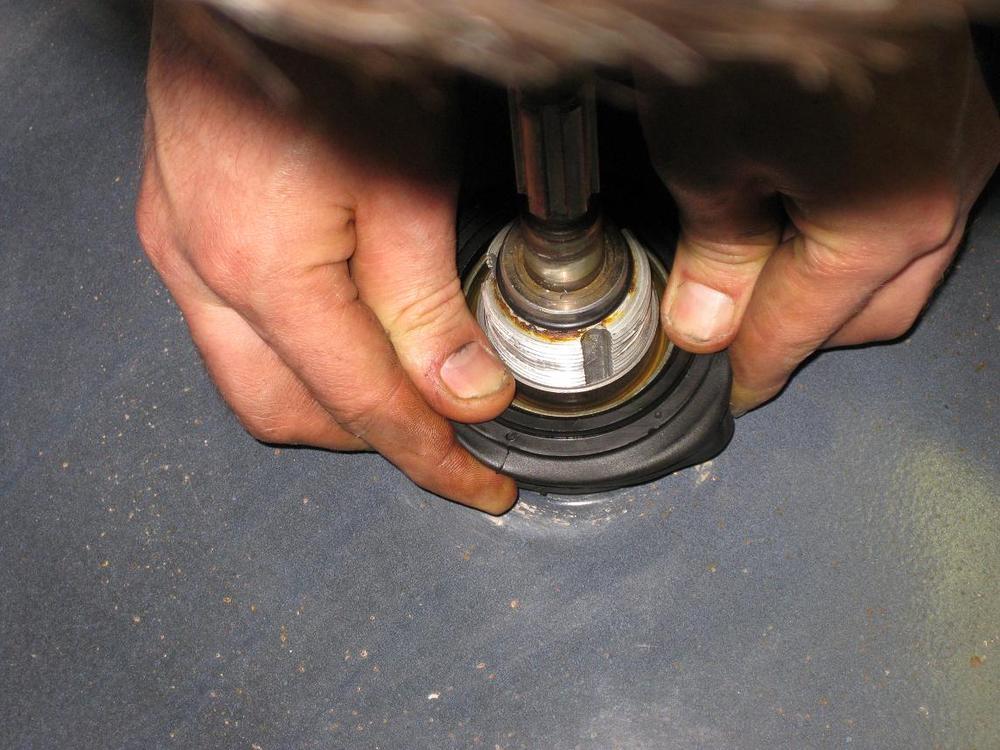
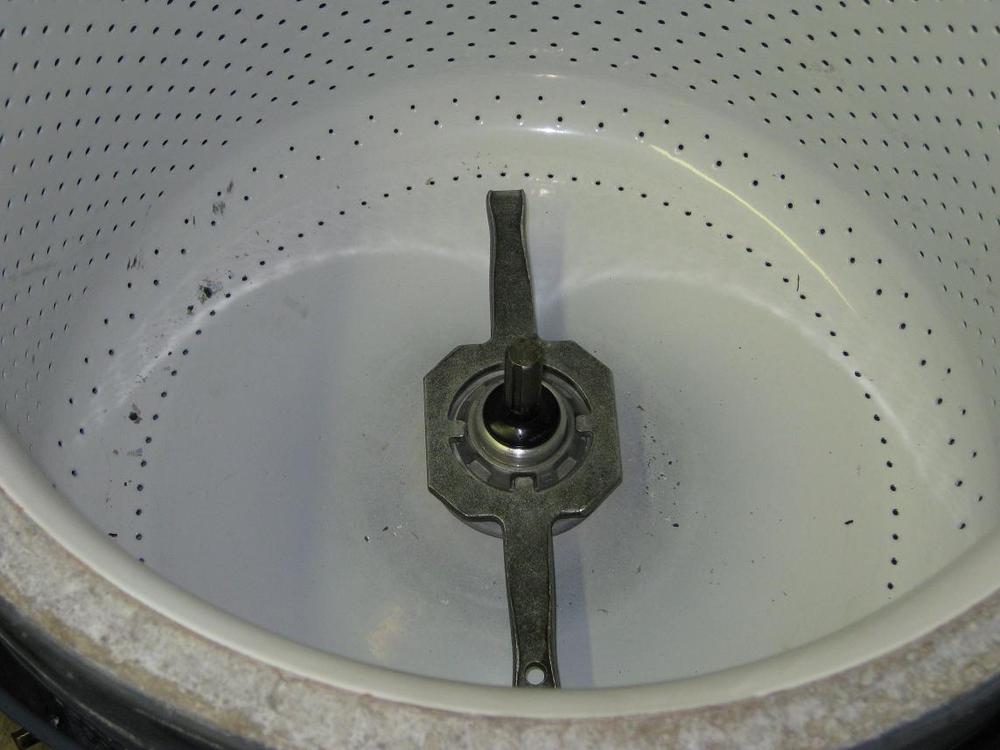
This is the old mounting stem that also forms part of the tub seal. Note the set screw you see in the side. The older ones are hex headed while the newer ones (and the new replacements) are torx. LOOK FIRST for a agitator keeper ring (the black rubber ring on the shaft in the picture.) You will need to remove this. If your agitator had a set screw, you most likely won't have this. Take a mini screwdriver and poke it inbetween the shaft and the ring, stretching it slightly enough to get it out of the channel and up off the shaft. You should save this for reuse as they are getting difficult to find. Remove the set screw and use the tool to spin off the stem. REMEMBER the reverse thread...
| ||
| Post# 392902 , Reply# 5 11/12/2009 at 22:51 (5,272 days old) by redcarpetdrew (Fairfield, CA) | ||
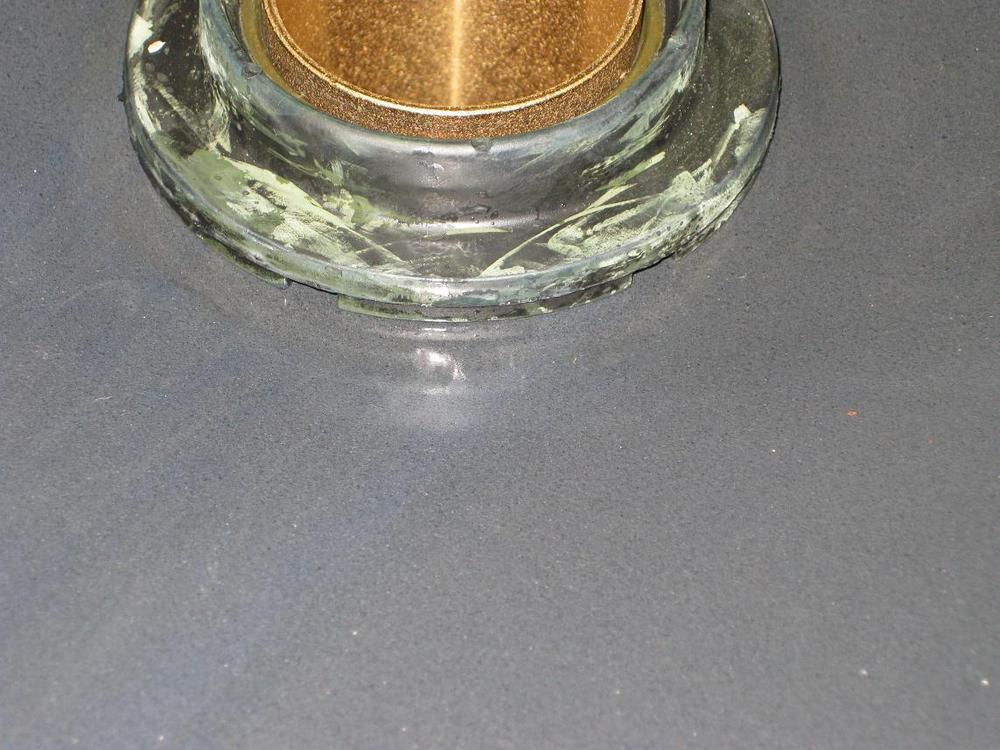
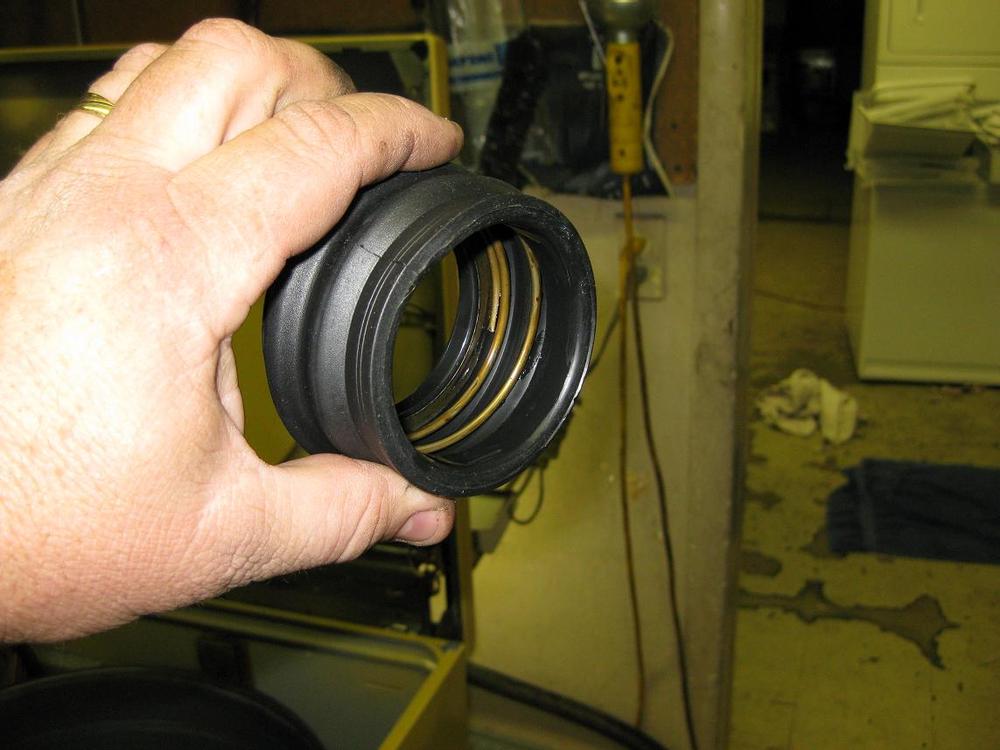
|
There's the boot seal. This just sets over a lip in the center of the outer tub. just pull it off. Also, there's the old agitator shaft seal. remove it, too. this may come off in bits. There are two washers with a spring compressed between them in that rubber cone. Make sure you have all those bits off ff it separates... You can also see how that keeper ring I talked about would interfere with it coming off now.

| ||
| Post# 392903 , Reply# 6 11/12/2009 at 22:54 (5,272 days old) by redcarpetdrew (Fairfield, CA) | ||
|
| ||
| Post# 392906 , Reply# 7 11/12/2009 at 23:02 (5,272 days old) by redcarpetdrew (Fairfield, CA) | ||
|
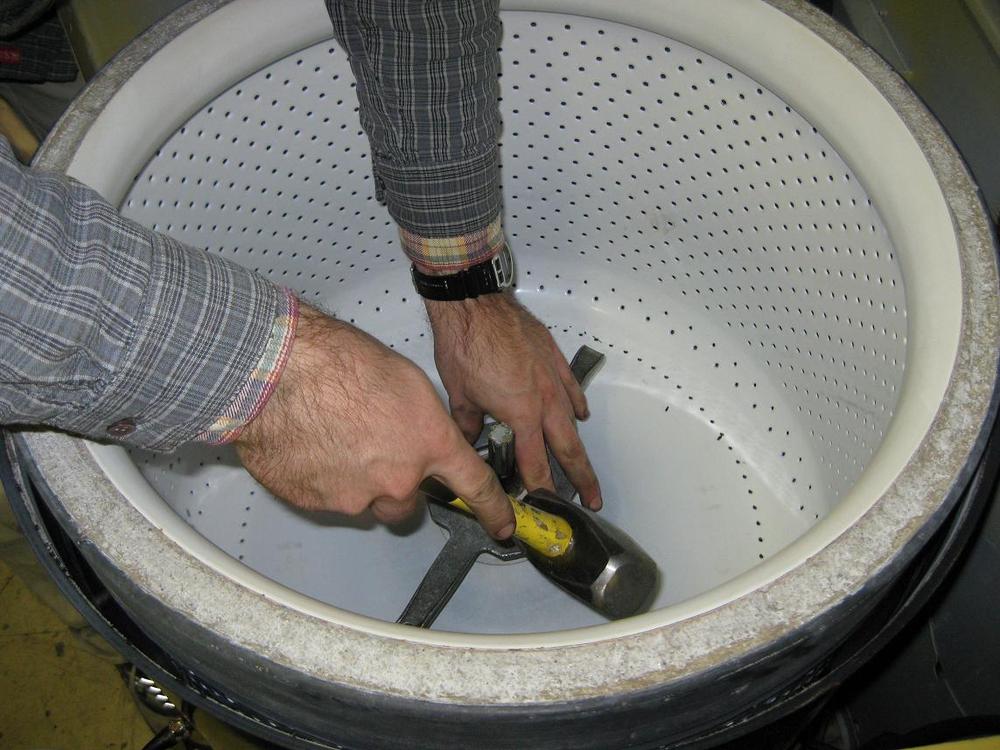
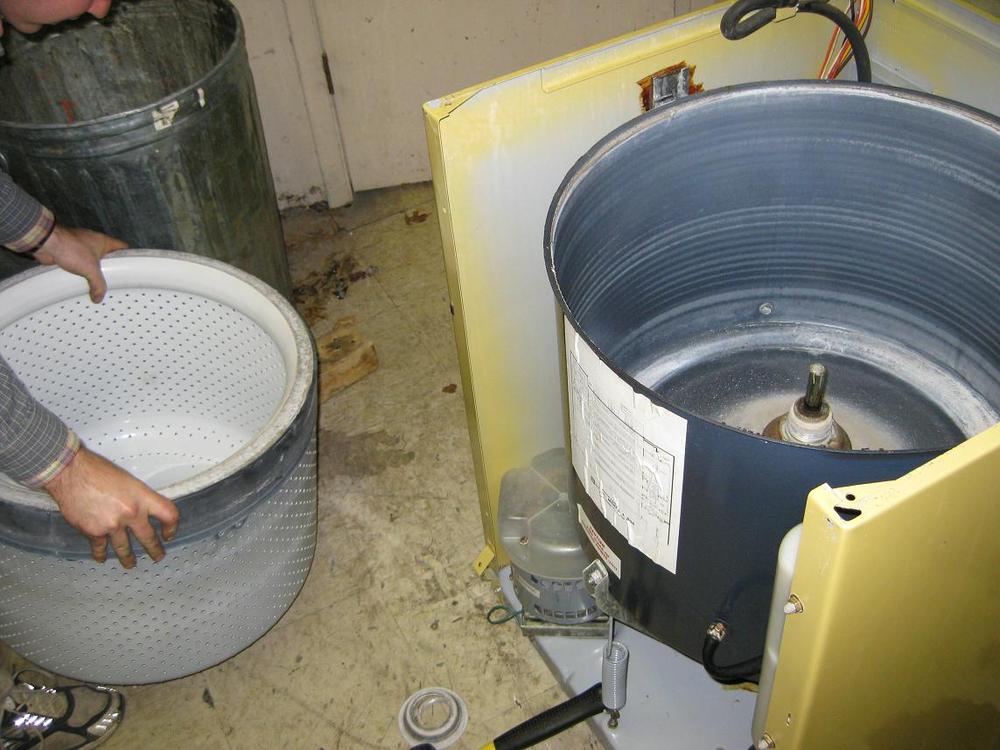
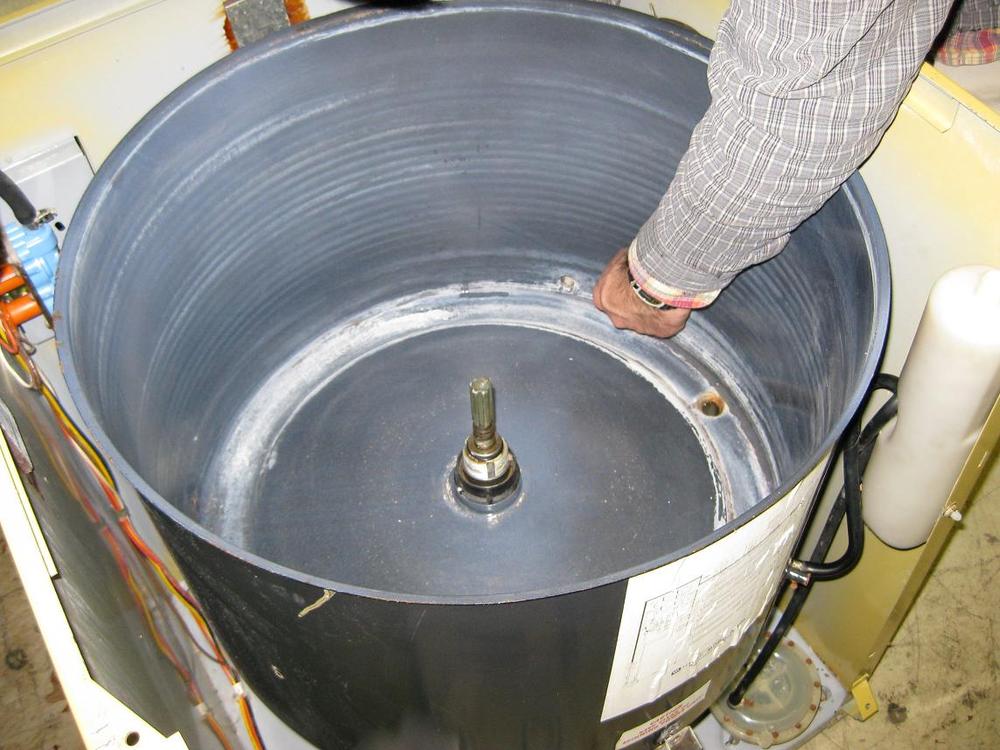
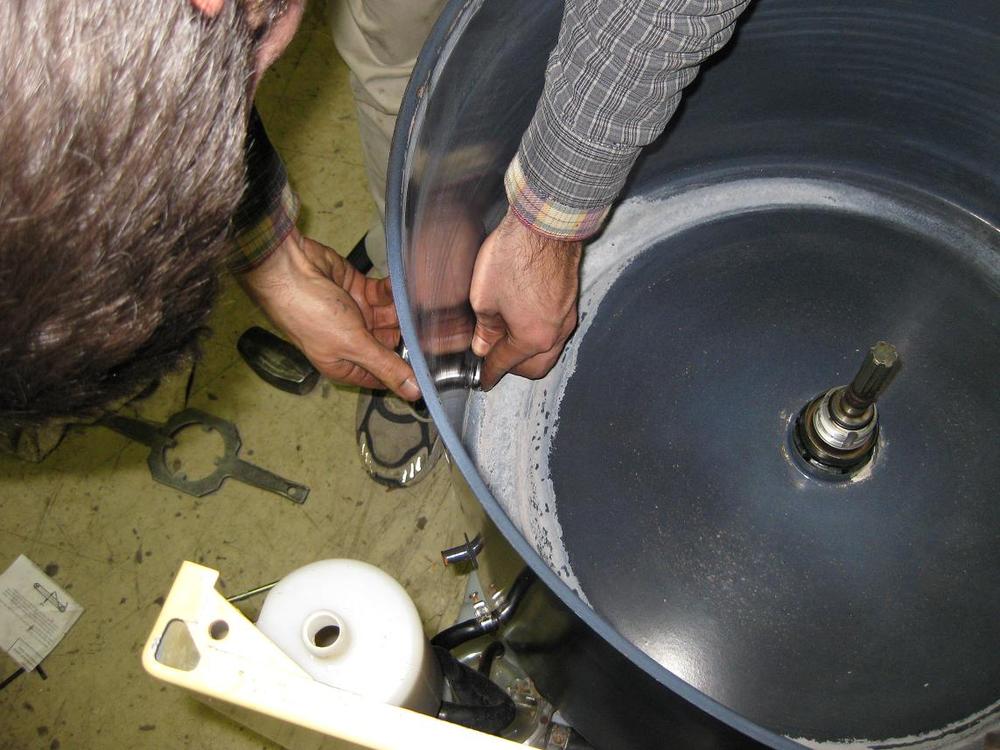
Carefully lift the outer tub off the transmission. If the seal has been leaking, this may fight you slightly. Twist the tub slightly left and right to help. Now you can see the bearing sleeve. They DON'T always look so pretty, esp if it's been leaking or was siezed up! If you're lucky, the old sleeve will just slide up and off. If you aren't so lucky, then it gets interesting. The sleeve is held onto the upper trans housing by corrosion/rust. Some people will use a torch to heat the sleeve to break it loose. I will use a chisel and hammer. Avoid damaging the trans housing and threads by running the chisel down the 'channel' you see in the neck. The sleeve will split and expand so you can lift it off. Use a very fine grit sand paper or better yet, plumbers sanding cloth to clean the transmission neck where the new sleeve will sit. Just enough to remove the crap and make it shine.

| ||
| Post# 392907 , Reply# 8 11/12/2009 at 23:03 (5,272 days old) by rollermatic (cincinnati) | ||
|
very interesting | ||
| Post# 392909 , Reply# 9 11/12/2009 at 23:07 (5,272 days old) by redcarpetdrew (Fairfield, CA) | ||
|
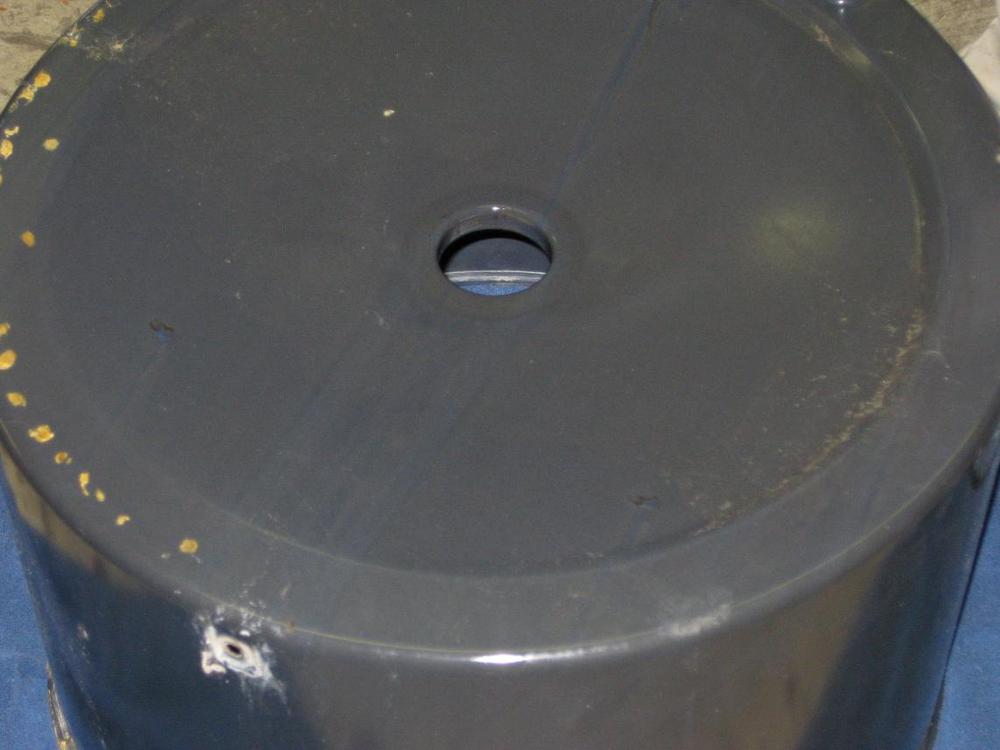
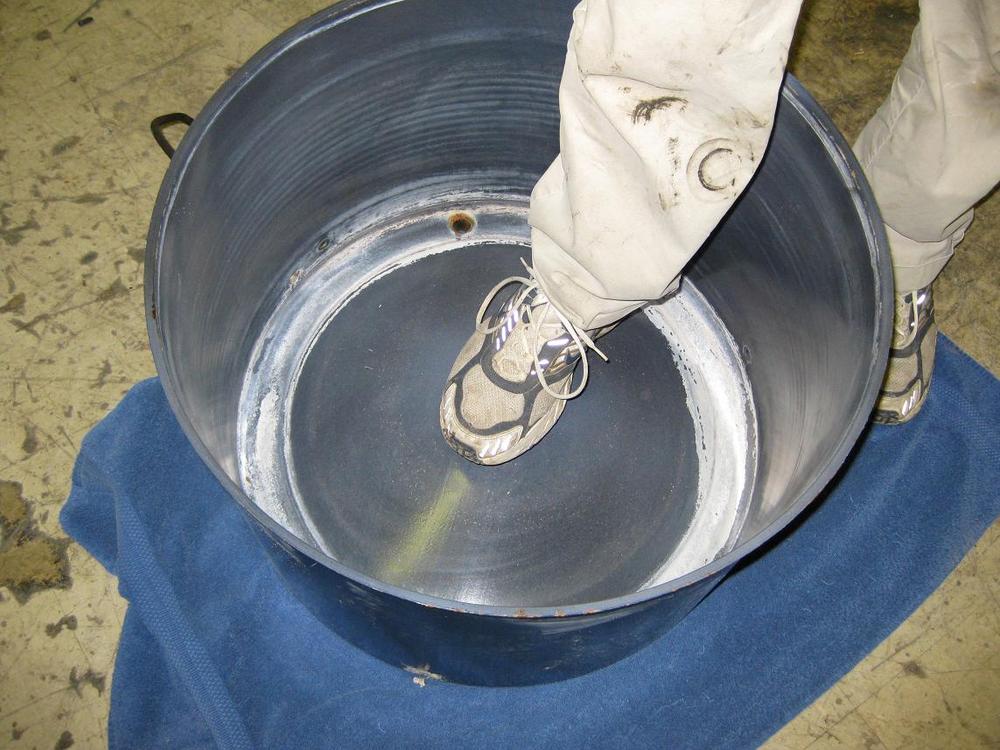
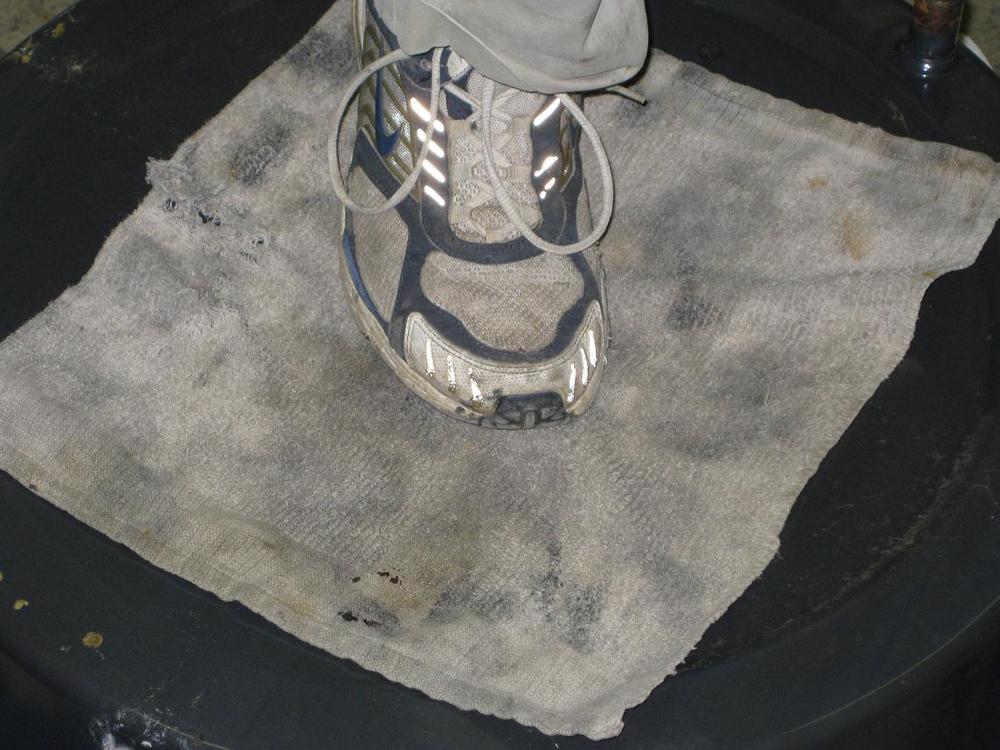
You can now press out the old bearing from the tub. This is pressed in from underneath the tub. Again, everybody has their own way. I will set an old blanket or towels down on the floor and set the tub on top of them. Use your foot to >gently< push the bearing out. Sometime rocking your foot will help. REMEMBER, the tub drain outlet neck is sticking out down there. Don't MASH it and damage that. ALSO, it is possible to warp the tub bottom with too much pushing with ALL your weight. Don't stand on it.
| ||
| Post# 392910 , Reply# 10 11/12/2009 at 23:09 (5,272 days old) by redcarpetdrew (Fairfield, CA) | ||
|
Nothing's better than a clean hole... | ||
| Post# 392911 , Reply# 11 11/12/2009 at 23:15 (5,272 days old) by redcarpetdrew (Fairfield, CA) | ||
|
Now we start to put this jugsaw puzzle back together!
The new bearing can be pressed in the same way. set the tub upside down on those pads as to NOT damage the lip of the tub. I will use a small shot of windex to lube the hole so the bearing will press in easier. Set the bearing in the hole and cover with a cloth to keep crap from getting into it. Press it in with your foot. Again, pivoting your foot in a circular motion while pressing can help. Use firm pressure but DO NOT STAND ON IT!!! You can deform the tub bottom then the bearing will not sit staight on the trans shaft. Then you are shafted yourself! Press until the bearing is seated up against the tub bottom.
| ||
| Post# 392912 , Reply# 12 11/12/2009 at 23:16 (5,272 days old) by redcarpetdrew (Fairfield, CA) | ||
|
| ||
| Post# 392913 , Reply# 13 11/12/2009 at 23:23 (5,272 days old) by redcarpetdrew (Fairfield, CA) | ||
|
A quick word on the difference between old and new...
This is a side by side of the old (left) and new (right) bearing assys. An old trick I used to quiet an old (thick) bearing as a temporary measure without tearing the washer apart was to take a knife and make a small slit in the side and use a Zoom Spout Turbine oiler to shoot a bit of oil in there. Then I'd spin the washer and listen to the tub bearing quiet down as the oil wicked up into the bearing. (That trick was requested by Ben a while ago. There you are...) You can see how the new, skinnier bearing can't be done like that... Ahhh, progress!

| ||
| Post# 392915 , Reply# 14 11/12/2009 at 23:25 (5,272 days old) by redcarpetdrew (Fairfield, CA) | ||
|
| ||
| Post# 392916 , Reply# 15 11/12/2009 at 23:26 (5,272 days old) by redcarpetdrew (Fairfield, CA) | ||
|
| ||
| Post# 392917 , Reply# 16 11/12/2009 at 23:29 (5,272 days old) by redcarpetdrew (Fairfield, CA) | ||
|
| ||
| Post# 392918 , Reply# 17 11/12/2009 at 23:33 (5,272 days old) by redcarpetdrew (Fairfield, CA) | ||
|
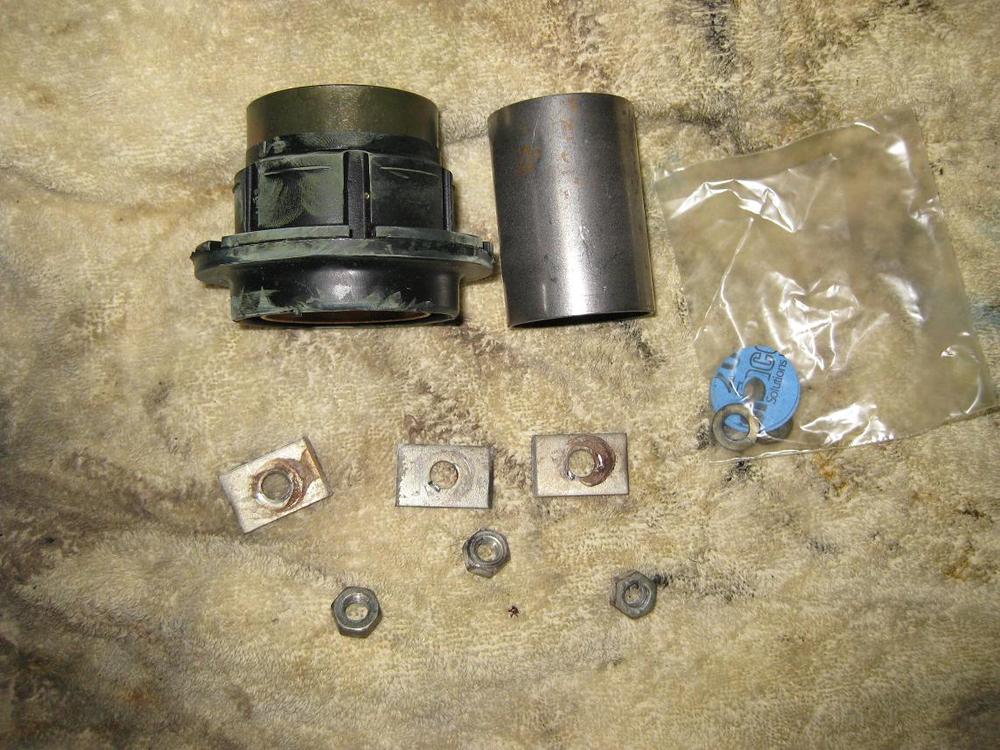
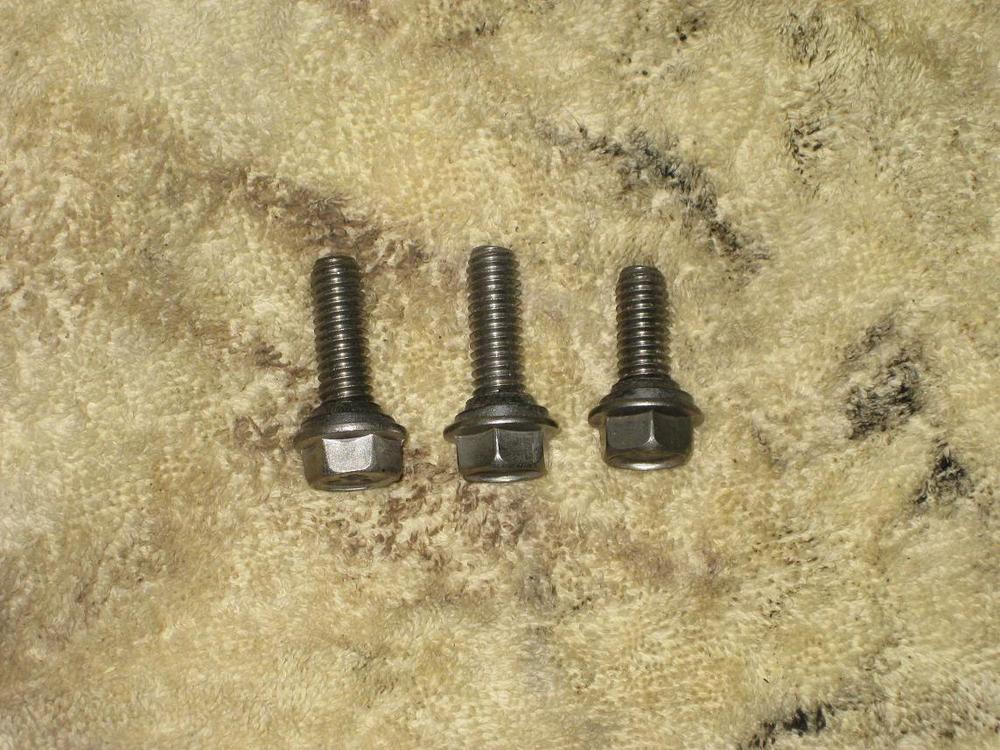
The three amigos...
The tub bolts have gaskets pressed onto them. It helps to use new bolts to help prevent leaks. REMEMBER, there are two long and one short bolt. The short one goes up front. I won't admit to having once putting a long bolt up front, reassembling the whole thing and spinning it to discover the long bolt smacking the inside of the front panel... No, I won't! I also won't share with you the words that slipped out of my mouth. I'm sure you can guess. I KNOW you Frigidaire owners know them by heart... LOL! Remember those gaskets when we hit the next step...
| ||
| Post# 392919 , Reply# 18 11/12/2009 at 23:38 (5,272 days old) by redcarpetdrew (Fairfield, CA) | ||
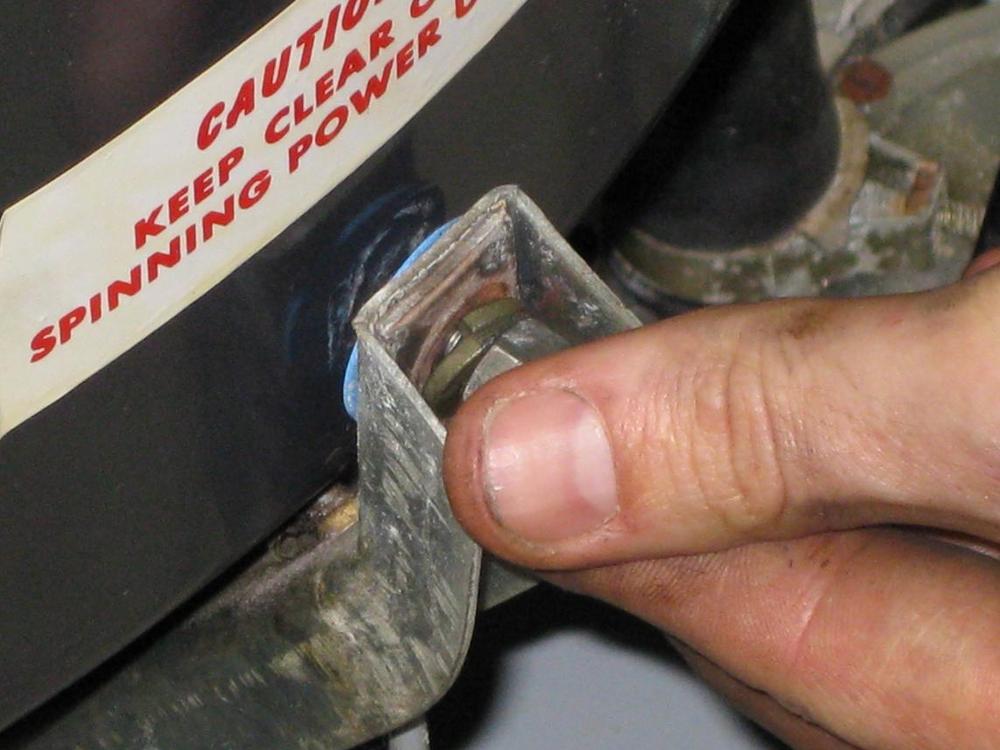
|
Time to tighten those bolts. Remember those gaskets? They are why I will tell you to use a wrench to hold the bolt in place while you use a ratchet to tighten the bolt nuts. If you turn the bolts instead, you will deform or outright damage those gaskets and then you can watch water dribble down the tub arms. Trust me, it's not an enjoyable experience. Tighten the nuts FIRMLEY but don't wank down to the point you'll mash the gaskets too much and cause leaks...
| ||
| Post# 392920 , Reply# 19 11/12/2009 at 23:42 (5,272 days old) by redcarpetdrew (Fairfield, CA) | ||
|
I will lightly drip some turbine oil into the bearing to help it spin until the self lubricating functin kicks in. Self lubing? What? How does THAT work? The metal of the bearing is impregnated with oil and as the bearing heats up while it turns, the bearing will 'sweat' a little oil. This is common for things like drum bearings, HOH blower bearings, etc...
| ||
| Post# 392922 , Reply# 20 11/12/2009 at 23:44 (5,272 days old) by redcarpetdrew (Fairfield, CA) | ||
|
| ||
| Post# 392924 , Reply# 21 11/12/2009 at 23:49 (5,272 days old) by redcarpetdrew (Fairfield, CA) | ||
|
Mounting the boot isn't too bad. Again, I use a little windex to lube the inner lip of the seal so it will slide on easier. Push down gently but firmly until it seats down against the tub floor. Turning it back and forth as you push helps. REMEMBER, the carbon ring is fragile. Don't push down on the ring with too much force or you'll break it. The boot should sit evenly and centered around the shaft. the lower lip of the boot should be touching the tub bottom evenly all around like the bearing did earlier.
| ||
| Post# 392926 , Reply# 22 11/12/2009 at 23:53 (5,272 days old) by redcarpetdrew (Fairfield, CA) | ||
|
The mounting stems. A big difference...
You can see the old (right) and new (left). Gone is the clip and washer which compressed the shaft seal down. That has been replaced with a triple lip seal that is part of the stem. Ehh, it works but you can see how the newer LAT's have been leaking in larger percentages compares to the old kids... No worries! I have a secret weapon! 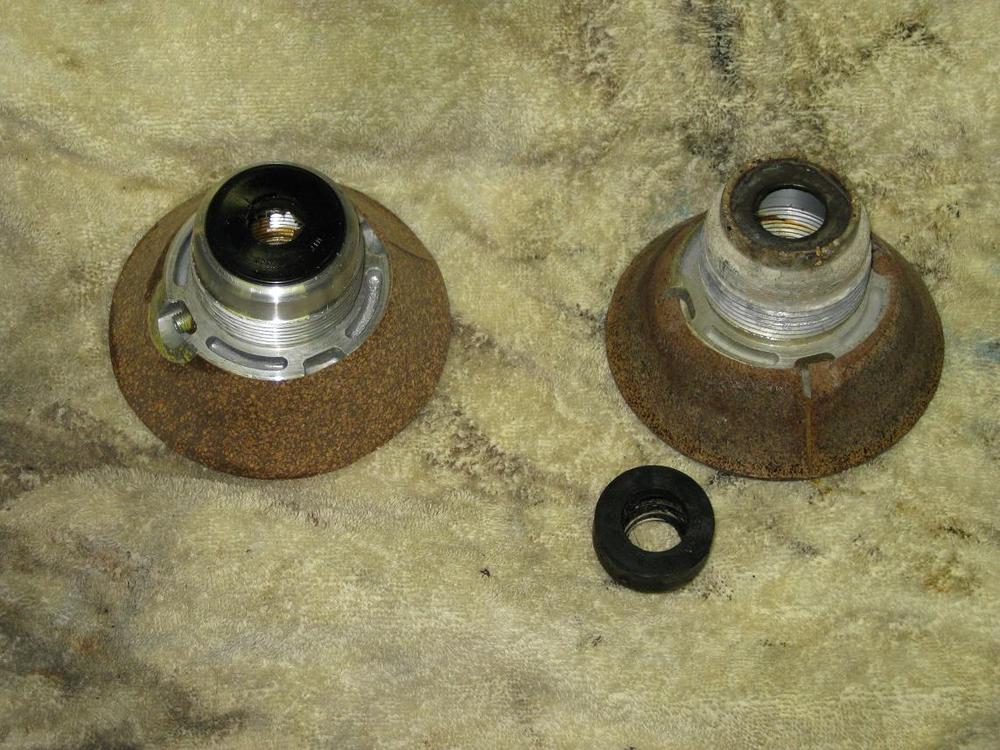
| ||
| Post# 392928 , Reply# 23 11/12/2009 at 23:58 (5,272 days old) by redcarpetdrew (Fairfield, CA) | ||
|
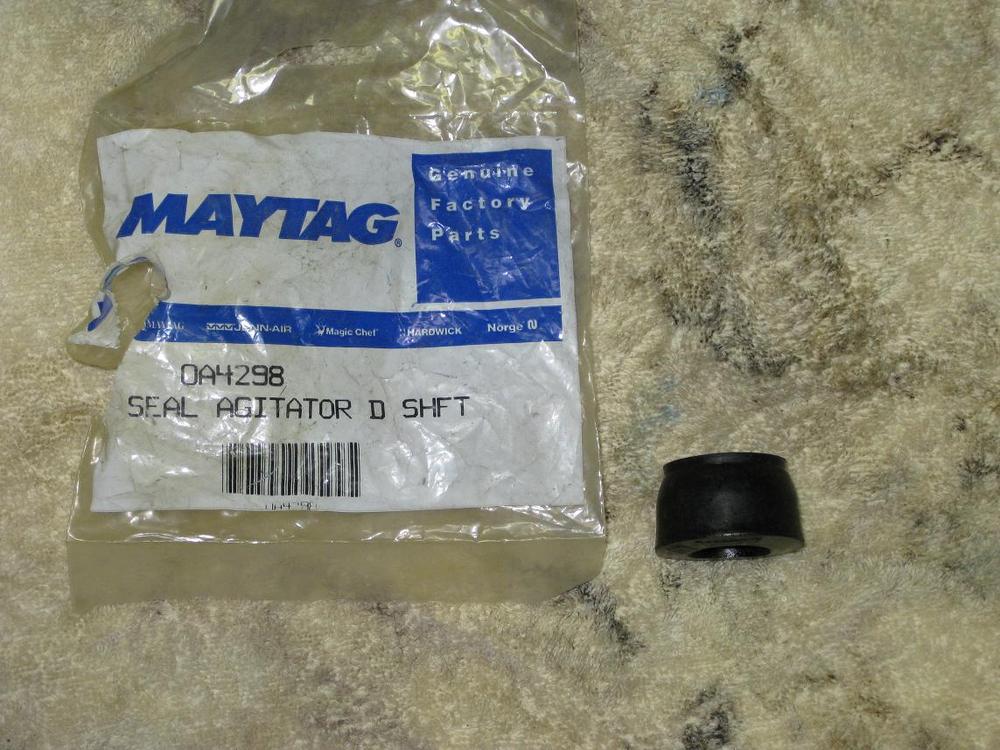
The secret weapon!
This is the original shaft seal. You can still get them for now. I will use this in conjunction with the new triple lipped stem for a fool proof seal. The only time you CAN'T use this is when you have one of those orbital transmissions with the white plastic shaft keepers. It comes with a modicum of grease inside it but I usually add a little. You can use Maytag's center seal grease, or in a pinch, the blue colored boat trailer wheel bearing grease. just add a little and push it on the shaft 'point' down the install the stem.
| ||
| Post# 392929 , Reply# 24 11/13/2009 at 00:04 (5,272 days old) by redcarpetdrew (Fairfield, CA) | ||
|
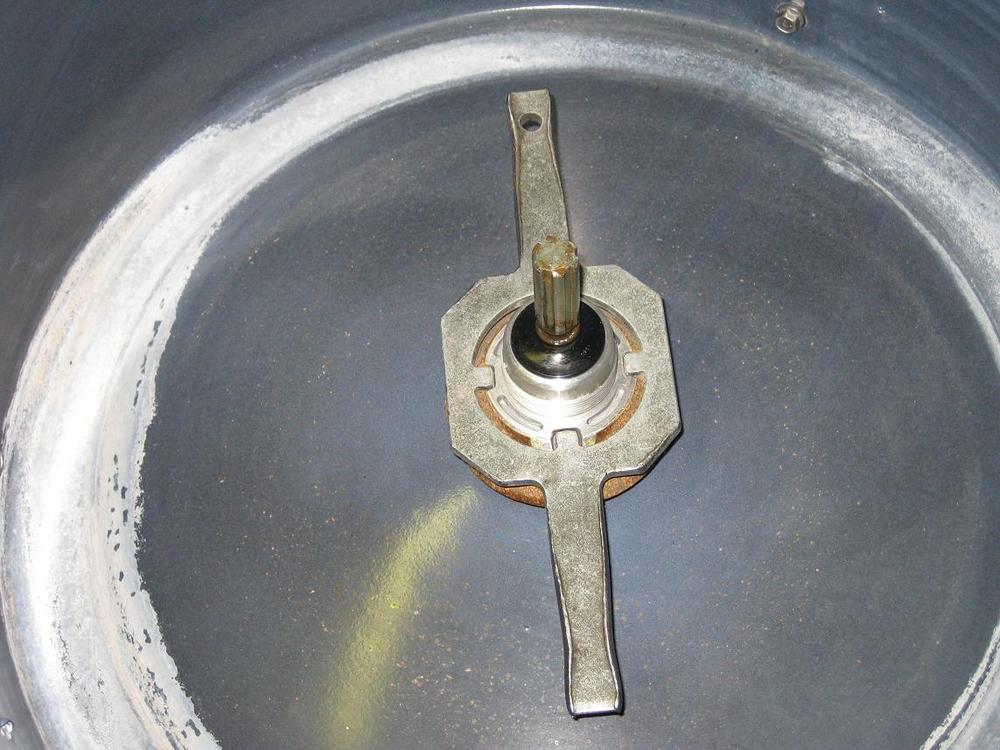
Screw the stem on. Tighten it by hand until you can't turn it then use the tool to tap it about 1/8-1/4 turn more. Install the set screw and tighten. You want it to bite into the 'meat' of the trans housing threads. You DON"T want it to go into that channel on the side of the trans housing. If it does, the tub will make a knock or click noise while in agitation as it torques back and forth. it will eventually also shear the set screw off and then do very unpleasant things... Trust me...
| ||
| Post# 392931 , Reply# 25 11/13/2009 at 00:06 (5,272 days old) by redcarpetdrew (Fairfield, CA) | ||
|
| ||
| Post# 392932 , Reply# 26 11/13/2009 at 00:11 (5,272 days old) by redcarpetdrew (Fairfield, CA) | ||
|
Reinstall that protector ring then the tub nut. Tighten the nut firmly. Next, you put the washer into a spin to check the tub centering. loosen the tub nut and adjust as needed to prevent the tub hitting the outer tub then tighten. NOW, you reinstall that small black agitator keeper ring if your washer had one. Reinstall the agitator. I have used the keeper ring WITH the agitators with the set screw if there is enought play that the agitator makes some noise. Another small trick...
| ||
| Post# 392933 , Reply# 27 11/13/2009 at 00:14 (5,272 days old) by redcarpetdrew (Fairfield, CA) | ||
|
The tub cover: another hint/trick... | ||
| Post# 392934 , Reply# 28 11/13/2009 at 00:15 (5,272 days old) by redcarpetdrew (Fairfield, CA) | ||
|
| ||
| Post# 392935 , Reply# 29 11/13/2009 at 00:19 (5,272 days old) by redcarpetdrew (Fairfield, CA) | ||
|
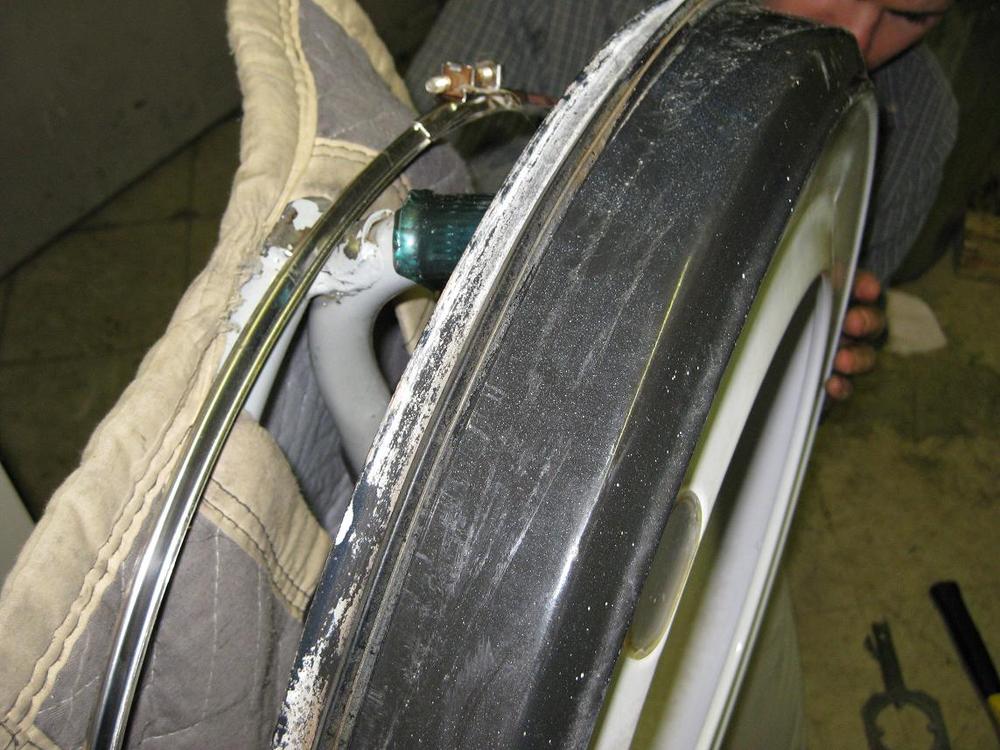
Mount the tub cover. Tap it down gently until the gasket hits the lip on the outer tub. It should be perfect. Put the band clamp on and tighten the two screws evenly while making sure you caught both the gasket AND the lip of the outer tub so they will sandwich together and seal. Remember to have the tub cover oriented correctly so the out of balance lever will hit the tab on the cover. Also, the band clamp should be positioned so it won't strike the cabinet as it spins. They should be in the corners. See next pic...
| ||
| Post# 392936 , Reply# 30 11/13/2009 at 00:20 (5,272 days old) by redcarpetdrew (Fairfield, CA) | ||
|
An example of where they should sit... | ||
| Post# 392939 , Reply# 31 11/13/2009 at 00:25 (5,272 days old) by redcarpetdrew (Fairfield, CA) | ||
|
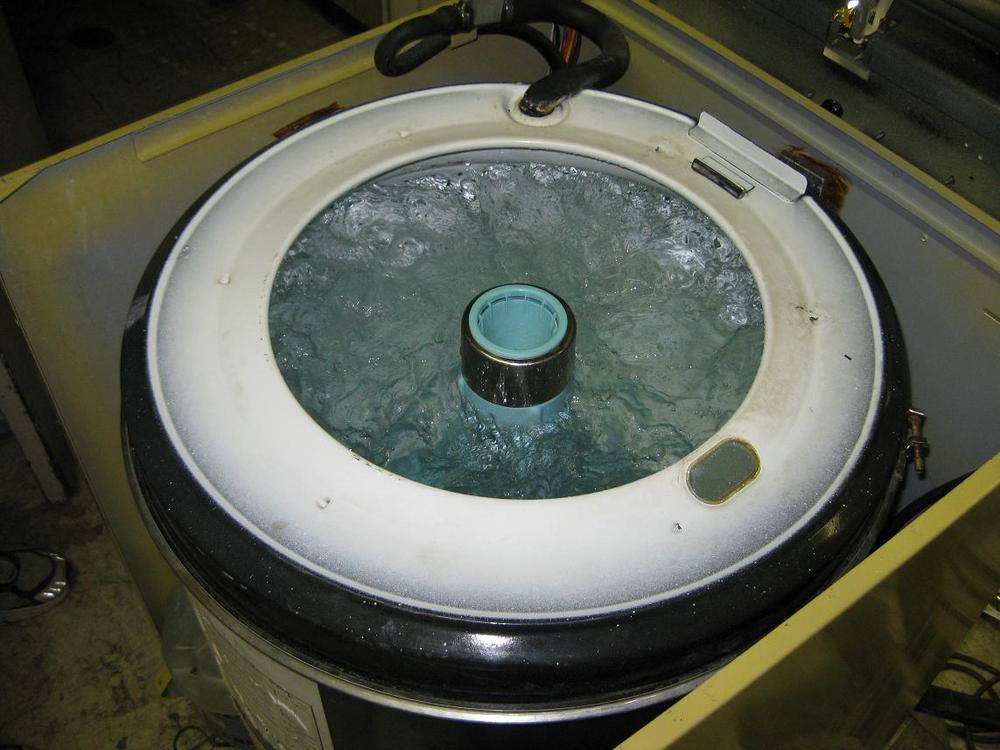
OK, kids... Almost there!
Reattach all your hoses (don't forget the water level hose in the back corner!). BEFORE YOU WET TEST IT, put the washer into a full spin cycle and dry spin it. You're now helping that carbon ring seat up against the bottom of the stem for that seal and break in the bearing. OK, NOW you can run it and test for leaks. Check your hoses and the seal in the tub bottom for weaps or leaks. Also, check the tup cover gasket for leaks as you spin out a full tub of water so it will slosh against the cover. You should be good except for one more very important step... 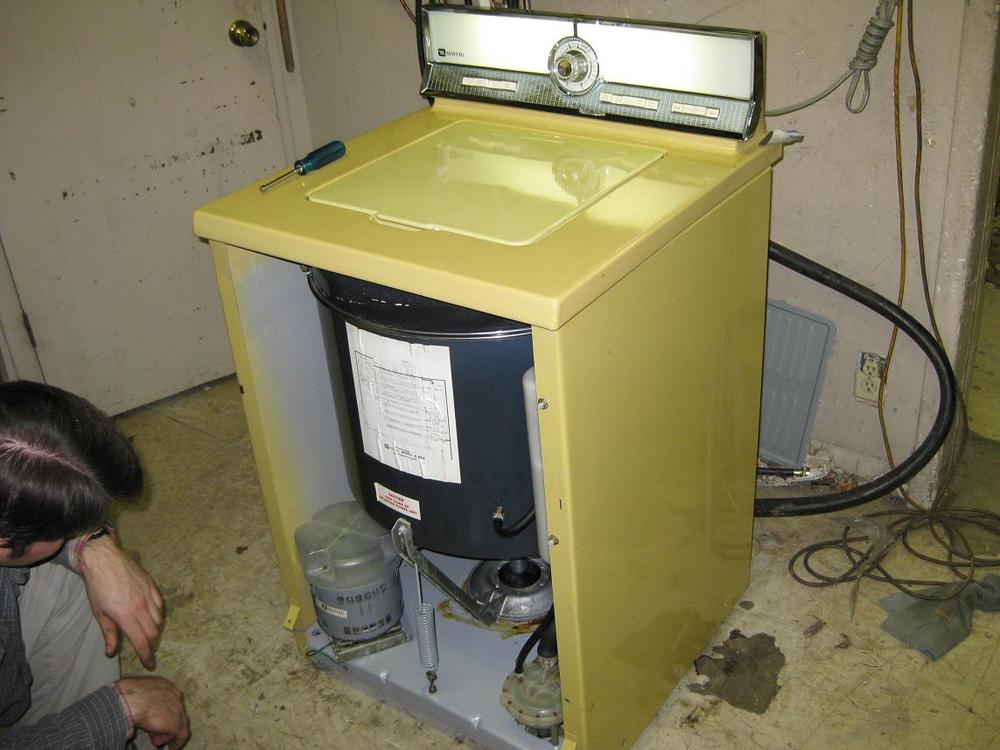
| ||
| Post# 392940 , Reply# 32 11/13/2009 at 00:32 (5,272 days old) by redcarpetdrew (Fairfield, CA) | ||
|
Add clothes, detergent and water! Start the washer and be rightfully proud of a job done well and by yourself! You've just hopefully added another lifetime of enjoyment and service to your best (and grateful) friend. Congratulations! This bearing change should translate to just about any Maytag Dependable Care platform washer from the Amp forward. As you can see, it's not bad to do. And the only special tool you'll need is the tub nut wrench. But, as a proud owner of a happy Maytag washer, you should have had that already, right? I hope this helps you all with doing the job or just better understanding the gizzards of a wonderful machine. RCD | ||
| Post# 392944 , Reply# 33 11/13/2009 at 01:05 (5,272 days old) by volvoguy87 (Cincinnati, OH) | ||
Wonderful!
I need to do a teardown on my housemate's (Elginkid) A206 and I think I ought to consider replacing the bearing since it's pushing 40 years of service. Thanks for this wonderful guide. Would you be up to posting a similar guide on how to open the transmission, replace the gasket and O ring, change the oil, and put it all back together? I have to do this as well once time allows, but I fear it will be very difficult. At least most of us who have old Maytags will likely have to do the job at some point. Thanks again and g'nite, Dave | ||
Post# 392949 , Reply# 34 11/13/2009 at 04:39 (5,271 days old) by goatfarmer  (South Bend, home of Champions) (South Bend, home of Champions) |
||
 | ||
| Post# 392956 , Reply# 35 11/13/2009 at 05:59 (5,271 days old) by toploader55 (Massachusetts Sand Bar, Cape Cod) | ||
Thank you | ||
|
Post# 392962 , Reply# 36 11/13/2009 at 06:34 (5,271 days old) by gyrafoam (Wytheville, VA) |
||
|
Thank you! That is an excellent tutorial! | ||
|
Post# 392963 , Reply# 37 11/13/2009 at 06:58 (5,271 days old) by yogitunes (New Jersey) |
||

EXCELLENT.....thanks soo much for the detail instructions...Yes we need this in the archives for future reference...for now I'm gonna print it out...Thanks RCD...your one in a million...on this planet...lol something like this seems a little scary at first to dig into, but this seems simple enough, with a little (I'm mean a hell of a lot) help from you....we bow to the MASTER...we owe you big guy! | ||
| Post# 392988 , Reply# 38 11/13/2009 at 10:48 (5,271 days old) by mickeyd (Hamburg NY) | ||
And i was just gonna ask ya what cool finds you made this we
and instead you deliver a fabulous Maytag Encyclopedia entry which is even better than a rare find!!!! Thank you, Drew, for all the time and the care that went into this. It is so enlightening for challenged mechanics like me. And of course I love the shot of the open choppy water surrounded by a sea of Maytag metal. Wonderful. | ||
| Post# 393061 , Reply# 39 11/13/2009 at 19:13 (5,271 days old) by redcarpetdrew (Fairfield, CA) | ||
|
| ||
| Post# 393140 , Reply# 40 11/14/2009 at 01:42 (5,271 days old) by travlincub321 () | ||
|
Bump | ||
| Post# 393174 , Reply# 42 11/14/2009 at 08:19 (5,270 days old) by travlincub321 () | ||
|
Hes wikipedia of maytag repair... LoL, looking through some control panels last night he knew just about every model number and then some..Very lucky to have him around... And his junk pile too | ||
| Post# 393250 , Reply# 43 11/14/2009 at 14:43 (5,270 days old) by qsd-dan (West) | ||
|
And his junk pile too | ||
|
Post# 393488 , Reply# 44 11/15/2009 at 17:01 (5,269 days old) by swestoyz (Cedar Falls, IA) |
||
 | ||
| Post# 393900 , Reply# 45 11/17/2009 at 01:49 (5,268 days old) by redcarpetdrew (Fairfield, CA) | ||
|
By popular request: Part Numbers!
Part numbers have been asked for so here they are with sub numbers according to my parts supplier... Mounting stem repair kit 204012 (sub number 6-2095720) Tub bearing repair kit 204013 (sub number 6-2040130) Agitator drive shaft seal Y0A4298 (sub number 6-0A57420) Bolt & gasket assy (short) 200744 (sub number W10175939) Bolt & gasket assy (long) 205254 (currently still a good number) Enjoy! I've gotten a good amount of E-mail responses from you folks telling me that you have washers needing this repair and with this post, courage to do it has been bolstered! Thank you for your responses! They have shown me that, in my small way, I have helped... RCD | ||
|
Post# 393937 , Reply# 46 11/17/2009 at 07:16 (5,267 days old) by steve1-18 (Grovetown (Augusta), GA) |
||
|
Will definitely have to bookmark this thread! Thanks. | ||
|
Post# 393945 , Reply# 47 11/17/2009 at 08:31 (5,267 days old) by gyrafoam (Wytheville, VA) |
||
|
I'm with Scrubflex----would like to coax you into a tutorial on changing the oil and gasket/rebuild of the Helical tranny. Almost every old Maytag owver I know of has a machine that needs help right now. Of course, it just wouldn't be an old Maytag if it didn't fling a bit of oil now and then. | ||
| Post# 394033 , Reply# 48 11/17/2009 at 15:59 (5,267 days old) by qsd-dan (West) | ||
|
oil and gasket/rebuild of the Helical tranny.
Not to step on RCD's territory, but I'll probably be the one doing that thread. I have 7-8 transmissions (thanks to RDC) ranging from 1961-1986 and can show the differences between them all during their years of production and what to look out for. I can also show how to increase that 54 OPM agitation to 63 with the swap of a gear and pitman arm :) Currently, I'm trying to find a DIY removal of the pin for the upper shaft removal. I pounded like hell on that thing with a 10 pound sledge and couldn't get it to budge on any of the tranny's. I ended paying nearly $100 for a machine shop to remove it for just one transmission. Not exactly cheap nor a diy situation. Once I find the trick, I'll post the thread. If someone here knows the trick, please speak up!!! | ||
| Post# 394042 , Reply# 49 11/17/2009 at 16:41 (5,267 days old) by volvoguy87 (Cincinnati, OH) | ||
|
GE roll pin?
When I was replacing the clutch on my grandmother's old GE Filter Flo (now mine)there was a roll pin connecting the clutch to the motor. That little bugger was beyond a b**ch to remove. I took it to a local appliance repair shop and they removed it for me, but they made me promise never to bring them another one of those again. Supposedly GE had a tool for removing this pin, but I don't know the part number or what it looked like. Maybe it would be useful in your application. Dave | ||
| Post# 394124 , Reply# 52 11/17/2009 at 22:42 (5,267 days old) by redcarpetdrew (Fairfield, CA) | ||
|
Not to step on RCD's territory | ||
|
Post# 395224 , Reply# 53 11/22/2009 at 23:55 (5,262 days old) by revvinkevin (Tinseltown - Shakey Town - La-La Land) |
||
|
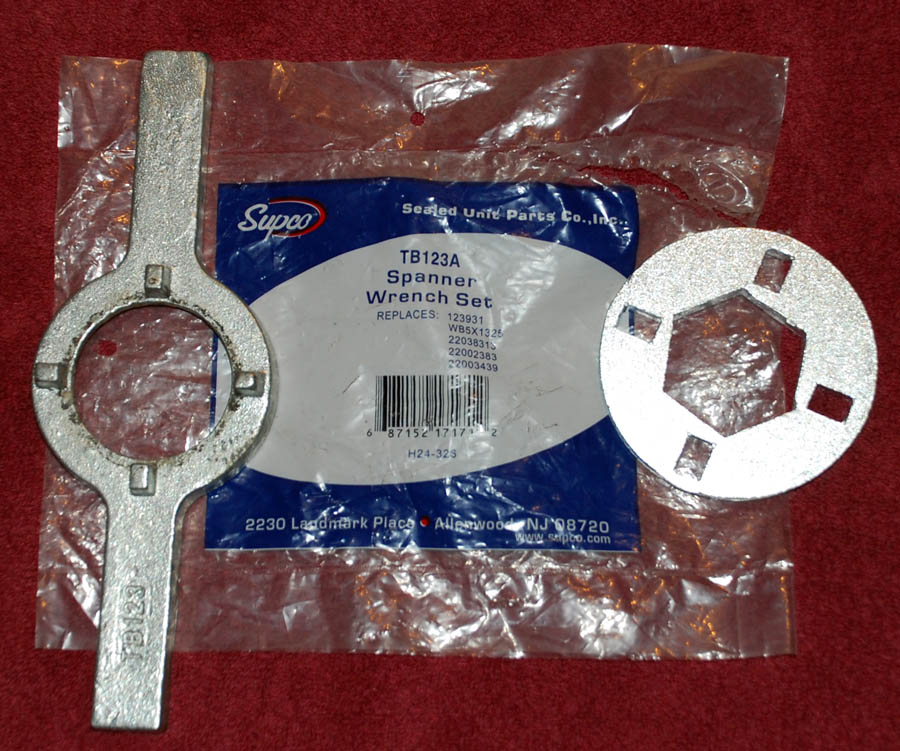
Tub Nut Wrench | ||
|
Post# 395250 , Reply# 54 11/23/2009 at 01:37 (5,262 days old) by launderess (Quiet Please, There�s a Lady on Stage) |
||
Atta Boy! | ||
| Post# 961994 , Reply# 56 10/11/2017 at 15:31 (2,382 days old) by reg (tennessee) | ||
|
nice post good imformation..... | ||
|
Post# 995805 , Reply# 58 5/31/2018 at 09:30 (2,150 days old) by swestoyz (Cedar Falls, IA) |
||
|
| ||
| Post# 995836 , Reply# 59 5/31/2018 at 19:16 (2,150 days old) by potatochips ( ) | ||
|
Ben, I agree whole heartedly. Ive been lurking since 2006, and had two user names. This was such an amazing time for how toos and helping everyone. Lots and lots of, as you said, buzz. Amazing buzz. The golden age of this forum. | ||
|
Post# 995850 , Reply# 60 5/31/2018 at 22:29 (2,150 days old) by robbinsandmyers (Conn) |
||
 | ||
|
Post# 995896 , Reply# 61 6/1/2018 at 09:36 (2,149 days old) by Revvinkevin (Tinseltown - Shakey Town - La-La Land) |
||
|
| ||
| Post# 1124909 , Reply# 62 8/4/2021 at 17:37 (989 days old) by Washoholic (San Antonio, TX) | ||
Is the tub seal universal for all older belt drive Maytags? | ||
| Post# 1124911 , Reply# 63 8/4/2021 at 17:41 (989 days old) by qsd-dan (West) | ||
|
Would any Maytag tub seal work in a 1960 Maytag 126? | ||
| Post# 1124914 , Reply# 64 8/4/2021 at 18:11 (989 days old) by Washoholic (San Antonio, TX) | ||
|
| ||
|
Post# 1142460 , Reply# 65 2/17/2022 at 21:02 (792 days old) by Braniff720 (97068) |
||
Photos missing | ||
| Post# 1142464 , Reply# 66 2/17/2022 at 21:27 (792 days old) by Repairguy (Danbury, Texas) | ||
 | ||
| Post# 1193857 , Reply# 67 11/18/2023 at 15:05 by Jr2712 (Maracaibo-Zulia-Venezuela... ) | ||
|
Oval thing in tub cover??? | ||
|
Post# 1193858 , Reply# 68 11/18/2023 at 15:28 by DADoES (TX,�U.S. of A.) |
||
|
| ||
| Post# 1193878 , Reply# 69 11/18/2023 at 20:48 by Jr2712 (Maracaibo-Zulia-Venezuela... ) | ||
|
| ||
|
Post# 1193969 , Reply# 70 11/20/2023 at 10:19 by DADoES (TX,�U.S. of A.) |
||
|
�
Only models 806 and 906 had a tub light in the '06 series. Earlier models are A700 and A702, A160, A900, A902. It turns on as designed when the lid is open and the timer knob is pulled out.� The tub light is available for loading by pulling the timer out presumably even at a cycle Off position.� The lid could be left open without the tub light with the timer pushed in.� It requires a different lid switch (double-pole, single-throw) and presumably the timer to have a wiring terminal for it, although something could be rigged-up to operate it manually. | ||
| Post# 1193991 , Reply# 71 11/20/2023 at 15:37 by Jr2712 (Maracaibo-Zulia-Venezuela... ) | ||
|
| ||
| Forum Index: | 
| Other Forums: |

|

|

|

|

|

 Comes to the Rescue!