Thread Number: 28069
Maytag A606 drive pulley install and stop lug adjustment
[Down to Last]

automaticwasher.org's exclusive eBay Watch:
scroll >>> for more items --- [As an eBay Partner, eBay may compensate automaticwasher.org if you make a purchase using any link to eBay on this page]
Post# 429651   4/18/2010 at 13:52 (5,121 days old) by oldschool (SE PA. USA)        

I'm moving ahead with my A606 repair. I'm at the assembly stage and I'm pulling a brain fart. I'm reassembling the drive pulley and stop/drive lug. As I spin the drive pulley on to the drive shaft it spins right up until it bottoms against the brake housing. That can't be right??? I'm not quite sure were the drive pulley should be before setting up the proper gap between the stop lug on the pulley and the lug under the attaching screw. I found a site with a nice guide to do this, but for the life of me , I can't find it now. Can someone post some detailed info maybe with some pics to correctly show this reassembly procedure?

I'll post all of my pics when I complete this mission. Maybe I can return the favor and possibly help someone else here on the forum.

As always TIA


Post# 429668 , Reply# 1   4/18/2010 at 15:59 (5,120 days old) by goatfarmer (South Bend, home of Champions)        

goatfarmer's profile picture
For me, it was trial and error.I had marked the drive lug where it went, but when reassembled, it wouldn't agitate. So I ended up moving about a half dozen times.

Post# 429677 , Reply# 2   4/18/2010 at 17:14 (5,120 days old) by qsd-dan (West)        

qsd-dan's profile picture
There's actually a long and short version, so I'll just stick with the short version.

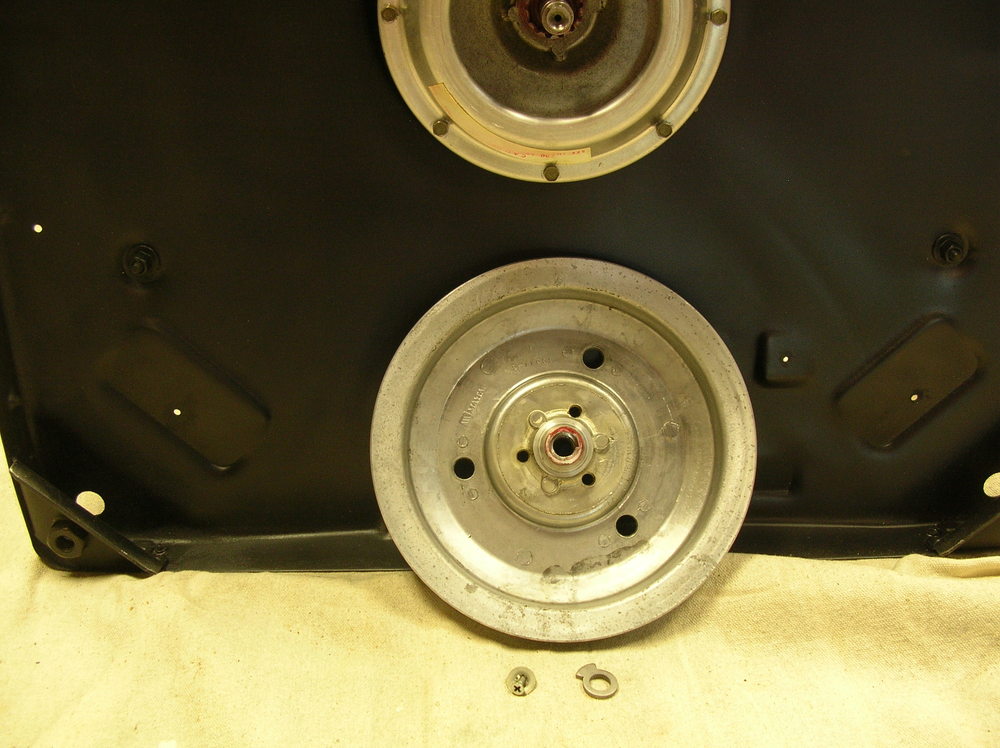
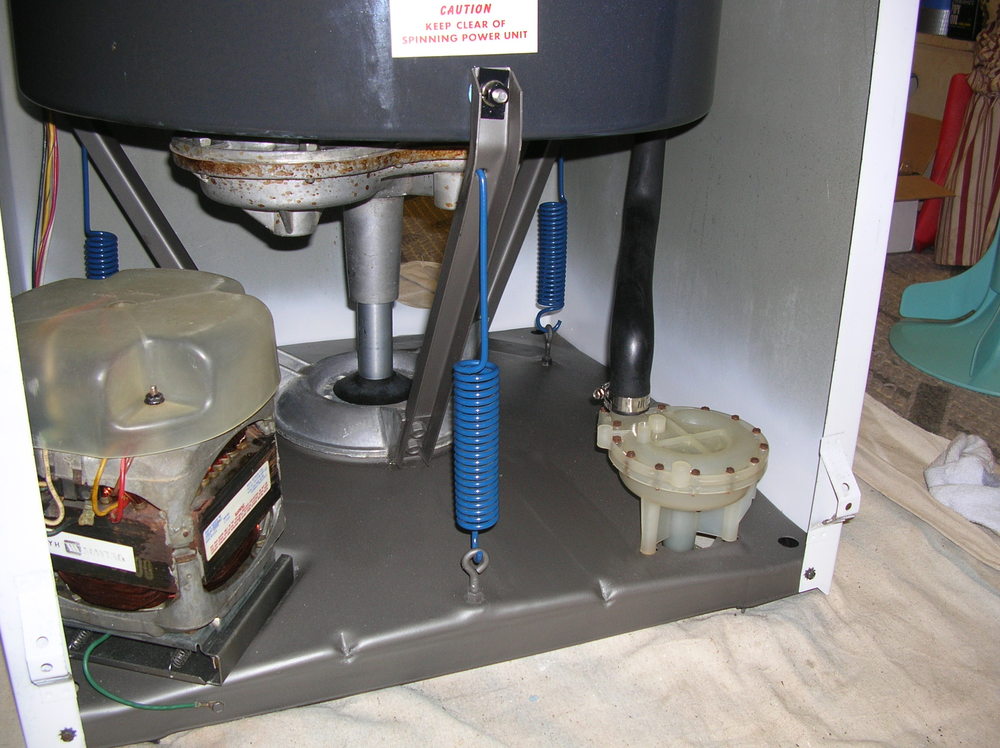
Run the pulley up the shaft until it stops. Take the stop lug, with the flat side pointing down (towards the pulley), and install it to the left of the pulley stop (stop lug should be in the 9 o'clock position in reference to 12 o'clock position of the pulley lug). The goal is to position the stop lug until you get 1/4-3/8 play between the stop lug and pulley. I shoot for 1/4 (.25) of an inch, otherwise you may get a knocking sound during agitation. Don't go any tighter then .25, or it'll be engaging the brake and the motor has to overcome that during agitation.


Post# 429704 , Reply# 3   4/18/2010 at 19:01 (5,120 days old) by oldschool (SE PA. USA)        

Dan, would running the drive pulley up until it contacted the bottom of the brake assembly be acceptable? That's where mine goes to and stops. In my case the drive pulley isn't stopped by running out of threads on the drive shaft.

Post# 429706 , Reply# 4   4/18/2010 at 19:24 (5,120 days old) by swestoyz (Cedar Falls, IA)        

swestoyz's profile picture
Silly question -

I didn't see it in the photos, but did you put the brake rotor bearing back in place when installing the pulley?

Ben


Post# 429709 , Reply# 5   4/18/2010 at 19:33 (5,120 days old) by dnastrau (Lords Valley, PA)        
Lug adjustment - another version (longer - sorry!)

I just went through this as well on my '61 A700. Here is what I did based on the "06" - "10" service manual instructions - it may or may not be helpful. Those instructions seemed to be the simplest to me compared to some other manuals that I have as well as other sources on the 'net.

Preliminaries:

When I took my pulley off there was still some grease on the shaft threads that the pulley "climbs" up on, but it was old and thick. I wiped it off and replaced it with some fresh "Moly-graph" grease. There was also oil inside the dust cap - it was black so I cleaned it out. I also packed some of that new grease into the ball bearing that was under the pulley and rolled it around by hand to work it in. I also put a little on the part of the pulley that contacts the bearing. Nice and smooth... Make sure the bearing goes back on the way it came off (tapered side out) or you will have no brake! I also added a teaspoon of heavy oil to the brake package while I was at it to avoid squealing brake syndrome.

Now for the adjustment... The book said to block the transmission with something to keep it from spinning. I used a scrap piece of 2x4. It then said to run the pulley all the way up until the spring is fully compressed. It will stop then it is fully seated. Then, install the lug 180 degrees out from the pulley lug. For instance, if the pulley lug ends up at 12:00 you should install the drive lug at 6:00. Install the washer and screw. Release the pulley and it will unwind. Then, take the 2x4 out and start winding up the pulley again. What should happen is the pulley will climb up the shaft until it contacts the spring and starts to move the transmission. This is the point where you can check your adjustment. At this point, you should see about 3/8 of an inch between the lugs.

The result for me was proper braking and agitation. I also filled the rubber dust cap 1/3 - 1/2 full with heavy oil before putting it back on to keep the lugs oiled.

I will try to upload a picture of the page from the manual later.

That is what I did to adjust mine and all is well so far.


Andrew S.


Post# 429710 , Reply# 6   4/18/2010 at 19:34 (5,120 days old) by qsd-dan (West)        

qsd-dan's profile picture
Dan, would running the drive pulley up until it contacted the bottom of the brake assembly be acceptable?

Yeah, that works. You just don't want to run the pulley up beyond that point, or you'll be disengaging the brake and turning the transmission/basket assembly.

All you're trying to do is take up the play between the pulley and brake so you can position the stop lug in order to accomplish 1/4-3/8 inch play between the stop lug and pulley lug when gently rotated in the clockwise/counter-clockwise fashion. Taking up too much play will keep the brake engaged. Too much play, and you'll get a knocking sound during agitation.


Post# 429711 , Reply# 7   4/18/2010 at 19:39 (5,120 days old) by qsd-dan (West)        

qsd-dan's profile picture
What Andrew described is the longer version, which works, but it's just more time consuming and kind of a PITA since you have to prevent the transmission/tub assembly from rotating.

Post# 429714 , Reply# 8   4/18/2010 at 19:53 (5,120 days old) by oldschool (SE PA. USA)        

Jackpot! I knew something was missing but wasn't sure. It's been awhile since I broke this all down. I know exactly where that bearing is. On the bench at the machine shop where I cleaned the transmission components and housing. It's probably gone by now. OK. Once again thanks for the help guys.
I'll either find it still sitting on the workbench at the machine shop........Not........or it's time to buy another. RATS


Post# 429717 , Reply# 9   4/18/2010 at 20:11 (5,120 days old) by dnastrau (Lords Valley, PA)        
Dan hit the nail on the head...

...with what he said:

"All you're trying to do is take up the play between the pulley and brake so you can position the stop lug in order to accomplish 1/4-3/8 inch play between the stop lug and pulley lug when gently rotated in the clockwise/counter-clockwise fashion. Taking up too much play will keep the brake engaged. Too much play, and you'll get a knocking sound during agitation."

I will post the pages from the book in case anyone wants to see them:


Post# 429718 , Reply# 10   4/18/2010 at 20:13 (5,120 days old) by dnastrau (Lords Valley, PA)        
Page 2

Page 2

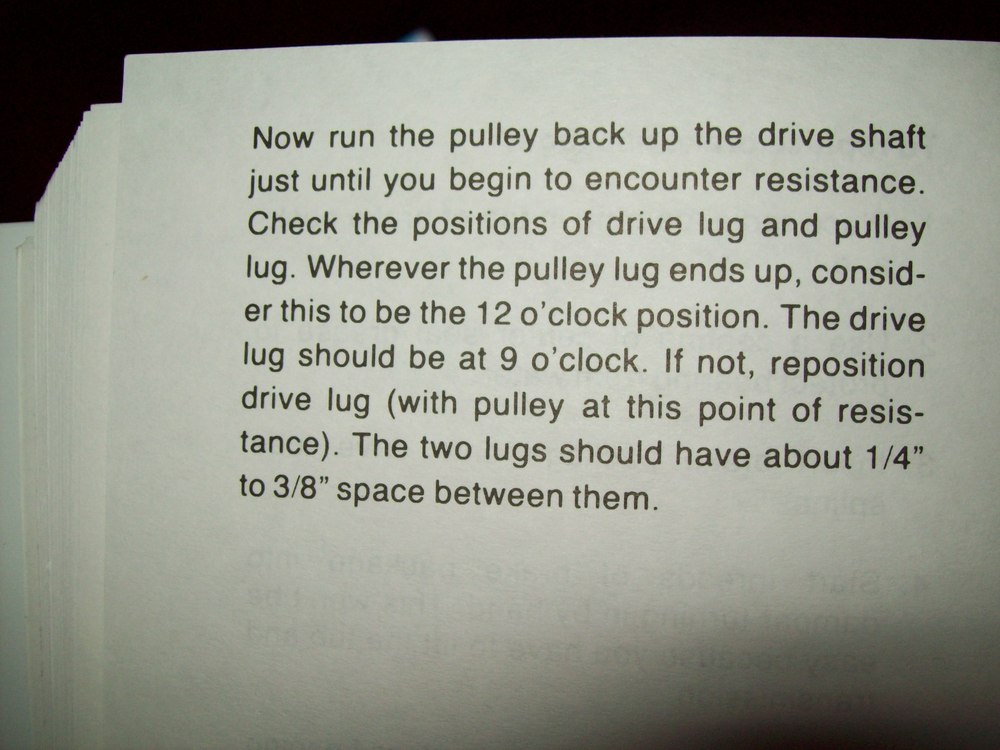
Post# 429719 , Reply# 11   4/18/2010 at 20:14 (5,120 days old) by dnastrau (Lords Valley, PA)        
Page 2 cont'd

...more

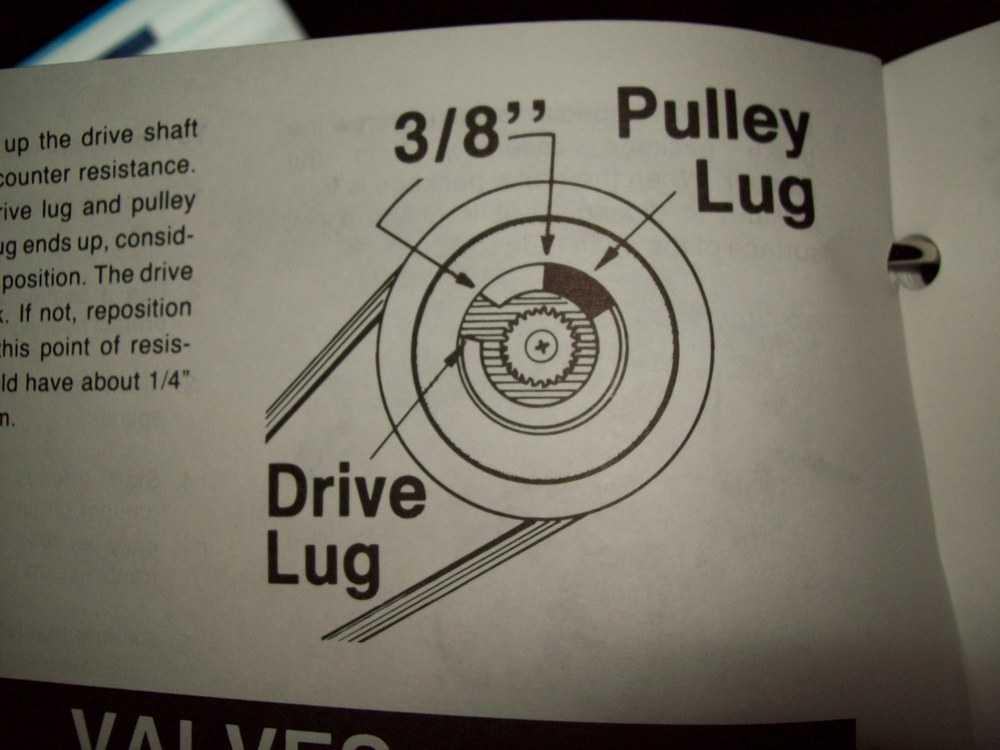
Post# 429763 , Reply# 12   4/18/2010 at 23:16 (5,120 days old) by swestoyz (Cedar Falls, IA)        
or it's time to buy another.

swestoyz's profile picture
Not a biggie. The old PN is 2-835, crosses over just fine in the popular parts websites. Also, independent dealers may still stock the bearing.

Good luck!

Ben


Post# 429859 , Reply# 13   4/19/2010 at 09:45 (5,120 days old) by dnastrau (Lords Valley, PA)        
Crosses to 200835...

...and looks like this example.

CLICK HERE TO GO TO dnastrau's LINK


Post# 429979 , Reply# 14   4/19/2010 at 17:22 (5,119 days old) by oldschool (SE PA. USA)        
Oh Yea.........I remember exactly what it looks like........

cleaned all the tranny stuff at my friends machine shop in his parts washer. I set the bearing aside because it still felt good and moved smoothly. I was going to reuse it. I didn't want to wash out the lube/grease because there is no way to repack it. It's pretty much a sealed bearing. Just wish now I had remembered to pick it up. Didn't get a chance to go by there today to look for it. I'll try tomorrow.

Post# 430003 , Reply# 15   4/19/2010 at 19:04 (5,119 days old) by dnastrau (Lords Valley, PA)        
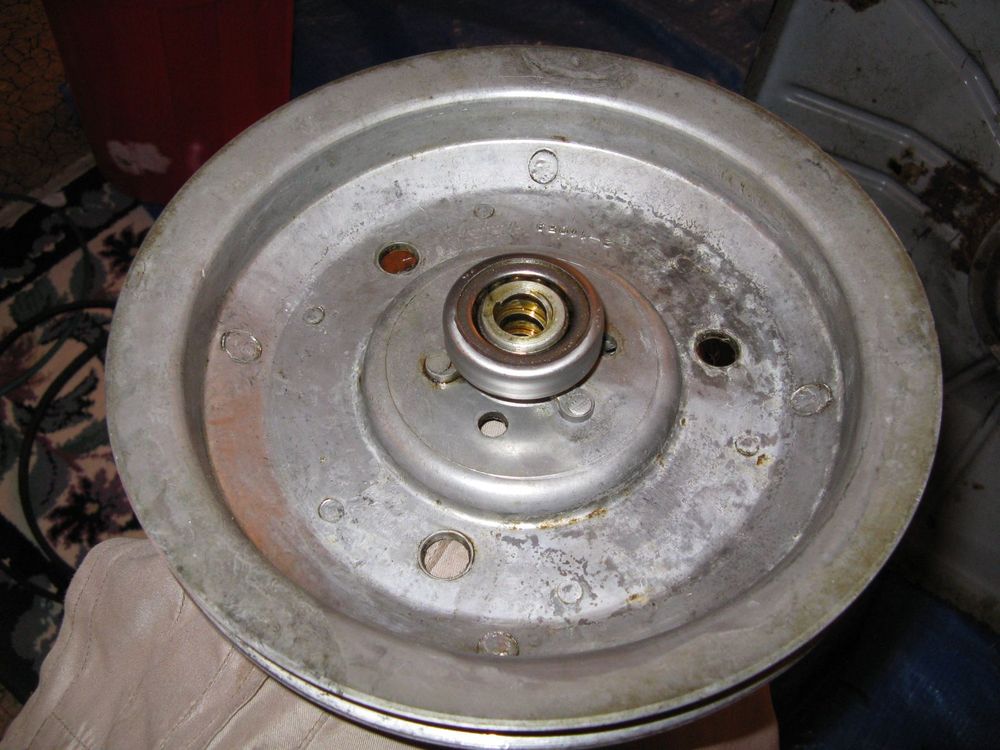
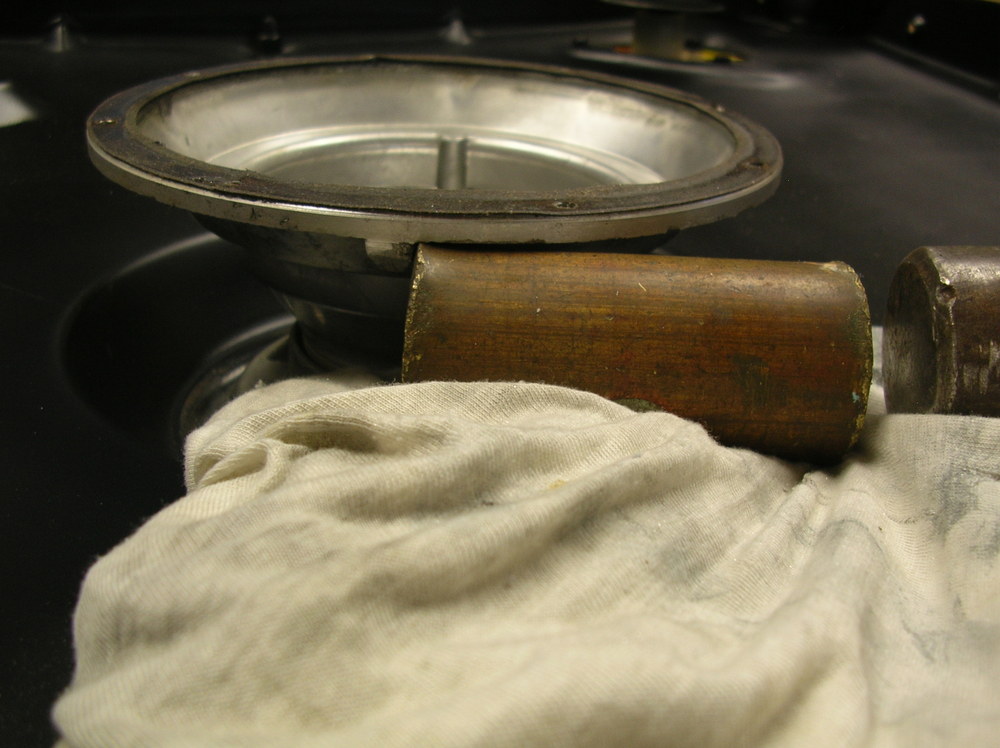
The bearing on my '61...

...was open on one side so I was able to jamb some more new grease in there and work it in. Mine was in great shape too.

Post# 430004 , Reply# 16   4/19/2010 at 19:08 (5,119 days old) by qsd-dan (West)        

qsd-dan's profile picture
The pulley and radial bearings seem to last forever in these machines. I have yet to come across a bad one yet.

Post# 433259 , Reply# 17   5/5/2010 at 08:54 (5,104 days old) by oldschool (SE PA. USA)        
Success with the old reliable A606

My Maytag is back on line again. I couldn't have done it without all the help and advise I received from everyone here . Started out to be a repair and turned into a soft restoration. As a way of showing my appreciation I've documented the whole process. When I get some more time, I'll post all the pics I took. Hopefully it may help someone else. I've attached some of the final pics. I couldn't resist repainting the console as a way of putting the icing on the cake. The first shot here is the before shot.

Post# 433262 , Reply# 18   5/5/2010 at 09:03 (5,104 days old) by oldschool (SE PA. USA)        
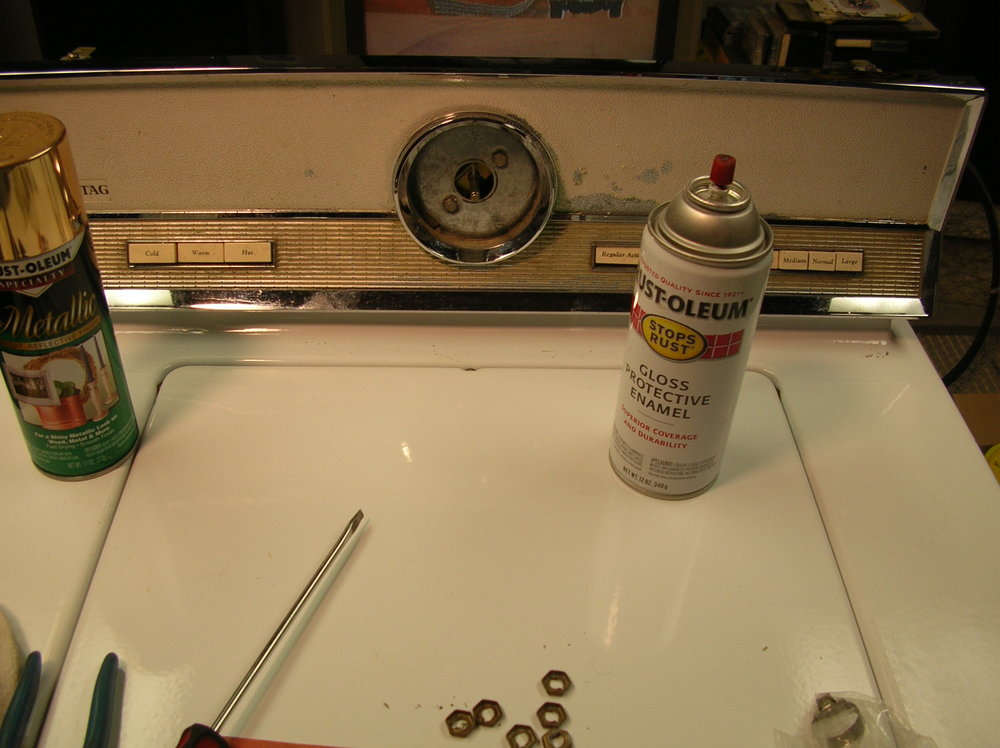
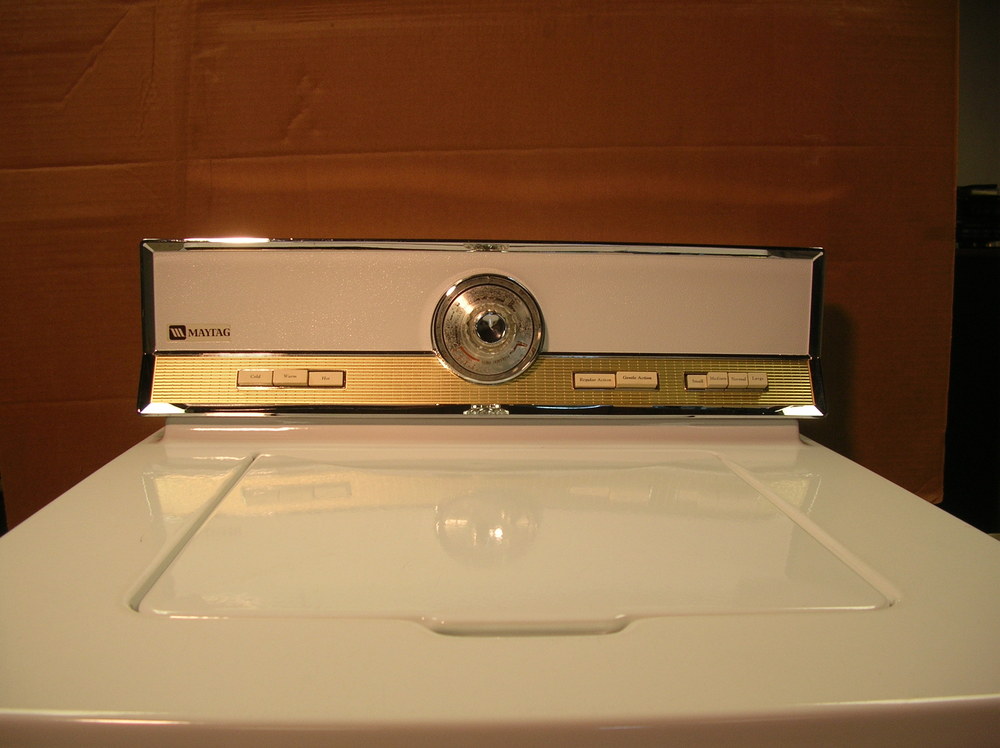
Masked off and ready for a facelift

Found some paint on the shelf that would do the trick.

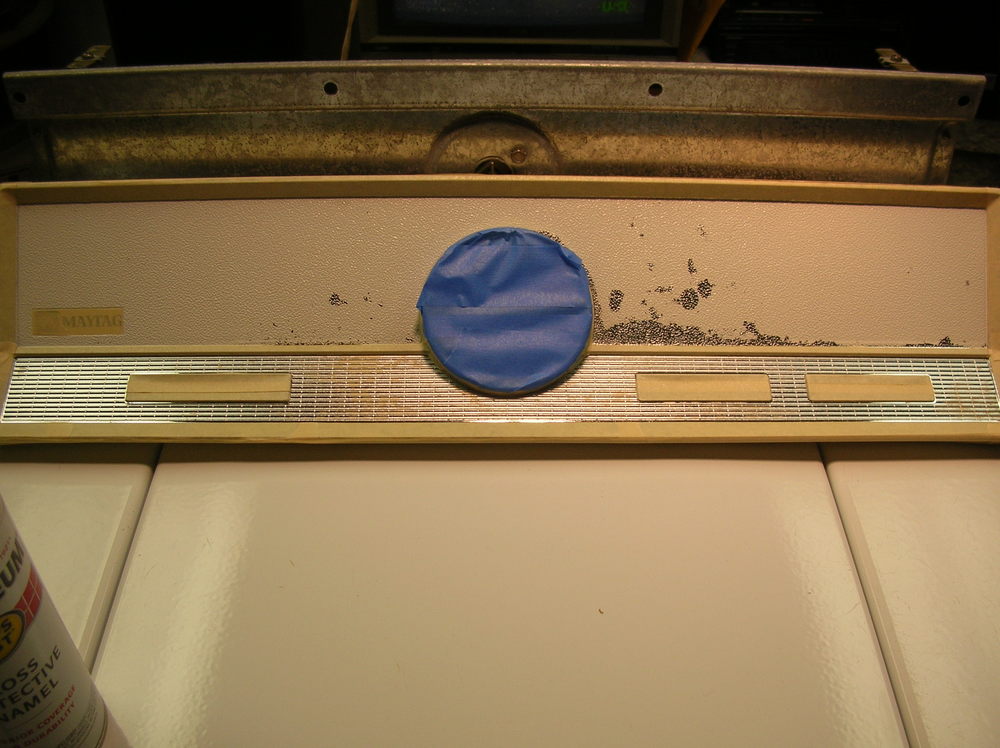
Post# 433264 , Reply# 19   5/5/2010 at 09:11 (5,104 days old) by oldschool (SE PA. USA)        
Moving along with paint

Step one..............the white

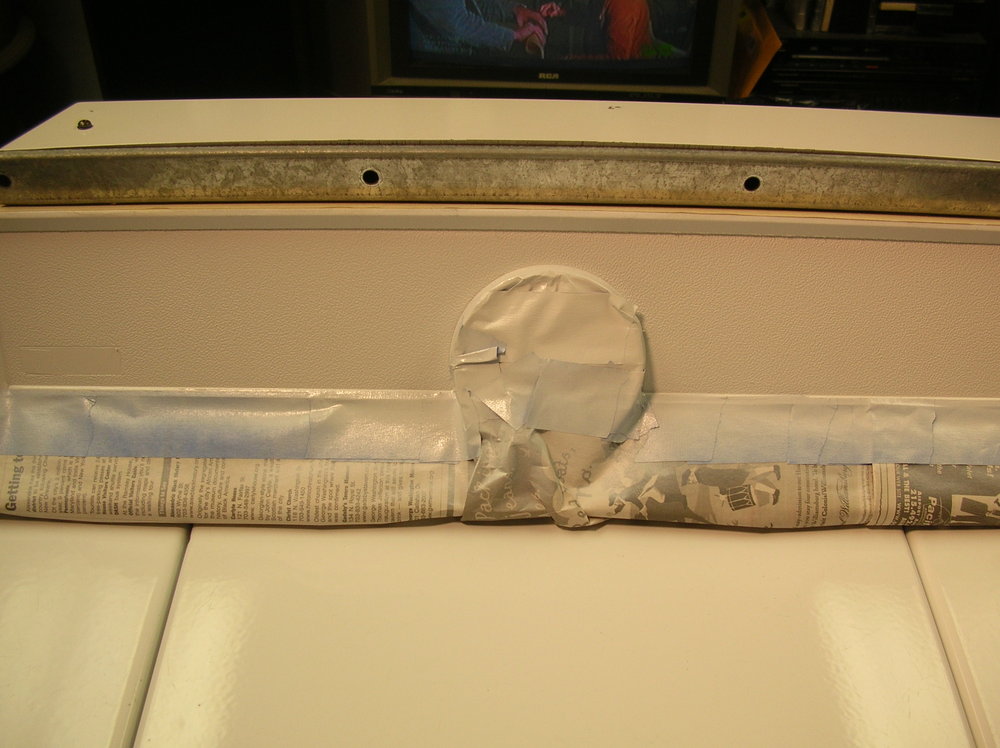
Post# 433266 , Reply# 20   5/5/2010 at 09:13 (5,104 days old) by oldschool (SE PA. USA)        
Paint

Now for the gold

Post# 433269 , Reply# 21   5/5/2010 at 09:24 (5,104 days old) by oldschool (SE PA. USA)        
And Finally Done

Here she is. I didn't want to paint the cabinet. Standard spray bomb paint I felt would scratch and chip much easier than the factory finish. The factory finish wasn't too bad. Alot of scratches and the sides were showing some early stages of pitting. I just used some rubbing compound and high end wax that I use on the cars. Turned out pretty cool. Again when I get sorted through all the pics I took, I'll get them posted.

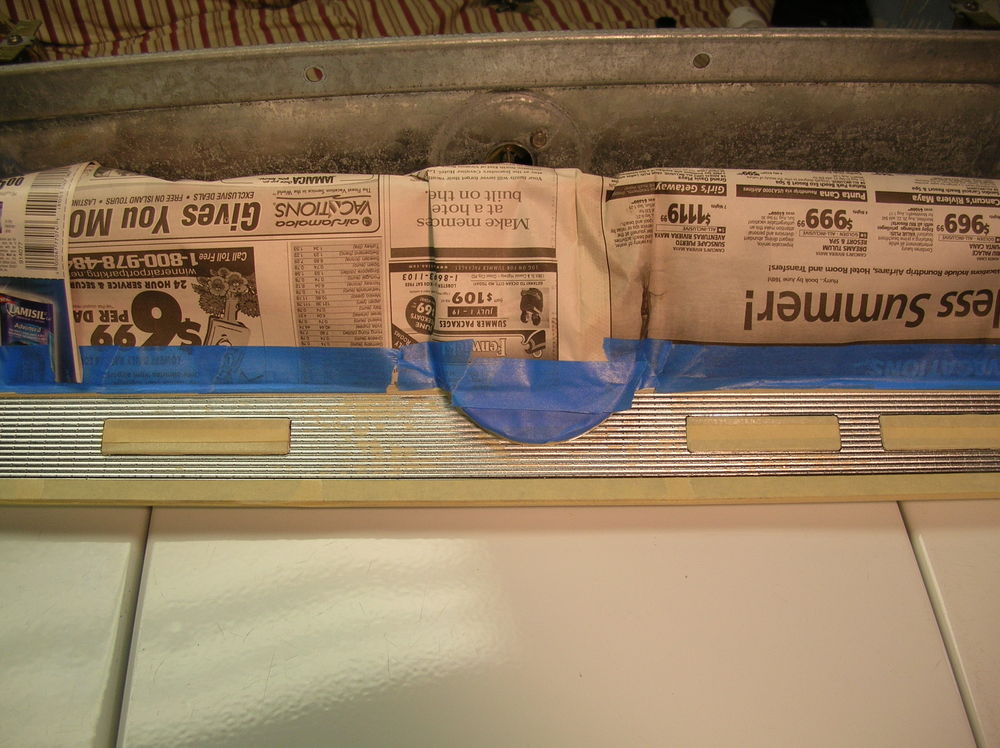
Post# 433280 , Reply# 22   5/5/2010 at 10:13 (5,104 days old) by mistereric (New Jersey (Taylor Ham))        

mistereric's profile picture
Damn! She looks GREAT!

Post# 433318 , Reply# 23   5/5/2010 at 12:40 (5,104 days old) by dnastrau (Lords Valley, PA)        
WOW!

Nice Job! That console looks NEW!

Post# 433319 , Reply# 24   5/5/2010 at 12:45 (5,104 days old) by qsd-dan (West)        
Damn! She looks GREAT!

qsd-dan's profile picture
X2

That really turned out nice!

I may have a spare NOS 606 aluminum dial if you really want to pretty her up.


Post# 433351 , Reply# 25   5/5/2010 at 15:29 (5,103 days old) by dnastrau (Lords Valley, PA)        
Off topic: brake tool

Hi Oldschool:

Were you the member who had posted that they found a Maytag brake tool for $20? If so, did they have more?

Thanks,

Andrew S.


Post# 433386 , Reply# 26   5/5/2010 at 20:49 (5,103 days old) by oldschool (SE PA. USA)        
Yep............that was me............. However,

I didn't buy it. (check the attached link for the tool). In my case,for a one time deal, I found another way to spin the brake assembly out. And my method worked quite well upon reassembly. I'm providing a pic of what I did. Please don't beat me up guys, but it worked for me. I WAS VERY GENTLE. I only needed to tap on the drift. There was no need to beat on it to get the brake assembly moving. There are three raised nubs on the top side of the housing. I moved around from one to next until I got movement, put on my leather gloves for a better grip, then muscled it the rest of the way off. I then reversed my method for reassembly. Spun it on until seated then used the drift and hammer to seat the assembly. It's not going anywhere.
Can't tell you if the tool is available or not as again I opted to go another route for removal and reassembly.


CLICK HERE TO GO TO oldschool's LINK


Post# 433388 , Reply# 27   5/5/2010 at 21:16 (5,103 days old) by oldschool (SE PA. USA)        
Thanks for the kind words. Can't say I'm in need of

I do appreciate the offer though Dan. I just wanted to get the old Maytag running again for doing my shop towels. I gave the old Maytag a new name....."RAGTAG". As far as the painting goes, I have shelves of automotive restoration paints. There was a ton of rust on the base pan and springs. The arms supporting the outer tub were pretty bad too. The slide assembly for the motor was jambed up too from rust. I was tempted to either glass bead the tranny housing or spray it with some cast aluminum paint but decided I needed to draw the line somewhere. As I look at the lube stains from the original assembly at the factory on the housing, maybe I should have done something. I just couldn't justify it.. The painting of the rusted areas didn't set me back anything, money wise.
Some of the colors I used were Ford blue, cast iron grey, stainless, black and white.


Post# 433391 , Reply# 28   5/5/2010 at 21:26 (5,103 days old) by dnastrau (Lords Valley, PA)        
Thanks Oldschool...

...as I think Scrubflex wanted to buy a brake tool. That is cheap!

Your brake removal method looks very good!

Your restoration work looks great too!


Post# 433415 , Reply# 29   5/5/2010 at 23:21 (5,103 days old) by dnastrau (Lords Valley, PA)        
One more question

That base and springs look great - did you sand/media blast the rust first or did you use something else?

Post# 433507 , Reply# 30   5/6/2010 at 13:19 (5,103 days old) by surgilator_68 (Maryland)        
WOW

surgilator_68's profile picture
That is beautiful!!

Post# 433616 , Reply# 31   5/7/2010 at 02:32 (5,102 days old) by chestermikeuk (Rainhill *Home of the RailwayTrials* Merseyside,UK)        
Restoration

chestermikeuk's profile picture
Great restoration there, you`ve inspired me to look at painting the fascia on my A206 which is rather crummy with work!!

Nothing like bringing a working machine back to full glory!!


Forum Index:       Other Forums:                      


Comes to the Rescue!

The Discuss-o-Mat has stopped, buzzer is sounding!!!
If you would like to reply to this thread please log-in...

Discuss-O-MAT Log-In


New Members
Click Here To Sign Up.


automaticwasher.org home
Discuss-o-Mat Forums
Vintage Brochures, Service and Owners Manuals
Fun Vintage Washer Ephemera
See It Wash!
Video Downloads
Audio Downloads
Picture of the Day
Patent of the Day
Photos of our Collections
The Old Aberdeen Farm
Vintage Service Manuals
Vintage washer/dryer/dishwasher to sell?
Technical/service questions?
Looking for Parts?
Website related questions?
Digital Millennium Copyright Act Policy
Our Privacy Policy