|
Thread Number: 31496
Everyone meet Horsey->LG |
[Down to Last] |
| Post# 475105 11/14/2010 at 19:43 (4,908 days old) by supremewhirlpol () | ||
|
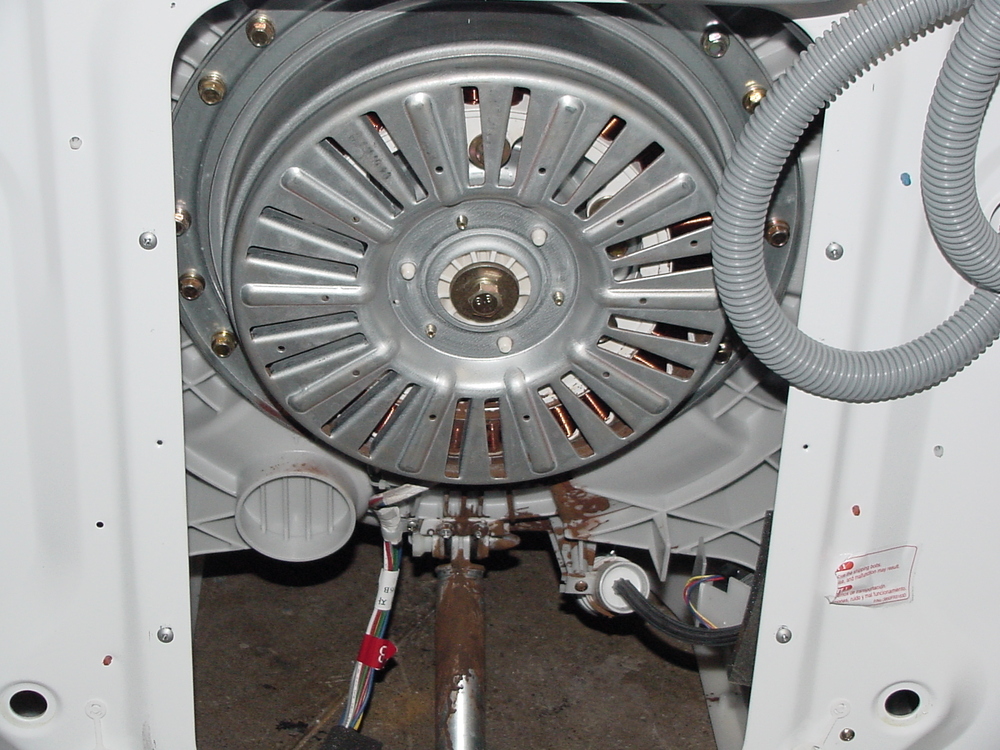
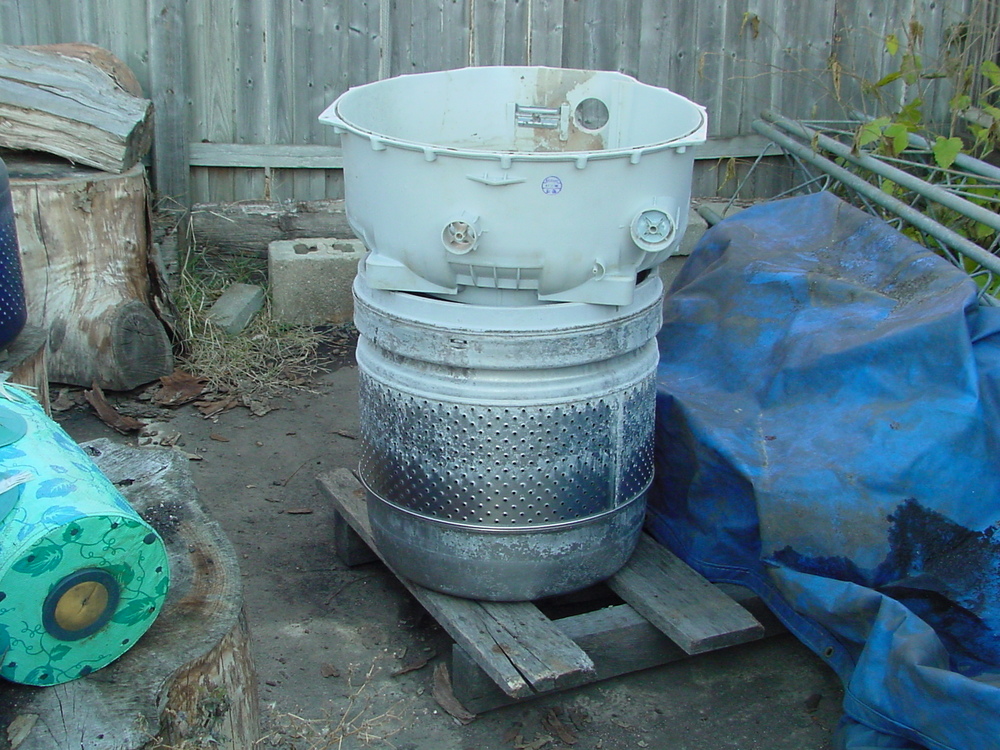
This LG (WM2277HW)came in->Time to see what it's made of. 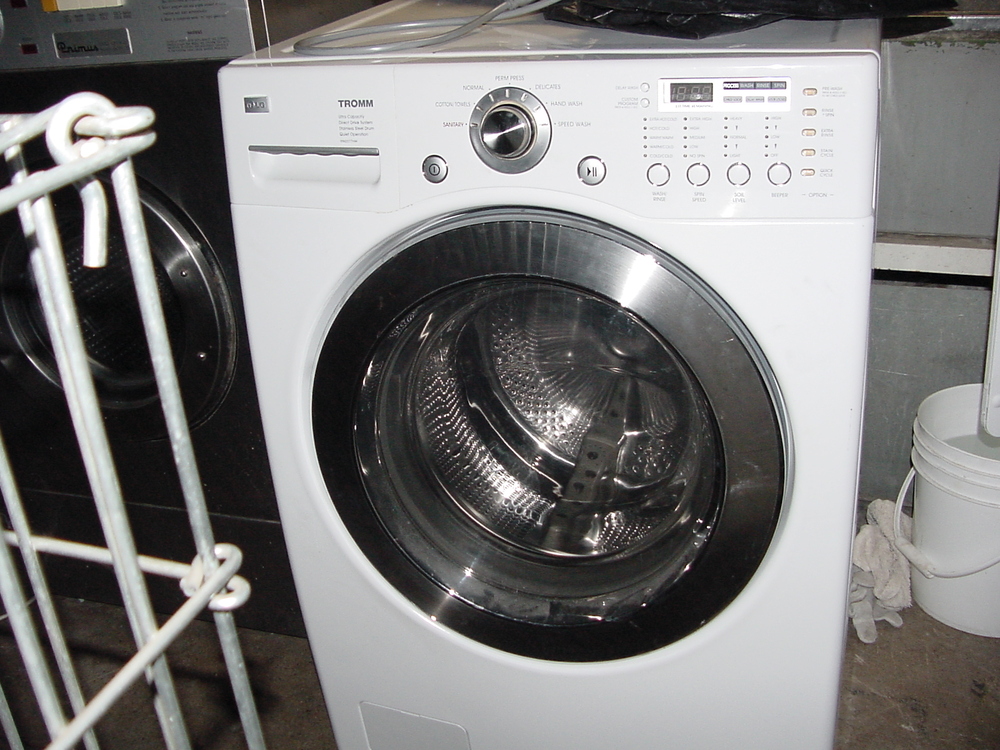
| ||

|
| Post# 475106 , Reply# 1 11/14/2010 at 19:48 (4,908 days old) by supremewhirlpol () | ||
|
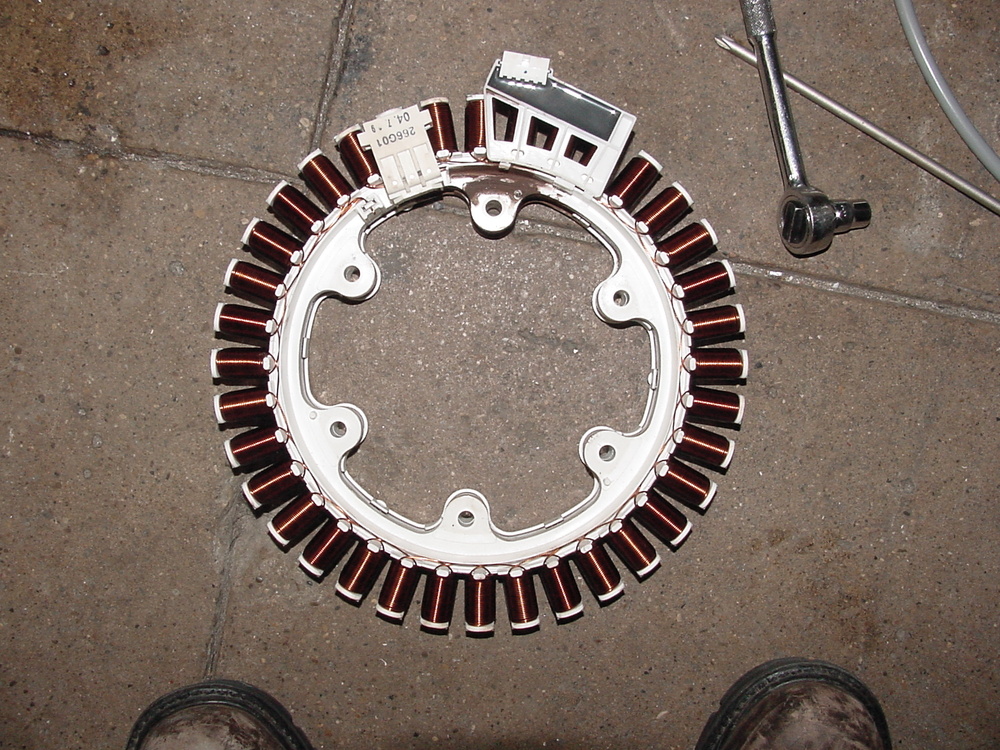
7 cycles 1200 RPM spin Direct Drive Brushless 3 phase DC Vector PWM heater pump recircation feature 2004-2005 Korea 
| ||
| Post# 475113 , Reply# 6 11/14/2010 at 20:23 (4,908 days old) by supremewhirlpol () | ||
|
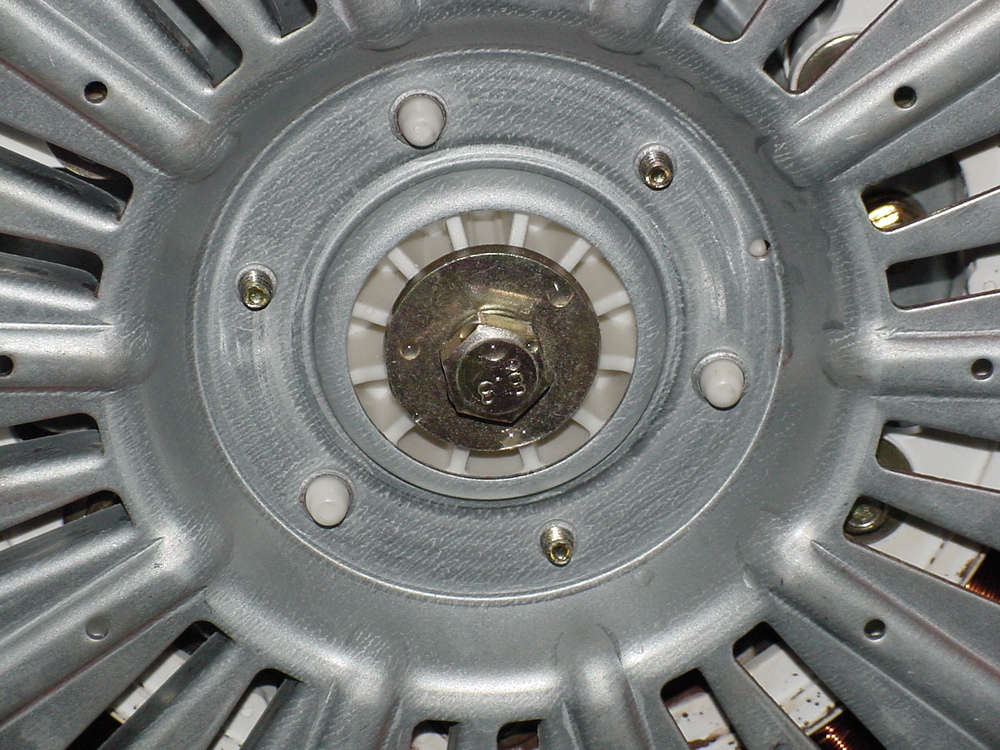
Inside of the hub. 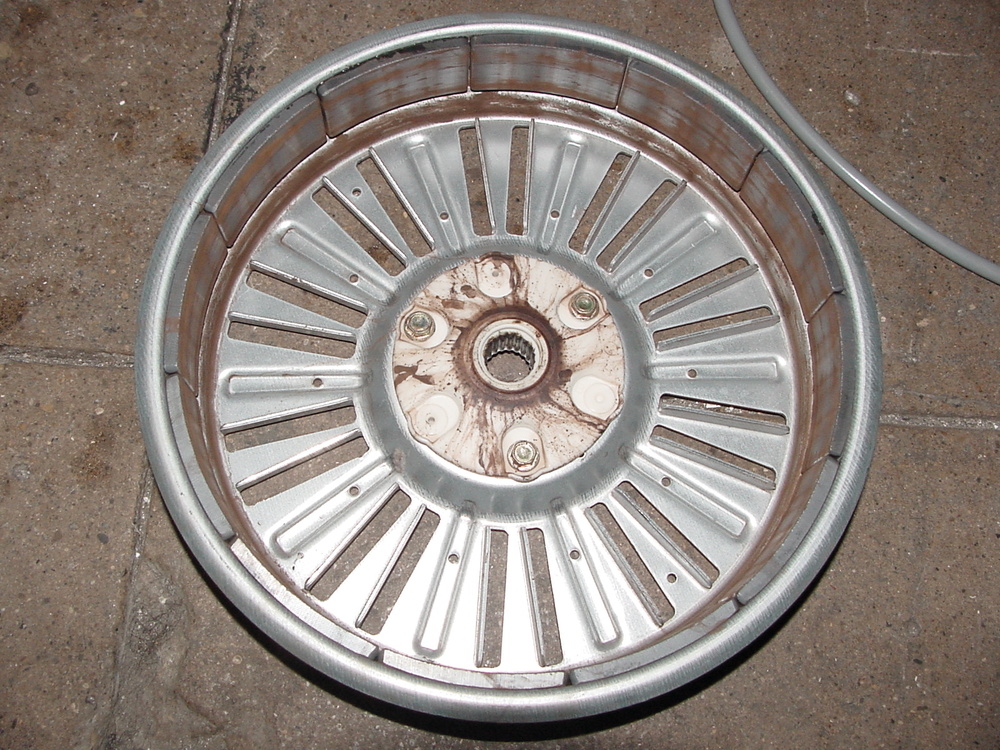
| ||
| Post# 475114 , Reply# 7 11/14/2010 at 20:26 (4,908 days old) by supremewhirlpol () | ||
|
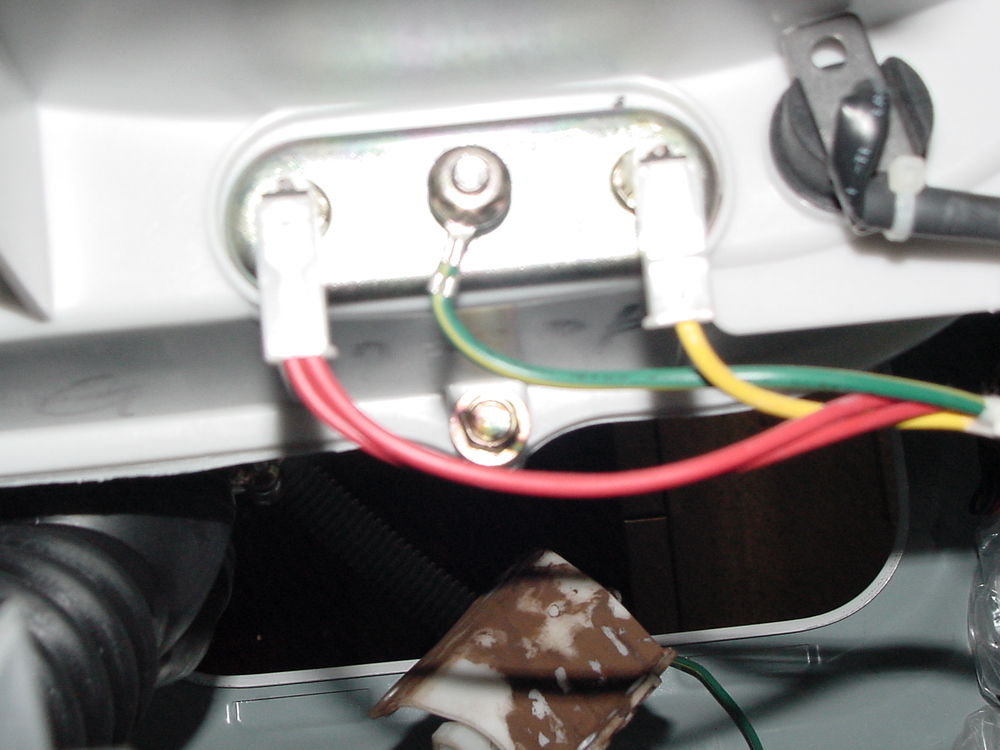
Remove the metal guide that holds the supply wires in place. 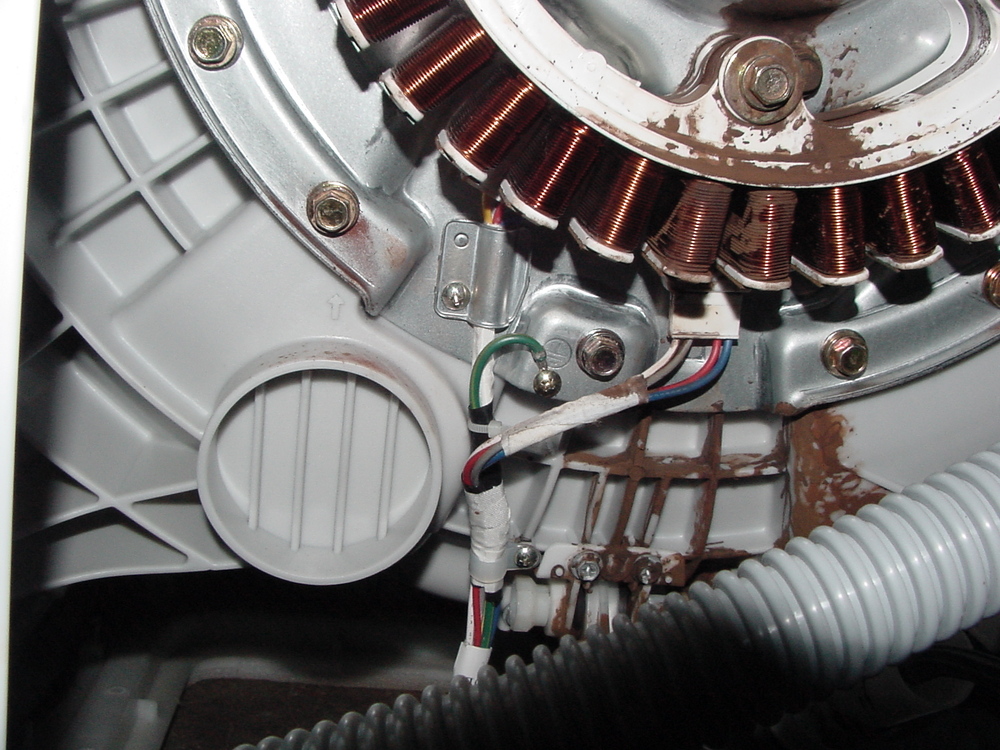
| ||
| Post# 475115 , Reply# 8 11/14/2010 at 20:27 (4,908 days old) by supremewhirlpol () | ||
|
Close up of the wire guide. 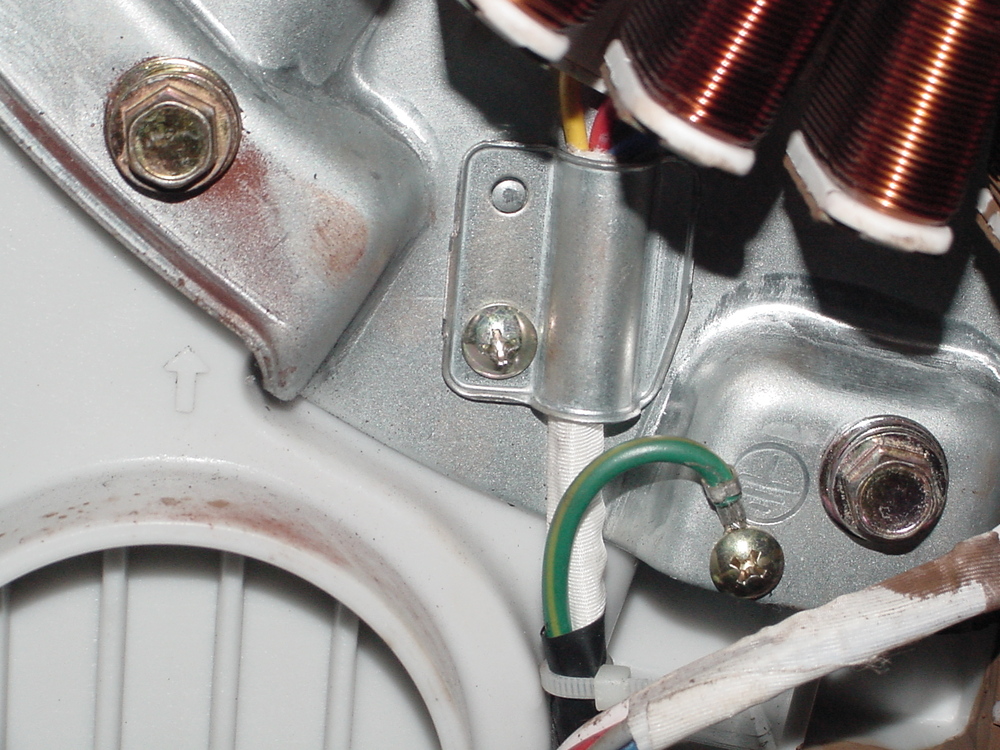
| ||
| Post# 475117 , Reply# 10 11/14/2010 at 20:40 (4,908 days old) by supremewhirlpol () | ||
|
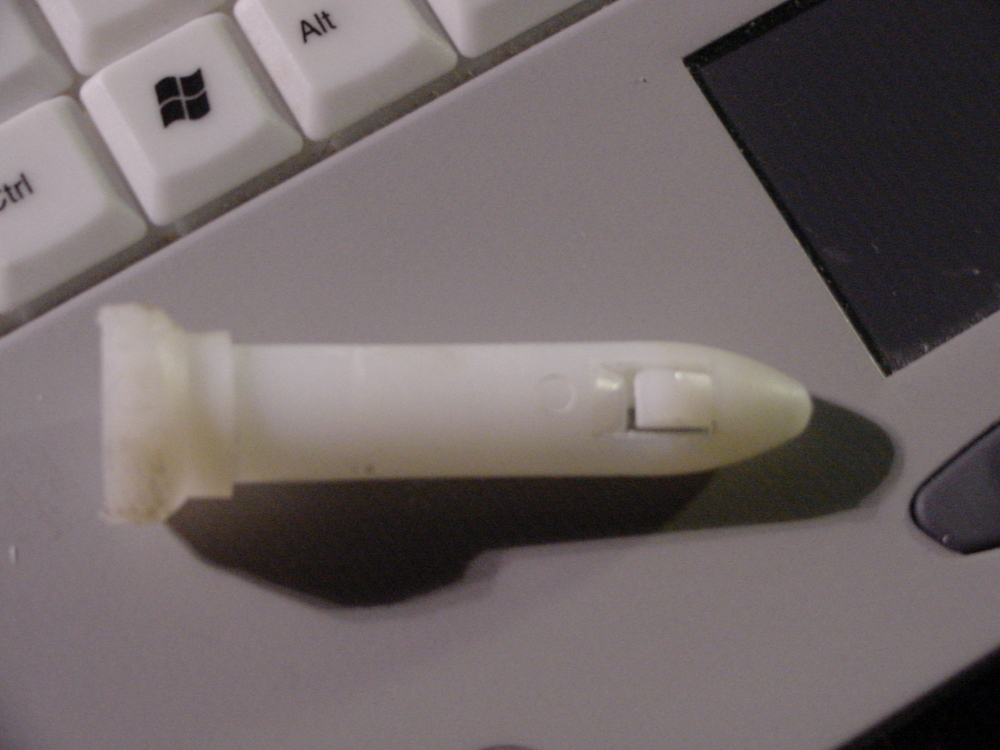
Close up of the sensor that needs replaced. 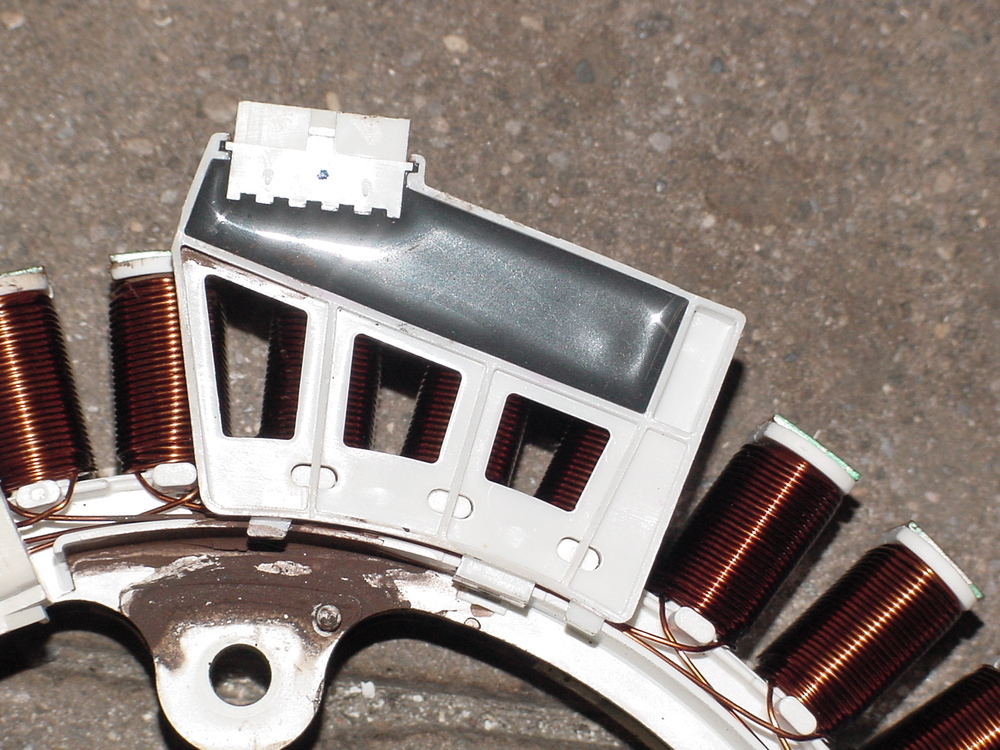
| ||
| Post# 475118 , Reply# 11 11/14/2010 at 20:42 (4,908 days old) by supremewhirlpol () | ||
|
Side view of the sensor. The sensor is attached to the stator by tabs. Remove the sensor by lifting the tabs. 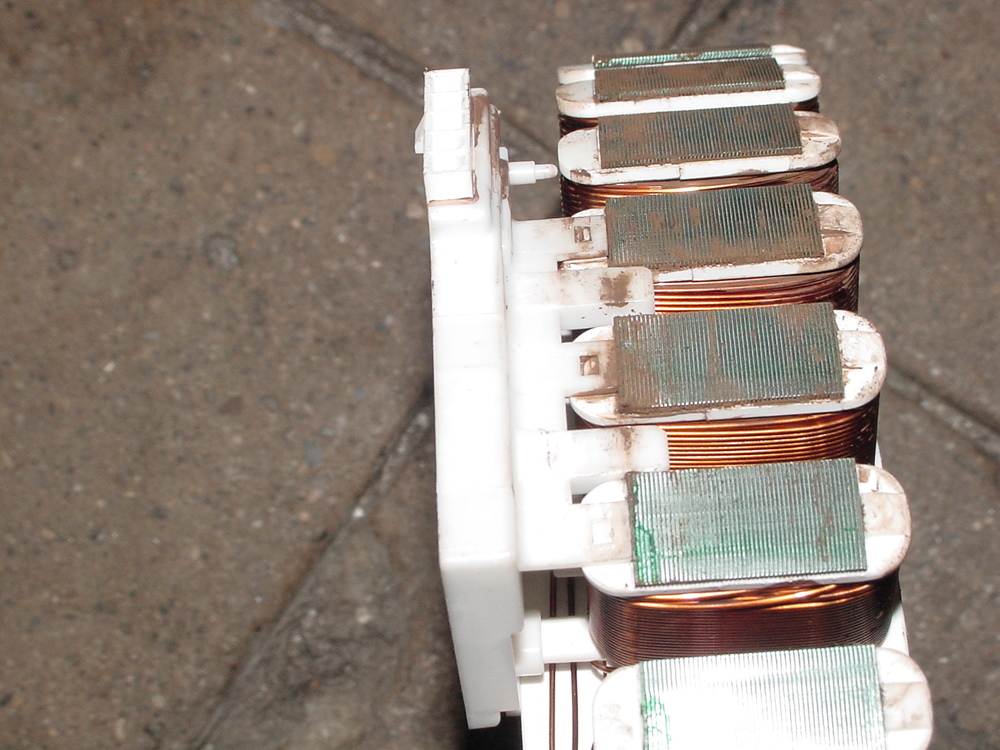
| ||
| Post# 475119 , Reply# 12 11/14/2010 at 20:43 (4,908 days old) by supremewhirlpol () | ||
|
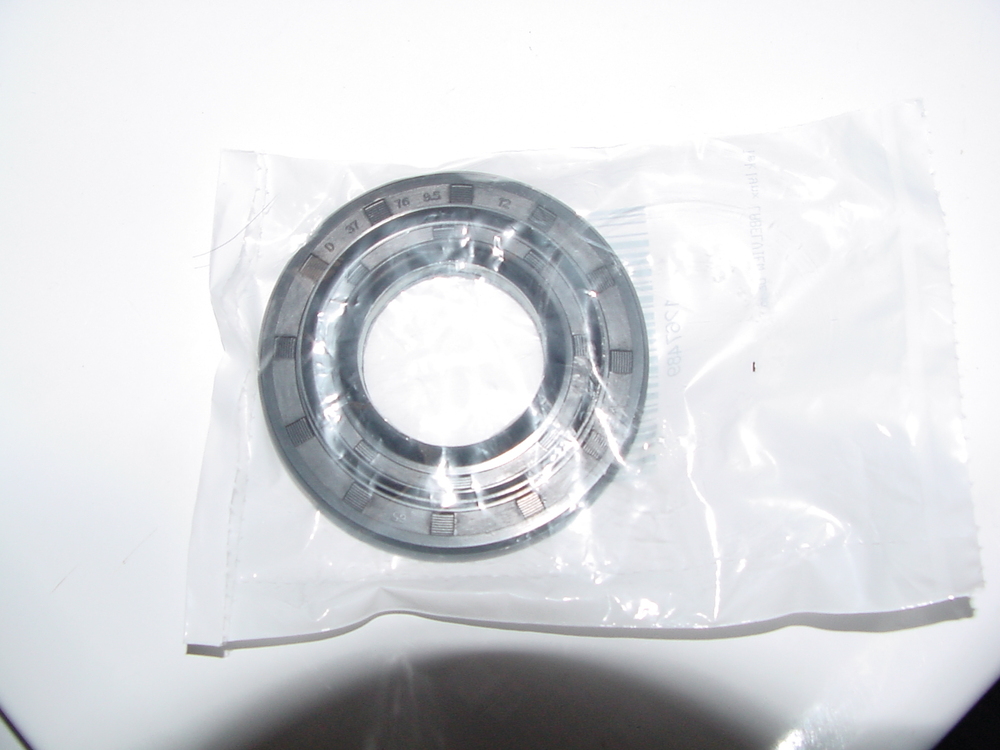
New sensor bag 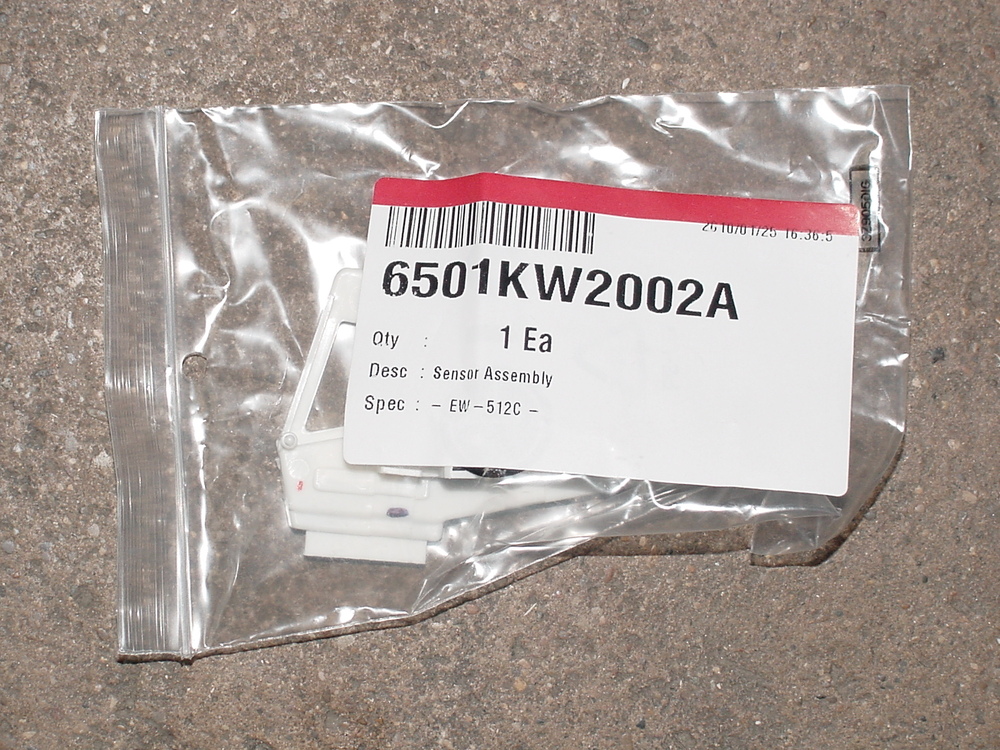
| ||
| Post# 475120 , Reply# 13 11/14/2010 at 20:44 (4,908 days old) by supremewhirlpol () | ||
|
New sensor 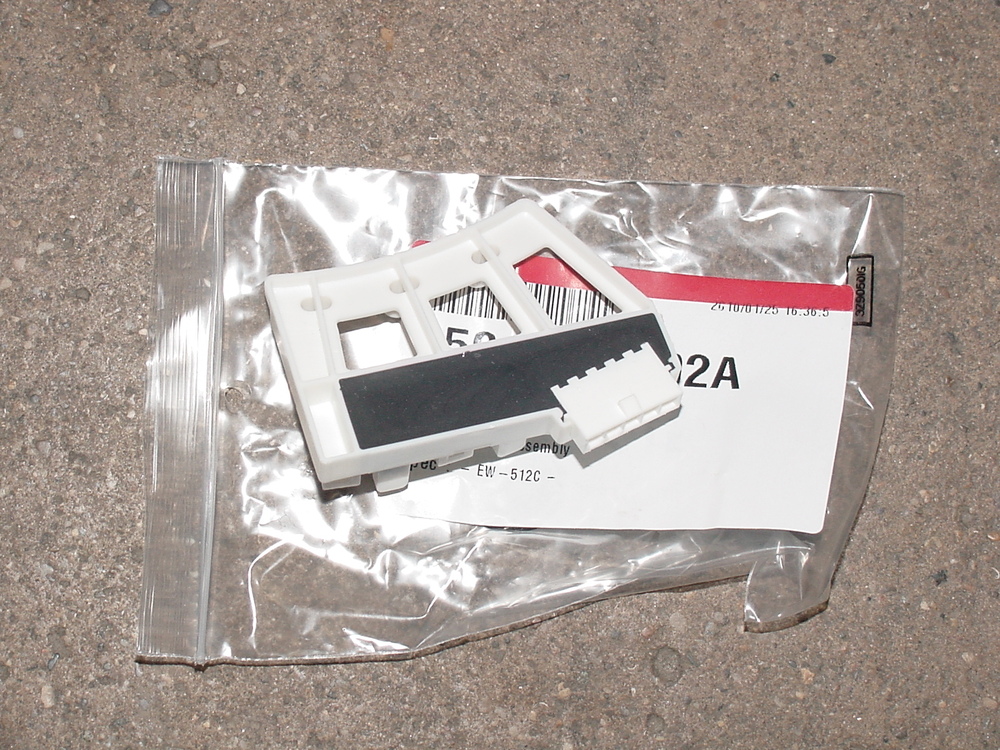
| ||
| Post# 475122 , Reply# 14 11/14/2010 at 20:48 (4,908 days old) by supremewhirlpol () | ||
|
The sensor will align itself in the proper place, it has been properly installed when the tabs snap in place. New sensor installed 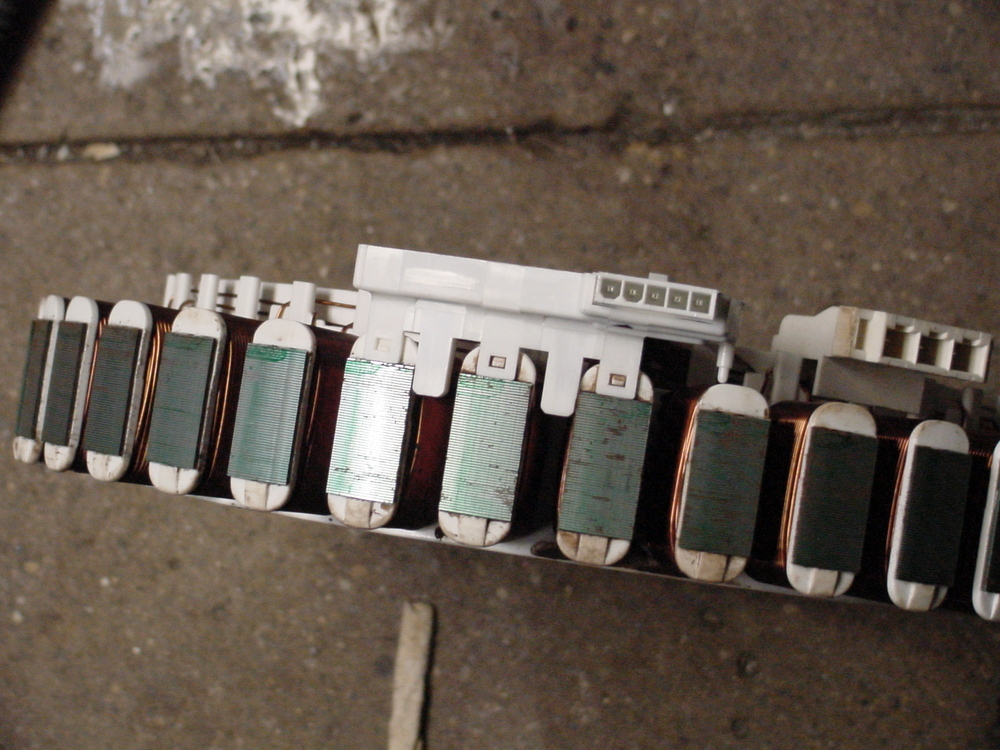
| ||
| Post# 475135 , Reply# 16 11/14/2010 at 21:05 (4,908 days old) by supremewhirlpol () | ||
|
Now it's time to address issues with the bearings and failed seal. 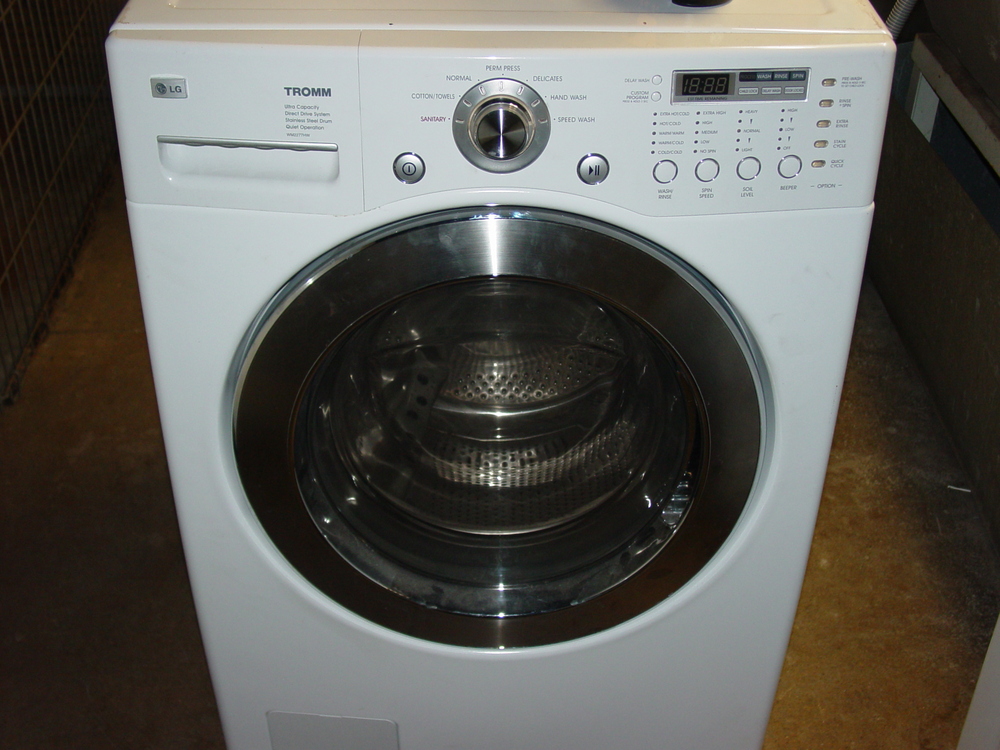
| ||
Post# 475178 , Reply# 17 11/15/2010 at 08:24 (4,907 days old) by RevvinKevin  (Tinseltown - Shakey Town - La-La Land) (Tinseltown - Shakey Town - La-La Land) |
||
|
Very Cool! | ||
| Post# 475179 , Reply# 18 11/15/2010 at 08:39 (4,907 days old) by amyswasher () | ||
|
Is this going to be your washer to keep or are working on it at you job to sell later? | ||
| Post# 475191 , Reply# 19 11/15/2010 at 09:45 (4,907 days old) by mrb627 (Buford, GA) | ||
LE Error
I seem to recall a problem with the sensor and the LE Error. If my memory serves, the sensor would wiggle out of position and cause a random error. Does this ring a bell with anyone?
I sent my LG set on to a new home within a year of owning them. They just didn't feel built to last at all. The dryer had a rattle I could not eliminate. The washer began to squeak with general tumbling action. Drove me crazy. Don't miss it one bit. Malcolm | ||
| Post# 475235 , Reply# 22 11/15/2010 at 13:16 (4,907 days old) by whirlcool (Just North Of Houston, Texas) | ||
|
Interesting. The Dual 701 turntable (1970) used the same hall effect coil system to move the platter. The result is a very stable speed. | ||
| Post# 475288 , Reply# 23 11/15/2010 at 14:54 (4,907 days old) by macboy91si (Frankfort, KY) | ||
I Can't Stop!
Melvin, this is great material. It's very interesting what you're finding in this relatively new LG machine. I know it takes a lot of time photographing and posting this stuff and I appreciate all the time. I also enjoyed the Neptune teardown, but I have to say that one looked very daunting not having even seen one apart like that. This one seems like it will be a bear to do, so I certainly look forward to seeing what's next. This is also the 1st of the Direct Drive setups I've seen and I have to say it's a bit more complicated than I thought it would be, but very interesting. We should chat again sometime.
-Tim | ||
|
Post# 475291 , Reply# 24 11/15/2010 at 14:59 (4,907 days old) by DADoES (TX,�U.S. of A.) |
||
|
�
Fisher & Paykel's SmartDrive motor is the same design and predates LG for market introduction by several years. They refer to the Hall Effect sensor as an RPS (Rotor Position Sensor). As I recall, F&P filed a joint lawsuit against LG for duplicating the design but I don't know what was the result. My GWL08 is 11 years old and never has needed any repairs. The rotor pictured appears to have 12 magnets, but there are probably four in each group, total of 48 magnets. | ||
| Post# 475340 , Reply# 25 11/15/2010 at 20:04 (4,907 days old) by supremewhirlpol () | ||
|
Remove the top by taking out the bottom screw of this white plastic piece(for stacking?) There is another plastic piece on the other side of the machine as well. Grab the plastic pieces and pull the top toward you->lift up and remove the top. 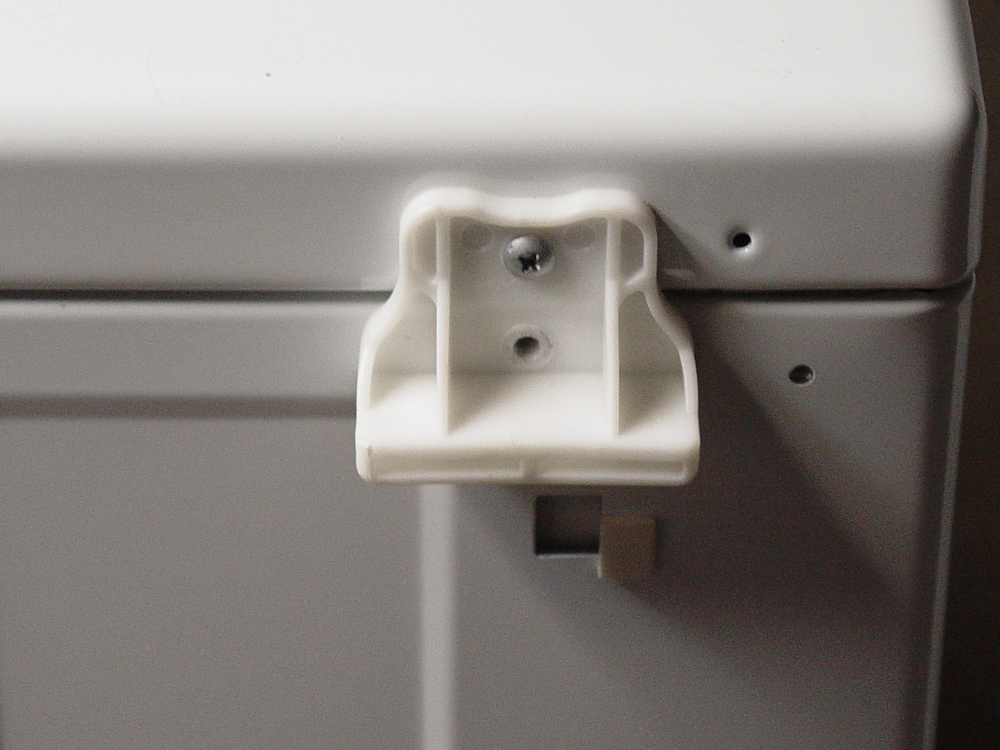
| ||
| Post# 475341 , Reply# 26 11/15/2010 at 20:08 (4,907 days old) by supremewhirlpol () | ||
|
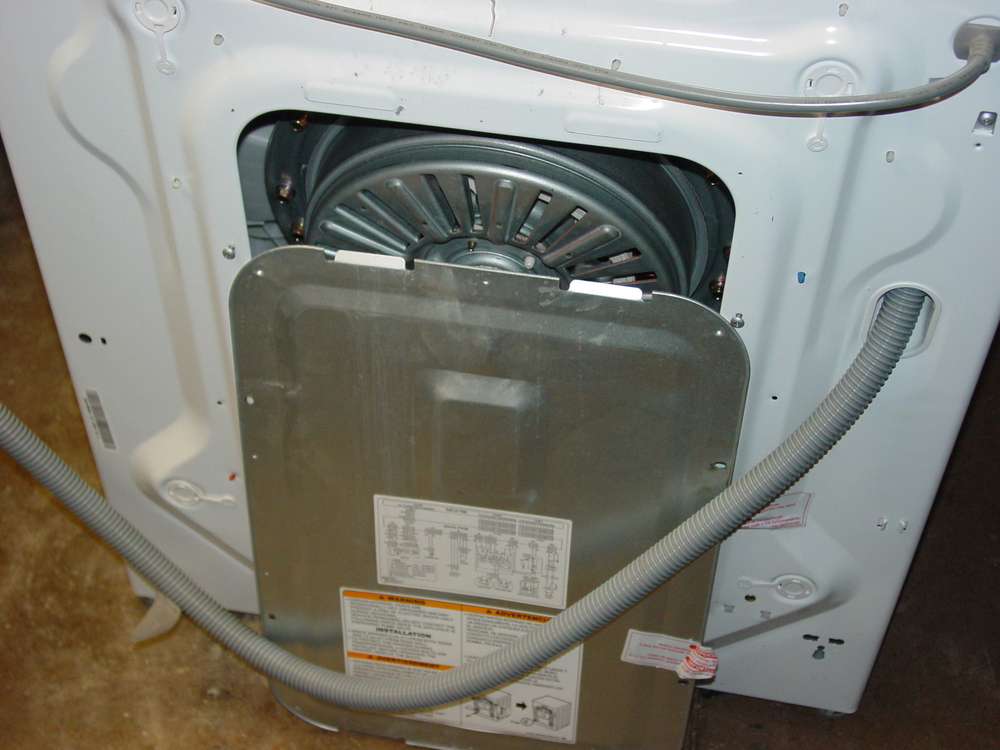
Machine with the top removed->I've removed the cover to the PCB for a reason, which I will get to later. 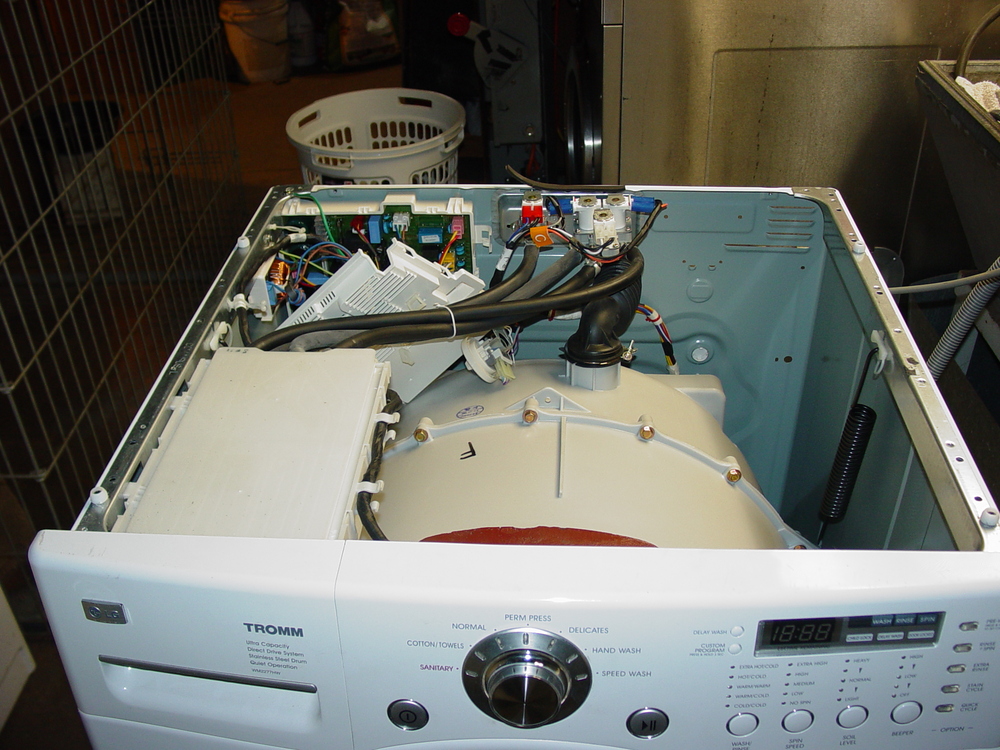
| ||
| Post# 475345 , Reply# 28 11/15/2010 at 20:17 (4,907 days old) by supremewhirlpol () | ||
|
Tab 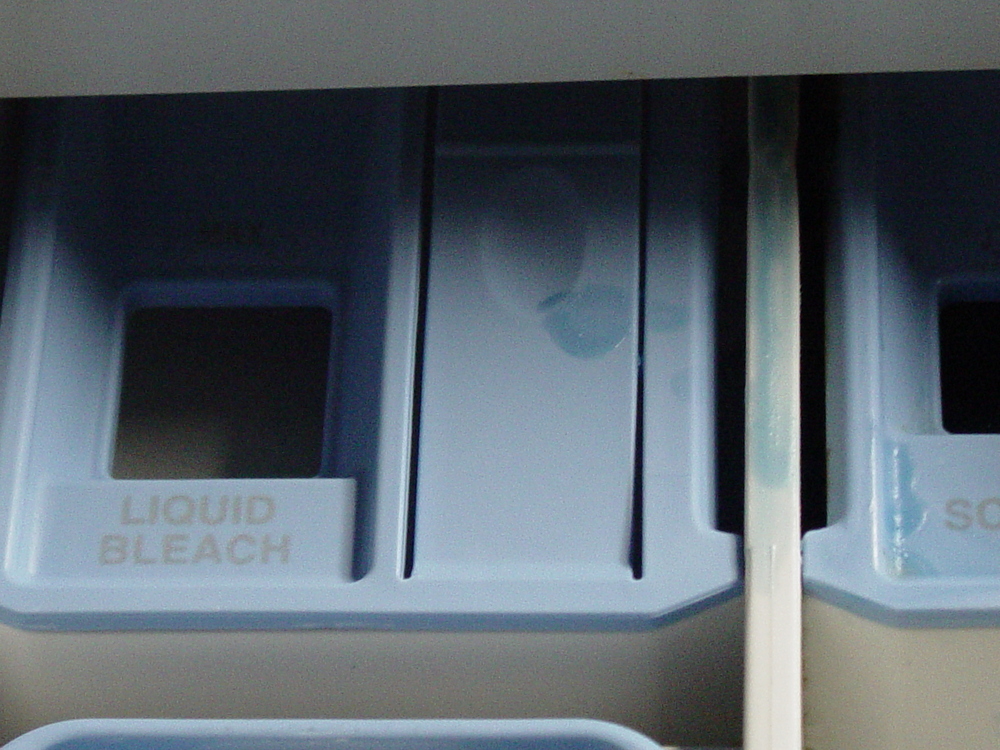
| ||
| Post# 475347 , Reply# 29 11/15/2010 at 20:19 (4,907 days old) by supremewhirlpol () | ||
|
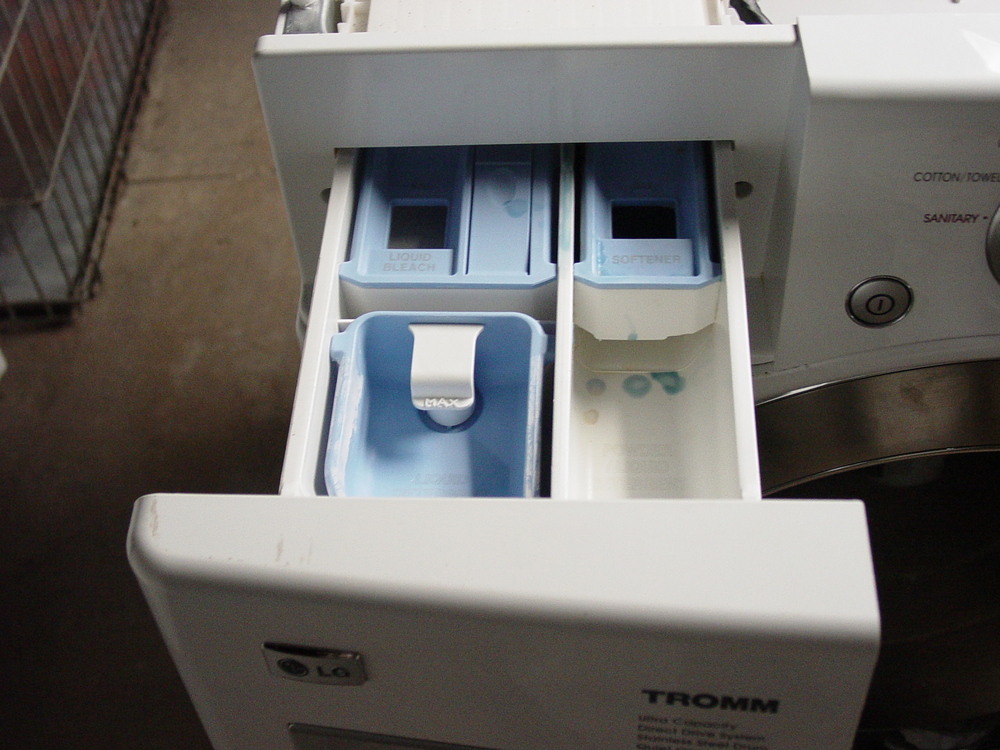
Drawer out! 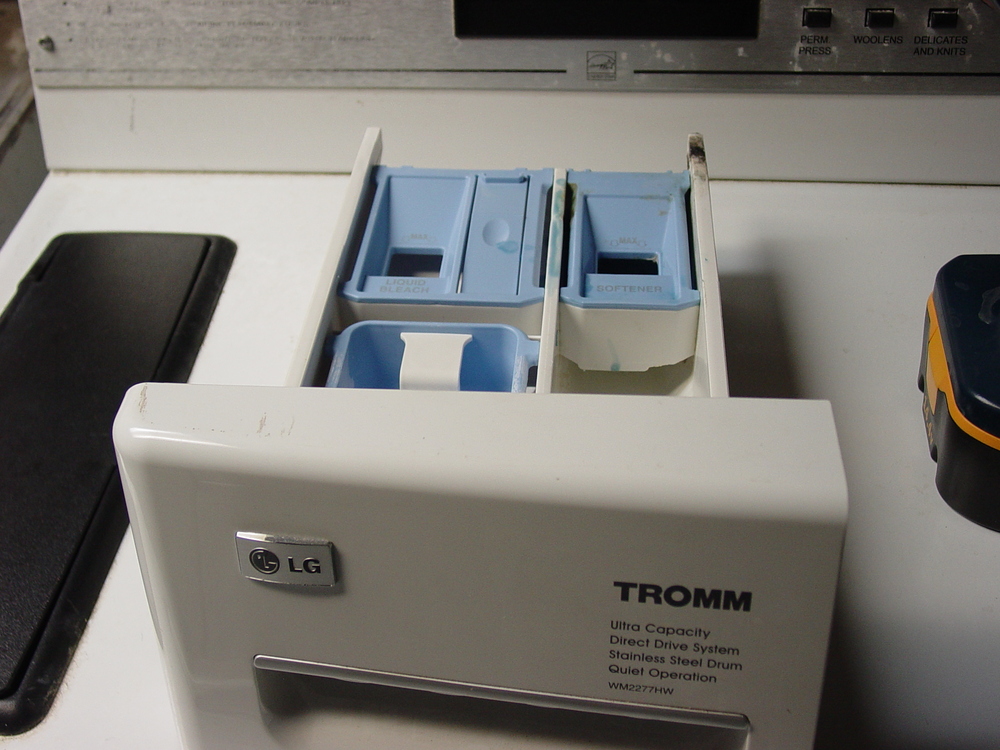
| ||
| Post# 475348 , Reply# 30 11/15/2010 at 20:22 (4,907 days old) by supremewhirlpol () | ||
|
There is a screw on each side. 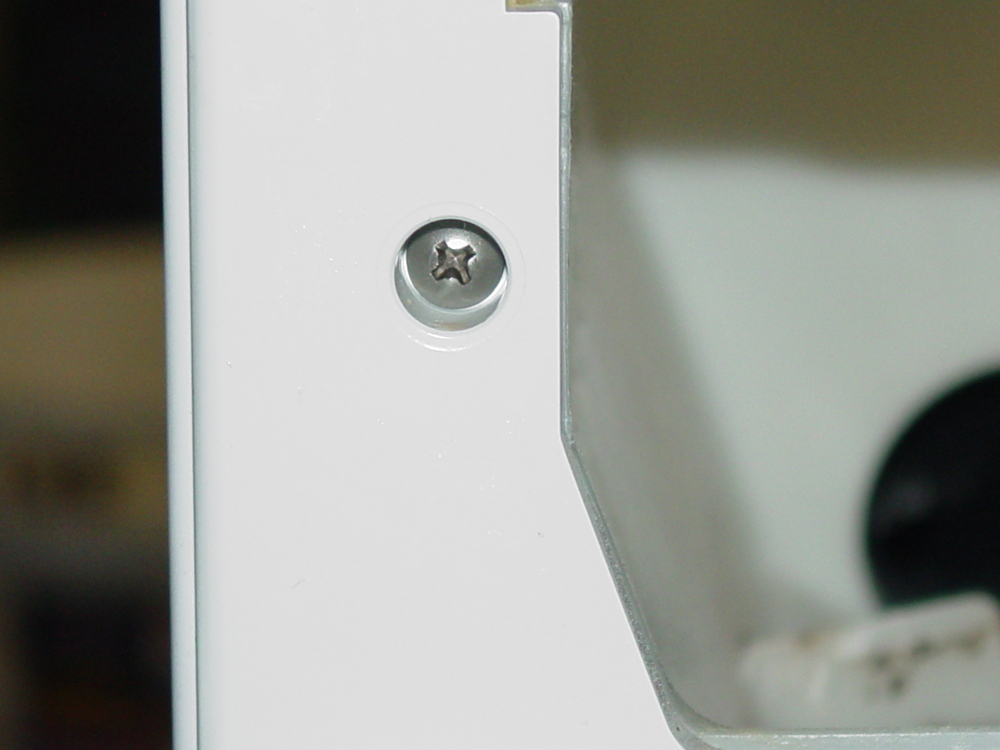
| ||
| Post# 475349 , Reply# 31 11/15/2010 at 20:23 (4,907 days old) by supremewhirlpol () | ||
|
Screw holes 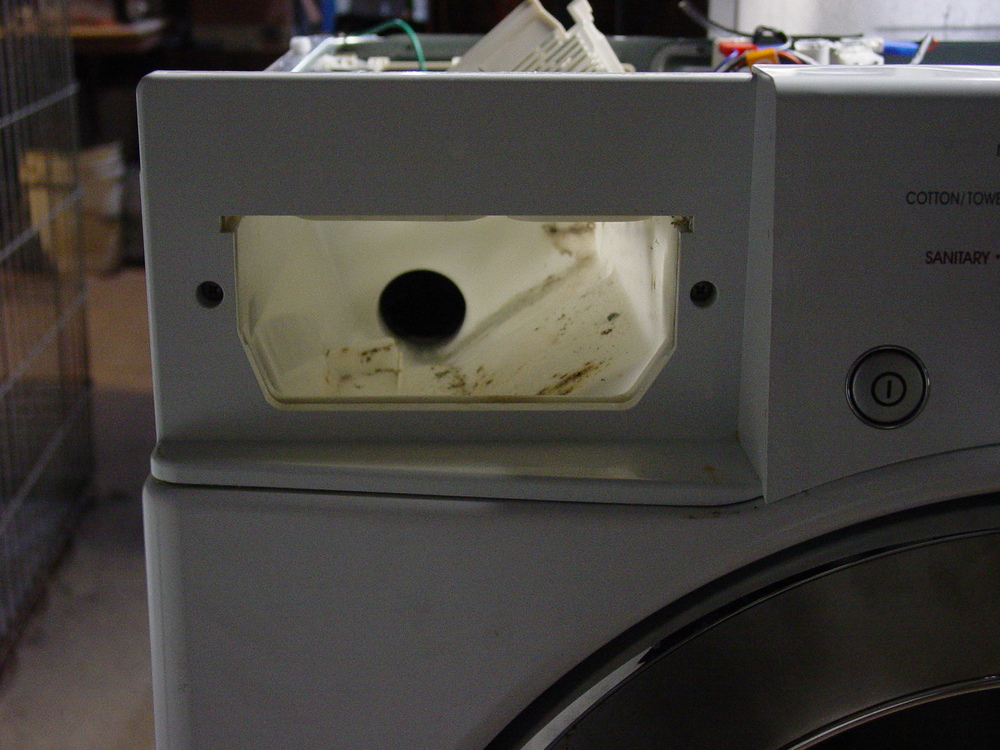
| ||
| Post# 475351 , Reply# 32 11/15/2010 at 20:27 (4,907 days old) by supremewhirlpol () | ||
|
There are a series of tabs located at the top under side of the controls->release them gently. 
| ||
| Post# 475352 , Reply# 33 11/15/2010 at 20:31 (4,907 days old) by supremewhirlpol () | ||
|
After the tabs have been released->pull the controls forward and down GENTLY. 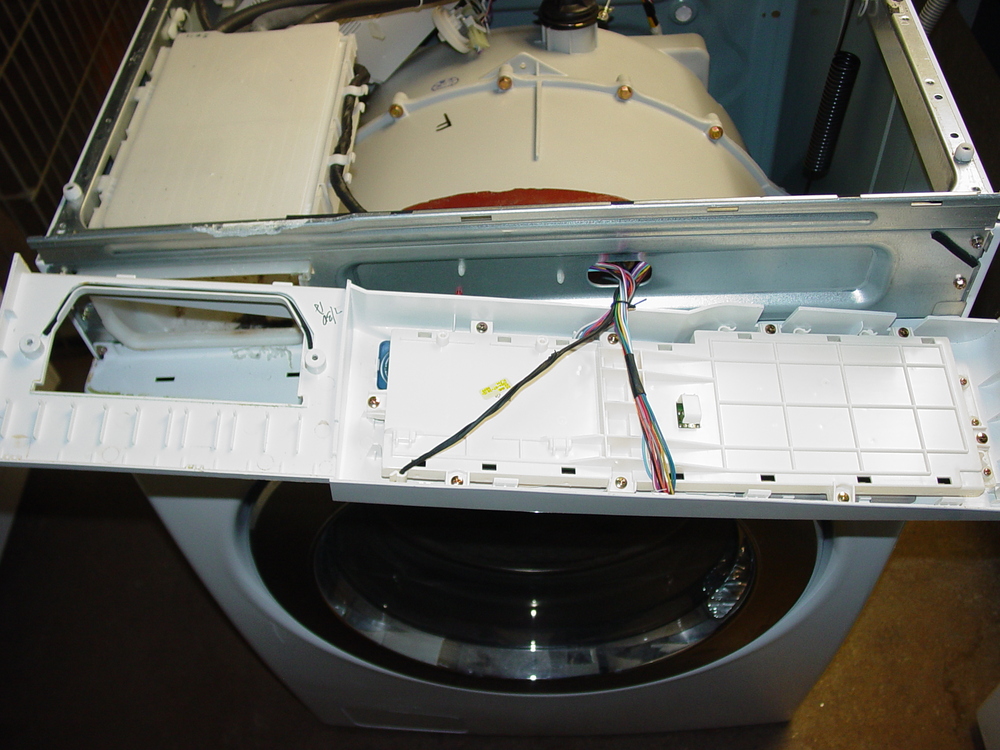
| ||
| Post# 475354 , Reply# 34 11/15/2010 at 20:33 (4,907 days old) by supremewhirlpol () | ||
|
There are tabs on the underside of the control region, be careful of those. 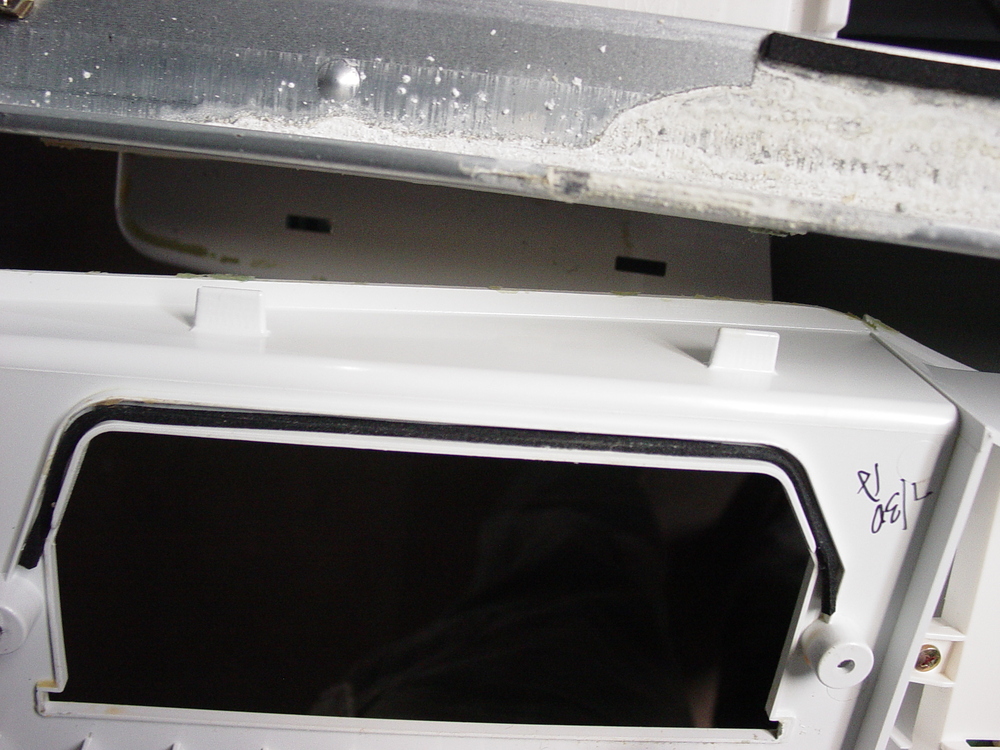
| ||
| Post# 475355 , Reply# 35 11/15/2010 at 20:39 (4,907 days old) by supremewhirlpol () | ||
|
Unplug and release the connectors from the ties. Guide the wires through the metal opening. 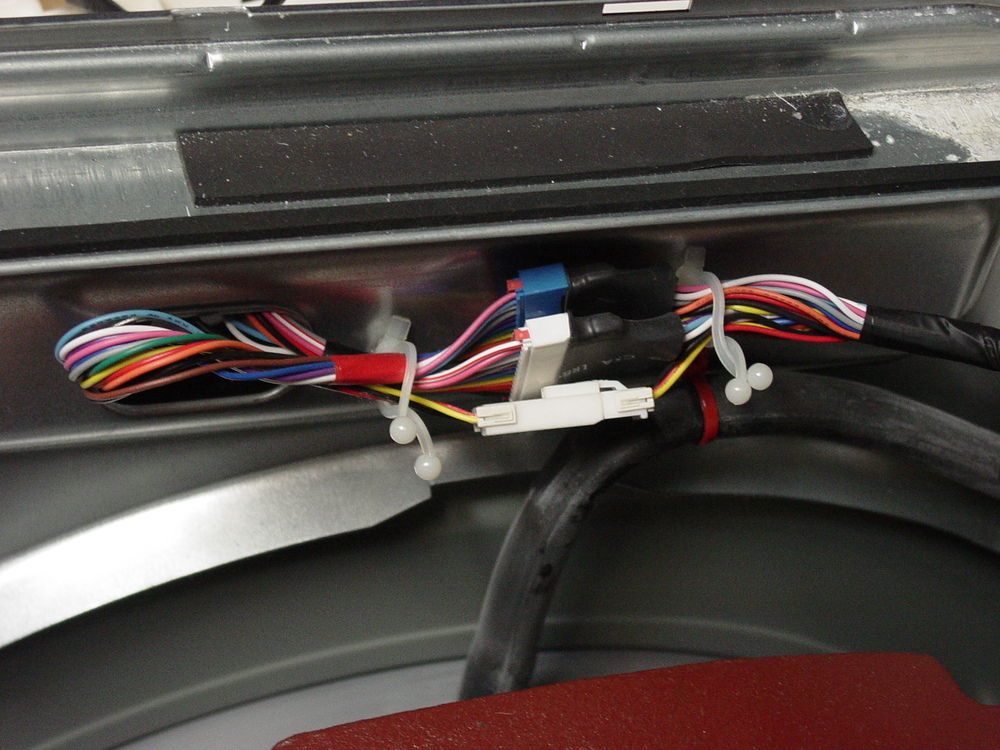
| ||
| Post# 475357 , Reply# 36 11/15/2010 at 20:42 (4,907 days old) by supremewhirlpol () | ||
|
Remove the screws in the front. 
| ||
| Post# 475358 , Reply# 37 11/15/2010 at 20:45 (4,907 days old) by supremewhirlpol () | ||
|
There is at least one screw on the top behind where the controls go on both sides of the front of the machine. 
| ||
| Post# 475360 , Reply# 39 11/15/2010 at 20:57 (4,907 days old) by supremewhirlpol () | ||
|
Remove the hidden screw. 
| ||
| Post# 475366 , Reply# 41 11/15/2010 at 21:07 (4,907 days old) by supremewhirlpol () | ||
|
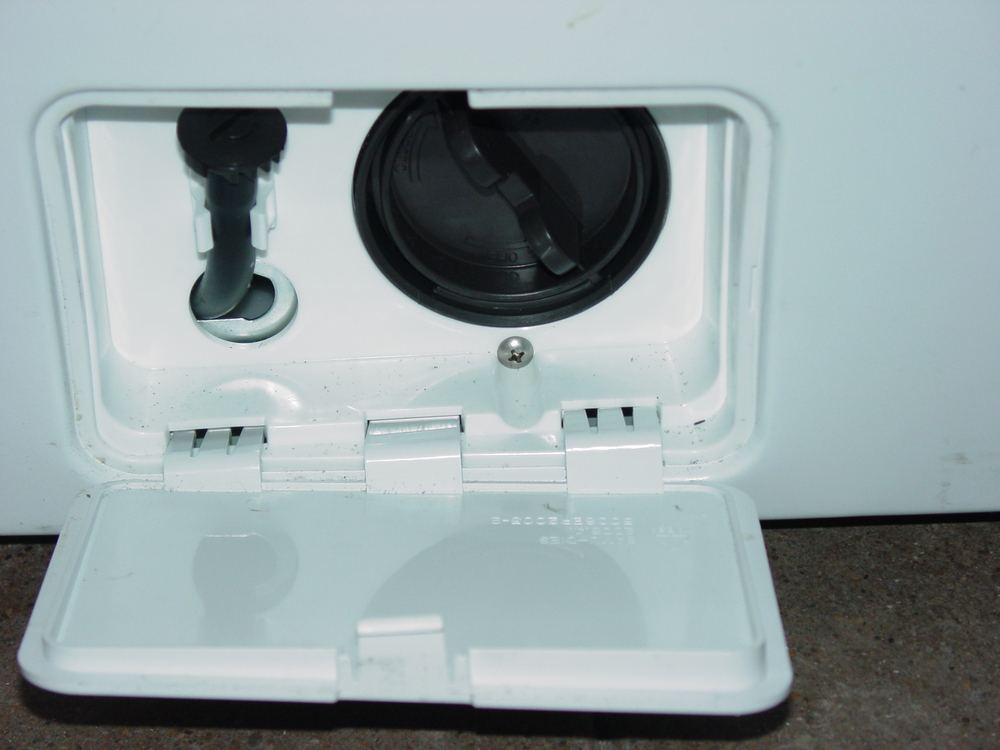
remove the drawer compartment by siding it back and lifting up and out. 
| ||
| Post# 475369 , Reply# 42 11/15/2010 at 21:10 (4,907 days old) by supremewhirlpol () | ||
|
Pull the front forward slightly, and disconnect the door lock assembly. Remove the front. 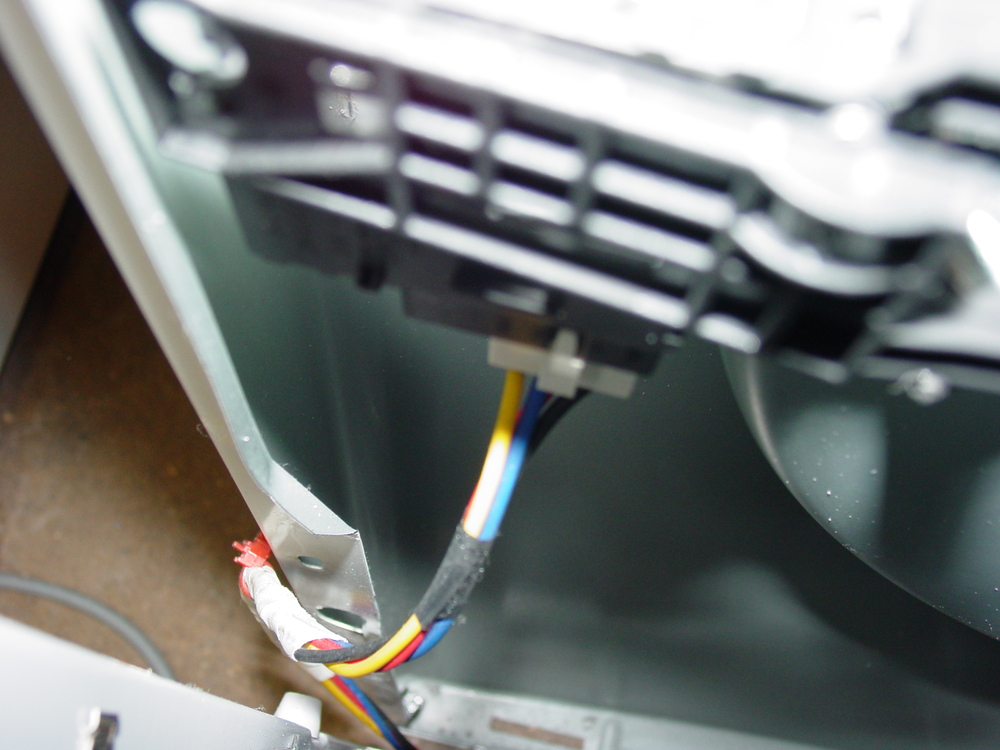
| ||
| Post# 475371 , Reply# 43 11/15/2010 at 21:16 (4,907 days old) by supremewhirlpol () | ||
|
Remove the counter weights->use pliers to push the bolt holes together to remove the counter weights. 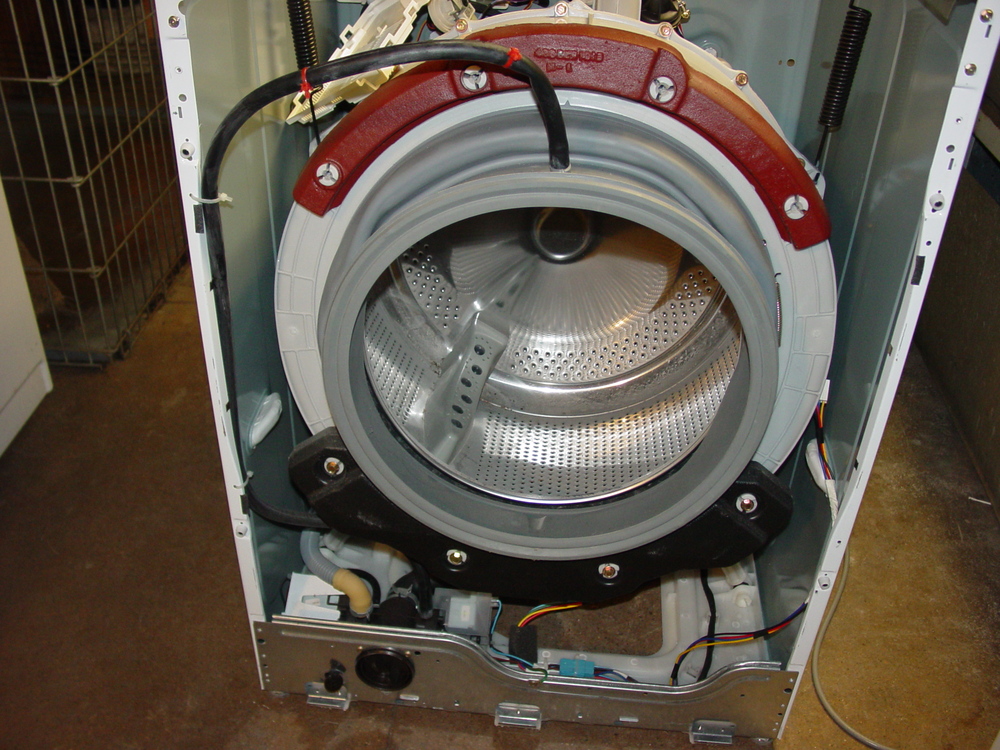
| ||
| Post# 475373 , Reply# 44 11/15/2010 at 21:20 (4,907 days old) by supremewhirlpol () | ||
|
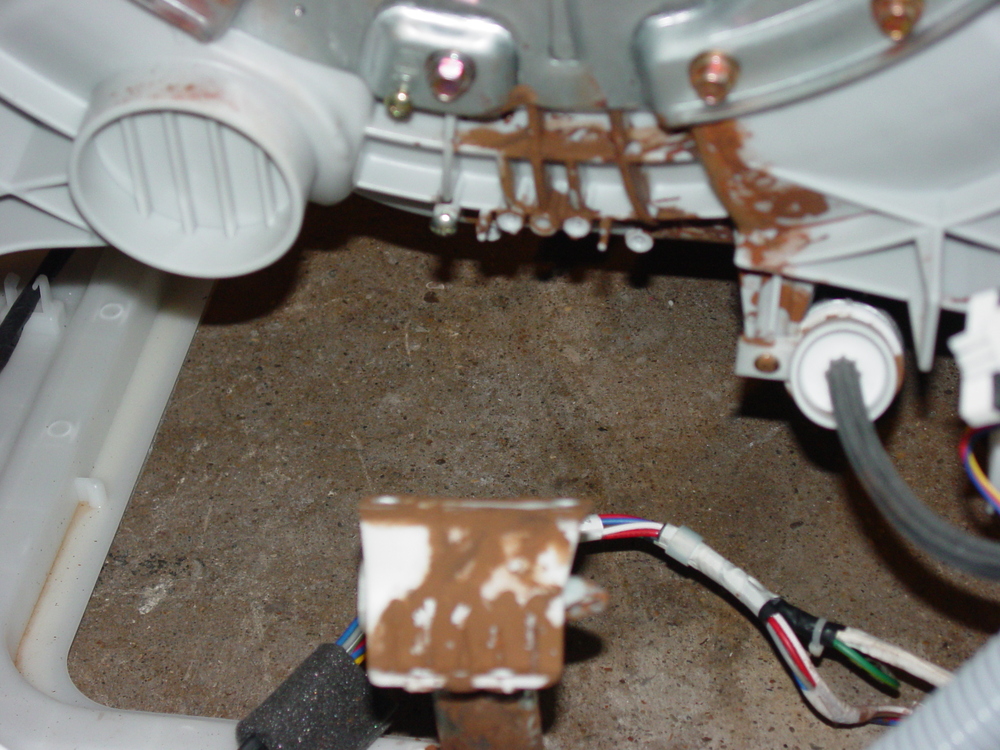
Remove the two hoses that are mounted to the top of the outer tub. The first hose is the breathe hose->located at the top rear of the outer tub. The second hose connects to the soap compartment. Breathe hose-- 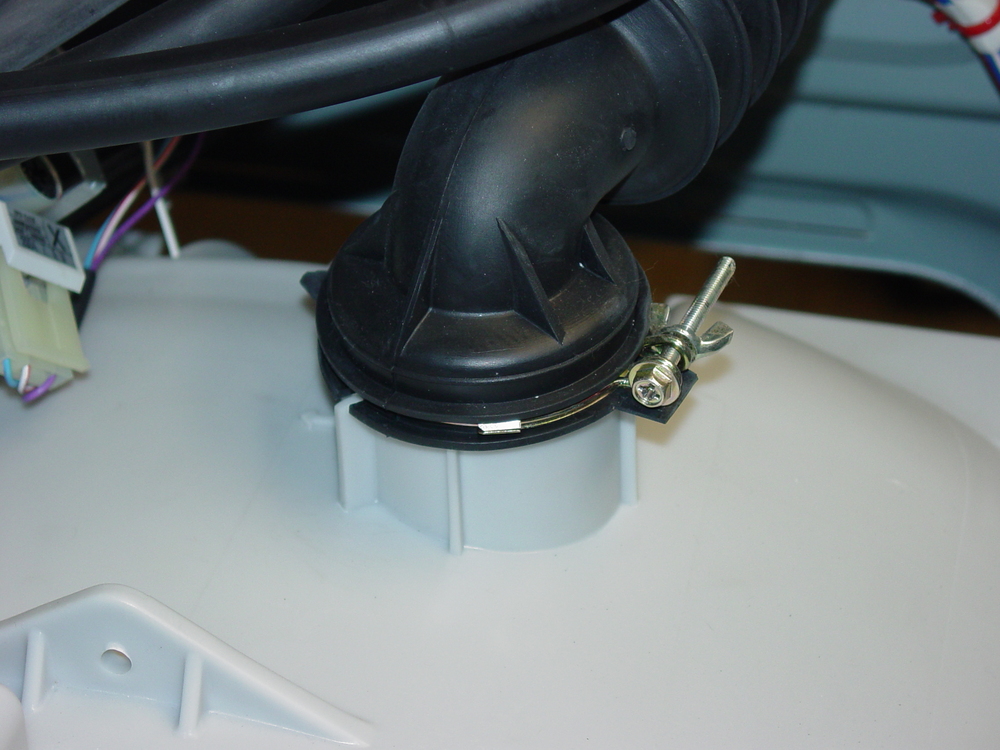
| ||
| Post# 475374 , Reply# 45 11/15/2010 at 21:21 (4,907 days old) by Maytagbear (N.E. Ohio) | ||
|
Am I being dumb (a possibility) or is this thing more complex than truly necessary? Or am I just used to REAL Maytag? This is interesting, and I do thank you a great deal for taking the photographs, but...... Lawrence/Maytagbear | ||
| Post# 475375 , Reply# 46 11/15/2010 at 21:22 (4,907 days old) by supremewhirlpol () | ||
|
Hose from the soap compartment. 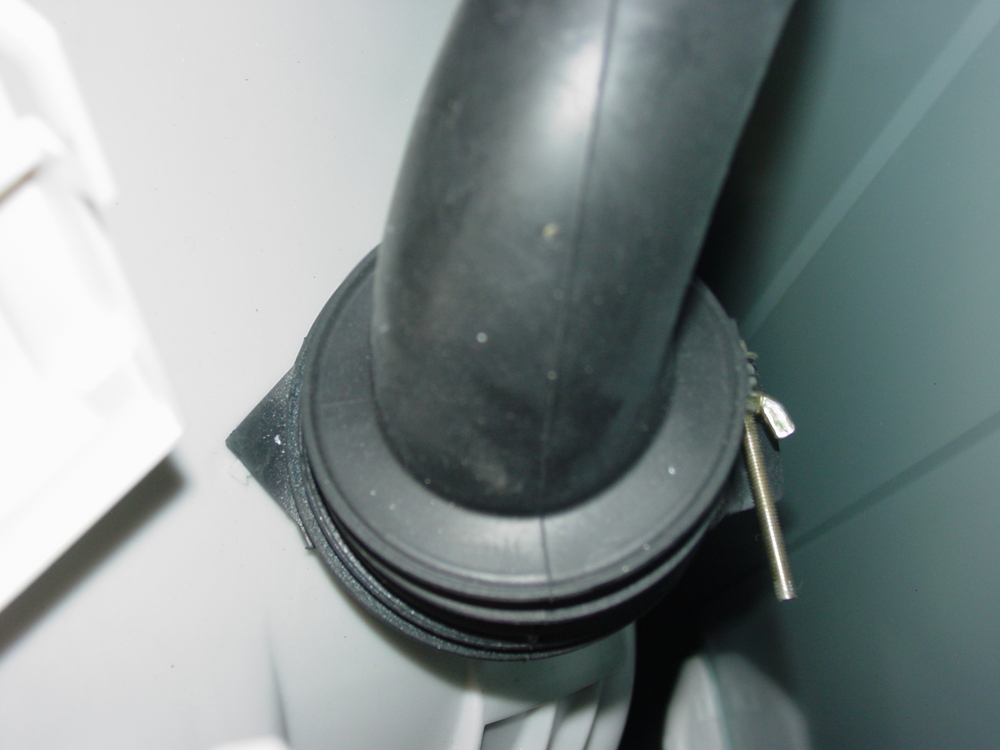
| ||
| Post# 475376 , Reply# 47 11/15/2010 at 21:24 (4,907 days old) by supremewhirlpol () | ||
|
Remove the floats -Breathe hose 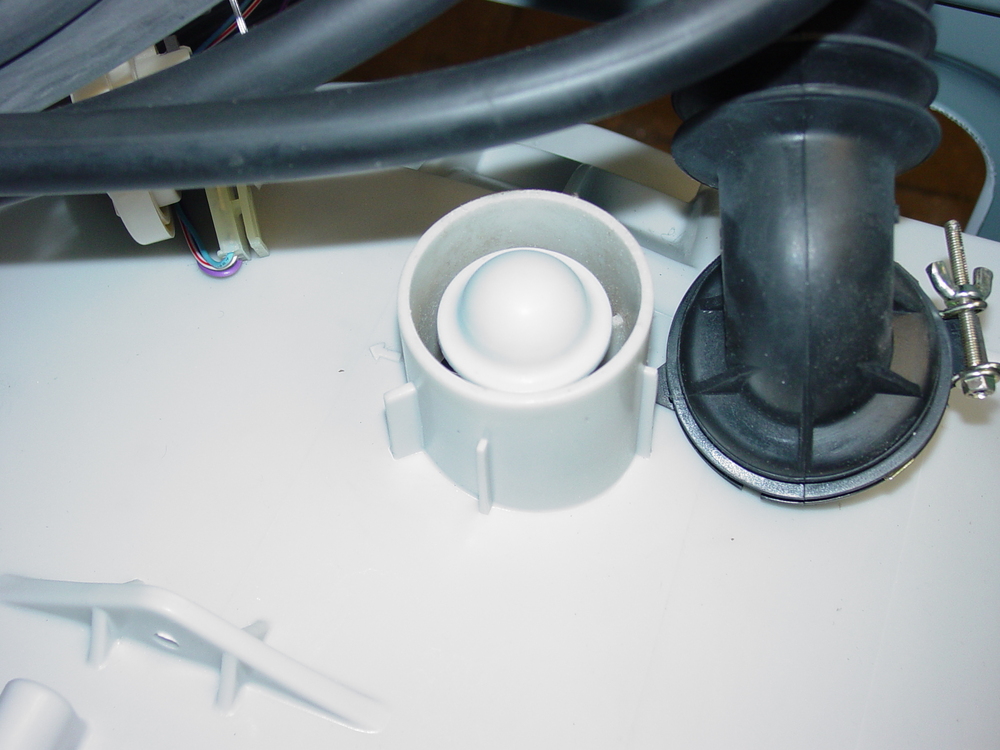
| ||
| Post# 475377 , Reply# 48 11/15/2010 at 21:26 (4,907 days old) by supremewhirlpol () | ||
|
Remove the floats->soap hose 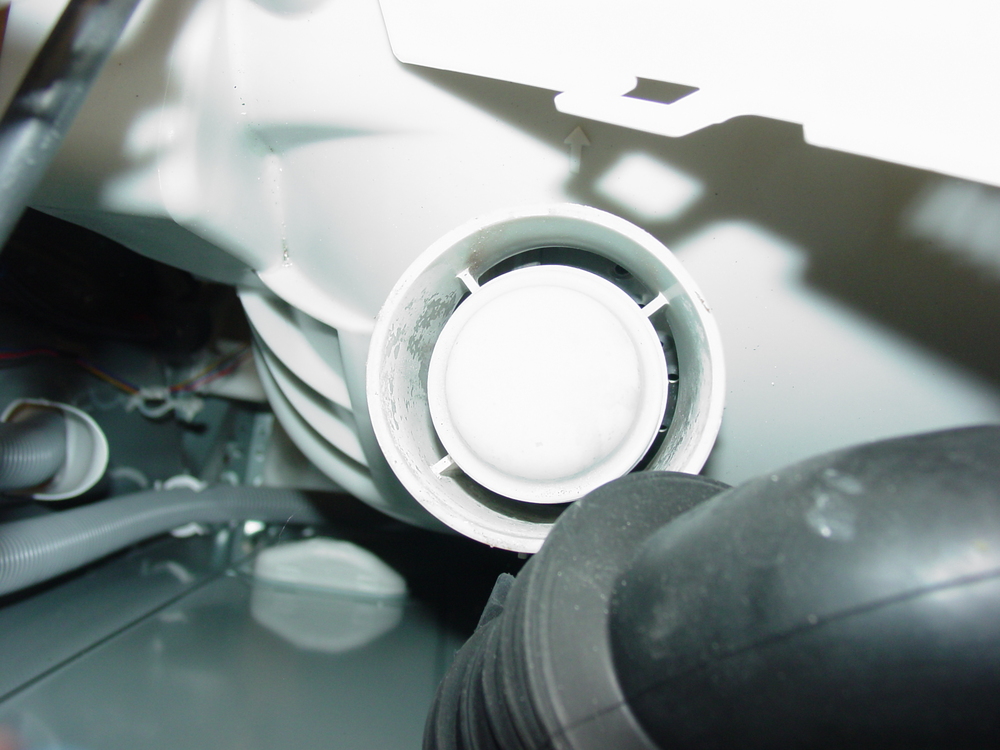
| ||
| Post# 475447 , Reply# 51 11/16/2010 at 09:47 (4,906 days old) by supremewhirlpol () | ||
|
The shocks in the front of the machine are harder to remove from the outer tub. The shocks in the front are held to the outer tub by a pin that has an indentation toward the end. -front of the pin 
| ||
| Post# 475452 , Reply# 53 11/16/2010 at 09:56 (4,906 days old) by supremewhirlpol () | ||
|
Remove the recirculation hose from the recirculation pump. This hose goes from the pump to the top of the boot. Remove the hose from the ties->it will go with the outer tub when it is removed. 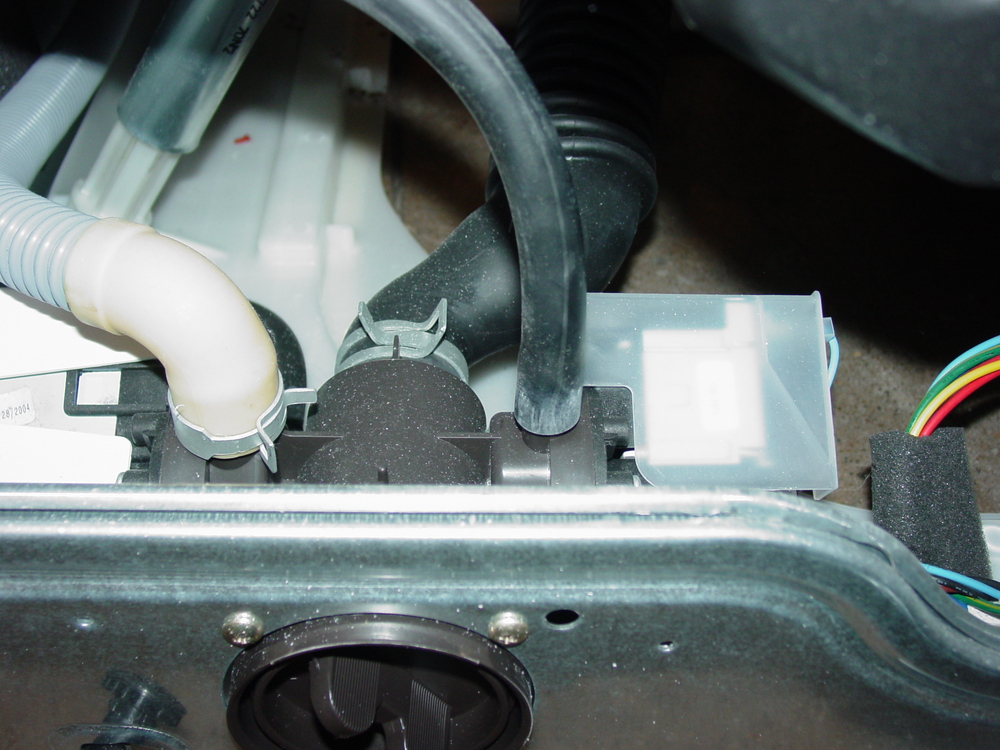
| ||
| Post# 475454 , Reply# 55 11/16/2010 at 10:05 (4,906 days old) by supremewhirlpol () | ||
|
The cabinet. 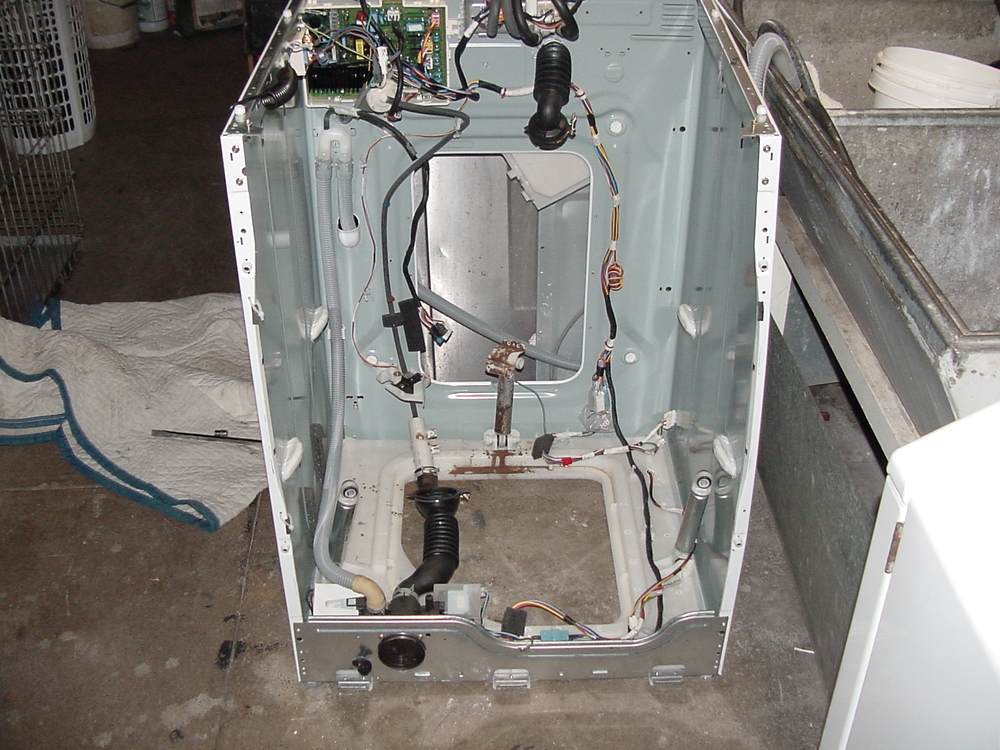
| ||
| Post# 475455 , Reply# 56 11/16/2010 at 10:07 (4,906 days old) by supremewhirlpol () | ||
|
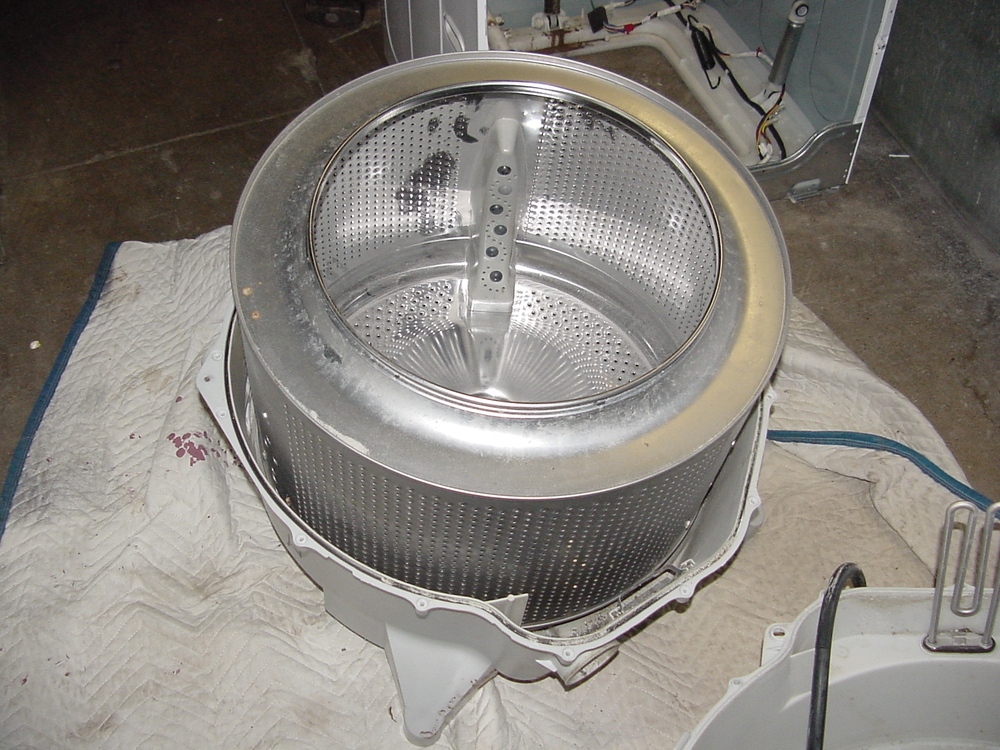
The outer tub. 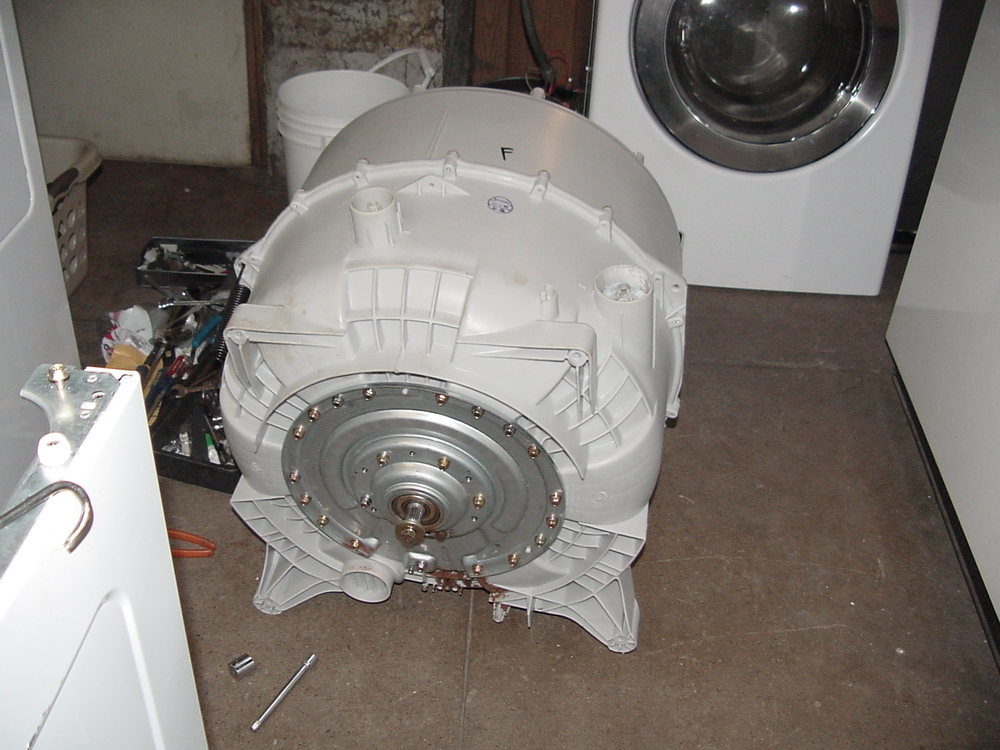
| ||
| Post# 475456 , Reply# 57 11/16/2010 at 10:10 (4,906 days old) by supremewhirlpol () | ||
|
To get to the bearings->got to disassemble the outer tub. The front of the outer is attached to the rear, by bolts->remove them. 
| ||
| Post# 475457 , Reply# 58 11/16/2010 at 10:11 (4,906 days old) by supremewhirlpol () | ||
|
Front of outer tub. 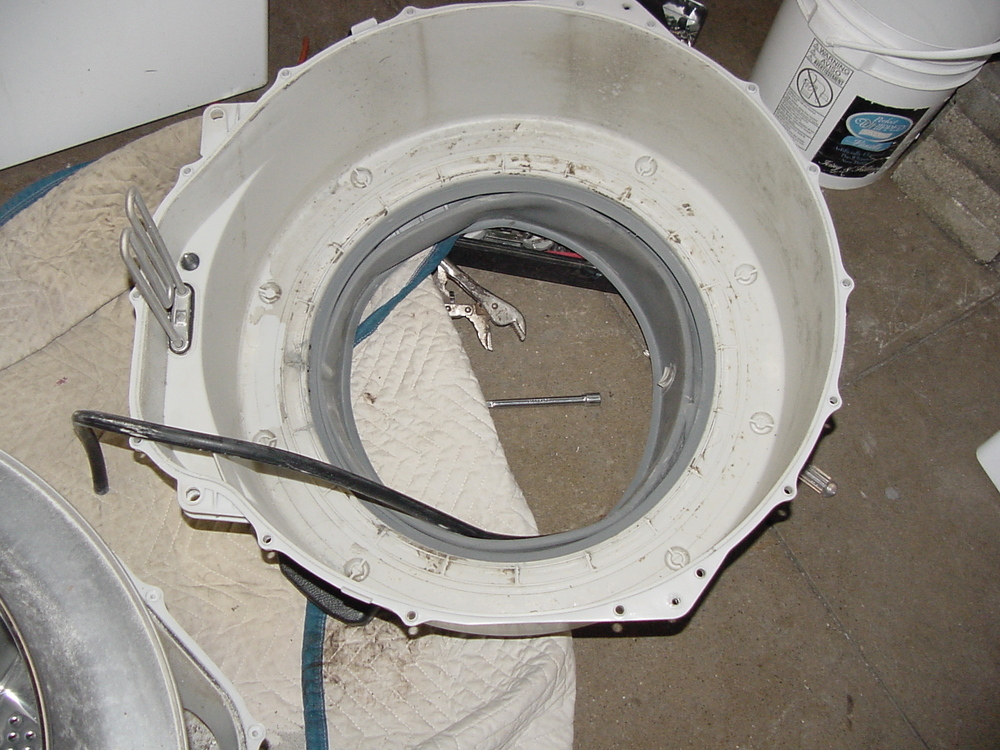
| ||
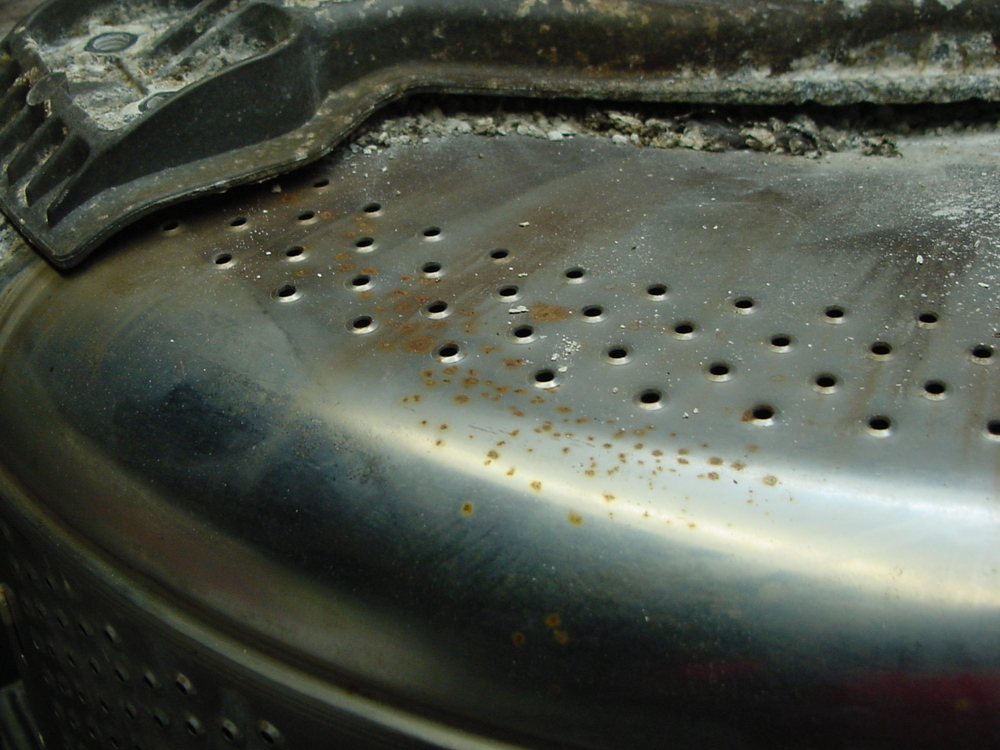
| Post# 475463 , Reply# 61 11/16/2010 at 10:27 (4,906 days old) by supremewhirlpol () | ||
|
Such poor quality! 
| ||
| Post# 475465 , Reply# 62 11/16/2010 at 10:29 (4,906 days old) by supremewhirlpol () | ||
|
more bad!! 
| ||
| Post# 475466 , Reply# 63 11/16/2010 at 10:30 (4,906 days old) by supremewhirlpol () | ||
|
. 
| ||
| Post# 475496 , Reply# 65 11/16/2010 at 12:38 (4,906 days old) by supremewhirlpol () | ||
|
Andrew: Those pictures are close to next in line. I first need to post some pictures of the base of the shaft, where it meets the spider. I've just ran out of time for now. | ||
| Post# 475572 , Reply# 67 11/16/2010 at 17:58 (4,906 days old) by supremewhirlpol () | ||
|
Soft metal...if you can call it metal. 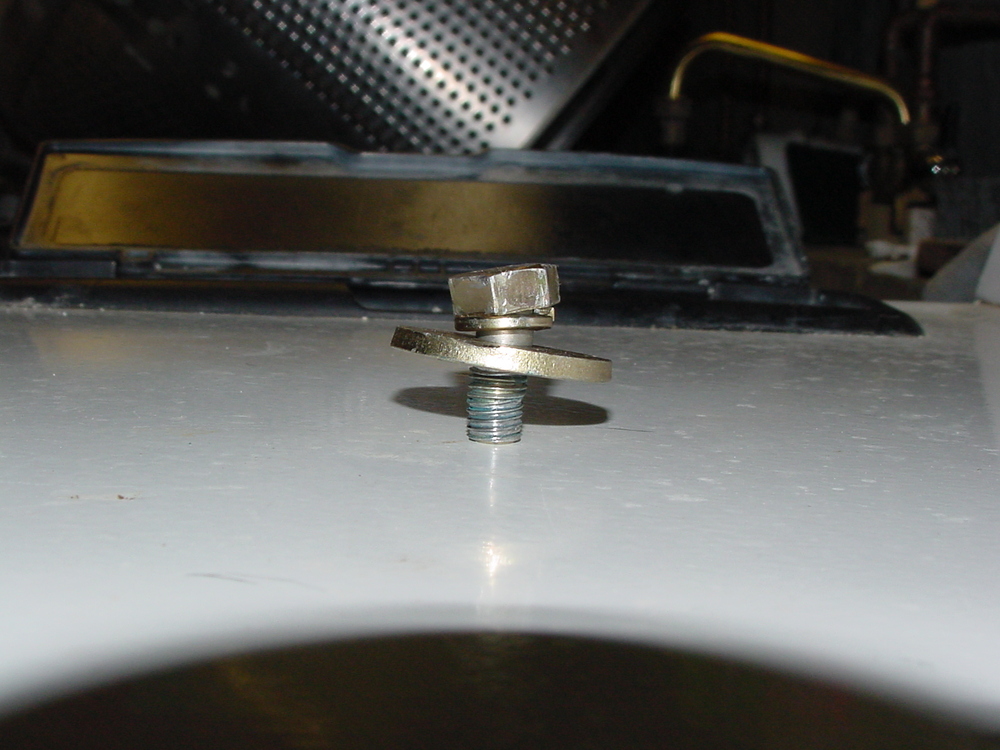
| ||
| Post# 475574 , Reply# 68 11/16/2010 at 18:00 (4,906 days old) by supremewhirlpol () | ||
|
busted threads! 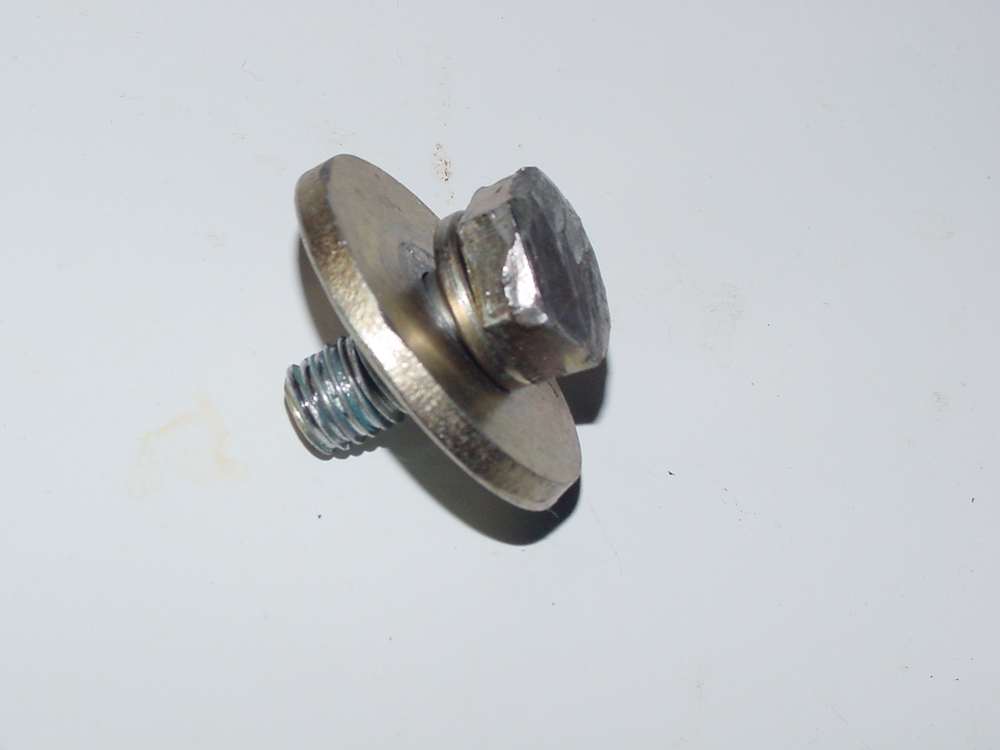
| ||
| Post# 475575 , Reply# 69 11/16/2010 at 18:02 (4,906 days old) by supremewhirlpol () | ||
|
. 
| ||
| Post# 475576 , Reply# 70 11/16/2010 at 18:05 (4,906 days old) by supremewhirlpol () | ||
|
Shaft 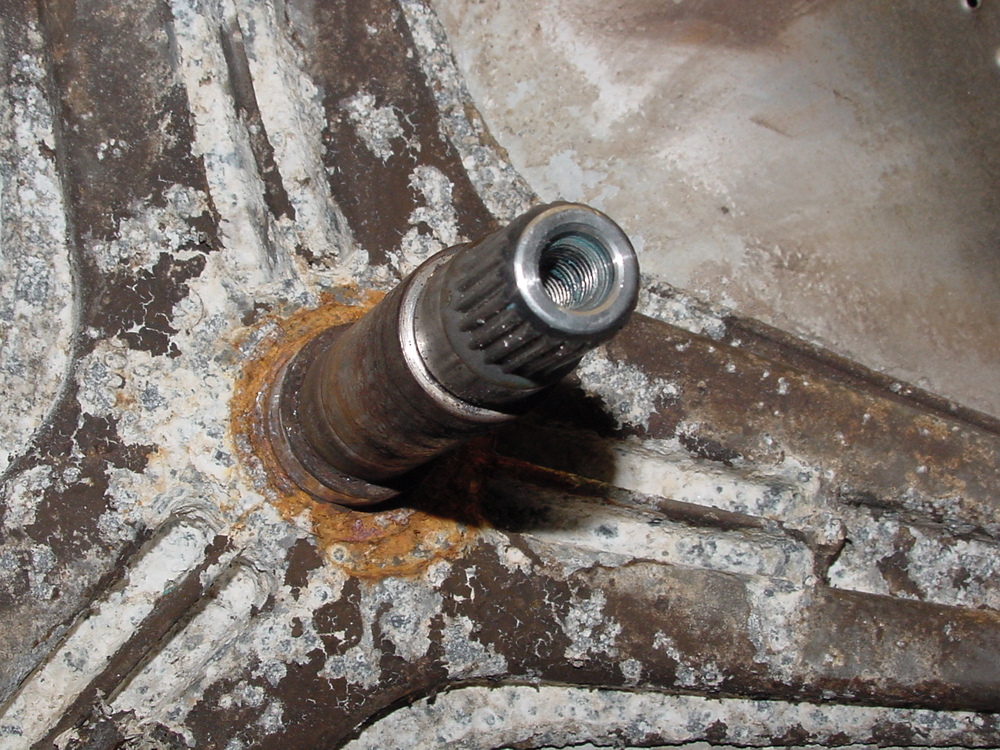
| ||
| Post# 475578 , Reply# 71 11/16/2010 at 18:08 (4,906 days old) by supremewhirlpol () | ||
|
Rust around the base. 
| ||
| Post# 475579 , Reply# 72 11/16/2010 at 18:10 (4,906 days old) by supremewhirlpol () | ||
|
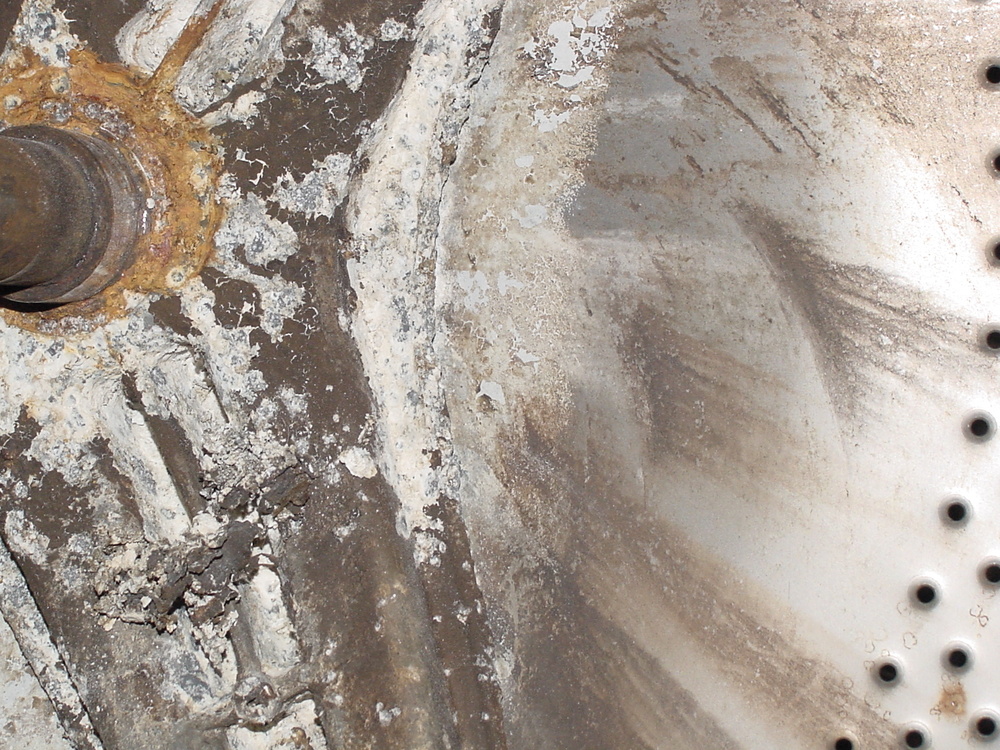
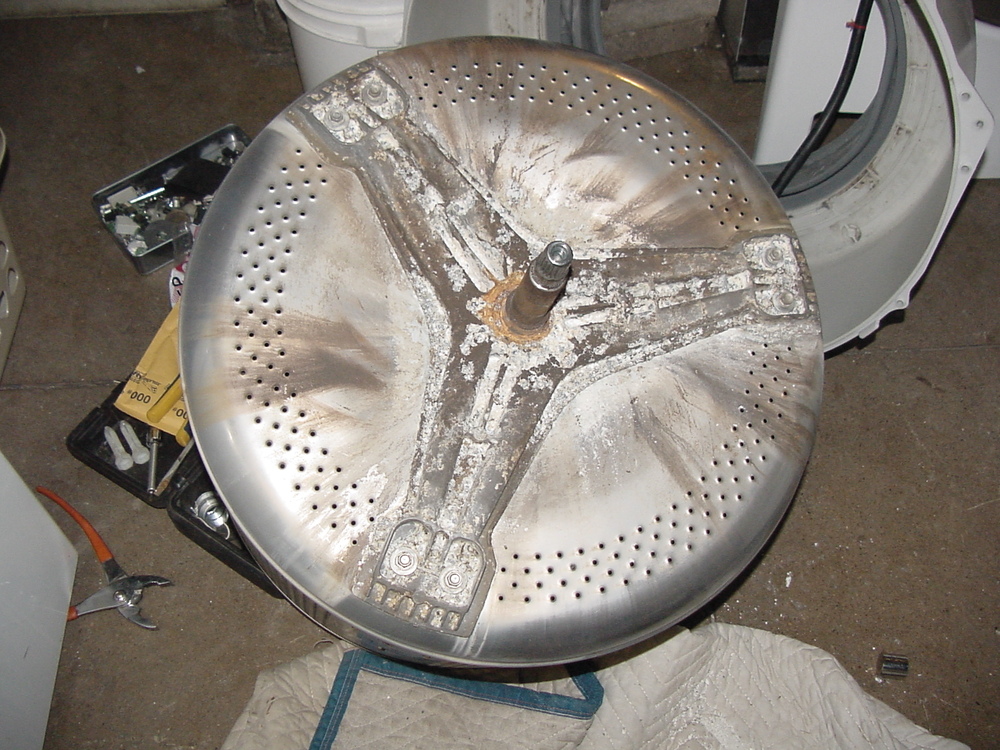
The spider is actually in very bad shape. There is nothing between the SS cylinder and the spider-> bad design!! 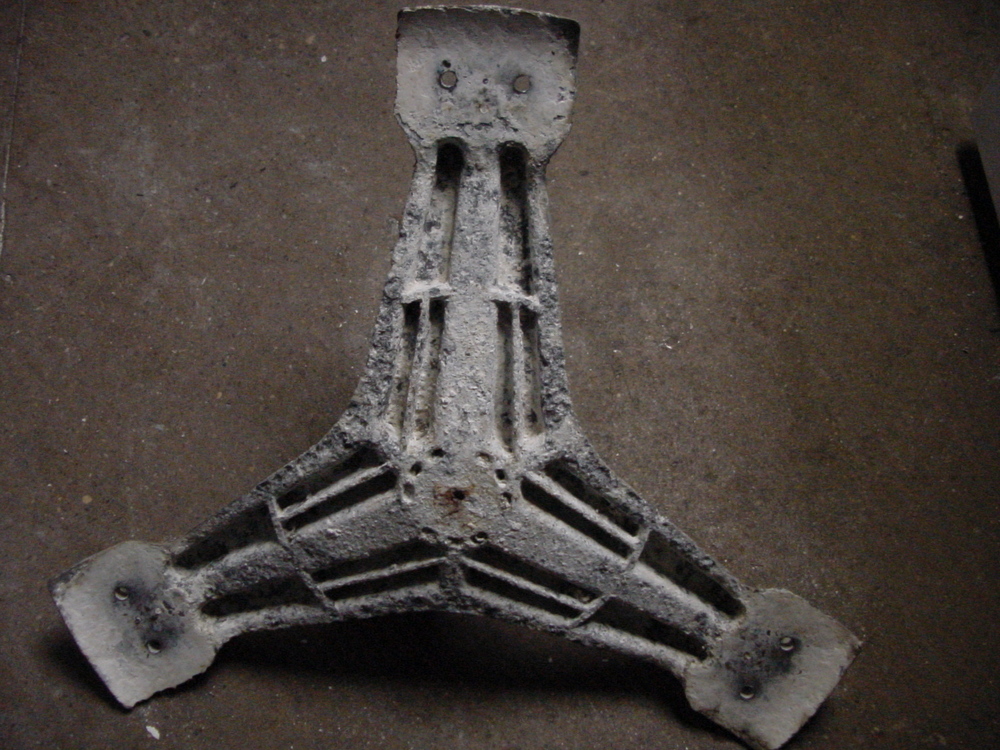
| ||
| Post# 475581 , Reply# 73 11/16/2010 at 18:12 (4,906 days old) by supremewhirlpol () | ||
|
eaten alive! 
| ||
| Post# 475583 , Reply# 74 11/16/2010 at 18:14 (4,906 days old) by supremewhirlpol () | ||
|
Yuk! 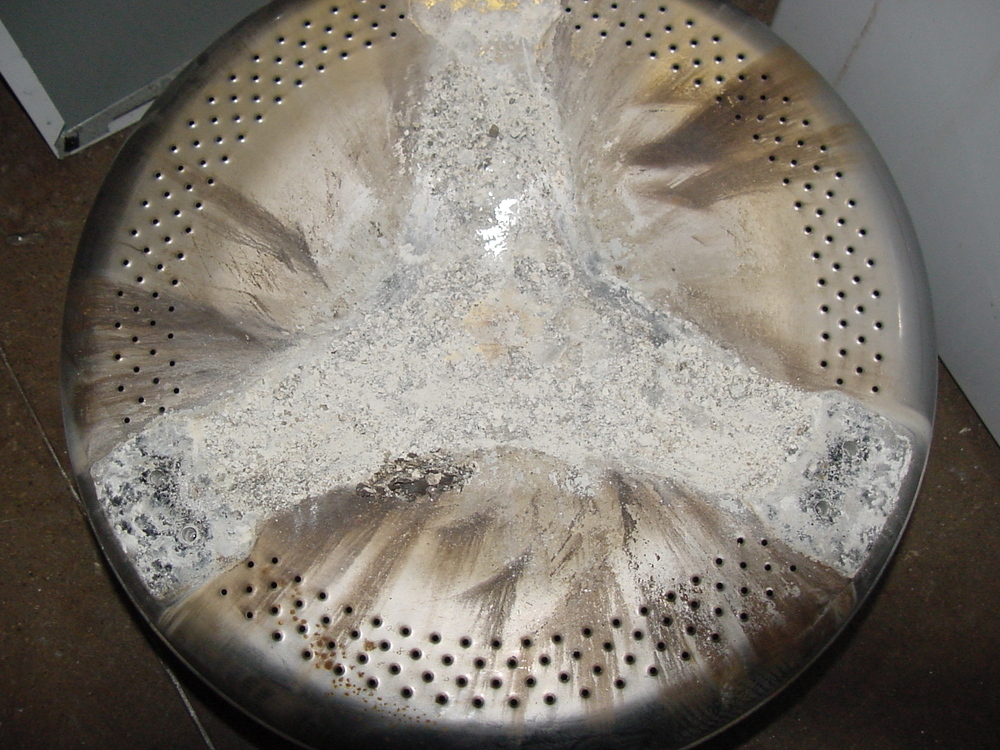
| ||
| Post# 475585 , Reply# 75 11/16/2010 at 18:16 (4,906 days old) by supremewhirlpol () | ||
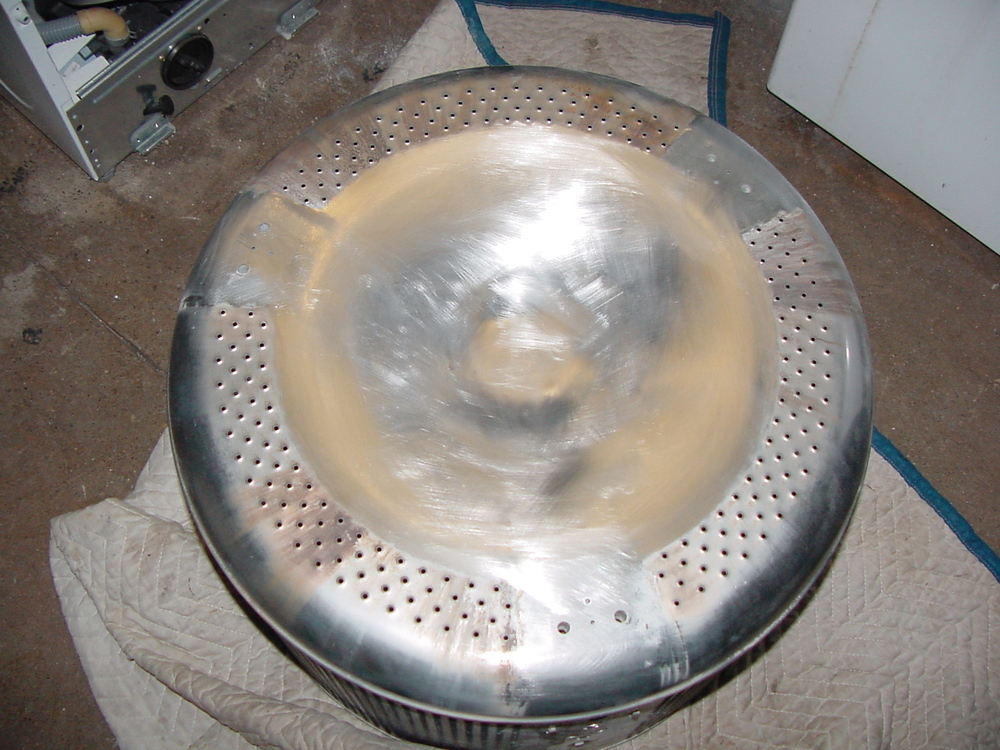
|
cylinder removed->rear part of outer tub. 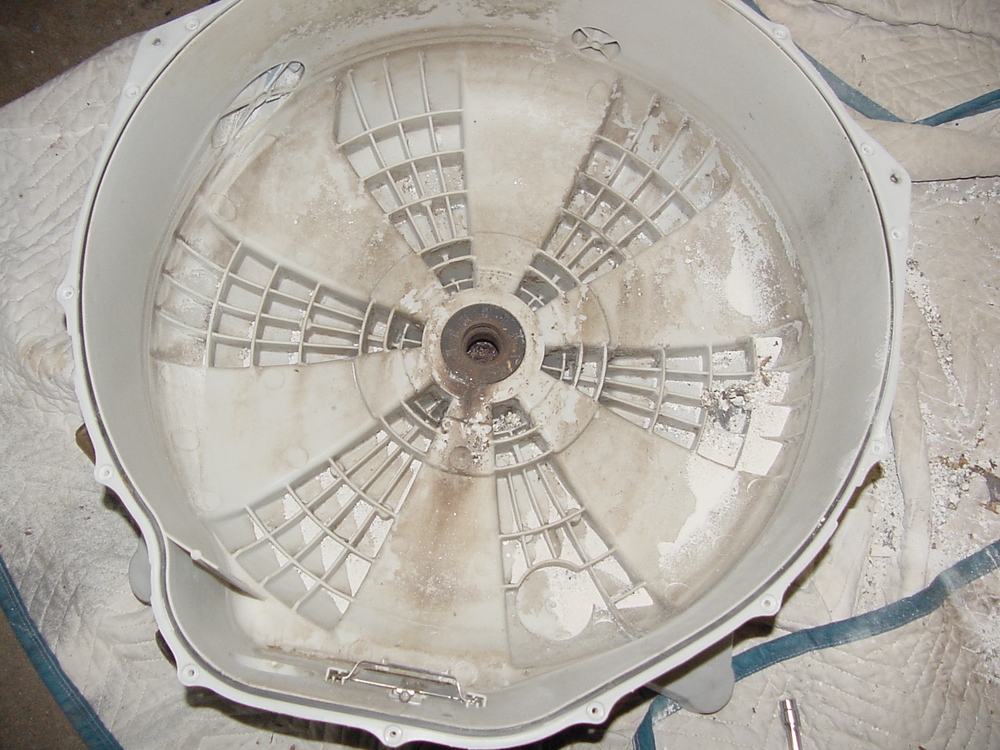
| ||
| Post# 475586 , Reply# 76 11/16/2010 at 18:18 (4,906 days old) by supremewhirlpol () | ||
|
The seal is very simple, just pry out with a screw driver-> pops right out! 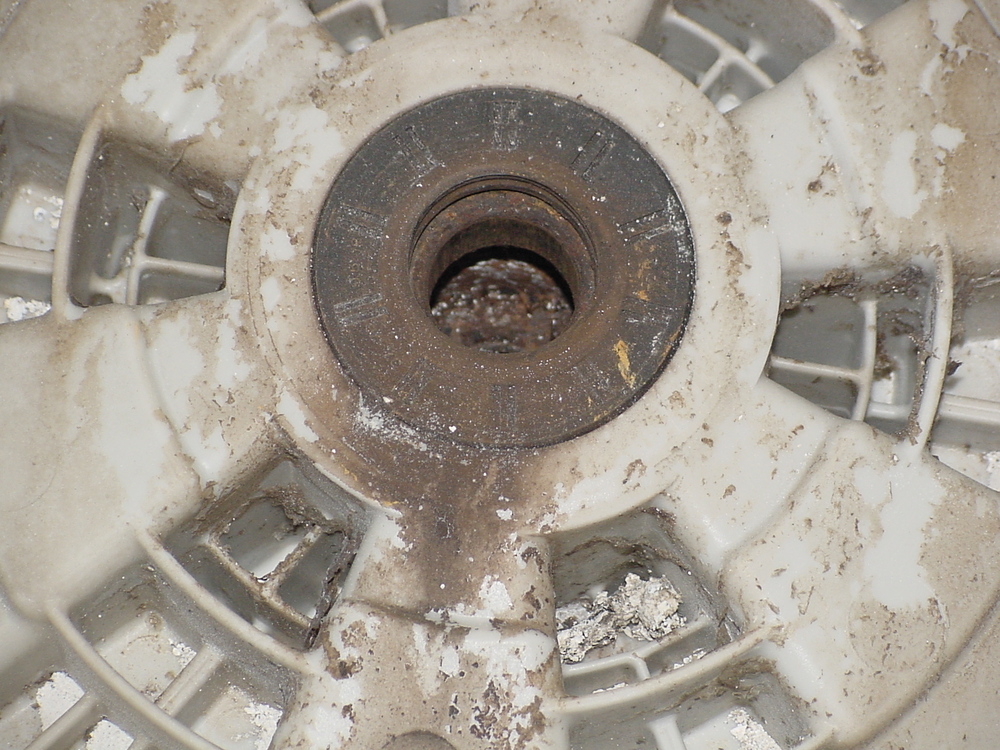
| ||
| Post# 475589 , Reply# 77 11/16/2010 at 18:23 (4,906 days old) by supremewhirlpol () | ||
|
inner bearing-> you can either get these from the manufacture if you want to pay more, or you can get them at a bearing shop. bearing is: 6305-zz, use 6305-2RS I could not find any SS bearings for this size. $8 at bearing shop $18 from sears 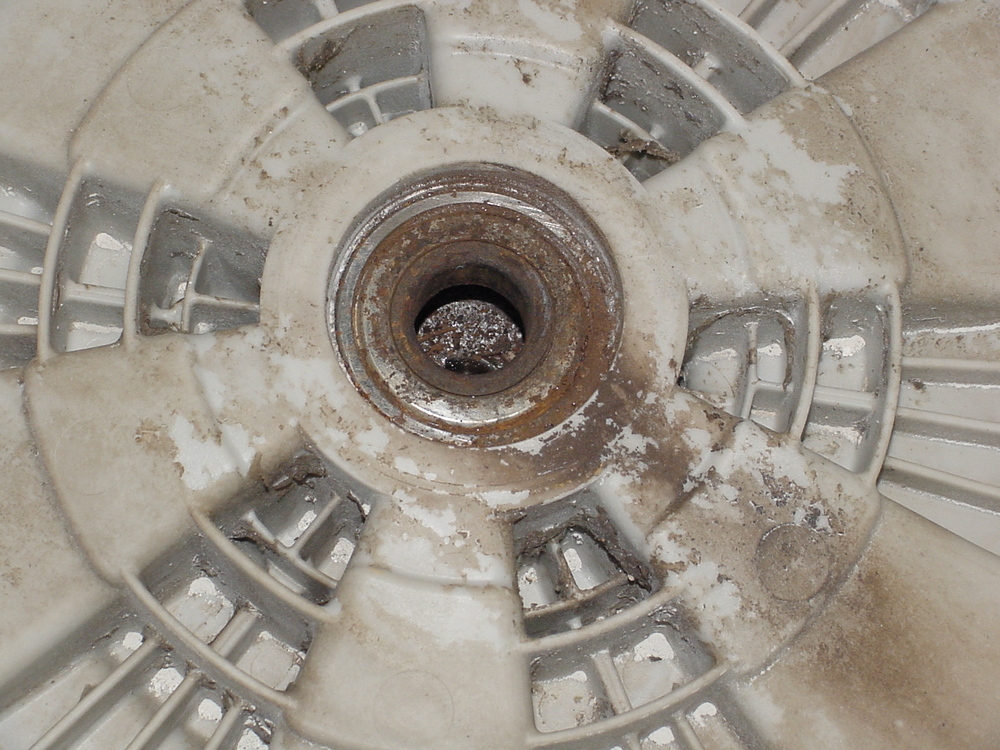
| ||
| Post# 475591 , Reply# 78 11/16/2010 at 18:30 (4,906 days old) by supremewhirlpol () | ||
|
Correction! inner bearing is 6306-z use 6306-2RS SORRY! The rear bearing is 6305-z use 6305-2RS. You can get both bearings for ~$8-$10. | ||
| Post# 475594 , Reply# 80 11/16/2010 at 18:40 (4,906 days old) by supremewhirlpol () | ||
|
rear bearing 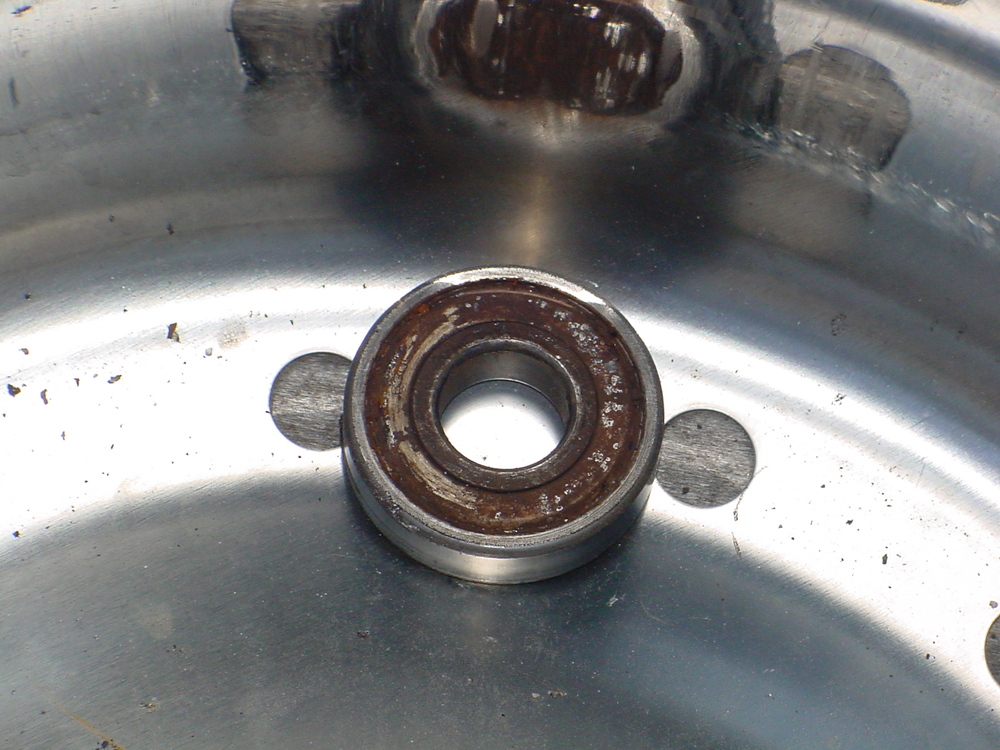
| ||
| Post# 475595 , Reply# 81 11/16/2010 at 18:41 (4,906 days old) by supremewhirlpol () | ||
|
both bearings 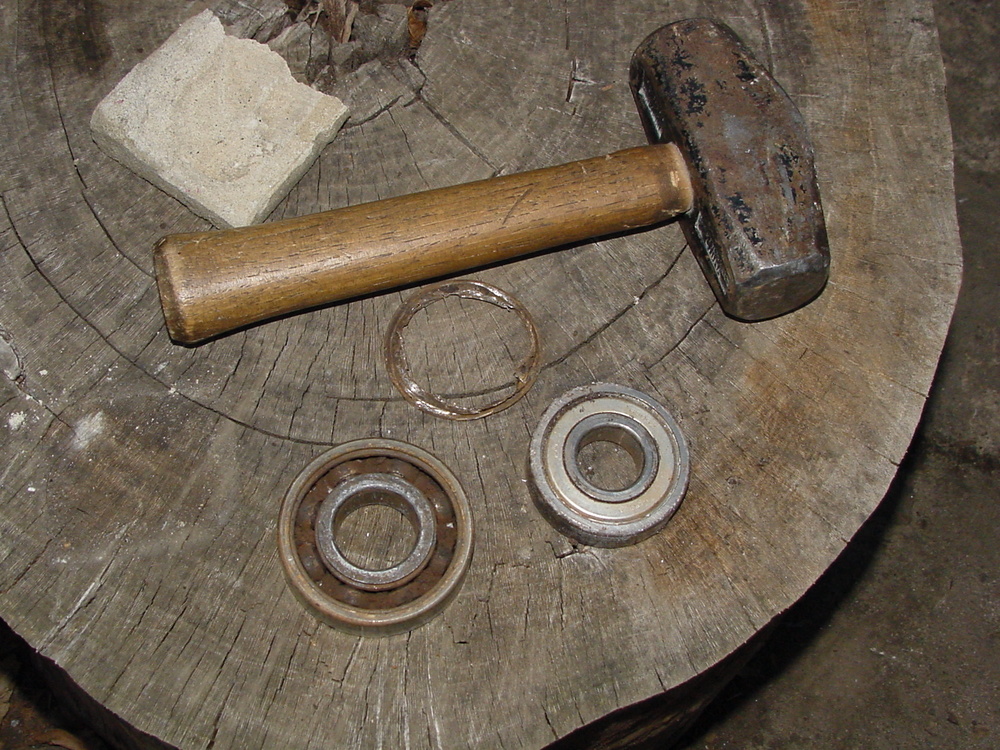
| ||
| Post# 475597 , Reply# 82 11/16/2010 at 18:44 (4,906 days old) by supremewhirlpol () | ||
|
bearings removed 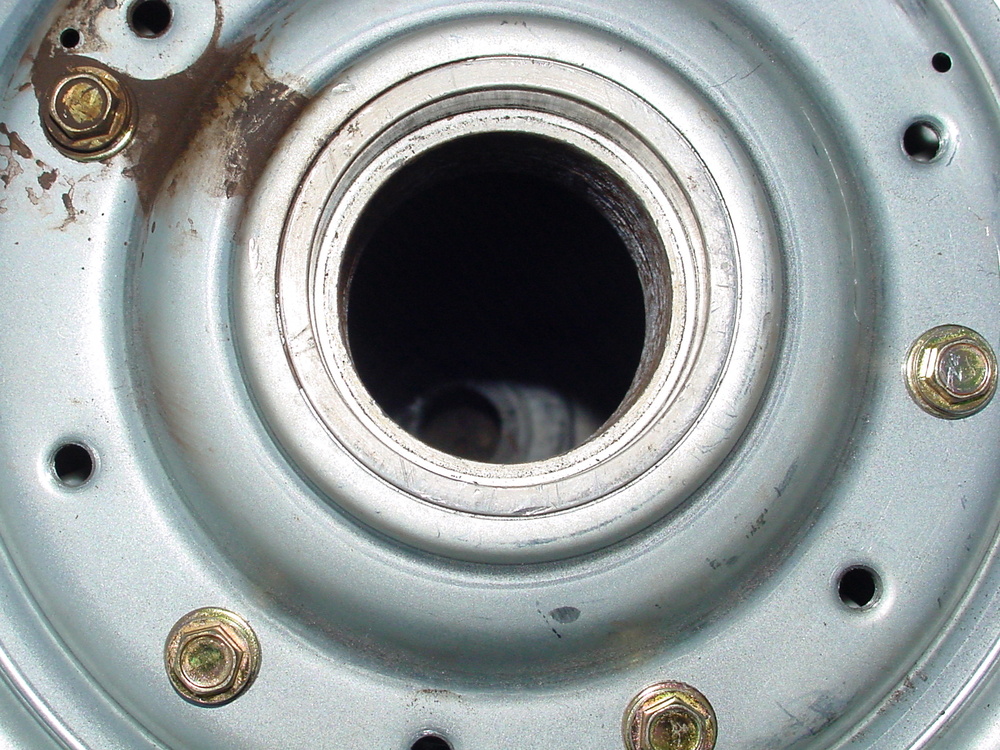
| ||
| Post# 475598 , Reply# 83 11/16/2010 at 18:46 (4,906 days old) by supremewhirlpol () | ||
|
Now have to wait until the parts get here. | ||
|
Post# 475686 , Reply# 84 11/16/2010 at 23:15 (4,906 days old) by Volvoguy87 (Cincinnati, OH) |
||
Good Lord!
This is pathetic! I remember how expen$ive those were. I can't believe a machine would be this trashed after such a short life, yet here's the proof right in front of us. The Neptune looked far more solidly built and easier to service to boot. Would you ever do this repair again on another LG of the same or a similar model?
There are no words to sufficiently express my disappointment at the quality of this washer's materials, construction, or non-service friendly design. Thanks for documenting this (and the Neptune too), Dave | ||
| Post# 475945 , Reply# 87 11/17/2010 at 20:41 (4,905 days old) by supremewhirlpol () | ||
|
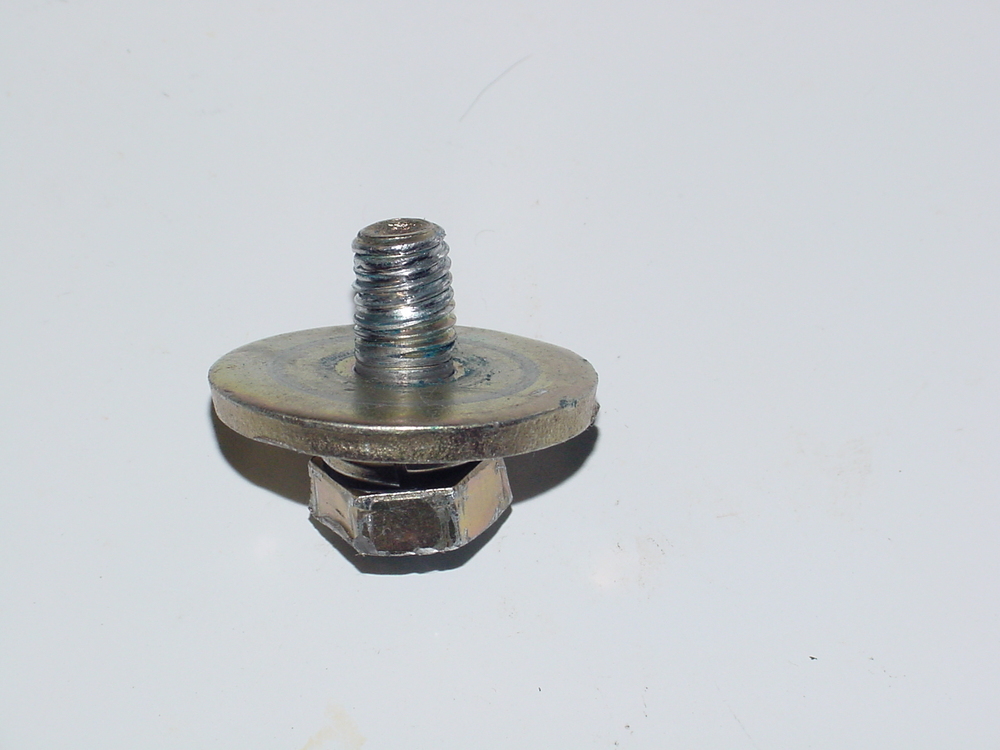
The spider and bolt arrived. 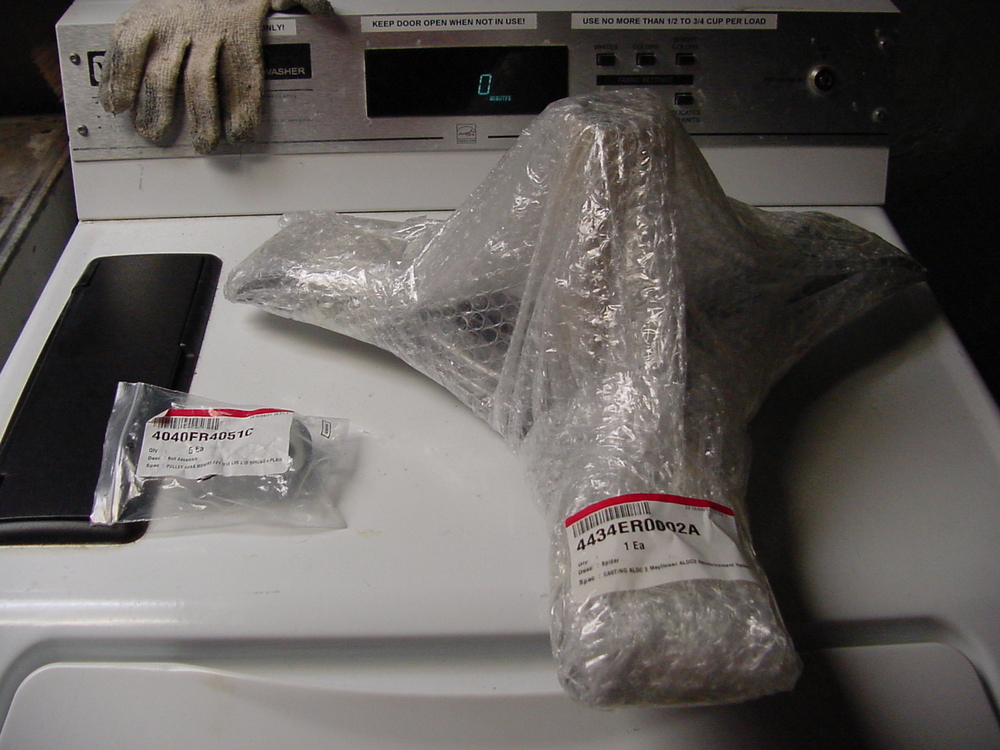
| ||
| Post# 475948 , Reply# 88 11/17/2010 at 20:42 (4,905 days old) by supremewhirlpol () | ||
|
bolt p/n: 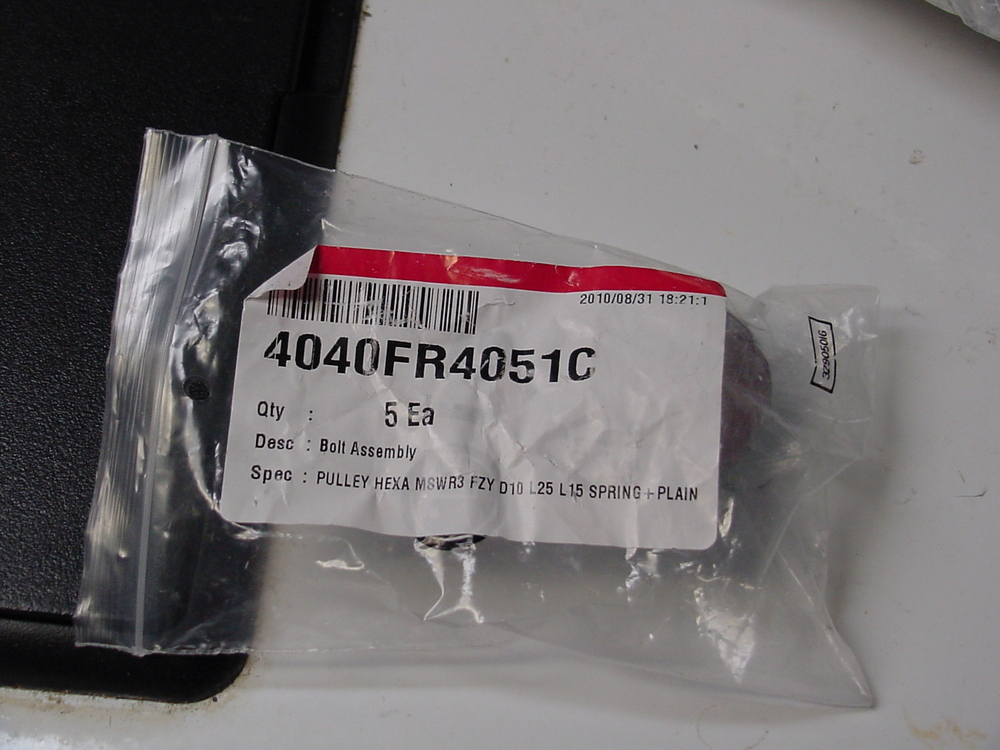
| ||
| Post# 475950 , Reply# 89 11/17/2010 at 20:44 (4,905 days old) by supremewhirlpol () | ||
|
Spider p/n 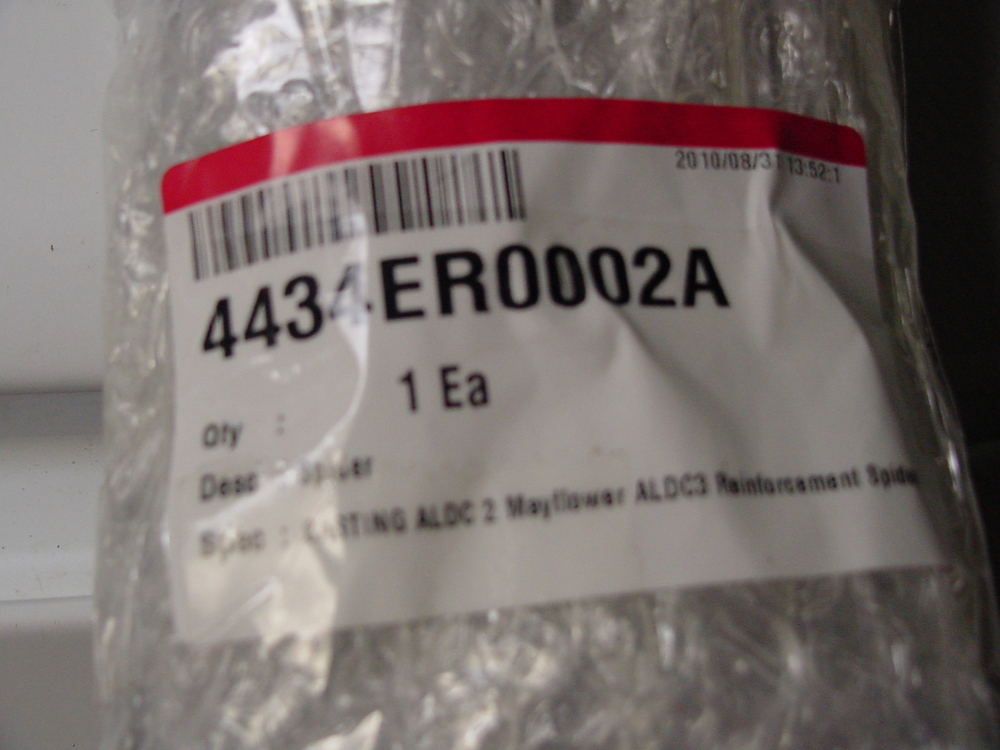
| ||
| Post# 475951 , Reply# 90 11/17/2010 at 20:45 (4,905 days old) by supremewhirlpol () | ||
|
Spider is cast Aluminum 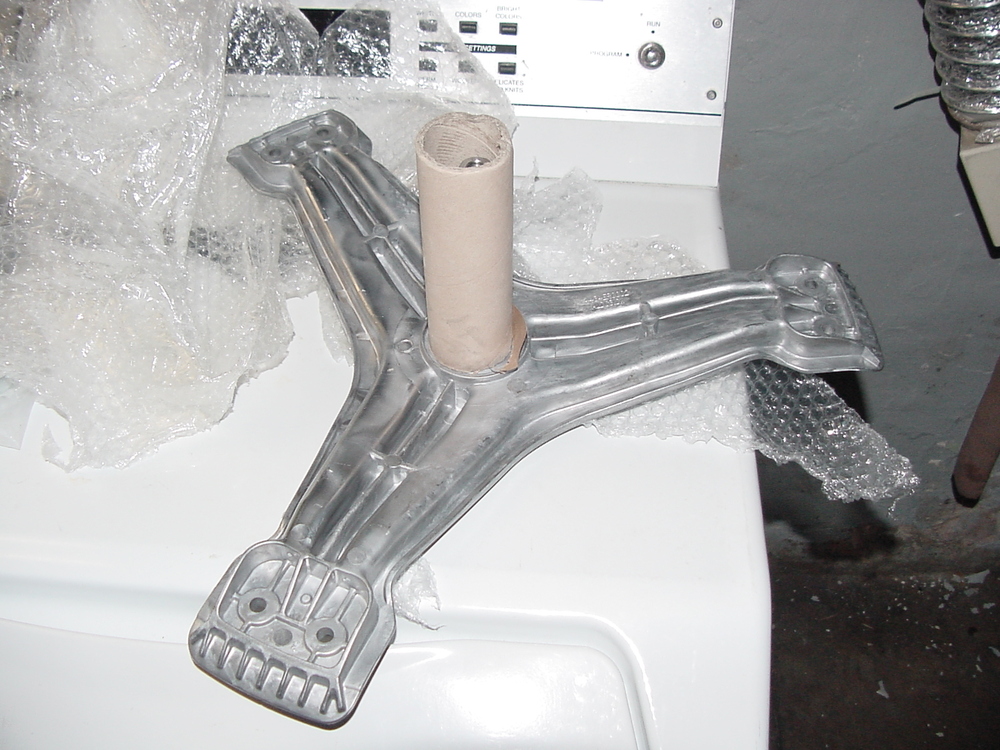
| ||
| Post# 475952 , Reply# 91 11/17/2010 at 20:46 (4,905 days old) by supremewhirlpol () | ||
|
Shaft 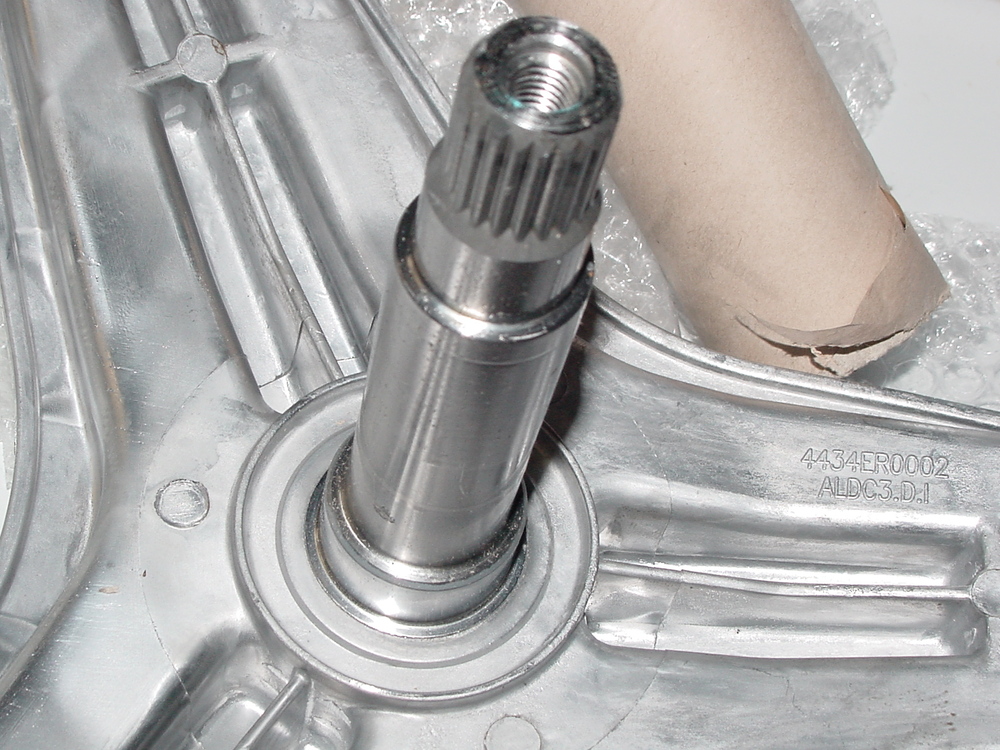
| ||
| Post# 475953 , Reply# 92 11/17/2010 at 20:47 (4,905 days old) by supremewhirlpol () | ||
|
other side 
| ||
| Post# 475955 , Reply# 93 11/17/2010 at 20:50 (4,905 days old) by supremewhirlpol () | ||
|
Before the new spider is attached-> need to change the design a bit. Still waiting for bearings. | ||
| Post# 475966 , Reply# 94 11/17/2010 at 21:32 (4,905 days old) by nmassman44 (Brooksville Florida) | ||

Well for one thing that was fast getting the parts that you needed to fix that washer. 2nd OMG the corrosion on that spider is unbelievable. I am wonder what they used for detergent and if they used chlorine bleach. I have to ask...the front counterweights are they cast iron? I always thought that Miele had used cast iron exclusively for its counterweights. Very interesting repair job...
| ||
| Post# 475967 , Reply# 95 11/17/2010 at 21:34 (4,905 days old) by nmassman44 (Brooksville Florida) | ||
|
| ||
| Post# 476009 , Reply# 98 11/18/2010 at 02:08 (4,905 days old) by mark_wpduet (Lexington KY) | ||
Wow
As I was scrolling down the pictures, I was just waiting to see as you tore that machine apart what the spider would look like, cuz I knew it was going to be made out of aluminum. I think we would all be hard pressed to find a front load washer that doesn't make its spiders out of aluminum. I think they all do, with the exception of Miele or SQ......(Not sure about those).........But it is a mystery about those spiders; some people have front load washers with spiders made out of aluminum that are twelve years old and still working fine. I don't get it. I shudder to think what the spider in my six year old Duet must look like.
| ||
|
Post# 476042 , Reply# 99 11/18/2010 at 08:36 (4,904 days old) by logixx (Germany) |
||
Perfect thread illustrating how LG is all about bling-bling, color screens, end-of-cycle tunes etc. but not so much about quality.
I recently saw a documentary on TV that stated that the average Korean consumer replaces his cell phone after one or two years because its technology and features are "old" or simply because it's no longer in vogue. LG is probably trying to get the American consumer to replace their washers for the same reasons AND at the same pace... Too bad. | ||
|
Post# 476052 , Reply# 100 11/18/2010 at 09:46 (4,904 days old) by bajaespuma (Connecticut) |
||
Thank you extremely much | ||
| Post# 476130 , Reply# 101 11/18/2010 at 15:08 (4,904 days old) by supremewhirlpol () | ||
|
I think the reason for the extreme corrosion is that the spider is directly attached to the stainless steel cylinder. There is nothing like plastic or spacers between the two metals. | ||
| Post# 476138 , Reply# 102 11/18/2010 at 16:35 (4,904 days old) by vivalalavatrice () | ||
|
Neither I could have been so good at doing this And it's almost my daily work! Very good job on a Tromm. BYE Diomede | ||
| Post# 476214 , Reply# 104 11/18/2010 at 23:33 (4,904 days old) by powerfin64 (Yakima, Washington) | ||
I too, am a LG owner...
I've been reading all the post's on this thread, and yes I am very happy with my LG washer(model WM2050CW)which is just now 7 months old, and come to find out, its been discontinued and replaced with Model WM2140CW.(with 6 motion wash action)
It shocks me beyond belief how in just the 4-5 years what problems arose and corrosion did such damage! Thank you for all the instructional posts on what your doing to get this LG back to life again. Rich | ||
|
Post# 476238 , Reply# 105 11/19/2010 at 03:58 (4,904 days old) by logixx (Germany) |
||
|
| ||
| Post# 476257 , Reply# 106 11/19/2010 at 07:45 (4,903 days old) by macboy91si (Frankfort, KY) | ||
|
Sometimes Truth Hurts
I enjoy your posts about this, and the ranting about Korean cheapness. Having owned a Hyundai and a Chevy Aveo as of recent I can expensively vouch that most products from that region look much nicer than they are. The LG washer you have is shocking, and I also can't see how anyone would stand behind it. That said, people like things for their own reasons and it's impossible to pry them off of it. Take aircooled VW's. The cars have a reputation of bursting into flames because of a brass fuel inlet nipple that's merely PRESSED into the soft aluminum carburetor top. I'll give you 2 guesses what happens after a few years of vibration with that setup and a red hot engine below the fuel line. Still people love them, with all of their valve adjustments and other oddities. While I don't think this is quite the same, logic would suggest that people would run far away, but logic is not always the holding factor there. I think VW's are VERY neat cars, but I'd probably never actually own one. I don't think you should tone it down at all, as the WORN OUT saying goes from Forrest Gump: "Stupid is as stupid does", I think if a company puts out a crappy product, the bashing that ensues is par for the course. At least this was an inexpensive machine for you and not a $15000 car that you realized that they made the transmission out of dog food...
Sometimes I'm a bitter person... -Tim | ||
| Post# 476357 , Reply# 108 11/19/2010 at 18:33 (4,903 days old) by supremewhirlpol () | ||
|
Alexander(logixx) I surely hope they did, but something tells me not so. There's only one way to see->find one on CL for cheap-> bust it open. I'll keep my eye out-> I did see a new Samsung FL on there several weeks ago->it had issues as well. | ||
| Post# 476489 , Reply# 110 11/20/2010 at 14:49 (4,902 days old) by electron1100 (England) | ||
LG machines
Hi from across the pond, thanks for posting these pictures of this machine.
I work at re-cyling centre and every LG machine that has come in has been dumped because of bearing failure, like you i tend think that these glitterboxes are cheaply made and not repairman freindly at all. Though the same can be said of many modern machines not just LG. So much emphasis is placed on superflous features and technology as if to guide prospective purchasers away from issues as reliability and build qaulity. It is a joke however that LG make such a big thing about how there machines balance loads so well for spinning and yet they suffer from bearing seal failure and bearings and in some cases this then takes out the motor aswell It is good that you have taken the trouble to show at least one very aggressive companies machine in the light of day. Gary | ||
| Post# 476493 , Reply# 111 11/20/2010 at 14:59 (4,902 days old) by electron1100 (England) | ||
|
The Dual 701 turntable
@ whirlcool
Hi I remember the Dual 701 direct drive turntables ;-) beautifully built decks came with a Shure V15 mk3 cartridge as standard over here. Duals claim to fame with their direct drive motor was that it did not cog as it rotated due to Hall Effect transistors being used to switch the current between coils smoothly so the rotor then rotated smoothly rather than cogging as it rotated which other designs did, though this was never a problem in reality as long as a suitably heavy platter was used to iron out the power pulses. Hitachi sort of copied the idea later on in the 1970s with what they called "Unitorque" Innovation eh ;-) 
| ||
|
Post# 476503 , Reply# 112 11/20/2010 at 16:38 (4,902 days old) by DADoES (TX,�U.S. of A.) |
||
|
| ||
|
Post# 476950 , Reply# 114 11/22/2010 at 14:16 (4,900 days old) by DADoES (TX,�U.S. of A.) |
||
|
| ||
| Post# 477154 , Reply# 115 11/23/2010 at 20:30 (4,899 days old) by supremewhirlpol () | ||
|
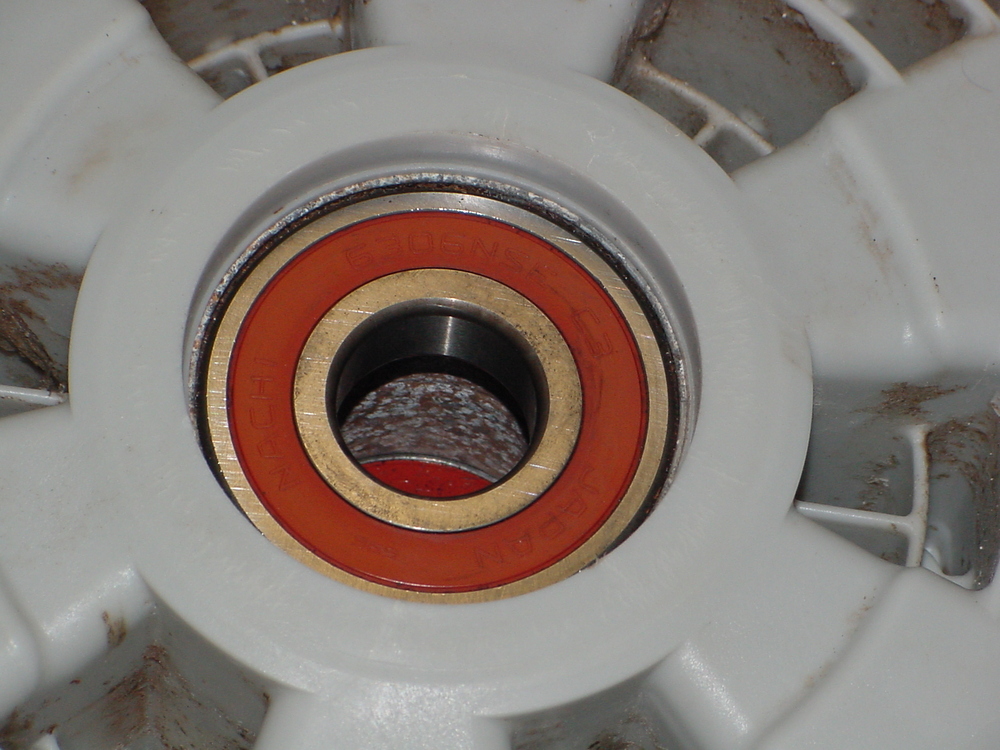
ok...I'm not so sure what the Brushless DC PWM has to do with replacing the bearings in this machine. -> MOVING ON!! I'm using Nachi bearings this time. 
| ||
| Post# 477155 , Reply# 116 11/23/2010 at 20:31 (4,899 days old) by supremewhirlpol () | ||
|
. 
| ||
| Post# 477160 , Reply# 118 11/23/2010 at 21:34 (4,899 days old) by cornutt (Huntsville, AL USA) | ||
|
Are you going to alodyne the spider? | ||
| Post# 477549 , Reply# 120 11/25/2010 at 21:50 (4,897 days old) by supremewhirlpol () | ||
|
The cylinder has issues too. Is it me or does this seem like its not totally SS 
| ||
|
Post# 477557 , Reply# 122 11/25/2010 at 22:27 (4,897 days old) by wiskybill (Canton, Ohio) |
||
|
thinking out loud...... Would it be possible to have the spider coated like a dishwasher rack? Might also serve to isolate it from the drum. | ||
| Post# 477601 , Reply# 123 11/26/2010 at 05:15 (4,897 days old) by dj-gabriele () | ||
|
Gosh! I already didn't like LG for whitegoods but after seeing those photos I'm never going to even consider the most remote idea of getting a machine of theirs! Thank you very much for this fantastic contribution! | ||
| Post# 477882 , Reply# 124 11/27/2010 at 14:24 (4,895 days old) by supremewhirlpol () | ||
|
Gabriele: Run!! Run while you can. Horsey LGs will attempt to back kick you and defecate on the very floor that it sits on. Don't stand too close it might give you rabies or something. Now that I'm looking at the front of him again, He looks kinda crazy. | ||
| Post# 477886 , Reply# 125 11/27/2010 at 14:54 (4,895 days old) by fordtech () | ||
|
That is definitely the rustiest stainless I think I have seen unless that is just rust colored washer poop on it.. | ||
| Post# 478669 , Reply# 130 12/1/2010 at 09:58 (4,891 days old) by supremewhirlpol () | ||
|
3beltwesty: Did you read my post above? Please tell me what you think this thread is about. | ||
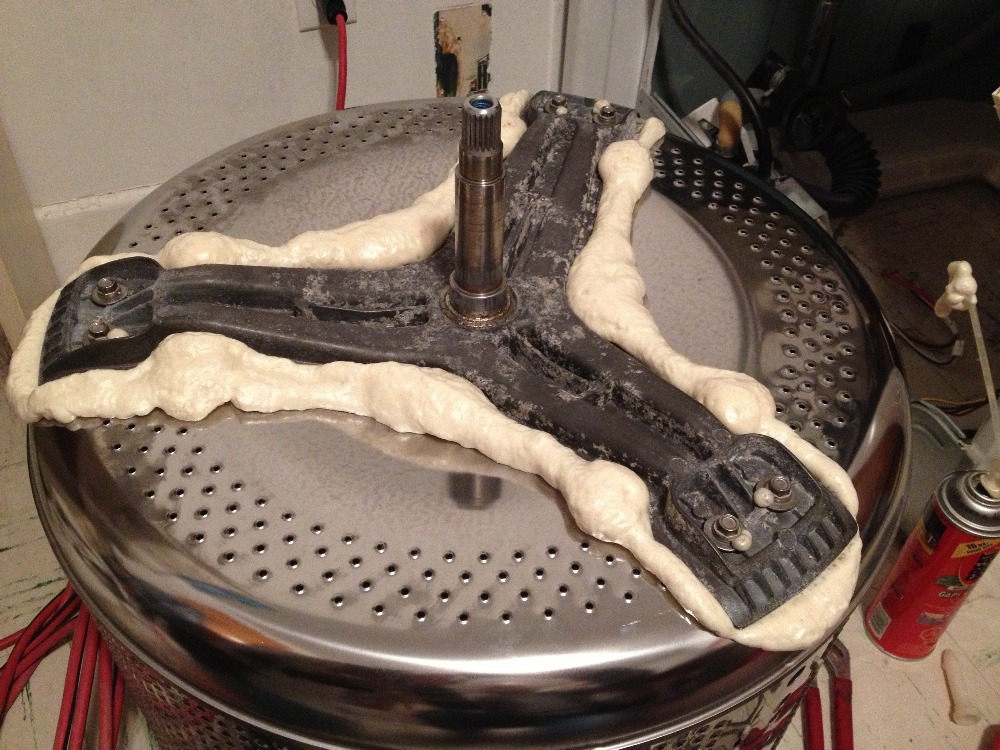
| Post# 478954 , Reply# 136 12/2/2010 at 11:48 (4,890 days old) by supremewhirlpol () | ||
|
Prepare the spider: I prepare the spider by covering the shaft and leaving just a little exposed at the base. 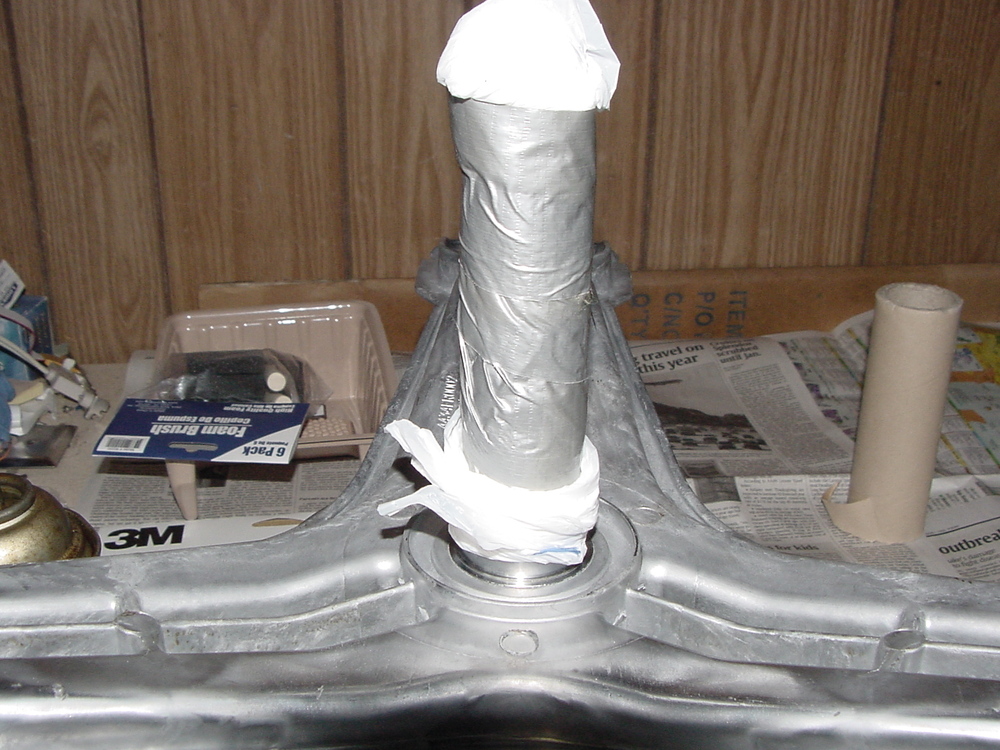
| ||
| Post# 478955 , Reply# 137 12/2/2010 at 11:52 (4,890 days old) by supremewhirlpol () | ||
|
Clean the metal. I use 150 git sand paper and sand the spider lightly. 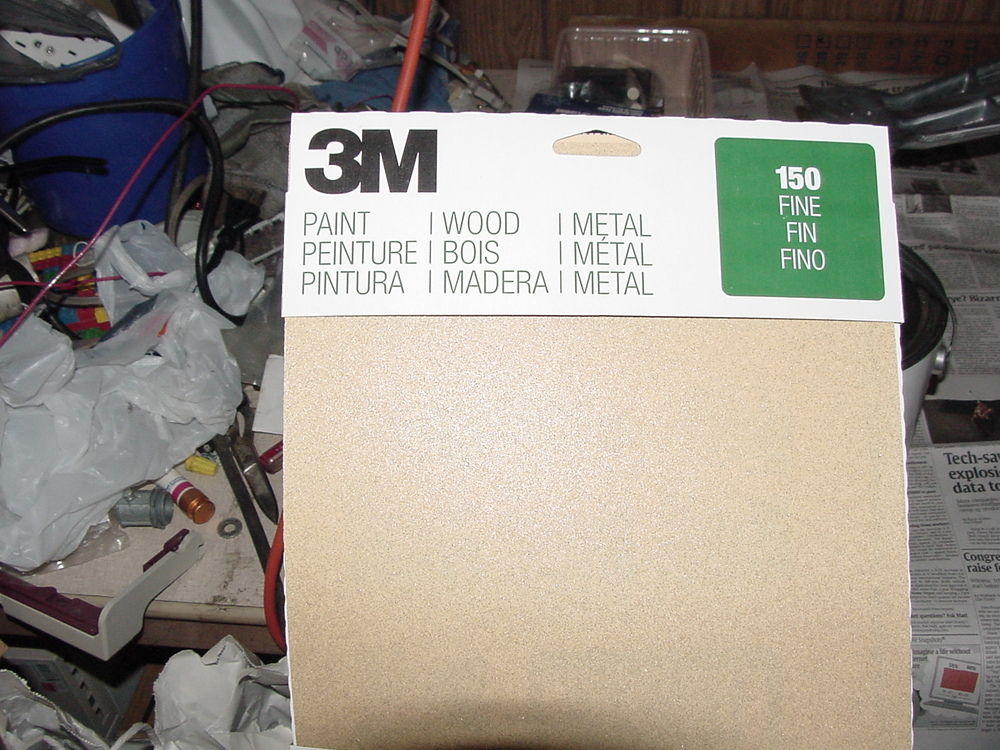
| ||
| Post# 478957 , Reply# 138 12/2/2010 at 11:57 (4,890 days old) by supremewhirlpol () | ||
|
Next I apply degreaser to clean the metal from oils touching it, metal fragments, etc. 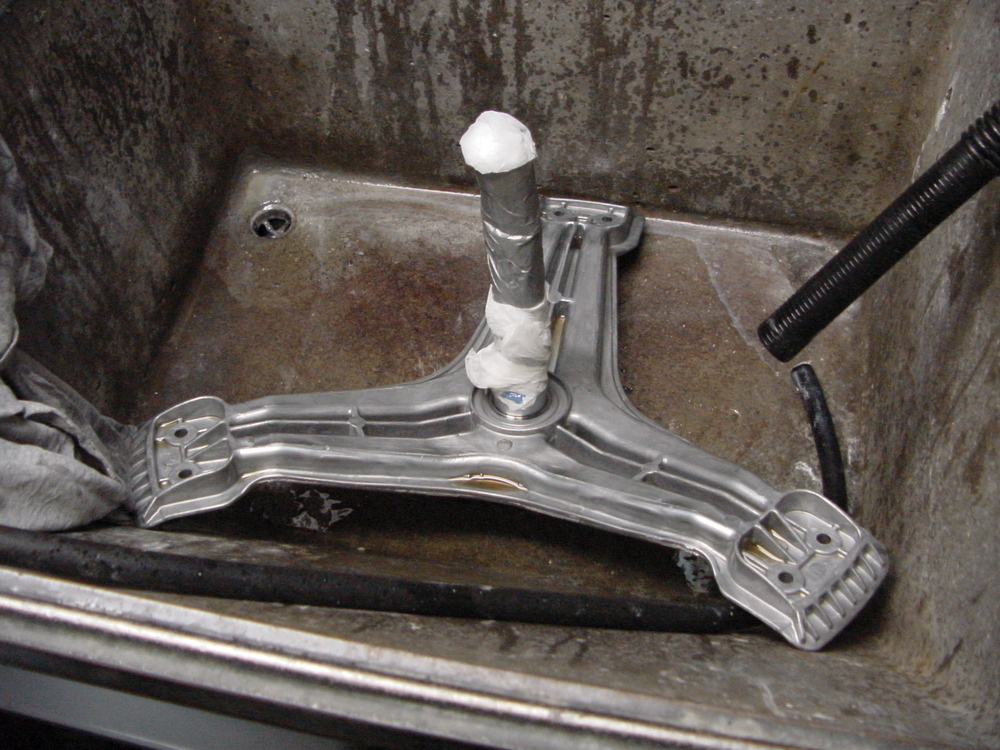
| ||
| Post# 478961 , Reply# 139 12/2/2010 at 12:00 (4,890 days old) by supremewhirlpol () | ||
|
Rinse really good with water, and let dry. I use a hair dryer to get the crevices. 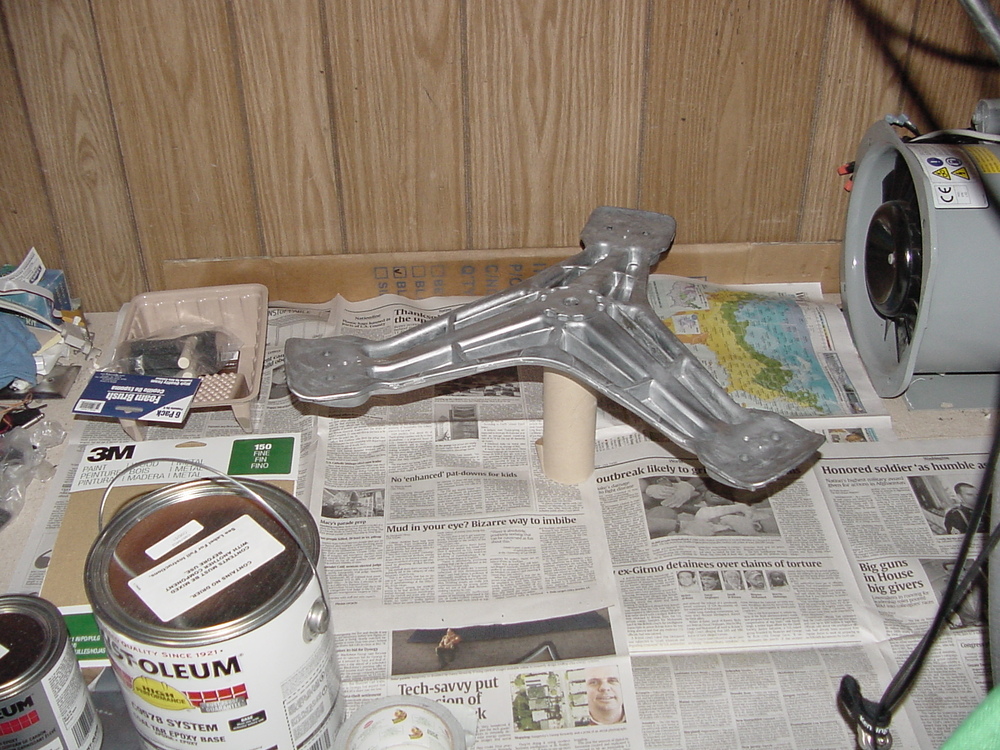
| ||
| Post# 478962 , Reply# 140 12/2/2010 at 12:05 (4,890 days old) by supremewhirlpol () | ||
|
Follow the directions when using this stuff. Like I say above, it is some nasty stuff to get on the skin. Use gloves, protect yourself from it. Oh, and it does stink. The fumes WIll make you dizzy, so use in well ventilated area. 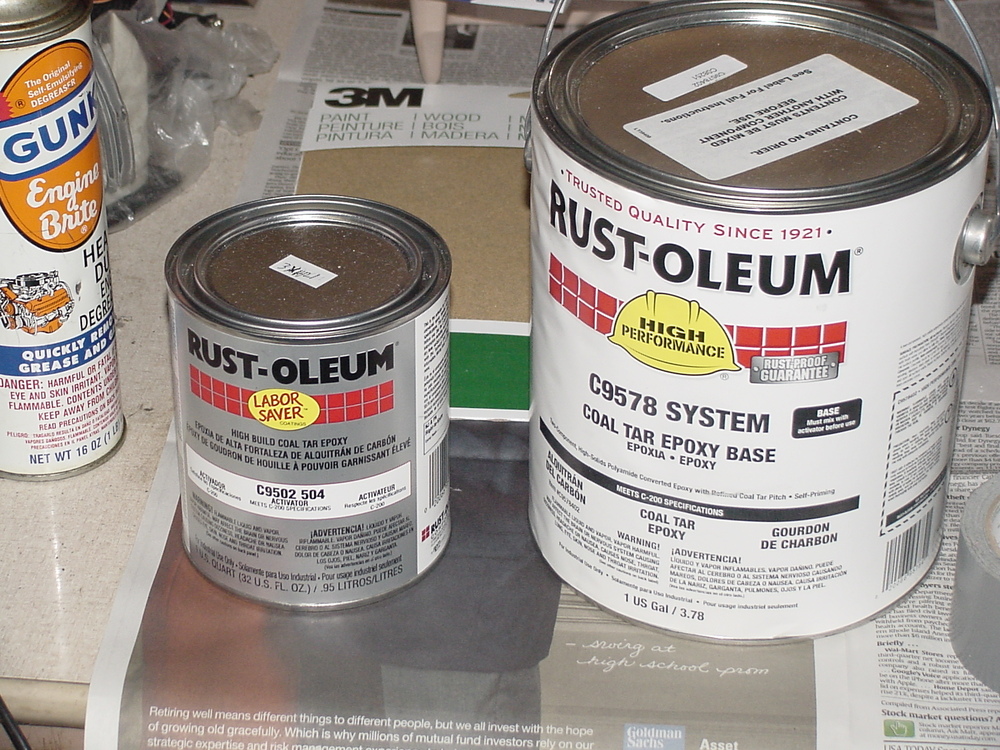
| ||
| Post# 478966 , Reply# 141 12/2/2010 at 12:13 (4,890 days old) by supremewhirlpol () | ||
|
Mix 4:1 ratio(base:activator). Will have to apply at least 2 coats. 
| ||
| Post# 478969 , Reply# 142 12/2/2010 at 12:54 (4,890 days old) by vacfanatic () | ||
|
Coal Tar Epoxy Nice!!! I was thinking of truck bedliner, so your idea wasn't too far off! This should really protect this spider from the elements inside the washing drum it's exposed to. Great idea!!! Andrew | ||
| Post# 479023 , Reply# 143 12/2/2010 at 18:20 (4,890 days old) by supremewhirlpol () | ||
|
Yes, bedliner could be another option, maybe even less expensive than Coal Tar Epoxy. Do you know whether or not it is conductive? Also where would you get it? | ||
| Post# 479029 , Reply# 144 12/2/2010 at 18:42 (4,890 days old) by cornutt (Huntsville, AL USA) | ||
|
You could try a can of conformal coat. It sprays on and it's not as nasty as the alodyne. It goes on thick and it's designed to exclude moisture. It's used a lot for protecting marine electronics. The only thing is, it may effect the balance a bit. | ||
|
Post# 479138 , Reply# 145 12/3/2010 at 05:51 (4,890 days old) by Tomturbomatic (Beltsville, MD) |
||
|
I hope the epoxy does not give off an odor when exposed to hot water and thus make the clothes stinky. I also hope that after all of your work the rest of the machine holds up and that the bearing/spider failure was not just the first float in the disaster parade. | ||
| Post# 479201 , Reply# 148 12/3/2010 at 12:51 (4,889 days old) by supremewhirlpol () | ||
|
first coat applied 
| ||
| Post# 479222 , Reply# 149 12/3/2010 at 15:56 (4,889 days old) by fordtech () | ||
|
Ack! That reminds me of Permatex Aviation gasget sealant.. sticky and gooey to put on with a brush but makes a great seal. | ||
| Post# 479249 , Reply# 150 12/3/2010 at 19:53 (4,889 days old) by nmassman44 (Brooksville Florida) | ||
|
I dont think I would have gone that route with the coal tar epoxy but still interesting just the same. I am wondering with the added weight and thickness that the rear drum clearances are going to be a hell of alot tighter. I hope I am wrong but it would suck that you went thru all this trouble only to have the drum not turn freely when you reassemble it.
I also agree with Tom about possible smells with a hot wash. I can only imagine what this stuff smells like. Does it dry scent free? | ||
| Post# 479251 , Reply# 151 12/3/2010 at 20:09 (4,889 days old) by supremewhirlpol () | ||
|
nmassman44: What would you have done? What are your thoughts? Is that cat posing for the camera? fordtech: That epoxy reminds me of wild E coyote cartoons and that black stuff in cans labeled ACME. | ||
| Post# 479267 , Reply# 154 12/3/2010 at 22:08 (4,889 days old) by supremewhirlpol () | ||
|
3beltwesty: Oh...right...I forget you are ME...looks like you've been in it forever in a day, back when the dinosaurs once roamed and stepped in their own poop! (HAHAHA) I'm studying EE, CE, and LAS. What else do you recommend? You've got my attention now. | ||
| Post# 479533 , Reply# 162 12/5/2010 at 08:58 (4,887 days old) by jlbrazil (brazil) | ||
|
My LG My LG has this little hose :) | ||
| Post# 480160 , Reply# 164 12/7/2010 at 17:14 (4,885 days old) by supremewhirlpol () | ||
|
There is also epoxy in the mounting holes of the spider. I can try to get some of that mylar in there, but will probably be a tight fit. I could put the mylar under the washers of the bolts and between the spider and the cylinder. | ||
| Post# 480580 , Reply# 165 12/9/2010 at 18:15 (4,883 days old) by supremewhirlpol () | ||
|
Time to put the bearings in->rear tub cleaned of the nasty gunk. 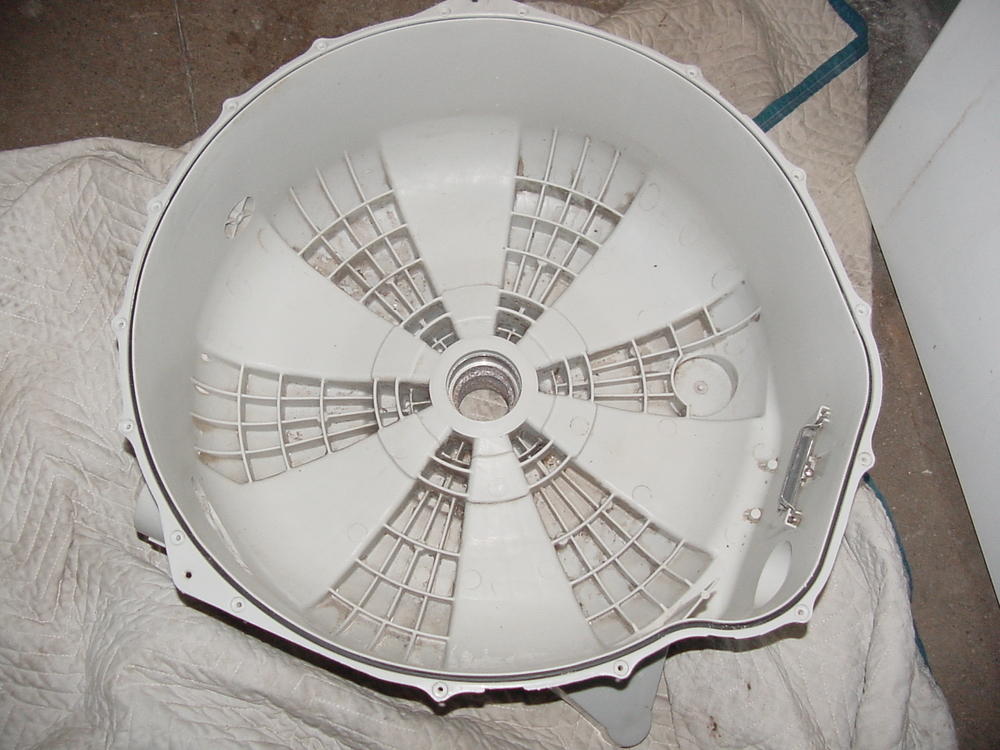
| ||
| Post# 480581 , Reply# 166 12/9/2010 at 18:18 (4,883 days old) by supremewhirlpol () | ||
|
I use 100W light bulb to heat the area where the bearings sit. ~30 min is good enough. 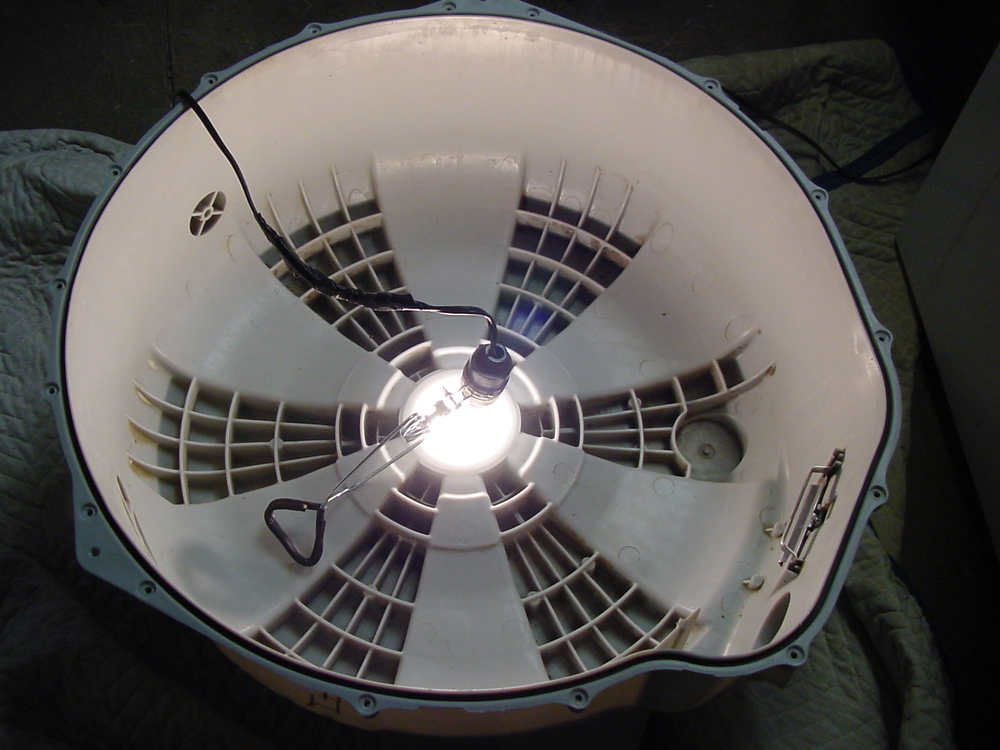
| ||
| Post# 480582 , Reply# 167 12/9/2010 at 18:25 (4,883 days old) by supremewhirlpol () | ||
|
I use the old bearings to push in the new bearings. For the rear bearing, make sure the top side of the bearings is flush with the metal that the bearing sits in, or slightly inside. 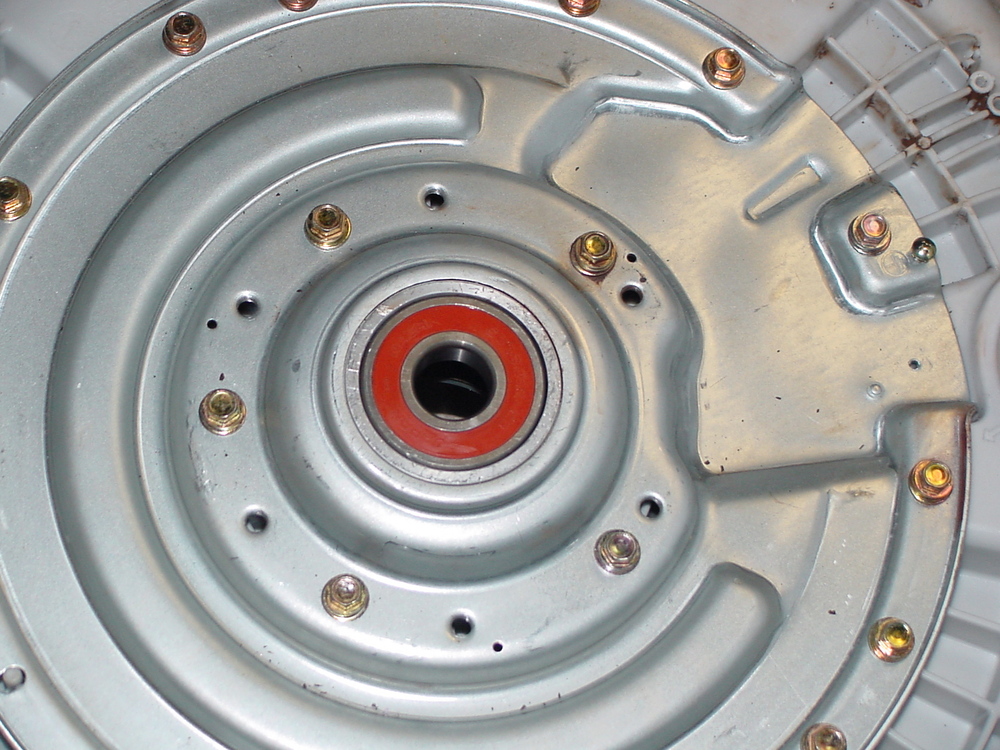
| ||
| Post# 480587 , Reply# 169 12/9/2010 at 18:38 (4,883 days old) by supremewhirlpol () | ||
|
The old seal and new seal->new seal has different design 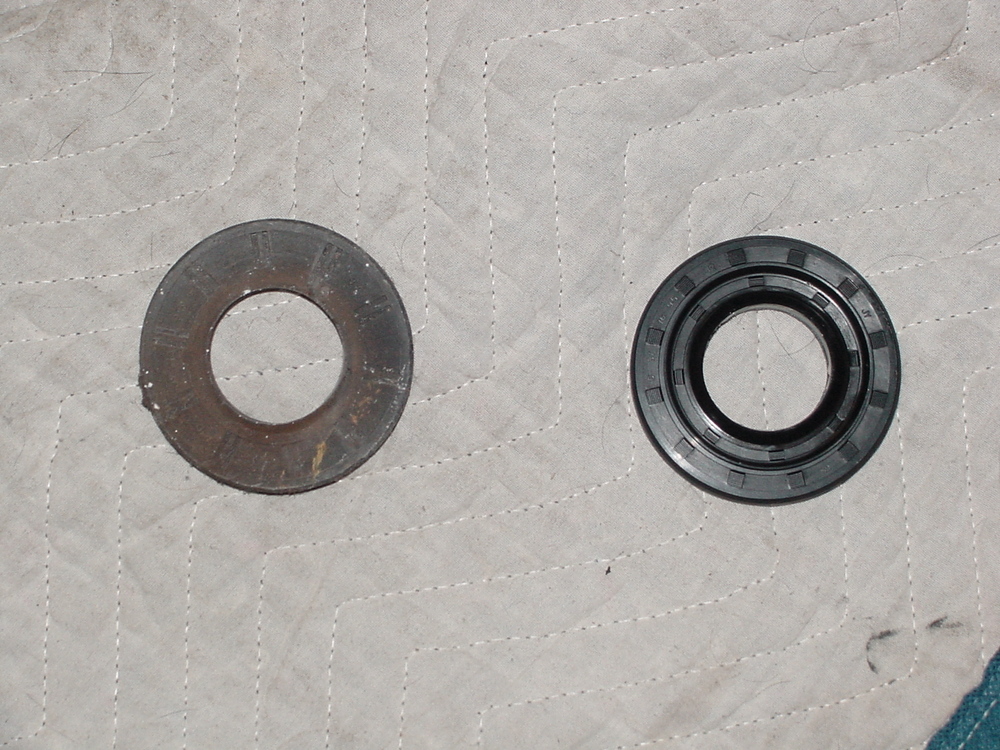
| ||
| Post# 480589 , Reply# 170 12/9/2010 at 18:45 (4,883 days old) by supremewhirlpol () | ||
|
seal installed->vaseline applied to outer side of seal to seat better against plastic. 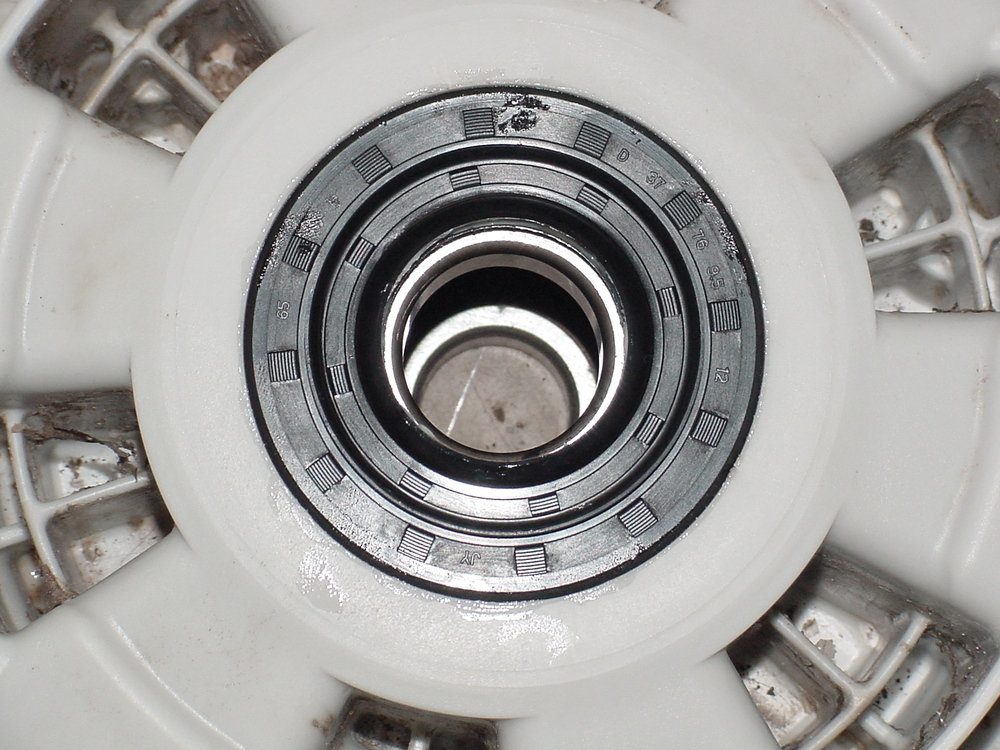
| ||
| Post# 480592 , Reply# 171 12/9/2010 at 18:48 (4,883 days old) by supremewhirlpol () | ||
|
Spider installed on cylinder->Have to wait until Saturday for water test. 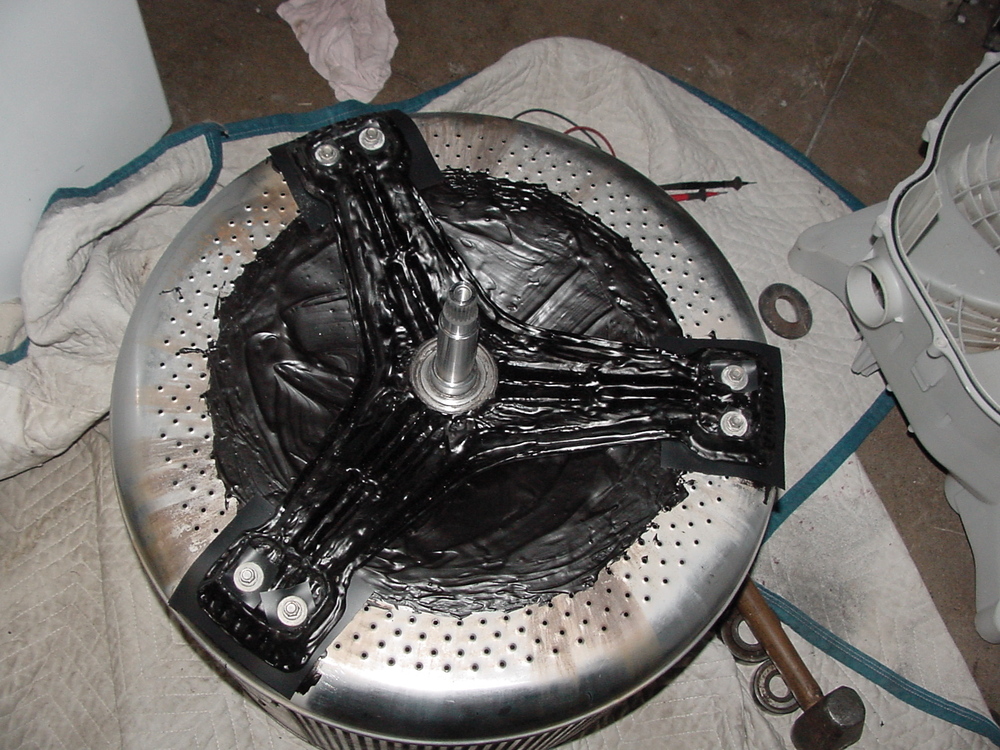
| ||
| Post# 480595 , Reply# 172 12/9/2010 at 18:54 (4,883 days old) by supremewhirlpol () | ||
|
Insert the shaft of the spider into the rear inner tub->carefully. Install the motor into the back and check for proper clearance. The hub of the motor should fit all the way on the shaft->tighten the hub down with the bolt. 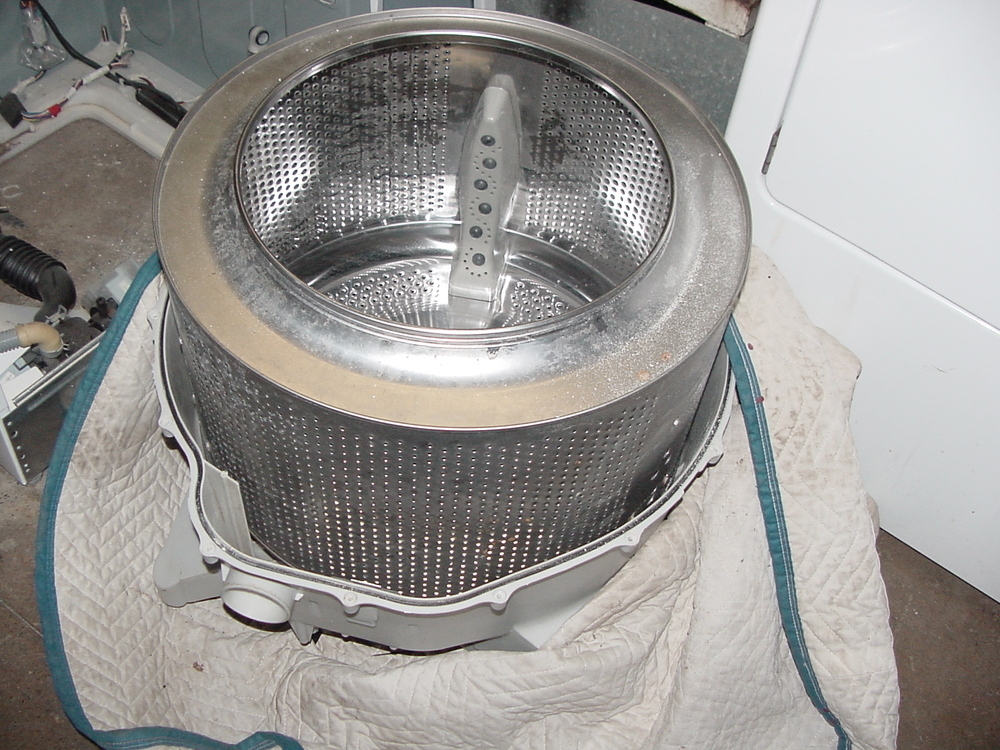
| ||
| Post# 480596 , Reply# 173 12/9/2010 at 18:58 (4,883 days old) by supremewhirlpol () | ||
|
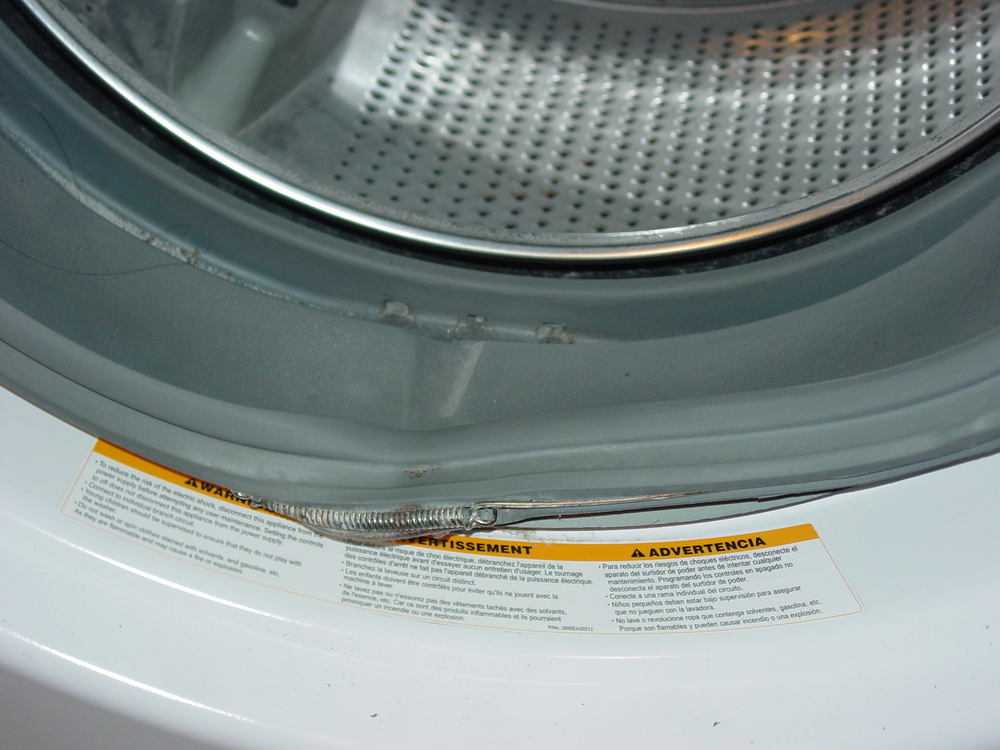
Put the front outer tub on the rear inner tub->check for clearance. Give cylinder a spin->make sure there in no rubbing, and that the cylinder spins freely. ->The boot was actually the reason why this machine was stinking up my car! 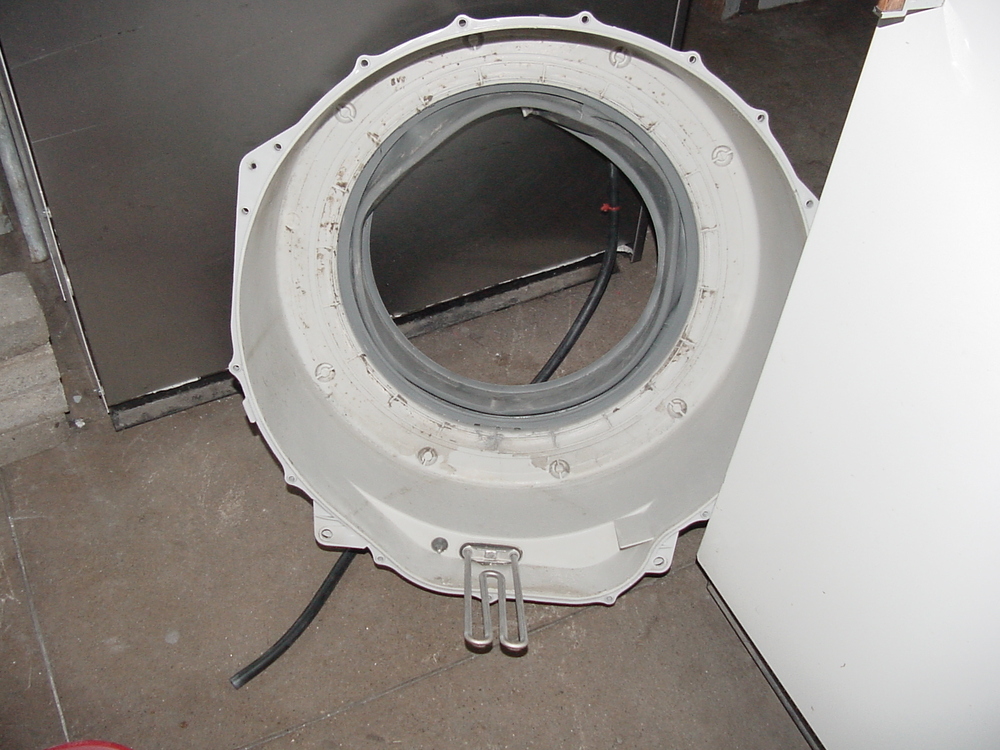
| ||
| Post# 480600 , Reply# 175 12/9/2010 at 19:08 (4,883 days old) by supremewhirlpol () | ||
|
OTHER ISSUES.... A BIG NO NO!!! 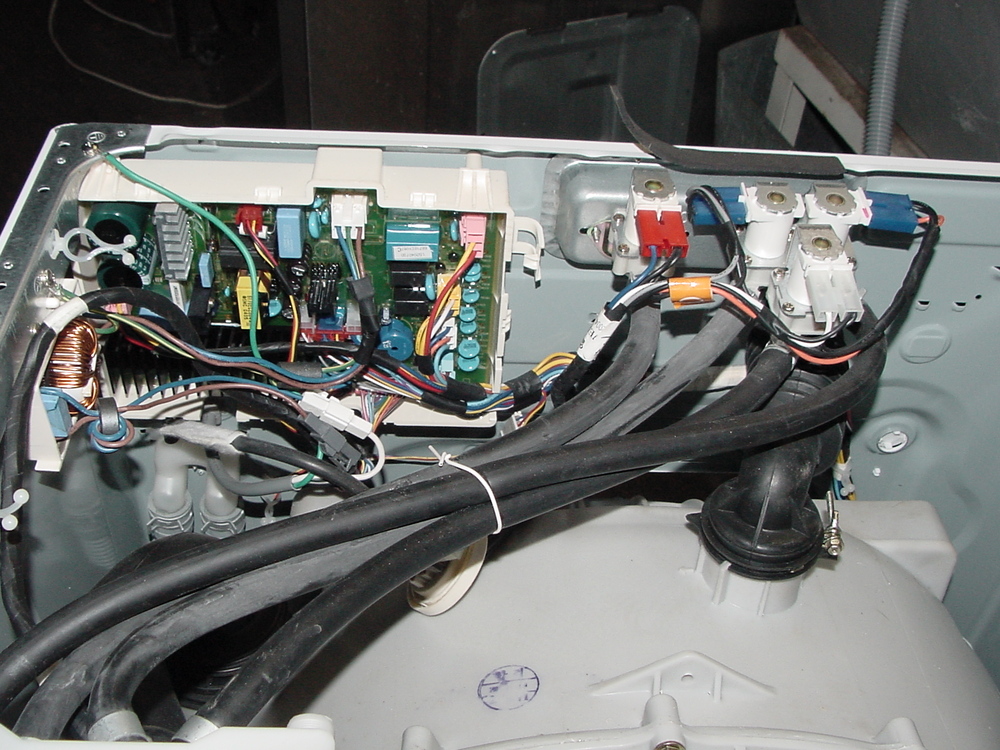
| ||
| Post# 480603 , Reply# 176 12/9/2010 at 19:13 (4,883 days old) by supremewhirlpol () | ||
|
Components on the PCB can't dissipate heat properly because of the epoxy? that it is in, thus the electronic smell that I get-> NOT GOOD! 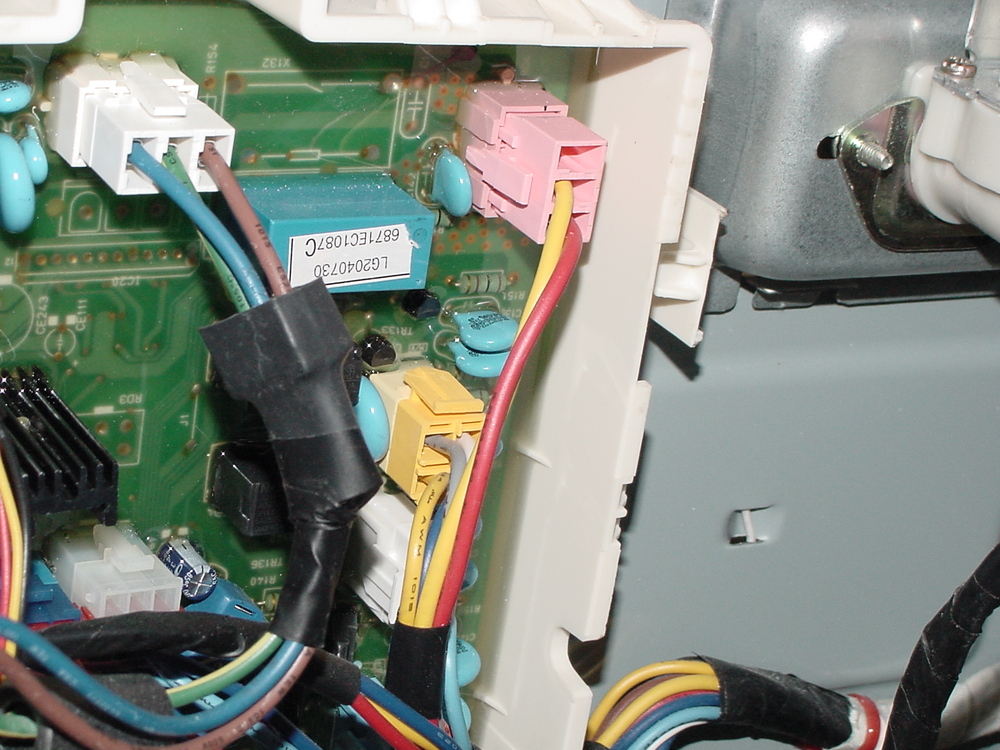
| ||
| Post# 480718 , Reply# 178 12/10/2010 at 07:18 (4,883 days old) by fordtech () | ||
|
Are you sure you arent just smelling residual dust and contamination from the motor area where you did the sensor fix? Looks like a magnificent job supremewhirlpol | ||
| Post# 480802 , Reply# 180 12/10/2010 at 18:06 (4,882 days old) by fordtech () | ||
|
You would think they could put cooling fans on the PCB like computers, printers, etc have. | ||
| Post# 481437 , Reply# 183 12/13/2010 at 16:15 (4,879 days old) by fordtech () | ||
|
Cooling fan If you purchased a 110V electronics cooling fan you could wire it straight to the L1 power source. You can find them at Radio Shack if you have one near you or online. | ||
| Post# 481454 , Reply# 185 12/13/2010 at 17:09 (4,879 days old) by fordtech () | ||
|
Well you certainly have no shortage of resources.. LOL Ill be anxiously waiting your solution. | ||
| Post# 481848 , Reply# 186 12/15/2010 at 11:55 (4,877 days old) by iheartmaytag (Wichita, Kansas) | ||
Just wondering . . .
With the epoxy you used to seal the spider and inner tub. Does it have an effect on the balance of the tub, or is the spider so far back that it doesn't matter?
After watching your repair, I am just glad that I resisted the man at Sear's that promised me everything but a pony ride if I would go LG. I am glad I kept saying no. | ||
| Post# 481876 , Reply# 188 12/15/2010 at 14:32 (4,877 days old) by iheartmaytag (Wichita, Kansas) | ||
|
| ||
| Post# 481886 , Reply# 189 12/15/2010 at 15:21 (4,877 days old) by 3beltwesty () | ||
|
which "American marketed, German built machine" ? which model number? | ||
| Post# 481888 , Reply# 190 12/15/2010 at 15:26 (4,877 days old) by iheartmaytag (Wichita, Kansas) | ||
|
which model number? | ||
| Post# 481919 , Reply# 193 12/15/2010 at 19:39 (4,877 days old) by supremewhirlpol () | ||
|
Works quite well! Now to install... 
| ||
| Post# 484784 , Reply# 196 12/28/2010 at 13:11 (4,864 days old) by supremewhirlpol () | ||
|
Videos of Horsey are up prewash spin CLICK HERE TO GO TO supremewhirlpol's LINK | ||
| Post# 484785 , Reply# 197 12/28/2010 at 13:12 (4,864 days old) by supremewhirlpol () | ||
|
main wash video CLICK HERE TO GO TO supremewhirlpol's LINK | ||
| Post# 720679 , Reply# 202 12/11/2013 at 19:29 (3,785 days old) by norgeway (mocksville n c ) | ||
|
All this... Just goes to show why my 30 year old Kenmore is still working!!!LOL..and probably will outlast three of these things, Korean cars are ok, ive had 2 Hyundais and have no complaints. | ||
| Post# 720968 , Reply# 203 12/13/2013 at 04:36 (3,784 days old) by laundromat (Hilo, Hawaii) | ||

Hey, Melvin
I have a similar model. You set the cycle, push start and here the door lock then it beeps and shows DL. When I set the diagnosis,the only thing it does is reads DL. If you keep restarting it, it finally comes on. Sometimes, it goes through with no problem but, it also can be difficult. It fills via the prewash not the main wash chamber of the dispenser and sometimes stops just as the recirculating spray begins. Sometimes during the wash. Other times during the rinse. It's model number WM2277HS. I spoke to one of their techs. He had me unplug it then press start for ten seconds then plug it in and retry. No luck. He thinks it's the door latch assembly. But, why would the door lock have anything to do with the recirculating spray or the flow of water through its dispenser? I want to make this my daily workhorse. If it's only the door lock, the price is right. Thanks in advance for being so in tune with these. They're my favorite. Mine actually has an adjustable screw on the pressure valve! I'll try to get its part number for those who prefer a higher water level. | ||
| Forum Index: | 
| Other Forums: |

|

|

|

|

|

 Comes to the Rescue!


;)
;)