Thread Number: 31585
KDS-20 nightmares: Calling in the KA guru's!
[Down to Last]

automaticwasher.org's exclusive eBay Watch:
scroll >>> for more items --- [As an eBay Partner, eBay may compensate automaticwasher.org if you make a purchase using any link to eBay on this page]
Post# 476529   11/20/2010 at 21:25 (4,895 days old) by Machinehead ()        

Hello all-- been a long time since i posted anything, been watching but that's about it since getting married and having a new baby running around our house! I am in a serious jam and i need some help. I removed our modern Frigidaire DW and replaced it with a KDS-20 for use as a daily driver. (I've waited about 30 years to have my own KA, that i remember as a kid, in my own house, use it everyday, etc, right?) All's fine and good-- some hiccups and headaches, but then moving right along in the bliss of vintage appliance heaven... until..
Until i made myself a fool-- a fool who listened intently one day to his beloved KA running and said, "what the hell's that strange noise?? Hmmm... exploratory surgery in a minor level is required! Its running good, yes... but hey! Lets make it run BETTER!! (and i know i'm not the only one who's ever thought that idea up in here!)

So, well-intentioned as i was, i removed the housings, etc to gain access to the soft-food grinder near the coarse strainer (i'm using KitchenAid's terms here or trying to!) and found some ancient pottery and glassware shards... nothing from our dishes, but evidence enough anyway. Now, that wasn't good enough: i was curious if possibly there might be a bearing issue, so i proceeded to remove the impeller that forces water into the stainless steel blade teeth (soft food disposer) and POOF: out of nowhere came these 4 or 5 tiny little washers! Uh-oh... where did they come from? Where did this o-ring go?

What followed over several hours was cascading disaster. It started with experiments in setting the two pumps to the right height so nothing rubbed on the housings or was too loose, and switching o-rings up, down, and 'spacers' or washers or whatever in various combinations and locations and finally, a massive watery mess as the seals were not apparently in the right place the last time i "tried it", and so it puked all the full tub of water all down the floor, into the basement ceiling, right over the fuse box for the house, onto other appliances waiting to be restored and in general made one HELL of a mess, not to mention me feeling really, REALLY stupid!

So, i need some help: i have about 5 or so washers and/or spacers, with an o-ring, for the lower (drain) pump. O-ring goes on TOP, with a _____ size washer on top of that, and what combonation of spacers (i read some previous forums before posting here) go UNDER the drain pump? Have one thick (about .020"), two very thin (maybe .005") and one inbetween (about .010"). Too much space, and there's interference between the wash pump and the drain pump. Too little, and it rubs on the housing. I also theorize (somebody please verify this for me yay or nay) that when the lower pump is installed correctly, there exists an air-gap, similar to what Maytag did with their agitators in some of their washers: trap a pocket of air in a container of some kind under water, and water can't get in and CAN'T LEAK... oh did i say that out loud? Anyway,

Second issue: the wash pump retainers. There are two Belleville-style washers i found and one very thick spacer that has a recessed ring on one side and a solid flange on the other. In what order do these )*#^^% things go? Is the thick spacer faced recessed-side down, towards the pump, or is it up? Do the washers sandwich each side of the spacer, or do they both go on top? And how tight do you tighten that screw on top of the wash pump? Too loose and it comes off (did that, right before the major water puke session) too tight and it seems to act as a preload force on the motor bearings: significantly less rotation by hand when its tight vs loose. Noticed also the motor seems to run much quieter when that top nut is put in a bit loose (not so much clamp on the bearings?) but that didn't work out well either. I have enclosed picts, using a combination of parts from a KDS-17A i consulted for insight.

I really REALLY appreciate anybody's help... i'm going to try and resurrect it tomorrow, but i'm fearing the King Midas-in-reverse will strike again... is it the Full Moon?

Thank you, Thank you, thank you for your paitence, your help, and your time in listening to my woes, and if i can't get back to you sooner, hug the ones you love and be grateful for what you have this Thanksgiving... Many blessings to you all with me in Applianceville,

Sincerely,

Chris B


Post# 476534 , Reply# 1   11/20/2010 at 22:27 (4,895 days old) by rollermatic (cincinnati)        
lets see here

rollermatic's profile picture
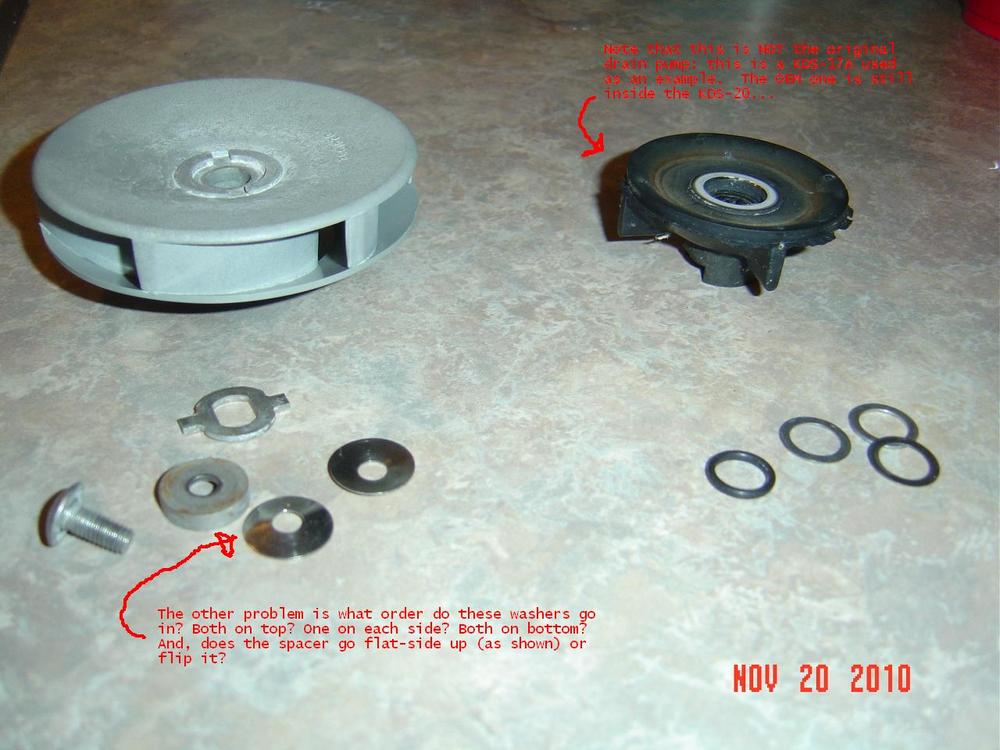
to the left side. these 5 peices are used to install the top bolt that holds the wash impeller on.

locking washer first (one with 2 extensions on each side. this locks top impeller to motor shaft. next put thick spacer on, flat side up. then the 2 conical shaped spring washers, and then the bolt.

right side. the o ring goes between the lower and top impeller on motor shaft. this seals water from flowing down shaft around bottom impeller. has to be in right place or it will leak!

other 3 are spacers that are used to add or decrease height of impeller. so they go on first thing, then drain impeller, then o ring, then top impeller, then peices to left as described above.

i have never seen a soft food disposal grinder used on any kitchenaid i have torn into. but i have only torn them down up thru the kd-19 models. i have a 21 and 23 model but have never taken them apart.

i know there is proper spacing required to get the impeller height just right, a guage is out ther that some use. for me when i have torn into any of my kitchenaids i simply put as many spacers back on it as came off and i have never had a problem!

good luck!


Post# 476536 , Reply# 2   11/20/2010 at 22:44 (4,895 days old) by rollermatic (cincinnati)        
oh and conical washers

rollermatic's profile picture
both go same way, not sandwiched opposite each other. large end down ofcourse. and i have always just snugged that top bolt on, tight enough to stay but not too tight. i snug it with the screwdriver and then give it one more gentle little turn.

some of the others here might have a more precise way to do it but it works for me! i have yet to have a leak in any kitchenaid i have torn into. they are a pretty simple and very well designed machine compared to some brands, D&M being the worst in my book!


Post# 476546 , Reply# 3   11/21/2010 at 00:21 (4,895 days old) by neptunebob (Pittsburgh, PA)        

neptunebob's profile picture
It looks like the drain impeller on the right is worn and maybe needs replaced. Probably you taking it apart was what "broke the camel's back" and it probably would have leaked eventually so don't feel bad. I have an impeller kit for the 16 generation. I don't know if it would fit yours. As for the washers, I placed them in this order, as if you are looking from a cross section:

The upper pump housing goes over all this.
Screw
Rest of the rings on top
Wash Impeller

The lower pump housing
One of the thick metal washers
Rubber O Ring
drain impeller on seal
Bottom of pump housing

Motor is below here.

The metal washer in between the upper and lower impellers prevents the upper one from rubbing against the lower housing. Your might require more washers because mine is worn. My upper impeller is different from yours too.


Post# 476594 , Reply# 4   11/21/2010 at 07:32 (4,895 days old) by rollermatic (cincinnati)        
sorry sorry sorry!!!

rollermatic's profile picture
think i told you wrong here. been about a year and a half since i worked on any kitchenaid over a 17 model which have a completely different pump.

i know the top washer sequence is right but i do believe those spacers of different thickness go betweem bottom and top impeller.

can't remember for sure and i am not home to check one of mine. just don't want to screw you up here! one of the other guys here will know for sure. but what i said about putting back in the number of spacers you took off is true, at least for me. and i do know that o ring has to go on right before top impeller does. this seals the gap between top and bottom impeller. so it would be bottom impeller, spacers, o ring, top impeller, and then the top washers and bolt.


Post# 476623 , Reply# 5   11/21/2010 at 10:15 (4,894 days old) by Machinehead ()        

Good morning to all the saviours of my Kitchenaid!

BIG BIG THANK YOU hugs to any and all who read and responded to my extended diatribe-- i had hit wits end, and was really starting to spin... and not in a good hi-speed Frigidaire washer-way either!

I am going to reassemble and take 'er out for a test drive... Thanks again, you guys ROCK!!


Post# 476627 , Reply# 6   11/21/2010 at 10:42 (4,894 days old) by Machinehead ()        
BTW, the soft food disposer...

Hi Rollermatic-- a post-script:

Like you, i'd never seen or heard of a soft-food disposer on any older KA (pre-Whirltag assimilation, that is), so i was quite surprised to read in a KA manual for the 20 i have that there was one.

Interesting design too: it uses a stainless steel plate which is screwed down under a piece of plastic that serves as the topside of the drain pump cavity. What makes it interesting to me is that the plate has what look like saw-teeth facing down, arranged in a circumference around the the ID of the drain pump impeller. The drain pump impeller itself is a savvy design of four vanes that are shaped to force water against the stationary saw-teeth, and the whole cavity is shaped so that as water constantly circulates around, as long as the drain solenoid is closed, it seems to be trapped and will continue to pulverize the food bits that slip through the coarse strainer! Very clever design... nothing to worry about jamming a spinning steel blade, like the modern DW's have, very easy to service and probably cheap to make. The drain impeller of course is a harder rubbery material, which has i would guess a lot more "give" in it than if it was like a blender blade in there. I can get a picture if you like... i was fascinated and quite impressed!


Post# 477594 , Reply# 7   11/26/2010 at 04:02 (4,890 days old) by beekeyknee (Columbia, MO)        
KitchenAid Nightmares....

beekeyknee's profile picture
If you are not already finished with you dishwasher, go to the super searchalator and look under the 2010 archives on thread # 27751 and scroll down to the next to the last post. I think that might help you.


This post was last edited 11/26/2010 at 04:19

Forum Index:       Other Forums:                      


Comes to the Rescue!

The Discuss-o-Mat has stopped, buzzer is sounding!!!
If you would like to reply to this thread please log-in...

Discuss-O-MAT Log-In


New Members
Click Here To Sign Up.


automaticwasher.org home
Discuss-o-Mat Forums
Vintage Brochures, Service and Owners Manuals
Fun Vintage Washer Ephemera
See It Wash!
Video Downloads
Audio Downloads
Picture of the Day
Patent of the Day
Photos of our Collections
The Old Aberdeen Farm
Vintage Service Manuals
Vintage washer/dryer/dishwasher to sell?
Technical/service questions?
Looking for Parts?
Website related questions?
Digital Millennium Copyright Act Policy
Our Privacy Policy