|
Thread Number: 34701
1967 A806 Refurbishment |
[Down to Last] |
Post# 520369 5/25/2011 at 12:40 (4,713 days old) by Kenmore71  (Minneapolis, MN) (Minneapolis, MN) |
||
 I thought I would take the opportunity to share a few pics of the refurbishment of the 1967 A806 that I aquired a few weeks ago. Once I did a little bit of cosmetic clean-up and checked out the basic mechanicals, I tore into the machine to check a few things and maybe do a little "tweeking". Well, it's never that simple.
The interior of the machine had a lot of surface rust on the baseplate. This seemed to stem from three things: 1. There was obviously a leaking fill valve that had been replaced somewhere along the line. The water from this had left plenty of rust behind. The rear leveling leg was so rusted that I snapped the bolt trying to turn it out. Now the nut will have to be drilled out and likely re-threaded. Sigh. 2. The original poly-pump had obviously gone bad at some point and was replaced. This was the cause of the rust in the front right corner. 3. The machine was housed in a basement in a 1914 house in N. Mpls. which was abviously quite damp. Enough said.
Since I had to take the motor off to re-do the glides, and I also needed to replace to damper pads (they were still there but one had come loose and they were VERY dry) I decided to take the pump off too and sand and repaint the entuire baseplate.
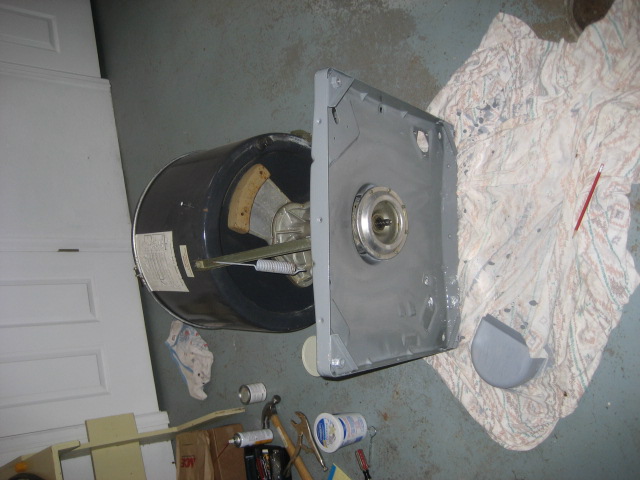
Here is the baseplate repainted with new damper pads but not yet re-assembled. 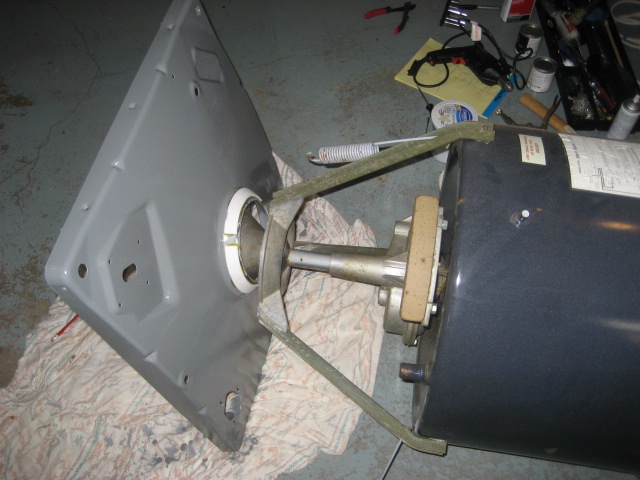
| ||

|
|
Post# 520370 , Reply# 1 5/25/2011 at 12:41 (4,713 days old) by Kenmore71 (Minneapolis, MN) |
||
|
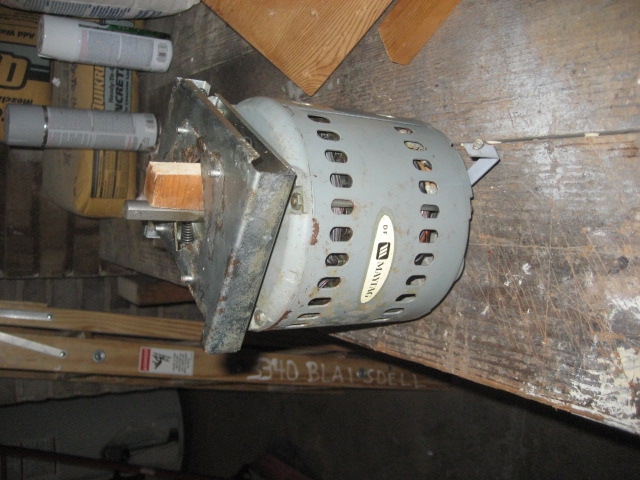
The motor | ||
|
Post# 520371 , Reply# 2 5/25/2011 at 12:43 (4,713 days old) by Kenmore71 (Minneapolis, MN) |
||
|
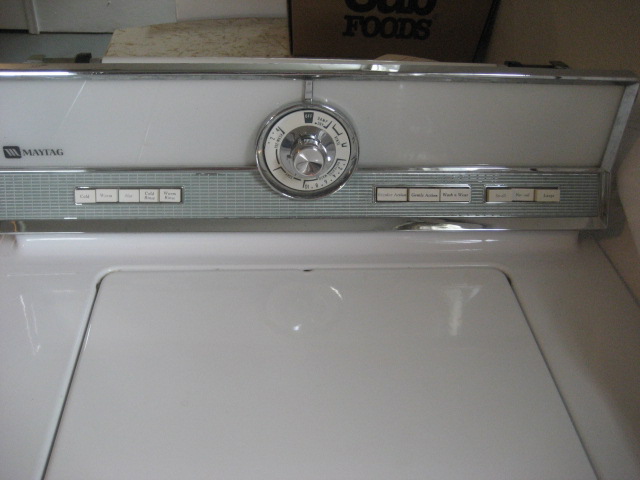
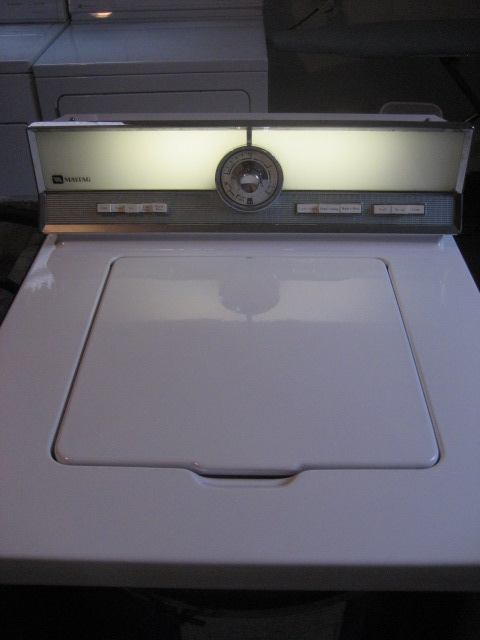
And the top | ||
|
Post# 520372 , Reply# 3 5/25/2011 at 12:44 (4,713 days old) by Kenmore71 (Minneapolis, MN) |
||
|
Another shot of the baseplate | ||
| Post# 520373 , Reply# 4 5/25/2011 at 12:47 (4,713 days old) by macboy91si (Frankfort, KY) | ||
Teardown | ||
|
Post# 520442 , Reply# 5 5/25/2011 at 18:26 (4,712 days old) by goatfarmer (South Bend, home of Champions) |
||
 | ||
| Post# 520446 , Reply# 6 5/25/2011 at 18:36 (4,712 days old) by mixfinder () | ||
|
8 Vane I'm anxious to see, hear and feel if there is any noticable turnbulance provided by the extra agitator bumps. | ||
|
Post# 520467 , Reply# 7 5/25/2011 at 20:26 (4,712 days old) by combo52 (50 Year Repair Tech Beltsville,Md) |
||
A 806S NON PP TIMER Nice clean up and repainting job Mark. Does your machine still have the suds-saver system?. The rust under the fill valve area is usually caused by leaks in the inlet air-gap area, inlet valves usually don't leak inside the machine and the rusty base plate around the pump area is normally caused by the bleach dispenser mounted above it. Overall it looks like you got a pretty good machine. One thing that helps the sluggish agitation on 60s and 70s MTs is to leave the machine or at least the transmission lay on its side for a few days, this allows the transmission oil to get into top agitator shaft bearing. This is one of the most frequent and serious problems that we see on machines of this era, they will become more and more reluctant to agitate until the agitator shaft bearing locks up altogether. At which point you have to either rebuild or replace the transmission and the top bearing is not easy to fix. | ||
|
Post# 520478 , Reply# 8 5/25/2011 at 20:52 (4,712 days old) by Kenmore71 (Minneapolis, MN) |
||
|
John, this machine never had a suds-saver. (That would have been an even rarer bird to find!) It's possible that the water damage in the rear corner under the water valve also came from failed or failing washers on the hoses that went unnoticed in a dark basement. I didn't knotice any leakage at the air-gap but I will definitely be on the lookout for that once I get things back together. I'll have to closely inspect the bleach system when I reconnect it to the pump and make sure there are no leaks. Whomever replaced the pump a number of years ago never drilled out the bleach injection port on the new pump or reconnected the hose. The hose is on the brittle side and it is likely that I will replace it. Somewhere I think I read that installing a very long hose on the bleach injection system (enough to actually wrap around the tub) would delay the dilution and injection of bleach to a more appropriate time in the wash cycle. Have you ever heard of this? Is it effective enough to be worth the bother? The entire basket assembly will have been on it's side for about a week with the sanding, priming and painting going on. It's nice to know that this has the added benefit of helping with transmission lubrication! Thanks for the tips! Mark. | ||
| Post# 520483 , Reply# 9 5/25/2011 at 21:21 (4,712 days old) by rickr (.) | ||
 | ||
| Post# 520498 , Reply# 10 5/25/2011 at 22:59 (4,712 days old) by beekeyknee (Columbia, MO) | ||
Restoration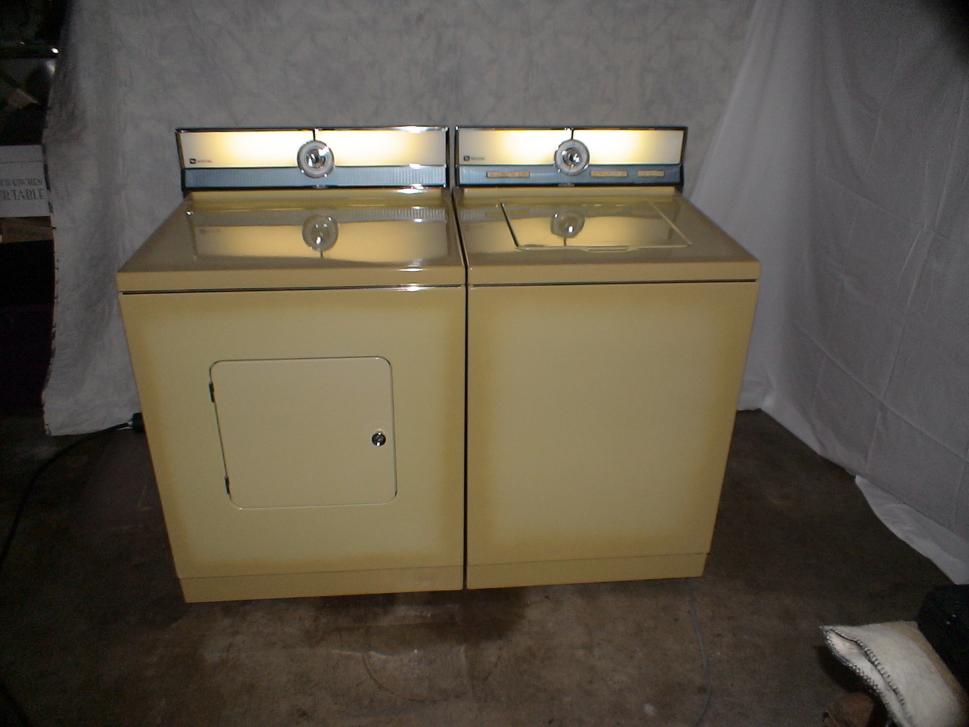
Looks like your restoration is going pretty well. I would have gone ahead and taken that brake package off. It would make restoring the base much easier. You take a 2x4 and put it under the counter-weight (on the left side), tighten the little bolts up really well on the brake package with a socket driver, remove the brake package holding clip, and then either use a pair of vice-grips or a brake package removal tool (which most people don't have), give the vice-grips or the tool a few good knocks with a hammer. The brake unscrews the usual way, counter clockwise. Then your base is free and much easier to work on. This also gives you access to the under side of your damper, the helix, the brake spline and the radial bearing. You can clean and grease these parts that way. You can also pour a tablespoon or two of Maytag transmission oil, or it's equivalent into the brake. I don't know what the equivalent is. Someone on here would know. I think it's 90 weight non-detergent oil, like transmission oil. You can usually tell if the break needs oil by holding the package vertically and looking down at the bottom edge (side closest to the ground) where the metal is rolled up. A small amount of oil should collect there. As old as your washer is, it may need a little oil. If it goes dry it will start to squeal like all get out. If you have trouble with frozen threads, give them a good squirt of PB Blaster and let it set overnight. That should help.
When you start to put your machine back together, be sure and get your spring tension right. I made that mistake and it caused me trouble for almost a year. I had to babysit the washer as it would easily go off balance and not trip the off balance switch. To center the tub cover with the washer cover I loosened the front spring a bit. This allowed the tub to swing more side to side than to the front during an off balance condition and the off balance trip lever didn't trip and it would start to bang. I adjusted all the springs so there were about 7 or 8 threads on the top of the eye bolt and it felt like there was about one half to three quarters of an inch of the bolt sticking through on the under side. That has solved the problem. Also be sure to get it completely level when you're done and tighten all the bolts and screws on the cabinet and where the cabinet attaches to the base. It's important to prevent vibration. In fact, you should probably tighten all the bolts and screws on the cabinet and replace the front panel before you do your leveling as these things keep the cabinet square. Same goes for the dryers. When you get it level, screw the locking nuts on the legs tightly up against the frame or it will work out of level again. I went through this last summer so I thought I'd offer you some advice. You can see my restoration on thread # 4060960 or Super Search-a-lator....beekeyknee 806. I see you have the older style round motor. These can be taken apart and serviced. I won't go into it in detail, but the motor caps have oil bells that can be lubed with turbine oil. The trick is getting it back together so the shaft doesn't bind when you turn the shaft by hand. qsd-dan has addressed this before in his posts. Did the agitator come off easily? You need to get it off. If it won't come off, do searches on here about stuck agitators and Agi-tamers. Do you need to replace the mounting stem and or the tub bearing? I don't know if you have to replace the tub bearing when you replace the mounting stem or not. If you can get away with out having to replace the stem mounting and tub bearing, that would be good. Just put some rags in the bottom of the tub, get some solvent like WD-40 or white kerosene and a tooth brush and clean the stem and drive shaft, wipe it down thoroughly, put some turbine oil on the top of the stem and then cover the agitator drive shaft and top of stem seal with poly-lube or Tri-flow grease. Both are synthetic greases. You might want to consider replacing the stop ring too. Clean the under side of the agitator and the splined hole where the shaft goes. If you still have the older style "fat" tub bearing, you can give it an injection of turbine oil with a needle and syringe, I made a post to Volvoguy87 (Dave) about this. It's post# 34023 or beekeyknee....syringe. Getting turbine oil to that sleeve bearing is important. It will stop wear and tear and greatly increases you spin speed. The bearing is sintered, and will sweat oil to the transmission stem. The older style "fat" tub bearing has wicking in the bottom of it that holds the turbine oil. Then when the sleeve bearing heats up it sucks up some oil from the wicking. This is what keeps the older style tub bearings going for so long, as long as the wicking doesn't dry out and no leaks develop. I got a lot of this information from qsd-dan's post# 22830. Scroll down to "Reply 15" titled "First Things First", then read down from there. Lots of good information. I printed these things out some time ago. As time goes by it gets harder to dig these thing up. Redcarpetdrew (Andrew) has an excellent post on stem mountings and tub bearings. It's post #25520 or Super Search-a-lator....redcarpetdrew....Maytag 806. Great information. Your machine looks great. I would love to have an A806 series 0 and a DE806 dryer in white. When you get the bottom part of your machine done you should consider starting work in the control console. Keep your eyes open. I'm going to be making a post about timer and switch maintenance soon. By the way, your new paint will scratch much easier than the factory paint. Take care and good luck. | ||
| Post# 520500 , Reply# 11 5/25/2011 at 23:16 (4,712 days old) by beekeyknee (Columbia, MO) | ||
|
Bleach Hose
About your bleach hose. I don't think I would wrap it around the tub. You could try making a coil and putting it under the drain hose, then bringing it up and over the bleach container as shown in the service manuals. Another thing you could try is to drill a smaller hole in the top of the pump where the hose connects. That would slow the amount of water coming out of the pump. I don't know if it would work or not. It might clog. But you could always make it bigger later. That's easier than trying to make it smaller later.
| ||
|
Post# 521960 , Reply# 12 6/2/2011 at 10:39 (4,705 days old) by Kenmore71 (Minneapolis, MN) |
||
|
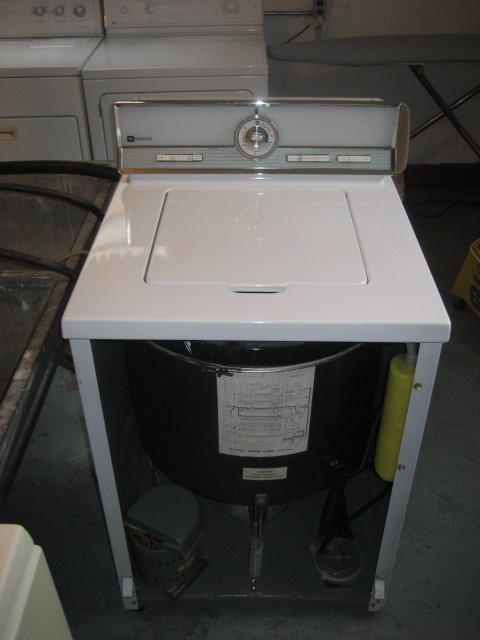
Back together I have the machine back together and washing! I'm not sure that I'm through doing all the work that I will do but here is a summary of what has been done (and not done) and why. Constructive opinions and thoughts are always welcome.
1. I sanded off the rust and repainted the baseplate top and bottom.
2. #1 would have been easier if I had removed the brake, but I do not own a brake removal tool. I checked with a number of my Twin Cities friends and they didn't have one either. Dey appliance wanted $80 for one and it would have been a special order. So, I decided to leave the brake alone and work around it. The other reasons for this were: it was working perfectly before I disassembled the machine, it stopped the tub silently in about 6 seconds. Also, when I had the machine on its side I could see the tell-tale few drops of oil showing where they should be. If I need to replace the brake in the future, it's one of the simpler things that can be done with minimal fuss.
3. I cleaned up the motor carriage and installed new glides and lubed them up. I did not take the motor apart or oil it at this point. The motor seems to be working just fine as it is. At some point when I have the time I will probably pull the motor off and take a closer look. With new glides and belts all of the agitation and spinning problems seem to have been taken care of.
4. I insalled new damper pads. This has quieted the machine considerably when spinning.
5. I had to install a new air dome because the old one was so brittle that it cracked in the removal process.
6. As suggested by several people, I lubed the spin bearing with about 4 ccs of turbine oil using a hyperdermic needle. This machine spins faster than I have ever seen a Maytag spin!
7. The agitator is FIRMLY stuck on. I know that it would be good to get it off at some point but I am honestly terrified of breaking that RARE 1967 agitator with the extra bumps. I have tried hot water and gentle to moderate persuation to no avail. I suppose at some point I will need to borrow an agitamer and air compressor and just take my chances. Ben is coming up at the end of the month and I'm going to see if he'll take a look and give me an assessment then. For the time being, there are no leaks at the tub stem and the agitation and spin are very nice.
8. I am still fussing a little bit with the outer tub top band and gasket. This seems to be a very tricky adjustment on this particular machine. By that I mean getting it to seat and seal completely without the inner tub binding or scraping on the top. I've redone this 3 times and I'm still getting the occassional little bead of water for a few seconds during the spin of a full tub of water.
I'm sure I've forgotten to mention a few things, but here are some pics of the machine cleaned up and mostly back together.
Mark
| ||
|
Post# 521961 , Reply# 13 6/2/2011 at 10:41 (4,705 days old) by Kenmore71 (Minneapolis, MN) |
||
|
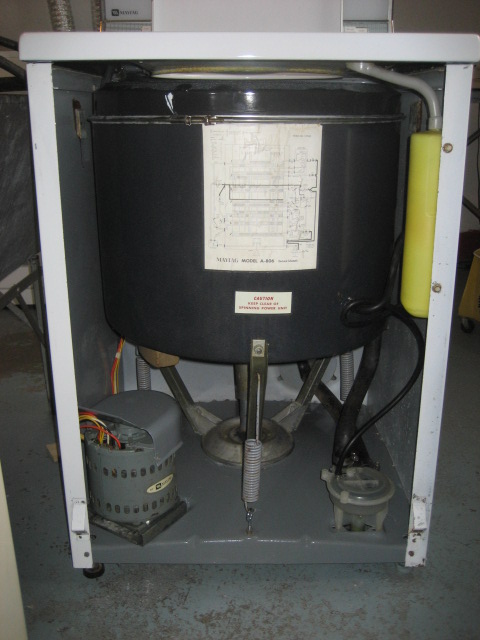
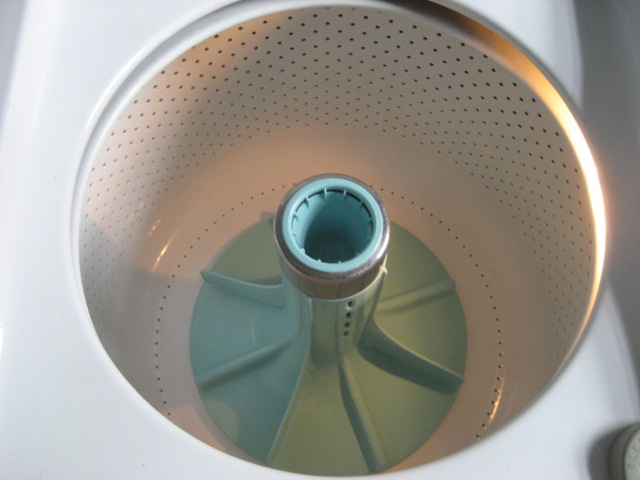
Inside | ||
|
Post# 521962 , Reply# 14 6/2/2011 at 10:42 (4,705 days old) by Kenmore71 (Minneapolis, MN) |
||
|
Money shot :) | ||
|
Post# 521963 , Reply# 15 6/2/2011 at 10:43 (4,705 days old) by Kenmore71 (Minneapolis, MN) |
||
|
And a glamor shot | ||
| Post# 522108 , Reply# 16 6/2/2011 at 19:56 (4,704 days old) by StrongEnough78 (California) | ||
|
| ||
|
Post# 522111 , Reply# 17 6/2/2011 at 20:07 (4,704 days old) by GadgetGary (Bristol,CT) |
||
Yay! | ||
| Post# 522236 , Reply# 18 6/3/2011 at 13:08 (4,704 days old) by beekeyknee (Columbia, MO) | ||
|
My Misdirected Anger
Mark,
I see that my anger at your lack of response to my post was totally unwarranted, as I can now tell that you did read them. I can offer my suggestions on how to work on your tub cover and if you choose to not use it or not respond I won't be offended. This will probably be on the long side, as I can't explain this process in detail in a short post. First off, your tub cover clamp is in the wrong position. The screw and nut portions of the clamp should be in the front left hand and back right hand corners of the cabinet. You want plenty of clearance in case of an off balance situation. You don't want that part of the clamp striking the cabinet and causing damage. I'm very fastidious about keeping all parts clean, polished, lubricated and free of rust for a successful restore. To fix tub cover start by 1: Using penetrating oil on clamp screw and nut. Loosen and tighten both sides of clamp. Clean clamp. If rusted use oil, like 3-in-1 or WD-40 and a green scratchy pad or steal wool. Clean screws and nuts with the same oil and a brass brush if needed. Rinse with WD-40 or kerosene and wipe with clean, dry cloth. Oil screw threads with a little oil and turn screw in and out to see if clamp is working well. Keep working with it tell it is. Set aside in safe place. No bending during or after process. 2: Pull tub cover up and out. Remove gasket and clean it with warm soapy water. I used the green pad for areas that didn't want to come clean. I even used a dull knife on stubborn, crusty rust spots, then cleaned again until it was smooth. Wet a paper towel or lint-free cloth with Pledge or Armor All and wrap the towel around the gasket and pull it through until it's well coated. If you lay it in a warm place it will help the gasket soften up and absorb the coating. 2: Clean the tub cover, paying special attention to outside edge of cover where gasket rests. If you're having trouble with mineral build-up, use some vinegar or CLR; something along those lines. Clean well where the injector hose goes. A little Pledge, Armor All or spit will help it go back in the cover. Sorry. I digress. After the cover is clean, inspect the porcelain for chips or rust, especially around the outside edge where the tub cover meets the collector tub. If you find rust, sand the area(s)with some fine grade emery paper - P150 to P220 - somewhere in there. Enough to take off the rust w/o making deep scratches. After sanding, dust it off. The outside of the tub cover was a little rusted on my machine and since it wasn't visible, I mixed up a little JB Weld and smeared a thin coat over the areas to fix the problem. You can even dampen your finger and run over it to make it extra smooth and thin. Make sure it's sealed completely or it will rust again. Set aside and let dry overnight. If part of the porcelain is damaged where you can see it, you'll have to use a porcelain patch. I've seen it on here in some thread, but I don't know where. I think Robert may have posted it. I've never used it. Now you'll have to do the same thing to the collector tub and lip if it needs it. If you have to seal it you'll have to use your little finger. The space between the tub and the basket is small, as I'm sure you've noticed. A good flashlight comes in handy. If you're using emery paper down in there, be careful to not drop it between the collector tub and the clothes tub. 3: Now comes the fun part. Replacing the tub cover. Some people find this task easier if the washer lid is removed. It's easier to work in the area with it off and it's also nice to clean when it's off. If you don't take the lid off I think it's best to cover the control panel with a towel to protect the lid and panel. The first time you take the lid off it seems kind of weird, but the second time's not as bad. If you want to try, stand straight in front of the washer, open the lid tell it's parallel with the length of your arms, and pull straight back on the lid with steady tension until the lid lets go. Two hard plastic balls will roll down into the basket when the lid releases. Put the lid where it won't get damaged. Leave the balls in the washer or put them in a cup. Don't loose them. I think they're still available, but I wouldn't want to go through the hassle of ordering or tracking them down. Most of the time when you're working to put them back on they just roll right back down in the basket. When you get ready to put the lid back on, soak the balls in the hottest water you can find. Get one ball out and place it in the indention in one side of the machine. Put the lid back down on the washer front first. While holding the first ball against the machine, bring the lid down to the ball and sandwich it between the machine and the indention in the lid. Then take the second ball and repeat on the other side, except hold that ball in the indention on the machine and lay the corresponding side of the lid against the outside of the ball. One side of the lid will be in the correct position and the other side with be high. Then with the indention in the lid lined up with the ball that's wedged between the two surfaces, push down with steady pressure and both balls will compress and the lid will pop back into place. This sounds like a daunting task, but once you get on to it, it's not bad. The trick is the hot water and time. If the balls cool down before you get the lid back on you can repeat. Do a trial run just by holding everything in place before you try the installation. Back to the tub cover. The tub gasket is triangular, so it doesn't matter which way it goes on, just as long as it's not twisted. Make sure all surfaces are clean. A piece of dirt or a non-smooth surface can cause a leak. Should have told you this earlier, but check your gasket for cracks or big dents. This will cause a leak. Most of the time these gaskets are fine. I took some Pledge and polished the outside edge of the tub cover on mine so the gasket would slide easier to get the proper adjustment. Also moisten a towel with Pledge and run around the inside edge of the collector tub. This also helps. Be careful with that part. If the towel falls between the collector tub and the clothes tub you've got that same problem as the emery paper. Use a long towel. Place the bottom edge of the tub gasket about an inch above the bottom edge of the tub cover all the way around the circumference of the cover. Hold the cover at about 3 and 9 o'clock with the off balance bracket straight back at 12 o'clock right under the lid switch. Gently push the tub cover down into the collector tub until the gasket touches the tub lip. An old service manual I have says to use two wooden clothes hangers between the tub cover and the inter basket to get proper clearance between the clothes basket and the washer top, but I don't think this seems to be a very good way to do things anymore. There aren't as many wooden clothes hangers around as there used to be and the ones we do have are probably a different size by now. I do have two thick plastic hangers that are 6/8th's thick, but sometimes the baskets are of slightly different heights on each side and that wouldn't account for this. Since the top of the tub cover just has to clear the washer top by about 3/8th's - 1/4 of an inch, just lower the washer cover to it's normal resting position, temporally put the top cover screws in the top front corners to be sure the tub cover and washer top align. Then manually raise and lower the tub cover for the correct clearance by putting your fingers on top of the wash basket and using a smooth object, like a piece of wood or plastic (any smooth narrow object) and raising or lowering the cover until you get the correct clearance. Repeat this procedure around the circumference of the tub cover opening until you get an equal clearance all the way around. Then without touching the tub cover, lift the washer top again. Gently slide the tub gasket down between the collector tub lip and the cover while making sure the cover doesn't move, by keeping your fingers between the cover and the clothes basket. If you haven't moved the tub cover any, your clearance should be the same when you put the washer top back down. Mine is set at just around the 3/8th's - 1/4 distance and works perfectly. Not much can get between there, yet there's no contact with the basket or the washer top. 4: Replacing the tub cover clamp. A delicate step. Loosen the tub cover clamp screws enough so that it will slip easily over the tub cover without moving it and will fit over the collector tub lip and gasket. The "V" that's created by the combination of the collector tub lip and the gasket should fit inside the tub cover clamp. Get this clamp over that "V" without moving the tub cover. Make sure the clamp screws are in the corners as I mentioned earlier. Tighten each screw the same number of turns. The end of the screw where it sticks through the nut should be about the same length on both sides of the tub or have close to the same number of threads sticking out behind the nut. Turn each screw a couple of turns on each side of the tub, jumping back and forth diagonally from one screw to the next. While doing this, watch to make sure the "V" on the tub in sinking into the clamp. In fact check this even before the clamp starts to get tight. By tightening the screws equally on each side and watching the clamp seat properly, you are making sure the tub isn't going out of round and you're getting a sure seal. When you're getting close to the end the tightness will feel about the same on each screw and you will have about the same amount of screw end protruding past the nut in each corner. When you're finished the screws will be pretty tight on both sides. The clamp should appear to be about equally close to the tub all round. When you're finished with that, lower the washer top cover, check that the top cover screw clips are in the right positions and replace and tighten the top cover screws. If you're lucky you'll still have the same clearance as you had when you made your initial adjustments. 5: I don't know if your model is the type that shuts off an off balance load by tripping the lid switch or if it's the one that pushes the timer knob back in. In either case I think there's a plunger and bracket assembly behind the lid. If you do decide to take the washer lid off you can remove the two screws that hold in the assembly and clean the old grease out of there and put in some new poly-lube. Mine has the plunger that pushes the metal bar into the lid switch and when the load goes out of balance the tub cover bracket knocks the metal bar off the lid switch. I put a tiny film of poly-lube on the end of the bar and the white piece that sticks out of the switch. Now when there's an off balance load, one tap and the machine stops. I don't know if you want to try that or not, but I think the plunger and bracket are NLA. After your tub cover adjustment is right you can check which type of shut of system you have by pulling the tub forward. Either the timer knob will pop in or you will just hear a click. If it's just a click, opening and closing the lid will start the machine again. And by the way, if you want to clean and grease this switch you'll have to do this while the washer top is still up. 6: You can start with a med. fill of water and if the tub does leak you can shut off the machine and start it again and not much water will leak out. Since your machine didn't have much of a leak to start with, I'll bet these things will solve your problem. Mine had apparently been leaking much worse before I got it and I started doing the things I mentioned above and it didn't leak a drop the first time I started it. Good luck. Brian | ||
|
Post# 522271 , Reply# 19 6/3/2011 at 14:32 (4,703 days old) by Kenmore71 (Minneapolis, MN) |
||
|
Brian, Thanks for the response and the suggestions. In terms of the disassembly and cleaning I had already done nearly everything you suggested. There are several new things I learned from your suggestions. The coat hanger trick sounds like a very accurate and easy way to get the outer tub evenly aligned with the top of the inner tub. I understand why you would want the screws on the band to miss the off-balance switch on the back but other than that and hitting the inside of the front does it really matter where the screws are? When I got the machine it was centered in the front and the back (which I figured was wrong) and I shifted it to about the 1 and 7 o-clock positions. Since I need to work on it again it certainly can be shifted more to a 2 and 8 o-clock position. I'm curious if there is another reason other than clearance at the off-balance switch and cabinet front.
Mark | ||
|
Post# 522307 , Reply# 20 6/3/2011 at 16:40 (4,703 days old) by gansky1 (Omaha, The Home of the TV Dinner!) |
||
 You did a beautiful job, Mark! Congratulations on a nice Maytag set, you will love them for many years.
We all restore machines to our own satisfaction. Sometimes we detail every part, re-paint, re-coat and re-plate every metal part, replace every rubber part and go over it all with a fine-tooth comb to make it just as it would have left the factory if not better. To the other extreme, I've had machines myself that I wanted to see washing, not as a permanent addition to the basement collection so I used tape to plug pin-holes in the tub to make it hold water long enough to get through a couple of loads (uh-huh, it was a Franklin!) so there are no right or wrong ways to enjoy this hobby. There is much to be learned from everyone here, and I'm glad you are sharing your machines and fun with us. (You do know we're all coming to your basement soon - with white gloves! :-) | ||
|
Post# 522312 , Reply# 21 6/3/2011 at 17:00 (4,703 days old) by Kenmore71 (Minneapolis, MN) |
||
|
Gloves | ||
| Post# 522338 , Reply# 22 6/3/2011 at 21:22 (4,703 days old) by AutowasherFreak () | ||
|
Looks GREAT! | ||
| Forum Index: | 
| Other Forums: |

|

|

|

|

|

 Comes to the Rescue!