|
Thread Number: 34705
New acquisition: 1969 GE FilterFlo Washer - Beginning the Dissassembly and Restoration |
[Down to Last] |
| Post# 520390 5/25/2011 at 14:22 (4,716 days old) by dishwashercrazy (West Peoria, IL) | ||
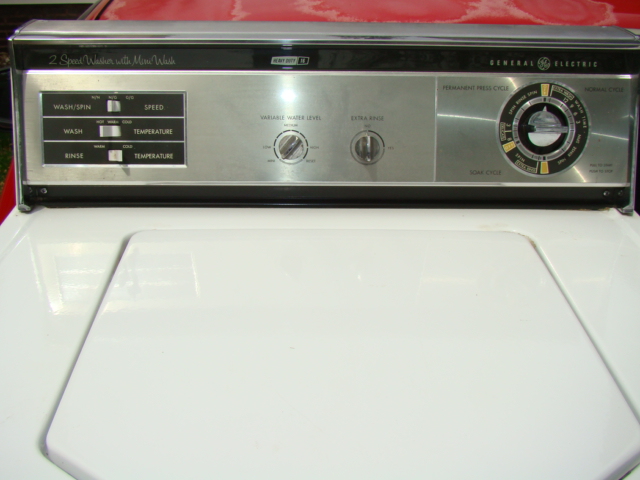
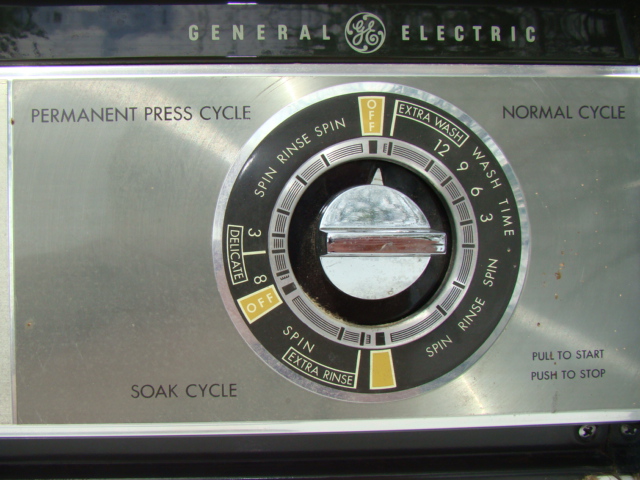
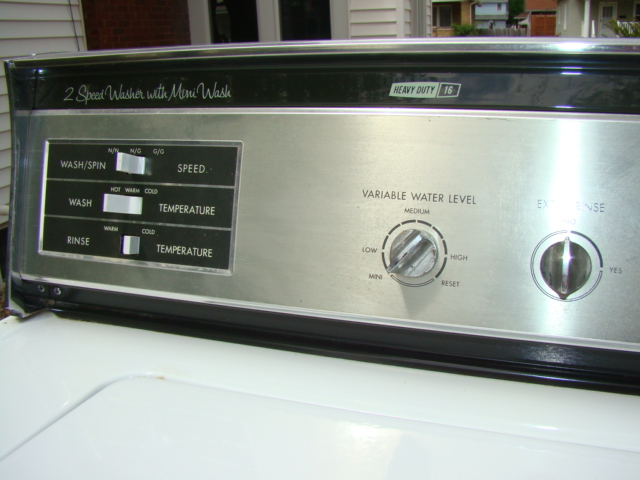
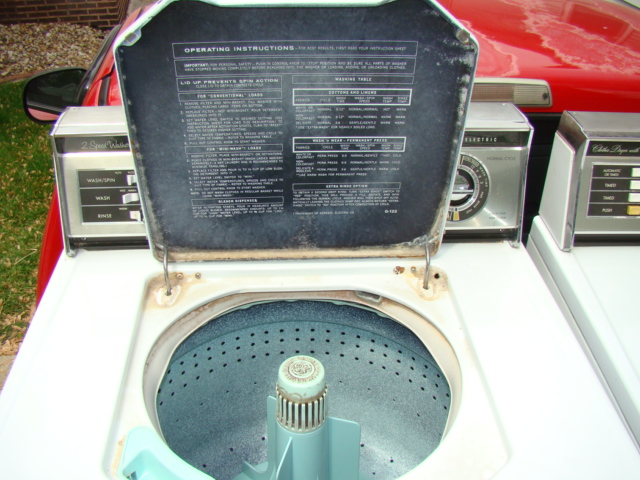
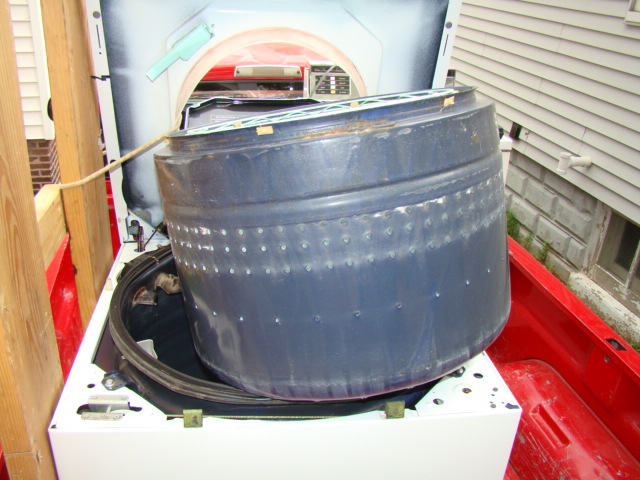
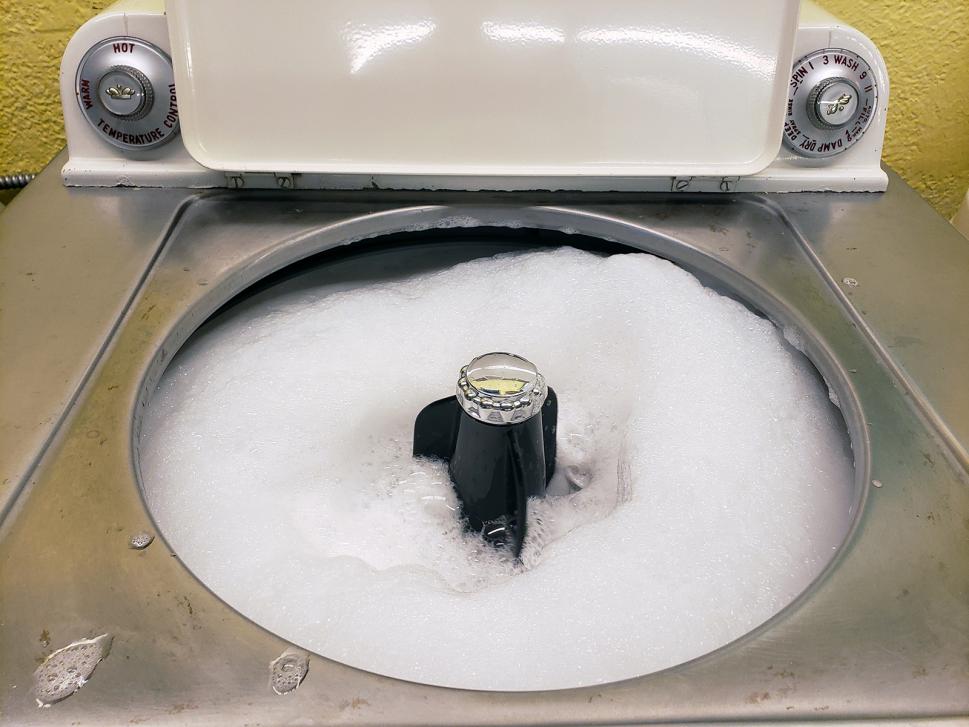
 On May 6, 2011, I was searching the Chicago area Craigslist ads, and came across an ad for a Washer and Gas Dryer, posted April, 29, 2011. There was a single small photo of a GE Washer and Dryer. The ad stated that the units were older, and the picture confirmed that, but I wasn�t sure how old. I wrote to the seller asking for the Model/Serial Number of the Washer. The next day, he wrote back stating that according to the literature he still had, the Model was WA743E, but he copied the Model number down wrong as: 1WA 1WA 74 F2W. I also wrote the seller asking for close-up photos of the washer and dryer console, plus a shot inside the washer, and he complied. On May 8, I consulted with Ken (bajaespuma) since he and I had communicated in the past about GE laundry products. I thought these machines were from 1978, but Ken was able to pinpoint them as models produced in 1969 based on the model information the seller provided and the photos which I forwarded. Ken and I talked talked about these machines, but I really needed to see them for myself. The seller was available on Thursday, May 12, so I agreed to drive up to Aurora to have a look. So Thursday morning as planned, I made the 2 � drive to Aurora. I was very pleased, seeing no oil dripping and the machines in pretty good condition. We haggled, and I agreed to buy the pair for $140. Now I know that the Model is: 1WA743E2W and S/N is: RD125395 (August 1969). With the Washer and Dryer still on my pickup truck, I started to do some preliminary clean-up work. Then On Sunday, May 15, I prepared to give the washer a full water test. I filled the washer nearly full with hot water and let it stand for 30 minutes or so. In the meantime, I started looking for problems. I did find a slow drip coming from about the 5 o�clock position. But I continued to run the test, which was very successful. The following video is an edited down version of what transpired over about an hour or so. The drip continued during the test, but did not change in volume. As I had been cleaning, I did see some rust in the bottom of the outer tube, so I concluded that the transmission boot was likely the source of the leak. Next step � search for the leak. SO, I am starting this thread to document this Washer and Dryer, AND the Disassembly and Restoration of the Washer. First some overall pictures taken before the clean-up process began, and then the Video will follow. AND the disassembly has been completed, with much of the cleanup complete, or in progress. Next, as I will discuss further down, I will begin the repair work to the outer tub. Lastly, I would appreciate any advice you might have, as I progress through this restoration project. Mike (Oh boy, Dishwashercrazy working on a Washer!) 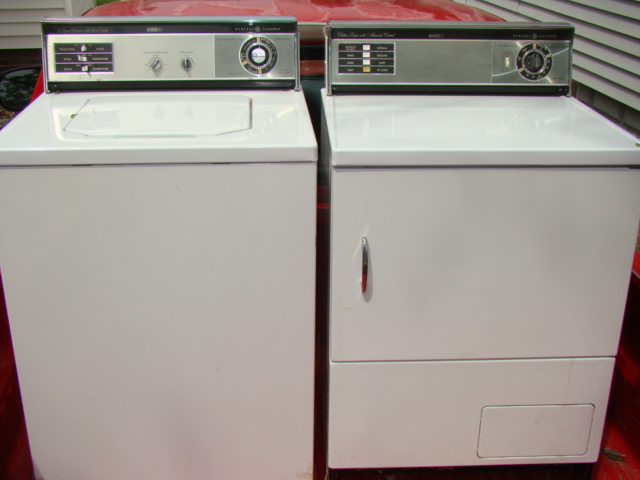
| ||

|
| Post# 520391 , Reply# 1 5/25/2011 at 14:24 (4,716 days old) by dishwashercrazy (West Peoria, IL) | ||
|
| ||
| Post# 520392 , Reply# 2 5/25/2011 at 14:25 (4,716 days old) by dishwashercrazy (West Peoria, IL) | ||
|
| ||
| Post# 520393 , Reply# 3 5/25/2011 at 14:25 (4,716 days old) by dishwashercrazy (West Peoria, IL) | ||
|
| ||
| Post# 520394 , Reply# 4 5/25/2011 at 14:26 (4,716 days old) by dishwashercrazy (West Peoria, IL) | ||
|
| ||
| Post# 520395 , Reply# 5 5/25/2011 at 14:29 (4,716 days old) by dishwashercrazy (West Peoria, IL) | ||
|
| ||
| Post# 520396 , Reply# 6 5/25/2011 at 14:30 (4,716 days old) by dishwashercrazy (West Peoria, IL) | ||
|
| ||
| Post# 520397 , Reply# 7 5/25/2011 at 14:31 (4,716 days old) by dishwashercrazy (West Peoria, IL) | ||
|
| ||
| Post# 520398 , Reply# 8 5/25/2011 at 14:32 (4,716 days old) by dishwashercrazy (West Peoria, IL) | ||
|
| ||
| Post# 520399 , Reply# 9 5/25/2011 at 14:33 (4,716 days old) by dishwashercrazy (West Peoria, IL) | ||
|
| ||
| Post# 520400 , Reply# 10 5/25/2011 at 14:37 (4,716 days old) by dishwashercrazy (West Peoria, IL) | ||
|
GE Filter Flo Washer Video | ||
| Post# 520404 , Reply# 11 5/25/2011 at 15:00 (4,716 days old) by dishwashercrazy (West Peoria, IL) | ||
|
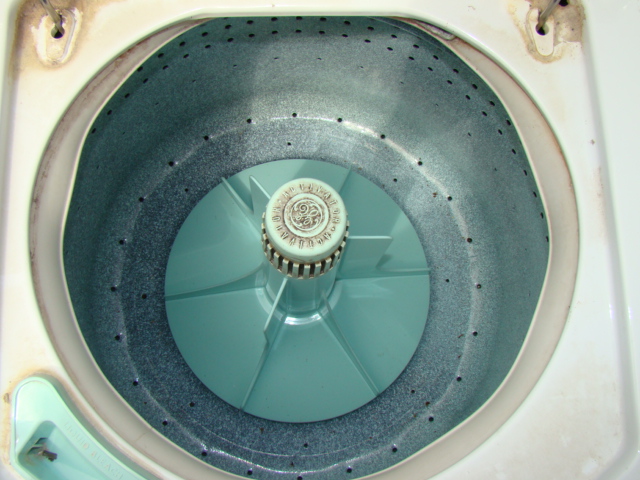
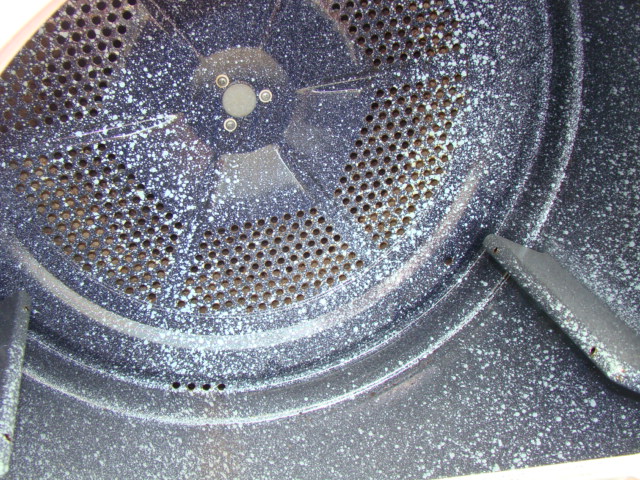
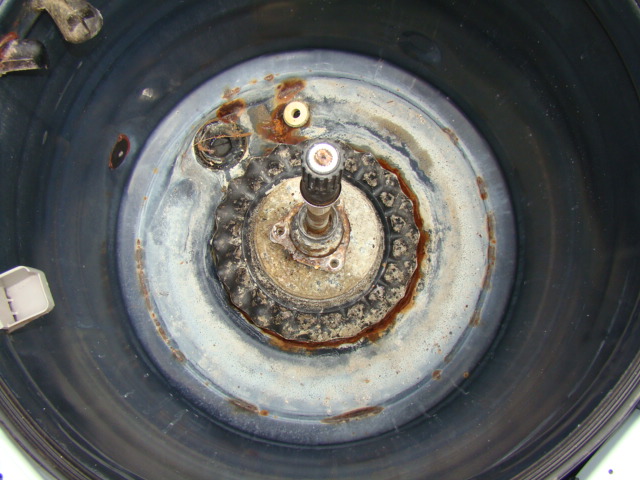
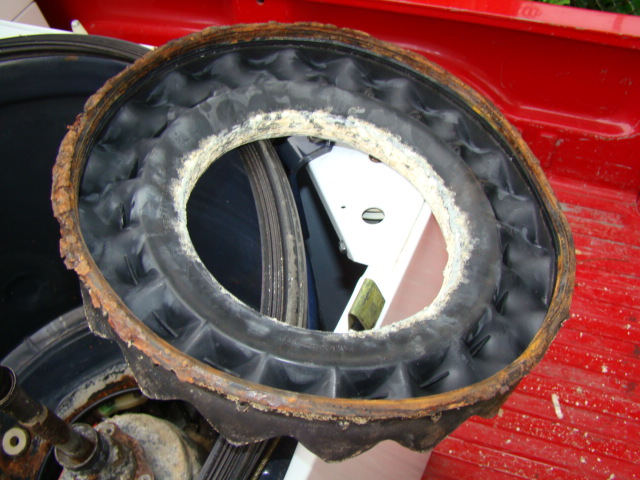
Dissassembly Started Well, my first problem was getting the Agitator off! It had not been removed in many years. I pulled and jerked, and pulled, and pulled some more. Nothing. I put two leather pants belts crisscrossed under the agitator, and pulled, but all I did was lift the washer up off of the bed of the truck. Worn out, needed rest. I came back to it later that night, and I decided to get more aggressive with the agitator. I put one belt underneath the agitator, and I started pulling with hard jerks. After a few pulls, I noticed that I was developing a gap underneath, so that encouraged me to make about 3 more pulls, and off it came. I had bruises on my forearm for several days after that. Underneath the agitator, I found this mess! 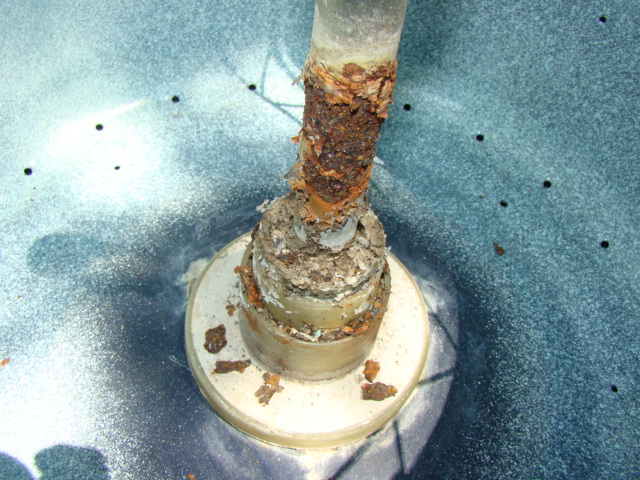
| ||
| Post# 520405 , Reply# 12 5/25/2011 at 15:03 (4,716 days old) by dishwashercrazy (West Peoria, IL) | ||
|
| ||
| Post# 520407 , Reply# 13 5/25/2011 at 15:19 (4,716 days old) by dishwashercrazy (West Peoria, IL) | ||
|
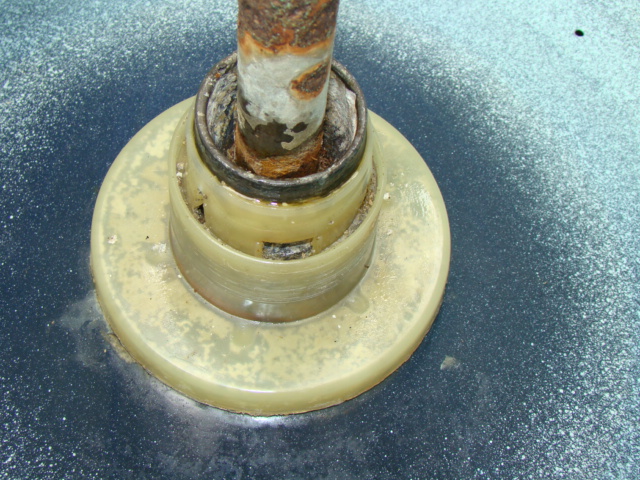
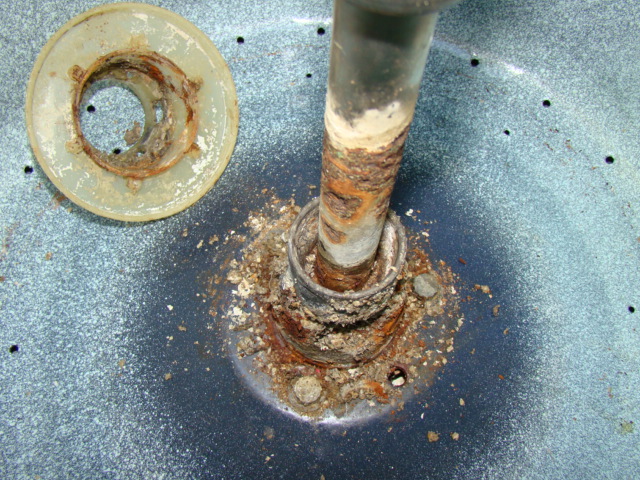
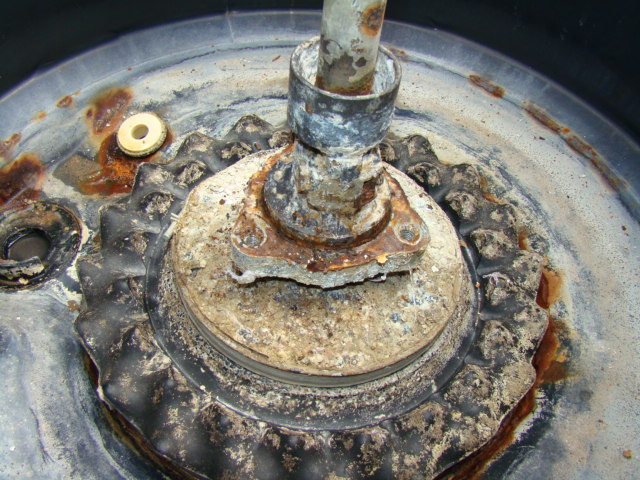
Well, that Plastic Cap does not come off easily! First, I took a feeler gage and went around the entire agitator shaft at the top (smallest diameter) portion of the plastic cap, to loosen all of the lime deposits that were bonding the cap to the shaft. I have sore and raw areas on both pointer fingers to show for that effort. Ah, but what next. A colleague had told me that there are two tabs that need to be pressed in order to get the cap off, but to the untrained servicer, he didn't know where the hell they were. Until later in the day, he discovered the secret. But before I found the tabs, I was trying to pry up from underneath the cap with a putty knife, but that was too flimsy. Next, I got out my 12 inch wonderbar pry bar, but that would not pop the cap off either, because I still had not figured out the secret of the two tabs. Once I discovered the tabs, I experimented, and found that using one blade screwdriver coming in from each side of the tab, for both tabs, was the right combination. Now, the pry bar finally started to gradually lift the cap up until if came off. 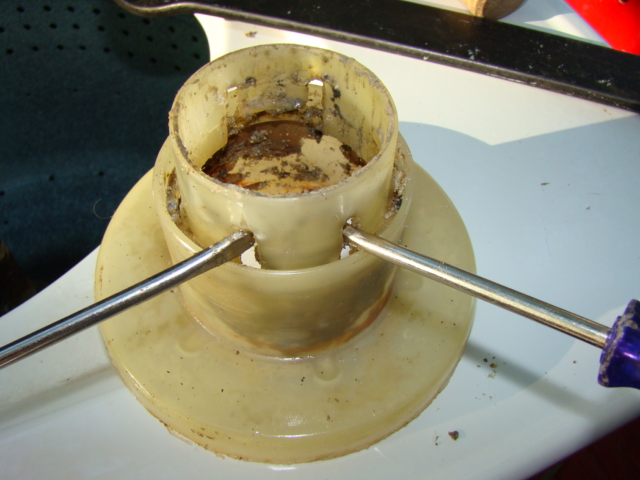
| ||
| Post# 520408 , Reply# 14 5/25/2011 at 15:21 (4,716 days old) by dishwashercrazy (West Peoria, IL) | ||
|
| ||
| Post# 520409 , Reply# 15 5/25/2011 at 15:22 (4,716 days old) by dishwashercrazy (West Peoria, IL) | ||
|
| ||
| Post# 520411 , Reply# 16 5/25/2011 at 15:30 (4,716 days old) by dishwashercrazy (West Peoria, IL) | ||
|
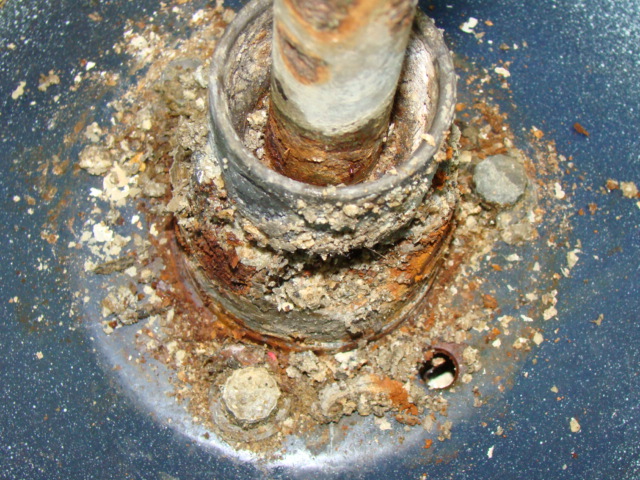
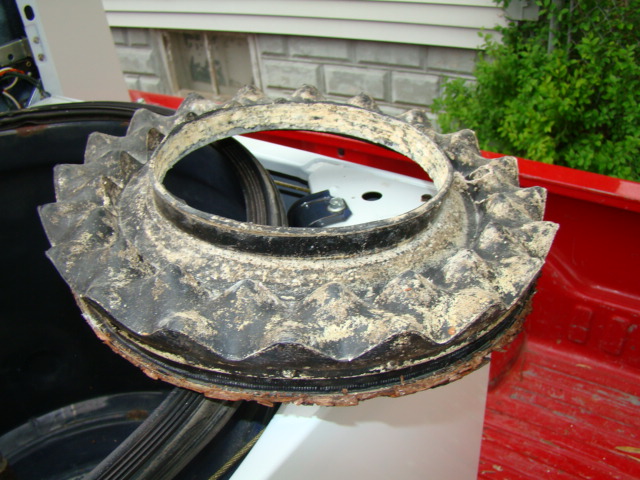
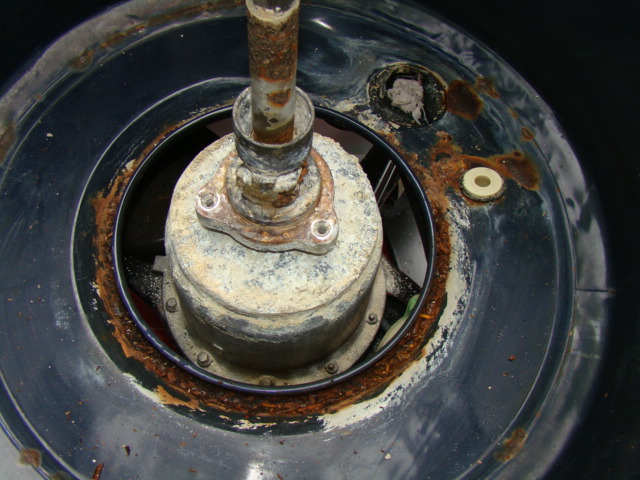
After more scrubbing and scrapping and cleaning, the spin tub bolts looked to be in very good shape. To my surprise, I placed a 1/2 inch box end wrench on one bold head, and it moved! As did the other two bolts, and in a few minutes, the moment of truth was upon me. Would the tub come out? I pulled. Nothing. I leaned. Nothing. I jerked. Nothing. Not until I went around the entire shaft and chisel out the rust that had accumulated there, was I able to get the tub to pop off of the flange that it had been bolted to for many years. 
| ||
| Post# 520412 , Reply# 17 5/25/2011 at 15:31 (4,716 days old) by dishwashercrazy (West Peoria, IL) | ||
|
| ||
| Post# 520413 , Reply# 18 5/25/2011 at 15:34 (4,716 days old) by dishwashercrazy (West Peoria, IL) | ||
|
| ||
| Post# 520414 , Reply# 19 5/25/2011 at 15:36 (4,716 days old) by dishwashercrazy (West Peoria, IL) | ||
|
| ||
| Post# 520416 , Reply# 20 5/25/2011 at 15:38 (4,716 days old) by dishwashercrazy (West Peoria, IL) | ||
|
| ||
| Post# 520417 , Reply# 21 5/25/2011 at 15:40 (4,716 days old) by dishwashercrazy (West Peoria, IL) | ||
|
| ||
| Post# 520418 , Reply# 22 5/25/2011 at 15:45 (4,716 days old) by dishwashercrazy (West Peoria, IL) | ||
|
| ||
| Post# 520419 , Reply# 23 5/25/2011 at 15:46 (4,716 days old) by dishwashercrazy (West Peoria, IL) | ||
|
| ||
| Post# 520421 , Reply# 24 5/25/2011 at 15:52 (4,716 days old) by dishwashercrazy (West Peoria, IL) | ||
|
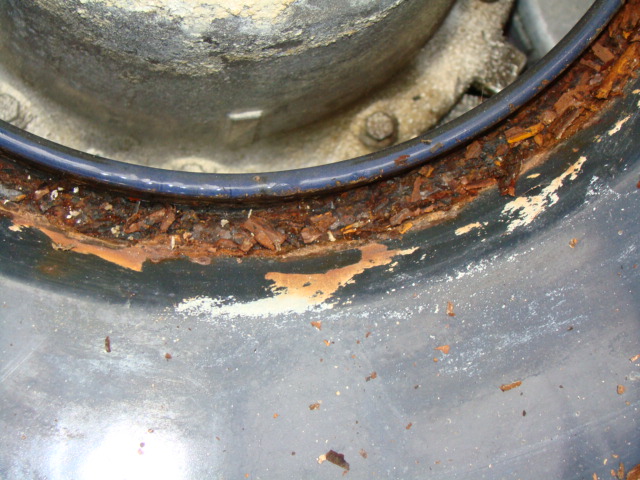
So what is next? Next, I plan to work on the rust areas. I have done some preliminary scrubbing and cleaning. I am uneasy scrubbing much more in the groove, and that large spot by the drain. I want to coat the rust with POR-15, but I cannot get it here in Peoria. Therefore, I have ordered a Starter Kit directly from the POR-15 customer support. Next step after that is to use a Bondo Fiberglass Repair Kit to form a patch over the worst areas. Finally, paint the affected areas with an Enamel paint. All further suggestions most welcome. Thank for reading so far. Mike | ||
| Post# 520423 , Reply# 25 5/25/2011 at 15:59 (4,716 days old) by macboy91si (Frankfort, KY) | ||
That Sucks! I've seen several machines like that. My boot in my GE looked similar and had become very hard. Water likes to stand in all of those rust spots and I guess over time it eats away at the porcelain and attacks the metal. That lip will also flex a lot when the metal becomes compromised and that only accelerates the problem.
Sorry to see that, do you plan on sourcing another outer tub?
-Tim | ||
| Post# 520430 , Reply# 26 5/25/2011 at 16:48 (4,716 days old) by mtn1584 (USA) | ||
|
one word.................................................... GORGEOUS! Mike | ||
Post# 520433 , Reply# 27 5/25/2011 at 17:42 (4,716 days old) by turquoisedude  (.) (.) |
||
 | ||
| Post# 520440 , Reply# 28 5/25/2011 at 18:22 (4,716 days old) by cfz2882 (Belle Fourche,SD) | ||
|
'69 GEs nice pair -those are really close to the very first washer and dryer i stripped down back in 1979,pair i stripped were kind of a pinkish color but not really a true pink.They might have been a couple years older than '69,but all the details were the same as the '69 pair pictured. | ||
|
Post# 520465 , Reply# 29 5/25/2011 at 20:23 (4,716 days old) by Unimatic1140 (Minneapolis) |
||
 | ||
|
Post# 520481 , Reply# 30 5/25/2011 at 21:13 (4,716 days old) by bajaespuma (Connecticut) |
||
Glad you got it home! Mike, I've fixed many of those holes in the outer tub successfully with the Bondo. Just use it fast, it sets up very quickly. Clean the rubber boot with oven cleaner spray then rinse it well and clean it with Lime-away. Works wonders on many of those parts.
Whoever designed that first generation of plastic hub cover deserves to have to pry it off of a 100 year-old machine to enter Heaven. I can't help but think that GE repairmen had a dedicated tool for its removal. Even when you know how it works it is a difficult and frustrating job.
Can't wait to see the machine in action with its new pimped-up spiral activator+mini tub. | ||
| Post# 520484 , Reply# 31 5/25/2011 at 21:25 (4,716 days old) by rickr (.) | ||
 | ||
| Post# 520492 , Reply# 32 5/25/2011 at 22:34 (4,716 days old) by dishwashercrazy (West Peoria, IL) | ||
|
Thanks everyone... Tim (macboy91si): I purchased a new Transmission Boot from my local Maytag/GE dealer for $30. To me, it is worth having a brand new boot in the machine. I didn�t think about the turned up lip weakening due to the rust in the groove. Nevertheless, I would really like to save the original outer tub, so I am going to proceed with a repair, rather than a replacement tub first. I did hear from my appliance store owner/friend in Missouri after I asked him for some assistance on the plastic agitator shaft cover. Apparently, he has some spare outer and inner tubs from this era that I could use as a replacement. It is nice to have that option. Mike (mtn1584): THANKS! Paul (turquoisedude): Thanks Paul. Yes, you, and anyone else can take advantage of the agitator removal method using a leather belt. Just slip it under and across the midpoint of the agitator. I closed the buckle on the belt forming a continuous loop. Then I just yanked and pulled and jerked on the belt until the agitator came loose. I have not tried this method on a couple of my Maytag washers yet, but I do want to give it a try one of these days. The POR-15 should arrive Thursday. Anxious to get started. cfz2882: Thanks. Robert (unimatic1140): Thanks, glad you liked the video. Yes, I was anxious to get to see the machine run, however, there is another reason why the Washer & Dryer were, and STILL are, on the truck � I don�t yet have a place to put them yet. I am hoping to sell the two dryers (Maytag and ASKO), which will open up the perfect location in the basement for a Washer/Dryer pair. Ken (bajaespuma): Thank you, and Thank you for all of your advice so far with this acquisition! I really appreciate your expertise. As I mentioned above � I bought a new boot for $30, so the peace of mind is well worth the small expense. I totally agree with you on the design of the plastic hub cover. What a bitch to get off. Rick (rickr): Thank you. I am looking forward to sharing the restoration project with everyone here. By the way, if anyone is looking for a GE FilterFlo, I am going to have For Sale, a 1990 Model WWA8350GBEAD (Almond). I use it quite regularly now, but once this restoration is complete, I will be looking to had this 1990 machine off to someone else. THANKS to all for reading. Mike | ||
|
Post# 520553 , Reply# 33 5/26/2011 at 06:09 (4,716 days old) by Jetcone (Schenectady-Home of Calrods,Monitor Tops,Toroid Transformers) |
||
I can't believe you got the tub bolts | ||
| Post# 520558 , Reply# 34 5/26/2011 at 06:26 (4,716 days old) by mrb627 (Buford, GA) | ||
Amazing | ||
| Post# 520563 , Reply# 35 5/26/2011 at 06:42 (4,716 days old) by MaytagA710 () | ||
|
Aww what an excellent looking set! Congratulations on your find! There is a dryer exactly like yours on Kijiji here in Halifax, I have half a mind to just pick it up now. Great video and good luck with the restoring process. | ||
|
Post# 520570 , Reply# 36 5/26/2011 at 07:23 (4,715 days old) by gansky1 (Omaha, The Home of the TV Dinner!) |
||
 Very nice, Mike! I've been doing the exact same repair on a FF recently too - the tub flange and drain area of the tub rust out terrible. (leave those lids up homemakers!) I used POR 15 and silicone before on these outer tubs and it worked great. Since the outer tub doesn't really have much stress of the moving transmission and basket it holds just fine.
Best of luck with the new GE set - they are in very nice shape! 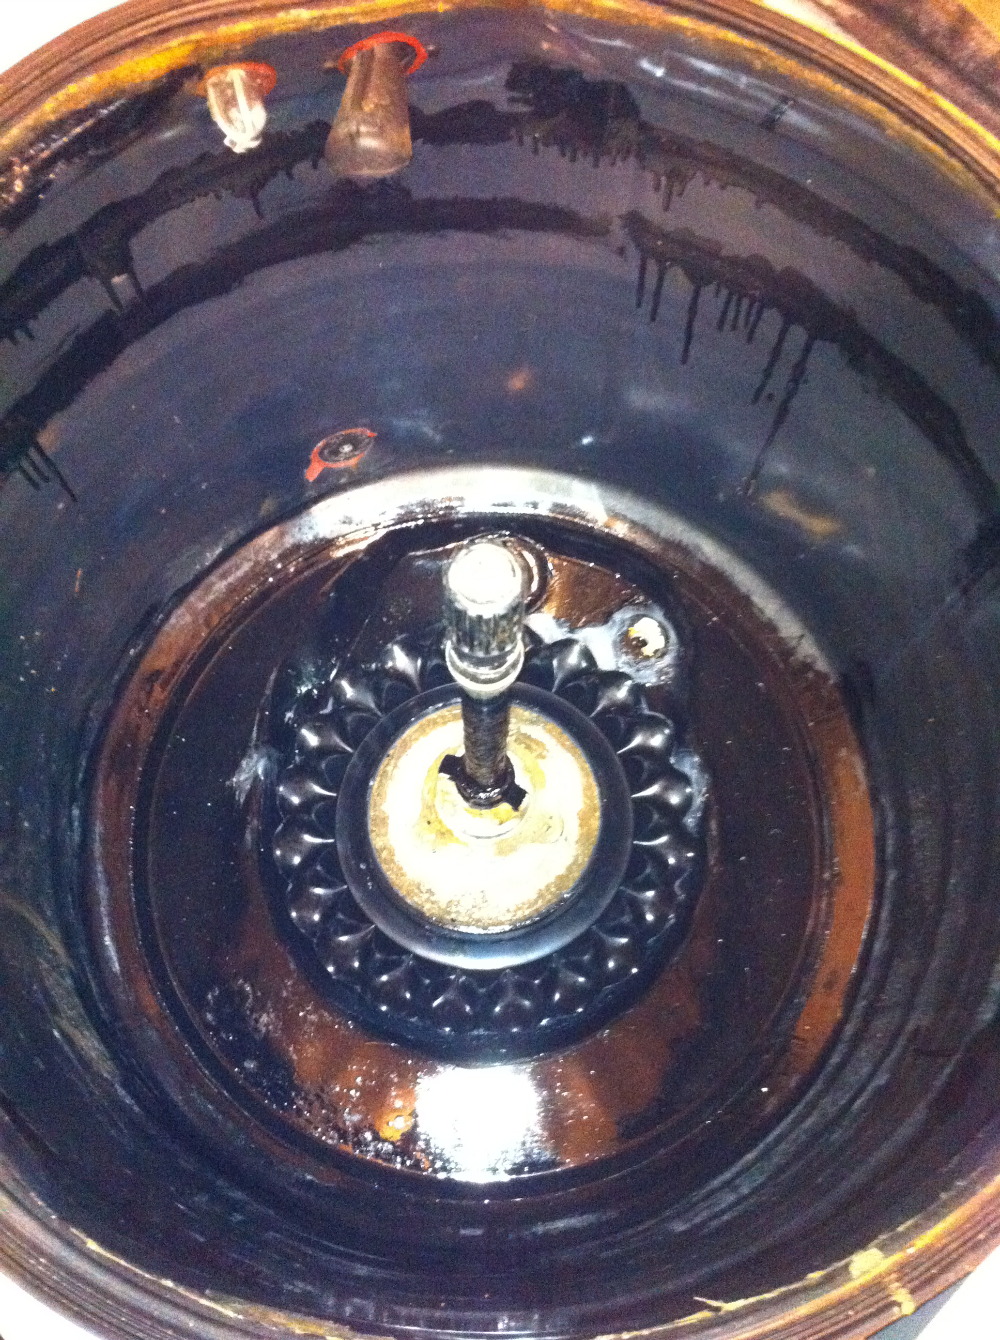
| ||
| Post# 520624 , Reply# 37 5/26/2011 at 14:17 (4,715 days old) by dishwashercrazy (West Peoria, IL) | ||
|
Thanks Jon, Malcolm, Kevin, and Greg. While I understand replacing the tub may be the preferred option for some of you, I believe I am going to follow Gregs example first and try to repair the tub. I may regret the decision, but I truly want to keep as much original iron in this machine as possible. BUT, I will double check with my sourch of the outer tub, and perhaps reserve it just in case. Mike | ||
|
Post# 520632 , Reply# 39 5/26/2011 at 14:52 (4,715 days old) by gansky1 (Omaha, The Home of the TV Dinner!) |
||
|
Unless there are very large holes, your outer tub should work just fine for many years to come. The picture I posted above is an oddity in that it looks as though there is rust all over the surface of the lower regions when in fact, that was a reflection or a flash anomaly - it's as clean and blue as the rest of the tub except where I used the POR15 around the flange and the drain/pressure switch outlets.
Good luck, Mike, I'm sure you'll make it work and it will be as good as new when you're done with it. | ||
| Post# 520695 , Reply# 40 5/26/2011 at 20:43 (4,715 days old) by redcarpetdrew (Fairfield, CA) | ||
Tub bolts from Hell (usually...)
I have to second Jon's comment. During my time as GE service way back when, I came to HATE those bolts. A real pill. Good for you that yours didn't fight!
Fixing the tub is very viable option. I've done that with a few. It seems to me that there was a repair 'patch' just for those occasions. Clean and dress the rust area (usually on the sides) and then apply the patch which became one with the tub. Maybe my memory is fuzzy but I DO remember it. Gemline, maybe? If you can, try to clean and reseal the drain port and such @ the tub bottom. Another spot for rust to rear it's ugly head. Also, check the lower transmission drive pully seal. If it's weeping, the lower seal is not to much of a headache to replace and I *think* it's still available. It's pretty much a lip seal that contacts with the drive pully shaft and a whole lot easier to service with the transmission out and upside down so the bottom cover can then be removed and seal replaced. It was a common repair for me to do... Nice machine and looks to well on her way to a permanent place in your laundry room (or at least until the next pretty face shows up...) RCD | ||
| Post# 520700 , Reply# 41 5/26/2011 at 21:19 (4,715 days old) by dishwashercrazy (West Peoria, IL) | ||
|
| ||
|
Post# 520775 , Reply# 43 5/27/2011 at 07:24 (4,714 days old) by combo52 (50 Year Repair Tech Beltsville,Md) |
||
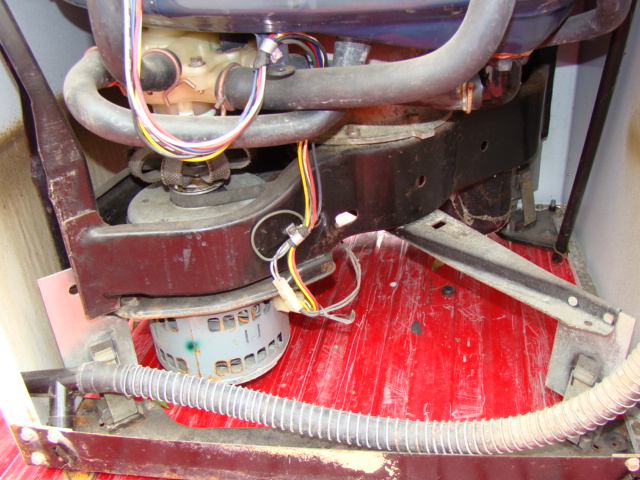
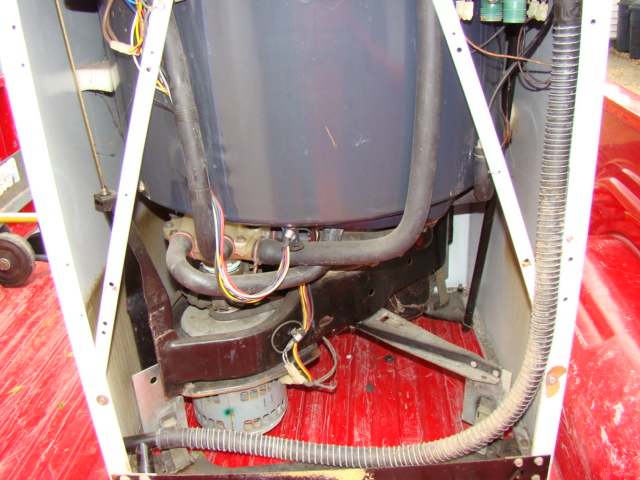
GE FF REBUILDING It looks like you are really giving this washer a good going over Mike i am sure that you will get it running well. The brown stains on the inside of the cabinet are most likely a bad pump seal, most often when its a water leak from somewhere else being thrown around by the pump driver it doesn't have that dark a rust stain.
One thing I don't understand [ and this goes to everyone that has a GE FF washer I am not picking on you Mike ] is why on earth you don't just replace the complete transmission when you are doing all this work. Excellent rebuilt complete transmissions are still available for often less than $100.00 with a one year warranty. And everyone that has a working GE FF washer that they expect to keep running for the foreseeable future should have at least one of these rebuilt transmissions in reserve. And if we don't buy these now they will go out of production even sooner. The transmission and the 2SP clutch were the two most troublesome major parts of GE FF washers and to of the most difficult to rebuild and good new or rebuilt ones are still available. | ||
| Post# 520914 , Reply# 45 5/27/2011 at 23:34 (4,714 days old) by mixfinder () | ||
|
What the hell happened to GE? Consumer Reports which coninually dogged their outdated platform and gave them mediocre ratings. | ||
|
Post# 520949 , Reply# 46 5/28/2011 at 05:07 (4,714 days old) by Easyspindry (Winston-Salem, NC) |
||
|
Way To Go, Mike. Looks like a great find. And, knowing your expertise, I'm sure it will be like new once you're done with it. The video was incredible. Thanks for sharing. Good luck. Jerry Gay | ||
|
Post# 520956 , Reply# 47 5/28/2011 at 06:32 (4,714 days old) by bajaespuma (Connecticut) |
||
|
Heresy It wasn't until I had my first Maytag (an A206 with helical drive) that it occurred to me that Consumer Reports wasn't as objective as one would think or expect. Although I wasn't a CU technician, my interest in these machines, as with a lot of us, was serious and I had enough experience in the laundry room to judge some of the differences for myself between the basic Maytag which kept garnering top place in the CU reports and the Filter-Flo's that consistently placed down in the middle of their ratings.
My first impression was that the Maytags, although I thought they were elegant machines, were overrated. Our GE's had always done a clearly superior job at cleaning clothing and also at rinsing, something that wasn't even measured by CU. The Maytags weren't bad, overall, but the agitation was ineffective with big loads, the kind of loads that everyone but the lady of the household would subject the family washing machine to normally and frequently. Our GE never slowed down or stalled with big loads the way I've seen many a Tag do. Maytag rinsing has always been skimpy. Again, if you have a serious load in those machines, you are lucky if they'll turn over even once during that 2 minute rinse. The Filter-flo rinse on the normal cycle was always about 4 minutes long and, again, that powerful activation moved that laundry up and down with ease. GE's lint filter was also a better design than the Maytags, but the more I think about lint, the more it's a non-issue.
I think this comparison is fair, also for Whirlpools although I was always disappointed by how ineffective extraction was with the BD pools and kenmores.
True, Maytags are engineered beautifully, dependable and quiet. But I always thought Filter-Flo's were much better than what Consumer Reports reported | ||
|
Post# 520972 , Reply# 48 5/28/2011 at 07:29 (4,713 days old) by jetcone (Schenectady-Home of Calrods,Monitor Tops,Toroid Transformers) |
||
|
We grew up with a '56 FF in the house | ||
|
Post# 520973 , Reply# 49 5/28/2011 at 07:31 (4,713 days old) by jetcone (Schenectady-Home of Calrods,Monitor Tops,Toroid Transformers) |
||
|
Greg who did you get your boots from | ||
|
Post# 520996 , Reply# 50 5/28/2011 at 08:52 (4,713 days old) by gansky1 (Omaha, The Home of the TV Dinner!) |
||
|
The ebay store I bought them from was TexasT-Resale, he's still there but no boots now. I found 7 for $35 + shipping.
Cuz I needed 7??
The one you mentioned for $15 appears to be the same as mine - luscious silicone rubber.
(I'm sure you know this but these are only for the perforated tub machines, the earlier ones had a different flange and extra lip on the bottom of the boot for the solid-tub washers) CLICK HERE TO GO TO gansky1's LINK on eBay | ||
| Post# 522217 , Reply# 52 6/3/2011 at 11:10 (4,707 days old) by mickeyd (Hamburg NY) | ||
Hi MIke, I couldn't get to sleep one night last week so I got up and watched your video which relaxed me completely. I loved it. All the graphics and the narration--perfect.
Especially the water throw--great that you filmed it. Who has a more exciting or rapid spin drain than a vintage GE. Again, your work is spectacular. | ||
| Post# 522227 , Reply# 53 6/3/2011 at 11:58 (4,707 days old) by dishwashercrazy (West Peoria, IL) | ||
|
Michael: Thank you so much. I am very happy that you liked my video. LOL - now I know that I can really put folks to sleep with my "teaching mode" voice.
UPDATE: Actually, I have not done anything else since last posting, except get the machines off of my truck and into the Solarium, where it will be much easier to work on. Contrary to some excellent advice (above) to replace the outer tub and transmission, I am going to start a restoration of the outer tub by first applying the POR-15 soon. And keep the present transmission for the time being. I want to keep as much original iron in the machine as possible.
Thanks to all.
Mike
| ||
|
Post# 522235 , Reply# 54 6/3/2011 at 13:05 (4,707 days old) by yogitunes (New Jersey) |
||

if your tranny was leaking, the belt and all areas underneath would be splashed with oil, it could be a small drip, but you would see it everywhere.....just looks like either at one time, or your current pump is leaking from the small hole on the side, one way to tell if this one is leaking, from that small hole there will be a dribble of black stripe oil streak running down the side of it....if its clean, it has already been replaced!
| ||
| Forum Index: | 
| Other Forums: |

|

|

|

|

|

 Comes to the Rescue!