Thread Number: 45349
Hoover 0611 Spin Tub Buffer Seal
[Down to Last]

automaticwasher.org's exclusive eBay Watch:
scroll >>> for more items --- [As an eBay Partner, eBay may compensate automaticwasher.org if you make a purchase using any link to eBay on this page]
Post# 664243   3/6/2013 at 17:23 (4,067 days old) by MIPS ()        

Hello everyone!
So I spotted a Hoover twin tub washer the other day and took the chance to buy it as I always wanted to try one.
It's a 0611 which is apparently your basic unit. It was relatively clean and there wasn't too much rust. WD40 and two test cycles found no electrical or mechanical problems however....

1)The pump leaked
2)The spin tub buffer seal was leaking

Top priority was the pump. Instead of leaking at the O-rings it was leaking out the valve seal at the top at a fairly fast and steady rate. A replacement seal could not be sourced so I rectified it by installing in a tightly fitting o-ring inside and stuffing the cavity with grease.

i11.photobucket.com/albums/a166/b...

The whole pump was dismantled, cleaned and the o-rings regreased even though they were fine.

The buffer seal is different. From the looks of the spray pattern it's been doing it for a while however it's a mere drip compared to the torrent of water from the pump. I removed the spin can and pulley and the inside of the buffer is starting to crack so I want to remove it, clean it, and apply silicone goop as well as take a drill brush to the inside of the tub to clean up the corrosion blisters.
I removed the snap ring and according to the exploded view you push the seal into the tub ( cdn.appliancepartspros.com/images...
...however even with a wooden block and a hammer I can't move it. Does it normally take a large amount of force to remove old buffer seals or has it rusted and reacted with the aluminum tub?


Post# 664280 , Reply# 1   3/6/2013 at 19:00 (4,067 days old) by unclejohn (Can)        
0611

Allo MIPS!

First of all,

welcome on this forum!

I too have one 0611 (bought in 2012) about which I had to fix only one thing, that is - a cracked rubber seal beneath the spin tub, quickly repaired with some amount of GE silicone rubber gel, after that no problem whatsoever. The repairs you refer to seem quite a bit more difficult. Perhaps you should get some helpful discussion on that matter with knowledgeable people regarding restoration.

This is a nice little machine, basic but practical. Please could you tell us where did you find - and how much did you pay for it? I got mine's (last year) for fifty bucks from a woman whose mother passed away so she had to get rid of that lil babe

BTW, it'd be cool if you could post in here a few pictures of your machine. I'm in preparation to post some photos of my own 'backyard collection' as soon as I can.


Post# 664283 , Reply# 2   3/6/2013 at 19:52 (4,067 days old) by mips ()        

Well I was hoping that someone here might know a bit more. All the other forums I frequent don't specialize with large appliances like here.
I purchased it at a used construction supply store that sits on the Mt. Paul Industrial Park's main drag. Paid $75 for it which was the high end of what I wanted but I have not seen a twin tub in years so I bit the bullet.
The unit obviously had a lot stacked on it. The lids are scratched up and the spin lid even has a piece of palstic riveted on because the aluminum is starting to break along a perforation. Cosmetics like that IMHO are fine by me.

i11.photobucket.com/albums/a166/b...

Inside the spin tub (ewwww~)
i11.photobucket.com/albums/a166/b...

Washer tipped over
i11.photobucket.com/albums/a166/b...

Underside of the spin tub (still have not gotten the buffer off)
i11.photobucket.com/albums/a166/b...

That leaks been there a while......
i11.photobucket.com/albums/a166/b...


Post# 664337 , Reply# 3   3/7/2013 at 08:48 (4,066 days old) by TwinTubber (Toronto)        
Oh my.....

She's a little beat up around the edges, that one. But a beauty no less.
Glad you rescued it and finally got yourself a Twin Tub! They are LOADS of fun (I know-groan...)
You have however, just reminded me of the task I will soon have to face with my recently acquired Hoover TT.
The pump works just fine in mine, (thankfully), but the spin tub seal leaks from cracking. I tried silicone sealant and it still leaks.
So come Spring, I'll get all new belts and a new seal and get it finally up and running smoothly.
I look forward to your success and hopefully learning from your efforts.


Post# 664353 , Reply# 4   3/7/2013 at 11:08 (4,066 days old) by unclejohn (Can)        

Thanks for posting some pictures of it, MIPS. It IS the very same model as I have. Cool! Here is a nice little machine, and I hope you will have fun working with it.


Post# 664450 , Reply# 5   3/7/2013 at 22:50 (4,065 days old) by mips ()        

Managed to get it off. Decided to take a risk and dent the side of the buffer's metal ring and then a few more taps with the hammer and it fell out. It's in pretty bad shape but again, it's not something I can affordably source a replacement for so out came the Goop and after being washed, scrubbed and dried it was given a light application.
i11.photobucket.com/albums/a166/b...
I'll probably have to put some more around the outside edge when I reinstall it because it's a tad warped from the prying.

As for the tub, it was also pretty bad. Some of the blisters had eatean right through but again, a good cleaning an application of Goop to the inside and outside of the tub looks like it will hold out.
i11.photobucket.com/albums/a166/b...

The drain was also messed up. A dime sized hole had corroded away. I cleaned that up then applied JBweld with a bridge patch to keep the epoxy on the hole.

That should about do it. Hopefully after everything sets for a day there shouldn't be any leaks or immediate issues with parts rusting out.


Post# 664522 , Reply# 6   3/8/2013 at 08:38 (4,065 days old) by unclejohn (Can)        
Good work !

MIPS, seems like you're on the right path to rejuvenate this machine. Hope it will work fine from now on, with NO leaks. Except for metal fatigue, normal wear, etc., rust is the worst enemy of our beloved household appliances. It's a fight to death against corrosion... And, well, washing machines are exposed to this problem, more so than any other appliance (dishwasher or humidifier excepted). Let us know, when your washer 'is back on its feet'. :-]

Post# 664884 , Reply# 7   3/10/2013 at 11:34 (4,063 days old) by barcoboy (Canada)        

barcoboy's profile picture
Nice machine MIBS! Hope you get it leak free soon.

Post# 664886 , Reply# 8   3/10/2013 at 11:47 (4,063 days old) by barcoboy (Canada)        

barcoboy's profile picture
Oops, sorry, I meant MIPS. :-)

MIBS is another acronym having to do with where I work.


Post# 664909 , Reply# 9   3/10/2013 at 14:17 (4,063 days old) by mips ()        

Lose one leak, gain another (or two)
I had a feeling that the drain from the spin tub would leak since it's the only place there was no hose clamp.....and it did but that was easy to fix.
Unfortunately our old friend is still being annoying. While reassembling the spin can assembly I noticed I had some extra play on the shaft which might affect the ceramic rotary seal but the documentation never showed a spring so I assumed that 1/16" more play wouldn't hurt.
It did. Add a bit of water and now it leaks around the shaft which means the rotary seal is not getting the compression it needs to keep water in. Everything is keyed so you can't loosen the pulley bolt and pull the spin can tighter against it so I guess orginally everything was a perfect fit and now that stuff like swelled up corrosion and damaged seats have been cleaned up it is now all out of spec. Either I can find a spring to place on the spin can side of the seal to press down against the other half on the buffer or find a washer or two and shim the buffer up from the underside against the other half. What would be better?


Post# 664926 , Reply# 10   3/10/2013 at 15:24 (4,063 days old) by chestermikeuk (Rainhill *Home of the RailwayTrials* Merseyside,UK)        
Hoovermatic

chestermikeuk's profile picture
Congratulations of finding and restoring this great washing machine, they are fun to use and relatively easy to work on, great job of de-rusting the outer can and getting the resiliant mount seal out with tearing any more holes in it!!

By the look of your resiliant mount (see link pic) it looks slightly different to the ones over here but our has a strong spring and copper seals on the shaft access, looking on your pic I cant see the spring on your seal.......


CLICK HERE TO GO TO chestermikeuk's LINK


Post# 664970 , Reply# 11   3/10/2013 at 20:10 (4,063 days old) by mips ()        

I was wondering why there was that giant cavity.
When I pulled apart thebuffer I found a large amount of rust but no spring.
I since reassembled it using large amounts of goop........
I'll pull the buffer out again and hopefully I can separate the pieces but where could I find a new spring?


Post# 665013 , Reply# 12   3/11/2013 at 00:37 (4,062 days old) by mips ()        

Pulled it apart agian and cleaned most of the goop out. Here's what you get.

i11.photobucket.com/albums/a166/b...

The exploded view a few posts up and with googling I can't find ANYTHING that says this had a spring in it. There's the face, counterface, the buffer and a thrust washer.


Post# 665961 , Reply# 13   3/14/2013 at 23:54 (4,058 days old) by mips ()        

Right. Problems.

So the lack of a spring in the rotary seal was apparently made up with one face being flexible with a reinforced steel ring around the edge. I bought a large washer and glued that inside the cavity of the buffer, then gooped in the rubber mount for the ceramic face. This was to seal over the old corroding seat and to lift up the seal a little.

i11.photobucket.com/albums/a166/b...

I then took another washer and fitted that on the other side so that now there was zero up/down play and the rubber face mount was partly compressed so the two ceramic discs were tightly together.

i11.photobucket.com/albums/a166/b...

But it didn't do anything. You add water and it immediately starts trickling down around the shaft. the buffer is good, the ceramic seal should now be good.....


Post# 666154 , Reply# 14   3/15/2013 at 22:19 (4,058 days old) by mips ()        

Say, unclejohn.
Would you be able to tell me how the mechanical seal assembly on your 0611 is assembled? I've gone over my seals, goop and everything thrice. Either mine isn't getting a flush seating between the discs (which is odd because the rubber buffer should flex it into place if it was not) or I'm doing it all wrong because there's no other palce this water can be leaking from. The only illustrations I can find online do not get detailed enough to show how it goes together and you are the only other person I know of who has one of these machines.


Post# 666523 , Reply# 15   3/17/2013 at 14:48 (4,056 days old) by mips ()        

Only took forever but with careful balancing and reseating of the seals I got it. Ran it through two cycles with no leaks. There is some squeaking but I don't know if that is the washer shim on the underside of the shaft rubbing its way into the new home or something else. Between how sensitive the seal is to alignment and screaming at a hose clamp for an hour because they suck to put on, I'm not taking it apart again.

i11.photobucket.com/albums/a166/b...


Post# 666576 , Reply# 16   3/17/2013 at 17:16 (4,056 days old) by unclejohn (Can)        
0611

Dear MIPS,

Good to hear it seems to work its way without problem. Hope it will continue to give you hours and hours of washday pleasure!

Beautiful machine. Mine doesnt have the original red and silver metallic logo. I had to 'replace' the missing badge by a peel & apply type of color sticker with the round hoover logo (see pic below). Thank you for sharing the photos.

btw, have you had a look at these? (see link)


CLICK HERE TO GO TO unclejohn's LINK


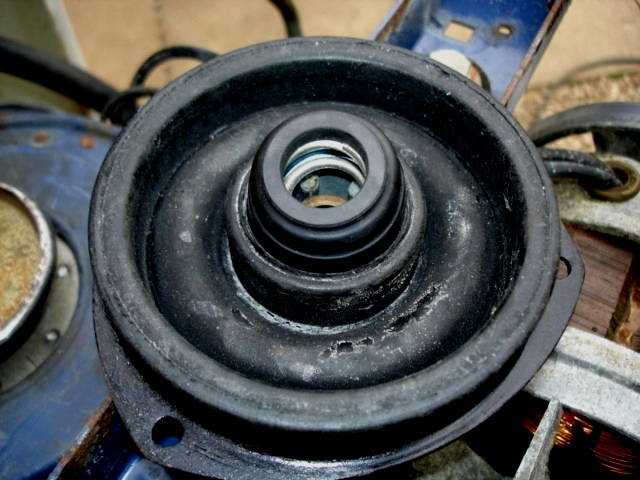
Post# 666697 , Reply# 17   3/18/2013 at 05:03 (4,055 days old) by chestermikeuk (Rainhill *Home of the RailwayTrials* Merseyside,UK)        
"and screaming at a hose clamp for an hour"

chestermikeuk's profile picture
Ha ha , that sound about right for some of these repairs, glad to see you persevered and got the trusted Hoover twinny working, now make sure you use it regularly, most of these oldies have just as much damage from not being used...

Heres a link to the Hoovermatic 3301 which is the nearest model to yours here in the UK...


CLICK HERE TO GO TO chestermikeuk's LINK


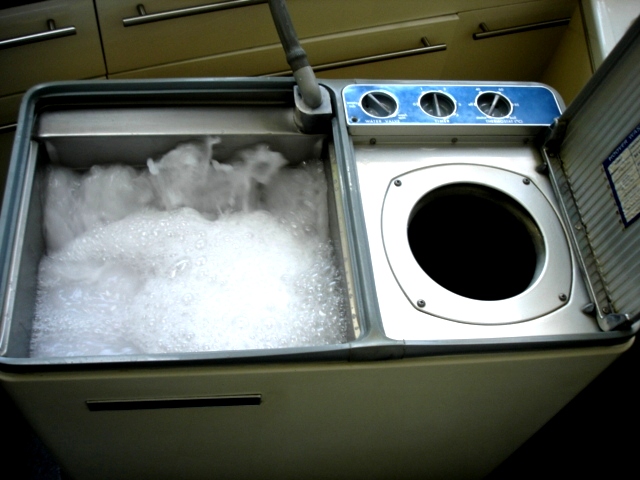
Post# 666935 , Reply# 18   3/18/2013 at 23:26 (4,054 days old) by mips ()        

Had to run it today when the Inglis had its timer give out halfway through a load.

Does anyone know the diameter of the original spin mats? These things don't like working without them unless you want the machine rumbling across the floor.


Post# 667156 , Reply# 19   3/19/2013 at 23:08 (4,053 days old) by unclejohn (Can)        
spin mats

''Does anyone know the diameter of the original spin mats?''

Spin mats for virtually all Hoover Twinnies are of the same 'size': 7 or 7.5 in diam.

Just as for the safety helmet inside a construction site, there should be a law to forbid every twin tub owner to actually be laundrying without using one. lol

twintub.co.uk/Hotpoint-Hoover-Twi...


CLICK HERE TO GO TO unclejohn's LINK


Post# 667160 , Reply# 20   3/19/2013 at 23:14 (4,053 days old) by unclejohn (Can)        
spin mats...

mips,

heres another link (as example) that should work:

www.amazon.co.uk/Hoovermatic-Wash...


BTW, the EXACT diam. is 7.5" or 190mm

uj


Post# 667170 , Reply# 21   3/20/2013 at 02:35 (4,053 days old) by chestermikeuk (Rainhill *Home of the RailwayTrials* Merseyside,UK)        
Spin Mats

chestermikeuk's profile picture
Providing the clothes are placed evenly round the drum and pressed down, a spin mat is not necessary, its only to stop small items, sock, hankies from flying out of the spin can if they are at the top...

Correct loading should be items placed evenly around the can (dip in the middle for rinsing) and a larger item say towel or shirt placed over the items and tucked into the sides...

If the spinner is vibrating excessively with an even load then you possibly have a problem with the spin mount / bearings / excess wear or not tightened up enough!!


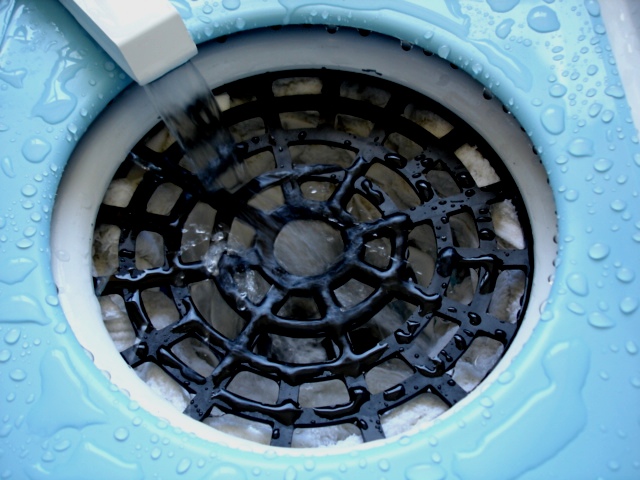
Post# 667263 , Reply# 22   3/20/2013 at 12:50 (4,053 days old) by Launderess (Quiet Please, There´s a Lady on Stage)        
Mats For Spin Dryers

launderess's profile picture
One that came with our NIB spin dryer tore apart after a few uses so that was that. Went into my Hoover parts stash to see if some of the extra mats would fit, but sadly they are too small. No huge deal.

Simply do what commercial laundries have done since extractors came upon the scene. Make sure the load is properly placed in the machine and if required one can tuck towel or some such sturdy cloth over the top of the load.

Mats and even the towel bit are only really to prevent small items from being flung up and over the tub. They also prevent fabric damage should parts of the load rise up during extraction and rub against the inside of the lid, etc...

Small items should always be loaded at the bottom of a spin dryer load so the heavier objects will cover, this keeps them from pushing up being flug up and out of the basket. The rest we all know, the load must be pushed down so it is well away from the top of the basket.


Post# 667738 , Reply# 23   3/22/2013 at 21:28 (4,051 days old) by mips ()        

Right, so as long as I properly load the spincan I shouldn't have any problems running sans the mat.

[quote]If the spinner is vibrating excessively with an even load then you possibly have a problem with the spin mount / bearings / excess wear or not tightened up enough!! [/quote]

It's fine with nothing in it. Only when you really fill it up do you get vibration issues but that might of been it being improperly loaded down with pants. I can tighten up the linkage between the spincan shaft and the pulley but I'm not shifting it otherwise. It took a full week to get in a spot where it would not leak. There is however pretty heavy wear along the shaft which probably might cause some vibration.


Forum Index:       Other Forums:                      


Comes to the Rescue!

The Discuss-o-Mat has stopped, buzzer is sounding!!!
If you would like to reply to this thread please log-in...

Discuss-O-MAT Log-In


New Members
Click Here To Sign Up.


automaticwasher.org home
Discuss-o-Mat Forums
Vintage Brochures, Service and Owners Manuals
Fun Vintage Washer Ephemera
See It Wash!
Video Downloads
Audio Downloads
Picture of the Day
Patent of the Day
Photos of our Collections
The Old Aberdeen Farm
Vintage Service Manuals
Vintage washer/dryer/dishwasher to sell?
Technical/service questions?
Looking for Parts?
Website related questions?
Digital Millennium Copyright Act Policy
Our Privacy Policy