Thread Number: 45806
Seeking advice for kd12.
[Down to Last]

automaticwasher.org's exclusive eBay Watch:
scroll >>> for more items --- [As an eBay Partner, eBay may compensate automaticwasher.org if you make a purchase using any link to eBay on this page]
Post# 669983   4/2/2013 at 16:08 (4,035 days old) by aloysius (Lake Tapawingo, Missouri)        

I have a Kitchenaid by Hobart kd12 dishwasher that was purchased by my parents in or about 1960. It still works and is in as close to perfect condition as one could imagine. However the p-trap cracked and when we tried to replace it we had difficulty removing the p-trap from where it attaches to the dishwasher. When a plumber was able to remove the p-trap he informed me the part of the machine that attaches to the p-trap had deteriorated so that a new p-trap could not be attached. I would like to keep the machine because it still works otherwise. It is in beautiful condition and matches the rest of the 1960 appliances and range hood that still work with a unique and very classy bronze-burst type of coloration.

I do not know the name of the deteriorated part but is there any way to fix the problem other than trying to find an old machine and scavenge the part? Would it be better to simply replace the machine and keep it in storage until I can find a way to fix it? I do not want to let it go because it is very cool and was purchased by my parents. I value those sort of things. If I keep the house I want to keep all the appliances the way they are now. If I sell the house I want to remove the appliances and install them in my house. In the meantime the house needs a working dishwasher.

Any help or advice will be greatly appreciated. Thank you.


Post# 670129 , Reply# 1   4/3/2013 at 00:40 (4,035 days old) by gansky1 (Omaha, The Home of the TV Dinner!)        

gansky1's profile picture
I had a KDC-14 dishwasher with the same problem. The cast iron drain outlet was rusted away so I just clamped a hose onto it and then onto an electric pump to drain into a garbage disposer, but you could connect the hose onto an extension that is fitted to a new p-trap as well. It may take a little reconfiguring of the existing drain parts and a trip (or two) to the hardware store, but this doesn't have to be the end of the machine.

Post# 670190 , Reply# 2   4/3/2013 at 09:43 (4,034 days old) by aloysius (Lake Tapawingo, Missouri)        

Thank you for your advice. As soon as I get the time I will try what you have suggested. If I run into any more problems with the drain repair or anything else that comes up in the process I may have to call on you again for help.

Post# 670201 , Reply# 3   4/3/2013 at 10:58 (4,034 days old) by stevet (West Melbourne, FL)        
Gravity (of the situation)Drain woes

As you probably know already, your machine is a gravity drain unit, so if you can get a Fernco no-hub rubber coupling on what is left of the drain valve and then plumb in a new trap you will be set. If you can drop the drain pipe down thru the floor into your basement, you can install the trap there too and then connect up to the waste to get rid of the water in the dishwasher. The other choice would be to raise the machine up higher and do the coupling and trap under the machine and then to the drain in the wall or sink.

There are a few Draion valves left but not easily gotten. And at over 300 bucks apiece, they come with a hefty price tag.

Good Luck and keep us posted.


Post# 670205 , Reply# 4   4/3/2013 at 11:50 (4,034 days old) by kb0nes (Burnsville, MN)        
Drain valve repair

kb0nes's profile picture
Steve or Greg,

Curious about repair of the drain valves. I'm assuming its cast iron? Perhaps it would be possible to braze a spud into effecting a permenant repair. Do either of you happen to have a photo of a drain valve?

Phil


Post# 670269 , Reply# 5   4/3/2013 at 15:08 (4,034 days old) by Jetcone (Schenectady-Home of Calrods,Monitor Tops,Toroid Transformers)        
Here's what a really

jetcone's profile picture
bad one looks like:


Post# 670321 , Reply# 6   4/3/2013 at 19:52 (4,034 days old) by kb0nes (Burnsville, MN)        

kb0nes's profile picture
Jon,

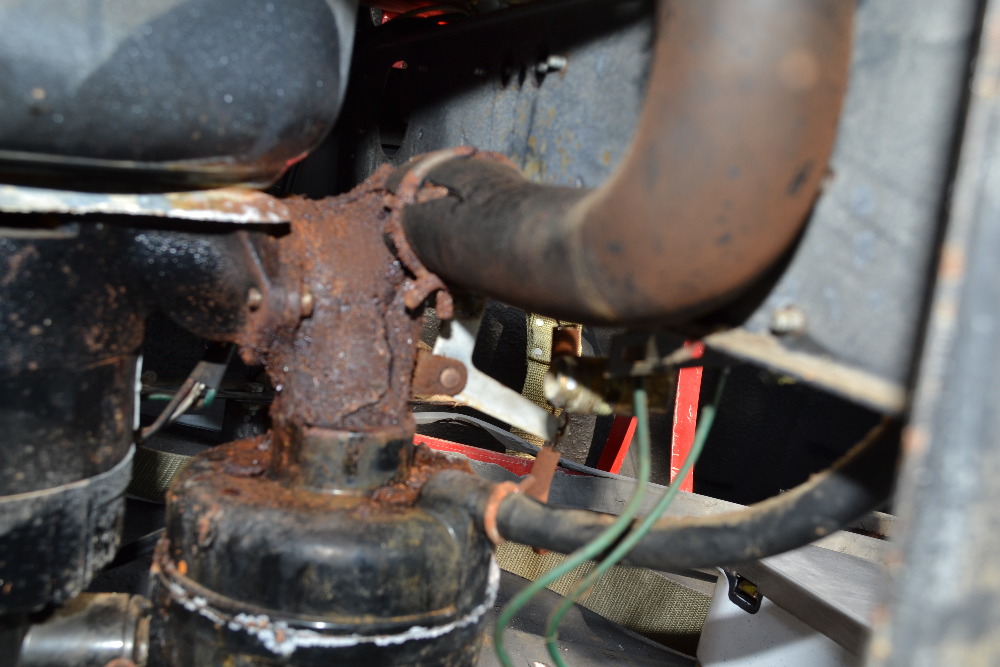
Could you describe what I'm seeing in your photo? Its a bit too much of a close-up to discern ;)

What is the black canister at the bottom (the one with the crusty seam), is that the drain valve itself?

The hose in the right foreground that runs up to? The tub??

The rusty fitting on this particular machine is close to beyond repair. There needs to be a bit of something there to attach anything new to. What exactly causes them to rust this badly? Last I checked they don't salt the roads under a dishwasher!


Post# 670328 , Reply# 7   4/3/2013 at 20:11 (4,034 days old) by Kenmore71 (Minneapolis, MN)        

kenmore71's profile picture
The drain valve is the rusted nastiness front and center. The "L" shaped piece of aluminum is connected to the drain solenoid.

The black canister is the drain pump - this is from a pump model. A non-pump model would simply have the gravity drain connected where the pump begins.


Post# 670336 , Reply# 8   4/3/2013 at 20:30 (4,034 days old) by gansky1 (Omaha, The Home of the TV Dinner!)        

gansky1's profile picture
The black canister is actually the sump, only found on "P" or pump models - a "trap" of sorts to protect the pump that mounts directly to the bottom of the motor.

When I had the KDC-14 (gravity drain) in my kitchen, I wired in an electric pump that ran continuously with the motor and attached the 1 1/2" hose to the drain valve on the machine and the other to the electric pump.


Post# 670345 , Reply# 9   4/3/2013 at 20:47 (4,034 days old) by Kenmore71 (Minneapolis, MN)        

kenmore71's profile picture
Ooops. My bad.

Post# 670399 , Reply# 10   4/4/2013 at 06:48 (4,033 days old) by toploader55 (Massachusetts Sand Bar, Cape Cod)        
Hi Greg.

toploader55's profile picture
Would you by any chance have a pic or two of the Pump set up for the KDC-14 Gravity Drain ?

Thanks.


Post# 670422 , Reply# 11   4/4/2013 at 09:59 (4,033 days old) by aloysius (Lake Tapawingo, Missouri)        

Thank you all for your responses. I am going to get a Fernco no-hub rubber coupling today as was suggested by stevet above. When I called Lowes they suggested a 1 1/2 inch coupling for a space under the dishwasher and above the floor. I feel fairly confident this should do the trick. I just hope I do not create any other problems in the process.

I will let you all know how it turns out.


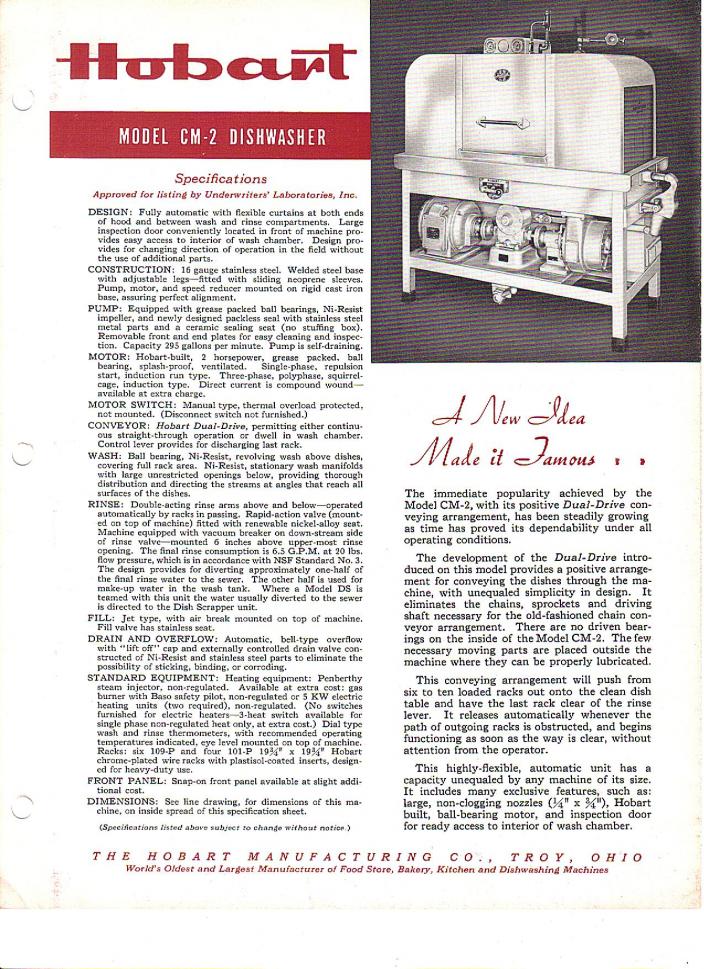
Post# 670442 , Reply# 12   4/4/2013 at 11:52 (4,033 days old) by Kenmore71 (Minneapolis, MN)        

kenmore71's profile picture
I don't have a picture, but here is a diagram from the service manual showing a cross-section of the KD-12 gravity drain setup.

Post# 670448 , Reply# 13   4/4/2013 at 12:33 (4,033 days old) by kb0nes (Burnsville, MN)        

kb0nes's profile picture
So why did the drain valves end up rusting so badly? Was it leakage through the pull rod hole or what?? I'm curious if these soon to be "Unobtanium" parts could be restored.

At the least it seems ones in good condition could be bead blasted and painted to extend their lives.


Post# 670745 , Reply# 14   4/5/2013 at 19:53 (4,032 days old) by combo52 (50 Year Repair Tech Beltsville,Md)        
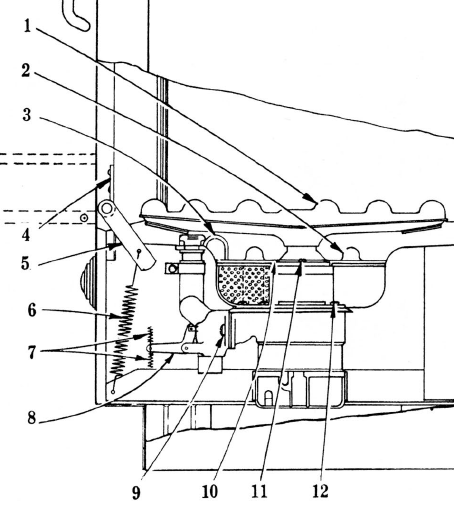
Early KA DWs

combo52's profile picture

The drain valve that Jon pictured usally do not get that rusty, the style he pictured was used on the KD-11 through 14 DWs.


Last night I parted out two gravity drain KD-10 KA DWs that I have had for years. I have wanted a good example of a KD-10 for years and Robin [ crestwood52 ]gave me a great deal on one that she had that was in excellent condition. So I parted out the other two saving parts for ours and to help anyone else out that needs parts.


For anyone that never got to see a Kitchenaid KD-10 Dishwasher up close you have truly missed seeing the most overbuilt major appliance built for the home. And it is easy to see that this is a commercial quality Dishwasher that could do at least 25,000 loads and still keep going. Even though Hobart always built a sturdy DW for home use the KD-10 is just amazing, they really should have just quit building DWs after this one.


Post# 670935 , Reply# 15   4/6/2013 at 19:15 (4,031 days old) by aloysius (Lake Tapawingo, Missouri)        
Photograph of the problem.

Here is a photograph of the rusted drain outlet. The photo also shows the remaining portion of the original p-trap where the j-trap connects.

It appears as though there is a rusted tube that fits inside the cast iron drain outlet. Over the tube is the nut. When I feel inside the tube I do not feel the end of the tube no matter how high I go. This is something with which I am totally unfamiliar but it seems as though if the tube could be removed a new tube could be inserted and solve the problem. Maybe that is not possible and that is why there is a problem.

To use a coupler or clamp anything on the rusted tube I will need to remove that nut on he rusted tube. How should I do that because it will not come off by hand? Should I force the nut off some way? When I get the nut removed then I cut an extension tube to fit and use the coupler to attach the extension tube to the rusted tube? (Or do I need to attach a hose to the rusted tube with a clamp and then attach the extension to the hose as suggested in the first reply by gansky1?) After that do I attach the trap to the extension?

On the remaining portion of the p-trap there seems to be another problem. The remaining pipe has a nut on it and therefore needs a j-trap with male threads on that side. All of the j-traps I have looked at so far have female ends with a nut on that side. I guess I could remove the rest of that existing p-trap and install an entirely new p-trap but to get to that I will have to remove the entire dishwasher. That is getting into more work than I anticipated. The basement is finished with a finished ceiling so that is not an option. Are there appropriate J-traps out there and I just need to look harder. On the other hand is it possible if I buy an entirely new p-trap would that j-trap have male threads on the opposite side of the dishwasher? Or should I go ahead and remove the dishwasher and try to replace the entire p-trap.

I am not a plumber and I hope I am explaining the problem clearly. It looks to me like it should be fairly simple to fix - but I would not know.

Thank you for any help you can give.


Post# 670942 , Reply# 16   4/6/2013 at 20:04 (4,031 days old) by combo52 (50 Year Repair Tech Beltsville,Md)        
Drain valve on A KD -12 DW

combo52's profile picture

You need to completely remove the chrome ring that is still on the drain valve, this ring is part of the old U trap and gets thrown away. Then we-you can see how bad the drain valve really is, I think as others have suggested this will be able to be saved without replacing the drain valve. John.


Post# 671065 , Reply# 17   4/7/2013 at 11:52 (4,030 days old) by STEVET (West Melbourne, FL)        
Picture worth a thousand words??

Jeff,

You can salvage the drain valve as shown with a setup like this.
As John mentioned, get the Chrome nut off the valve first but first soak it with PB Blaster and then work it off with your hands. Don't Wrench it off as it may take more of the valve metal with it. You want as much of the old valve as you can keep on it.

Then use a Fernco Coupling and set it up like the picture. Try to keep the trap as low as possible so you dont have water standing in the valve. I think that was the problem where the tailpiece of the valve was sitting in the trap water. So cut the new plastic tailpiece to achieve that result. Connect the long swivel of the new trap to either the connection on the pipe with another fernco coupling or a female to female coupling or, if you can remove the old pipe, then a new slip nut and bushing.

You may want to try purchasing a spare valve thru your Local Hobart Office or service agency, The part number is 77818. It is expensive..very expensive. Don't mention Kitchenaid at all. They will not get it for you! There are some available at some of the Service Agents so they may have to bring it in from one of them.
If they ask for a model number, tell them it is for a Model UM dishwasher.

Let us know how you progress with the project.
Your other choice is to find someone who stipped a pump model machine and has kept the valve, water trap, pressure switch and pump that attached to the bottom of the motor and convert your machine to a pump drain. Then you can connect it right up to you sink drain!


Post# 674202 , Reply# 18   4/20/2013 at 16:41 (4,017 days old) by aloysius (Lake Tapawingo, Missouri)        

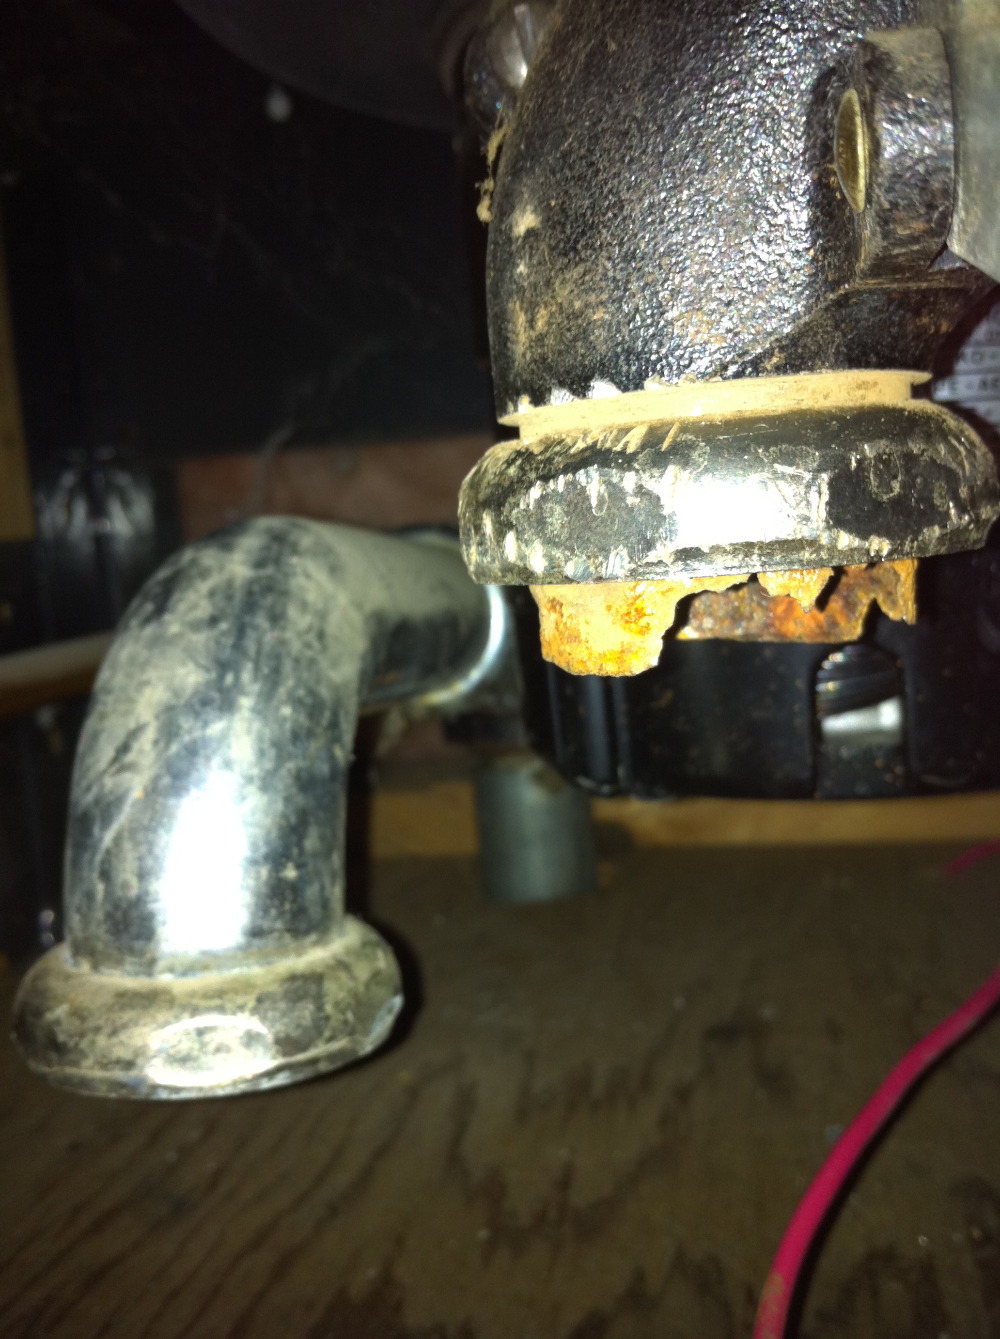
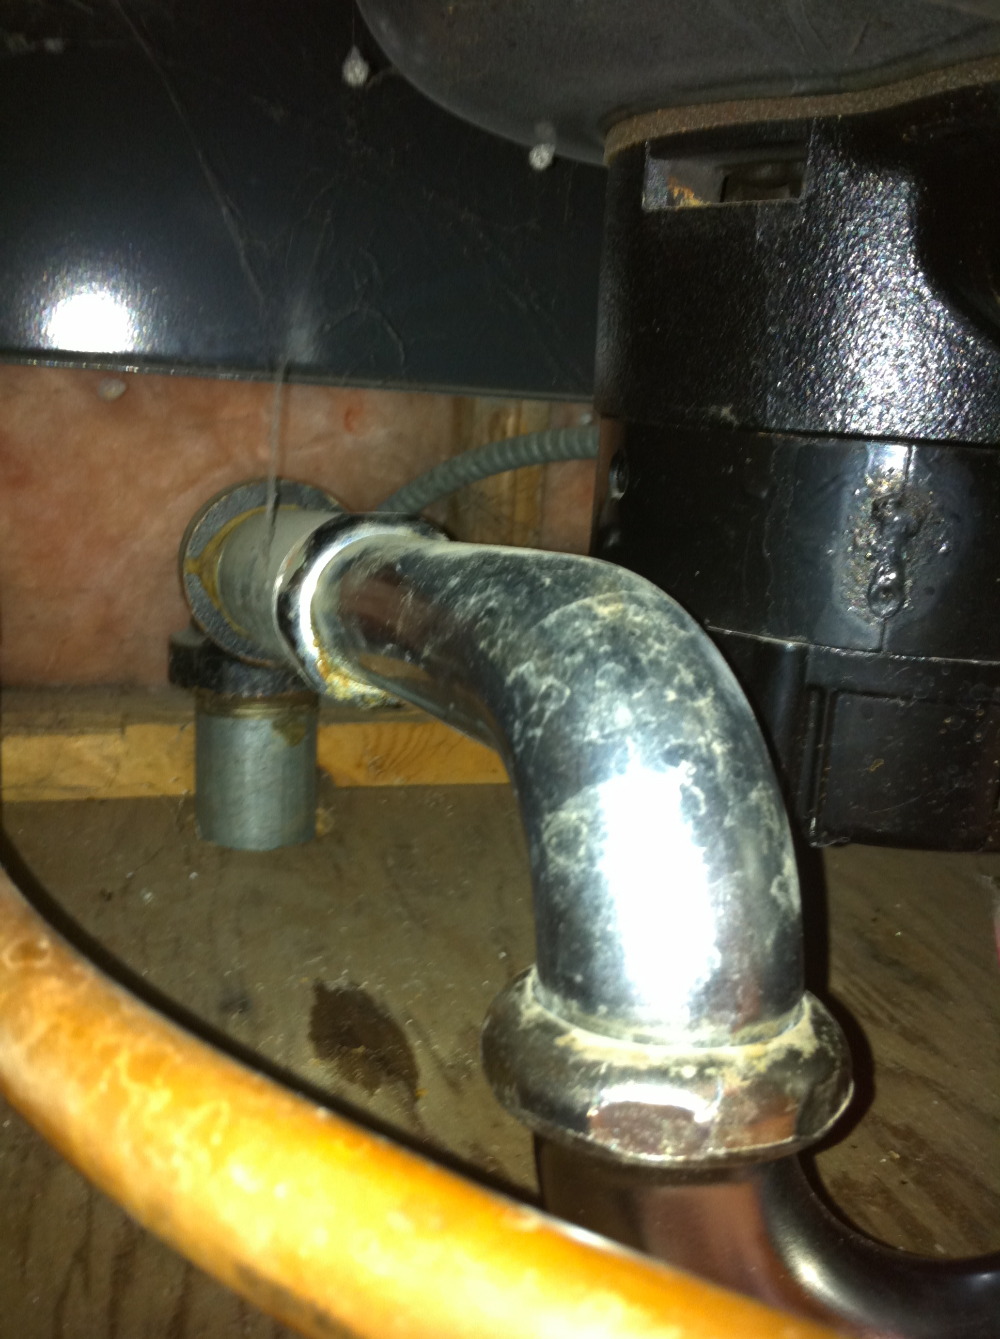
I thought I would let you know how I resolved the problem. I would have let you know sooner but I have had a number of emergencies over the past ten days.

The first photo shows the drain pipe with the nut removed.


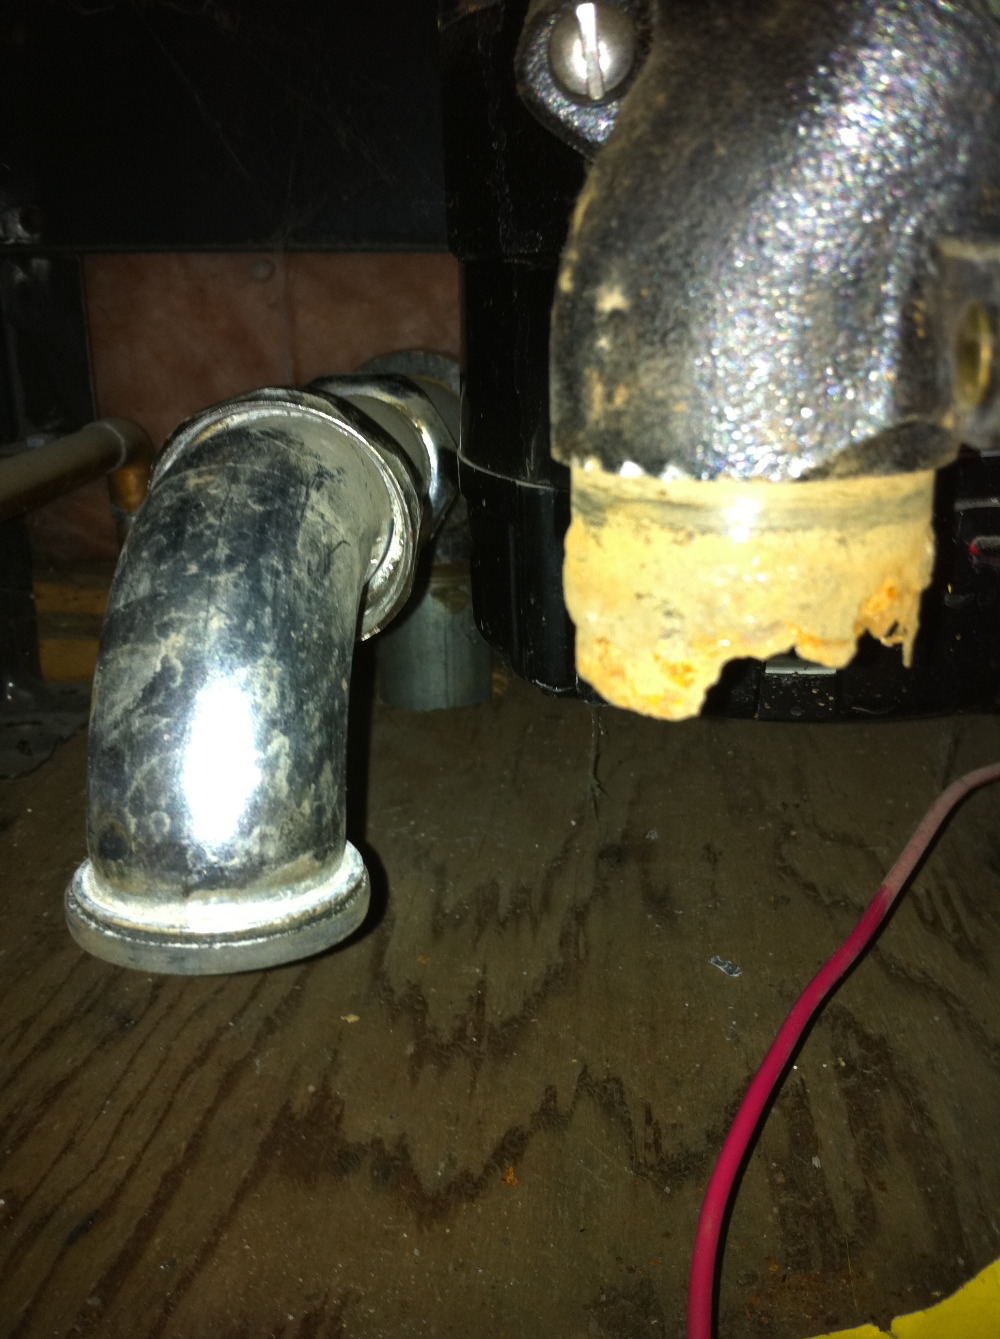
Post# 674203 , Reply# 19   4/20/2013 at 16:43 (4,017 days old) by aloysius (Lake Tapawingo, Missouri)        

The second photo shows how high I could get the extension pipe on the drain pipe.


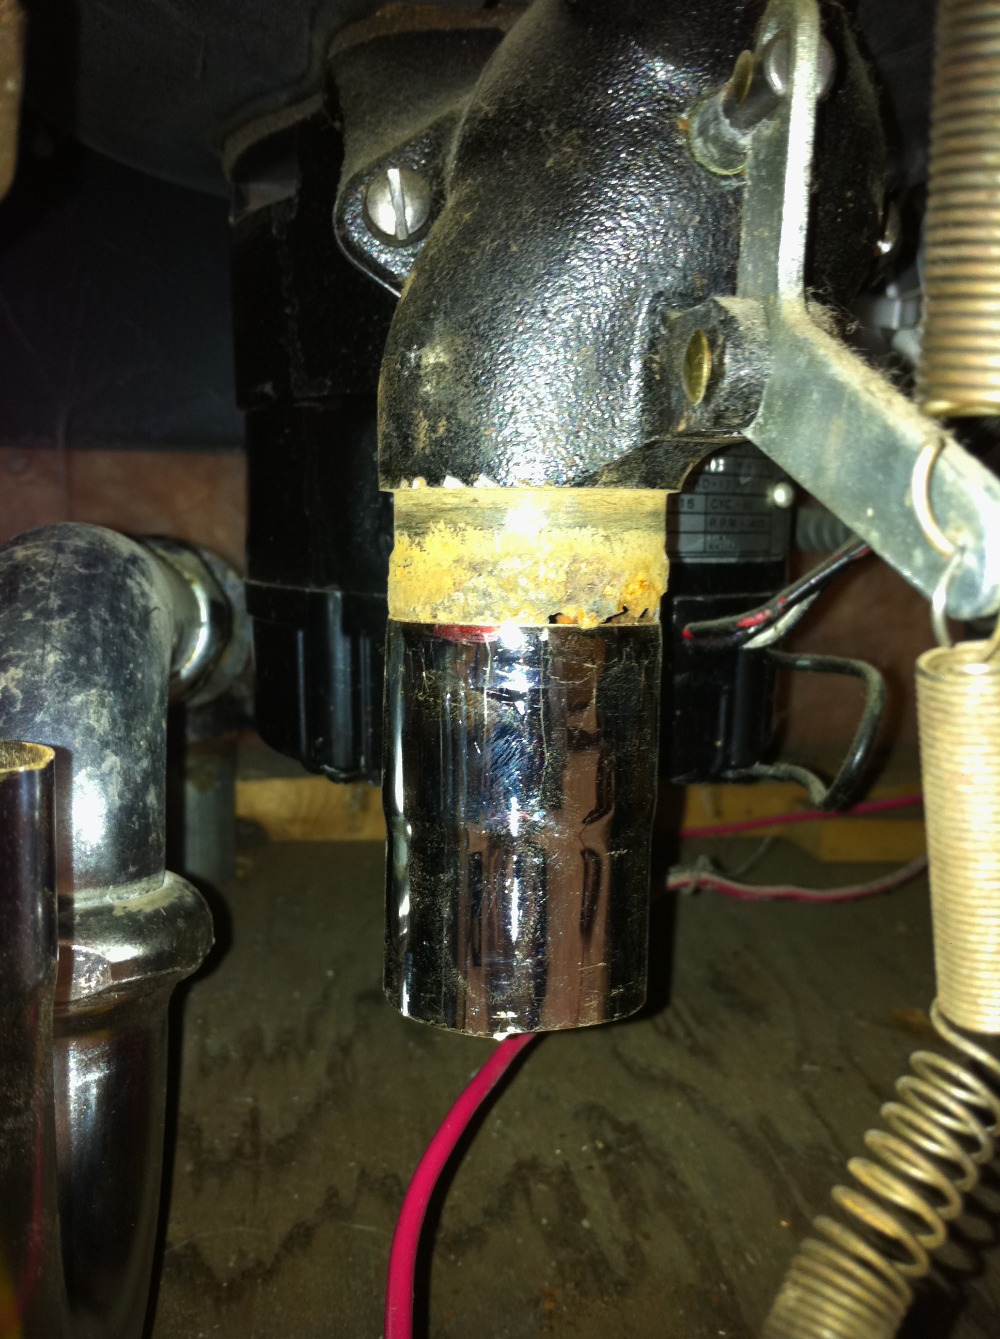
Post# 674204 , Reply# 20   4/20/2013 at 16:45 (4,017 days old) by aloysius (Lake Tapawingo, Missouri)        

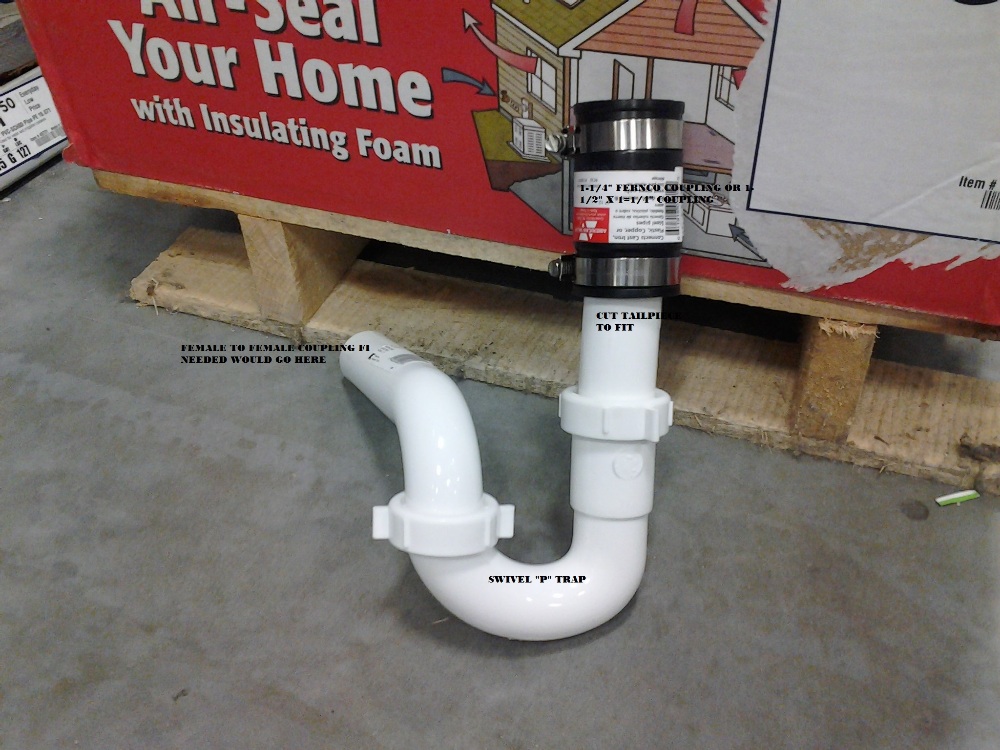
The third photo shows where the p trap came without the extension pipe.


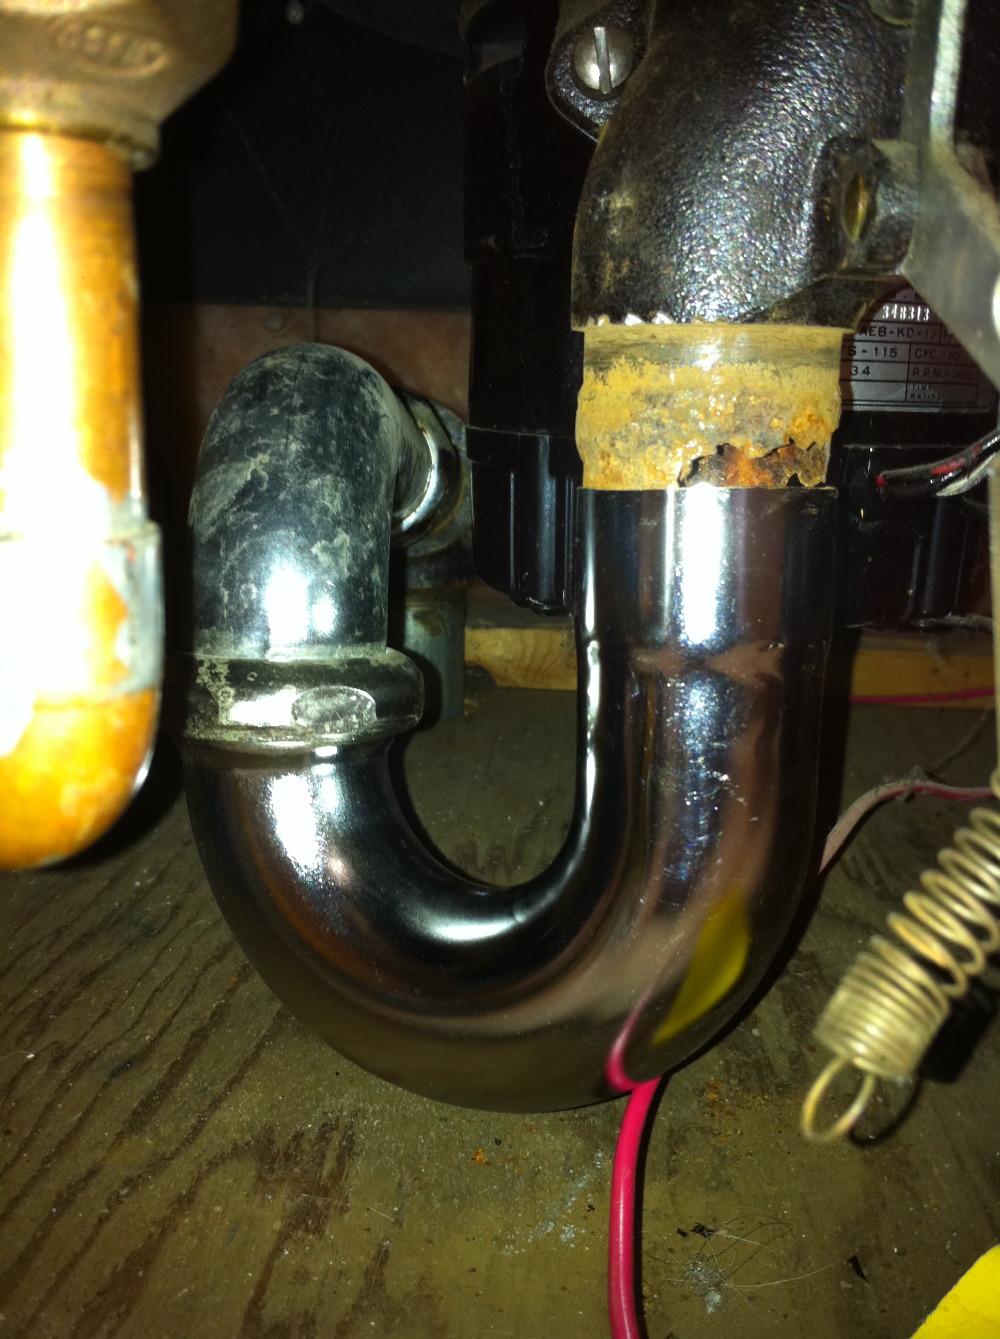
Post# 674206 , Reply# 21   4/20/2013 at 16:49 (4,017 days old) by aloysius (Lake Tapawingo, Missouri)        

The fourth and fifth photos show the repair with the Fernco coupling. I only had approximately an inch under the p trap as the next photo shows - so I could not configure the repair as suggested in the last post by stevet. I could not go into the basement without more work than I wanted to do because the basement is finished with a finished ceiling.


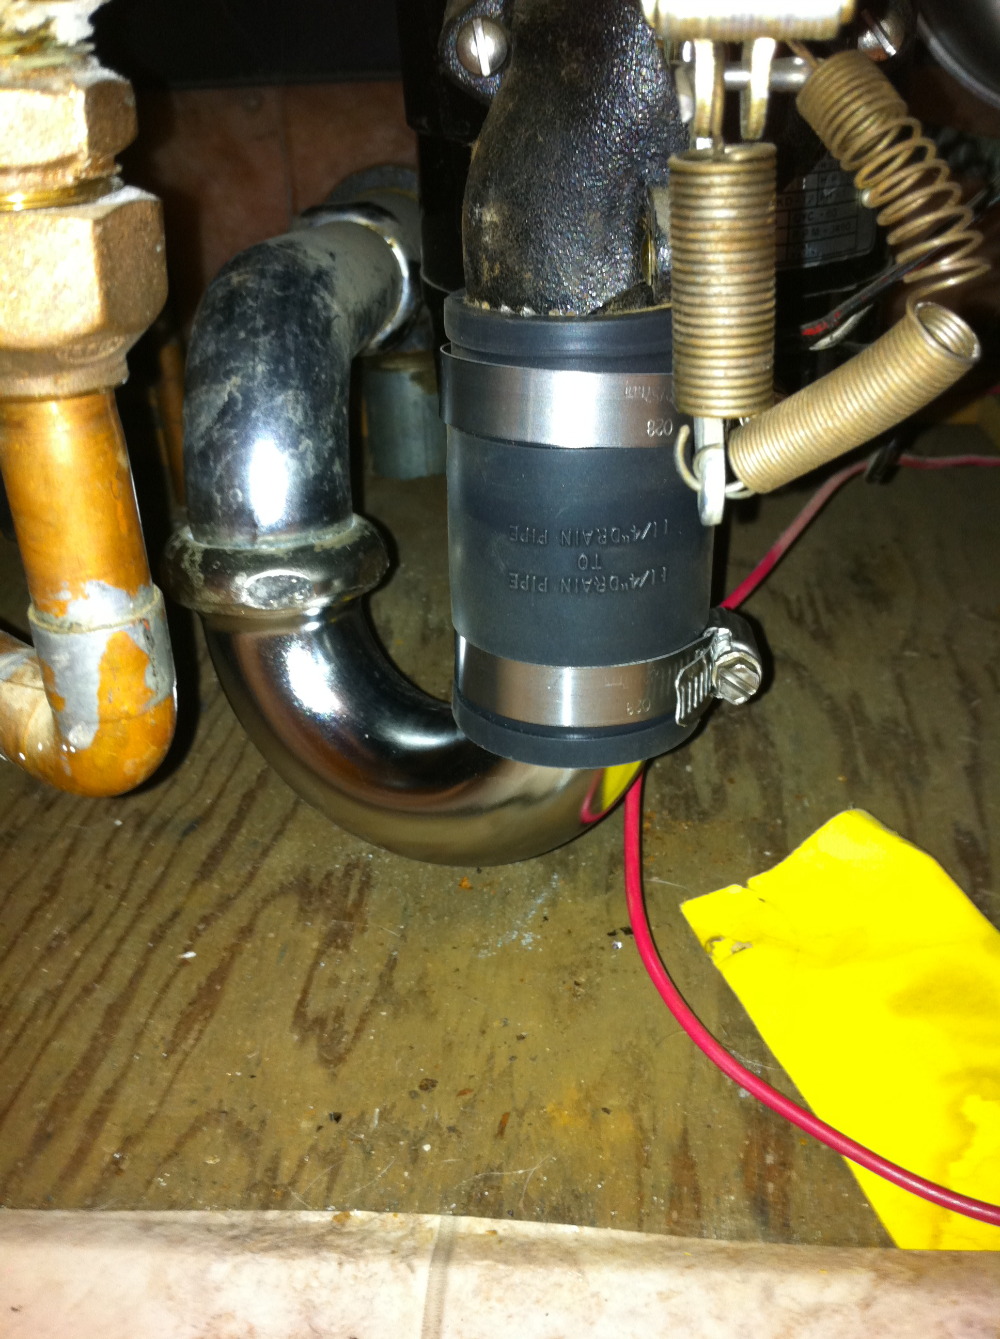
Post# 674207 , Reply# 22   4/20/2013 at 16:52 (4,017 days old) by aloysius (Lake Tapawingo, Missouri)        

Fifth photo.

Post# 674208 , Reply# 23   4/20/2013 at 16:55 (4,017 days old) by aloysius (Lake Tapawingo, Missouri)        

The repair seems to have been successful as it does not leak from that area now. However it leaks from around the two nuts on the long portion of the p trap. The final photo shows the start of a leak around one of the nuts. I had a plumber at the house for another problem and he could not get the nuts any tighter with the space available. He suggested applying some sealant around the nuts.


Post# 674210 , Reply# 24   4/20/2013 at 16:57 (4,017 days old) by aloysius (Lake Tapawingo, Missouri)        

I am curious about something else. The spray wand moves easily by hand. However when I tested the dishwasher immediately after the repair every time I opened the door the sprayer was in the same position. I did not let it run through a full cycle because I noticed the leaking at the nuts. Is the sprayer stationary at the beginning of the wash cycle or is there a potential problem with the water pressure?

Thanks again for any help.


Post# 674217 , Reply# 25   4/20/2013 at 17:13 (4,017 days old) by Kenmore71 (Minneapolis, MN)        

kenmore71's profile picture
The KD12 has a 1-1/2 minute purge at the beginning of the cycle where the pump runs, the water valve is open and the drain valve remains open. This is to help warm up the interior of machine since it immediately goes into the detergent wash after this purge. If you wait for that purge to end, the pump will shut off, the drain valve will close and the machine will start to fill up with water for main wash (approx 2-1/3 gallons). The leaking will also likely slow down or stop since the drain valve will close.

Here's the cycle chart:


Post# 674224 , Reply# 26   4/20/2013 at 17:36 (4,017 days old) by aloysius (Lake Tapawingo, Missouri)        

I will try to run through the cycles again and see what happens. However the photo of the leak was when I first noticed the leak and the leak continued for quite some time after I shut the machine off. It covered quite a large area under the machine. I assume that was from the water sitting in the pipes. I guess I could put some towels or a pan under the pipes and keep an eye on it while I am testing it again.

Thanks


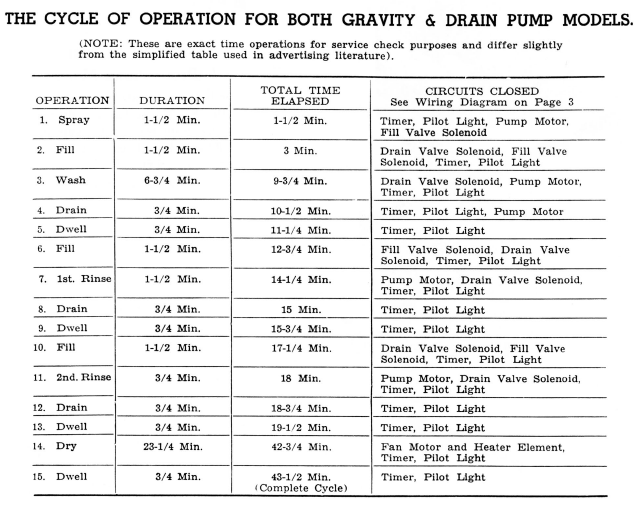
Post# 674233 , Reply# 27   4/20/2013 at 18:19 (4,017 days old) by Kenmore71 (Minneapolis, MN)        

kenmore71's profile picture
When you shut the machine off did you disconnect the power or advance the timer dial to off? If so the drain valve solenoid will release and let any water that's in the machine drain.

Post# 674235 , Reply# 28   4/20/2013 at 18:32 (4,017 days old) by aloysius (Lake Tapawingo, Missouri)        

I advanced the timer dial to off. I am not even sure I know where to disconnect the power. Unless you mean the on/off switch in the upper right corner of the machine. Do I need to move the on/off switch to the off position as well or does it automatically go to the off position? I do not recall.

Post# 674244 , Reply# 29   4/20/2013 at 19:27 (4,017 days old) by Kenmore71 (Minneapolis, MN)        

kenmore71's profile picture
The gravity drain Kitchenaids were wired such that if you opened the door during one of the "washing" periods it cut the power to everything EXCEPT the signal light and the drain solenoid. Because, if you think about it, since the drain solenoid was energized to keep water IN, if you opened the door while it was washing and it cut power to the whole machine the water would drain OUT. If, however you advanced the timer dial past a washing period, the drain solenoid would not be energized through the timer anyways if you opened the door.

Post# 674713 , Reply# 30   4/22/2013 at 16:58 (4,015 days old) by aloysius (Lake Tapawingo, Missouri)        
Good news/Bad news

The good news is I turned on the dishwasher to go through the cycle of operation and it did cycle through the wash without leaking anywhere. Also the spray wand was revolving during the washing periods. The not so good news is that when I opened the lever and consequently the door the power was not cut off and the washing continued with water spraying out of the machine. This happened about 8 out of 10 times. Any suggestions?


Post# 674717 , Reply# 31   4/22/2013 at 17:23 (4,015 days old) by Kenmore71 (Minneapolis, MN)        

kenmore71's profile picture
The door switch is sticking.

Post# 674729 , Reply# 32   4/22/2013 at 18:22 (4,015 days old) by aloysius (Lake Tapawingo, Missouri)        

Where would I find the door switch? Does it just need some lubricant? WD40?

Thanks again for your help.


Post# 674741 , Reply# 33   4/22/2013 at 18:57 (4,015 days old) by Kenmore71 (Minneapolis, MN)        

kenmore71's profile picture
Upper right hand corner above and behind the start switch. The right hand door latch depresses the switch when the door is latched.
You need to figure out why it's not releasing when you open the door.
Lubricant rarely helps and is almost always a bad idea when electrical switches are involved.


Post# 676447 , Reply# 34   4/30/2013 at 12:50 (4,007 days old) by aloysius (Lake Tapawingo, Missouri)        

Thanks for your help. I have been too busy and just had a chance to let you know what I found. I found the switch and the problem seems to be the metal lever that cuts the power gets stuck when the handle is opened slowly and carefully. When that happens I can just touch the metal tab or lever with my finger and the power is cut. However when the handle is opened rapidly (not jerked - just rapidly) the power cuts each time. Think I should just leave that alone until it never works? Is it possible it might loosen up and begin to work better with more use?

Post# 676491 , Reply# 35   4/30/2013 at 18:23 (4,007 days old) by Stevet (West Melbourne, FL)        
Another obscure part needed!

The part that you are referring to is called a switch actuator and is a copper colored, thin springy piece that buffers the action of the locking arm from the door and gently presses on the microswitch to interrupt the power flow.

The part number is 060087 and is basically NLA. There are Hobart offices that show that they may have some available. The list price is 23.95.

You might call the Cape Girardeau office and maybe the Mansfield,Ohio office and see if they still have any they are willing to sell you.

I don't want to tell you how many I changed out on the UM machines years ago. But they usually did hundreds of cycles a day compared to anything a homeowner could throw at their Kitchenaids!

IIRC, I stocked at least 15 or 20 of them on the truck along with a couple of the micro switches.


Post# 676852 , Reply# 36   5/2/2013 at 15:49 (4,005 days old) by aloysius (Lake Tapawingo, Missouri)        
Found one.

Thanks for the info. I called Cape Girardeau and Mansfield. Mansfield quit carrying Kitchenaid parts quite some time ago. However Cape Girardeau had three switch actuators, part Number: 060087 with a cost of $23.95 each. I have decided to move the dishwasher to the house I am remodeling and I will try to replace the switch at that time. Thanks again for all your help.

Post# 677398 , Reply# 37   5/5/2013 at 10:33 (4,002 days old) by Stevet (West Melbourne, FL)        
Never say Kitchenaid!

I forgot to RE-mention that when calling any Hobart office, never say you want Kitchenaid parts. They sold it nearly 27 years ago to Whirlpool so most people working nowadays for Hobart don't even know that Kitchenaid belonged to Hobart at one time. Just give them the part numbers you want and go from there. Many of the parts were interchangeable as the commercial and domestic machines shared the same designs and engineering.

I will endeavor to provide the Hobart model numbers where applicable so if they should ask, you can say the "right" thing. There are still some of us out there that remember and some parts personnel who know what the deal is as well, but they are few and far between.

Glad you were able to find the actuator, but don't delay buying it because they can be gone before you know it. And anyone who still has a Kitchenaid of that vintage or even a UM machine they are using, should have one or more of those actuators as a definite spare part. They do break eventually!


Post# 677696 , Reply# 38   5/6/2013 at 15:29 (4,001 days old) by aloysius (Lake Tapawingo, Missouri)        
Copy that.

I did order the part when I was on the phone with the parts dept. in Cape Girardeau. It should be on its way right now.

I may have to ask for more help when I get to the installation at the remodel.

Thanks again.


Forum Index:       Other Forums:                      


Comes to the Rescue!

The Discuss-o-Mat has stopped, buzzer is sounding!!!
If you would like to reply to this thread please log-in...

Discuss-O-MAT Log-In


New Members
Click Here To Sign Up.


automaticwasher.org home
Discuss-o-Mat Forums
Vintage Brochures, Service and Owners Manuals
Fun Vintage Washer Ephemera
See It Wash!
Video Downloads
Audio Downloads
Picture of the Day
Patent of the Day
Photos of our Collections
The Old Aberdeen Farm
Vintage Service Manuals
Vintage washer/dryer/dishwasher to sell?
Technical/service questions?
Looking for Parts?
Website related questions?
Digital Millennium Copyright Act Policy
Our Privacy Policy