|
Thread Number: 48282
question on ge ff outer tub |
[Down to Last] |
| Post# 699658 8/29/2013 at 02:31 (3,892 days old) by doug (West Virgina) | ||

just wondering what this coating was that someone used on their ge ff outer tub, and how did they apply it. I think i need to put a coating of something on my outer tub for the rust. here is a pic of the tub someone put a coating of something on, if anyone recognizes it could u let me know what u used?
| ||

|
| Post# 699728 , Reply# 1 8/29/2013 at 09:14 (3,892 days old) by DigAPony () | ||
|
Looks like POR-15. | ||
Post# 699734 , Reply# 2 8/29/2013 at 10:14 (3,892 days old) by Yogitunes  (New Jersey) (New Jersey) |
||
Gentlemen, we have the technology to rebuild him
actually glad your bringing a thread up about this stuff....
my sister has sold her house and offered me her 1987 GE FilterFLo, a beautiful MOL model on the outside, I don't know what the hell went on inside in all these years, the filter flo alone barely dribbled....I know about 7 years ago, I have the paperwork, he had service practicaly rebuild this machine, new motor, new clutch(don't know why, but the clutch is now a one speed), belt, pump, tranny, agitator, pan and dispenser.....the reason for the service call in the first place, and again, was a leak!....apparently the inner tub under the fill flume has developed a hole.....and this crackpot of a repairman used something like silly putty caulk and globbed it on the outside of the tub, I thought it was a bees nest of some sort..... so on to the fix...the fact of the layers of mold, mildew, gunk, scum, what ever you want to call it that stuck to everything is being delt with, I can;t get the splash shield clean.....I feel so sorry for this machine, I must bring it back to life, pics to horrible to show you guys, anyon else would proabably scrap this thing....... anywho.....with some auto repair fiberglas cloth and clear epoxy, from the outside of the outter tub, I applied and glued down the fiberglas to seal the hole.....all is well and fine.....and another patch on the inside as well, all other ports and openings I used clear sealant and covered all bases for potential leaks as well.....once dried after a few days, I used "FlexSeal" spray coating on the whole interior of the outter tub, and the outside area of the patch spreading out about 4 inches past the repair...... so far, so good.....no leaks, water stays inside machine, were onto putting outselves back together.....step by step.....since this origianlly had a tranny leak, and oil/sludge thrown everywhere, thought it was best to remove the motor and spray degreaser and powerwash the whole underside, starting to look like his ole self again....I actually thought this machine was almond when I got it, but its back to white now..... one of the base snubber/rubber/clamp is missing of the lower rear, so I have to locate one of them.....still a work in progress......just not sure I could pass this on to another member knowing what it started out as... not sure I want to return it to a two-speed....that single speed non-slip lockup has some KICK ASS washing going on for a large capacity machine! I know....a lengthly story.....but if a hole is started, it can be repaired, but I am also thinking of my other ones, of opening them up, and spraying "FlexSeal" at least around the upper part of the outter tub as a "bumper" before any damage may occur in the future.... | ||
|
Post# 699783 , Reply# 3 8/29/2013 at 14:42 (3,892 days old) by gansky1 (Omaha, The Home of the TV Dinner!) |
||

Gotta get some of that Flex-Seal, I'd forgotten about it until you mentioned it again now, looks like a great product.
How do you think it will bond with the porcelain, Martin? If it's durable enough, I would love it for coating the insides of the old, cast (pot-metal) pumps to keep them from corroding over time. | ||
| Post# 699820 , Reply# 4 8/29/2013 at 15:58 (3,892 days old) by doug (West Virgina) | ||
|
| ||
|
Post# 699821 , Reply# 5 8/29/2013 at 16:11 (3,892 days old) by turquoisedude (.) |
||
 | ||
| Post# 699838 , Reply# 7 8/29/2013 at 16:55 (3,892 days old) by doug (West Virgina) | ||
|
Ok yea I was just wondering, I checked out some YouTube videos and they said u have to appy the degreaser then the metal prep then put the actual por 15 paint on. Someone also said u have to wear a gas mask? I was thinking maybe some jb weld on the bad rust spots instead of doin the por 15 bc I need my washer lol, so idk I'm really undecided.
| ||
|
Post# 699840 , Reply# 8 8/29/2013 at 17:02 (3,892 days old) by pdub (Portland, Oregon) |
||

I also have found out the hard way that POR-15 won't bond well over porcelain or bare shiny metal. So if you have rust through porcelain and have to coat over both surfaces the POR eventually starts peeling off the shiny parts unless they are roughed up first.
I too am anxious to try this flex-seal on an outer tub. Once it's all back together I hope it holds up because I don't want to disassemble again just to see if it's working. | ||
|
Post# 699865 , Reply# 9 8/29/2013 at 19:38 (3,891 days old) by Yogitunes (New Jersey) |
||
|
for one thing with the FlexSeal.....you have to have ventilation as well, and let it dry for a few days, for the upper part of the outter tub, I applied a second coat.....only time will tell how well it holds up.....
this is my second attempt with this stuff, the first one I just did the upper inside part of an outter tub, about half way down, just to cover a few scrapes before it got worse.....that was over a year ago, and the filterflo is still running, of course I have not had the chance to opened it and see if it is still attached... the can claims to seal and bond to anything......for the most part it does.....but to spray it on a leaking pipe, and have it stop the leak right away....that ain't happening........it needs to be left alone to dry and seal for a few days.... I think this stuff would be good for deck steps, ramps, and such areas for slip/skid resistance....just a thought my brother has used this stuff as a coating in the back of one of his makeshift trailers.....thru everything he hauls in it, plus out in the weather, it seems to be holding up....I was expecting it to be scratched/scraped away over certain areas | ||
| Post# 699895 , Reply# 10 8/30/2013 at 02:08 (3,891 days old) by doug (West Virgina) | ||
|
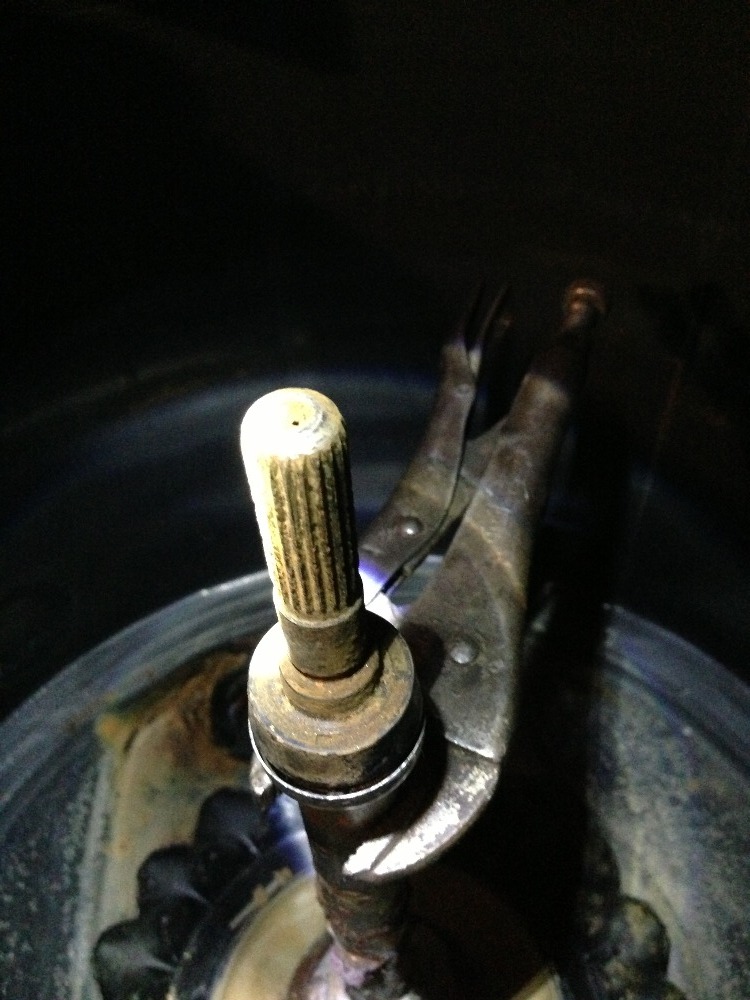
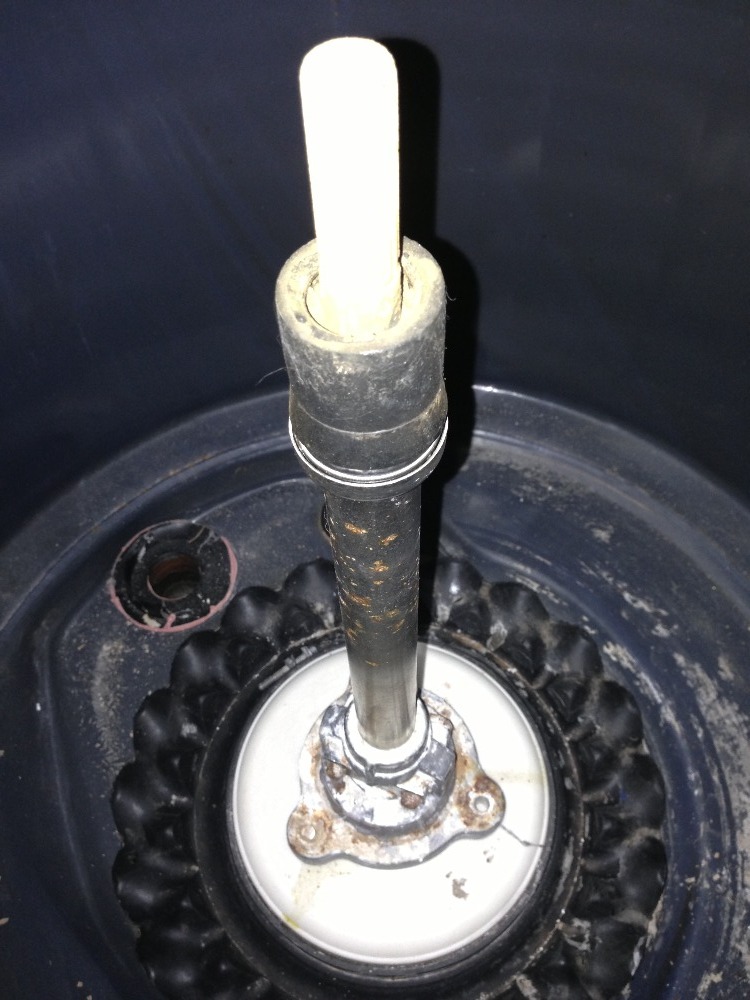
Ok here's what I'm actually doing, I was goin to fix some rust while I was in the process of transferring a newer transmission into my filter flo and putting the tranny that came out of mine into the other filter flo. I was able to get 2 of the tub bolts out then the 3rd gave me trouble. I tried almost everything u could think of to bring the bolt out pb blaster and everything. Nothing would work so I had to drill it out "just to remind u this was in my daily driver filter flo" ok then i went to take the tub out of the other filter flo that has the newer tranny in it and the top of 1 of the bolts broke right off so there for the rest of the bolt is stuck in the threads, I guess ill have to drill this one out also. The whole reason I wanted to transfer the tranny's is bc I bought the tranny new about 3 to 4 yrs ago and wanted to put it in my daily driver bc the tranny in my daily driver has a problem, the agotator hold down is worn completely off idk if there is a way to replace this or what but i looked it up online n didnt see any results on how or if u even can replace the agitator hold down. So I got as far as taking the tub out and the newer tranny has a problem also besides the bolt broke off, it had some yellow oil around the top of the tranny. Idk if it will even be worth transferring them now bc I'm afraid of oil getting on our clothes. We had that problem with a ff that we had when I was a kid. Sorry for such a long and complicated story I just know when there is a problem with appliances this is the best way to get the advice :) ill upload some pics to show u guys the tranny's.
| ||
| Post# 699896 , Reply# 11 8/30/2013 at 02:10 (3,891 days old) by doug (West Virgina) | ||
|
Pic #1 | ||
| Post# 699897 , Reply# 12 8/30/2013 at 02:13 (3,891 days old) by doug (West Virgina) | ||
|
Pic #2 | ||
|
Post# 699920 , Reply# 13 8/30/2013 at 07:51 (3,891 days old) by Yogitunes (New Jersey) |
||
|
Doug
I think you may be a little confused, and hope I can clear this up for you, or maybe I am the one confused..... in pic1 you say the agitator hold down is worn...actually its missing, do you have this?. or is it stuck inside the agitator?..... in pic2, the hold down is there, these just slide up off the post with a tug from a pair of needlenose pliers......theres also a small rubber washer in the top portion that will allow adjustment of the agitators clearance at the bottom of the tub... you should be able to pull the hold down off the one, and slide it on to the other, it pops in place along that groove... pop open your control panel....theres instructions and detail pics of this hold down, and how to make adjustments, yours may just be worn, but usually once the agitator is popped in place, the inside of the agitator also snugs around to keep it taught....if this makes sense to you...you wil want to coat these areas with light grease or vaseline, makes it easier to install and remove... theres also other info....like how long it should take for your pump to empty the tub...if working correctly......and proper height of your inner tub.... odd also, beause one of mine doesn't have the hold down, and doesn't rise during any level....then again, this is a ramped activator, and by design the stroke is pushing it downward..... worst case scenario......drill a small hole in top of the tranny post, and with a small washer and self setting screw, you can bolt it down, and snap the cap over top to hide everything......at least thats what the last of the filterflos were doing from the factory... let us know if we can help further..... | ||
| Post# 700003 , Reply# 14 8/30/2013 at 15:48 (3,891 days old) by doug (West Virgina) | ||
|
| ||
|
Post# 700030 , Reply# 15 8/30/2013 at 18:57 (3,890 days old) by Yogitunes (New Jersey) |
||
|
| ||
| Post# 700244 , Reply# 16 8/31/2013 at 17:30 (3,889 days old) by doug (West Virgina) | ||
|
| ||
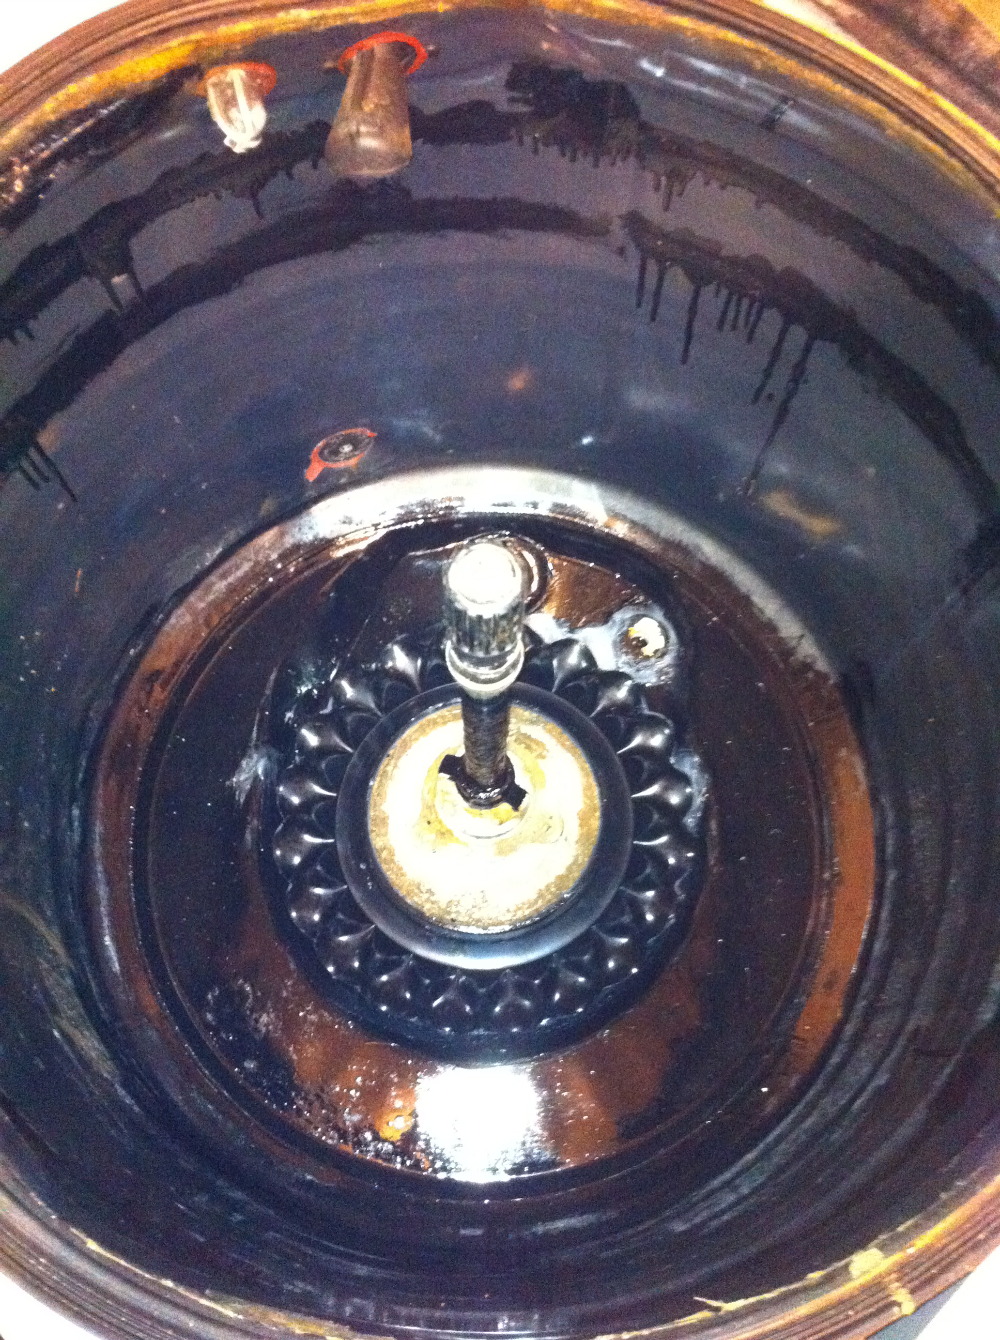
| Post# 701047 , Reply# 17 9/4/2013 at 06:43 (3,886 days old) by doug (West Virgina) | ||
|
| ||
|
Post# 701050 , Reply# 18 9/4/2013 at 07:04 (3,886 days old) by combo52 (50 Year Repair Tech Beltsville,Md) |
||
GE FF Transmissions Hi Doug, the difference in the rubber agitator hold-down collars from your two different pictures is that the first picture is missing the upper part of the hold-down collar.
The oil leak you pictured below the basket mounting flange can be fixed, but beware that when a GE FF transmission is leaking in this area water may have all ready filled the transmission and the oil may be floating out around a bad seal and a complete transmission rebuild is in order to save it, Good Luck, John. | ||
| Post# 701255 , Reply# 19 9/4/2013 at 21:17 (3,885 days old) by doug (West Virgina) | ||
|
The washer has been sitting for about a year maybe a year and a half, so idk if that's the reason oil is leaking out or what. I never noticed any oil on our clothes when i used this machine though. But if I use the transmission water will prob. work it's way in and settle in the oil is what ur sayin right?
| ||
|
Post# 701332 , Reply# 20 9/5/2013 at 07:19 (3,885 days old) by combo52 (50 Year Repair Tech Beltsville,Md) |
||
|
Outer Tub Damage on GE FF Washers When a GE FF washer goes badly out of balance the inner wash basket strikes the outer tub, even on a brand new GE washing its first load of clothing this collision between the porcelain coating on the outer tub and basket can result in enough porcelain being chipped and worn off to expose bare steel which will continue to rust. This design flaw was one of the worst things about GE FF washers, I was always amazed that with all GEs great experience with advanced plastics that they did not install something like Delrin wear strips around the top edge of the inner basket to prevent such damage.
When I do the cabinet swap on the GE DispenseAll washer in our museum I am going to add some Delrin ware strips to the wash basket that I removed from the front bearing of a WP built clothes dryer. The problem of the washers basket striking the outer tub seems to be even worse on the bigger tub 18 pound machines. And while it is easy to re-coat the damaged areas on the outer tub and top of the basket when restoring these washers I do not know of anything that is tough enough to withstand the crashing of the tub into the outer tub, so ones repair may not last if you ever have a severely out of balance load. | ||
|
Post# 701345 , Reply# 21 9/5/2013 at 08:32 (3,885 days old) by Yogitunes (New Jersey) |
||
|
yes....John is right.....its hard to figure something to use for the inner and outter tub areas that will withstand constant banging/scraping along those areas, nothing is exactly fool proof.....
we just have to try and use stuff to minimize the future damage...... not a complete forever fix, but usng the FlexSeal on the outter tub gives a layer of cushion, and was thinking along the lines of a piece of rubber wrap, like an innertube glued to the top area of the inner tub.....again, over time both will sustain some damage from banging/scraping, but every bit of cushion will help some.... always was suprised GE never put in some layer of protection, one way or another, either a coating/shield for one of the tubs, or a suspension retainer that would not allow the inner tub to swing that far out to make contact with the outter tub... as usual its up to us to think of things outside the box.... | ||
|
Post# 701346 , Reply# 22 9/5/2013 at 08:37 (3,885 days old) by gansky1 (Omaha, The Home of the TV Dinner!) |
||
|
The (bicycle tire?) inner tube is a good idea. Already a circle that can be stretched around the spin-tub and possibly glued would work perfectly. If it stays.
I've used a couple of inner tubes for the tubular rubber for other things in washer restore projects, they are very useful and come in a range of sizes and diameters. | ||
|
Post# 701348 , Reply# 23 9/5/2013 at 08:49 (3,885 days old) by Yogitunes (New Jersey) |
||
|
Thats what I was thinking Gansky.....get one the right size, and slice it long ways, it would fit snug around the entire inner tub....and then something like rubber cement or epoxy to hold it in place....
you know again....like my pool noodle trick....an innertube of the right size would fit inside between the tubs, and "inflated" to keep the tub centered for transport....this would work for a number of machines.... keep the ideas comming guys.... | ||
| Forum Index: | 
| Other Forums: |

|

|

|

|

|

 Comes to the Rescue!