|
Thread Number: 51223
model a806 |
[Down to Last] |

|
| Post# 736085 , Reply# 3 2/18/2014 at 13:24 (3,718 days old) by hippiedoll ( arizona ) | ||
CONGRATULATIONS!!!
on the great find. from what i understand about the A806, it's the most versatile washer to use that maytag offered. i hope it's not too complicated of a fix for you to get this maytag working right.
by the way, because of the model number, i'm guessing your washer is white?? i'll be keeping my fingers crossed for you!!! | ||
Post# 736133 , Reply# 4 2/18/2014 at 17:33 (3,718 days old) by goatfarmer  (South Bend, home of Champions) (South Bend, home of Champions) |
||
 | ||
| Post# 736139 , Reply# 5 2/18/2014 at 18:39 (3,718 days old) by maytagmodela806 () | ||
|
Yes it is white and Oakland city. Is in Indiana and I'm hopen a can find parts for it what it does makes me think it's the timer but the water level doesn't stop at what its set for | ||
| Post# 736140 , Reply# 6 2/18/2014 at 18:41 (3,718 days old) by maytagmodela806 () | ||
|
30 miles from Evansville | ||
| Post# 736142 , Reply# 7 2/18/2014 at 18:51 (3,718 days old) by danemodsandy (The Bramford, Apt. 7-E) | ||
|
Dean:
I own two 806 sets, one from 1968, one from 1977. Each is a pair with washer and dryer.
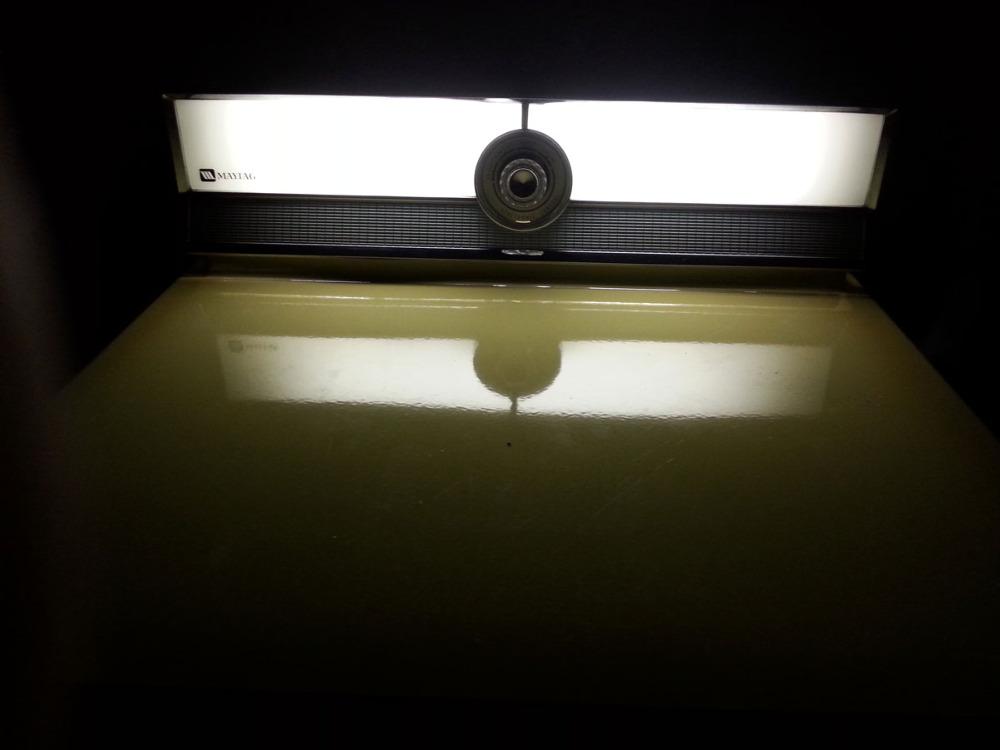
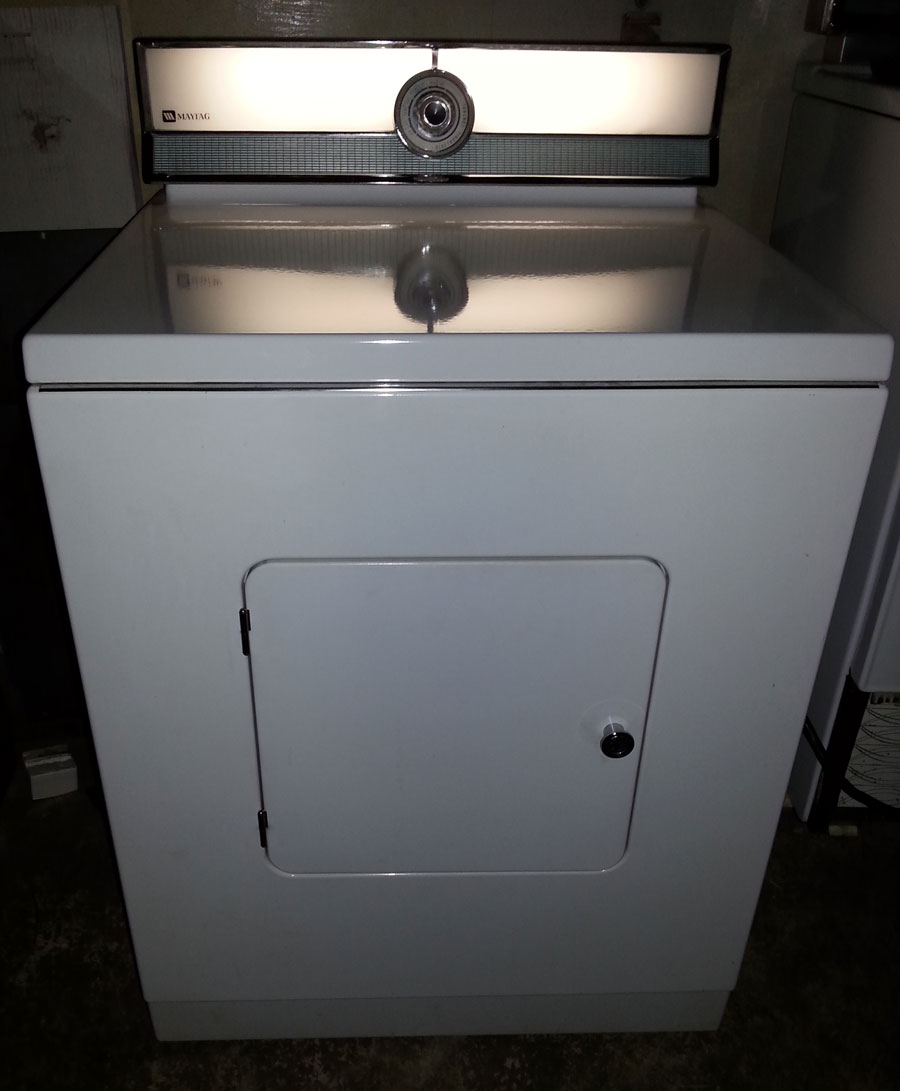
You will be very happy with your washer if you can get its problem straightened out. It does sound like a timer issue. Several things will help us help you - one would be a photo of the machine. Another would be a photo of the timer. And if you could post the serial number, members here can help you date the machine. If you like the washer, wait until you find a matching dryer. They are both fully-featured machines, the top of the Maytag line. Doing laundry in them is a real pleasure. Photos and serial number, mmkay? You'd be surprised how much we can help with those two things in hand. | ||
| Post# 736179 , Reply# 8 2/18/2014 at 20:35 (3,718 days old) by maytagmodela806 () | ||
|
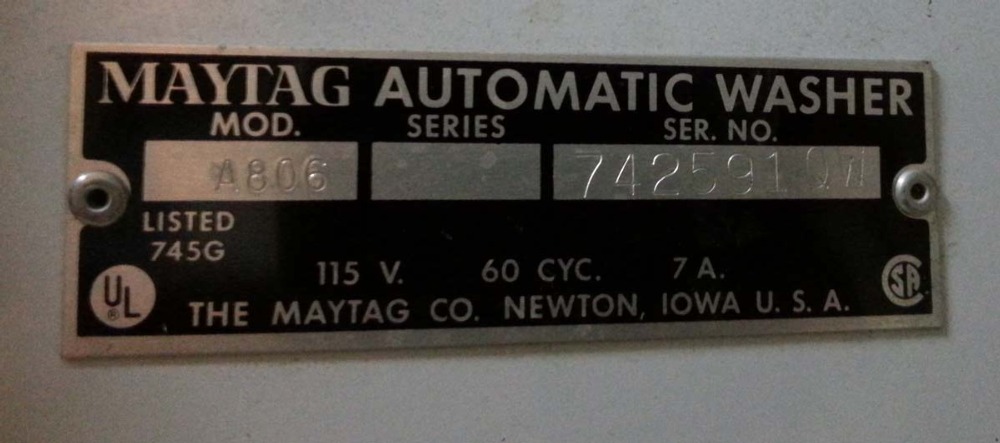
OK well if tried to upload photos but itstelling me low memory and the. S/n is 74468210L. 60 cyc. 7A 115v model number A806 if that helps any I'd like to find a matching dryer for it to make it a complete set it is white in color | ||
| Post# 736218 , Reply# 9 2/18/2014 at 22:40 (3,718 days old) by PhilR (Quebec Canada) | ||
 I've also been actively looking for a white 806 dryer recently! (good thing we're not in the same neighborhood!).
The closest I got so far it is a $100 harvest gold HDE-606 so I passed! Strangely, my white A-806 washer was originally paired with a 606 dryer (I have the sales catalog and instruction manuals for both the washer and the dryer from the former owner) but I'd like to have a 806 dryer!
Also, can anyone tell me if there's a paint code that matches the blue on the control panel, on mine is gone in several places... 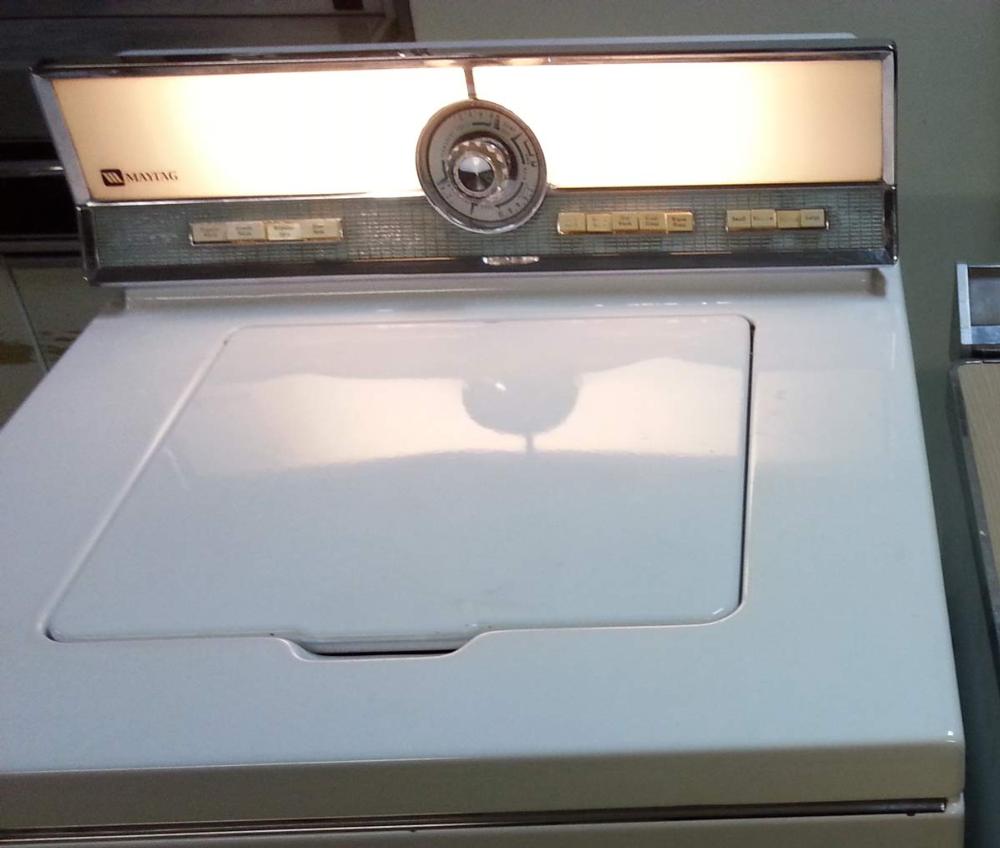
| ||
|
Post# 736222 , Reply# 10 2/18/2014 at 23:10 (3,718 days old) by akronman (Akron/Cleveland Ohio) |
||
Maytag Dryers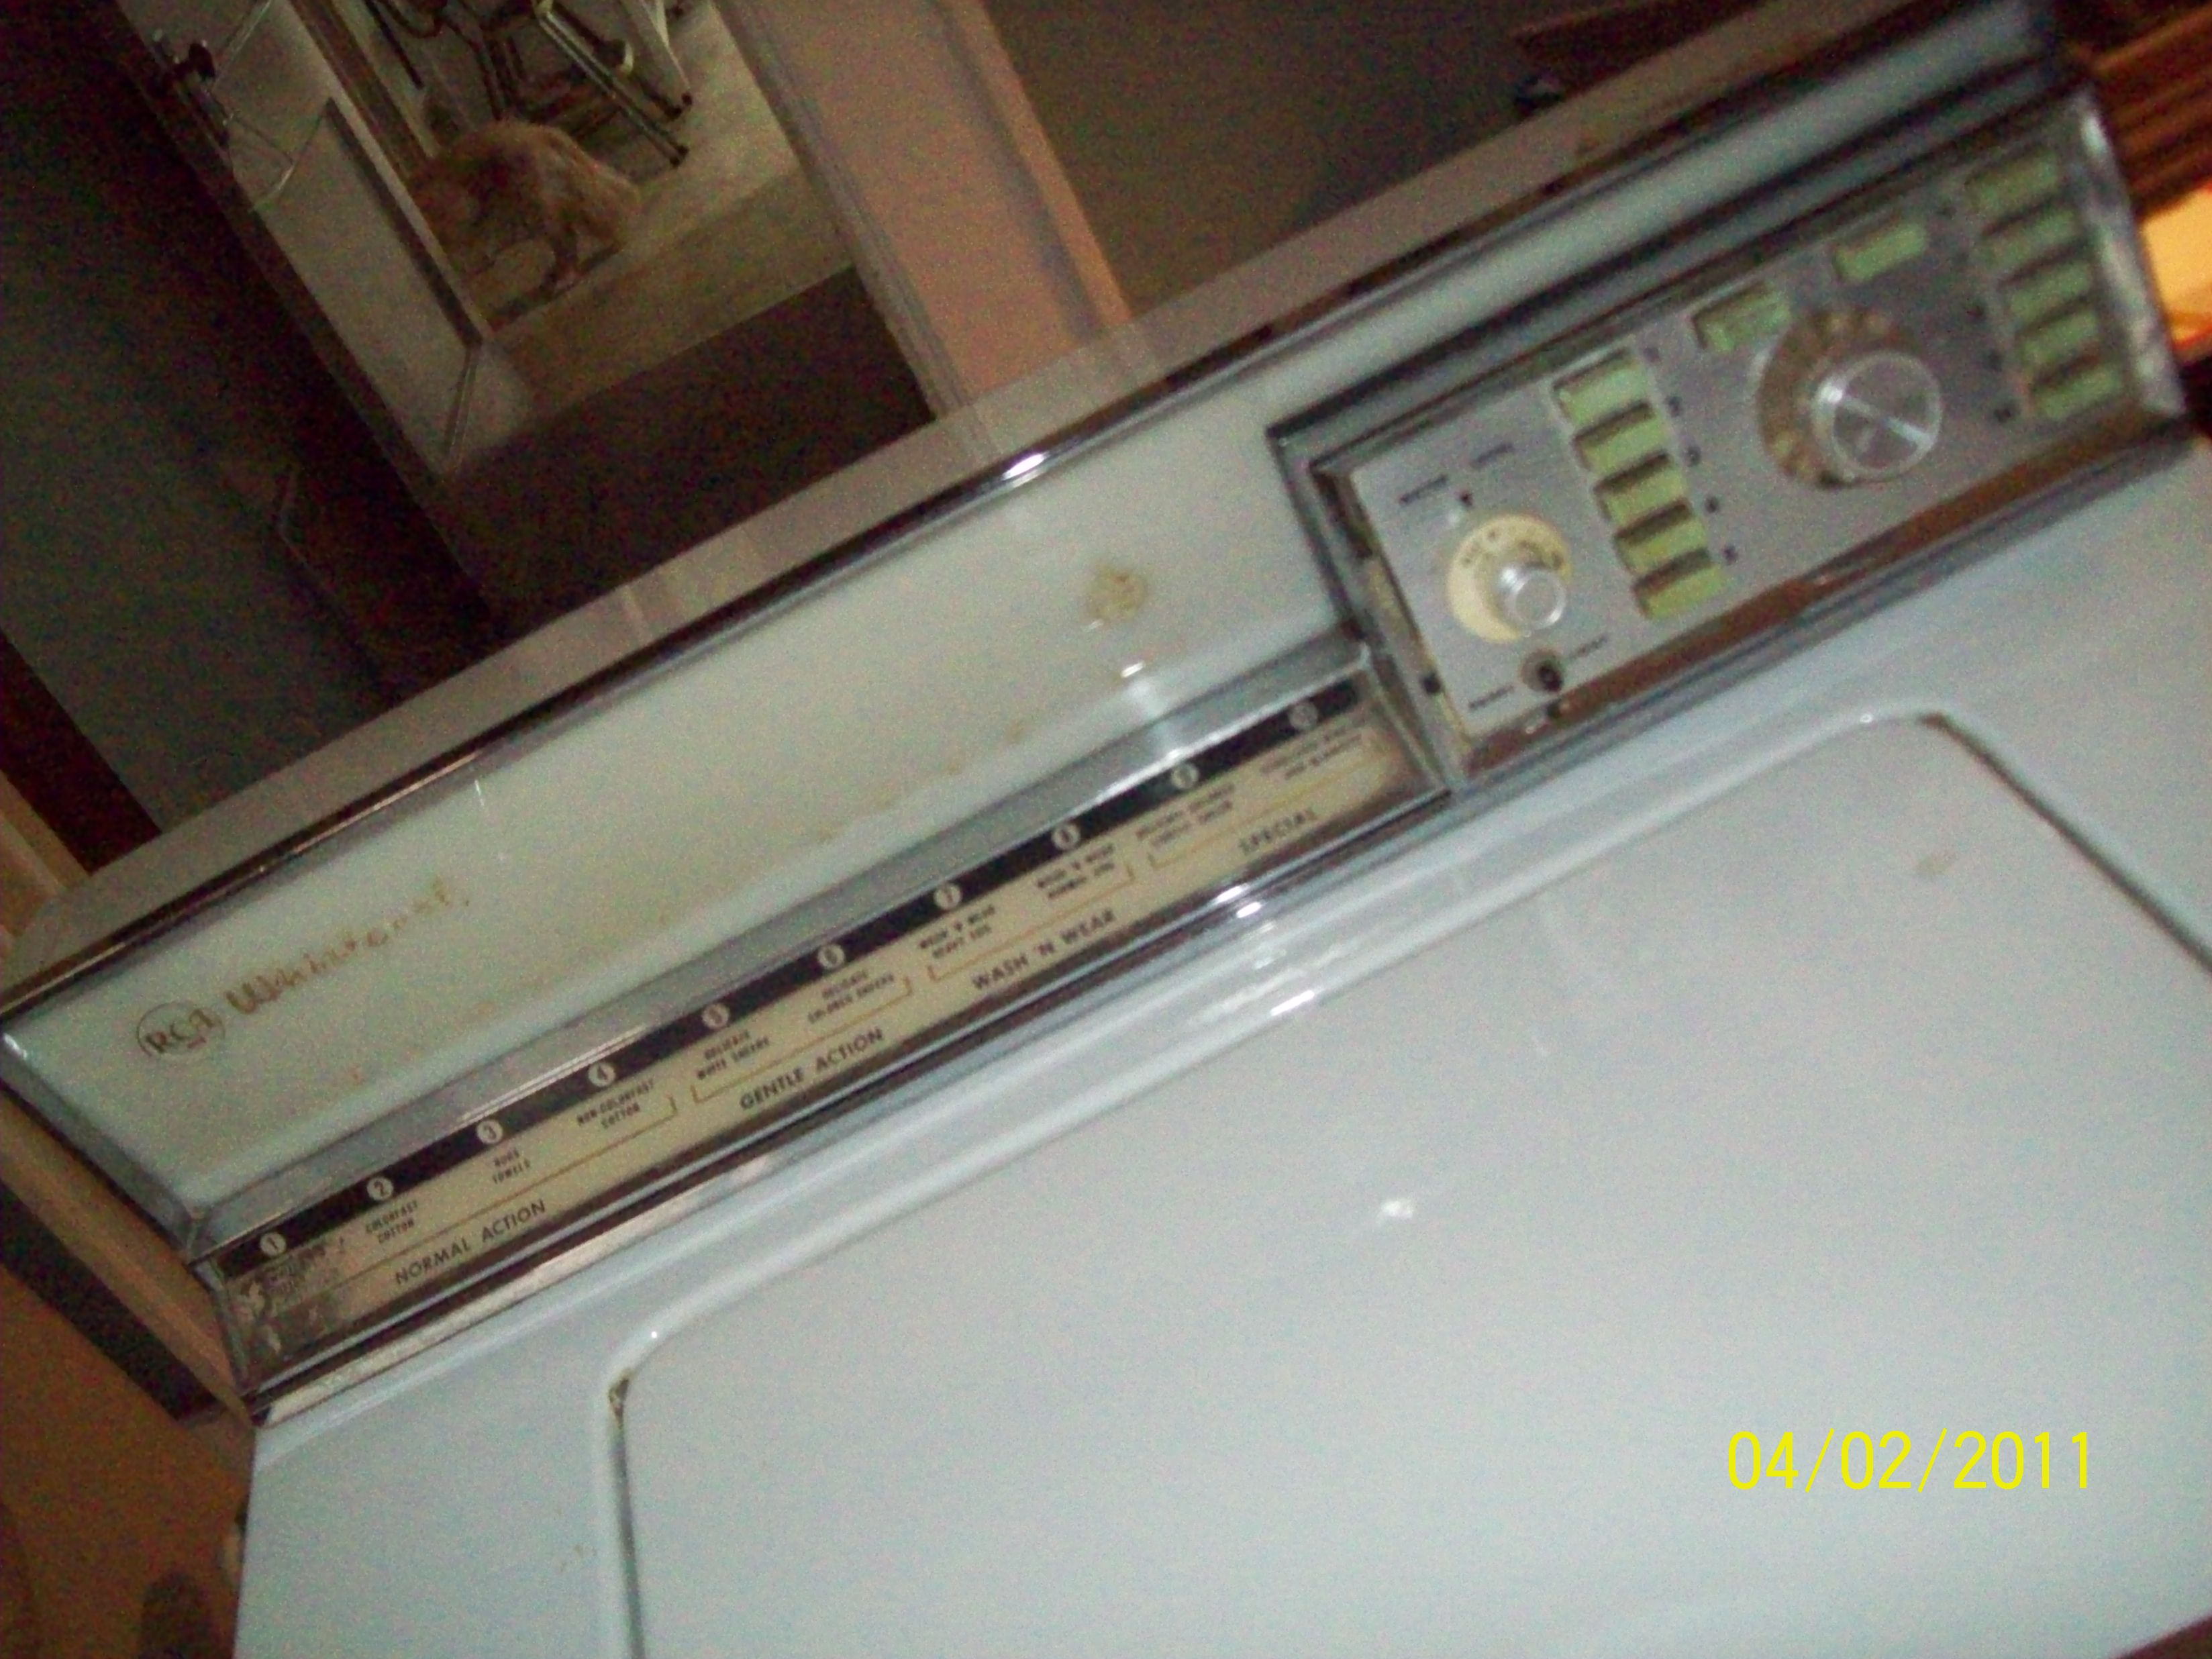
I have both a DE606 and a DE608, both white, in good working order. The 606 I rebuilt about 4 years ago, the 608 about 3 years ago. I retired the 606 since the drum is so small. I retired the 608 when I found a 59 and 64 and 66 Kenmore dryers, they look sharp lined up next to each other. I only have so many electric models I can install at one time.
I'm in Ohio, shoot me an email if you're interested. These are both "6" models, no console lights. | ||
| Post# 736242 , Reply# 12 2/19/2014 at 04:45 (3,718 days old) by maytagmodela806 () | ||
|
In the picture does that washer have permanent press without suds saver on the dial if so that pic looks just like mine PhilR???? | ||
| Post# 736257 , Reply# 13 2/19/2014 at 06:26 (3,717 days old) by dnastrau (Lords Valley, PA) | ||
|
Serial number The serial number should be six digits followed by two letters. I am guessing that the "...0L" that you posted is actually "QL." I don't think Maytag used an "O" in the date code. If that is the case, then the Q = 1972 and the L = June. | ||
| Post# 736258 , Reply# 14 2/19/2014 at 06:36 (3,717 days old) by maytagmodela806 () | ||
|
Yes that's what i ment to put I just look on the back of it again the timer makes a loud buzzing sound | ||
| Post# 736301 , Reply# 15 2/19/2014 at 09:37 (3,717 days old) by PhilR (Quebec Canada) | ||
|
| ||
| Post# 736306 , Reply# 16 2/19/2014 at 10:17 (3,717 days old) by danemodsandy (The Bramford, Apt. 7-E) | ||
|
Okay....
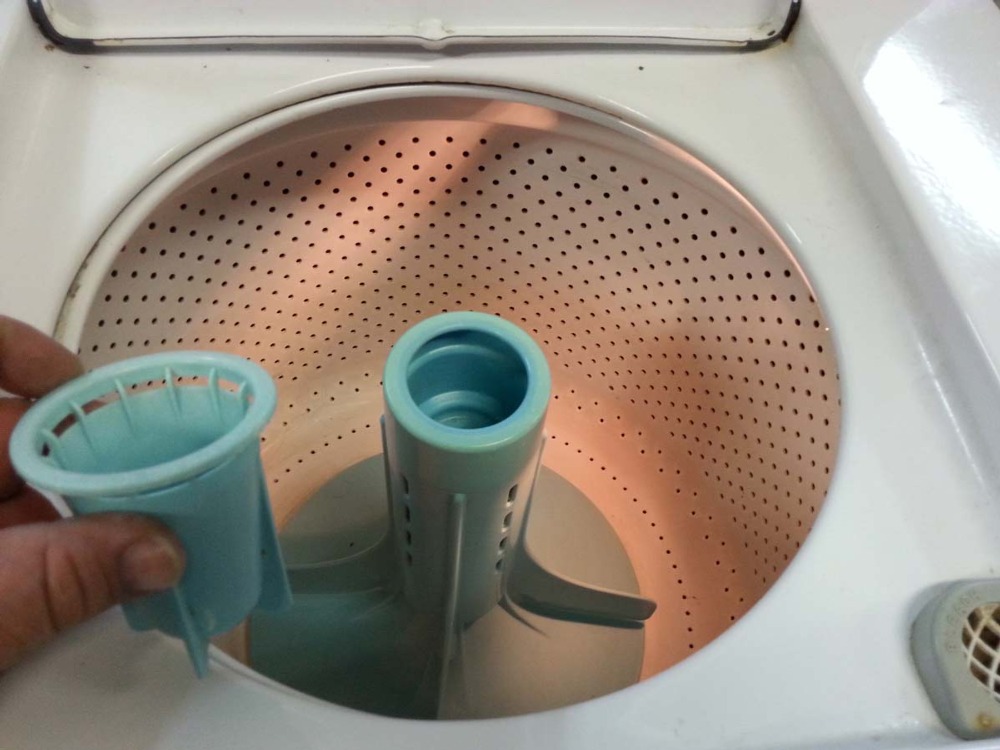
What you have sounds like the most desirable of the three 806 washer iterations. It has all the cycle options of later models, but it has the real bleach dispenser of early models, plus the blue trim on the console and possibly the chrome-topped lint filter.
The match for that would be a DE806 Halo of Heat dryer. This dryer is Electronic Control, with a lighted console matching that on your washer; other Maytag models did not have the lighted console. I'd really love to see photos of your washer. We can help you find a dryer if you're interested, I'm sure. 
| ||
| Post# 736335 , Reply# 17 2/19/2014 at 11:54 (3,717 days old) by PhilR (Quebec Canada) | ||
|
| ||
| Post# 736337 , Reply# 18 2/19/2014 at 12:04 (3,717 days old) by danemodsandy (The Bramford, Apt. 7-E) | ||
|
Phil:
Yes, the change to the "crystal" knob was also carried out on the dryers. I personally prefer the chrome knob, as I do on faucets as well.
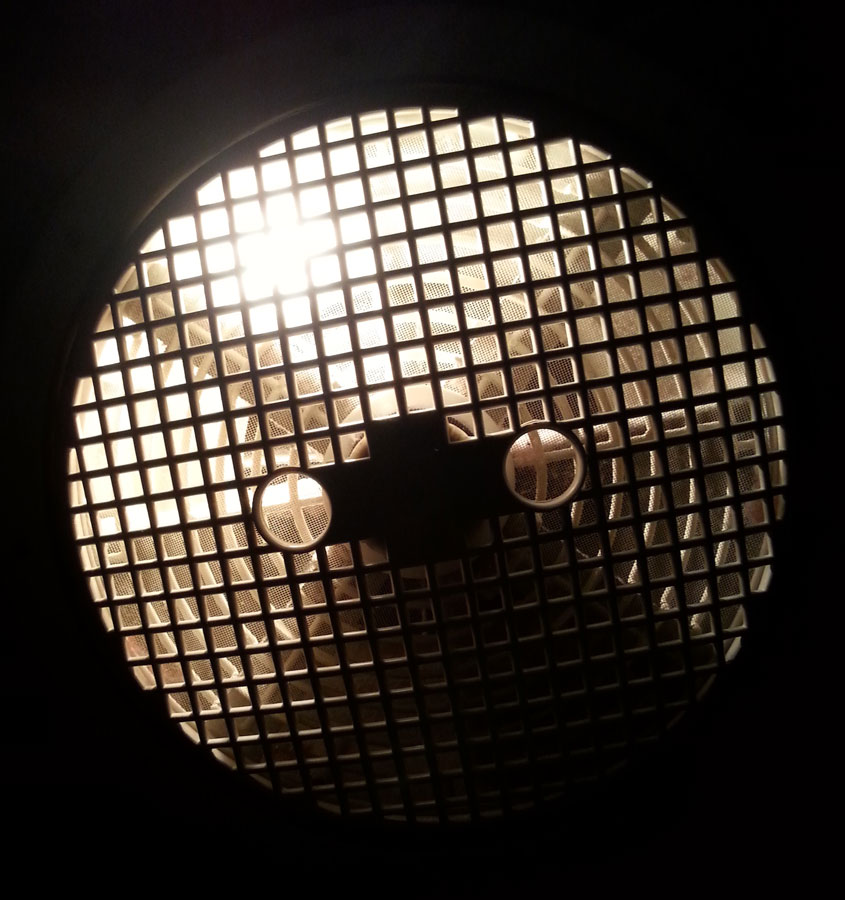
These dryers aren't that damn small. They'll handle what you take out of the washer, and that is all any dryer should be expected to do. Their major drawback is that the lint filter, which is located at the back of the drum, is easy to ignore, so it's likely that you'll have to do a thorough de-linting of any HOH DE806 you find. And as you know, that's a good idea on any vintage dryer anyway, so it's not a huge issue. I've heard complaints from people who have enormous resentment about having to reach into the drum to clean the lint filter, but they always seem to be the sort of people who wouldn't attend to a lint filter no matter where it was. You've surely seen what happens to Maytag washer filters, which are about the easiest-to-clean design ever made. Yikes. You, being a responsible and motivated person, will have no difficulty with it whatsoever. | ||
| Post# 736349 , Reply# 19 2/19/2014 at 12:36 (3,717 days old) by PhilR (Quebec Canada) | ||
|
| ||
| Post# 736353 , Reply# 20 2/19/2014 at 12:41 (3,717 days old) by danemodsandy (The Bramford, Apt. 7-E) | ||
|
Phil:
Both knob and lint filter can be exchanged for what you like. The chrome filters aren't easy to find - I had to buy one and I know. But they're out there.
Having the crystal knob on a blue control panel is sort of rare - they only did that for a brief "changeover" period before the Sunglow panel was introduced. The chrome knob is far, far more common. | ||
| Post# 736354 , Reply# 21 2/19/2014 at 12:47 (3,717 days old) by danemodsandy (The Bramford, Apt. 7-E) | ||
|
By the Way, Phil:
You mentioned repainting your panel.
What I would do is to go to an auto-parts store and look over the spray cans of auto touchup paint. A medium metallic blue like that should be an easy one to match, or to come very close to. You will need to buy both the color paint and a can of clearcoat; today's auto paints don't have any gloss to speak of until the clearcoat is applied. It will take careful masking. I had to redo the Sunglow on my first set of Maytags, and I found myself working masking tape very carefully into the creases of the panel, then trimming with an X-Acto knife. Worked well. | ||
| Post# 736364 , Reply# 22 2/19/2014 at 13:44 (3,717 days old) by PhilR (Quebec Canada) | ||
|
As I think about it, I may have something that's close to that in a spray can. That would definitively be cheaper than having base coat mixed just for that! Then I could clear it with automotive clear coat (I have that too). The control panel and the porcelain top are the worst parts of this washer. The porcelain isn't chipped but it has quite a few scratches. The cabinet paint is in good shape and even the inside is in very good shape. The porcelain in the tub could be better but it doesn't look too bad now that I cleaned it (it was stained orange/brown by water and the inside of the outer tub was really dirty!)
Here's what the tub looked like when I got it! It got much worse when I filled it with water with all the debris in the water and large insects that were pumper out of outer tub! The good thing is that it works nicely and doesn't leak oil or water! 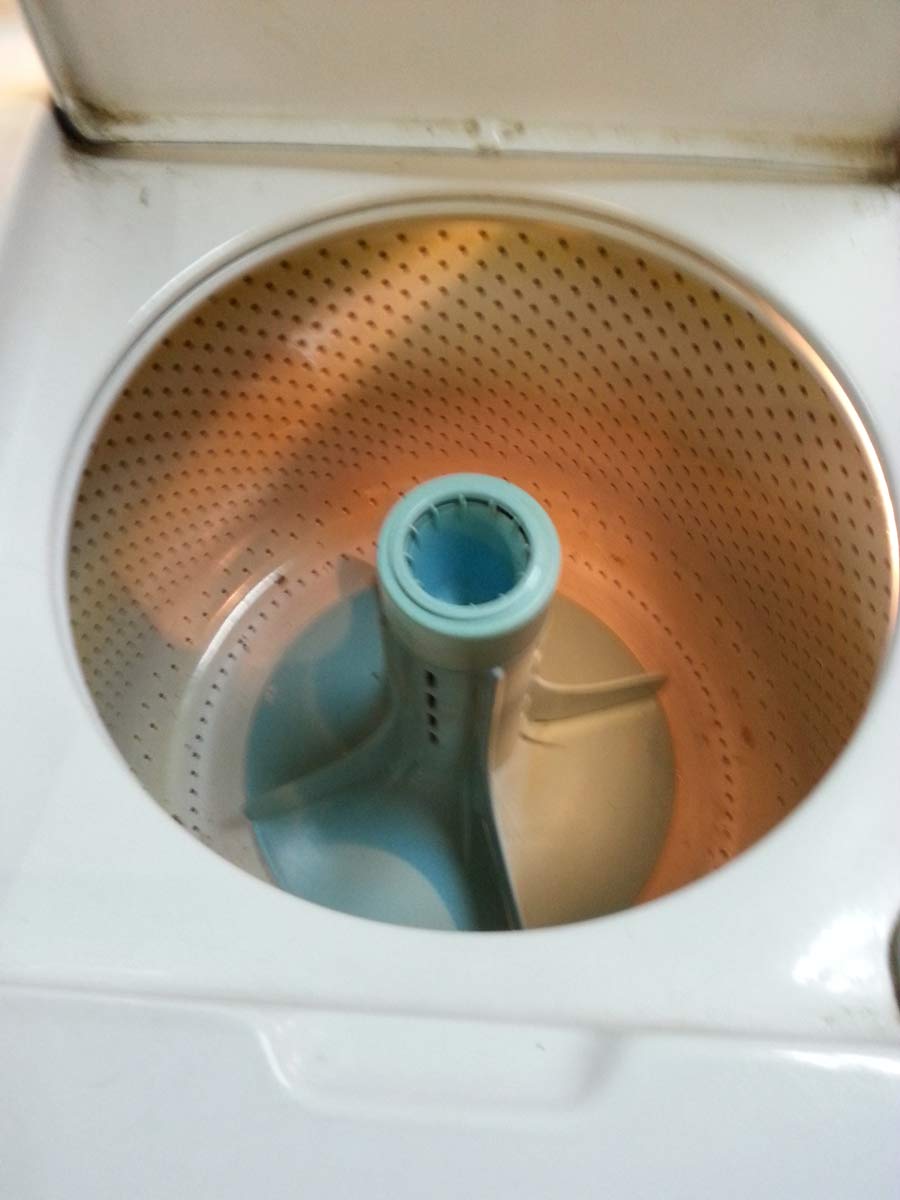
| ||
| Post# 736398 , Reply# 23 2/19/2014 at 16:39 (3,717 days old) by maytagmodela806 () | ||
|
My washer has the plastic lint filter and I'd also like to find a matching dryer to go with it | ||
| Post# 736410 , Reply# 24 2/19/2014 at 17:43 (3,717 days old) by danemodsandy (The Bramford, Apt. 7-E) | ||
|
Dean:
Here's what I suggest on a dryer:
You need to check the "Shopper's Square" forum every day. Look at every Maytag dryer, but pay particular attention to anyone listing one with the description "HOH." "HOH" means "Halo of Heat," which refers to the generation of Maytag dryers you're looking for. The dryer you are after is called a DE806 (for "Dryer, Electric, Model 806"); a Shopper's Square post may or may not say if a dryer is a DE806 or a HOH dryer. You may have to ask some questions to be sure that a dryer in Shopper's Square is what you're looking for, but everyone here will be glad to help you. If a HOH DE806 turns up near you, I would advise you to grab it if you possibly can; these are forty-year-old units now, and their numbers are decreasing every year. These dryers are prone to some Electronic Control issues, but they are fixable. Since you'll be working on your washer soon, probably, you'll be gaining some confidence and experience, and again, members here will help guide you through the process. | ||
| Post# 736462 , Reply# 26 2/19/2014 at 23:25 (3,717 days old) by maytagmodela806 () | ||
|
Where do I get parts for my washer to fix what's wrong with it | ||
|
Post# 736469 , Reply# 28 2/20/2014 at 00:39 (3,717 days old) by rp2813 (Sannazay) |
||
 Sounds like the fabric softener dispensing cup is gone if you're just seeing a single hole.
BTW, if you need a gas dryer, that would be a DG806.
I'm sure there are people here who can advise on where to get a new timer or have yours fixed. It does sound like a bad timer is causing the problems you're having. | ||
| Post# 736471 , Reply# 29 2/20/2014 at 01:03 (3,717 days old) by PhilR (Quebec Canada) | ||
|
| ||
| Post# 736473 , Reply# 30 2/20/2014 at 01:06 (3,717 days old) by PhilR (Quebec Canada) | ||
|
| ||
| Post# 736479 , Reply# 31 2/20/2014 at 02:35 (3,717 days old) by maytagmodela806 () | ||
|
That might be and would you know where to find a new timer and the fabric softener Despenser it would be nice to have that as well and as far as a dryer it would have to be the electric one and Oakland city is in Gibson county | ||
| Post# 736492 , Reply# 32 2/20/2014 at 06:35 (3,716 days old) by danemodsandy (The Bramford, Apt. 7-E) | ||
|
Dean:
eBay is a good source for parts, and people here also have parts; they're sometimes advertised in the Shopper's Square forum. You can also put a "Wanted to Buy" ad in Shopper's Square.
However, you do need to know what you're looking for, which is why posting some photos here is highly, highly recommended. We can then guide you on parts numbers, etc., more easily. It works like this: You show us the old part, with a photo. We can then figure out what is needed and what the part number is. Someone here may say they have it, and will sell you one. Or you might go to eBay and find it there. Once you have parts in hand, you can then repair your machine. One more thing: You mention rust on your machine. Photos will also help us in assessing whether your machine is a good candidate for repair. Beyond a certain point, rust gets very expensive to eradicate, and you might not want to put in the time, money and effort. In those cases, it's better to look for another machine that doesn't have tinworm. Once we see photos, we can help a whole lot more. Without them, we're just guessing at some stuff. | ||
| Post# 736516 , Reply# 33 2/20/2014 at 10:18 (3,716 days old) by maytagmodela806 () | ||
|
If been trying to upload photo s but my tablet won't let guess I'll have to use my phone and email them to my self and see if that way works | ||
| Post# 736714 , Reply# 34 2/21/2014 at 02:50 (3,716 days old) by maytagmodela806 () | ||
|
Still unable to load pics | ||
| Post# 736718 , Reply# 35 2/21/2014 at 03:23 (3,716 days old) by PhilR (Quebec Canada) | ||
|
| ||
| Post# 736721 , Reply# 36 2/21/2014 at 04:14 (3,716 days old) by maytagmodela806 () | ||
|
OK thank you I'll do that I do have to get pictures of the timer b4 I do e mail them that way I can do it all in one email | ||
| Post# 736805 , Reply# 37 2/21/2014 at 14:25 (3,715 days old) by maytagmodela806 () | ||
|
Pics have been emailed to you PhilR | ||
| Post# 736812 , Reply# 38 2/21/2014 at 15:06 (3,715 days old) by PhilR (Quebec Canada) | ||
|
| ||
| Post# 736814 , Reply# 39 2/21/2014 at 15:44 (3,715 days old) by maytagmodela806 () | ||
|
There is one of the back of the timer its a close up of the part number if I sent that one not sure they look good | ||
|
Post# 736840 , Reply# 40 2/21/2014 at 18:44 (3,715 days old) by goatfarmer (South Bend, home of Champions) |
||
|
| ||
| Post# 736850 , Reply# 41 2/21/2014 at 19:28 (3,715 days old) by danemodsandy (The Bramford, Apt. 7-E) | ||
|
Kenny's Right!
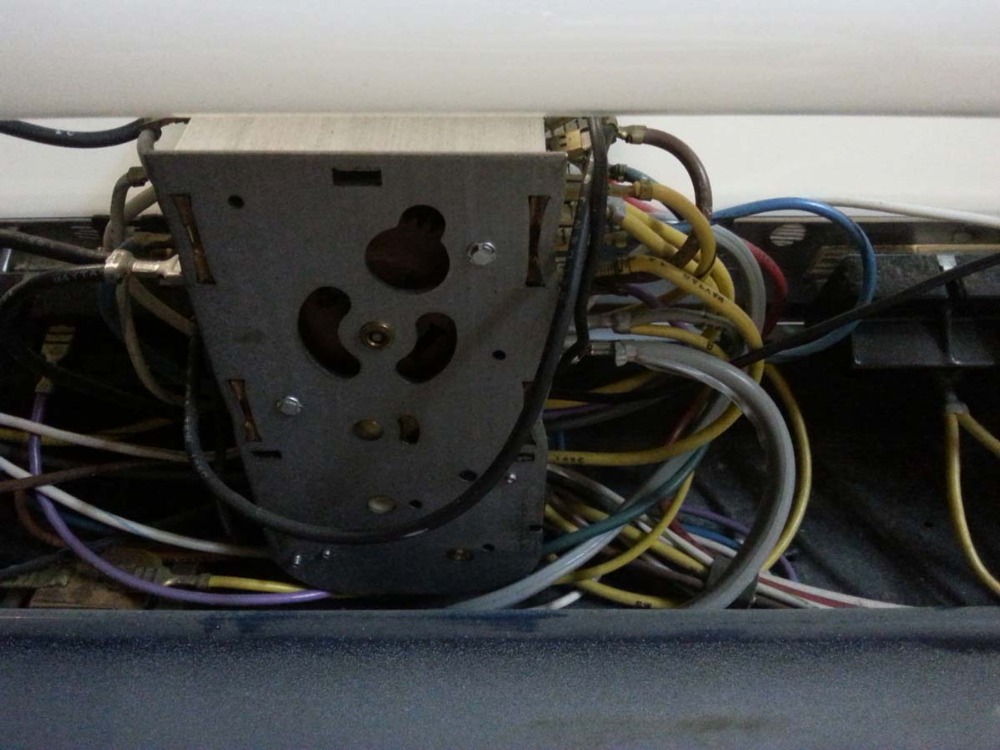
The first order of business is to get that mouse nest cleaned out of the console. He's also right that a chewed wire might be all that's wrong with the machine.
When you clean that out, I would wear disposable rubber gloves, and a dust mask, available anyplace that sells DIY supplies. I'd pick out as much as I could by hand, then use an old vacuum or a shop vac to clean out the rest. Then I would start with a cleaner such as Windex and a lot of inexpensive paper towels to clean away the dirt left behind. Spray the cleaner on paper towels and use them to wipe dirt away - don't spray the wiring and timer and switches. It will take some doing, but you need to do it anyway. It will give you some familiarity with the insides of your machine, and you may spot some problems that need taking care of. P.S.: The dust mask is indispensable. Rodents carry germs you do not want to breathe in from their nesting materials. P.P.S.: This machine is in showroom condition compared to some that members here have restored; this is an excellent machine for you to learn on. | ||
| Post# 736868 , Reply# 42 2/21/2014 at 20:24 (3,715 days old) by maytagmodela806 () | ||
|
Thank you I'm ready to start learning and to get it cleaned up it had a bunch of scrap metal on top of it when I found it | ||
| Post# 736871 , Reply# 43 2/21/2014 at 20:39 (3,715 days old) by PhilR (Quebec Canada) | ||
|
Here's a picture of the timer motor
BTW, it looks like a Kingston 60. I did replace the plastic gear in one of these in a 1969 Frigidaire dishwasher.
If the timer motor is bad, you can probably order this brass gear to repair it (other members could tell more as I haven't dismantled my Maytag timer motor). To test it, simply disconnect it from the timer and plug it to 120V to see if the gear still turns. CLICK HERE TO GO TO PhilR's LINK | ||
| Post# 736891 , Reply# 44 2/21/2014 at 22:28 (3,715 days old) by maytagmodela806 () | ||
|
Okk I'll be checking things out this weekend | ||
| Post# 736892 , Reply# 45 2/21/2014 at 22:35 (3,715 days old) by danemodsandy (The Bramford, Apt. 7-E) | ||
|
Just In Case:
Please do your preliminary checking - and that cleaning - with the machine unplugged. After the cleaning, let it sit a couple of days before plugging back in.
I'm sure you already know this, but it's doubly important on a machine that could have a wiring issue - things that are not supposed to be "live" can become that way if bare wire is touching something it's not supposed to. Once you've looked at all the wires and are sure you don't have any mouse-chewed spots, then you can start plugging the machine in and start checking it for operation again. | ||
| Post# 736899 , Reply# 46 2/21/2014 at 22:59 (3,715 days old) by maytagmodela806 () | ||
|
I will do that I want this washer to live longer I'd hate to see a beautiful machine go | ||
| Post# 736920 , Reply# 47 2/22/2014 at 02:16 (3,715 days old) by hippiedoll ( arizona ) | ||
|
keeping | ||
| Post# 736936 , Reply# 48 2/22/2014 at 05:56 (3,714 days old) by maytagmodela806 () | ||
|
I will thank you | ||
| Post# 736947 , Reply# 49 2/22/2014 at 07:06 (3,714 days old) by beekeyknee (Columbia, MO) | ||
 | ||
| Post# 736974 , Reply# 50 2/22/2014 at 10:43 (3,714 days old) by PhilR (Quebec Canada) | ||
|
| ||
| Post# 737012 , Reply# 51 2/22/2014 at 15:27 (3,714 days old) by beekeyknee (Columbia, MO) | ||
|
Dean and Phil,
I have an 806 set out in the shed awaiting restoration. I got the washer in Kansas City in Nov. of '11 for $25.00 and the dryer in Oklahoma City for 50.00 in Nov. of '12. The summer of '12 turned into a water heater project year and last summer just turned out to be a bad year for doing anything, so hoping this is the year. I've been collecting parts for the last three or four years in anticipation of this project. I'm looking forward to it and dreading it at the same time. My washer is just like the one you guys have, except mine doesn't have the mouse nest and it has the early Mallory "scritchin" timer instead of the Kingston timer. In fact, it was made in Oct. 1972, just like Phil's. And the dryer was made in Oct. 1973. An odd coincidence that they were made a year apart and I got them a year apart. My machines have the acrylic knobs and the turquoise plastic topped lint filters too. I'd like to have the cabinets powder coated but I don't know what to do about the little chrome strips along the top edge of the front panels. Do they come off? Does anyone know? Should they be left on during the powder coating process or would that ruin them? I can take the factory placard off the machines and rivet them back on afterwards. But is the dryer placard riveted on or is it one of the peal off - stick on kind? I can't remember. The blue strip on the dryer's control panel is going to have to be re-painted. The original paint is kind of an egg shell or almost flat, slightly metallic type of blue. I have a spare 806 washer c/p that I can take with me to the automotive shop and I think they'll be able to match it and put it in a spray can for me. I think that will work out pretty well. Depending on the match, I may have to paint them both but I think the end result will be close enough to the original that it will suit. Does anyone have any experience with my painting dilemma? Brian | ||
| Post# 737013 , Reply# 52 2/22/2014 at 15:33 (3,714 days old) by PhilR (Quebec Canada) | ||
|
| ||
| Post# 737014 , Reply# 53 2/22/2014 at 15:46 (3,714 days old) by beekeyknee (Columbia, MO) | ||
|
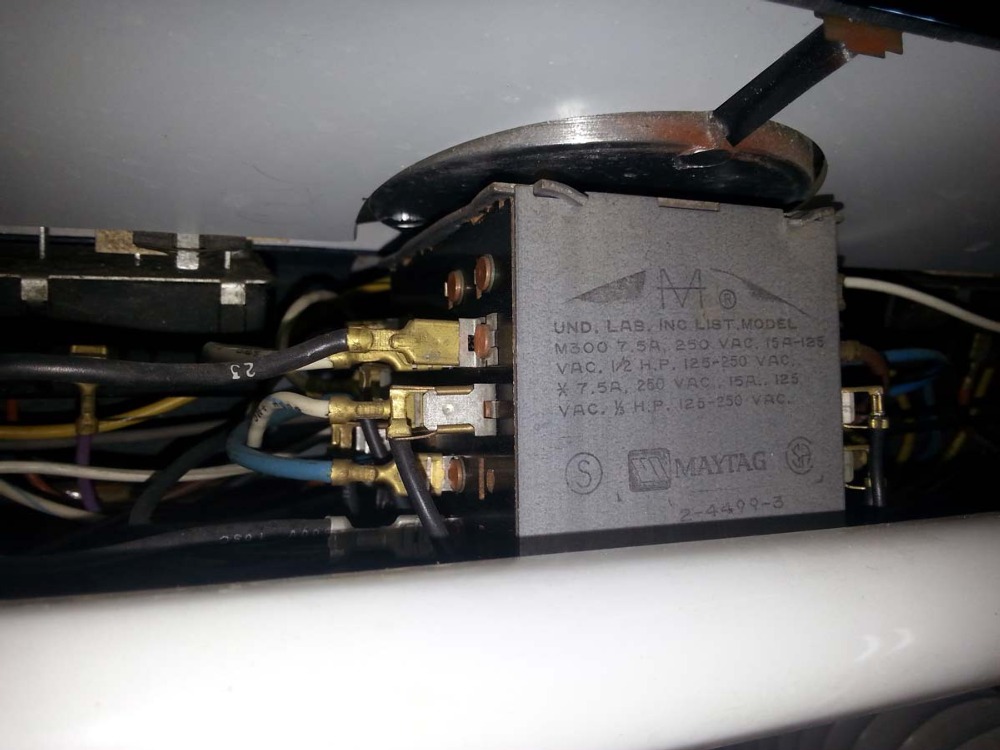
They're not hard to tell apart just by looking. Mallorys are in a square metal box. Kingstons are in a flat Bakelite box. I have a thread on here about timer maintenance somewhere. James from Las Vegas just recently referenced it. Actually, Maytag used both brands of timers through out their run, especially up to the '90's. It was kind of a toss up which timer one might get when buying a machine at the time, as is now when buying a used machine. The only way to know is to look under the hood before purchase.
This post was last edited 02/22/2014 at 16:18 | ||
| Post# 737018 , Reply# 54 2/22/2014 at 16:35 (3,714 days old) by danemodsandy (The Bramford, Apt. 7-E) | ||
|
Control Panel Painting:
Brian:
Here is what I did for my first set of Maytags, which were '70s machines with the Sunglow accent instead of the blue. The panel is a single die-cast piece. Although it has what appears to be a chrome frame around color areas, it's all the same casting. What you have to do is to mask off the chrome and the white area at the top (or glass on 806/906 models), and buttons if you're painting it in place. What you want to do is to lay down a strip of masking tape over the chrome, with one edge of the tape extending over the color area. Next, you smooth the tape, rubbing it so that it adheres well to the chrome. Then, you need to force the tape into the little "valley" between the chrome part and the color area - this is so that the masking tape wraps completely around the edge of the chrome to where it meets the color area. Last, you use an X-Acto knife to trim along the "valley," running the knife in a continuous line, and then lifting the excess tape away from the color area. You need to use the knife delicately, not pressing down too hard, so as not to cut through the chrome. Doing all this around the openings for the cycle buttons is a particular PITA, but patience pays off here. When you are through, you will have all the chrome masked off, and the color area exposed. The white or glassed area above the color area needs to be masked to, but this is much simpler, since you don't have chrome right up against where you want to paint. And if you're painting the control panel in place, a cheap plastic dropcloth over the machine itself will protect its finish from overspray. Secure it with some masking tape so that you don't brush up against it and knock it awry at an inopportune moment. This is what worked for me. I sprayed with stock gold spray paint, and clear-coated it. If the color match wasn't absolutely perfect (and I thought it was damned close), it at least made a very bedraggled set of control panels look new again. When I got the machines, a cycle button was missing and the panels were afflicted with a very bad case of Spray 'n Wash-itis, looking scabrous where there were big patches of Sunglow missing. One cycle button (for which I am still grateful to Kenny!) and some paint later - I had machines to be proud of. | ||
| Post# 737024 , Reply# 55 2/22/2014 at 16:58 (3,714 days old) by beekeyknee (Columbia, MO) | ||
|
| ||
| Post# 737208 , Reply# 56 2/23/2014 at 17:02 (3,713 days old) by hippiedoll ( arizona ) | ||
|
fabric softener dispenser cup...... | ||
| Post# 737221 , Reply# 57 2/23/2014 at 18:12 (3,713 days old) by PhilR (Quebec Canada) | ||
|
| ||
| Post# 737255 , Reply# 58 2/23/2014 at 21:54 (3,713 days old) by maytagmodela806 () | ||
|
Hey if got another issue when it spins it makes a loud groaning noise and stops spinning | ||
| Post# 737265 , Reply# 59 2/23/2014 at 22:30 (3,713 days old) by beekeyknee (Columbia, MO) | ||
|
Yes, the timers are interchangeable. You have a 4499-3. Are you sure it "scritches"? The 4499-1's are usually the "scritchin" ones. A -1 is an early Mallory "scritchin" type (torsion spring) escapement (the spring unwinding causes the timer to make the sound), a -2 indicates a Kingston timer (rotating cam disc) and -3 indicates plastic gear driven escapement (late style Mallory timer). I have all three and my -3 doesn't "scritch". IMO any timer of that age should be cleaned and lubricated if one expects it to last.
When the timer turns hard it's more likely to fail. The -1 style has a complicated escapement that wears when not lubricated and cleaned, the -2 (Kingston) has a plastic motor pinion that will break easily and the -3 seems to be the most durable. Others may feel differently, but this is what I've found to be true most of the time. That's more information than you asked for, but when I saw the -3 on your timer I was skeptical about it being a torsion spring type timer. Are you sure it doesn't just "click"? If I could see the bottom of the timer where the escapement is I could tell you by looking. Do a search for Mallory and/or Kingston (just the individual words) under Imperial. There's also the Westinghouse Automatic Timer Service Manual in Automatic Ephemera. | ||
| Post# 737269 , Reply# 60 2/23/2014 at 22:53 (3,713 days old) by beekeyknee (Columbia, MO) | ||
|
Dean,
I hate to be the bearer of bad news, but I've been looking at the pics of your machine and the things you have been saying and it looks and sounds as though your machine needs a complete tear down and restoration. This can be done, but it takes patience, hard work and some money. You can't expect a machine of that age to be in tip-top condition. On the upside, when you're finished you will be rewarded with a machine that will most likely run a very long time. You can look through the archives to find the rebuilding process. The groaning sound you hear sounds like a dry or worn tub bearing which usually requires removing the basket and tub down to the transmission. At that point you might as well do a complete restore. Hope this helps. Brian | ||
| Post# 737280 , Reply# 61 2/24/2014 at 01:00 (3,713 days old) by PhilR (Quebec Canada) | ||
|
Brian, is the Mallory timer in your Oct 1972 machine a type 1 or type 3? Mine doesn't have a spring-loaded escapement (it moves slowly like a Kingston would do) but it's motor is noisy (it makes constant noise) I guess something is worn in it and/or lacking lubrication but it still works. The Kingston timers that I have don't make as much noise. I do have one Ingraham timer motor that makes a similar noise (not that noisy still) but others that are less noisy.
BTW, I did send a link in a previous post to brass replacement gears for Kingston 60 timer motors. They are quite easy to replace. I replaced the Kingston 60 timer motor in a Frigidaire dishwasher with a new one but I did fix the old motor with a brass gear for future use!
Do you think any action is needed with a noise like this (that's the Mallory type 3 on my A-806)?
| ||
| Post# 737301 , Reply# 62 2/24/2014 at 03:53 (3,713 days old) by beekeyknee (Columbia, MO) | ||
|
Phil,
The timer in my Oct. 1972 machine is a -1. The timer in my Oct. 1979 machine is a -3. Yours is a -3. You usually see -1 timers in a machine of your age. Since your video was less than a minute, I didn't get to hear it advance. It's possible that the machine could have had a timer replacement somewhere in it's past. Someone correct me if I'm wrong, but this is what I have observed. John or Drew might know if -3's were used that early, but I'm thinking no. That's just plain old motor noise in that timer. I don't know if you can stop it or not. It can happen to any of those little synchronous motors. You can pull that timer out of there, take the motor off, connect it to 120 with an extension cord and alligator clips and put a drop or two of turbine oil or Tri-flow oil on the pinion and see if it will take any in. I can't remember if there is anywhere to get oil into the back of the motor or not. Sometimes they will quiet down and sometimes not. Be careful. It's an easy way to get shocked. See thread # 38712 and # 50753. There you can see what I did and what James did. My video is of a -1 escapement running after cleaning and lubrication. Your escapement is much simpler to work on. It's hard telling with those little motors. It could run like that for along time or it could quit the next time you use it. I've had them stop on me while working on them and start back up after giving it a little tap on the bench top or turning them over and tapping them again. Once I got it to run again, I kept putting oil on it and turning it over and on it's sides to help the oil distribute and it finally quit making noise. It's kind of touch and go with those little motors sometimes. If it won't quiet down, you could try and look for a new one. I don't know what the part number is right off the top of my head. Someone on here actually rewound one of those little motors, but I think it was a different type of motor and much older. It didn't look like something I wanted to try. I typed in synchronous motor in a google search and got several hits. You have to make sure it matches your old motor specs or it won't work. Brian | ||
| Post# 737304 , Reply# 63 2/24/2014 at 04:26 (3,713 days old) by maytagmodela806 () | ||
|
Thanks Brian would you know where I can find the parts for that | ||
| Post# 737487 , Reply# 64 2/24/2014 at 20:33 (3,712 days old) by beekeyknee (Columbia, MO) | ||
|
Dean,
That's nearly impossible for me to answer because I'm not there to look at the machine. All I can suggest is that you start looking through the archives to see what other people have done. You can search the archives if you're not a contributing member, but it's easier if you are because you can take full advantage of the sites features and not have to go through Google to search through them. Ebay and on line appliance parts stores will have most of the things you will need. You will most likely need new damper pads and glue, silicone grease, belts, injector parts, mounting stem and boot seat kit and maybe a new tub bearing and sleeve if the old one isn't saveable. I would replace that patched power cord too. That's just for starters. If you're really serious about this, personally I would recommend upgrading your membership so you can easily take full advantage of the site. (And I'm not trying to start an issue here, folks. So please don't rake me over the coals.) Here are some thread #'s I've found helpful in the past. These were copied and pasted out of a notepad note, so if it's not completely accurate, that's why. AW Threads: #28069, 22830, 25520, 38714 (rebuild of LAT 9800AAW), #42324 (A206 drive lug adjustment), #21438 (Reply #2, control panel from A806 from ebay). Also download the Maytag Helical Drive Automatic Washer Service Manual from Automatic Ephemera and print it out. You'll need that. If your transmission is sluggish and it probably is unless it's been replaced, you can find a low mileage donor out of an early to mid-eighties machine instead of trying to rebuild your old transmission. Just depends on how it runs and what the agitator drive shaft looks like. If you can get the agitator out, that will give you an idea of what you're starting to get into. Also, take the front panel off and look inside. That will tell you a lot too. You will get more advise if you can get to the point where you can resize your photos and post them on here so we can see what it is you're seeing. There's a learning curve here and it takes time. Good luck. Brian | ||
| Post# 737731 , Reply# 65 2/26/2014 at 00:29 (3,711 days old) by maytagmodela806 () | ||
|
Thank you how do you take the front panel off | ||
| Post# 737793 , Reply# 66 2/26/2014 at 08:45 (3,710 days old) by danemodsandy (The Bramford, Apt. 7-E) | ||
|
Dean:
Getting into a Maytag is easy.
On the front panel of the machine, close to the bottom, there is a ridge, and then the panel has an area at the very bottom that is recessed. Under the ridge, there are two screws. Remove the screws, and grasp the front panel at the bottom. Pull it outward and swing the panel towards you. At the top of the panel, the panel is held by two clip assemblies that will let go all by themselves if you will just keep swinging the panel outward and toward you. Reassembly involves seating the top edge of the panel back on the clips, swinging the bottom of the panel back into place, and re-installing the screws. 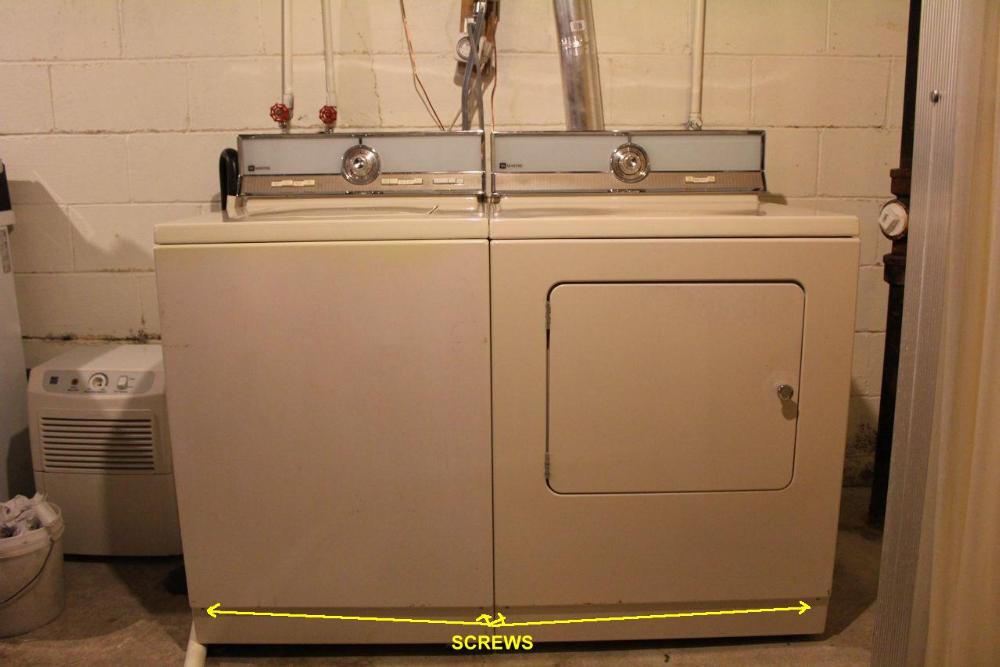
| ||
| Post# 738349 , Reply# 67 2/28/2014 at 19:35 (3,708 days old) by danemodsandy (The Bramford, Apt. 7-E) | ||
|
Dean:
Here's a DE806 dryer in the Allentown, PA area. Wouldn't be the longest road trip someone ever made to get a matching machine:
www.automaticwasher.org/cgi-bin/T... I'm alerting PhilR as well; he's also looking for one. | ||
| Post# 738371 , Reply# 68 2/28/2014 at 20:24 (3,708 days old) by PhilR (Quebec Canada) | ||
|
| ||
| Post# 738460 , Reply# 69 3/1/2014 at 10:11 (3,707 days old) by maytagmodela806 () | ||
|
Been at the hospital since the 24 had twin red head girls premes but doing good | ||
|
Post# 738463 , Reply# 70 3/1/2014 at 10:30 (3,707 days old) by goatfarmer (South Bend, home of Champions) |
||
|
| ||
| Post# 738492 , Reply# 71 3/1/2014 at 13:18 (3,707 days old) by maytagmodela806 () | ||
|
Thank you | ||
| Post# 738534 , Reply# 72 3/1/2014 at 15:33 (3,707 days old) by hippiedoll ( arizona ) | ||
|
CONGRATULATIONS!!! | ||
| Post# 739741 , Reply# 73 3/6/2014 at 04:40 (3,703 days old) by maytagmodela806 () | ||
|
Unfortunately I do not have a PayPal account but thank you I'm kinda strapped for cash right now and thank you there quite a hand full being premes | ||
| Post# 741644 , Reply# 74 3/13/2014 at 17:05 (3,695 days old) by maytagmodela806 () | ||
|
What timer part numbers work with my washer I'm looking for them trying to find one on eBay | ||
| Post# 741796 , Reply# 75 3/14/2014 at 09:52 (3,694 days old) by beekeyknee (Columbia, MO) | ||
|
Are you looking for the whole timer or the timer motor? Have you taken the timer out of your machine and hooked it up to 120V to see what it does? Refer to reply #62 in this thread I made to Phil about working on timers. From looking at the pics that Phil posted for you in reply #38 you have a Kingston 4499-2 timer. The top view looks pretty bad, but the back view looks better. Even so the timer will most likely need maintenance. It's probably too old and dirty to work properly.
If your timer motor really is the problem maybe some of the other guys can tell you which of these numbers will be of help to you. I have never had to replace a timer motor yet, so I'm not sure which of these numbers is most important as far as motor replacement goes. I looked in the Maytag Parts Identification Manual that I downloaded from Automatic Ephemera and I didn't see that model timer listed. There are lots of timer motor manufacturers and many motor numbers listed, but I'm not sure which one to look for. I would guess the numbers on the timer back are the right ones, but I'm not sure. If you can't find the motor by it's self, any 4499-1, 4499-2, or 4499-3 replacement timer will work. I hope this helps you. | ||
| Post# 741807 , Reply# 76 3/14/2014 at 11:19 (3,694 days old) by PhilR (Quebec Canada) | ||
|
If the timer motor is the issue, follow the link I posted in the reply#43 of this thread and see how to replace the plastic gear in the Kingston motor. I did order the brass replacement gear for one of mine and it was easy to replace. It works well now.
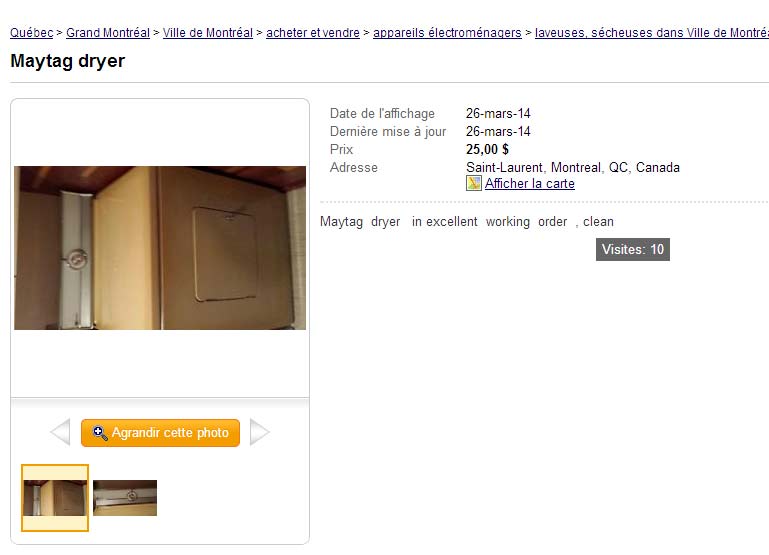
BTW, I'm still looking for a DE806 dryer, the one on Craigslist was sold to someone else even if the seller had accepted my offer... The seller was supposed to get back to me, I waited two days then I called back to hear him tell me that it was sold to someone else. | ||
|
Post# 741834 , Reply# 77 3/14/2014 at 13:14 (3,694 days old) by d-jones (Western Pennsylvania (Pittsburgh Area)) |
||
 The correct motor for your Kingston timer will have a drive mechanism that looks like this. If it has a metal or plastic gear then it's the wrong one. CLICK HERE TO GO TO d-jones's LINK on eBay 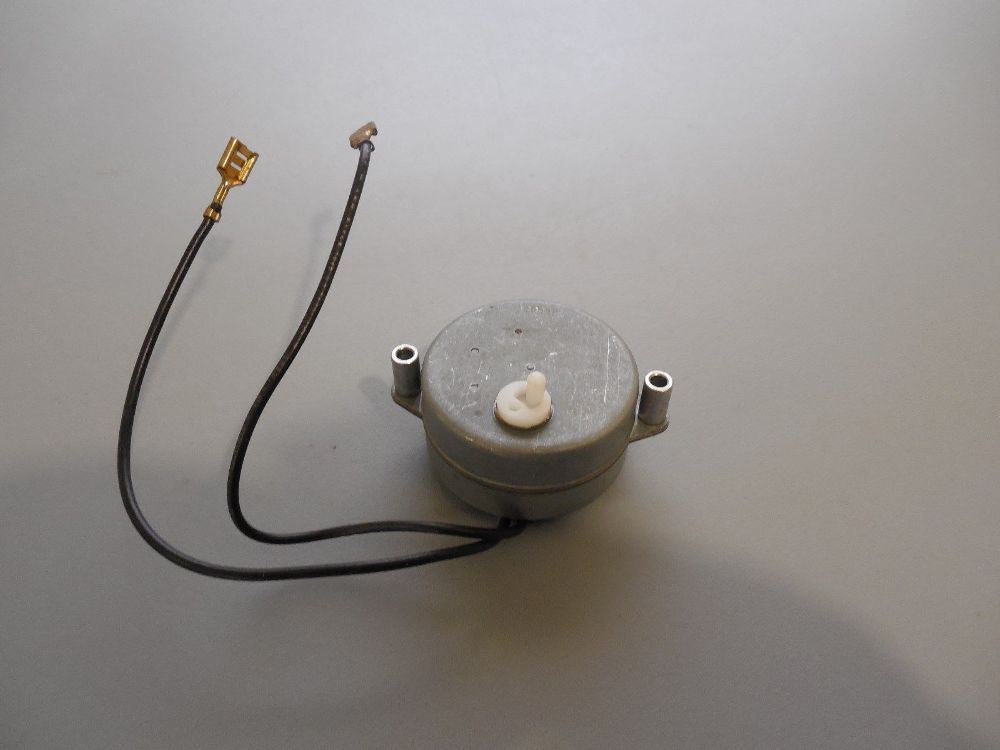
| ||
| Post# 741835 , Reply# 78 3/14/2014 at 13:29 (3,694 days old) by beekeyknee (Columbia, MO) | ||
|
Yes. That's what the pinion or drive on the motor looks like on a 4499-2 Kingston timer. The plastic pin that sticks up is off center which gives it an eccentric motion. The pin pushes inside a oblong slot in a plastic bar that moves the bar in and out of the timer to advance the cam or in the case of this timer I believe it's a rotating disk/cam.
David, wasn't it you who recently opened up one of these Kingston timers and replaced some little rivets or something like that? | ||
|
Post# 741837 , Reply# 79 3/14/2014 at 13:43 (3,694 days old) by d-jones (Western Pennsylvania (Pittsburgh Area)) |
||
|
Yes, Brian. I confess, that was me. I had purchased a group of ten timers from a seller on eBay because three of them were for an A806, and the price was close to what some folks ask for just one of them. But due to careless packaging several of the Bakelite timer bodies didn't survive shipping, and one the broken ones was an A806 timer. So I took a good body from a lesser timer and swapped all of the A806 switches into it. Here's a link to that thread. CLICK HERE TO GO TO d-jones's LINK | ||
| Post# 741853 , Reply# 80 3/14/2014 at 15:07 (3,694 days old) by beekeyknee (Columbia, MO) | ||
|
| ||
| Post# 741929 , Reply# 81 3/14/2014 at 18:56 (3,694 days old) by PhilR (Quebec Canada) | ||
|
I had no idea that the Kingston timer motors in Maytag washers had a plastic pin like that. I thought they had a metal gear like the one I repaired in my Frigidaire dishwasher.
Internally, do they use a 10 teeth plastic primary drive gear like the Kingston 60 from Frigidaire dishwasher? CLICK HERE TO GO TO PhilR's LINK | ||
| Post# 741989 , Reply# 83 3/14/2014 at 22:02 (3,694 days old) by hippiedoll ( arizona ) | ||
|
GOOD LUCK!!!! | ||
| Post# 742355 , Reply# 84 3/16/2014 at 12:11 (3,692 days old) by maytagmodela806 () | ||
|
Thank you I'm hoping I can get them from him there greenish looking i want to get them home out of the weather and see if they can be saved I also found an extra dispenser cup there at his place as well so I got that same color as the agitator | ||
| Post# 745608 , Reply# 85 3/27/2014 at 18:24 (3,681 days old) by PhilR (Quebec Canada) | ||
|
I finally found a 806 dryer. Not exactly the color I wanted but at $25, the price was fine! Now, I'll probably hunt for an equally cheap white lower series and make a white-colored HDE-806!
Can anyone tell me how to remove the top and front panel on the dryer? Is it like the washer and newer large door dryers? 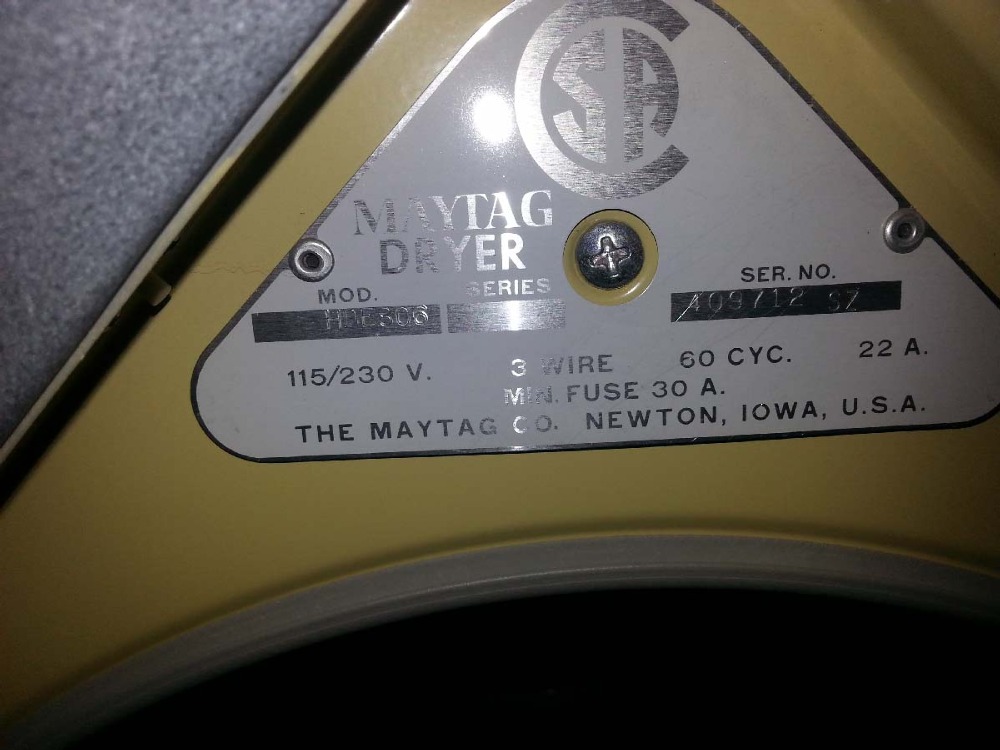
| ||
| Post# 745609 , Reply# 86 3/27/2014 at 18:29 (3,681 days old) by PhilR (Quebec Canada) | ||
|
| ||
| Post# 745612 , Reply# 87 3/27/2014 at 18:34 (3,681 days old) by PhilR (Quebec Canada) | ||
|
| ||
|
Post# 745627 , Reply# 88 3/27/2014 at 19:31 (3,681 days old) by d-jones (Western Pennsylvania (Pittsburgh Area)) |
||
|
"Can anyone tell me how to remove the top and front panel on the dryer?"
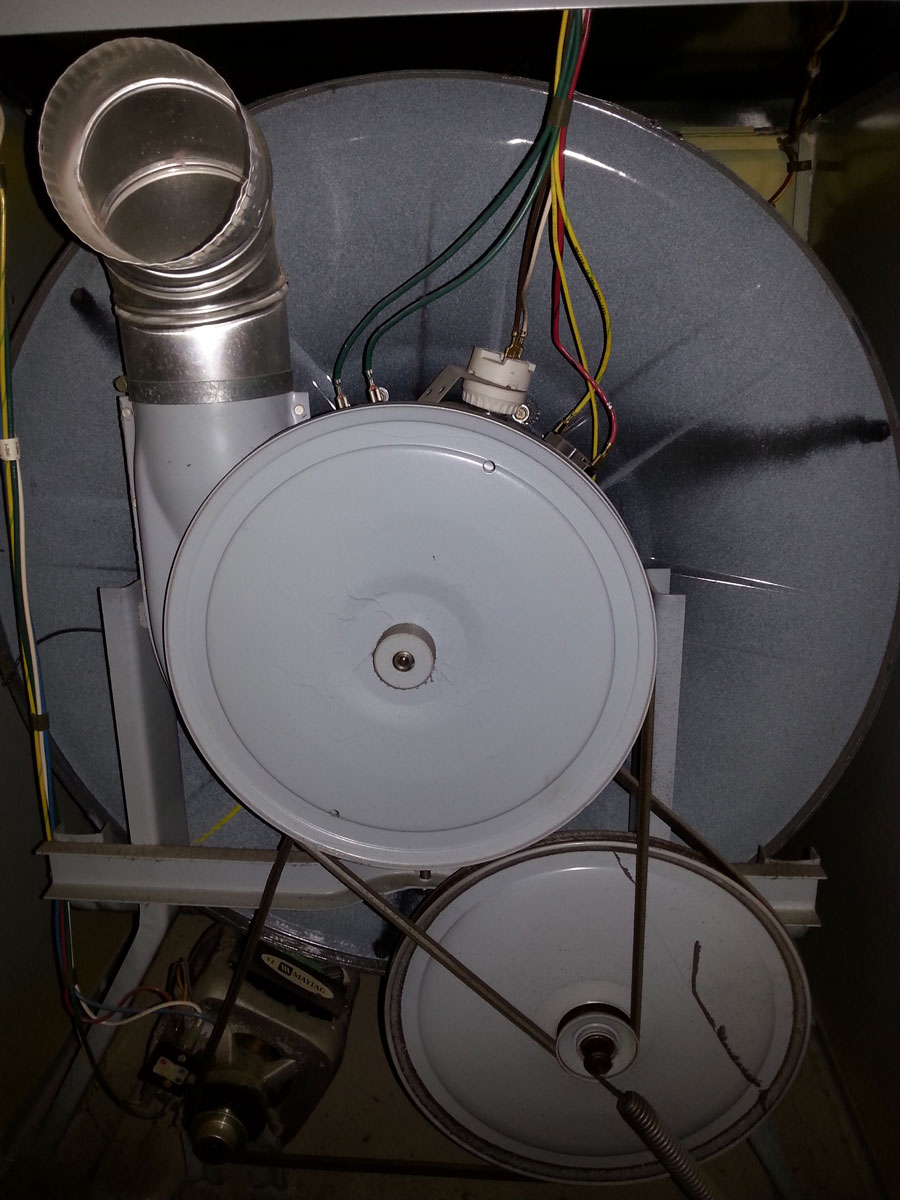
There's one pair of bolts that hold the top panel in place. Have a look behind your dryer and you'll see a long L shaped bracket mounted to the underside of the top panels back edge. Remove the two inboard bolts(left arrow), slide the top panel forward until the front clips disengage, then lift it away.
Once you get that far you'll be able to see how the front panel is held in place. It's been a while since I did this but I believe it's fastened to the side panels with screws.
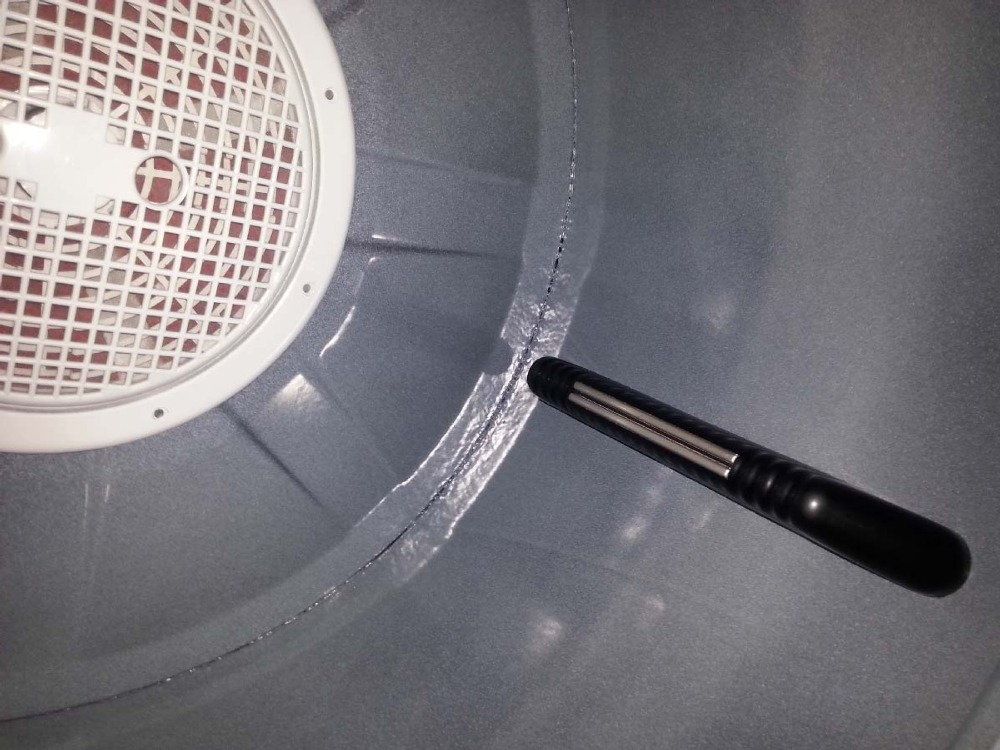
By the way - from the looks of it the shield for the spider isn't installed correctly. It seems to be on top of the lint filter and flipped around backwards, so you might want to look into that right away. 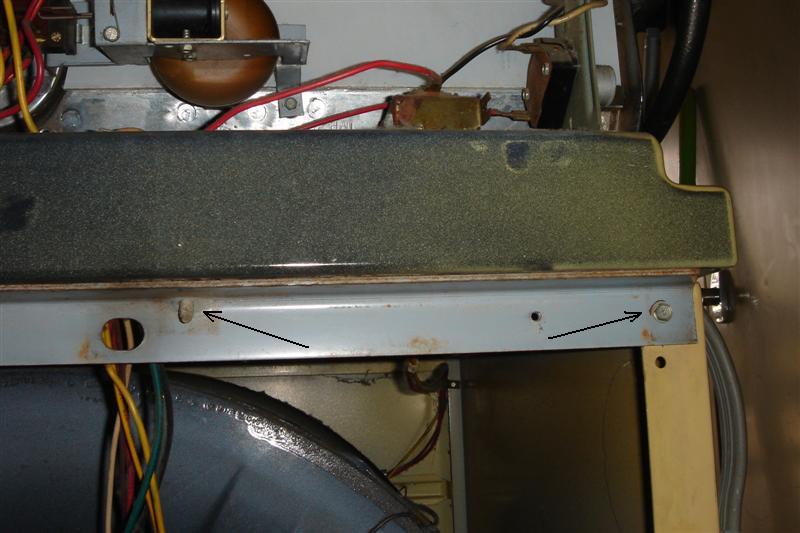
This post was last edited 03/27/2014 at 22:53 | ||
| Post# 745697 , Reply# 89 3/28/2014 at 01:32 (3,681 days old) by PhilR (Quebec Canada) | ||
|
| ||
| Post# 745698 , Reply# 90 3/28/2014 at 01:34 (3,681 days old) by PhilR (Quebec Canada) | ||
|
| ||
| Post# 745699 , Reply# 91 3/28/2014 at 01:35 (3,681 days old) by PhilR (Quebec Canada) | ||
|
| ||
| Post# 745700 , Reply# 92 3/28/2014 at 01:36 (3,681 days old) by PhilR (Quebec Canada) | ||
|
| ||
| Post# 745861 , Reply# 93 3/28/2014 at 16:04 (3,680 days old) by hippiedoll ( arizona ) | ||
|
very cool lit up console/control panel!!! | ||
|
Post# 745883 , Reply# 94 3/28/2014 at 18:30 (3,680 days old) by goatfarmer (South Bend, home of Champions) |
||
|
| ||
| Post# 745911 , Reply# 95 3/28/2014 at 19:50 (3,680 days old) by maytagmodela806 () | ||
|
I no longer have power going to anything on the washer and I was wondering about the small mother if it can be swaped from a newer maytag dryer its one of the 4 dryers I have in my basement along with 2 older Kenmore's and a newer performa dryer | ||
| Post# 745937 , Reply# 96 3/28/2014 at 21:31 (3,680 days old) by PhilR (Quebec Canada) | ||
|
| ||
| Post# 745974 , Reply# 97 3/29/2014 at 01:02 (3,680 days old) by PhilR (Quebec Canada) | ||
|
| ||
|
Post# 745984 , Reply# 98 3/29/2014 at 02:35 (3,680 days old) by d-jones (Western Pennsylvania (Pittsburgh Area)) |
||
|
Very Nice! The DG906 that belongs to my parents came with a white cabinet, but I'm putting it into a harvest gold cabinet taken from a DG406 to match the washer. And now that I think about it, that leaves me with all of the components I'd need to convert my DE806 into a DG806. Since there wasn't any interest in it in the other thread where I tried to give it away that would probably be the best thing for it. Then I'd just keep it to pair up with my HA806. Of course the data plate would be inaccurate then, and being the detail obsessed sort that I am that might keep me up at night, but what the hell. I'll get over it.......at some point........maybe. | ||
| Post# 746010 , Reply# 99 3/29/2014 at 09:14 (3,679 days old) by PhilR (Quebec Canada) | ||
|
| ||
| Post# 746420 , Reply# 101 3/30/2014 at 22:45 (3,678 days old) by PhilR (Quebec Canada) | ||
|
Dean,
Some dryers with the electronic controls like the 606 and 806 didn't use timer motors. I have a timer from the DE407 and I haven't looked at it (it's in a box). I'll try to look at that tomorrow night.
Maybe others will tell...
This is the dryer that donated it's panels for my DE806 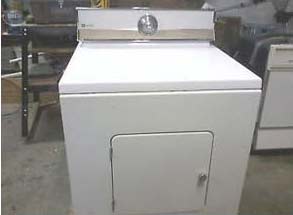
This post was last edited 03/31/2014 at 00:14 | ||
| Post# 746463 , Reply# 102 3/31/2014 at 01:24 (3,678 days old) by maytagmodela806 () | ||
|
Nice I'm slowly getting it going I also have an issue with it being unbalanced even empty | ||
| Post# 749619 , Reply# 103 4/12/2014 at 21:43 (3,665 days old) by PhilR (Quebec Canada) | ||
|
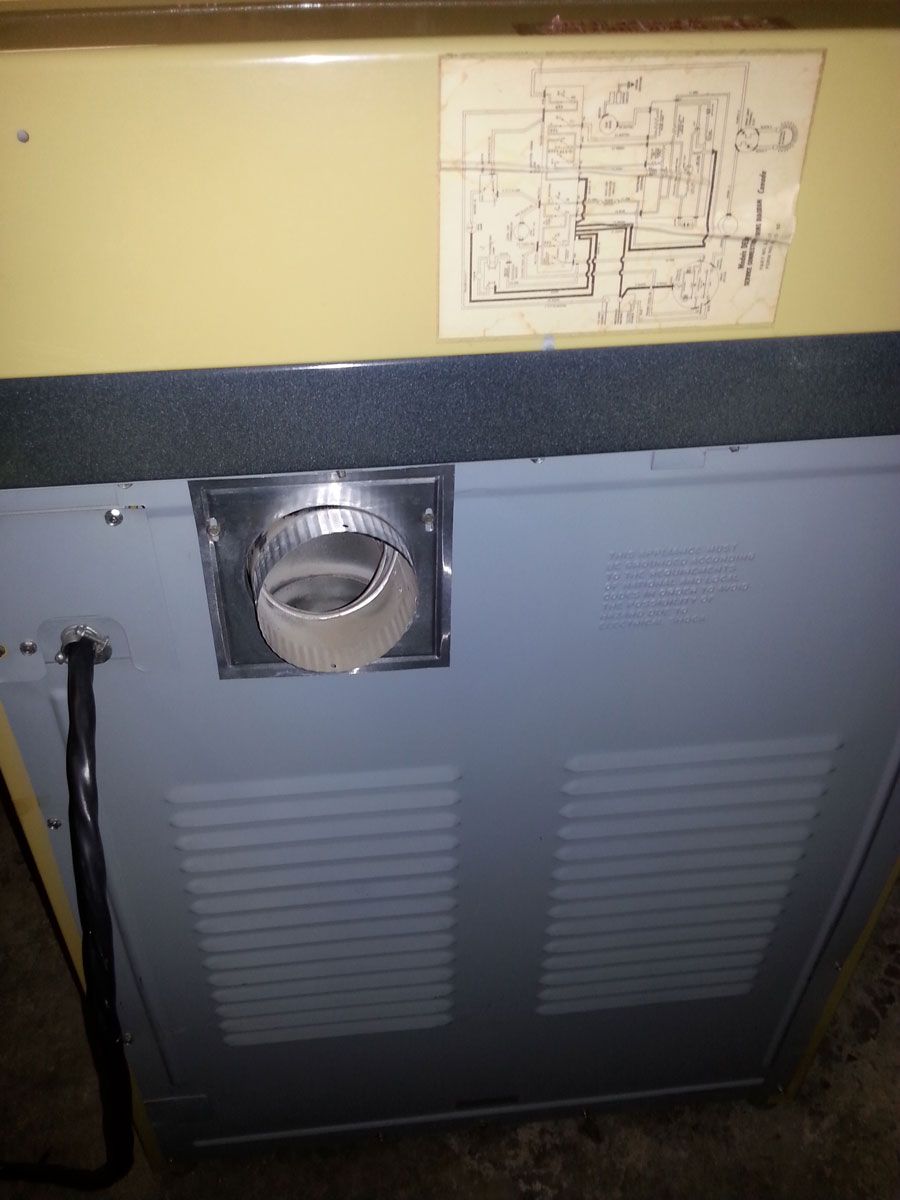
Here's the tag I took from the HDE-806 to installed on the new white panel. 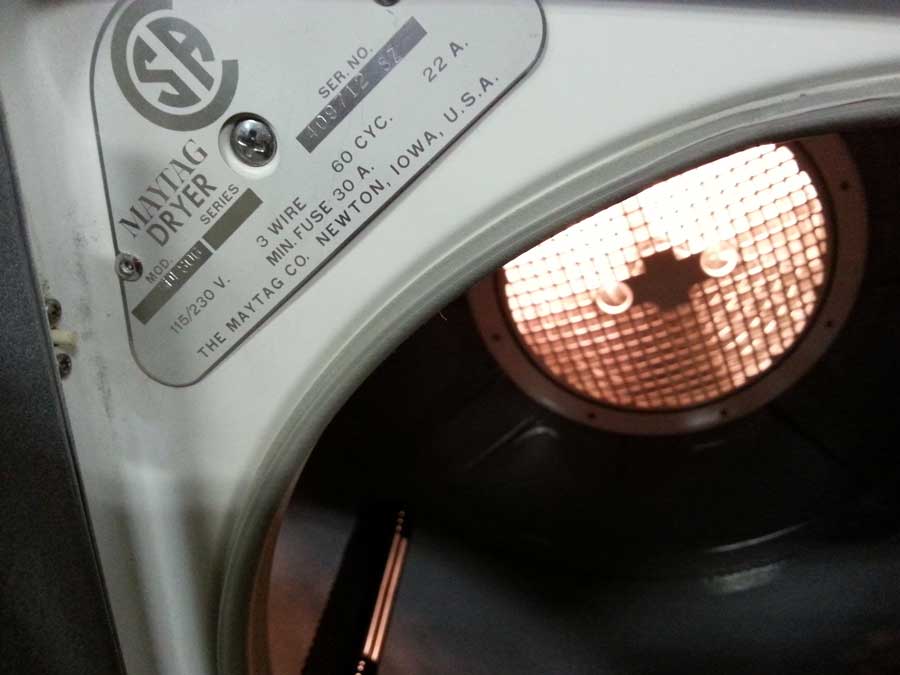
This post was last edited 04/12/2014 at 21:59 | ||
| Post# 749621 , Reply# 104 4/12/2014 at 21:46 (3,665 days old) by PhilR (Quebec Canada) | ||
|
| ||
|
Post# 749633 , Reply# 105 4/12/2014 at 22:58 (3,665 days old) by ovrphil (N.Atlanta / Georgia ) |
||
 | ||
| Post# 749641 , Reply# 106 4/13/2014 at 00:05 (3,665 days old) by hippiedoll ( arizona ) | ||
|
what a beautiful pair there!!! | ||
| Post# 749652 , Reply# 107 4/13/2014 at 03:31 (3,665 days old) by PhilR (Quebec Canada) | ||
|
Phil, It was quite easy. Much easier than repainting the cabinet (and I'm not speaking about the porcelain top...). It took more time to remove the damaged printed wiring diagram and reprinting it to stick at the back of the white control panel than it took to switch all the panels! Too bad the DE-806 wiring diagram wasn't as easy to remove as the one from the DE-407.
Thanks Christina! | ||
| Post# 756970 , Reply# 108 5/14/2014 at 17:26 (3,633 days old) by maytagmodela806 () | ||
|
PhilR if got sum more pics and a video to put up of my washer | ||
| Post# 757174 , Reply# 109 5/15/2014 at 14:06 (3,632 days old) by maytagmodela806 () | ||
|
PhilR Did you get the pics I sent yet | ||
| Post# 757186 , Reply# 110 5/15/2014 at 15:46 (3,632 days old) by PhilR (Quebec Canada) | ||
|
| ||
| Post# 757189 , Reply# 111 5/15/2014 at 16:01 (3,632 days old) by maytagmodela806 () | ||
|
Last night from my wife's gmail account | ||
| Post# 757193 , Reply# 112 5/15/2014 at 16:07 (3,632 days old) by PhilR (Quebec Canada) | ||
|
| ||
| Post# 757194 , Reply# 113 5/15/2014 at 16:12 (3,632 days old) by maytagmodela806 () | ||
|
OK I will I'll send u two separate emails with them from my email hot mail account | ||
| Post# 757610 , Reply# 114 5/17/2014 at 06:42 (3,630 days old) by PhilR (Quebec Canada) | ||
|
Hi Dean, I can't find your emails. I have looked in the spam folder too and there's nothing there either... I have recently received emails that were delayed from my contacts but I doubt the delay would be so long...
You could host your pics/videos on Flickr (or on YouTube for the videos if you prefer). That's what I did for your previous set. I made them private so they would be viewed only with the link/embed code. I haven't found a way to embed videos from Flickr on this site but it works for pictures. If I remember well, videos from YouTube can be embedded on this site just by pasting the link in the message box, you don't need the "embed code" from YouTube.
Here's the link to the Flickr website if you want to host pics there. CLICK HERE TO GO TO PhilR's LINK | ||
| Forum Index: | 
| Other Forums: |

|

|

|

|

|

 Comes to the Rescue!