Thread Number: 58038  /  Tag: Vintage Automatic Washers
Maytag A712 Question
[Down to Last]

automaticwasher.org's exclusive eBay Watch:
scroll >>> for more items --- [As an eBay Partner, eBay may compensate automaticwasher.org if you make a purchase using any link to eBay on this page]
Post# 805157   1/21/2015 at 11:45 (3,376 days old) by colloquor ()        

The orbital transmission in our "old reliable" Maytag A712 washer failed after 24 years of excellent service. After surveying a number of new washers, including the Speed Queens with the mechanical timer (probably the only new washer I would have purchased), and speaking with a number of experienced appliance service technicians, I've decided to repair the A712 instead of buying a new machine since its in excellent aesthetic condition, plus my wife simply likes the washer! FYI... I'm a retired auto technician, and have maintained all of our appliances since we bought this house in 1990.

After initial troubleshooting, I've decided to essentially overhaul the washer, replacing the majority of the mechanical internals, including the failed deep tub orbital transmission of course.

Here's my question: Do you install the brake assembly on the bottom of the suspension block (also sometimes called the damper) prior to installing the transmission, or after the transmission is installed through the suspension block?

Otherwise the overhaul is pretty straightforward. The snubber pads beneath the suspension block are also being replaced as they were worn down to the metal base of the washer.

Although some may feel it's crazy to invest $400 to $500 in parts in rebuilding a 24 year old washer, most professional technicians I have talked with have told me the Maytag A712 is a great washer, and worthwhile of overhauling. Thankfully, the outer tub and top have practically no rust, thus leaks after the overhaul hopefully won't be a problem.

Thanks for any insight on my question.


Post# 805161 , Reply# 1   1/21/2015 at 12:23 (3,376 days old) by washdaddy (Baltimore)        

There are many people here on this site that will commend you for what you are doing.

Maytag's are good performers that last and last when maintained. Try to touch base with "Combo52" on this site. He has been in the appliance business for years and has given his support and knowledge to many to keep their machines going. His e-mail is listed on his profile page which you can access thru the "member profiles" tab at the top of the page.

Good luck with your restoration and welcome to AW.ORG.


Post# 805163 , Reply# 2   1/21/2015 at 12:31 (3,376 days old) by rp2813 (Sannazay)        

rp2813's profile picture

Redcarpetdrew is another good resource.  He's an authorized Maytag repairman. 


Also, click on the Super Searchalator link at the top right of this forum's index page.  Type something like "maytag orbital" in the field and threads discussing that topic will be displayed.


Redcarpetdrew has posted some detailed threads about Maytag repairs, but I can't say for sure if they address your specific transmission and the related repair process.


I can assure you that there are people here who can answer your question.  You may have to allow them some time to check in here and notice your thread.


Post# 805164 , Reply# 3   1/21/2015 at 12:32 (3,376 days old) by mrb627 (Buford, GA)        
Orbital?

mrb627's profile picture
Does your transmission look like this?


  View Full Size
Post# 805172 , Reply# 4   1/21/2015 at 13:05 (3,376 days old) by colloquor ()        

Perhaps I was incorrect in my choice of nomenclature for the transmission, perhaps it's called a helical transmission instead... I apologize for mis-speaking if I was incorrect.

No, it doesn't look like the transmission in your photo mrb627. I have a photo on file, but it's from one of the repair websites, thus I shouldn't use it here. But, it looks like a car's rear differention. The Whirlpool (OEM) Part Number is 6-2097750


Post# 805180 , Reply# 5   1/21/2015 at 14:29 (3,376 days old) by colloquor ()        

I'm sorry, I meant to say "it looks like a car's rear differential." Darn tablet...

There are two transmissions available for the A712 from RepairClinic.com - one for the deep tub, and one for the shallow tub. Our's is the deep tub's transmission, and the Whirlpool (OEM) Part Number, as I listed in the above post, is 6-2097750.

I presume this is called the helical transmission... Correct. I have all of the new repair parts, and just need to know if I should mount the brake onto the suspension block before installing the transmission, or install the transmission first and then the brake. It looks like it could be done in either order, but just wanted to check first.

Thanks.


Post# 805182 , Reply# 6   1/21/2015 at 14:37 (3,376 days old) by rp2813 (Sannazay)        

rp2813's profile picture

I was wondering about a 712 having an orbital transmission as well, but I don't know when Maytag made the switch. 


It's my understanding that the later orbital transmission provides a quick short agitation stroke and the older "helical" or pitman type provides the classic long agitation stroke associated with the virtually indestructible vintage Maytag washers beloved by many members here.


If using the Super Searchalator as I suggested above, modify your search terms accordingly.


Post# 805189 , Reply# 7   1/21/2015 at 15:14 (3,376 days old) by colloquor ()        

Since I'm a new member, I can only post every 30 minutes, thus I can't reply to a post as soon as I would like. Well, if the helical transmssion, aka Pittman, is the long-stroke transmission, I would say I have the orbital as originally posted, since the agitation stroke is short. Attached is the photo of the dead transmission from our A712. The washer is in almond color, and here's the entire info from the serial number tag: LA-712 Series: 11 Serial Number 203927 BD

Thanks.


  View Full Size
Post# 805191 , Reply# 8   1/21/2015 at 15:16 (3,376 days old) by DADoES (TX, U.S. of A.)        

dadoes's profile picture
 
The (newer) style that looks like a car's differential is referred to as "orbital" per the gearing inside that drives the agitator (output shaft) ... which is different from the style shown in Reply #3.  However, both types are helical drive, which refers to the method used to drive the tranmission's input shaft.

So, they're both helical drive ... but one is orbital and one is not.  :-)


Post# 805193 , Reply# 9   1/21/2015 at 15:34 (3,376 days old) by rp2813 (Sannazay)        

rp2813's profile picture

I'm not familiar with this level of repair, but let's say the transmission was fine and you were only needing to replace the brake.  Could you do it without messing with the transmission?  If so, you have your answer.


Strange that you're restricted to 30 minutes between replies as a new member.  I've never heard of that, but it might be a defense against spammers and hijackers that our webmaster has implemented.


Post# 805194 , Reply# 10   1/21/2015 at 15:48 (3,376 days old) by colloquor ()        

The transmission lower-shaft splines pass through the brake, but the brake screws onto the bottom half the suspension block. A special tool is required to remove the brake, and to put the final tightening torque when installing it. I have one of these $58 tools, and this will likely be the only time I use it!

Since the brake can be removed with the transmission in place on the upper portion of the suspension block, or conversely, can be installed with the transmission in place resting on the suspension block, I guess it's probably best to go ahead and install the transmission first, and then the outer tub, bearings, spin tub, etc. - and once all of the top end work is done, install the brake and the pulley on the bottom end.

I know the transmission can be replaced with the brake attached to the suspension block, hence my original question. There are a number of YouTube videos on A712 repair which are very helpful. In reality, either procedure could probably be followed.


Post# 805196 , Reply# 11   1/21/2015 at 16:03 (3,376 days old) by beekeyknee (Columbia, MO)        

beekeyknee's profile picture
Hi Colloquor,

May we refer to you as something else? There's not much in your profile, which is Okay, but some kind of name, whether it be an alias or not would be nice. I have to go to an appointment and when I get back I can post some links to other threads that will help you. I guess you know that you can upgrade your account and have full access to all the features offered here like the Super Searchalator, the different forums and so forth. It's only $12.00 a year and there's lots of great information here on all kinds of topics that you can only see if you're an upgraded member. Not trying to pressure you into anything. Just a suggestion. Looks like PayPal and several different type of credit cards are accepted. And the people here are fantastic. Some of the nicest people you'd ever want to meet or chat with, whether it be in person or over the internet.

As for the transmission/drive confusion thing; that comes up all the time. There's the orbital style and older standard (Pitman) style transmissions, but the drive is the same on both types of machines, unless you're talking about something really old, like early '50's stuff and before. Helical drive refers to the "helix" that's on the end of the drive shaft that the pulley climes up on when the motor reverses. I'll see if I can give you some more info when I get back.

Brian


This post was last edited 01/21/2015 at 20:51
Post# 805199 , Reply# 12   1/21/2015 at 16:26 (3,376 days old) by goatfarmer (South Bend, home of Champions)        

goatfarmer's profile picture

The tool to remove the brake package does a good job, but in a pinch, I've removed them by clamping a set of Vice Grips on the brake, and then hitting the Vice Grips with a hammer.


Post# 805206 , Reply# 13   1/21/2015 at 17:22 (3,376 days old) by colloquor ()        

I have everything out inside the washer. The brake tool worked very well in removing the brake. I replaced the main drive shaft in my wife's old Lady Kenmore washer (the one with the push button switch rails circa 1971) many years ago, and working on this Maytag is easy compared to that one. And, much easier than being an auto tech on European cars! All of the parts arrived less than an hour ago, so the complete rebuild begins tomorrow. First off is the gluing on of the new felt snubbers, the installation of the suspension block, suspension and springs, transmission, and then everything else. All new bearings and all new mechanicals - the only parts not being replaced are the outer tub, spin tub, drive motor and motor switch assy. I replaced the timer last month, so essentially this will be a new machine intenally. It looks new externally too even though we purchased it in August 1990. The machine will probably now outlive my wife and I.

Don


Post# 805215 , Reply# 14   1/21/2015 at 17:51 (3,376 days old) by bendixmark (Winchester Mass)        
rebuild

When replacing the damper pads,I always use high temp rubber adhesive which lasts forever and then lubricate the pads with plenty of the polylube which should come with the pads.What they give you is often not quite enough so I get a separate tube of the stuff.The new transmission comes with a new stem and seal kit but I would replace the tub bearing and sleeve also if it looks as if water got at it.You will need a spanner wrench to remove the spanner nut and basket mounting stem.You should also clean up the bottom of the transmission support if it was rubbing on the base.If it is rough I would put a small amount of polylube on that as well.

Post# 805235 , Reply# 15   1/21/2015 at 19:50 (3,376 days old) by colloquor ()        

bendixmark - Yes, I have the high temp adhesive and plenty of polylube. Amd, yes, a new tub bearing and sleeve were ordered as well, plus the outer tub has been completely cleaned and ready to go back in. I have the spanner wrench (bought the spanner wrench and brake wrench specifically for this job), as everything was dismantled last weekend. The transmission support is brand new as well, plus new outer tub mounting bolts and rubber washers - short bolt goes to the front! The only mechanical parts not new in this rebuild are the suspension arms, the motor and motor switch, the outer tub, and the spin tub. All of the other "guts" including the pump, brake, pulley, belts, hoses, etc. are brand new.

One question: the new transmission did not come with the spring on the top or agitator side (see photo above on the left), nor did it come with the rubber cone-looking seal on the bottom side of the transmission (see photo above on the right). I presume you have to remove those, and place them on the new transmission shafts. I did not see these pieces available separately from the website where I purchased everything.


Post# 805239 , Reply# 16   1/21/2015 at 20:35 (3,376 days old) by beekeyknee (Columbia, MO)        

beekeyknee's profile picture

Here are some threads that might help you. Some of the information will apply and some may not. Most of these threads have the older style Pitman transmission in them, but most of the basics are still the same.


#1: Scroll down to reply #15. It's instructions from a Helical Drive Service Manual.


CLICK HERE TO GO TO beekeyknee's LINK

Post# 805240 , Reply# 17   1/21/2015 at 20:37 (3,376 days old) by beekeyknee (Columbia, MO)        

beekeyknee's profile picture

An excellent thread from Drew (redcarpetdrew)


CLICK HERE TO GO TO beekeyknee's LINK

Post# 805241 , Reply# 18   1/21/2015 at 20:40 (3,376 days old) by beekeyknee (Columbia, MO)        

beekeyknee's profile picture

A stop lug adjustment thread. Seems to cause confusion sometimes if you're unfamiliar with it.


CLICK HERE TO GO TO beekeyknee's LINK

Post# 805242 , Reply# 19   1/21/2015 at 20:44 (3,376 days old) by beekeyknee (Columbia, MO)        

beekeyknee's profile picture

A long post I made a few years back. Some of this information may help.


CLICK HERE TO GO TO beekeyknee's LINK

Post# 805248 , Reply# 20   1/21/2015 at 21:33 (3,376 days old) by beekeyknee (Columbia, MO)        

beekeyknee's profile picture
Don,

Have you found a replacement or donor transmission yet? If you can find a parts machine you could snag one out of it. I've got a good one you can have but I don't know how much the shipping would cost. What part of Illinois are you in?

Brian


Post# 805310 , Reply# 21   1/22/2015 at 07:49 (3,375 days old) by combo52 (50 Year Repair Tech Beltsville,Md)        
Rebuilding an A712 MT Washer

combo52's profile picture
It sounds like you have it pretty well covered, answers to a few of your questions.

You should assemble the damper housing, supension springs, tub support arms and then screw the brake assembly in from below the baseplate, and then set the transmission in place. The brake assembly just gets screwed completly in place and locked in with the little bolt and clip.

The spring on the old agitator shaft is part of the old agitator shaft seal [ the new seal is an improved lip seal, so you don't need this part ], at this point it just gets recycled along with the old transmission.

It looks like you are having a fun rebuilding project and hopefully you will get many more years use out of this washer, however one of the problems of doing a rebuild like this is many of the NEW replacement parts are not as good as the orignal parts and the machine is not reassembled with the same quality controls as it was orignally, as result it will not likley last as long as it did the first time around without doing additional repair work over the comming years.

John L.


Post# 805329 , Reply# 22   1/22/2015 at 10:10 (3,375 days old) by colloquor ()        

Brian and John,

Thank you for all of your information. Yes, I have all of the replacement parts and the new transmission. I purchased the majority of the parts from www.repairclinic.com..., including the new transmission.

John, in reference to your statement: "The spring on the old agitator shaft is part of the old agitator shaft seal [ the new seal is an improved lip seal, so you don't need this part ], at this point it just gets recycled along with the old transmission." The new transmission's agitator shaft doesn't have the spring, but I am using the original agitator since it appears to be in good shape. Are you saying that I need to purchase a new agitator, or can use the existing one? I will post a photo of the new transmission and a close-up it's agitator shaft this afternoon, as I'm taking care of my 4 year old grandson this morning!

Thanks again for all of your input. I'm going to start the rebuild tomorrow.


Post# 805358 , Reply# 23   1/22/2015 at 14:06 (3,375 days old) by colloquor ()        

John... Attached is a photo of the new transmission. I am a bit confused regarding the spring and seal on the old transmission's agitator shaft. Are you saying that with this new transmission (and seal) I don't need to use the spring? I just want to clarify that. And, do I need to remove the rubber boot from the bottom of the old transmission to use on the new one - since the new one did not come with one?

Everything else on the rebuild is pretty self-explanatory, especially with all of the help here, and the YouTube videos available on the A712. I just need to clarify the differences between the old and new transmission.

Thanks.


  View Full Size
Post# 805363 , Reply# 24   1/22/2015 at 14:37 (3,375 days old) by colloquor ()        

Prior to disassembly, I took photos and also took measurements of everything. I'm pretty much an OCD person, and have an obsession with attention to detail. I guess this came from rebuilding BMW and SAAB engines over the years! Thus, I hope my QC on the A712 rebuild will be as close to factory assembly as possible. Probably not, but I'm going to do my best, and check and recheck all of the dimensions, etc. during each step.

Post# 805365 , Reply# 25   1/22/2015 at 14:40 (3,375 days old) by rp2813 (Sannazay)        

rp2813's profile picture

Don, I think your OCD will pay off.  You are asking good questions.


If I knew an auto technician like you, I'd be a customer for life!


Ralph


Post# 805419 , Reply# 26   1/22/2015 at 21:19 (3,375 days old) by combo52 (50 Year Repair Tech Beltsville,Md)        
Rebuilding an A712 MT Washer

combo52's profile picture

Hi Don, I assume you are replacing the main water seal in the outer tub, it comes in a kit kit called a mounting stem assembly, this seal kit includes the aluminum part that the wash basket is bolted to. This mounting stem has a lip type water seal installed in the top of it, this lip type seal does not need the spring that is on your old transmissions agitator shaft.


Post# 805442 , Reply# 27   1/23/2015 at 04:21 (3,374 days old) by beekeyknee (Columbia, MO)        

beekeyknee's profile picture
Don,

If you read Drew's thread>

www.automaticwasher.org/cgi-bin/T...


again thoroughly you will see that the agitator drive shaft seal isn't absolutely necessary. It's just something that he added to help the new type mounting stem with built in lip seal work better. They have a tendency to fail more than the old type mounting stem with separate drive shaft seal. The spring and washer are inside the agitator drive shaft seal and you normally don't see them. It's reply #22, 23 and 24.

I've done it and it worked well for me.

www.automaticwasher.org/cgi-bin/T... Reply #138, 139 and 140. This is what it looks like.

Like John said, you don't have to do this but it might make your repair last longer.

www.repairclinic.com/Shop-For-Par... RepairClinic Item # 1480327 or this>

partsdr.com/part/6-0a57420-agitat...

You put the small end down over the drive shaft, add some grease to the inside threads of the mounting stem and the top of the drive shaft seal, put the mounting stem on, turn it down until snug and give the spanner wrench a few taps with a mini-sledge , (not a rubber mallet like I mentioned in my thread) following the rest of Drew's instructions. You'll be able to see the agitator drive shaft seal pushing up against the lip seal on the mounting stem. That's what makes it last longer. It's just a suggestion.

And the rubber water deflector that's on the bottom of your old transmission will need to be moved to your new one. This thing> www.repairclinic.com/PartDetail/b...


Brian


Post# 805455 , Reply# 28   1/23/2015 at 06:50 (3,374 days old) by colloquor ()        

combo52 and Brian,

Thanks for the all of the tips and information. Yes, I am replacing the mounting stem and seal kit (I ordered one separately, but one was included with the new transmission as well), and the outer tub bearing repair kit. I am replacing all mechancial parts that can be replaced!

However, one part that I have not ordered, but will order today thanks to Brian's input, is the agitator drive shaft seal. Although apparently not absolutely required, I am going to order one and install it. RepairClinic is out of stock at the moment, but PartSelect has them in stock.

With all of the help, and insight, that I've had here, as well as the videos on YouTube, and the instructions provided with the ordered parts, the rebuild should go well.

I sincerely thank everyone for all of their excellent assistance. I'm planning to use high-temp synthetic wheel bearing grease for all of the bearings, splines, etc., but if anyone has a better suggestion on which grease to use, please advise.

Don


Post# 805457 , Reply# 29   1/23/2015 at 07:00 (3,374 days old) by combo52 (50 Year Repair Tech Beltsville,Md)        
Rebuilding an A712 MT Washer

combo52's profile picture

Top agitator shaft seals, Hi Everyone, The orignal type seal was pressed against a SS washer, I am very skeptical as to whether it is a good idea to put this upward pressure against the bottom of a lip type seal that is being used in the new mounting stem. If this pressure dislodges the lip seal you are done, or if the pressure just causes the seal to open up a little again you are done, the old type seal will not work without the SS washer being held in the proper place with the retainer clip, are you also putting the clip and washer under the lip seal ?.


John L.


Post# 805477 , Reply# 30   1/23/2015 at 08:51 (3,374 days old) by beekeyknee (Columbia, MO)        

beekeyknee's profile picture
John,

Drew's post was documented years ago and has been referred to many times and I know you have seen it. Why all of a sudden now you decide to say it's wrong? That really doesn't make much sense.

B.


Post# 805488 , Reply# 31   1/23/2015 at 10:38 (3,374 days old) by bendixmark (Winchester Mass)        
seal

You cant use that old seal with the new stem and seal,the new seal is better they hardly ever leak.

Post# 805490 , Reply# 32   1/23/2015 at 10:39 (3,374 days old) by combo52 (50 Year Repair Tech Beltsville,Md)        
Rebuilding an A712 MT Washer

combo52's profile picture

Hi Brain, I did not say Drew's method is necessarily wrong and yes I saw his orignal post about using the extra seal, I am only saying I WOULD NOT DO IT, with a brand new transmission- agitator shaft I don't see the need and it might cause a problem and without the SS washer it will not likely work in any event.


After this dual seal method is used on a hundred or so machines and after 15-20 years goes by I might change my mind, but at this time I don't think it is a good idea.


John L.


Post# 805508 , Reply# 33   1/23/2015 at 13:24 (3,374 days old) by beekeyknee (Columbia, MO)        

beekeyknee's profile picture
Well, the old seal can be used with the new stem mount because I've done it. The stainless washer isn't used. That's explained in my thread as well as Drew's. Whether it lasts for ten or fifteen years, I'll have to let you know. It's worked well for over three and I'd do it again if needed. Drew might chime in on this since it was his idea but if I were him I'm not sure I'd want to. Peace out.

Post# 805557 , Reply# 34   1/23/2015 at 18:56 (3,374 days old) by DigAPony ()        
upward pressure against the bottom of a lip type seal

I've wondered about that myself.

How about simply reusing the original stem mount with a new boot and agitator shaft seal?


Post# 805766 , Reply# 35   1/24/2015 at 17:38 (3,373 days old) by colloquor ()        
Outer Tub/Spin Tub Clearance

I have everything back together on the A712 rebuild with the exception of the "old fashioned' tub cover, and its bleach hose and water fill hose, and the agitator. I have a new tub cover gasket, and have cleaned both the outer tub and tub cover, so that is hopefully my next step.

As I stated in an earlier post, I'm really OCD and pay very close attention to detail, thus I took a number of photos with my digicam during the disasembly. One thing I noted during disassembly was the space or clearance between the spin tub and the outer tub was equal on the sides (9 and 3 o'clock positions), but not equal - more space or clearance at the front (6 o'clock position) than the back (12 o'clock position). Is this normal? My logical brain tells me that the space should be equal around the circumference of the spin tub and outer tub - but, maybe not.

If the space should be equal all the way around the spin tub within the outer tub, what's the problem? Could it have been mis-centered from the Maytag factory? As I said, it was this way before I began the disassembly.

Attached is a front-view JPG of the circa 1990 LA712 moved out of the workshop area into the basement hallway adjacent to the laundry room. If the inner tub clearance anomaly is a problem, it gets rolled back into the workshop ASAP.

Thanks,
Don


  View Full Size
Post# 805777 , Reply# 36   1/24/2015 at 18:37 (3,373 days old) by rp2813 (Sannazay)        

rp2813's profile picture

I'm pretty sure the difference in 6:00 and 12:00 tub clearance is normal.  Our old Maytag was the same way.


Post# 805853 , Reply# 37   1/25/2015 at 00:11 (3,373 days old) by colloquor ()        
The A712 Rebuild Complete

The Maytag A712 rebuild is finished. I pushed it into the laundry room, and did several test runs with various water levels and cycles. All works fine - agitates fine, spins fine, no leaks, no spin tub rubs, and sounds good with less vibration that before. The toughest task of the entire rebuild was the installation, and adjustment, of the old-style outer tub top cover. it took several tries to get the clearance exactly correct.

Attached is a JPG of the machine in the basement hallway as before, as I can't get a wide shot in its location next to the Maytag companion D713 gas dryer due to lack of space.

Thanks to everyone who gave me advice and input on this project. It is sincerely appreciated. I'm tired, but pleased, and my wife is happy to have her A712 back in service again - and more importantly, no more trips to the laundramat! Although the A712 probably won't last another 24 years, but then again, neither will I.

Thanks again,
Don


  View Full Size
Post# 805871 , Reply# 38   1/25/2015 at 04:53 (3,372 days old) by goatfarmer (South Bend, home of Champions)        

goatfarmer's profile picture

Excellent job!


Post# 805882 , Reply# 39   1/25/2015 at 06:08 (3,372 days old) by mrb627 (Buford, GA)        
Wow

mrb627's profile picture
It looks factory new. Great job, Don.

Malcolm


Post# 805948 , Reply# 40   1/25/2015 at 14:04 (3,372 days old) by colloquor ()        

Malcolm,

That's why my wife wanted to keep it! She really takes care of her appliances.

Thanks again to everyone for the kind words.

Don


Post# 806644 , Reply# 41   1/29/2015 at 21:02 (3,368 days old) by colloquor ()        
Back in Service in the Laundry Room

I thought you guys would like to see the finished A712 back in its rightful home next to the DG713 dryer.

Thanks again for all of your assistance. I took the opportunity to completely clean out the dryer venting, and also install a new vent hood assy on the outside of the house. Hopefully, all should be good for a few more years!

Thanks.
Don


  View Full Size
Post# 806646 , Reply# 42   1/29/2015 at 21:30 (3,368 days old) by akronman (Akron/Cleveland Ohio)        
a FEW MORE YEARS, you say?

akronman's profile picture
like maybe 15 or 20, damn fine work you did. While you still have the bug to restore well built appliances, take on the dryer. De-linting EVERYWHERE inside, a thorough blowout of the motor and then some few drops of oil in the motor bearings, some minor lithium grease on the drum spindle or glides, a firm swipe of rubbing alcohol across the thermostats, a new belt after all this time and a drop of oil on the idler pulley, that matched set of sturdy workhorses might be a reliably working pair for another 15 years.
Your hard work will pay off.


Post# 806655 , Reply# 43   1/29/2015 at 22:06 (3,368 days old) by rp2813 (Sannazay)        

rp2813's profile picture

That washer is beautiful.  It's worthy of every bit of the expert service you performed, and is a far better machine than anything on the market today. 


Enjoy it for another 20 years!


Post# 806663 , Reply# 44   1/30/2015 at 00:08 (3,368 days old) by washdaddy (Baltimore)        
CONGRATULATIONS

That machine looks great. You did a phenomenal job on it and it should outlast anything new that's out on the market now.


Post# 810083 , Reply# 45   2/19/2015 at 12:48 (3,347 days old) by nyvram (Nashville)        
LA612

Hey all,

I'm looking to purchase a 1987(?) LA612 washer/dryer set from someone who has taken really good care of them.

Do you know the difference between the "A612" and the "LA612"?

I'm going to offer him around $150 for the set. Is that too high or low? I've seen the insides of the washer and it looks clean and the outside looks fantastic. He says its in perfect running condition although the dryer has recently starting making a vibration when running.

Is this a 'large capacity' washer? I'm trying to figure out the "L" in the model number.

I want a mid-1980s Maytag set so should is this a great set to go with or should I look for something else?

Thanks and sorry for all the questions! Consider me a man who is fed up with front loader washers and all the electronic headaches. I want something simple and reliable.


  Photos...       <              >      Photo 1 of 4         View Full Size
Post# 810096 , Reply# 46   2/19/2015 at 14:32 (3,347 days old) by DADoES (TX, U.S. of A.)        

dadoes's profile picture
 
L is a code for color Almond, I believe.  Maytag prepended color codes for many years instead of appending them as most other manufacturers.


Post# 810097 , Reply# 47   2/19/2015 at 15:18 (3,347 days old) by rp2813 (Sannazay)        

rp2813's profile picture

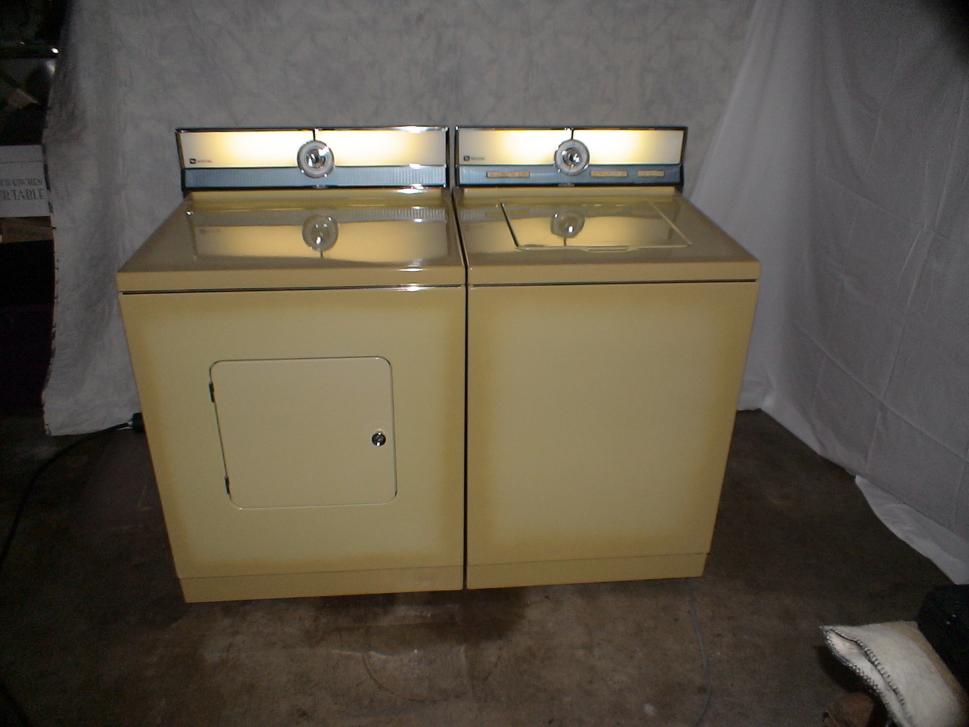
I don't know all of the differences, but capacity doesn't appear to be one of them per the water level selector and the copy below the Maytag logo on the left.  The 612 has Maytag's version of an "extra large" tub.


With fewer buttons than the 712, that means fewer options, like you can't have a slow wash speed with a normal spin speed -- it's all slow, or it's all normal.  Wash and rinse temperature selections are fewer than on the 712 too, with no warm rinse option on the 612.


I think the cycle selections on the timer dial are pretty much the same on both.


Others may have more detailed information about the differences in these two models, and about the dryer as well.


I think $150 is reasonable for the pair, considering that at $75, you're paying less than 10% of the price for a new and frustrating electronic junk front loader, and getting something that will easily outlast one -- even after already providing over 25 years of service.


Post# 810099 , Reply# 48   2/19/2015 at 15:27 (3,347 days old) by nyvram (Nashville)        

thank you so much!!! i'm not sure if i want to hold out for a 712 or stick with the 612. i honestly dont use that many options even on my current model.

i'm also looking forward to getting my hands 'dirty' as i am used to fixing things..swapped out a ridicuously expensive 'motherboard' on my fancy samsung washer for several hundred dollars.

i cant wait to get back to the simplicity of these machines. clothes washing shouldnt be so expensive and complicated.

my wife fussed forever when i gave up my trusty old sears washer and started down the front loader death spiral of increasing frustration and expense and crummy performance.


Post# 810100 , Reply# 49   2/19/2015 at 16:01 (3,347 days old) by goatfarmer (South Bend, home of Champions)        

goatfarmer's profile picture

Nice looking set! The vibration in the dryer may be a bad roller, or the front glides are bad. Or it may even be the blower on the motor being bad.


Post# 810108 , Reply# 50   2/19/2015 at 18:07 (3,347 days old) by rp2813 (Sannazay)        

rp2813's profile picture

If you know the 612 set has been well maintained -- and they sure look it -- go for it! 


A 612 washer will get your clothes just as clean as a 712 would.


You'll get help with the dryer from experts here when/if you need it.


Post# 810118 , Reply# 51   2/19/2015 at 19:26 (3,347 days old) by combo52 (50 Year Repair Tech Beltsville,Md)        
Maytag LA-612

combo52's profile picture

The L is for limited edition, LOL, no it it means that the machine is almond in color.


Your laundry choice should not be between a Samsung [ yuck ] and an old MT that is an energy hog and was only an average performer back in the day. I would look at a new Speed Queen front Load washer, a new SQ could last you the rest of your life, [ depending on your age of course ].


Post# 810137 , Reply# 52   2/19/2015 at 20:03 (3,347 days old) by nyvram (Nashville)        

Im intrigued by speed queen but I have made several costly $1500 mistakes with bad front loader after bad.

I long for the relative simplicity of my old sears top loader I owned for 15 trouble free years. I regret the day I sold it for $20 as nothing has worked nearly as well since.


Post# 810154 , Reply# 53   2/19/2015 at 23:06 (3,347 days old) by DigAPony ()        

I'd grab them, $150 is a fair price especially since the dryer may need some work.

If you come across an A712 in the future the control panel/wire harness could be swapped onto the A612 to keep the matching almond set intact.


Post# 810166 , Reply# 54   2/20/2015 at 00:53 (3,347 days old) by redcarpetdrew (Fairfield, CA)        
Don't hold back, John...

redcarpetdrew's profile picture
Tell us how you really feel!

Where the Maytag is going to shine is in solid performance and ease of service. Properly maintained, that set will last a good long time and for the asking price will more than return that price many times over.

RCD


Post# 810363 , Reply# 55   2/20/2015 at 22:34 (3,346 days old) by nyvram (Nashville)        

Quick update: picked up both units today and will hopefully install them next week. Very excited.

Post# 857800 , Reply# 56   12/22/2015 at 02:54 (3,041 days old) by elgato (Arizona)        

I have an LA612. It has been one of the most reliable appliances I have ever owned.
Truly Amazing!

Recently the spin cycle began slowing to a crawl. I removed the tub cover to check for obstructions. After replacing it there was a grinding noise and it would not turn at all. Thanks to this thread I learned that replacing the cover is a bit tricky. Adjusted the gasket and all is well.

It tries to spin, just very slowly. When I put a bit more pressure on the belt by pulling on the motor it spins fine. I assume it just needs a new belt?

Does anyone know the capacity of the LA612?

If you had to buy a new top loader today, which one would you recommend?

Thanks for the expertise.


Post# 857815 , Reply# 57   12/22/2015 at 07:57 (3,041 days old) by gansky1 (Omaha, The Home of the TV Dinner!)        

gansky1's profile picture
Buy the washer you already have. If it's been running well, a little maintenance will keep it in good shape.

It sounds like you just need to replace the motor glides & springs and re-lube the tracks the motor moves in. A new set of belts probably would be a good idea now too. The video link should help guide you through this relatively simple process.

I've recently been working on a new arrival, a 712 version. It's in testing mode in the garage now. What a nice washer.


CLICK HERE TO GO TO gansky1's LINK


  Photos...       <              >      Photo 1 of 2         View Full Size
Post# 857824 , Reply# 58   12/22/2015 at 08:57 (3,041 days old) by Volvoguy87 (Cincinnati, OH)        
Bearings.

volvoguy87's profile picture
Take out the inner tub and see if it will spin.

Has it been leaking water? You might Need to replace the bearing in the bottom of the outer tub below the mounting stem / boot seal assembly. If it's been leaking, you may need to replace the mounting stem / boot seal, or a part in it. There is also an even cheaper bearing in the top of the brake below the transmission that can have issues, especially if it gets wet. That one tends to make soem noise when it fails.

Dave


Post# 857969 , Reply# 59   12/23/2015 at 02:28 (3,040 days old) by elgato (Arizona)        
It sounds like you just need to replace the motor glides & s

"It sounds like you just need to replace the motor glides & springs and re-lube the tracks the motor moves in. A new set of belts probably would be a good idea now too. The video link should help guide you through this relatively simple process"

The parts store was out of the spring and guides kit. I cleaned the pulleys, greased the slides with silicone grease and replaced the belts. The motor slides back and forth very easily. With the new belt the motor does not move as far so the belt was obviously very stretched. The spin starts extremely slow but works its way up to speed in about 30 seconds. Seems way to long? If I put a little additional pressure on the motor it seems to work fine. Do the springs really weaken that much over time?
Thanks again.


Post# 910051 , Reply# 60   12/7/2016 at 16:54 (2,690 days old) by odessa91_1 (California)        
A712 leaking after seals replacment

Hi Experts, I have maytag washer A712, replaced "Mounting Stem/Tub Seal Kit". Part number 2-2551 old, new PS2351899. Replaced "Tub Bearing Kit" part number old 2-824, new PS2347235 and still have a leak. Please advice. Thank you.

www.partselect.com/PS2351899-Whir...

www.partselect.com/PS2347235-Whir...


Forum Index:       Other Forums:                      


Comes to the Rescue!

The Discuss-o-Mat has stopped, buzzer is sounding!!!
If you would like to reply to this thread please log-in...

Discuss-O-MAT Log-In


New Members
Click Here To Sign Up.


automaticwasher.org home
Discuss-o-Mat Forums
Vintage Brochures, Service and Owners Manuals
Fun Vintage Washer Ephemera
See It Wash!
Video Downloads
Audio Downloads
Picture of the Day
Patent of the Day
Photos of our Collections
The Old Aberdeen Farm
Vintage Service Manuals
Vintage washer/dryer/dishwasher to sell?
Technical/service questions?
Looking for Parts?
Website related questions?
Digital Millennium Copyright Act Policy
Our Privacy Policy