Thread Number: 9522
Maytag A207 - purchased 1974
[Down to Last]

automaticwasher.org's exclusive eBay Watch:
scroll >>> for more items --- [As an eBay Partner, eBay may compensate automaticwasher.org if you make a purchase using any link to eBay on this page]
Post# 176473   12/18/2006 at 15:06 (6,336 days old) by steveak ()        

This machine has been a trooper. I don't think we have ever called the repair man before. But now we are getting small puddles of water under the machine after the wash cycle.

Talking to folks, it seems like the new machines are nothiing but trouble. How easy is to repair an old machine like this? We'd love to keep it. It's clean, no rust, looks fine, and other than the leak, washes fine.

Is it worth getting the repairman out ($75 for the trip including 1/2 hour) or should we just say it was a great ride and buy a new washer? Can these old machines be fixed and kept going?


Post# 176478 , Reply# 1   12/18/2006 at 15:25 (6,336 days old) by toggleswitch (New York City, NY)        
OMG that is my momma's first machine from ' 65/66

toggleswitch's profile picture
FIX IT!

I'm will to bet you can get the price of a new machine for it. That is how much these are well-loved and irreplace-able.


Post# 176483 , Reply# 2   12/18/2006 at 16:51 (6,336 days old) by kenwashesmonday (Carlstadt, NJ)        

If you're handy, you can take the front cover off and see where it's leaking (2 phillips-head screws near the bottom of the front and swing up to remove). Often they leak on the top left where it fills (top has (2) 3/8" screws in behind the front, then top flips up). Watch out for the spinning transmission if you run the motor with the front off! These machines are easy to repair and parts are available. Don't junk it yet, let's find out where it's leaking.

Ken


Post# 176485 , Reply# 3   12/18/2006 at 16:54 (6,336 days old) by brettsomers ()        

we had one like that. often, the small leak is simply the fill flume. thats what happened to ours. a very simple repair you could do yourself. can this machine be fixed? YES, no doubt. this style of Maytag washer is from a bygone-era of manufacturing. made to last, and age gracefully. most repair parts are still available for this syle Maytag. if you are mechanically inclined, perhaps you should take a look "under the hood". the full-flume, pump, water valve and belts are all repairs the average person can do. machines such as Maytag were made to last MANY years. if you were to buy a machine as well made as this Maytag TODAY, you'll have to spend AT LEAST 1000 dollars.

Post# 176493 , Reply# 4   12/18/2006 at 17:45 (6,336 days old) by pturo (Syracuse, New York)        

I would repair it, and the fill flume thing is probably the leak source, it was on mine. Rubber parts only last so long, but these machines will last forever with the simplest of replacement parts. They don't make that "dependable care" design anymore, it was too good.

Post# 176538 , Reply# 5   12/18/2006 at 21:11 (6,336 days old) by rinso (Meridian Idaho)        

Sometimes the fill flume gets a little lime or calcium build up from hard water that directs a tiny part of the stream outside the tub. IMHO, there are few, if any, top loading agitator washers on the market today that can hold a candle to the performance and reliability of this machine! I think it is truly worth fixing.

Post# 176549 , Reply# 6   12/18/2006 at 22:21 (6,335 days old) by mayken4now (Panama City, Florida)        

mayken4now's profile picture
Fix the machine (yourself) and you will be glad you did.

Steve


Post# 176556 , Reply# 7   12/18/2006 at 22:34 (6,335 days old) by swestoyz (Cedar Falls, IA)        

swestoyz's profile picture
I agree with Steve. Get your hands dirty, learn the machine, and your respect for it will grow ten fold. If you need help, ask away here, or grab a Maytag Helical repair manual off ebay for those times when you need a quick answer. It is much more helpful than the Master's repair manual (red book).

Ben


Post# 176571 , Reply# 8   12/18/2006 at 23:03 (6,335 days old) by swestoyz (Cedar Falls, IA)        

swestoyz's profile picture
This is actually a Picture of the Day - but it is a great cut-away from Maytag - in color! It will give you an idea of where everything is in the machine when you take off the front cover. The only thing that isn't labeled is the fill flume, which is just above the water valve in the picture, on the left hand side.


Post# 176587 , Reply# 9   12/19/2006 at 01:52 (6,335 days old) by steveak ()        

Thank you, thank you, thank you. First, you quickly convinced me to go the repair route. Of course, that was my preference. We retired our 71 VW camper in 1995 after our mechanic said we'd gotten our money's worth and we could see the ground thru the holes in the floor and no body shop would guarantee the repairs. We still have our Sony tv from 1975. And, of course, this washer.

Second, while I'm not a total klutz, over the years I've found it faster and more reliable to call a repair person for most things like this. They know what they're doing, have the tools, and the parts. But you all have made it really easy here to open the front and top. It sure looks like the fill flume hose. It has calcium build up, and there was a lot of calcium on the rim on the right side. We cleaned the gunk out of the rim before taking the picture. It was mostly where the screw driver was.

Given that the hose has to be 32 years old or more, probably need to replace it. I haven't looked carefully to see how it attaches to the rim of the washer, but that can't be too hard. At the very least, just opening it up, having the diagram, and checking it out ourselves, with your clues, was very satisfying. Thanks again to you all.

Steve


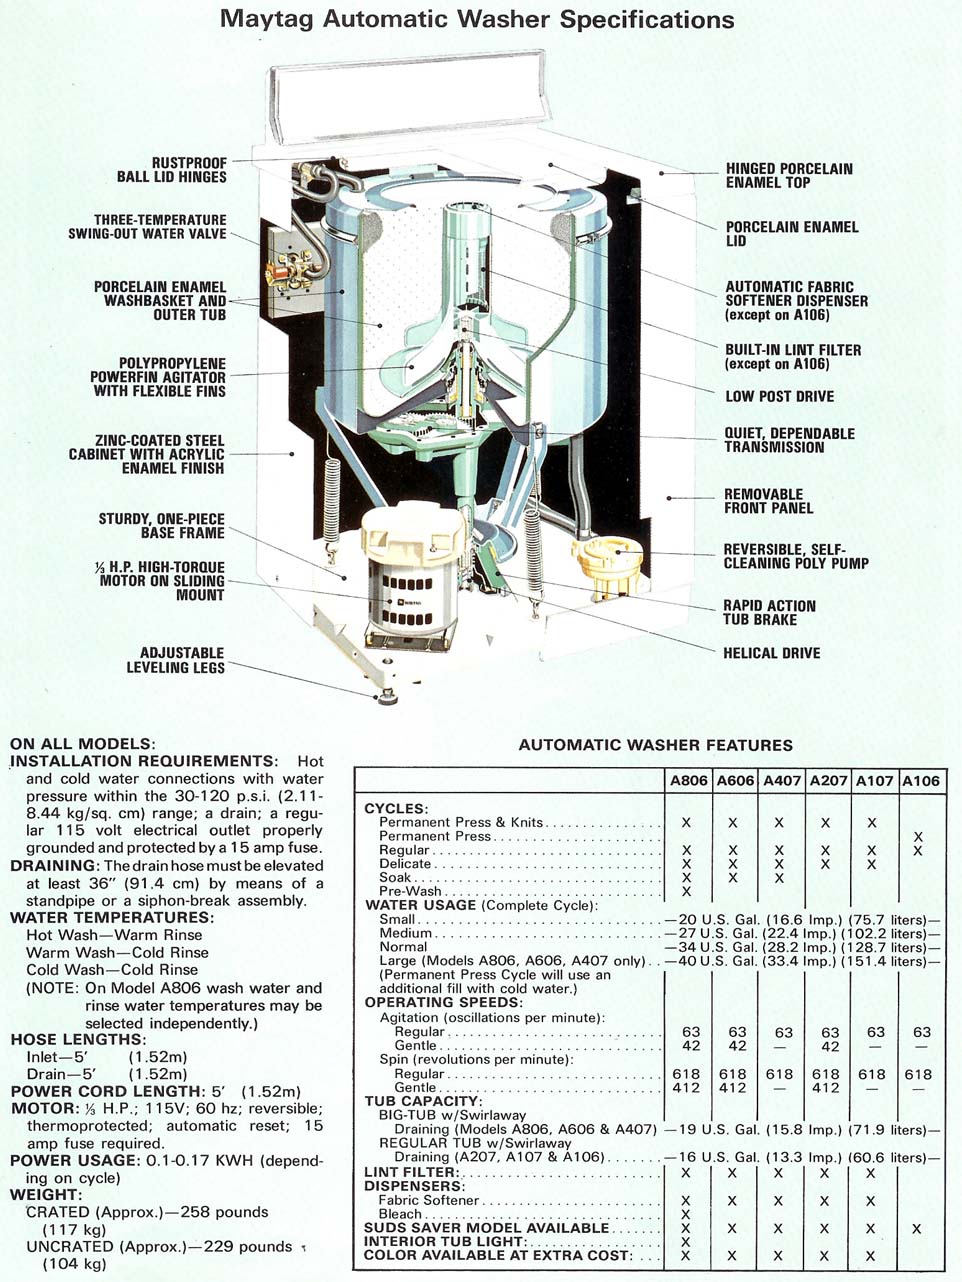
Post# 176602 , Reply# 10   12/19/2006 at 07:38 (6,335 days old) by mayken4now (Panama City, Florida)        

mayken4now's profile picture
Let us know how you fare.

Steve


Post# 176606 , Reply# 11   12/19/2006 at 07:59 (6,335 days old) by laundromat (Hilo, Hawaii)        
Maytag repair

laundromat's profile picture
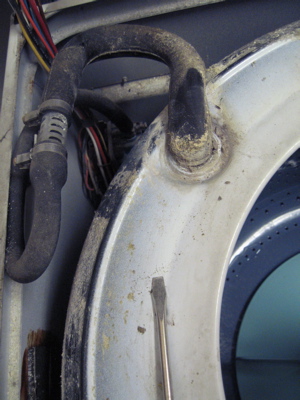
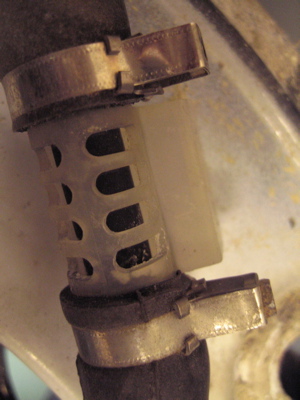
There is a rubber piece that goes over the jet spray that is a cone shaped plastic piect which guides the incoming fill spray into the tub.this piece wares out from water presure and needs to be replaced usualy every 5 years.It is available at any Maytag parts distributer or service center and runs about $8.To install it takes the removal of the screws holding the front panel in place as well as the bolts holding the lid.Once the lid is loose,raise it up and just on the upper left side , you'll see the straight nozel leeding into the "j"or "elbow"shaped hose going into the wash tub.Inbetween the 2 hoses,you'll see the 2 clamps holding the 2 parts together.Be sure you have unplugged the washer and turned off the water suply.Loosen the clamp holding the hose onto the nozel and remove it.Take out the nozel and remove the rubber sock around it.You'll emediately see how stretched it is.place the new sock on and replace the nozel tightening up the clamps and replacing the lid and front.Before you reattach the front,run the washer to be sure the leak has stopped.Not too hard a repair but there may be some cleaning up to do to remove any sediment the previous leak has left in the base.Don't be surprised if you see some rust starting on the left side below the nozel.Depending on how long the leak has been occuring.Good luck!!

Post# 176708 , Reply# 12   12/19/2006 at 15:39 (6,335 days old) by goatfarmer (South Bend, home of Champions)        

goatfarmer's profile picture
Before you replace the fill part pictured,make sure that's where the leak is at. put the washer on FILL,and see where the water is coming from.

kennyGF


Post# 176722 , Reply# 13   12/19/2006 at 16:03 (6,335 days old) by seeitrun2006 (Commerce, GA)        
Washer leak

Check also the drain hose coming from the outer tub that connects to the drain pump. If you look at the picture it is in front and runs straight down to the pump. The rubber tends to harder over time then the movement of the tub causes it to crack.

My mother had that same problem and discovered the hose was hard a rock with a spilt in it. Changed it out leak was fixed.


Post# 176724 , Reply# 14   12/19/2006 at 16:06 (6,335 days old) by steveak ()        

OK, guys. It's clear that all of you are really into this stuff and it seems like a piece of cake to you. I almost feel like I'm letting you down if I call the local repair man to come finish this. Here's my reasoning.
1. Just finding the parts in town - and I'm skeptical anyone actually stocks them - means a lot of calling around.
2. Ordering on line means I need to know the names of the parts - "rubber piece that goes over the jet spray that is a cone shaped plastic piece" doesn't show up on the inventories of the two online places I've checked. There are a few pictures, even of the hose part that goes into the washer tub and where all the mineral deposit was. But mostly there are names and numbers, no pictures.
3. I know that there is a chance that I'll order a piece and I'll need another piece to go with it or to attach it. But I won't know that until I order it and it gets here and it doesn't work by itself. Or something else will be the problem.
4. The repairman knows what he's doing and can come, order all the necessary parts, even check out the rest of the machine for parts that ought to be replaced while he's here.

I really appreciate all your insights and suggestions and your willingness to share your expertise with me and others here. I feel I've learned a lot about the machine I never would have known. We'll definitely keep this one. If you think I'm giving up too easy, let me know. Otherwise I'll call the repairman tomorrow. Thanks.


Post# 176734 , Reply# 15   12/19/2006 at 17:03 (6,335 days old) by rinso (Meridian Idaho)        

Steveak, There's nothing wrong with having a repair person out to fix this machine. It would still be cheaper and better than buying a new one. I know how to work on all my appliances, but I don't always have the time or patience, so I call the "Man-to-Fix." (That's a 1950's household equipment repair title. For example: "The man-to-fix the TV is here." or "The man-to-fix the dishwasher is here.")

Go for it!!!


Post# 176753 , Reply# 16   12/19/2006 at 19:29 (6,335 days old) by christfr (st louis mo)        

christfr's profile picture
oh hell yes save the child.. tags are easy rather fix a water leak than an oil leak ha ha.. they really are easy to work on go for it youll always find good help and advice here

Post# 176874 , Reply# 17   12/20/2006 at 02:09 (6,334 days old) by brettsomers ()        

some of us have had negative experinces with repairmen. i distrust them. i though i trusted this man. i had been to him before and been pleased. he tried to tell me a vacuum cleaner i sent to him for service needed a new fan. he lied to me. if you have a repairman you can trust 100 percent, by all means use him. on the other hand, parts diagrams with part numbers can prolly be an email away.

Post# 177179 , Reply# 18   12/21/2006 at 16:45 (6,333 days old) by steveak ()        

Hey, just want you to know that you all inspired me to perservere. I called another repair man yesterday to check if he had parts and mentioned automaticwasher.org. He was honest, said he'd never worked on a Maytag this old and suggested I go to Harold's Appliance Repair. So I did that this morning with a picture of the insides of the washer. The lady there - Janeen (not sure of spelling) - was very helpful. She went to the back and got the parts in question. $60 later, I'm home and ready to make the repairs. I think I should be able to do this, though I'm a little concerend about being able to reconnect the hose so it is really tight. (Where the black pipe goes into the greyish part in the picture.) I would send you a picture of the new parts - two hose pieces and the clear plastic connecter, but I seem to only be able to put up one picture per message. I'll let you know how it goes.

Post# 177180 , Reply# 19   12/21/2006 at 16:46 (6,333 days old) by steveak ()        

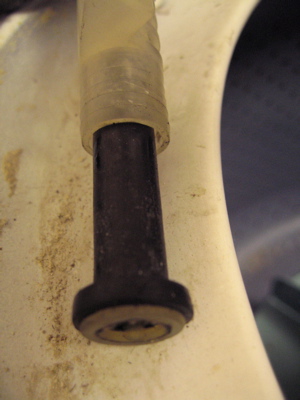
Here are the new parts.

Post# 177186 , Reply# 20   12/21/2006 at 17:24 (6,333 days old) by steveak ()        

OK, You've gotten me this far. Now I need your help again. I don't know how to undo these clamps. There are these two that I need to undo and put on the new hose, and there is the one in the previous picture that I need to undo to get the old hose out of the machne and then redo on the new hose. I've gotten the main screw out of the clamps, but I'm not sure how to loosen them after that. Is there some special tool for this?

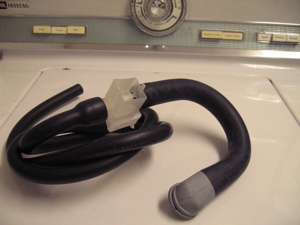
Post# 177311 , Reply# 21   12/21/2006 at 22:33 (6,332 days old) by neptunebob (Pittsburgh, PA)        

neptunebob's profile picture
These hose clamps are/were found on some GM cars for the heater hoses. I would tap down on the part where the bolt came out, that should loosen the clamps. But wait, I just looked, do you actually have to undo that part? It looks as if there is a similar but different looking fitting on the new hose assembly! If you do have to remove the clamps, as you might from the water valve, you may not be able to reuse them but you can buy worm screw clamps from auto parts stores that will work. Good luck! Nep

Post# 177402 , Reply# 22   12/22/2006 at 13:26 (6,332 days old) by steveak ()        

Thanks, Neptune. I'm getting closer. I've gotten the clamps loosened - it's really easy and obvious once you know what to do - and now I have one more issue. When I loosened the clamp, I discovered another part inside the clear plastic thing (see the picture for this new part) which isn't in the kit I got at the Repair shop. So I'll go down there and see if that have that part too. I'm assuming it is something essential. Again, thanks to you all.

Post# 177409 , Reply# 23   12/22/2006 at 14:03 (6,332 days old) by neptunebob (Pittsburgh, PA)        

neptunebob's profile picture
Are you sure it (sounding like Westinghouse!) that it is not inside the new assembly but maybe a different color plastic, maybe clear like the rest of the assembly is? I believe these parts may have something to do with preventing "backflow" in case something happens to the water supply to prevent contamination. I would place the assembly on the washer and see if it works without a leak. Nep, who wishes a merry Christmas with a non-leaking Maytag. Now aren't you glad you sat on Santa's lap and asked for this part and for our advice?

Post# 177410 , Reply# 24   12/22/2006 at 14:11 (6,332 days old) by steved (Guilderland, New York)        
right, Bob

I assume since you were sold a replacement "assembly" that all the old parts can go - it seem as if the airgap is an uppdated version of the old style. SteveD

Post# 177413 , Reply# 25   12/22/2006 at 14:26 (6,332 days old) by steveak ()        

If you look at the picture of the clamps (post 177186) you can see the black part (I show in post #177402) inside the clear plastic thing. That is where it was in the old set of parts. But there is really nothing like that in the new set. Also, I can't toss the old clamps since there were no new ones. I'm headed back to Harold's Appliances to see what I can do. By the way, they had about a dozen refurbished old washers and dryers for sale. I'll see if I can take a picture of them.

Post# 177418 , Reply# 26   12/22/2006 at 14:48 (6,332 days old) by neptunebob (Pittsburgh, PA)        

neptunebob's profile picture
You can get heater hose clamps at any auto parts store, they are the worm style clamps. You might be able to use yours again as they don't seem to be rusted. In a car, the clamps are usually so rusted from all the salt that you have to replace them.

Post# 177432 , Reply# 27   12/22/2006 at 16:20 (6,332 days old) by steveak ()        

Almost done. It turns out that the kit they gave me ("Water Injector Kit" Part No: 204660) had been opened when she got it off the shelf yesterday. It should have had the piece I was looking for. She got a new kit and I got the missing piece, and it had two clamps. She gave me a third clamp for where the end of the hose connects to the water input. It is now all in place. I've cleaned out must of the gunk from the insides of the machine and it looks beautiful. All I have to do now is turn it on and see if it is leakfree. As way of a token thank you for all your help, here's a pic of the used washers for sale at Harold's Appliances in Anchorage - or at least some of them. They also have refrigerators and stoves.

Post# 177762 , Reply# 28   12/23/2006 at 22:55 (6,330 days old) by pturo (Syracuse, New York)        

I replaced mine and any hardware store stainless replacement clamp will do, does not have to be Maytag, just the right size for the job.

Post# 178041 , Reply# 29   12/25/2006 at 06:44 (6,329 days old) by goatfarmer (South Bend, home of Champions)        

goatfarmer's profile picture
Great job on your Maytag! And nice pic from Harold's!

Post# 178432 , Reply# 30   12/27/2006 at 00:32 (6,327 days old) by steveak ()        

Hey, just a final follow up - I hope it's final - the machine is now washing leak free. Again thanks to you all. I've attached a link to the second post on my blog where I mentioned this site and all the help you gave me. Steve

CLICK HERE TO GO TO steveak's LINK


Forum Index:       Other Forums:                      


Comes to the Rescue!

The Discuss-o-Mat has stopped, buzzer is sounding!!!
If you would like to reply to this thread please log-in...

Discuss-O-MAT Log-In


New Members
Click Here To Sign Up.


automaticwasher.org home
Discuss-o-Mat Forums
Vintage Brochures, Service and Owners Manuals
Fun Vintage Washer Ephemera
See It Wash!
Video Downloads
Audio Downloads
Picture of the Day
Patent of the Day
Photos of our Collections
The Old Aberdeen Farm
Vintage Service Manuals
Vintage washer/dryer/dishwasher to sell?
Technical/service questions?
Looking for Parts?
Website related questions?
Digital Millennium Copyright Act Policy
Our Privacy Policy