Thread Number: 18261
I'm confused
[Down to Last]

automaticwasher.org's exclusive eBay Watch:
scroll >>> for more items --- [As an eBay Partner, eBay may compensate automaticwasher.org if you make a purchase using any link to eBay on this page]
Post# 297038   8/15/2008 at 21:02 (5,726 days old) by saltysam ()        

Hi everyone, finally got the Maytag A-206 cleaned up and it really shines. Tried to test it out for leaks and such...Unfortunately leak is exactly what it did BUT it only leaks when it is agitating. This really seemed weird to me that it will only leak when it's agitating. If I fill it up with water and just let it sit there it doesn't leak. The leak is from around the trans shaft that goes through the outer tub just above the transmission. Since this is my very first "Tag" I'm at a loss as to how this machine comes apart....any suggestions or instructions would be greatly appreciated.......Thanks guys and gals!
Mark


Post# 297147 , Reply# 1   8/16/2008 at 12:59 (5,725 days old) by redcarpetdrew (Fairfield, CA)        
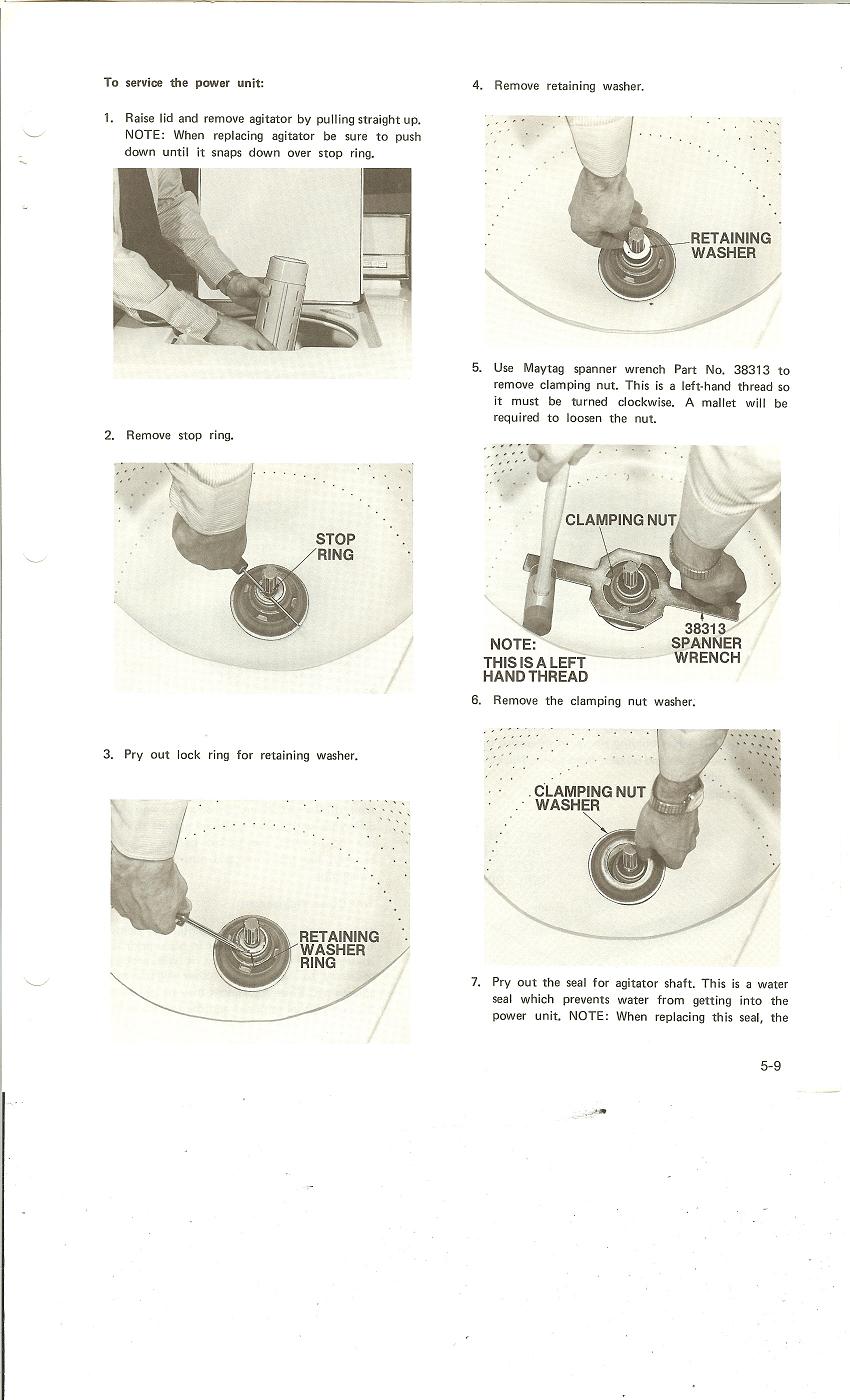
'Tag 101 the hard way...

redcarpetdrew's profile picture
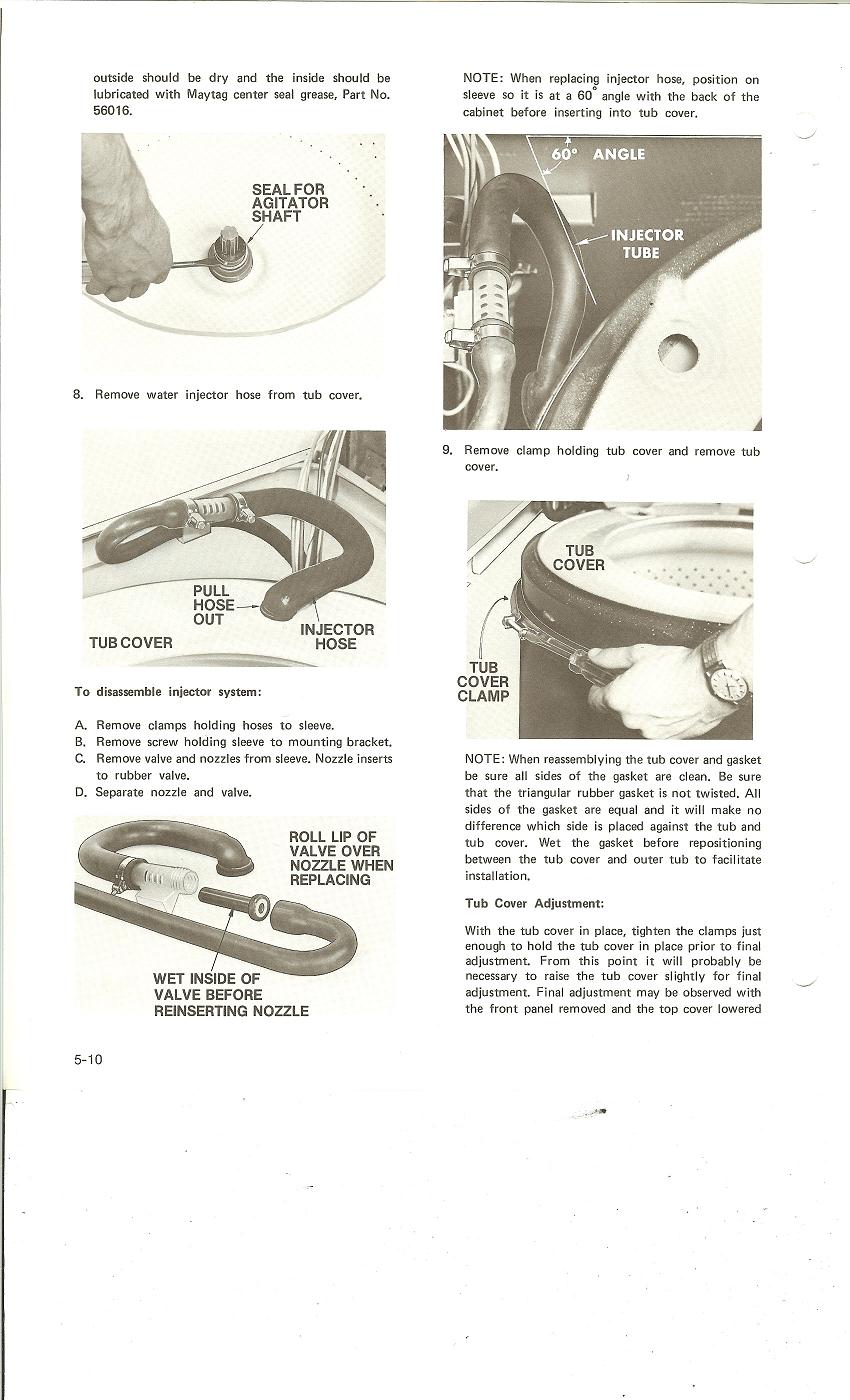
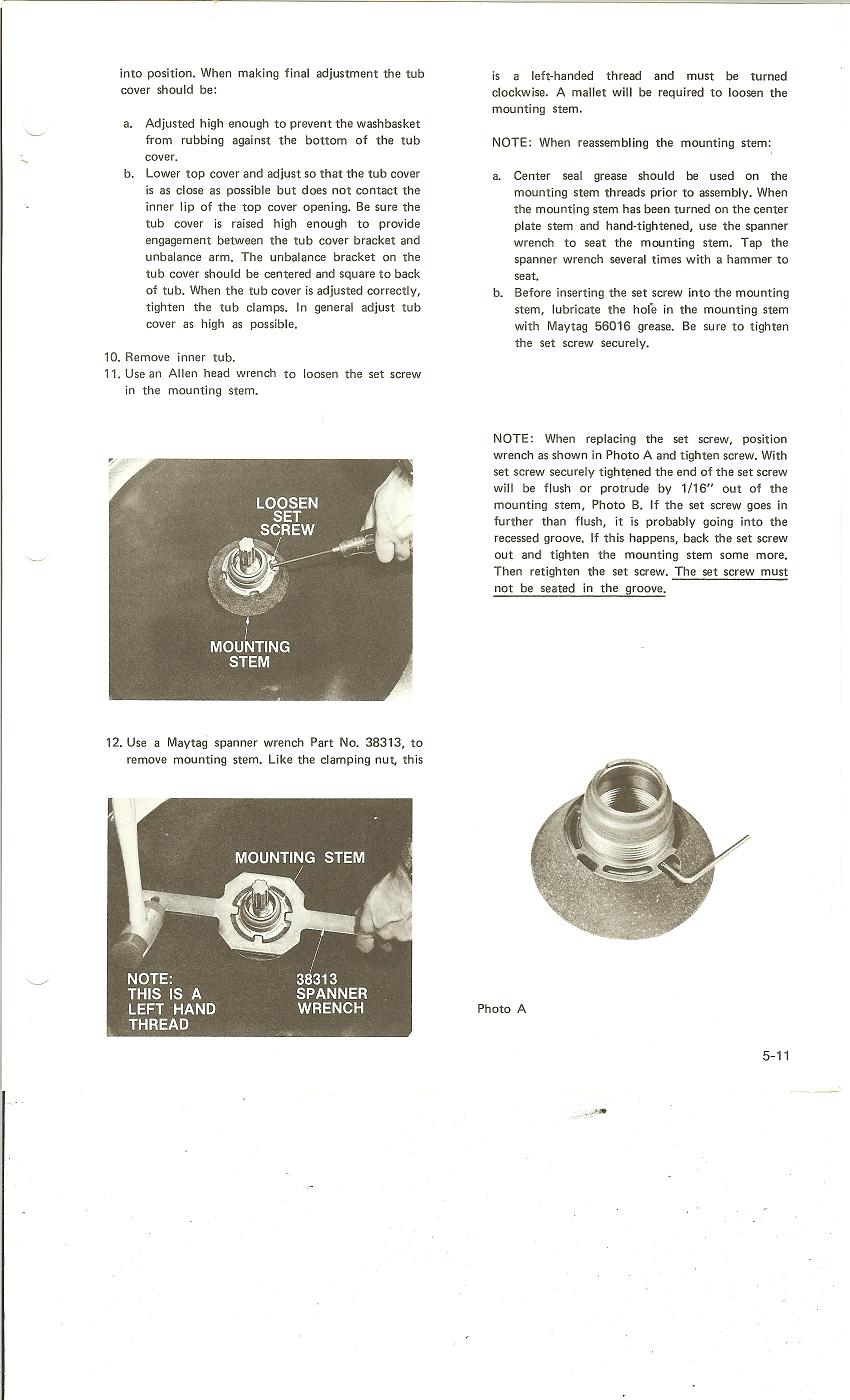
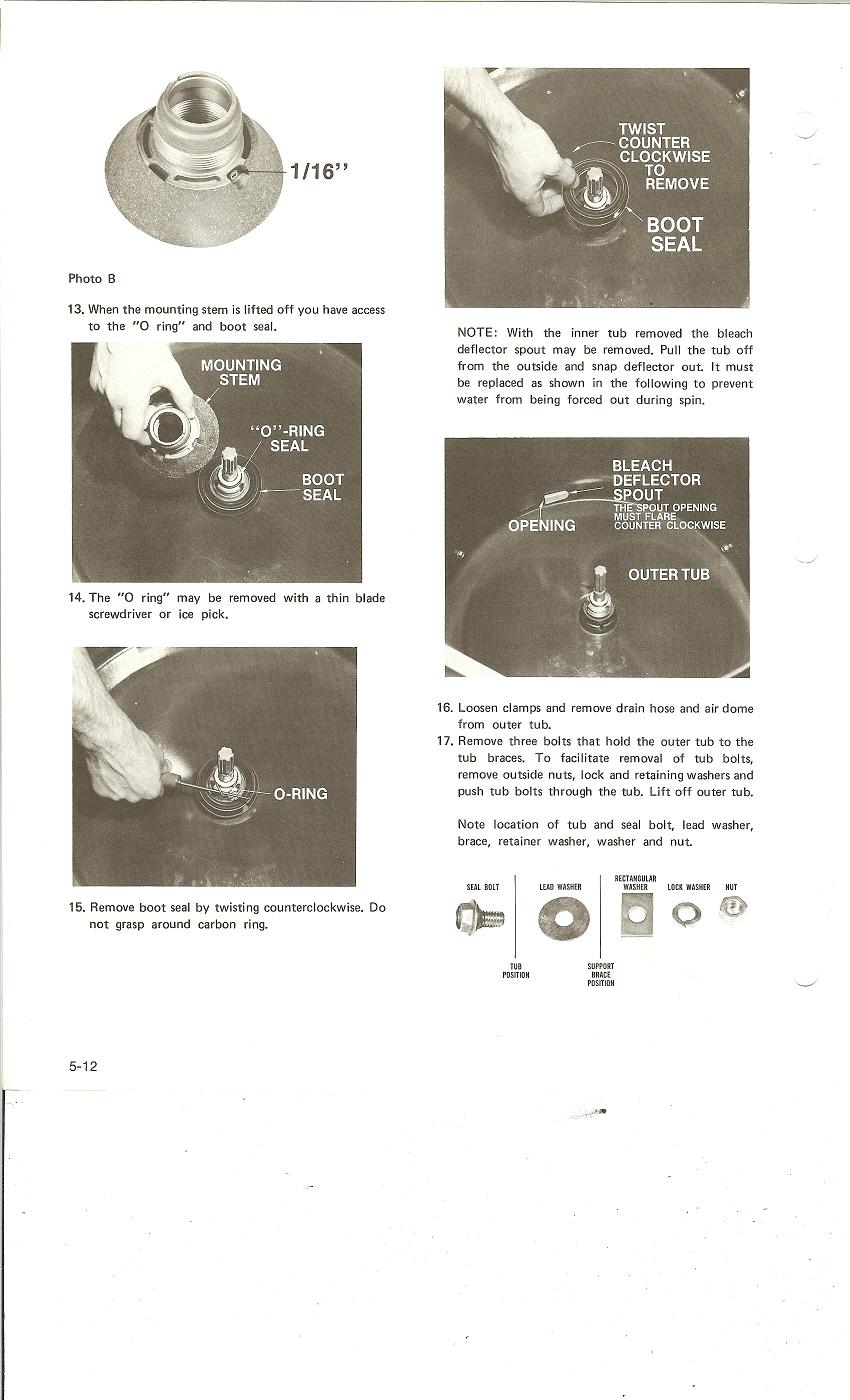
Replacing the tub seal is a joy. It involves removing the tub cover, the agitator, the tub nut (requires a special but easy to get tool), the inner tub, the mounting stem (a combination of a set screw and the above listed tool) and there's your seal. If your tub bearing is bad, then you have to pull the outer tub to change that assy. It's a job but worth it for the right machine. If you're interested in proceding, let me know and I can send/post instructions right from the book.

RCD


Post# 297335 , Reply# 2   8/17/2008 at 00:03 (5,725 days old) by saltysam ()        
If you're interested in proceding, let me know

Thanks RCD I really would like to learn how this machine is taken apart and repaired.......This is my first "Tag" and it seems like it will be a fun machine once i get the leaks fixed.....If you would post the instructions I would really appreciate it!
Thanks!
Mark


Post# 297483 , Reply# 3   8/17/2008 at 15:15 (5,724 days old) by qsd-dan (West)        

qsd-dan's profile picture
Get a new stem and tub seal from here. A local parts place will charge you nearly $80.

CLICK HERE TO GO TO qsd-dan's LINK on eBay


Post# 297484 , Reply# 4   8/17/2008 at 15:16 (5,724 days old) by qsd-dan (West)        
Tub Bearing

qsd-dan's profile picture
Might as well install a new tub bearing while it's apart.

CLICK HERE TO GO TO qsd-dan's LINK on eBay


Post# 297576 , Reply# 5   8/18/2008 at 01:41 (5,724 days old) by redcarpetdrew (Fairfield, CA)        
Your wish...

redcarpetdrew's profile picture
I should be able to get it together and posted sometime Monday.

RCD


Post# 297589 , Reply# 6   8/18/2008 at 06:33 (5,723 days old) by christfr (st louis mo)        

christfr's profile picture
oh no say it aint so.. mark the master is confused... no way.. your gonna love that tag if it kills you ha ha.. she is gonna make you work before she becomes a good girl.. get the parts you need and if you want help il come on out. the tags are easy to tinker with

Post# 297646 , Reply# 7   8/18/2008 at 11:51 (5,723 days old) by fltcoils (South Bend, Indiana)        
drimel tool is your friend

I struggled and struggled to use that tool to get my tub seal nut loose. The lime buildup siezed it. I finally sawed the nut off with a hack saw.

Reach way down, then take a 2" stroke before hitting knuckles on drum, then lift, then take another stroke. a long process back in '87.

Since the nut and the threaded stem just got/get thrown away...I recommend saving yourself the trouble and just use a dremmel tool with a cutoff wheel (and safety glasses).. Unless I'm mistaken, you can chop thru the nut and even hit the stem threads with no fear, the nut and stem threads are gonna be replaced.

right?

10 minute job to get the nut off, 1 night job to do the seal. allowing for pizza and breaks.


Post# 297648 , Reply# 8   8/18/2008 at 12:11 (5,723 days old) by redcarpetdrew (Fairfield, CA)        

redcarpetdrew's profile picture
I like your approach but I'll bet the dremel didn't work too well on tightening the new parts... Remember that the tub nut AND the mounting stem ARE reverse threaded with the set screw on the stem partially hidden under the cork pad. Not knowing about the reverse threading on those parts is one of the most common mistakes I see when cleaning up a home repair job...

RCD


Post# 298037 , Reply# 9   8/19/2008 at 21:29 (5,722 days old) by redcarpetdrew (Fairfield, CA)        
Sorry it took so long...

redcarpetdrew's profile picture
Here you go, Mark. This should help. Remember, the new mounting stem & boot doesn't have the separate agitator shaft seal. It's now all one piece BUT... I've used a old style shaft seal in addition to the lip seal that's part of the Stem. It's just more insurance against future leakage...

Post# 298038 , Reply# 10   8/19/2008 at 21:30 (5,722 days old) by redcarpetdrew (Fairfield, CA)        

redcarpetdrew's profile picture
Pg2...

Post# 298039 , Reply# 11   8/19/2008 at 21:31 (5,722 days old) by redcarpetdrew (Fairfield, CA)        

redcarpetdrew's profile picture
Pg3

Post# 298040 , Reply# 12   8/19/2008 at 21:36 (5,722 days old) by redcarpetdrew (Fairfield, CA)        

redcarpetdrew's profile picture
Pg.4 It's always best to use new tub bolts when putting her back together. Remember 1 short for the FRONT support and 2 long for the back two supports. Put a long bolt in the front position and you'll hear this really neat tapping noise as the bolt hits the front panel during spin. Yes, I made that mistake very early on in my career and the ration I got from my training tech was enough to make sure I remembered...

Post# 298041 , Reply# 13   8/19/2008 at 21:37 (5,722 days old) by saltysam ()        
That is AWESOME!

Thank you so much Drew........You don't know how much I appreciate this information. It will save me a lot of time for sure!

Also Thank-You QSD-Dan for the links to the parts I will need......

Can't wait to get this baby apart and get the seals replaced and back in action..I want to see what this machine will do......

Thanks again guys.....you are the BEST!

Mark


Post# 298043 , Reply# 14   8/19/2008 at 21:38 (5,722 days old) by redcarpetdrew (Fairfield, CA)        

redcarpetdrew's profile picture
Pg.5 The bolts come with a seal already attached...

Post# 298046 , Reply# 15   8/19/2008 at 21:45 (5,722 days old) by redcarpetdrew (Fairfield, CA)        

redcarpetdrew's profile picture
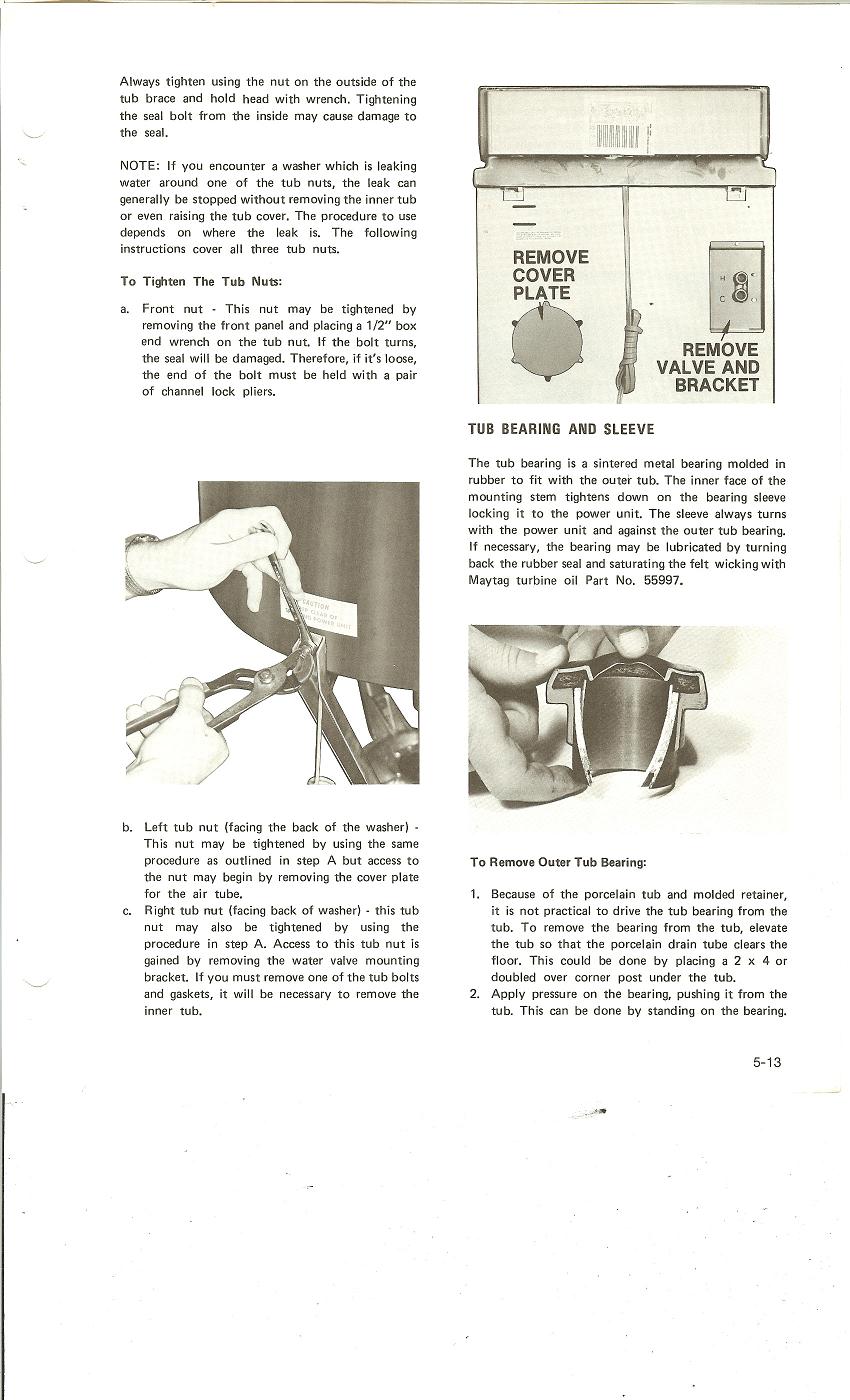
Pg.6 When pressing in the new bearing, it helps to wet the rubber surface with water to help it slide in. (That just sounds different...) Reassembly is the reverse. When you've got it put back together, do two DRY spin cycles to seat the new stem seal before wet testing her. Any questions, let me know. Once you've done the job and ran your first load without a leak, post a picture.

RCD
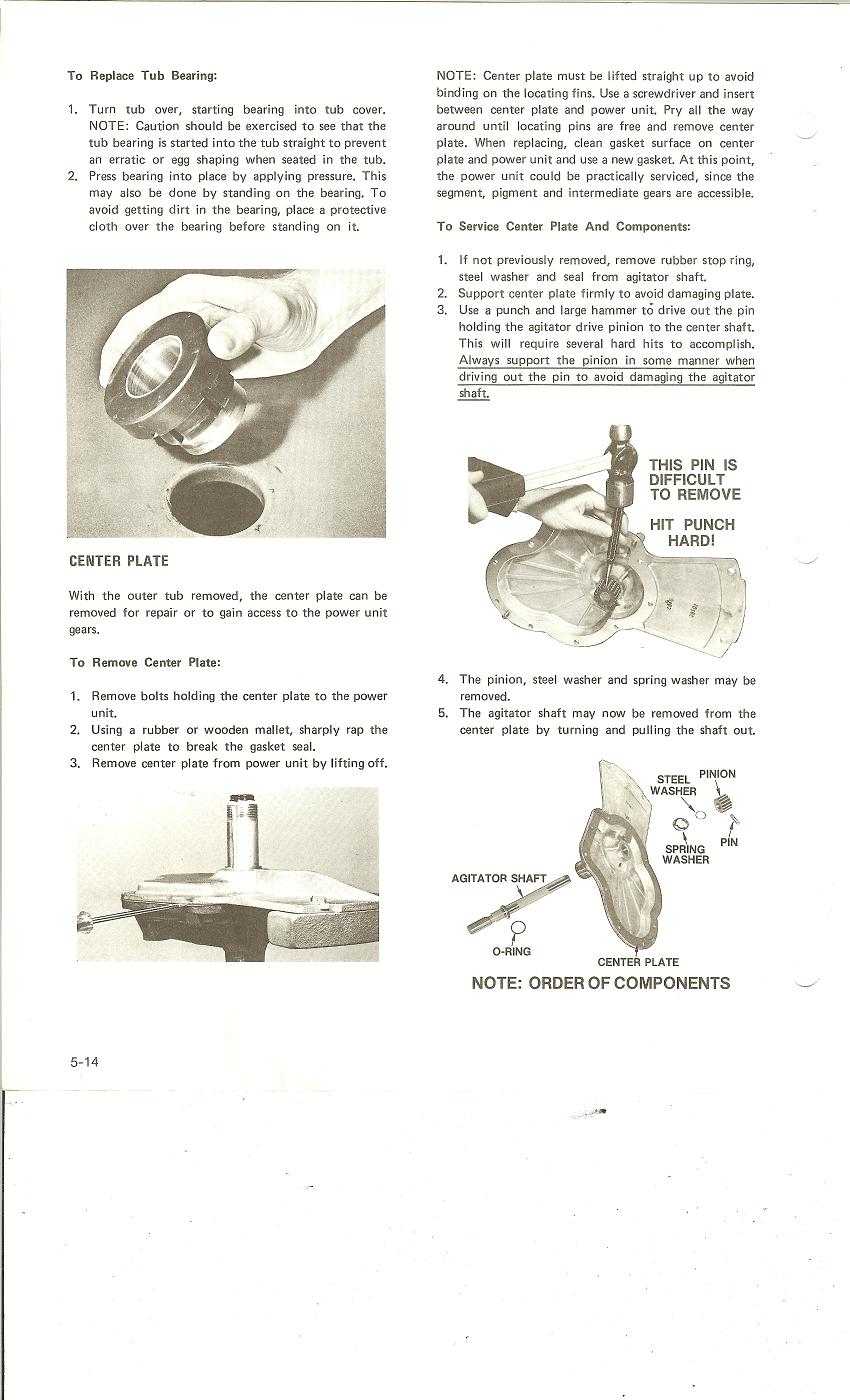


Forum Index:       Other Forums:                      


Comes to the Rescue!

The Discuss-o-Mat has stopped, buzzer is sounding!!!
If you would like to reply to this thread please log-in...

Discuss-O-MAT Log-In


New Members
Click Here To Sign Up.


automaticwasher.org home
Discuss-o-Mat Forums
Vintage Brochures, Service and Owners Manuals
Fun Vintage Washer Ephemera
See It Wash!
Video Downloads
Audio Downloads
Picture of the Day
Patent of the Day
Photos of our Collections
The Old Aberdeen Farm
Vintage Service Manuals
Vintage washer/dryer/dishwasher to sell?
Technical/service questions?
Looking for Parts?
Website related questions?
Digital Millennium Copyright Act Policy
Our Privacy Policy