Thread Number: 21311
1960 Maytag Highlander Restoration Progress (Pix)
[Down to Last]

automaticwasher.org's exclusive eBay Watch:
scroll >>> for more items --- [As an eBay Partner, eBay may compensate automaticwasher.org if you make a purchase using any link to eBay on this page]
Post# 336041   3/17/2009 at 21:22 (5,511 days old) by ttuee2006 ()        

If you recall a while back, A Maytag Highlander was posted for free in San Antonio which I picked up.

Well I've been slowly working on it, and getting that tub nut out was a PAIN! But the progress has been amazing so far! Pictures to follow...

Picture 1 is the Tub and tub ring before cleaning...


Post# 336042 , Reply# 1   3/17/2009 at 21:23 (5,511 days old) by ttuee2006 ()        
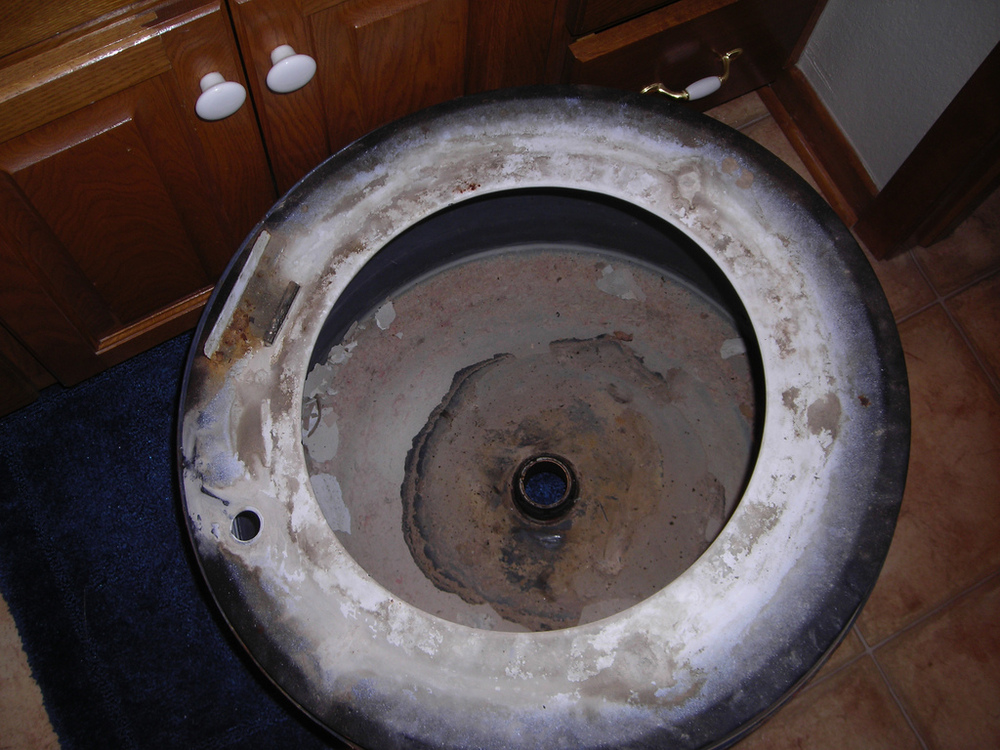
Tub Ring

Now we have the underside of the tub ring


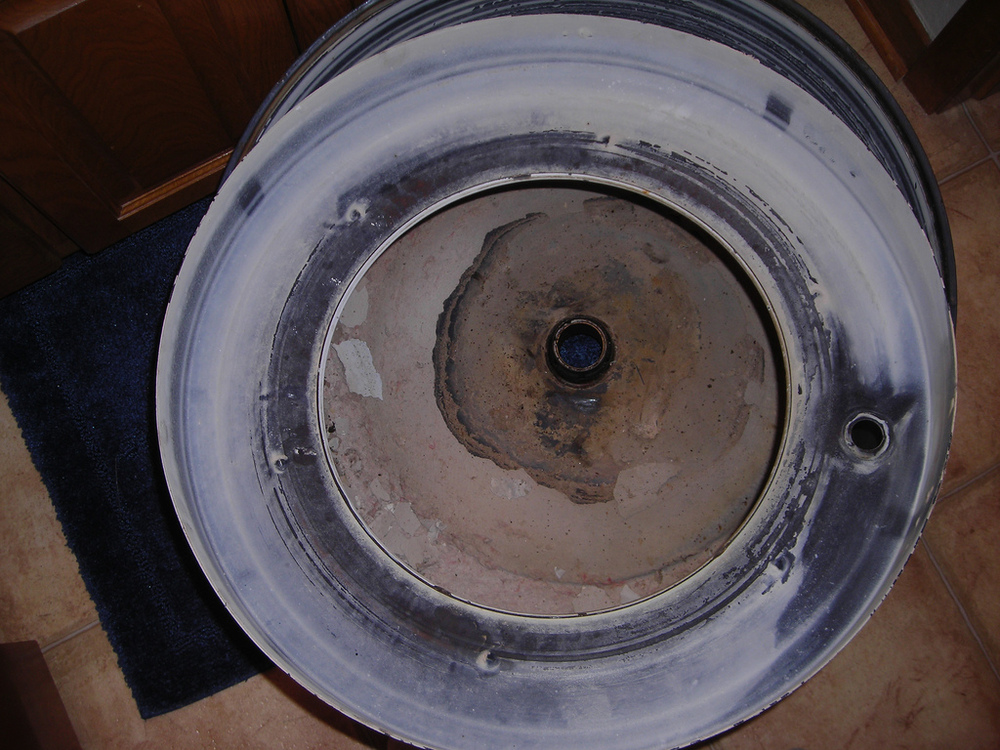
Post# 336043 , Reply# 2   3/17/2009 at 21:24 (5,511 days old) by ttuee2006 ()        
Tub

Now for the tub itself...


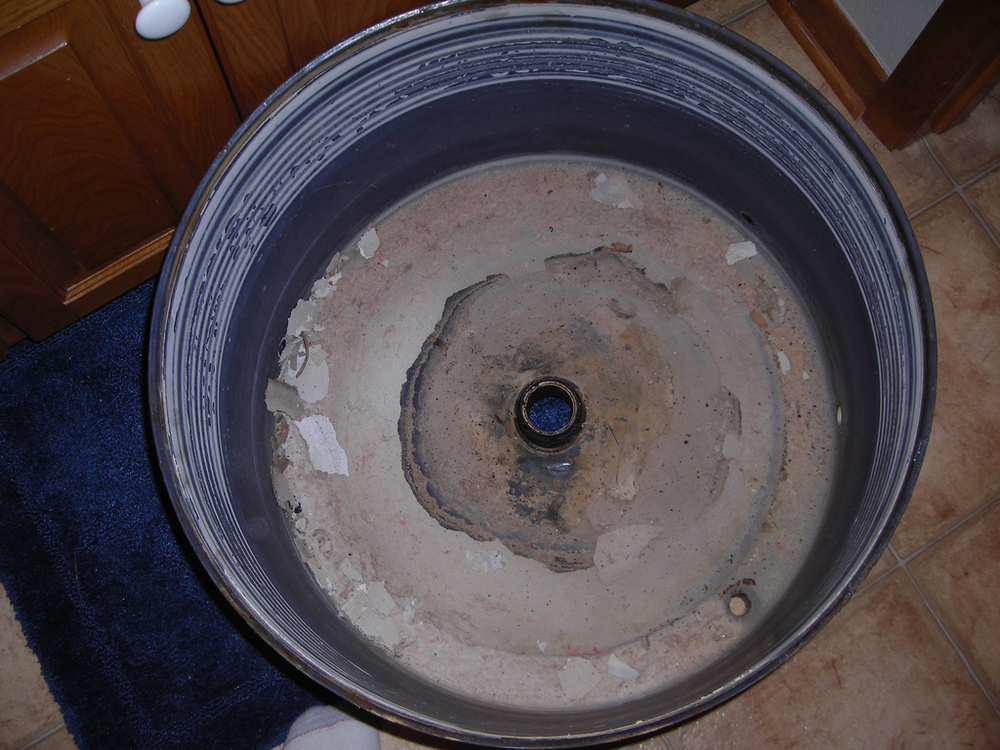
Post# 336044 , Reply# 3   3/17/2009 at 21:24 (5,511 days old) by ttuee2006 ()        
Spin Basket

Inside of the Spin Basket... This part was a PAIN to de-lime


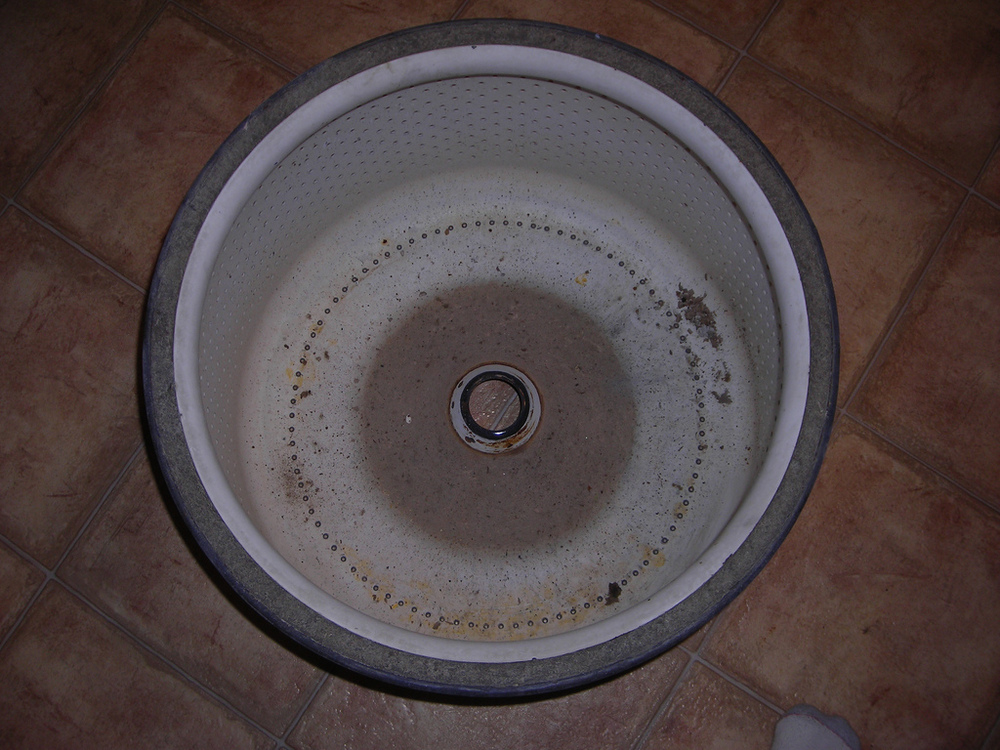
Post# 336045 , Reply# 4   3/17/2009 at 21:25 (5,511 days old) by ttuee2006 ()        
Underside of the spin basket

Underneath the Spin Basket...


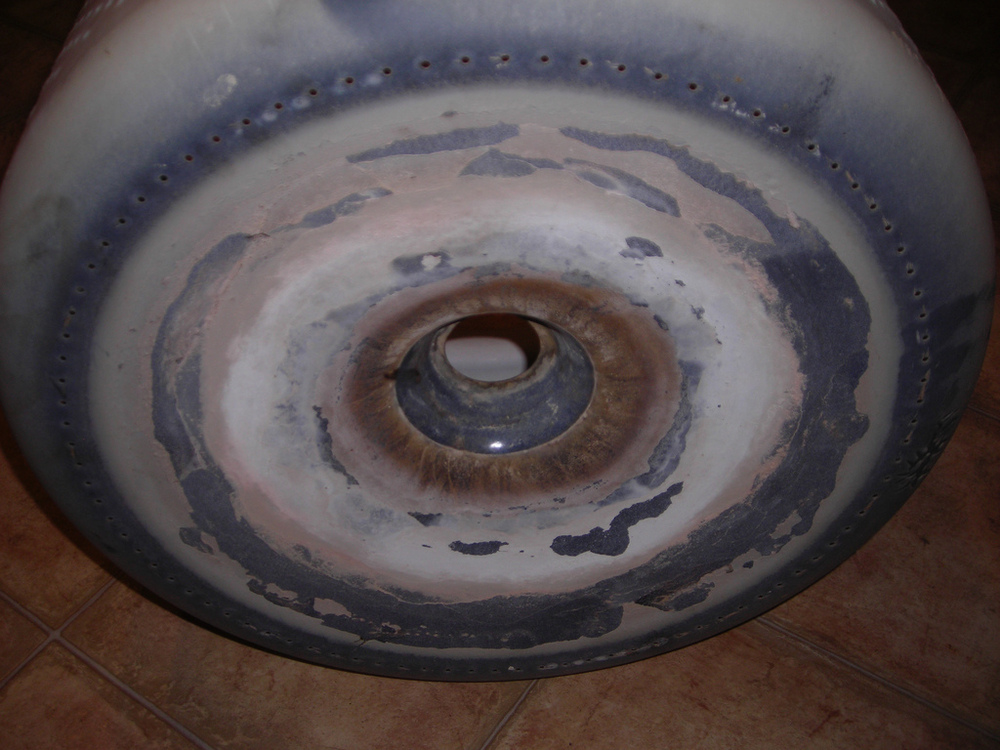
Post# 336046 , Reply# 5   3/17/2009 at 21:26 (5,511 days old) by ttuee2006 ()        
Clean Spin Basket

Spin Basket post-cleanup...


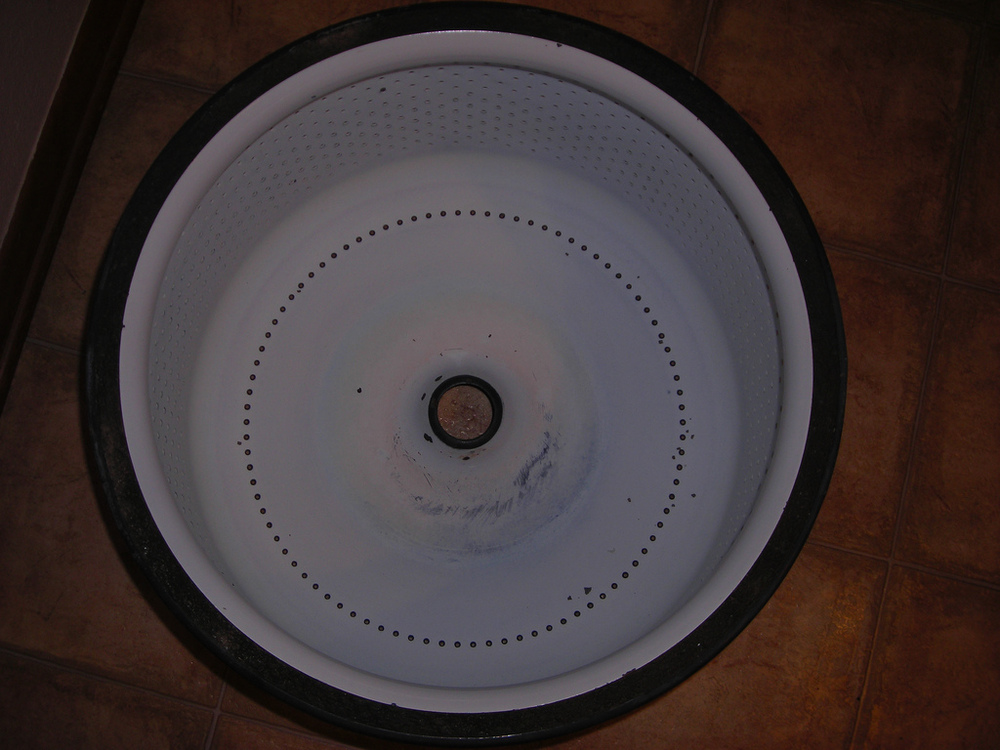
Post# 336047 , Reply# 6   3/17/2009 at 21:27 (5,511 days old) by ttuee2006 ()        
Underside of Spin Basket post-cleanup

Under the spin basket after cleanup...


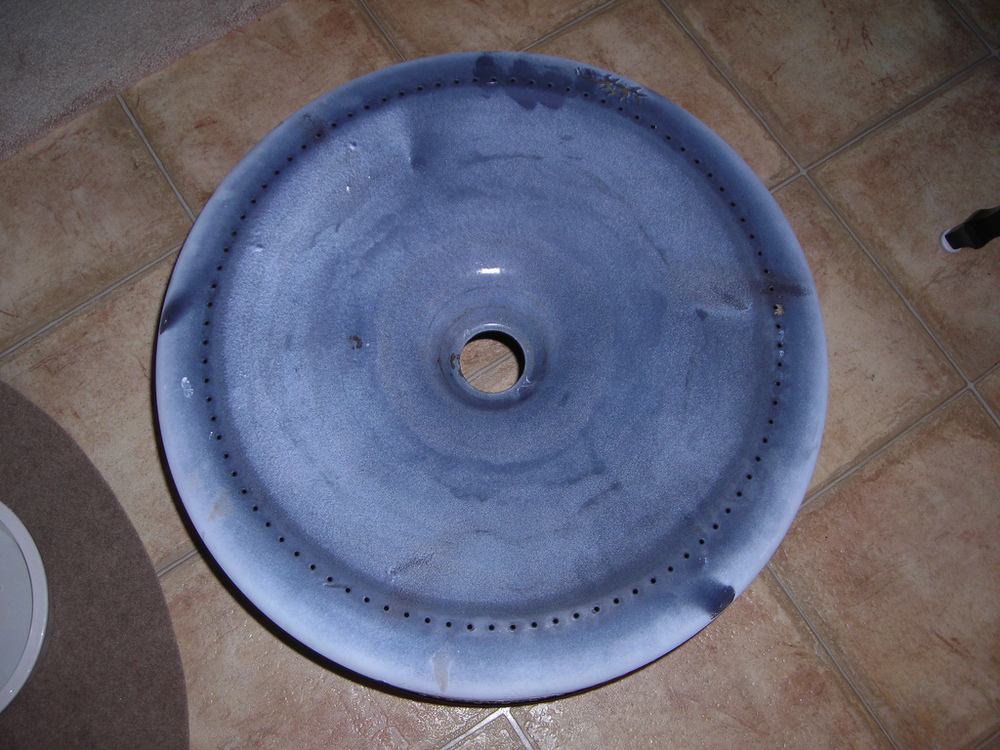
Post# 336048 , Reply# 7   3/17/2009 at 21:28 (5,511 days old) by ttuee2006 ()        
Clean Tub Ring

Tub Ring post-cleanup...


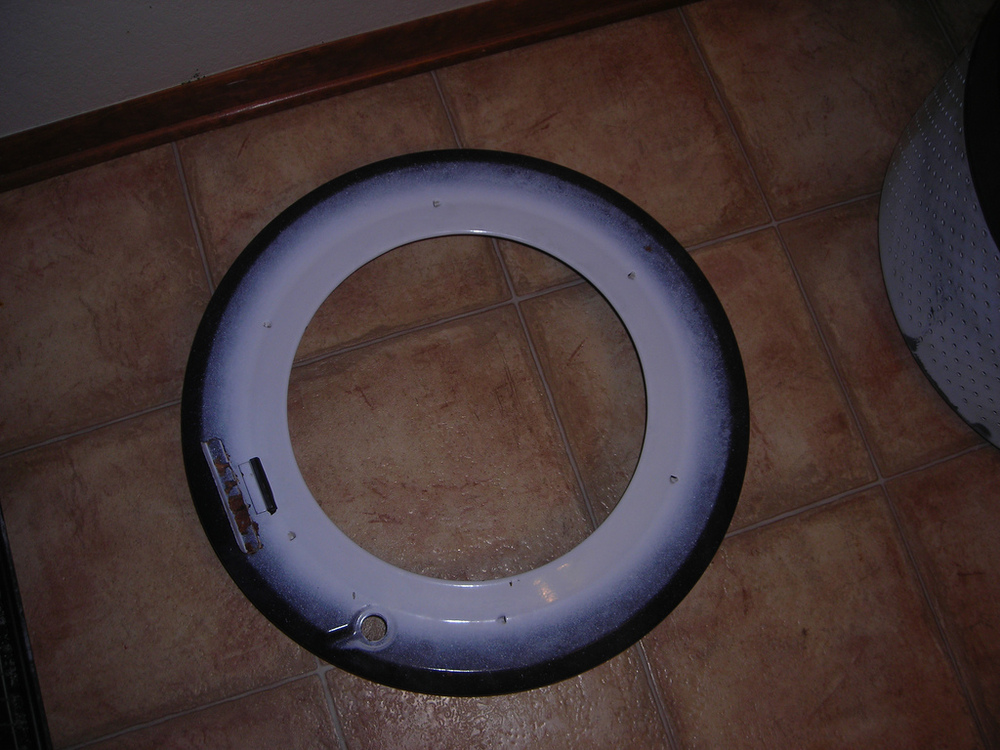
Post# 336049 , Reply# 8   3/17/2009 at 21:29 (5,511 days old) by ttuee2006 ()        
Underside of Tub Ring post-cleanup

Clean tub ring, post-cleanup...


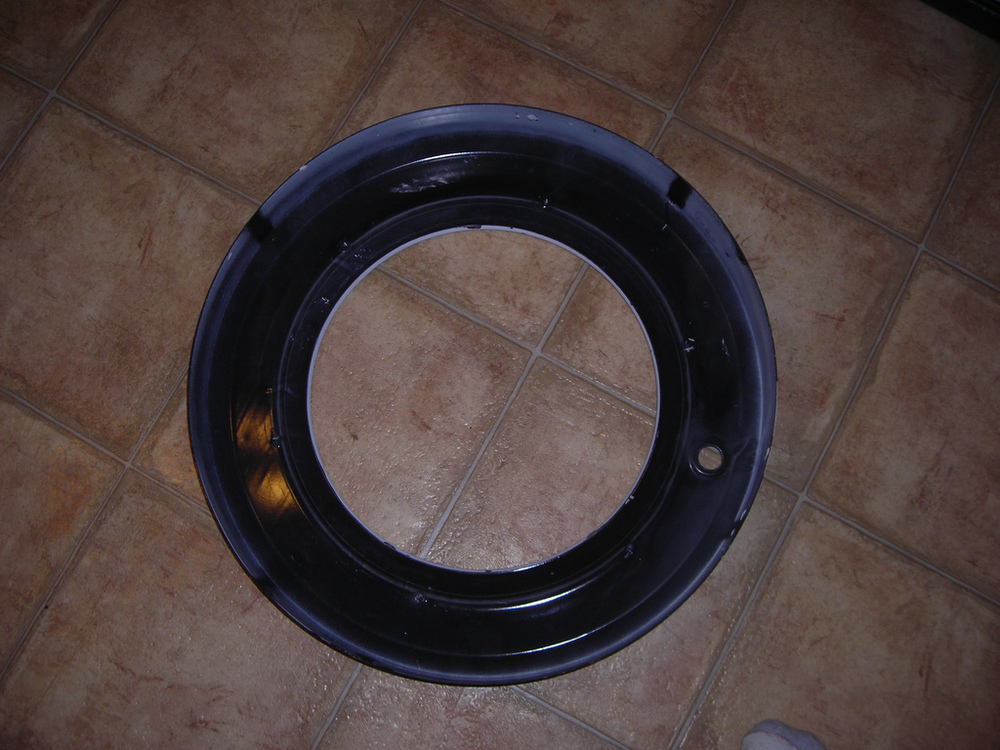
Post# 336050 , Reply# 9   3/17/2009 at 21:29 (5,511 days old) by ttuee2006 ()        
Tub Post-Cleanup

Tub inside post-cleanup...


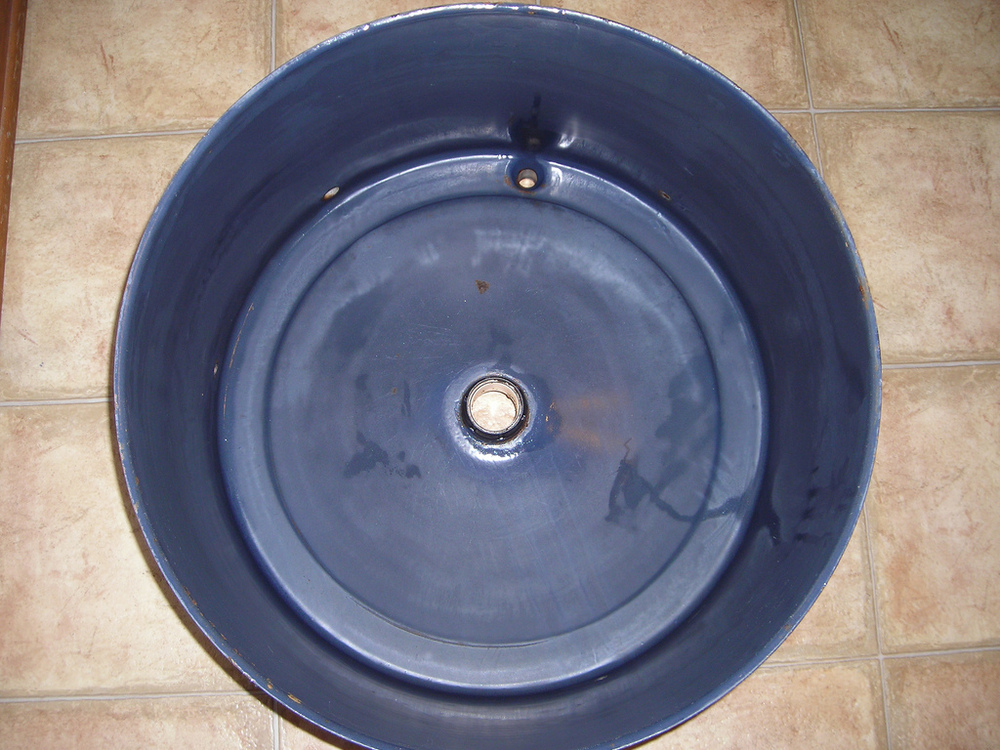
Post# 336051 , Reply# 10   3/17/2009 at 21:30 (5,511 days old) by ttuee2006 ()        
Tub Post-Cleanup

Outside of the tub post-cleanup...


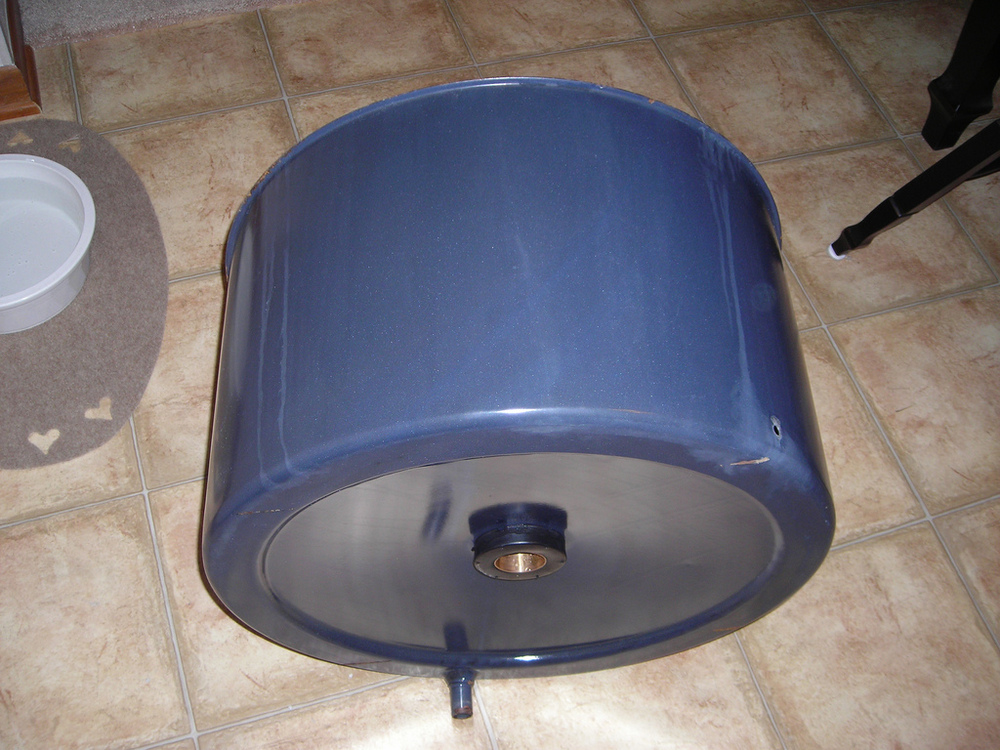
Post# 336068 , Reply# 11   3/17/2009 at 23:15 (5,511 days old) by redcarpetdrew (Fairfield, CA)        
Just about factory new!

redcarpetdrew's profile picture
How did you go about cleaning them? Elbow grease, chemicals or both? The shine is awsome.

RCD


Post# 336090 , Reply# 12   3/18/2009 at 06:26 (5,510 days old) by christfr (st louis mo)        

christfr's profile picture
lookin good keep up the good work. cant wait to see the finished machine

Post# 336094 , Reply# 13   3/18/2009 at 07:45 (5,510 days old) by geoffdelp (SAUK RAPIDS)        

Looks great, Eric! It's a rewarding process, isn't it?

Can't wait to see it when you get done.


Post# 336099 , Reply# 14   3/18/2009 at 08:17 (5,510 days old) by ttuee2006 ()        

It took a LOT of elbow grease, and just about as much chemicals! Took FOREVER with a ton of scraping and scouring. That hard water scale is TOUGH to get rid of, especially when it's been in there for 49 years!

It's definitely a rewarding process, but it also makes you really appreciate some of the really nice machines that you see on this site. Mine's pretty rough cosmetically, but mechanically it's in good shape, so I'm hoping it's going to turn out well. It's getting all new belts and hoses since the ones that were in it were ROCK hard! Leaks just aren't my thing....

I'll have the main unit pulled out later this afternoon and post some pictures of the guts before I clean that up as well.


Post# 336180 , Reply# 15   3/18/2009 at 23:32 (5,510 days old) by whirlaway (Hampton Virginia)        
Amazing!!!!!!!!!!!!!!!!!!!!!!!!

Just beautiful!!!!!!!!!!!!!!!!!!!!!!!!!! What did you get that scale off with?

Post# 336184 , Reply# 16   3/19/2009 at 00:09 (5,510 days old) by ttuee2006 ()        
Scale Removal

I used a non-scratching tub scrubber and "The Works" toilet bowl cleaner. The lime scale was so thick, that it required some heavy artillery! Squirt on, let sit a few minutes, scrub off what will come off, rinse. Repeat.

It takes a very long time, lots of scrubbing and elbow-grease, but well worth it.

The cleaner fumes very badly, and on the REALLY icky parts, it actually smokes! Make sure if you use this stuff to do it outside when there's a breeze! SERIOUSLY! OUTSIDE! Do NOT inhale the fumes as they are hydrochloric acid fumes! I can't iterate enough.....ventilation is IMPORTANT!

I will state one thing: If the metal is not in very good shape in the tub, I wouldn't suggest using the toilet cleaner on it. It's VERY harsh and can damage thin or rusty metal. I was able to do it in this tub since it's porcelain lined, and was actually in very good shape! The thick lime scale actually seemed to preserve the finish somewhat.


Post# 336200 , Reply# 17   3/19/2009 at 05:49 (5,509 days old) by kenmore81 ()        
Cant wait to see more

Im hoping there will be a vid on you tube as well ;), Im subscribed. for how long I dont know lol. My you tube acct erases everthing for some reason

Post# 336284 , Reply# 18   3/19/2009 at 16:11 (5,509 days old) by ttuee2006 ()        

My youtube goes a bit wonky at times too. It's REALLY annoying too since there's nobody to contact to complain about it!

But yes, you can expect a video, as well as more pictures. I've got the injector and siphon break all cleaned up and nice, and currently working on re-painting the lettering on the timer dial and pushbuttons, so there are still a lot of pictures left to come before the video is made.

This weekend I'm expecting to finally paint the body and cabinet, so hopefully that turns out nicely as well.


Post# 336383 , Reply# 19   3/20/2009 at 03:13 (5,508 days old) by kenmore81 ()        
All I have to say is...

WOW.What a project, and a terrific job.Just The thought of painting the timer makes my hands shake lol, i cant do that unless its a stencil.

Post# 336394 , Reply# 20   3/20/2009 at 04:21 (5,508 days old) by chestermikeuk (Rainhill *Home of the RailwayTrials* Merseyside,UK)        
Restore

chestermikeuk's profile picture
Hi Eric, Congratulations on the restoration!!! wow, that enamel is positively gleaming...all the hard work pays off in the end, looking forward to seeing the vids..

Post# 336527 , Reply# 21   3/20/2009 at 22:05 (5,508 days old) by ttuee2006 ()        
Some more...

Here's the siphon break and (I'm assuming) the original fill valve. Has the old cursive Maytag logo on it, but it wont' stop running, so it's getting replaced. Do NOT ask me why there's a piece of hose defeating the siphon break. The thing works fine without it. All I can figure is that it was on an unlevel surface and water would run out of the break when the water shut off.


Post# 336528 , Reply# 22   3/20/2009 at 22:09 (5,508 days old) by ttuee2006 ()        

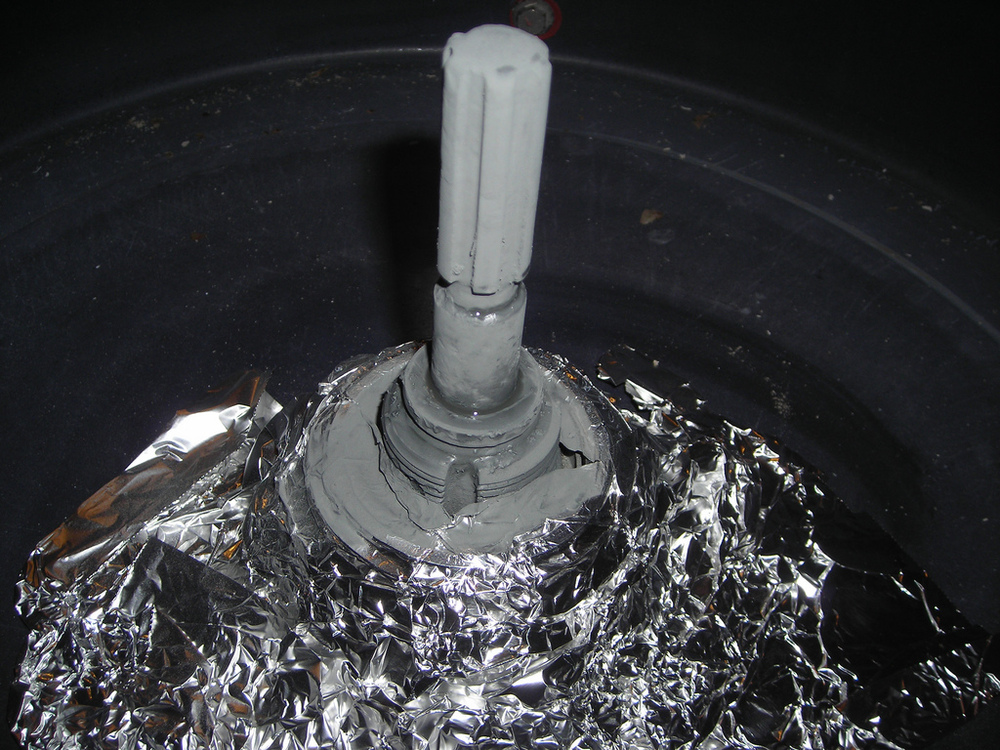
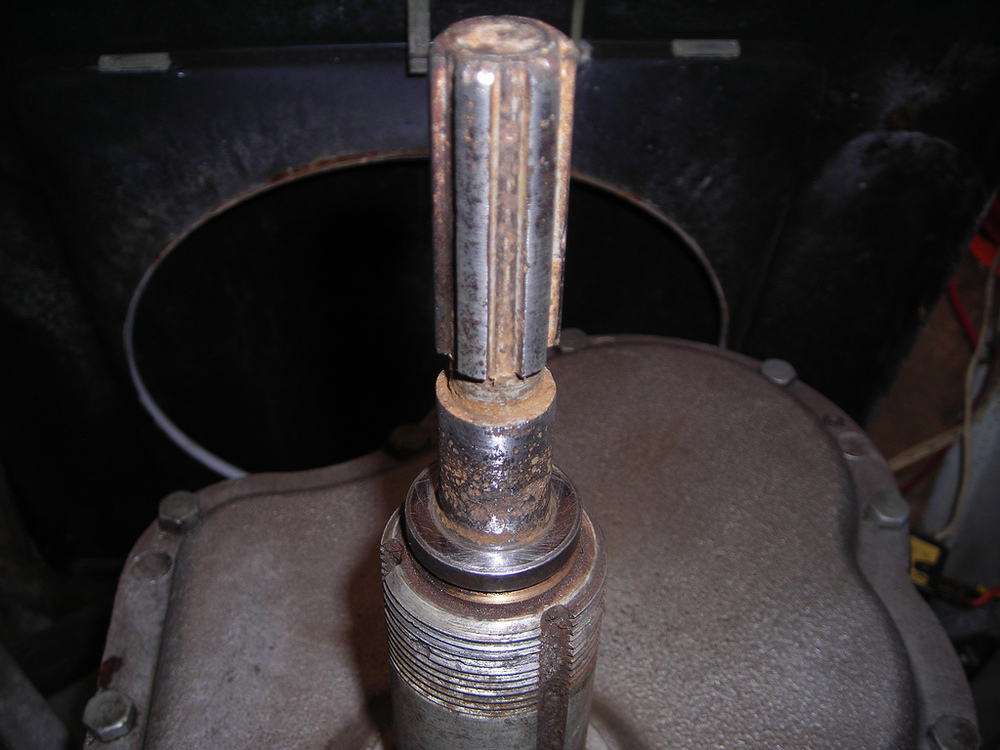
The rusty agitator shaft and the top of the tranny...


Post# 336529 , Reply# 23   3/20/2009 at 22:10 (5,508 days old) by ttuee2006 ()        

And of course the timer dial......which I'm currently working on


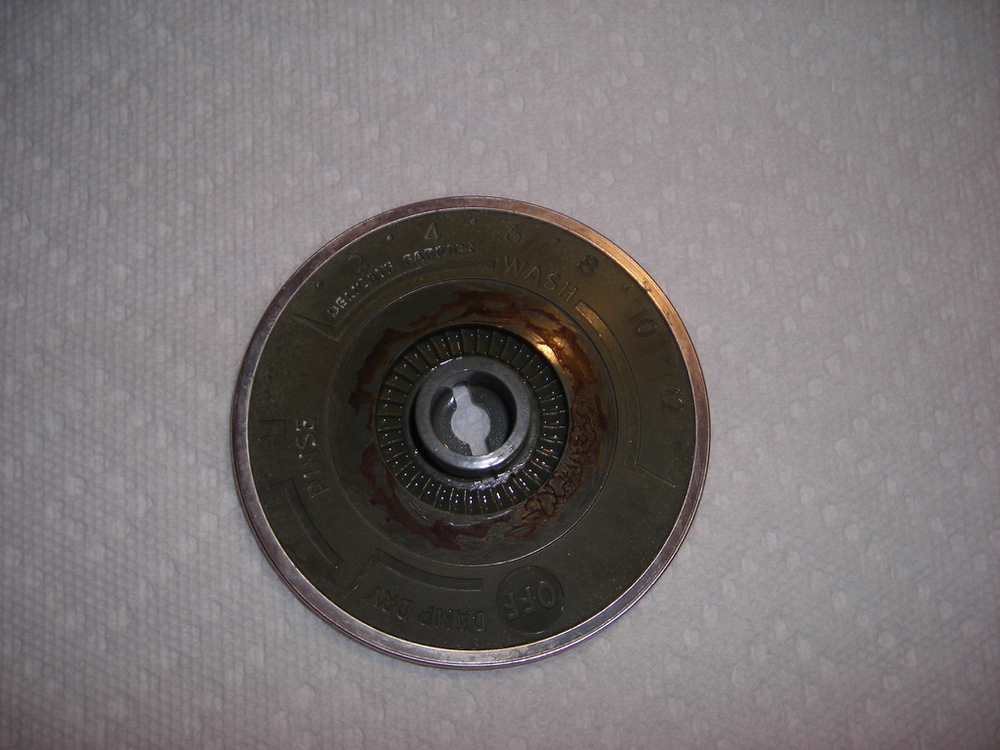
Post# 336552 , Reply# 24   3/21/2009 at 00:06 (5,508 days old) by ttuee2006 ()        
Finished Timer Knob

Got the knob finished! And yes.....that IS the same knob!

Post# 336553 , Reply# 25   3/21/2009 at 00:07 (5,508 days old) by ttuee2006 ()        
Uh......Picture?

Let's try that again.....


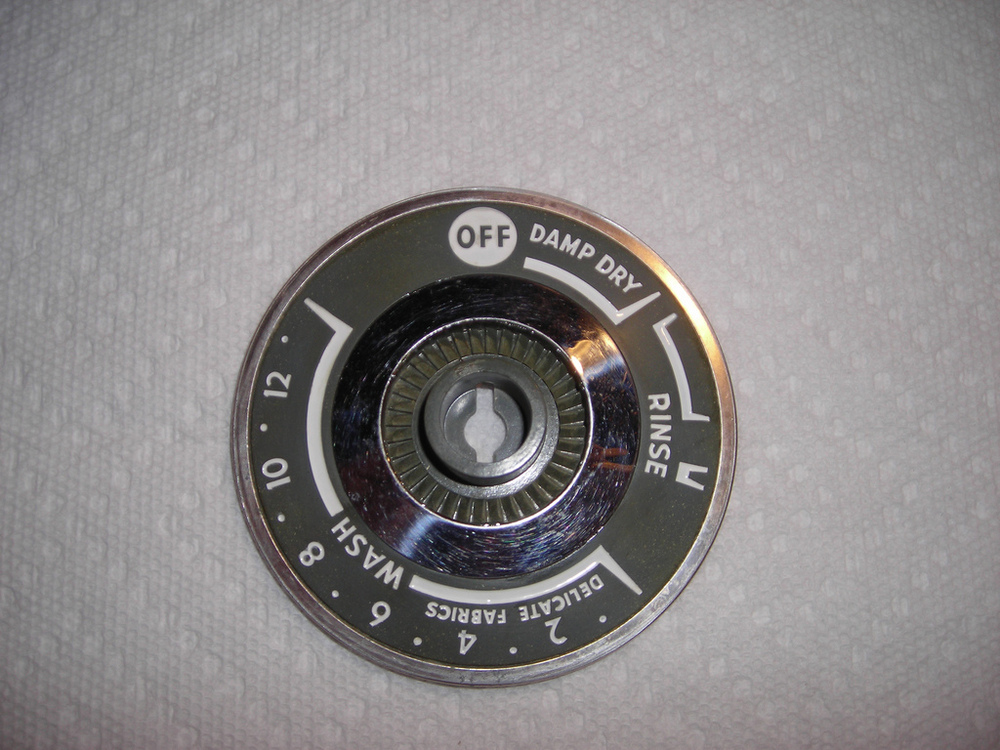
Post# 336568 , Reply# 26   3/21/2009 at 01:51 (5,508 days old) by qsd-dan (West)        
Whoa!!

qsd-dan's profile picture
How the heck did you get that timer dial to look brand new? Fantastic job, BTW!!

Post# 336851 , Reply# 27   3/22/2009 at 14:13 (5,506 days old) by ttuee2006 ()        
Well we've hit a snag.....

Well we've hit a snag in the restoration progress.....The agitator shaft is too far gone to make a good seal.....which really SUCKS by the way since the machine is finished otherwise! I cleaned all the rust off and decided to try it to see if I could by some chance be lucky.....

Murphy hates me.....still has a slow leak around that damn agitator seal! Well I guess this project gets put on ice until I can find a new one. Hacked off doesn't even come close to describing how I'm feeling at the moment....


Post# 336856 , Reply# 28   3/22/2009 at 14:21 (5,506 days old) by ttuee2006 ()        
At least I can show how she came out..

Here's how she turned out:


Post# 336857 , Reply# 29   3/22/2009 at 14:22 (5,506 days old) by ttuee2006 ()        
Closer view of the Control Panel...

The control panel didn't turn out as nice as I would have desired, but it's a FAR CRY from what it was!


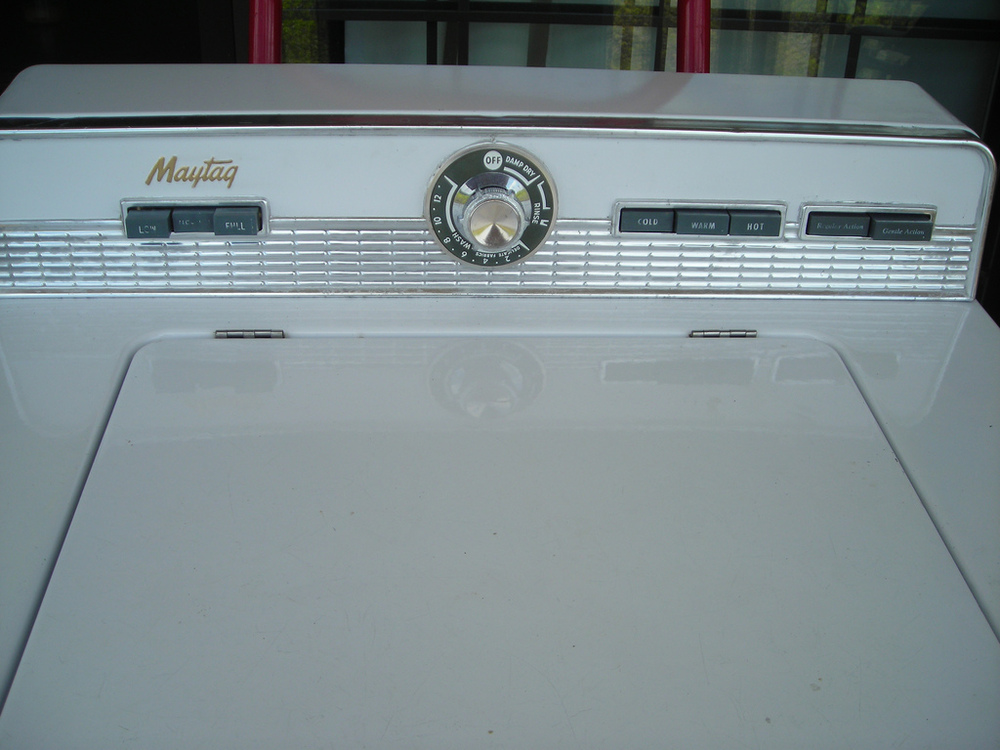
Post# 336860 , Reply# 30   3/22/2009 at 14:31 (5,506 days old) by ttuee2006 ()        

Of course for comparison, you've gotta understand what it looked like when it came home! The link below posts to the original thread in the archives section...


CLICK HERE TO GO TO ttuee2006's LINK


Post# 336878 , Reply# 31   3/22/2009 at 15:31 (5,506 days old) by qsd-dan (West)        
Center shaft

qsd-dan's profile picture
Well, the shaft and collar are still available but at the steep price of $91-110, depending where you purchase it :(


CLICK HERE TO GO TO qsd-dan's LINK


Post# 336931 , Reply# 32   3/22/2009 at 19:22 (5,506 days old) by ttuee2006 ()        
OUCH!

That's more than my total bill of costs! OUCH! I think it may be worth my time to try some "southern" engineering on the shaft and see if I can get anything to bond and hold to fill in the gaps. I'm thinking of possibly using a very hard epoxy, and then polishing it off with fine sandpaper. Think it would work?

For $91 I'm willing to try it........


Post# 336932 , Reply# 33   3/22/2009 at 19:26 (5,506 days old) by qsd-dan (West)        
I'm thinking of possibly using a very hard epoxy

qsd-dan's profile picture
JB Weld may work. It'll probably be a little time consuming to get a concentrically smooth surface, but I'm willing to bet it's very much possible.

Post# 336934 , Reply# 34   3/22/2009 at 19:32 (5,506 days old) by autowasherfreak ()        

Wow, it looks great! What did you use to clean the dial with?

Post# 336936 , Reply# 35   3/22/2009 at 19:42 (5,506 days old) by swestoyz (Cedar Falls, IA)        

swestoyz's profile picture
Are you using a new stem seal?

BTW - your resto efforts are amazing. You took this project and ran with it - congrats!


Post# 336938 , Reply# 36   3/22/2009 at 19:52 (5,506 days old) by ttuee2006 ()        
Stem Seal...

Yes, it has a brand new stem seal in it. New seals all around, new spin bearing, etc.

I went and looked at work and we've got some 5 ton 2-part epoxy for metal. I think that may be just what the doctor ordered, slather it on, let it set, smooth it off, and I think I may be back in business!

Timer Dial:
The lettering on the timer dial on this model is recessed in the plastic. The original paint was very crumbly and LITERALLY came out when hit with water. It was in terrible shape anyway. I cleaned it all off and rubbed it down with alcohol to get rid of any oily residue (the whole washer was NASTY with fabric softener) and then painted the lettering with gloss white model car enamel. I used a tiny paintbrush and took care to not go outside the lines. What did go out was sanded very carefully off with 1200 grit sandpaper. Well you see the results......it looks brand new. Better than new actually since it's glossy paint instead of the original flat!

Took and Ran:
Well I like a challenge. I do fix up vacuums as well (see my link below for a Hoover 105 Resto job...) and I've wanted a Maytag for a LONG time. This one came along and satisfied both wants in one place! I'll say one thing......washer restoration is neither cheap OR easy! It definitely gives you a new respect for the machines you see on this site that are so amazingly well restored! This one turned out nice (especially for my lack of skill), but it's nowhere NEAR some of the ones I've seen on here!


CLICK HERE TO GO TO ttuee2006's LINK


Post# 336939 , Reply# 37   3/22/2009 at 19:59 (5,506 days old) by ttuee2006 ()        
More Pix

Here's some more pix from the restoration process...

This one is of the right side before it was repainted.....what a wreck!


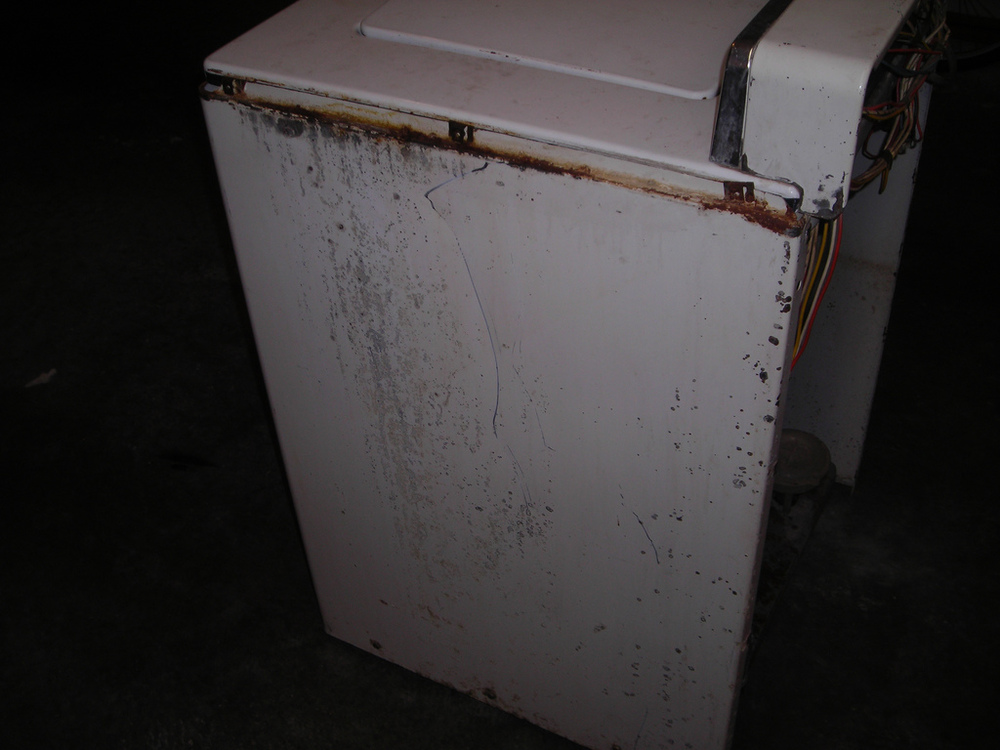
Post# 336940 , Reply# 38   3/22/2009 at 20:00 (5,506 days old) by ttuee2006 ()        
Left Side before Repainting...

The left side before being repainted...

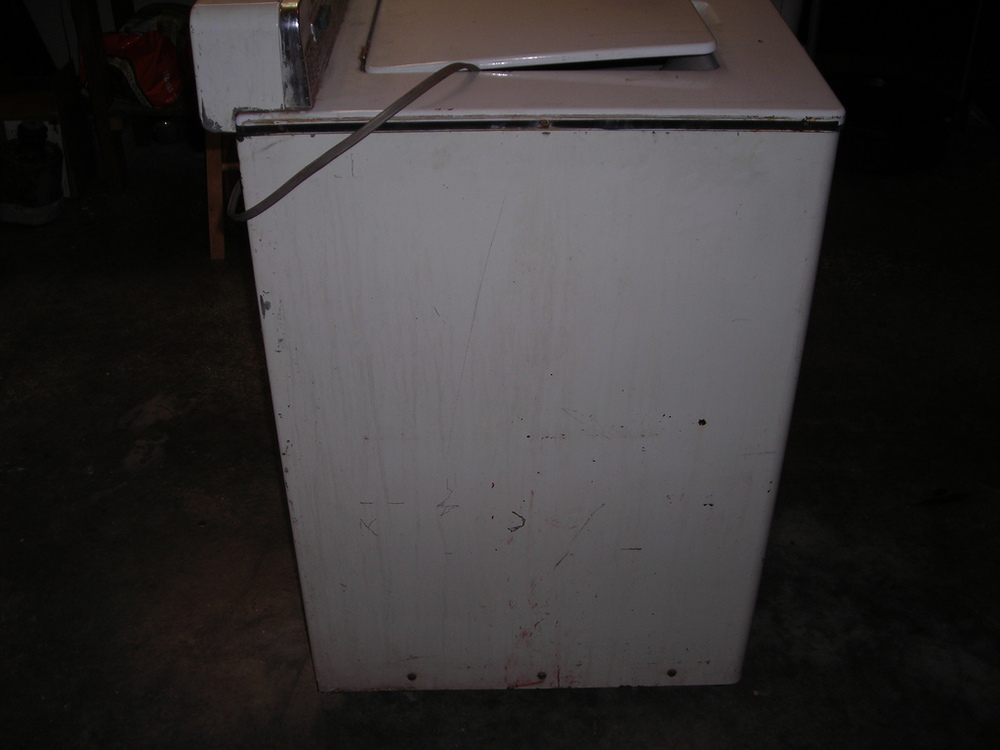
Post# 336941 , Reply# 39   3/22/2009 at 20:01 (5,506 days old) by ttuee2006 ()        
Front Before Repainting

The Front before repainting...

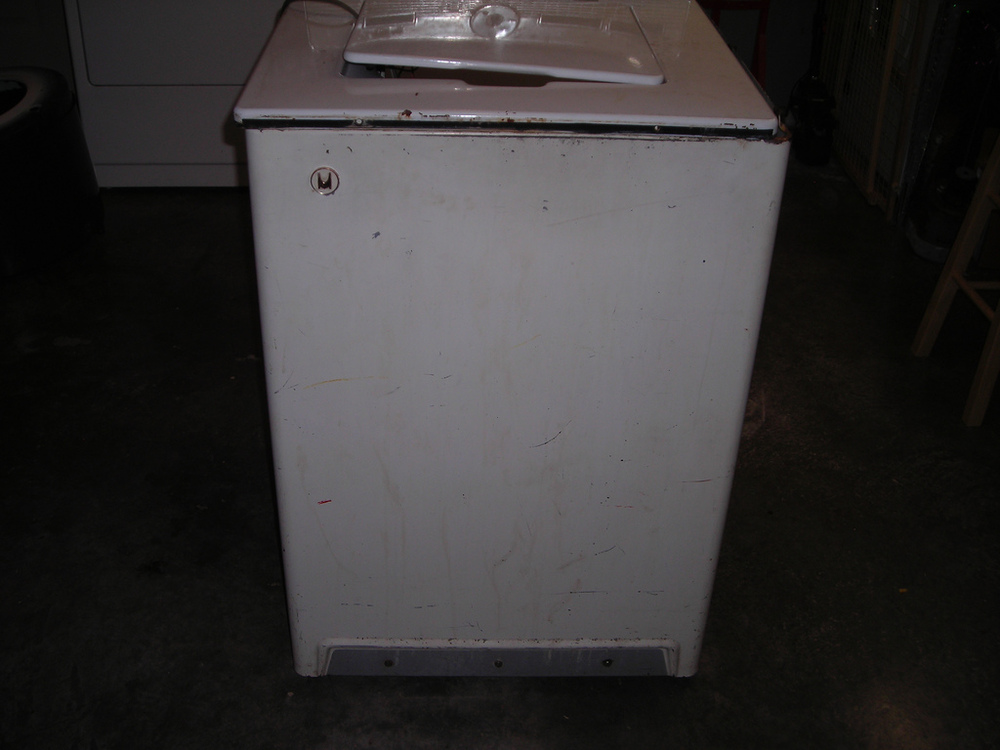
Post# 336942 , Reply# 40   3/22/2009 at 20:02 (5,506 days old) by ttuee2006 ()        
Front after painting

Shot of the front after it was painted...

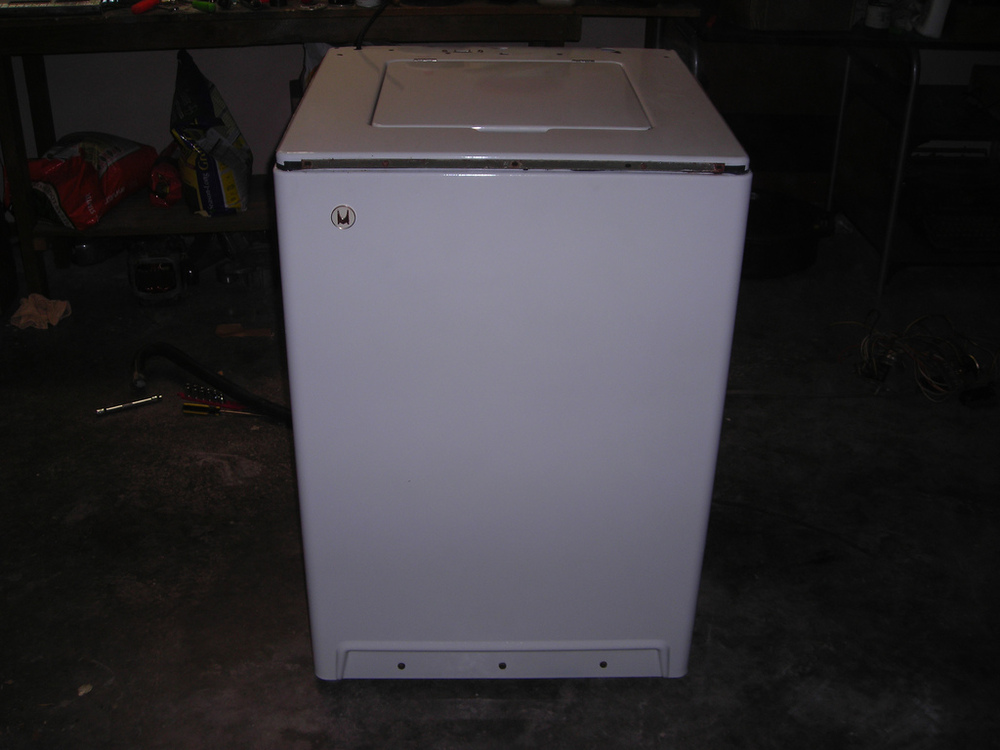
Post# 336944 , Reply# 41   3/22/2009 at 20:03 (5,506 days old) by ttuee2006 ()        
Basepan Painted

Stripped the base pan down to bare metal and repainted with 2 coats of "rusty metal" Rustoleum...


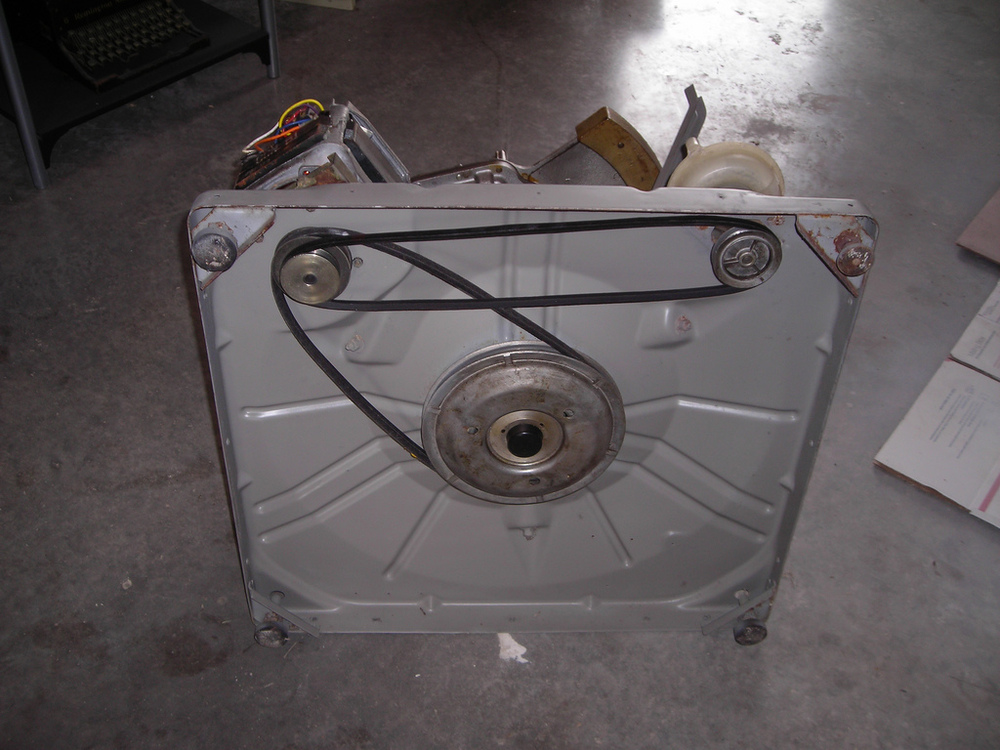
Post# 336945 , Reply# 42   3/22/2009 at 20:04 (5,506 days old) by ttuee2006 ()        

Base Pan #2


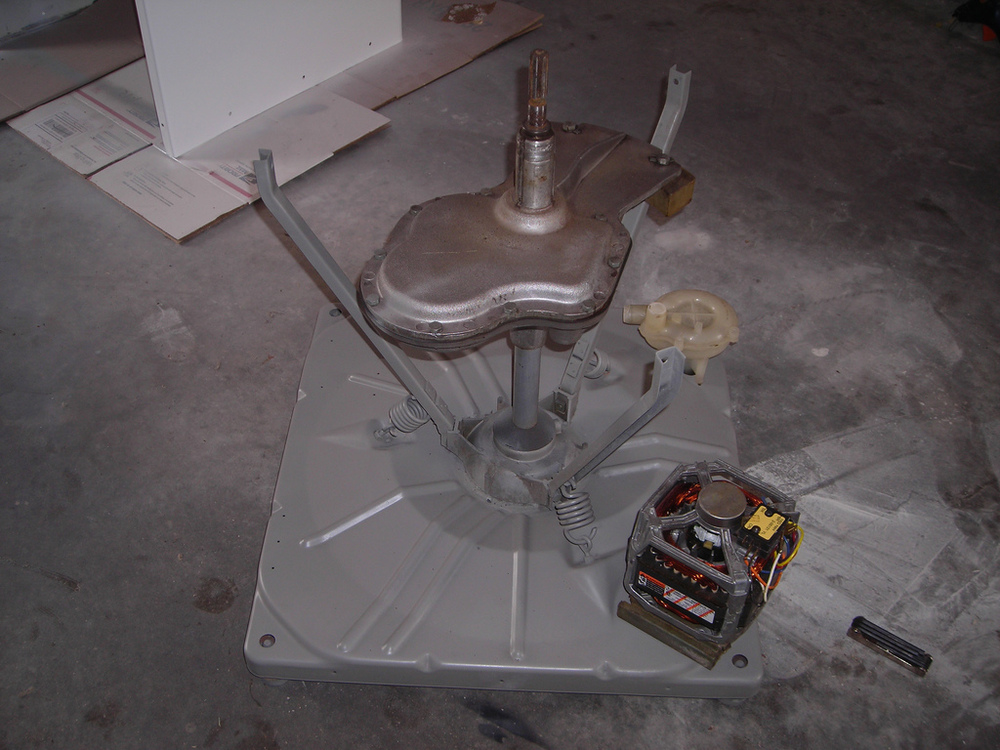
Post# 336946 , Reply# 43   3/22/2009 at 20:05 (5,506 days old) by ttuee2006 ()        
Tub remounted

Tub remounted on the base pan. New seals, spin bearing, and tub to pump hose.

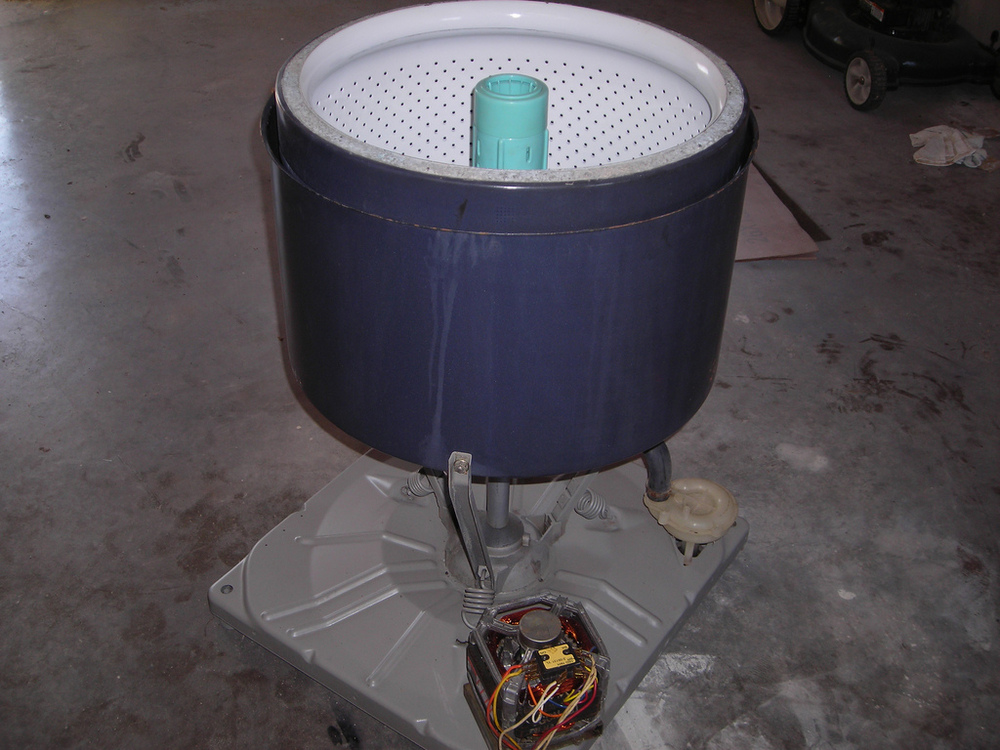
Post# 336947 , Reply# 44   3/22/2009 at 20:06 (5,506 days old) by ttuee2006 ()        
Back in the Cabinet

Cabinet remounted on base. New fill valve installed.

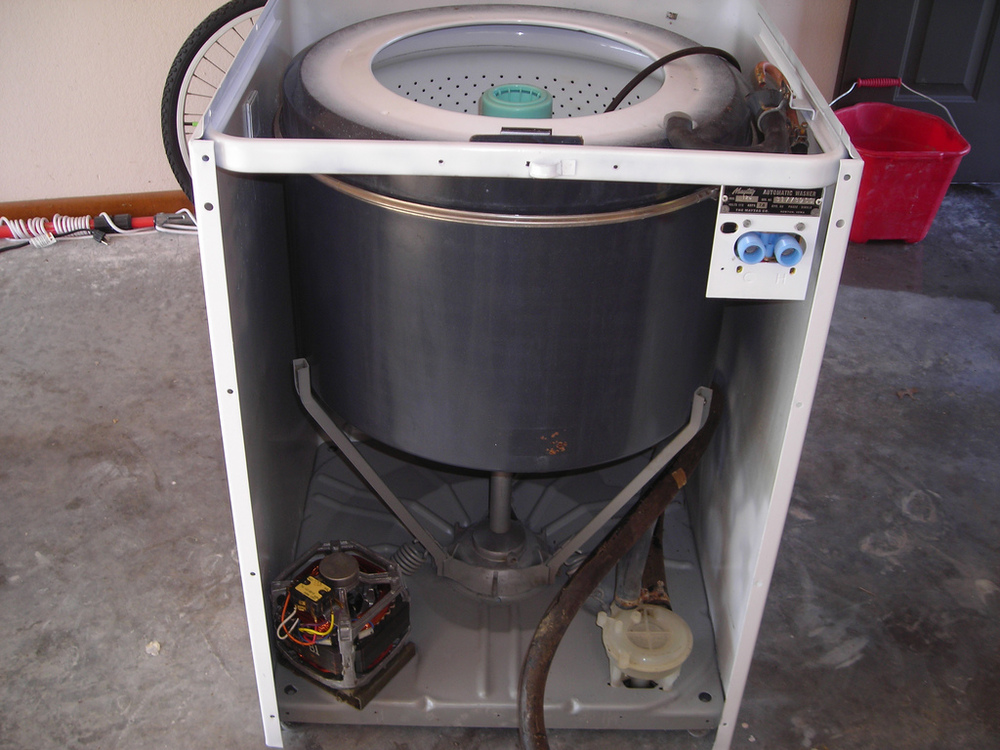
Post# 336948 , Reply# 45   3/22/2009 at 20:07 (5,506 days old) by ttuee2006 ()        
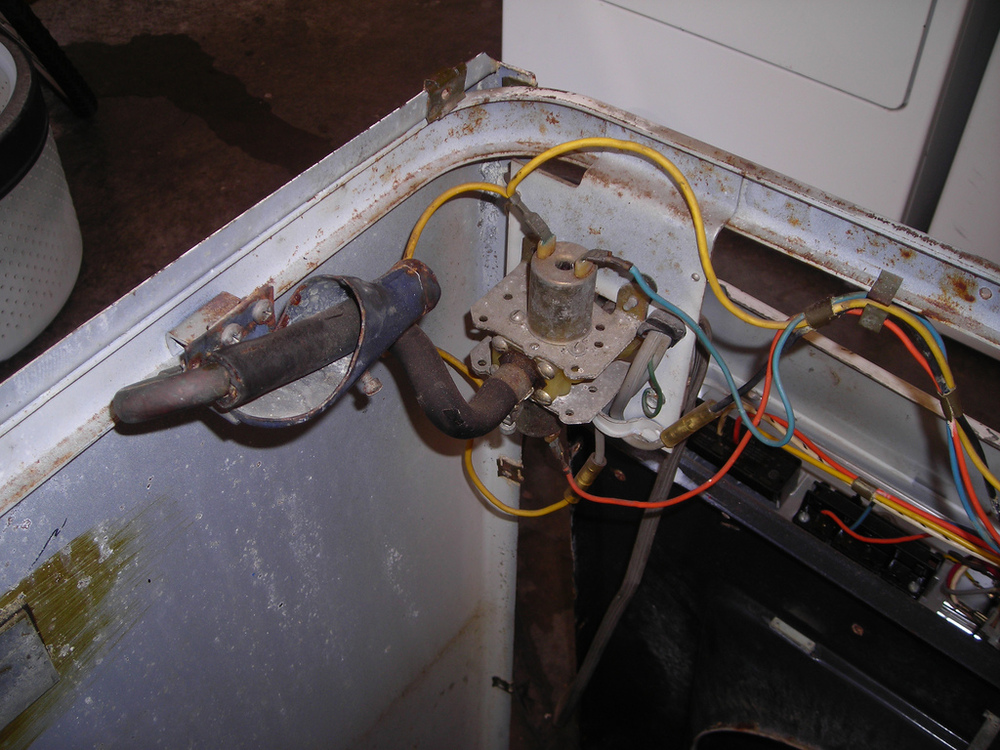
Plumbing remounted...

Plumbing all cleaned up and remounted...

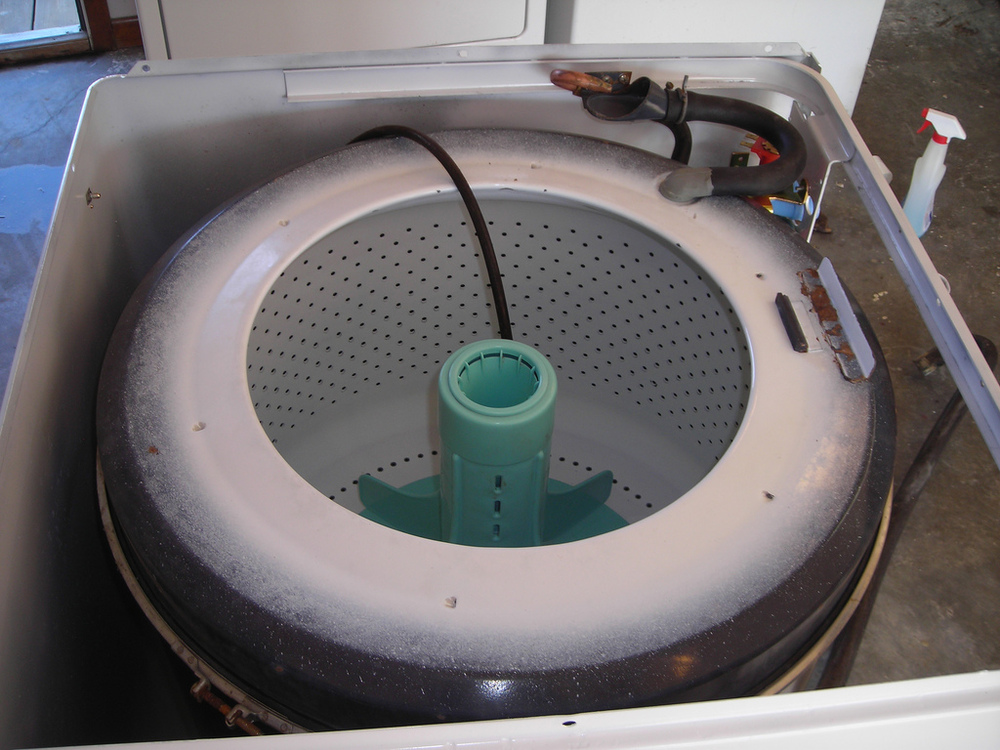
Post# 336949 , Reply# 46   3/22/2009 at 20:08 (5,506 days old) by ttuee2006 ()        
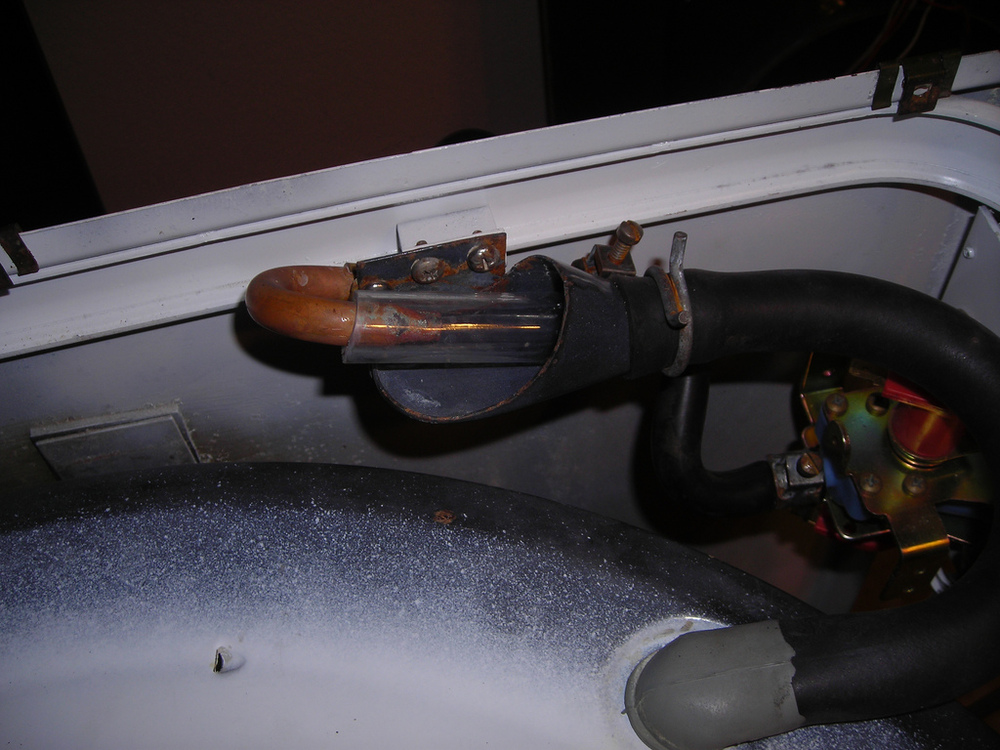
A better view of that air gap

Siphon break!


Post# 336950 , Reply# 47   3/22/2009 at 20:09 (5,506 days old) by ttuee2006 ()        
View from the top

First picture taken with the cover back on. Too bad the original bakelite agitator is long gone. Top is porcelain coated, so it was just cleaned up as best as possible. It's scratched a bit, but nothing horrible, so I figured leave well enough alone...


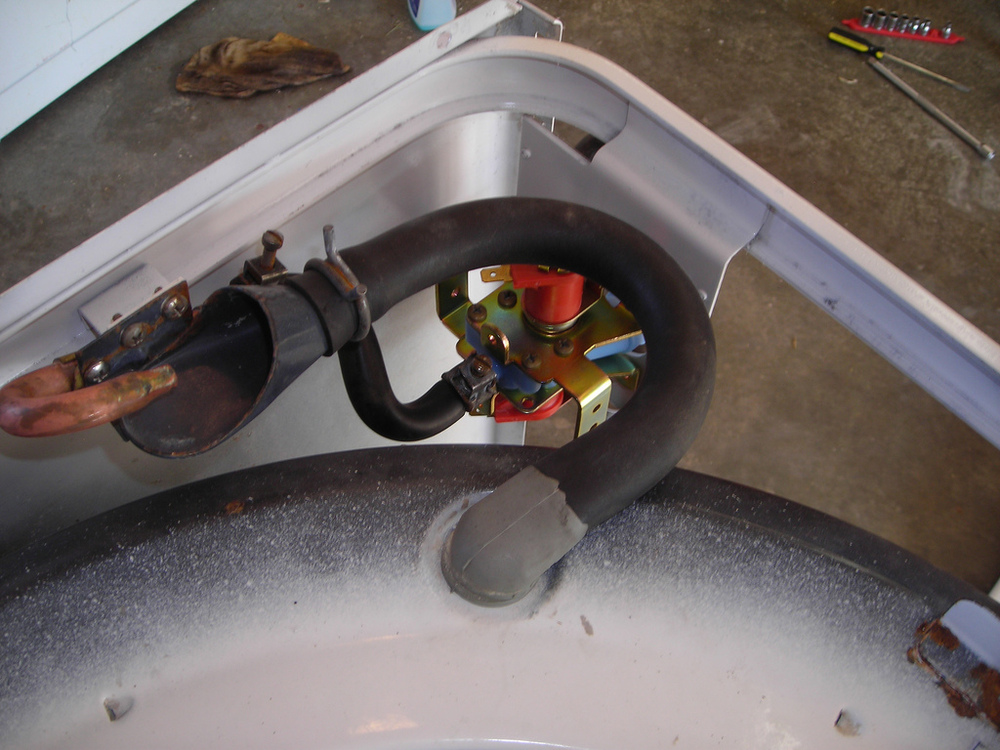
Post# 336951 , Reply# 48   3/22/2009 at 20:18 (5,506 days old) by swestoyz (Cedar Falls, IA)        
Agi shaft -

swestoyz's profile picture
If your attempts with epoxy fall short, you could always opt for a parts machine. More than likely you can find a 70's or 80's BOL 'Tag near by for cheep or nearly free. I can't say I've seen them by the thousands, but I haven't seen these get this bad on later machines (probably due to the non-splined Power Fins.)

The machine came out stunning!

Ben


Post# 336953 , Reply# 49   3/22/2009 at 20:27 (5,506 days old) by qsd-dan (West)        
Scratch removal

qsd-dan's profile picture
Try aggressively(!) rubbing some medium grade rubbing compound on the scratched areas of the porcelain (don't do this on the cabinet, you'll wear through the paint). I was able to make some deep scratches (deeper than yours) disappear on the porcelain top of my A806 using this procedure.

Post# 337005 , Reply# 50   3/23/2009 at 07:20 (5,505 days old) by countryguy (Astorville, ON, Canada)        

countryguy's profile picture
Wow, that is the same washer we had when I was growing up. I remember the day (around 1967 I think) we got it, actually it was in the evening and my mom, dad and I were down in the basement watching it work for the first time! Prior to that my mom had a wringer washer (don't know what brand it was). I do remember it had a black agitator and the lint catcher was chrome with the black cup on the top and the black rubber band on the bottom. My mom used that washer up until the day she died in 2001. I don't remember it ever needing a repair other than a new belt.

Gary


Post# 337971 , Reply# 51   3/26/2009 at 21:01 (5,502 days old) by ttuee2006 ()        
HOLY CRAP!!!!!

I FIXED THE SHAFT!!!!!! IT WORKS! IT WORKS!!!!! I'M STILL PINCHING MYSELF!!!!!

Videos and an explanation to follow shortly!


Post# 338022 , Reply# 52   3/26/2009 at 23:19 (5,502 days old) by ttuee2006 ()        
The Video

Very first video showing it running with NO LEAKS!

CLICK HERE TO GO TO ttuee2006's LINK


Post# 338023 , Reply# 53   3/26/2009 at 23:25 (5,502 days old) by ttuee2006 ()        
How I fixed the Shaft

So I fixed the shaft with many, many coats of cold-galvanizing compound. I'd spray a coat, let it cure, then sand it off. The result is that the small holes and imperfections towards the top of the shaft were filled in with zinc. Below is a picture of the shaft when it was still in the process of being fixed, but you can see how many of the holes have been filled already at this point. The finished product was a smooth shaft until the very bottom. There was a little bit of pitting at the lower end of the shaft, but the seal didn't ride there.....so I didn't bother filling those in!


As an added bonus.......I NEVER have to worry about that shaft rusting ever again!


Post# 338024 , Reply# 54   3/26/2009 at 23:28 (5,502 days old) by ttuee2006 ()        
The Fill Flume

The siphon break on this washer works fine the way it is, however it tends to spray a bit! I think that's what the original rubber hose was in there for to bypass it.

I took it a step further and bypassed the siphon break, but still allowed the air gap! Gotta love vinyl tubing...


Post# 338025 , Reply# 55   3/26/2009 at 23:29 (5,502 days old) by ttuee2006 ()        
In the Laundry Room

Taking it's place in the laundry room! (Temporarily of course...)

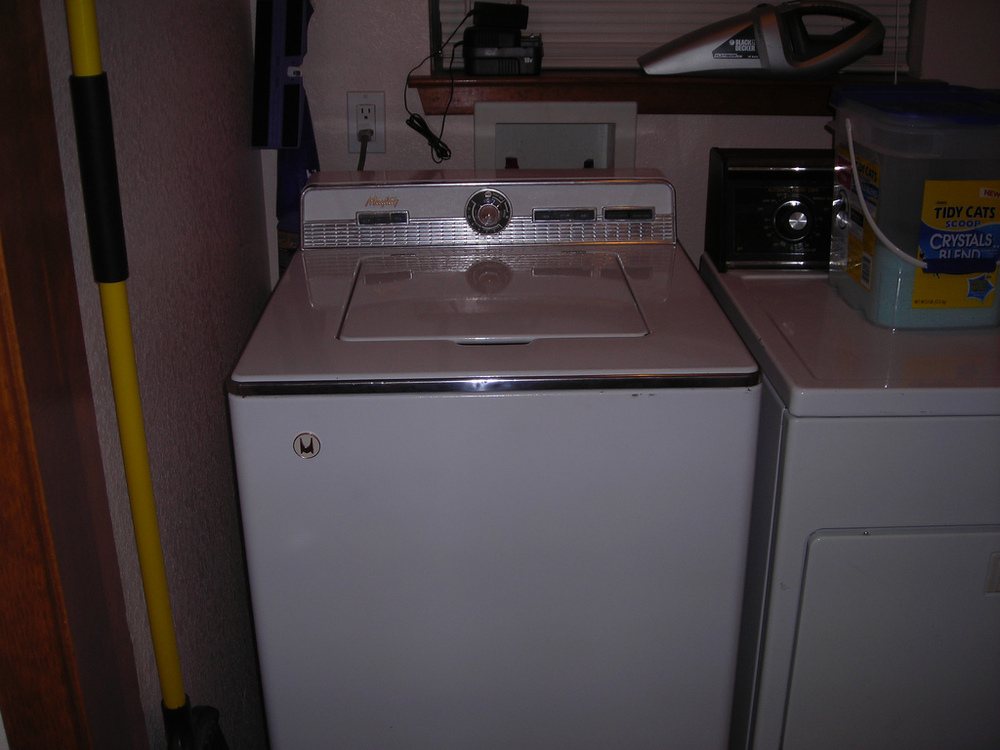
Post# 338026 , Reply# 56   3/26/2009 at 23:31 (5,502 days old) by qsd-dan (West)        
Indexing tub

qsd-dan's profile picture
Indexing tub is a maladjusted stop lug, worn brake package (weak internal spring), or the trans fluid is too thick (could also be all of the above). Did you crack open the trans and change the fluid?

Post# 338028 , Reply# 57   3/26/2009 at 23:36 (5,502 days old) by swestoyz (Cedar Falls, IA)        

swestoyz's profile picture
My money is on the brake.

Still, nice job! Washer looks great.


Post# 338034 , Reply# 58   3/26/2009 at 23:41 (5,502 days old) by autowasherfreak ()        
Another Fantastic Restoration!

Wow, you did a great job on the old girl. She looks good, and sounds great!

Post# 338038 , Reply# 59   3/26/2009 at 23:48 (5,502 days old) by ttuee2006 ()        
Tranny...

I didn't change the transmission fluid. Honestly I don't know how to go about it, and I don't want to get in over my head! I'm pretty sure the transmission oil is too thick, but I don't want to screw something up trying to change it! Something for another day when I've learned how to take care of it a little better.

I also know that the spring is, in fact, a bit weak. Again......something I have no clue how to service, and I don't want to screw it up!


Post# 338041 , Reply# 60   3/26/2009 at 23:58 (5,502 days old) by ttuee2006 ()        
And of course......

The Compulsory video!

Wash.......WITH CLOTHES!


CLICK HERE TO GO TO ttuee2006's LINK


Post# 338045 , Reply# 61   3/27/2009 at 00:13 (5,502 days old) by qsd-dan (West)        
Transmission Fluid

qsd-dan's profile picture
Heh, well, changing the fluid is the easiest part of the resto. Remove bolts, crack trans open, drain fluid, pour in new fluid, reinstall trans cover with new gasket. Brake package replacement is easy too but a special tool is needed to remove and install brake package.

Post# 338226 , Reply# 62   3/27/2009 at 20:38 (5,501 days old) by ttuee2006 ()        
Tub Brake

It's definitely the tub brake. If I reach in and just hold the tub while it's agitating, the indexing stops. No force even required. I can also turn the tub backwards if I push on it, against the direction it's indexing.

Now I just have to figure out how to fix the brake......


Post# 338277 , Reply# 63   3/28/2009 at 00:36 (5,501 days old) by redcarpetdrew (Fairfield, CA)        
I may be of assistance...

redcarpetdrew's profile picture
Can you post the model/serial? I didn't see it in the above posts. I just may have access to the orig service manual or at least I should be able to find some instructions on tear down and rebuilding of the trans and the brake package repair and adjustment. I can fax them to you or whatever... QSD can attest to the large amount of older books and manuals I have access to... The brake tool is still very much available and is a small price to pay for if you and your Maytags are to stay together for a while. That is if you don't already have it...

RCD


Post# 338291 , Reply# 64   3/28/2009 at 02:17 (5,500 days old) by ttuee2006 ()        
Model & Serial

It's a Maytag Model 126. Serial # is 317739SS.

You can see a picture of the original nameplate here:

img.villagephotos.com/p/2006-1/11...

From the previous owner. I can't believe I never took a picture of the nameplate myself!

If you've got access to the brake rebuild of it, or some similar machine I'd be interested in seeing the service manual for it since I've been pretty well flying blind on it so far. I don't have access to a fax, so it would have to be emailed if you have that ability.

Thanks in advance.


Post# 339153 , Reply# 65   3/31/2009 at 20:29 (5,497 days old) by redcarpetdrew (Fairfield, CA)        
I'm working on it...

redcarpetdrew's profile picture
Between my new wringer and the other half in the hospital for a couple of days, I'm B.U.S.Y. I'll have a care package for you shortly.

RCD


Forum Index:       Other Forums:                      


Comes to the Rescue!

The Discuss-o-Mat has stopped, buzzer is sounding!!!
If you would like to reply to this thread please log-in...

Discuss-O-MAT Log-In


New Members
Click Here To Sign Up.


automaticwasher.org home
Discuss-o-Mat Forums
Vintage Brochures, Service and Owners Manuals
Fun Vintage Washer Ephemera
See It Wash!
Video Downloads
Audio Downloads
Picture of the Day
Patent of the Day
Photos of our Collections
The Old Aberdeen Farm
Vintage Service Manuals
Vintage washer/dryer/dishwasher to sell?
Technical/service questions?
Looking for Parts?
Website related questions?
Digital Millennium Copyright Act Policy
Our Privacy Policy