|
Thread Number: 22596
Homart Electric Sink Dishwasher Water Valve Repair (Documentation for Archives) |
[Down to Last] |
| Post# 353958 6/1/2009 at 18:11 (5,436 days old) by dishwashercrazy (West Peoria, IL) | ||

Preface: I�m mainly documenting the following for the automaticwasher.org Archives for future reference. Mike When I attempted to conduct the first �Wet� test of the Homart (Sears Kenmore) Electric Sink Dishwasher on Wednesday, May 20, the water valve failed to open. I had previously run the dishwasher through a successful �Dry� test on Sunday May 17 (reference 2009 Thread Number 22372). I then temporarily connected a generic G.E. water valve to this dishwasher and was successful in conducting a �Wet� test. However, I still had a nonfunctioning water valve. And keep in mind, I don�t know the first thing about water valves. First I tried to discern whether of not I was getting magnetism when the solenoid was energized. I was fairly confident that I was, but after removing and replacing the solenoid from over the valve shaft, there was no change. Next, I partially disassembled the valve, first starting with the chamber containing the mesh water filter strainer. Although there was some rust and foreign material present, after I cleaned this area up and reassembled the valve, I still wasn�t getting any water through the valve. I removed the nut and copper tube on the �outlet� side of the valve, but this area was clean and contained no moving parts. I removed the 90 degree elbow on the �inlet� side of the valve, but this part of the chamber contained no moving parts as well. Then I again removed the solenoid, and this time removed the 4 small screws holding the needle valve itself. I was perplexed to find no spring present, but only an extra weight behind the needle valve. At this point, looked and found a diagram of the early Hobart KitchenAid dishwasher water and drain valves, and a diagram of the early D&M dishwasher water valves � all of these diagrams show a spring behind the needle valve. What the f__k? Did somebody else try to troubleshoot this valve, and forget to put the spring back in? Several attempts to reassembly the valve and solenoid, did eventually result in a very little water passing through the valve. Perhaps some of the rinsing and blowing through the chamber had loosened something up, but I still didn�t know why the valve wasn�t working. I called my brother and ended up taking the water valve over for him to look at. We definitely confirmed that there was sufficient magnetism in the solenoid. We again dissembled the needled valve assembly. And determined that the rubber boot was somehow or other not moving properly. At first we thought that the rubber boot slid on a shaft in the valve, but it was stuck. We tried to gently pry the boot out of the impression that it was sitting in. I was so afraid that we would damage the rubber boot. So I brought the valve back home to work on it more delicately. I ran the boot under warm water, and gently lifted the edge of the boot with a small screwdriver. I kept re-warming the boot, and continuing to gently lifting until it popped off, revealing a small metal pilot, molded to the boot, which fits into a hole in the valve � it had slightly rusted in place. After gently cleaning up the boot, and scrubbing the rust inside the pilot hole, the pilot on the boot easily slipped in and out of the pilot hole. The mystery had finally been solved. I reassembled the boot, and the needle valve assembly, reattached the solenoid, and connected it to electricity. There was a definitely new sound that the water valve made now that the boot had been freed up. I hooked the valve to a water hose, plugged the electric cord in, and WATER FLOWED! The name stamped on the plate of the water valve is �Dole Valve Company, Chicago, U.S.A.� (see photo). The photos here and on the subsequent two replies, document the steps that I took in the above process. For more information, feel free to contact me at mikehaller@aol.com. Clockwise from top left: Overall Water Valve (the copper tube is extended with a short piece of rubber hose, which loops into the top of the inlet water air gap mounted to the side of the dishwasher tub at about the 8 o�clock position); close-up of water valve (two holes in side of valve are for bolts which secure the water valve to the left front corner of the cabinet frame); water valve slightly tilted shows the metal clip which holds the solenoid in place; Dole Valve Company identification and Patent Pending number (9/32� bolt heads). 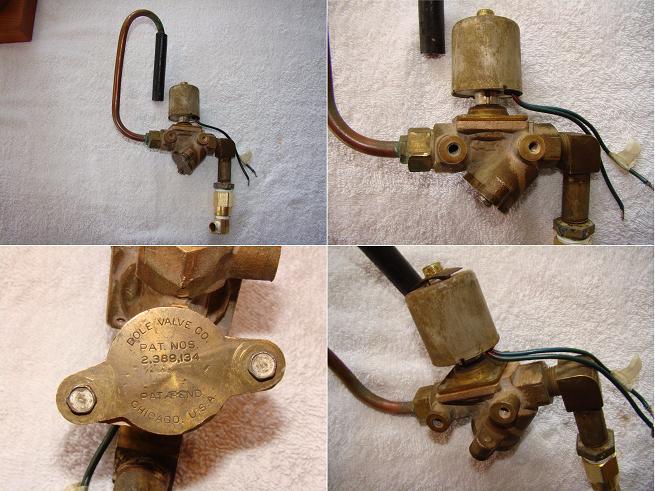
| ||

|
| Post# 353959 , Reply# 1 6/1/2009 at 18:12 (5,436 days old) by dishwashercrazy (West Peoria, IL) | ||
|
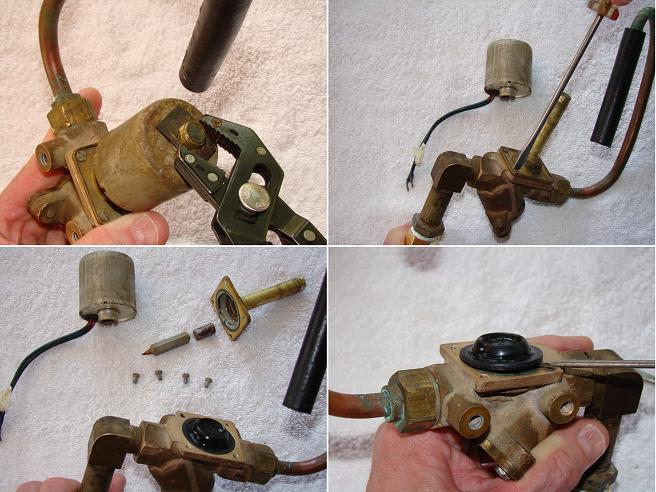
Clockwise from top left: Lift off the Solenoid retainer clip with pliers or blade screwdriver being careful not to bend the clip; with firm pressure and a perfectly sized blade screwdriver, carefully loosen the four small screws holding the needle valve assembly cover; Originally, there were lime deposits present around the boot, which were scrubbed away with Limeaway and a toothbrush - then with warm water applied periodically, I gently lifted the rubber boot from its seated position slowly moving around the perimeter of the boot, until the pilot pops out of the pilot hole; disassembled needle valve housing with parts laid out � note the extra weight which rests on top of the needle section, and boot is shown in place. When the water valve is �off� (not energized), the point of the needle rests on top of the boot, in the small hole in the center of the boot, assisted by the extra weight. In the �off� condition, pressurized inlet line water is present, and a small amount of water passes through the tiny hole in the boot to equalize water pressure on both sides of the boot, thus holding the boot firmly in the pilot hole � the closed position. When the solenoid is �on� (energized by electric current), the needle and the extra weight are drawn upwards into the shaft (which the solenoid surrounds), thus allowing the rubber boot and pilot to slide out of the pilot hole, allowing water to pass through the valve and on into the dishwasher.
| ||
| Post# 353960 , Reply# 2 6/1/2009 at 18:13 (5,436 days old) by dishwashercrazy (West Peoria, IL) | ||
|
Clockwise from top left: The rubber boot is removed from its seated position � the pilot which is molded to the rubber boot can be seen, along with the pilot hole in the valve; Removing the 9/32� bolds from the filter screen cover; Disassembled valve, screen and cover plate; the cover plate can be twisted slightly counterclockwise before lifting it off of the filter base. Care in reassembly should be taken so as not to damage the delicate filter screen. 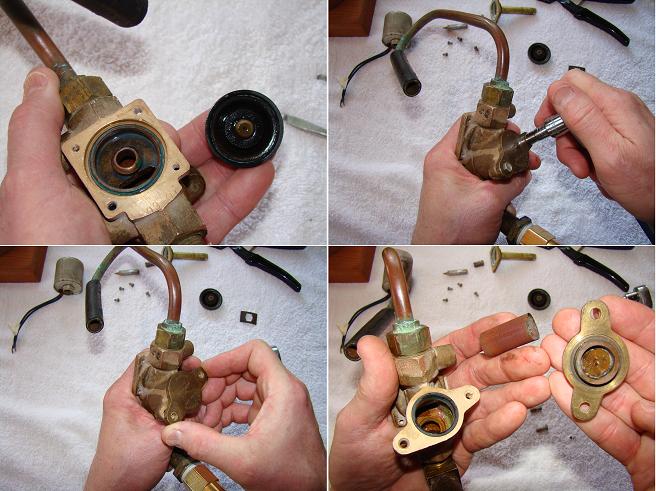
| ||
| Post# 354021 , Reply# 4 6/1/2009 at 23:02 (5,435 days old) by dishwashercrazy (West Peoria, IL) | ||
|
Will a movie be in the works?
Thanks for the comments Pete. Yes, a video is going to be made. I bought a piece of Plexiglas and had it cut to fit the opening, but it still needs to be trimmed a bit in order to fit the tub opening. I'm hoping to get over to my brother's shop so that I can use his band saw to make the rough cut and his surface grinder to smooth out the edges. And I need to buy some rubber gasket material to put around the perimeter. Then I'll be set to get started making the video. I'm planning on making a similar video to the 1948 G.E. Electric Sink Dishwasher, with edits showing the various solenoid action that happens as the cycle progresses. | ||
Post# 354088 , Reply# 6 6/2/2009 at 06:49 (5,435 days old) by turquoisedude  (.) (.) |
||
 | ||
| Forum Index: | 
| Other Forums: |

|

|

|

|

|

 Comes to the Rescue!


