|
Thread Number: 22830
Maytag Washer Model A702 - parts needed |
[Down to Last] |

|
| Post# 357214 , Reply# 1 6/15/2009 at 14:58 (5,426 days old) by qsd-dan (West) | ||
|
First of all, we need pics!! :D "It had been working hard until a couple of years ago when it started to spit oil all over the floor." That would be the famous lower o-ring seal in the transmission. It's a common issue on Maytag washers of this age. The o-ring only cost .75 cents, but you gotta tear down the entire machine, take apart the trans, remove the gearing, and then fish out the o-ring (if it's still even there). Very doable, just time consuming. You'll need new parts such as a stem seal kit, tub bearing, tub bolts, transmission gasket, tub cover seal, probably new belts and hoses, ect. I'm currently in the middle of a full restoration on my A702. "Called Maytag and they said keep using it until it does not go any more (what an answer)." That's a good way to fry the transmission! "That problem I could deal with but then the inside fill hose broke and none of the regular supply stores could locate a replacement." If it's just the rubber hose (not the metal injector), that won't be a problem to fabricate if the original isn't available. Tomorrow, I'll take a look at my microfiche slides and see what I can come up with for a replacement. I know a few sites that still carry this old stuff. The gear component of the washers dial is the timer. If it isn't working correctly, you'll need a new timer. The good news is that I was able to pick up a new timer last year for my A702. The bad news is that these old parts are QUICKLY disappearing since Whirlpool took over Maytag and most part stores are simply throwing these old parts in the trash. If you can get a hold of a new timer, DO IT NOW!!! 5 years from now, it'll be impossible to locate one. CLICK HERE TO GO TO qsd-dan's LINK | ||
| Post# 357293 , Reply# 3 6/15/2009 at 20:58 (5,426 days old) by qsd-dan (West) | ||
|
The repair clinic part you post was a timer knob for a 1989-94(?) Maytag washer. Is your problem the knob? I can scan and post the original documentation of a complete tear down and build up for this period machine. The only special tools you need are the spanner wrench and the brake tool. Spanner wrench is cheap. The brake tool is somewhat expensive (of course "expensive" is subjective to most people). Usually a good parts store will have the brake tool on hand for rental. You can usually find the spanner wrench for about $10. Here what they look like. CLICK HERE TO GO TO qsd-dan's LINK on eBay | ||
| Post# 357296 , Reply# 4 6/15/2009 at 21:06 (5,426 days old) by qsd-dan (West) | ||
|
| ||
Post# 357393 , Reply# 5 6/16/2009 at 07:45 (5,425 days old) by bajaespuma  (Connecticut) (Connecticut) |
||

There's a beautiful 702 set available here in Trumbull, CT. Maybe they'll consider splitting them up.
CLICK HERE TO GO TO bajaespuma's LINK on Newhaven Craigslist | ||
| Post# 357463 , Reply# 6 6/16/2009 at 12:20 (5,425 days old) by qsd-dan (West) | ||
|
There's a beautiful 702 set available here in Trumbull, | ||
| Post# 357467 , Reply# 7 6/16/2009 at 12:32 (5,425 days old) by qsd-dan (West) | ||
|
the inside fill hose broke | ||
| Post# 357471 , Reply# 8 6/16/2009 at 12:39 (5,425 days old) by qsd-dan (West) | ||
|
| ||
| Post# 357574 , Reply# 11 6/16/2009 at 19:18 (5,425 days old) by qsd-dan (West) | ||
|
Timer
Keep the old timer for parts such as the timer motor and escapement. These parts will be impossible to find 5 years from now. I'll scan and post the procedures Wednesday or Thursday. There were some changes made (for the better) so I'll be jumping back and forth with the scans between two different era's of manuals. | ||
| Post# 358120 , Reply# 12 6/19/2009 at 02:33 (5,422 days old) by qsd-dan (West) | ||
|
Scans | ||
| Post# 358205 , Reply# 13 6/19/2009 at 15:06 (5,422 days old) by 64maytag () | ||
|
Manuals Thanks again qsd-dan. This will be a life saver, or better put a vintage Maytag saver! | ||
| Post# 358568 , Reply# 14 6/21/2009 at 18:23 (5,420 days old) by qsd-dan (West) | ||
|
Sorry for the delay; I ended having to backup 250 gigs of info and reformat my hardrive. This will be a conglomeration of 4 different manuals. I'm going to first post the manual that is from the era of your machine. However, you'll soon find out that the info is very limited, with limited pics. I'll post info from the newer manuals as I go along. | ||
| Post# 358569 , Reply# 15 6/21/2009 at 18:25 (5,420 days old) by qsd-dan (West) | ||
|
First things first | ||
| Post# 358571 , Reply# 16 6/21/2009 at 18:44 (5,420 days old) by qsd-dan (West) | ||
|
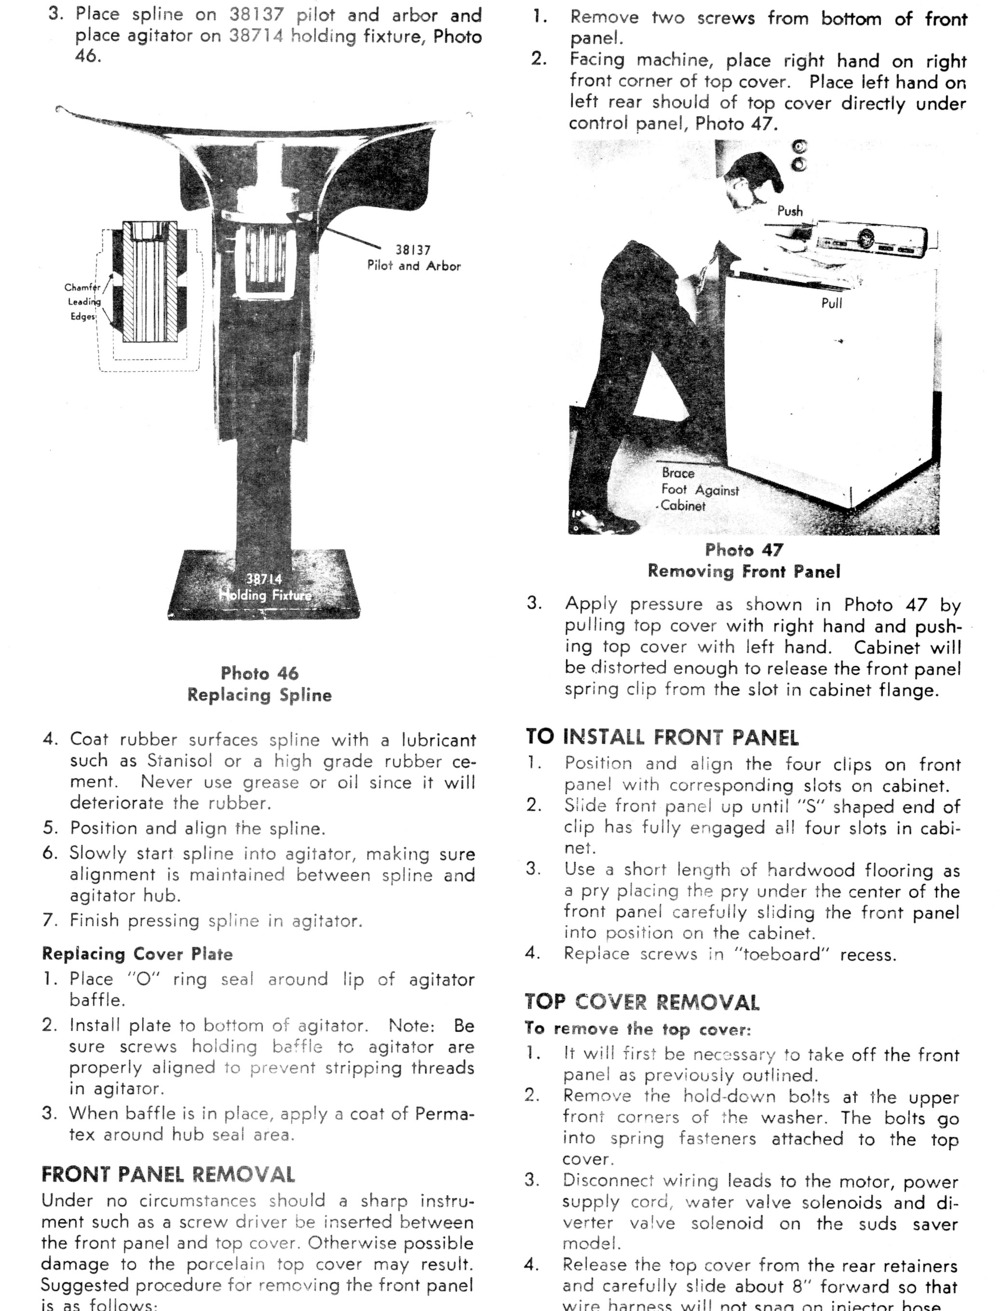
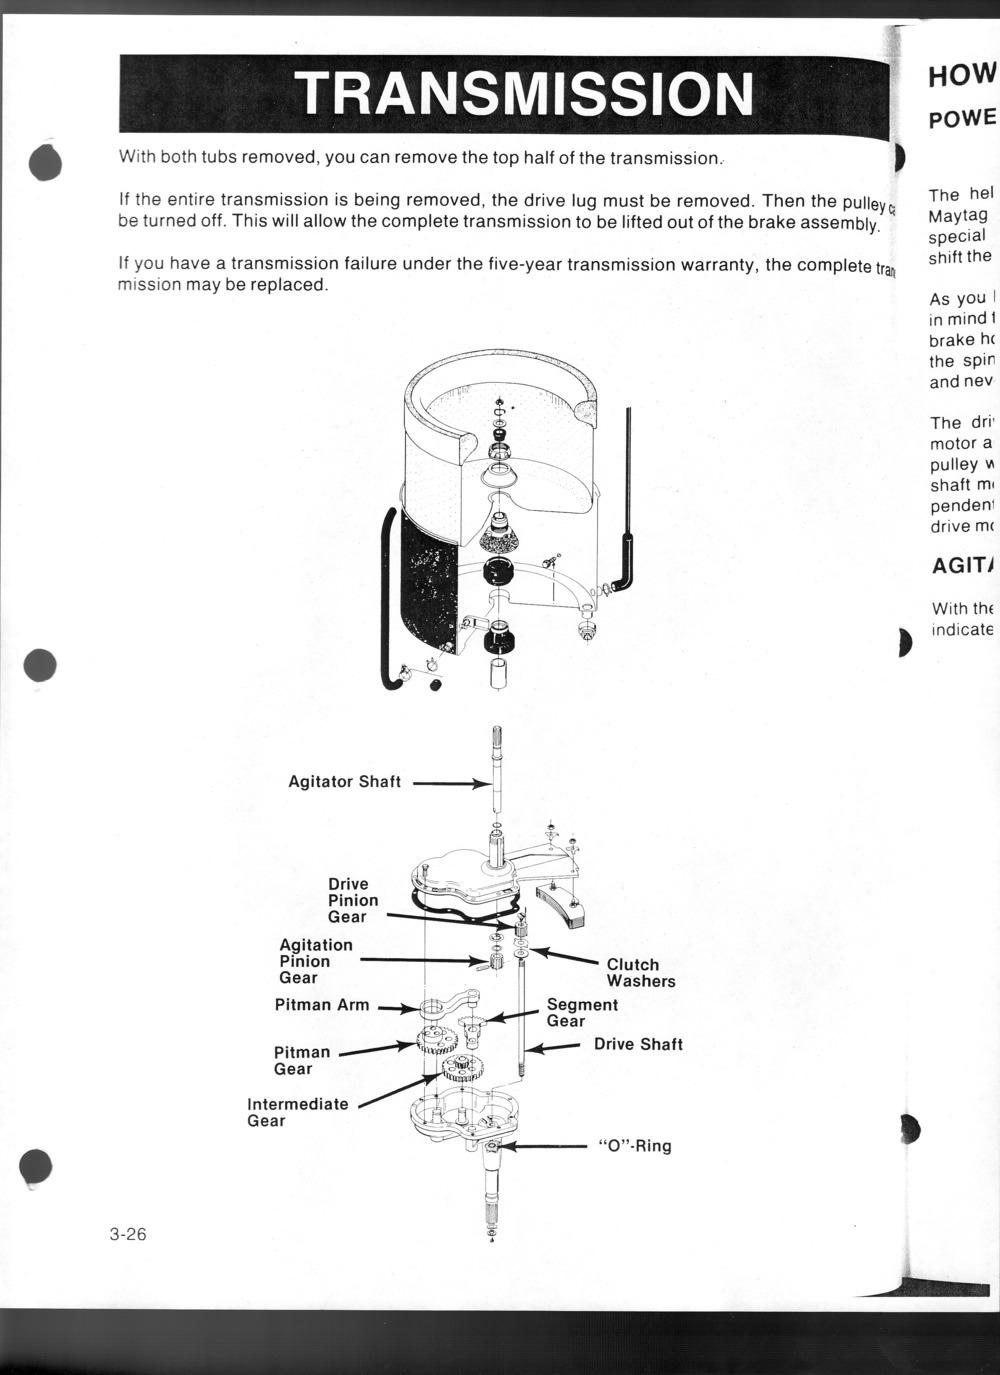
Tub Cover Removal
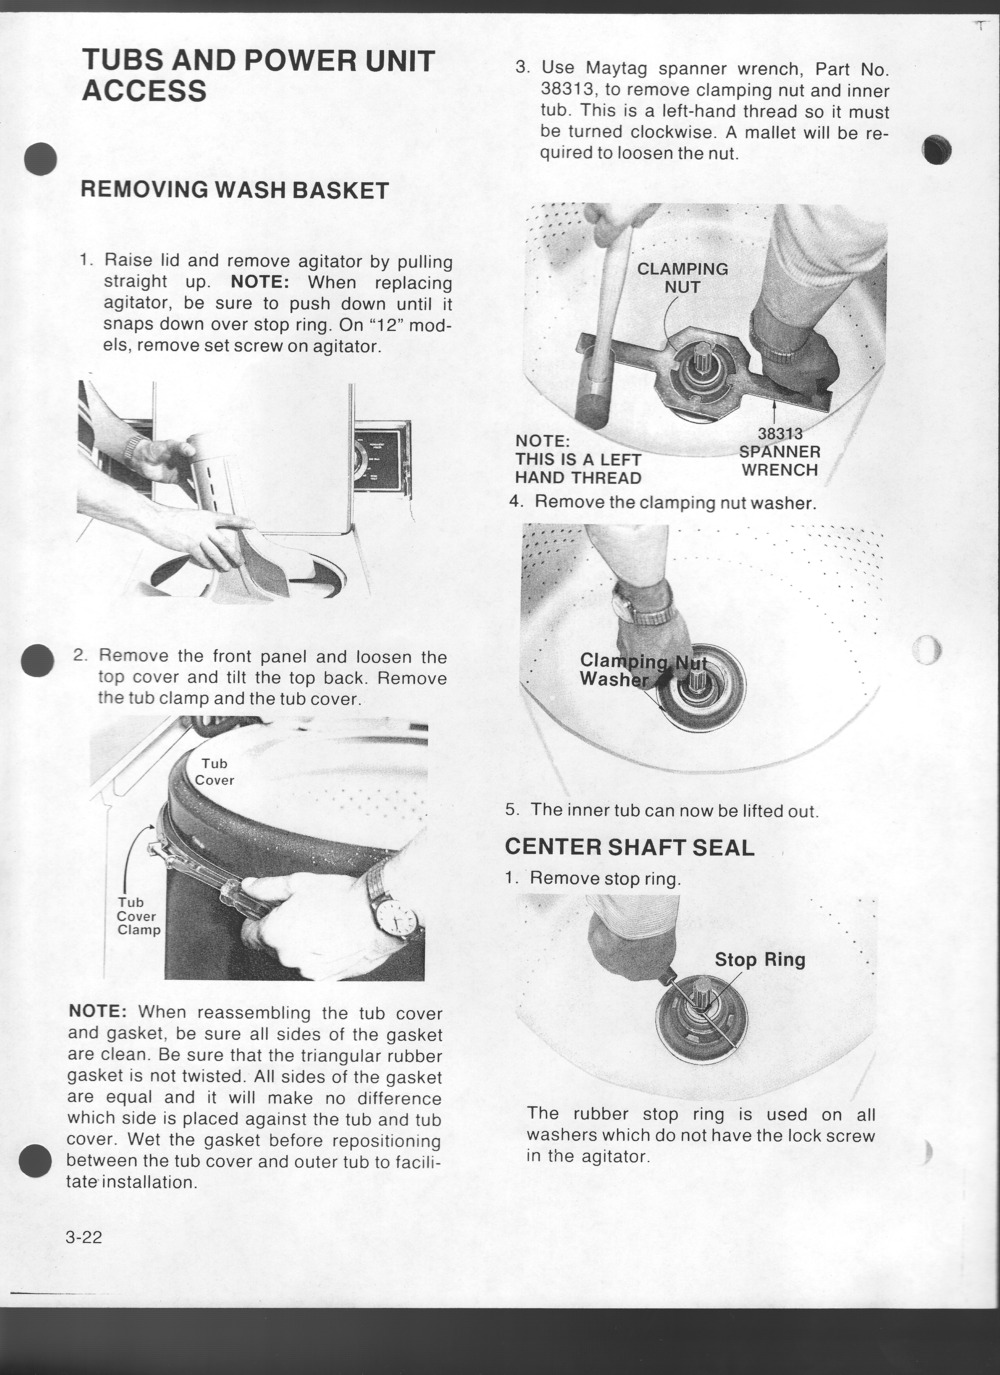
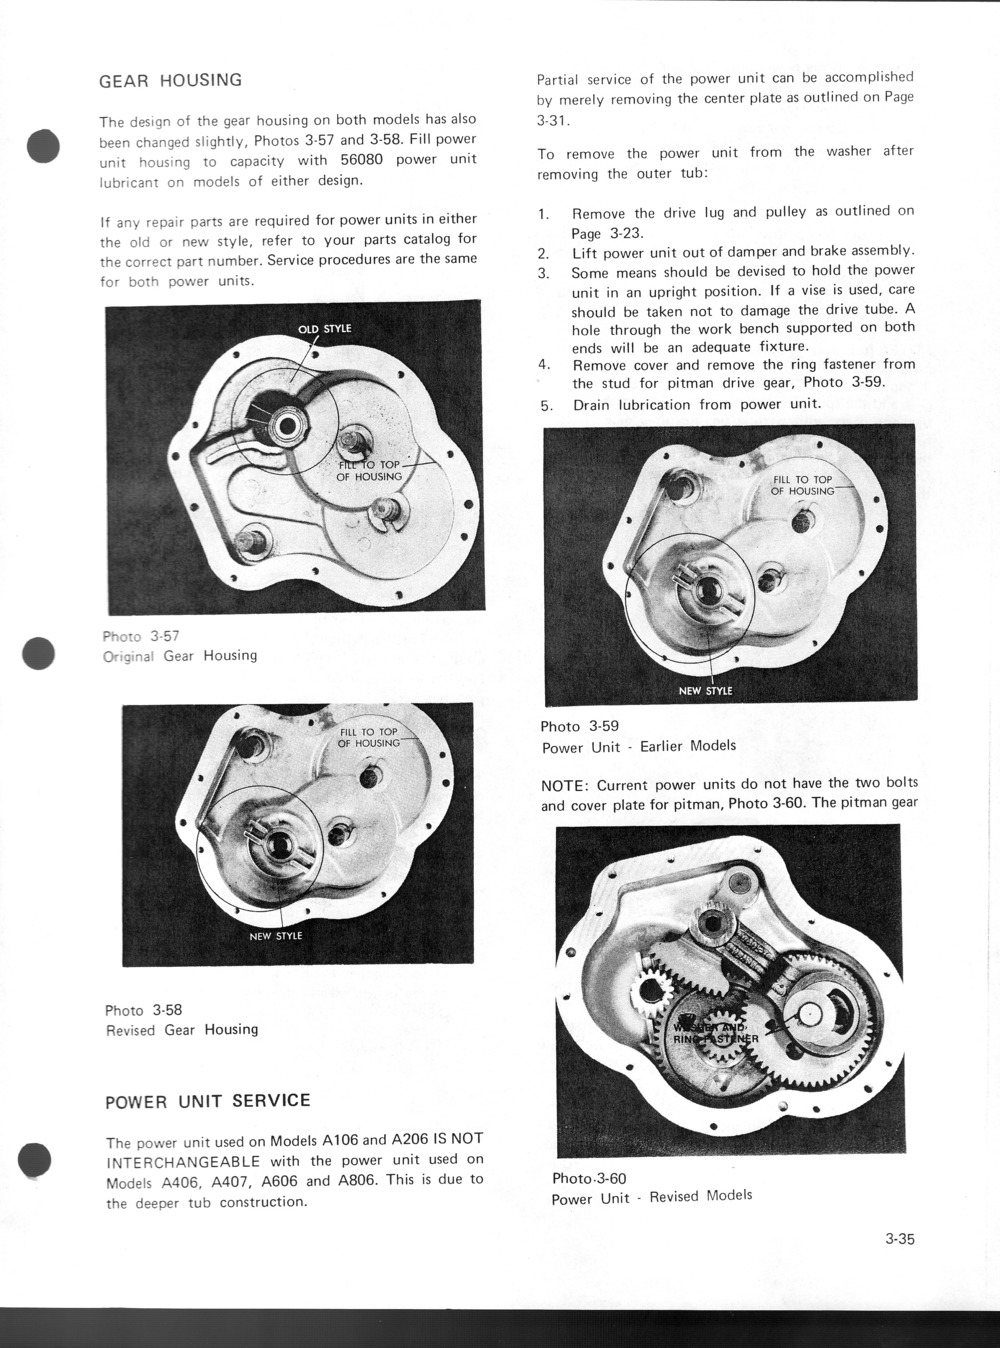
It's best to tag and remove all wires going to the motor, remove the entire water valve bolts (reinstall the screws in the holes so you don't lose them) and remove the entire top panel with the water valve and console. Remove rubber injector hose. Remove the tub cover by loosening the bolts of the metal band. You may need to soak the bolts in a penetrating fluid for a few minutes. Remove metal band and seal. Remove tub cover. Keep tabs on the tub light lens on the tub cover. They like to fall out. Those lenses are NLA!! The fun part. Remove the agitator by reach underneath pulling up. If it has never been removed, it will be a very time consuming project. The best approach is to remove the lint filter, hang the drain hose up so water can't escape the tub, and pour a big pot of boiling hot water down the middle of the agitator. Let it sit for a while, put some rubber gloves on, and keep rocking the agitator back and forth while pulling upward. It'll eventually come out. 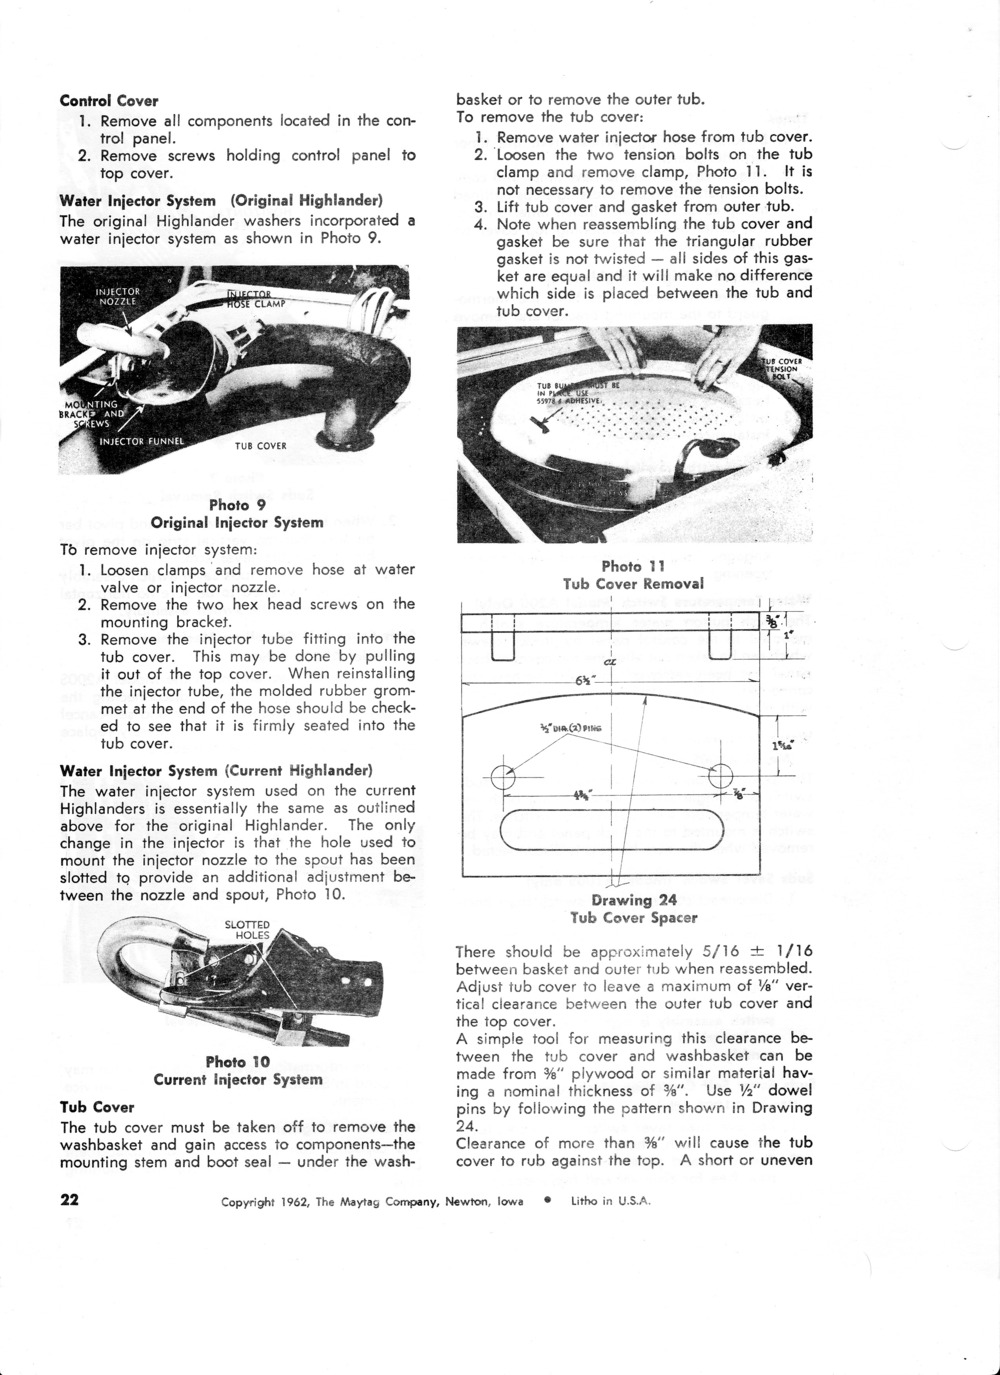
| ||
| Post# 358580 , Reply# 17 6/21/2009 at 19:15 (5,420 days old) by qsd-dan (West) | ||
|
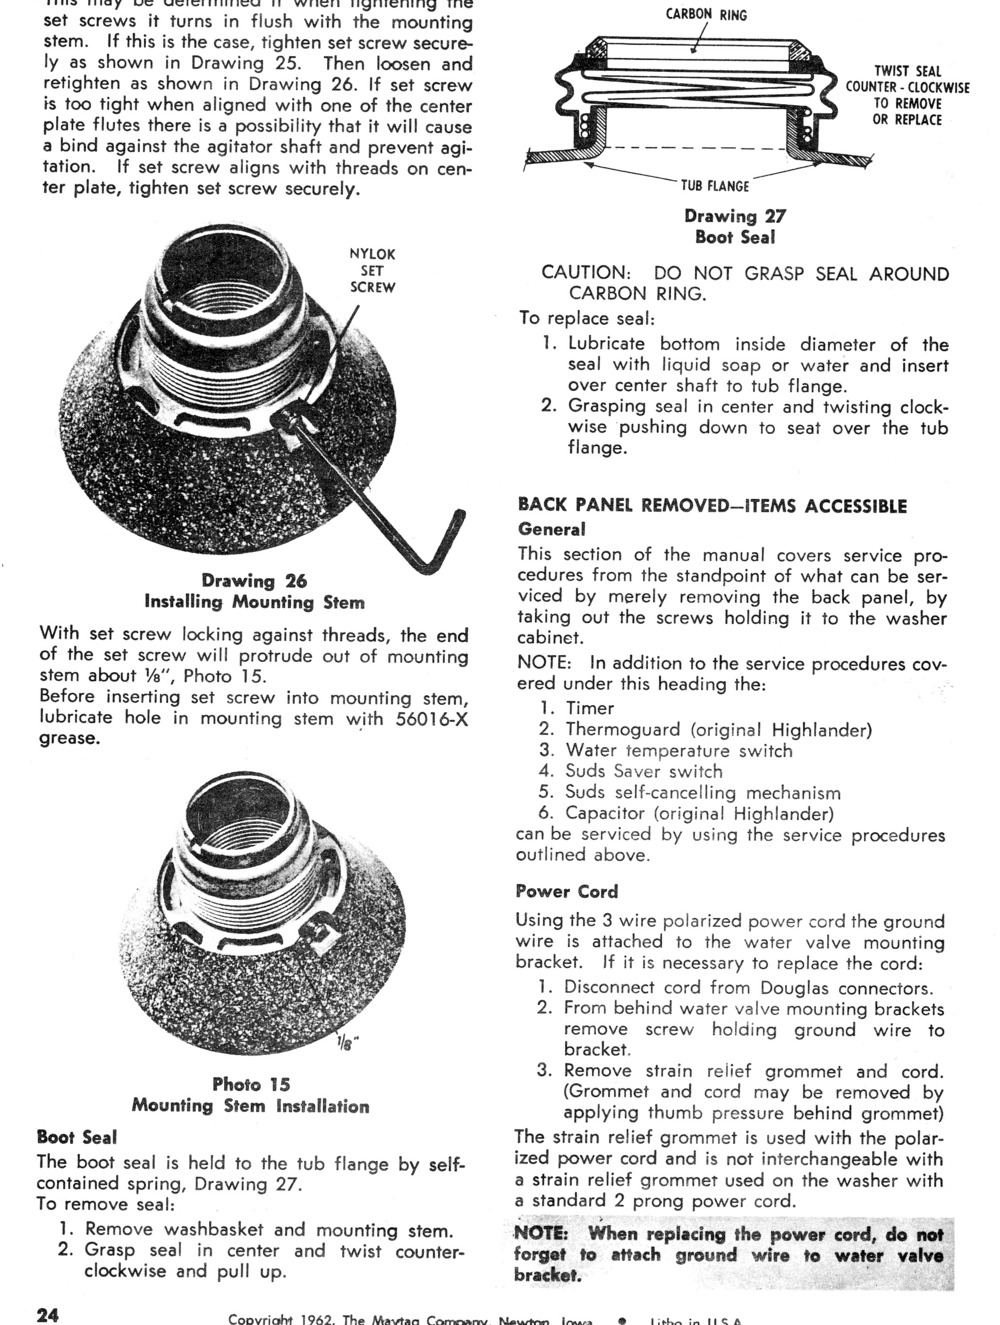
Seal Removal
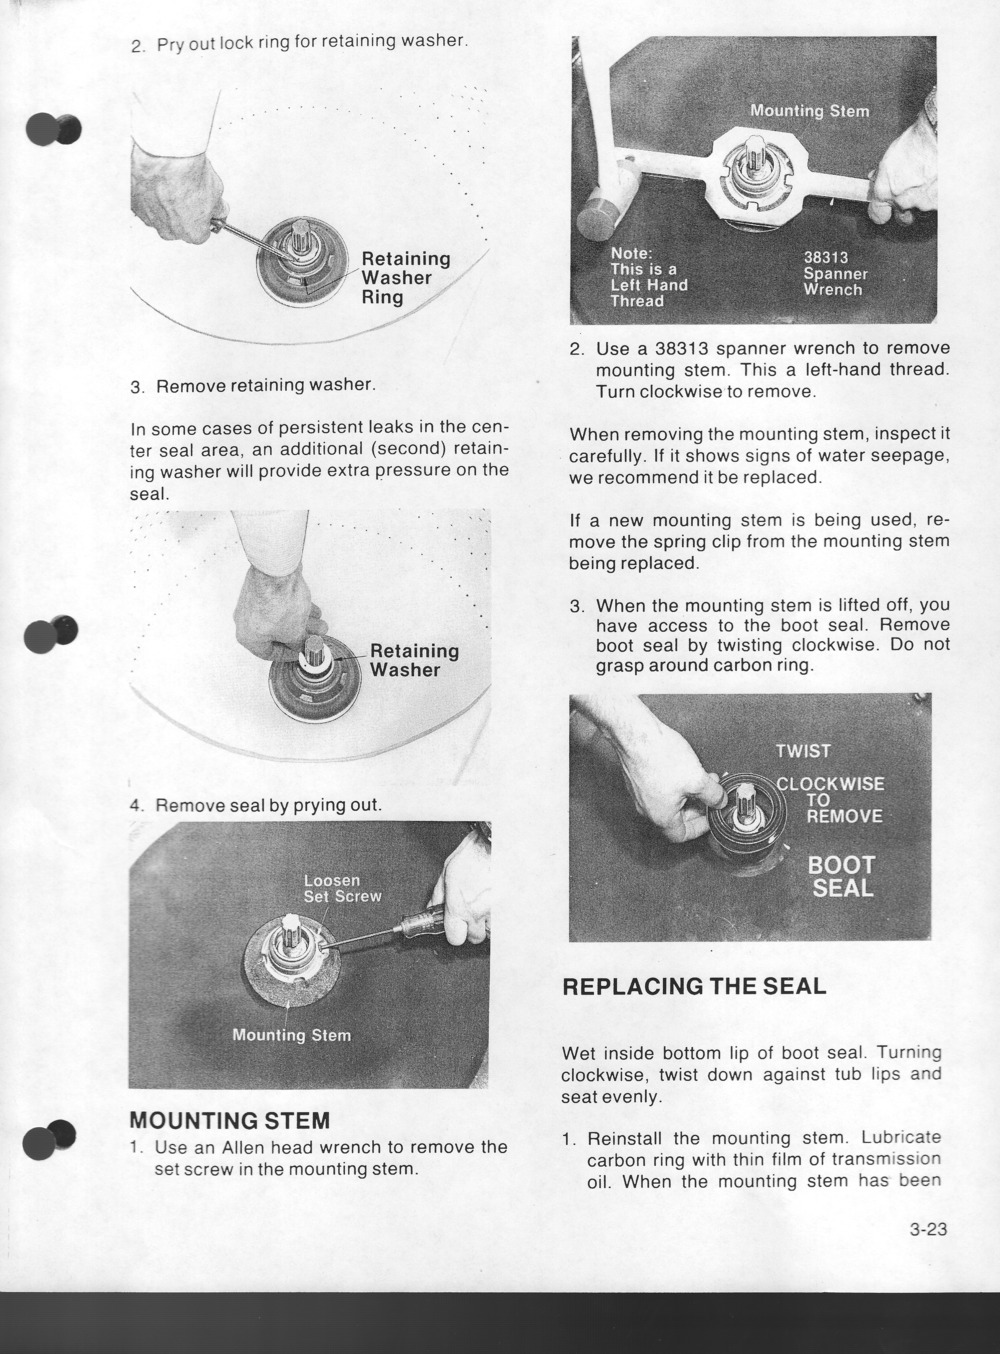
Get out the spanner wrench, line up the notches, and firmly push down to seat the wrench on the nut. Use a hammer and bang the clamping nut clockwise. Be careful not to hit the inner basket. Pack towels around the basket to prevent chipping. WARNING!! Clamping nut has left hand threads!! Remove inner wash tub. 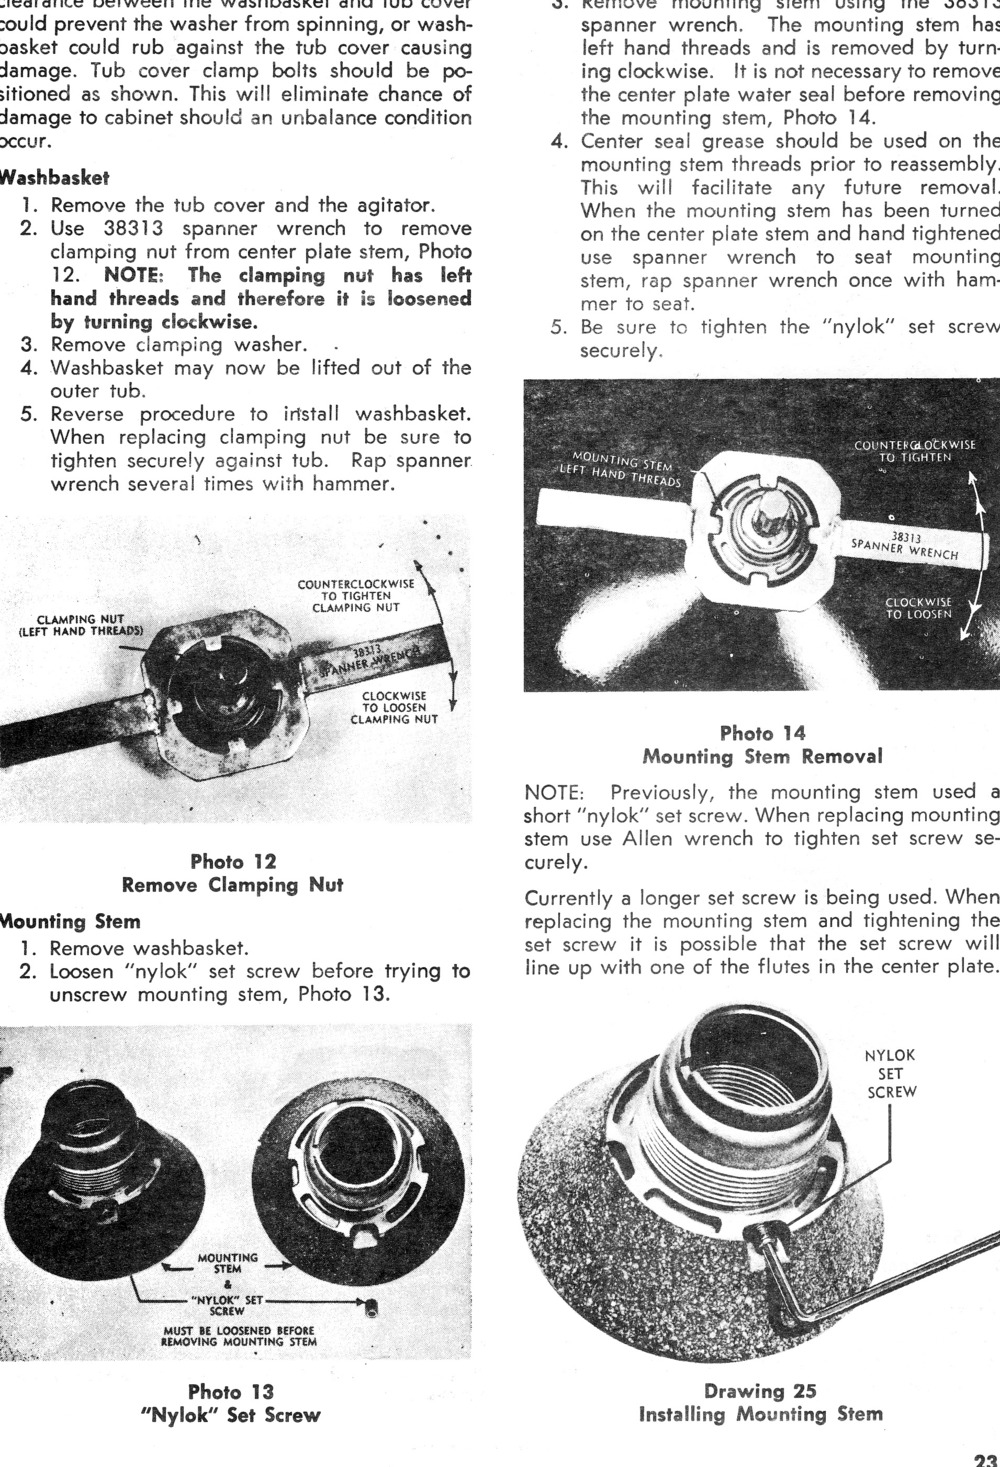
| ||
| Post# 358581 , Reply# 18 6/21/2009 at 19:18 (5,420 days old) by qsd-dan (West) | ||
|
| ||
| Post# 358584 , Reply# 19 6/21/2009 at 19:25 (5,420 days old) by qsd-dan (West) | ||
|
| ||
| Post# 358587 , Reply# 20 6/21/2009 at 19:33 (5,420 days old) by qsd-dan (West) | ||
|
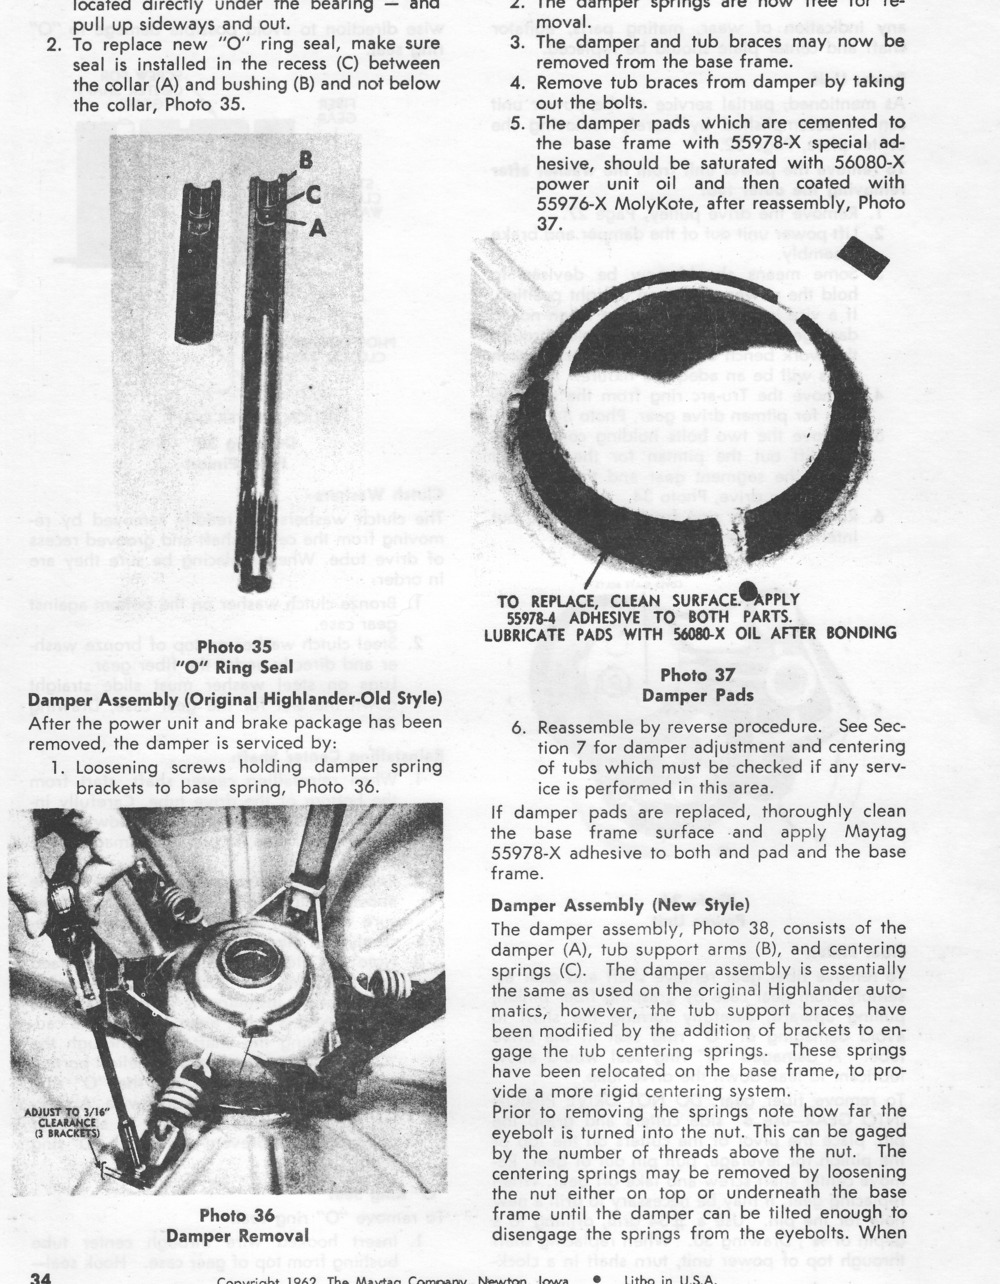
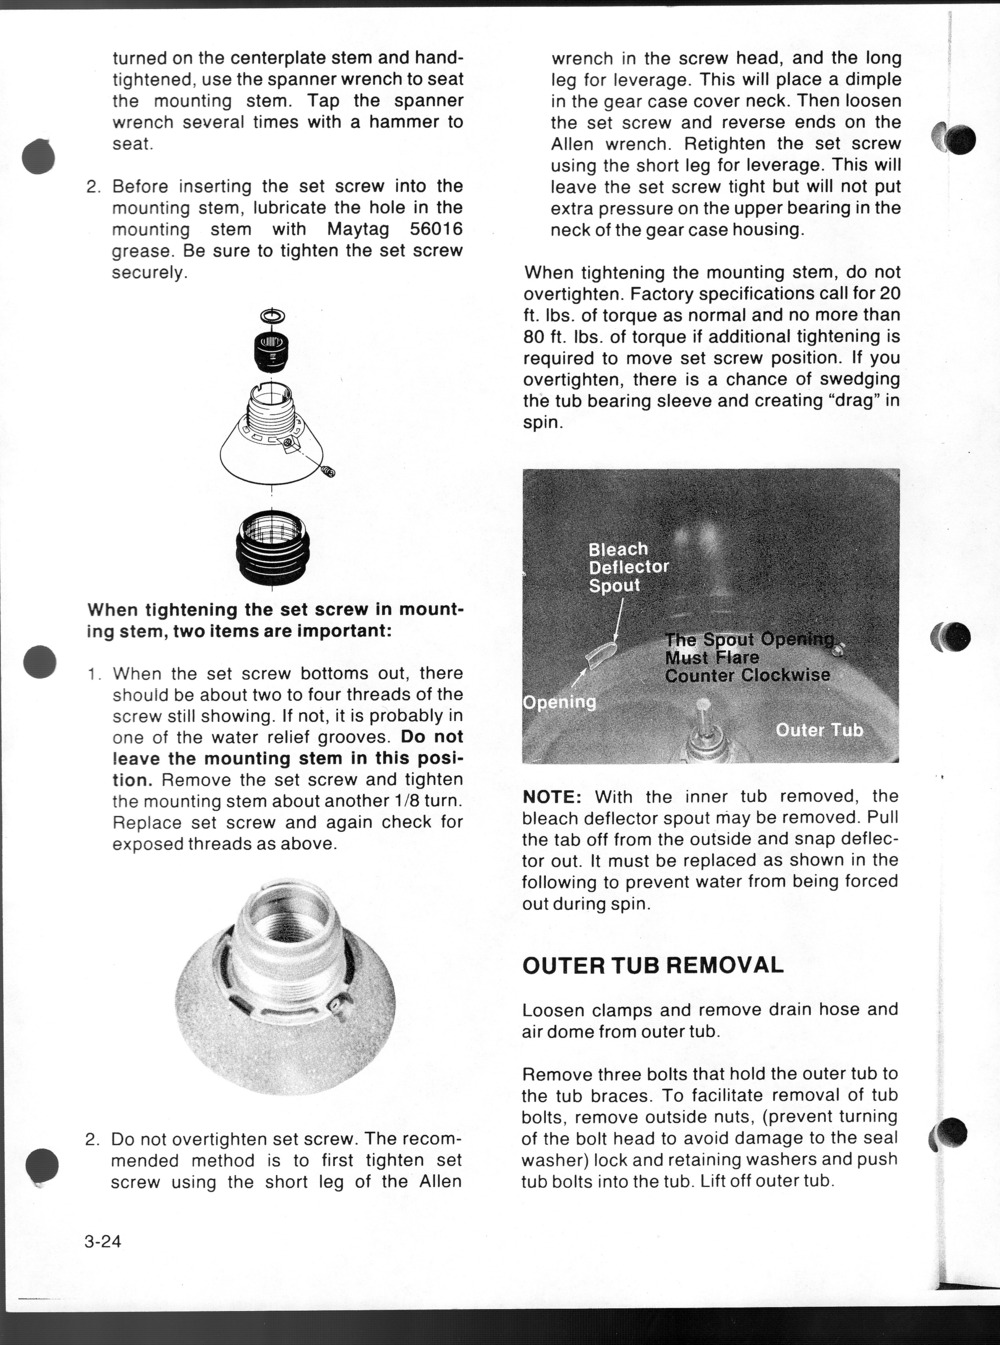
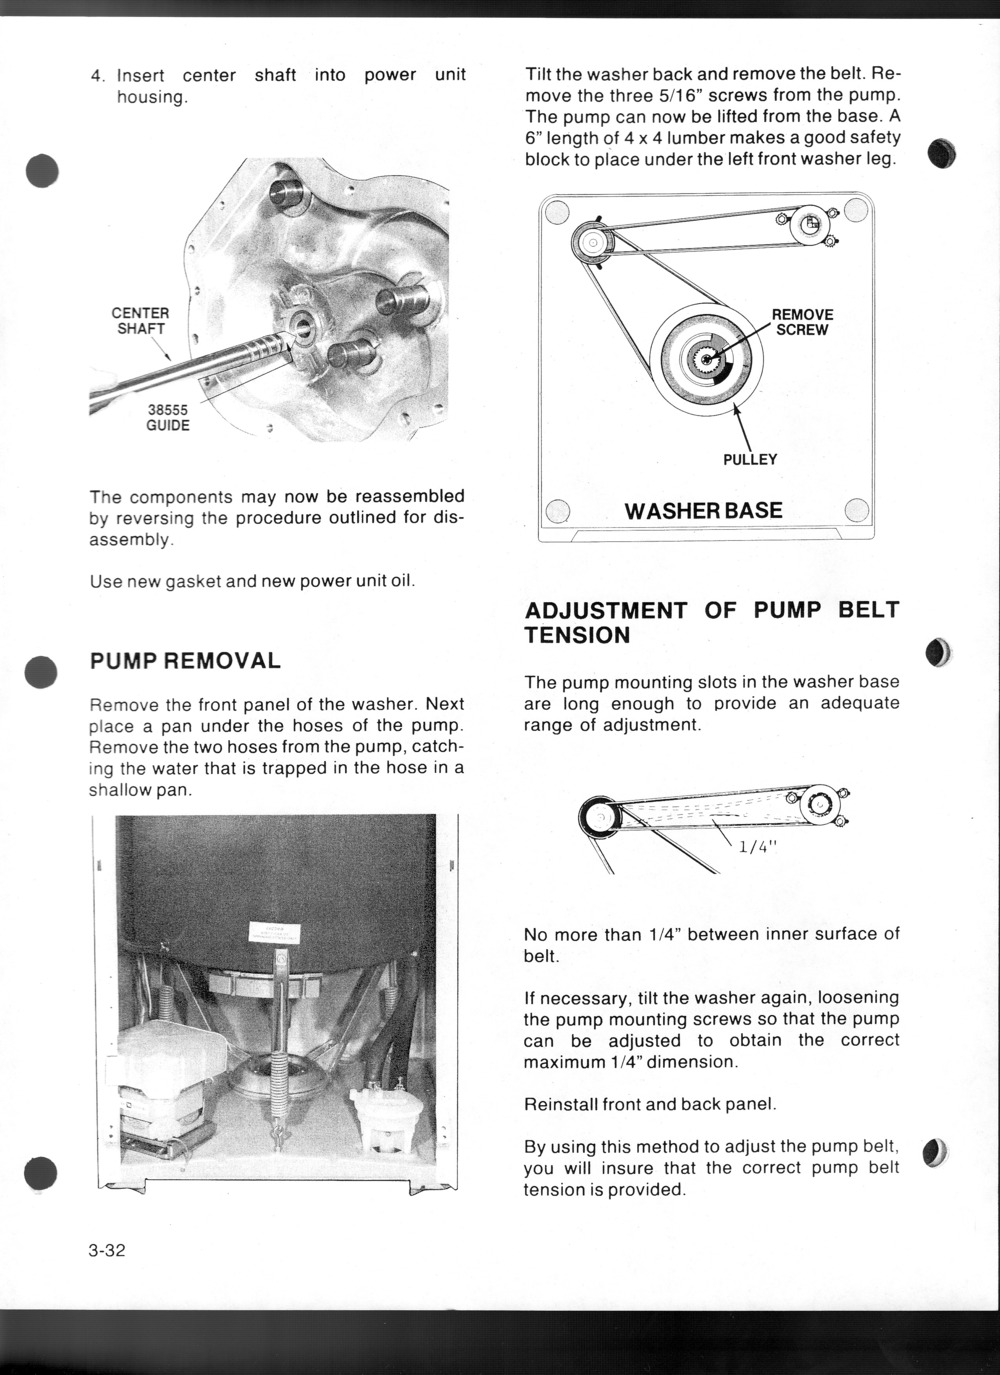
Remove all hoses going to the outer tub. Loosen and remove the 3 tub bolts. Remove outer tub. You will need new tub bolts and new lead washers during re-assembly. Tub bolt part #200744 3 qty. Lead washer 211100 3qty. Tub bearing removal and installation. The new design bearing does not allow you peal back the seal and saturate it will turbine oil. Just lube the wearing surfaces with turbine oil. 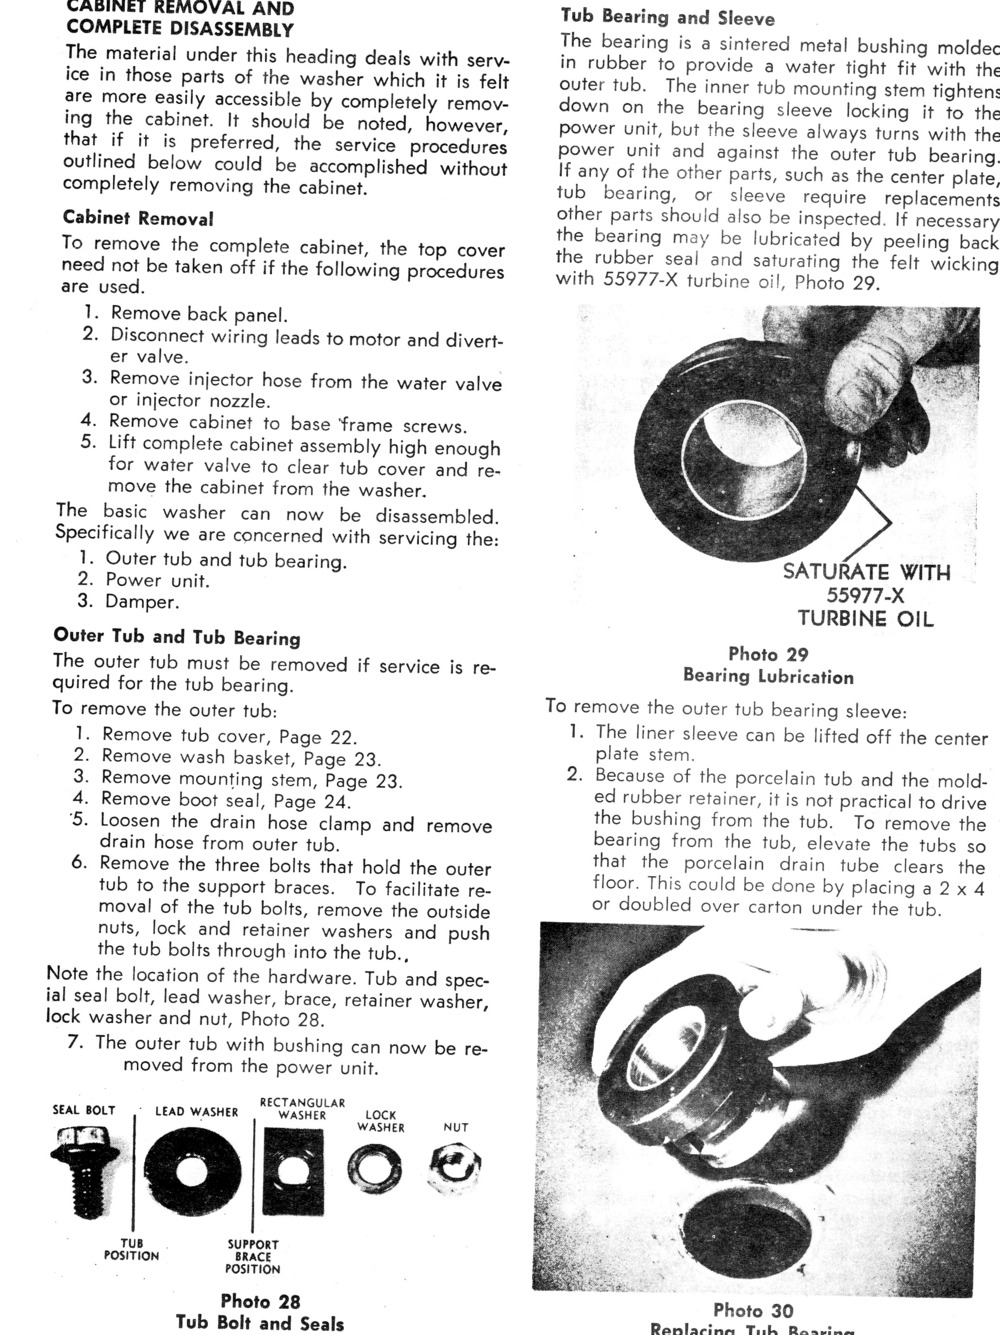
| ||
| Post# 358593 , Reply# 21 6/21/2009 at 20:03 (5,420 days old) by qsd-dan (West) | ||
|
More tub bearing installation & Trans disassembly
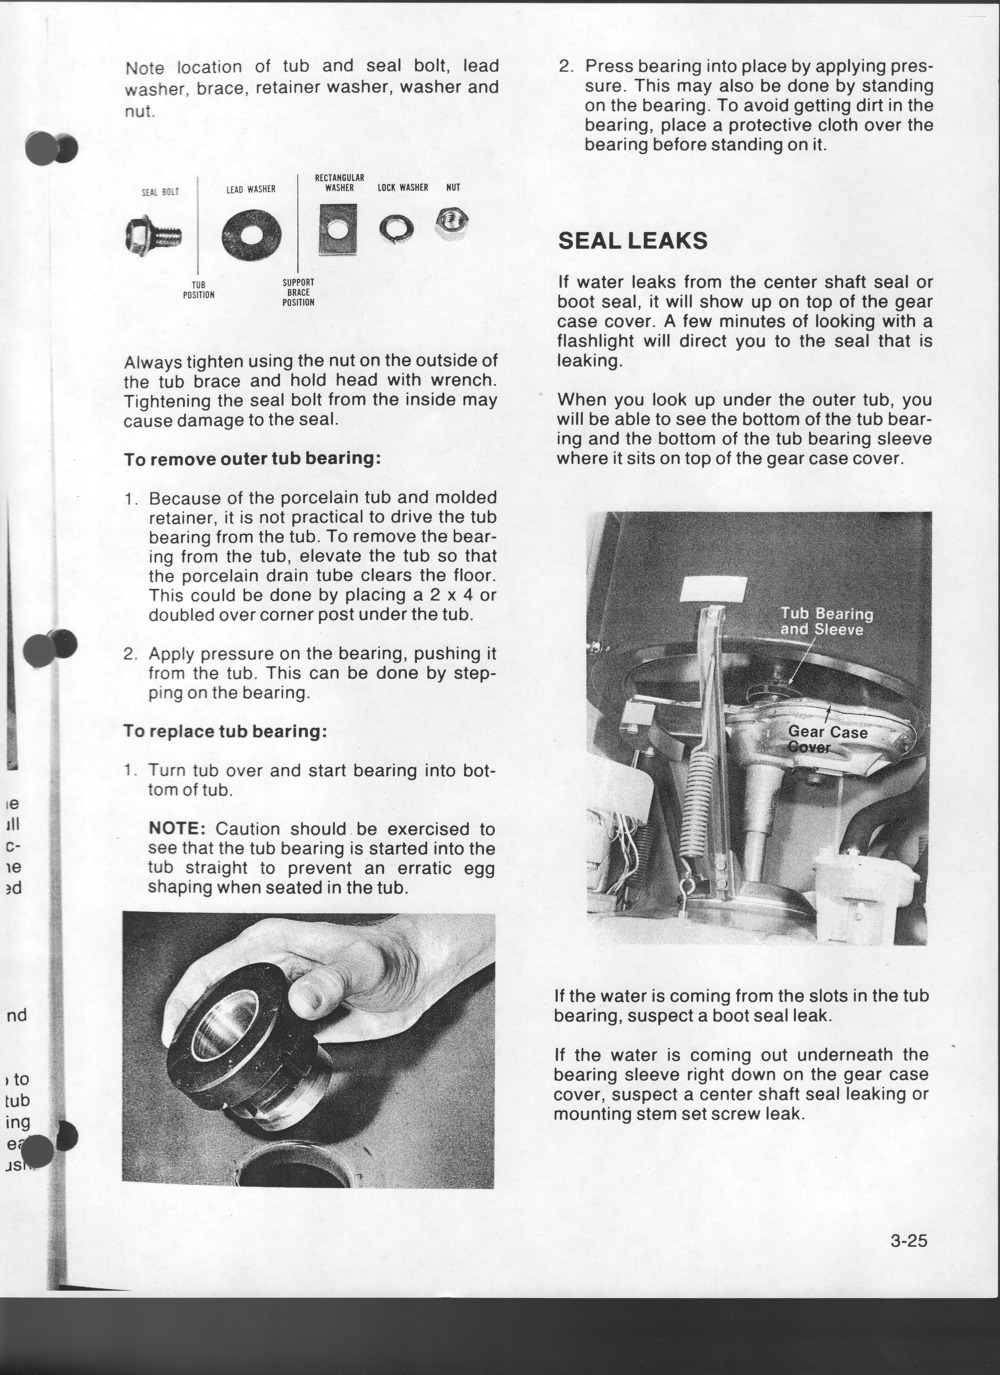
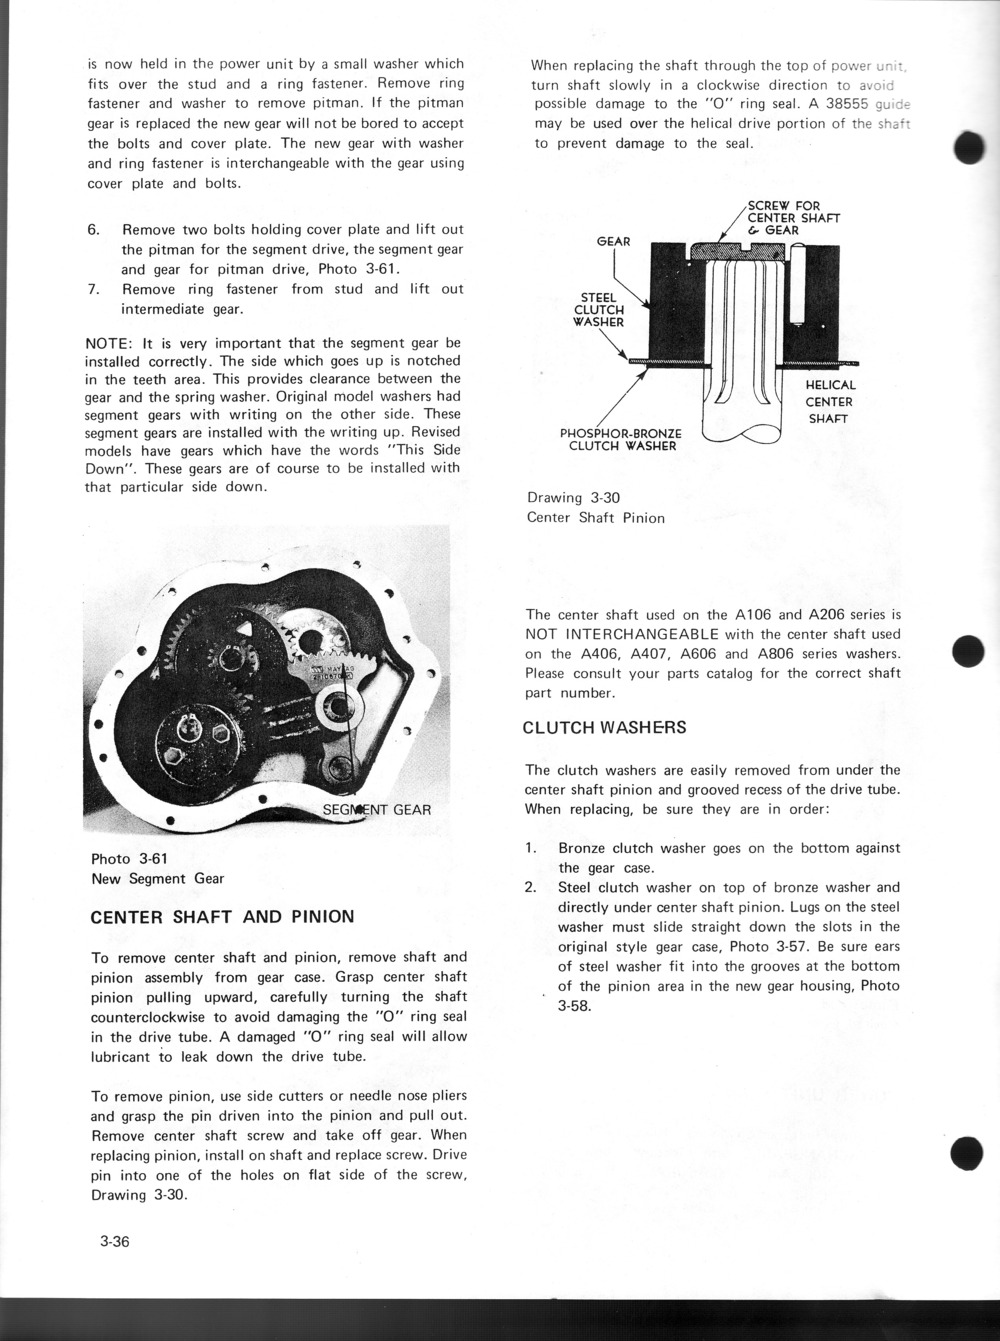
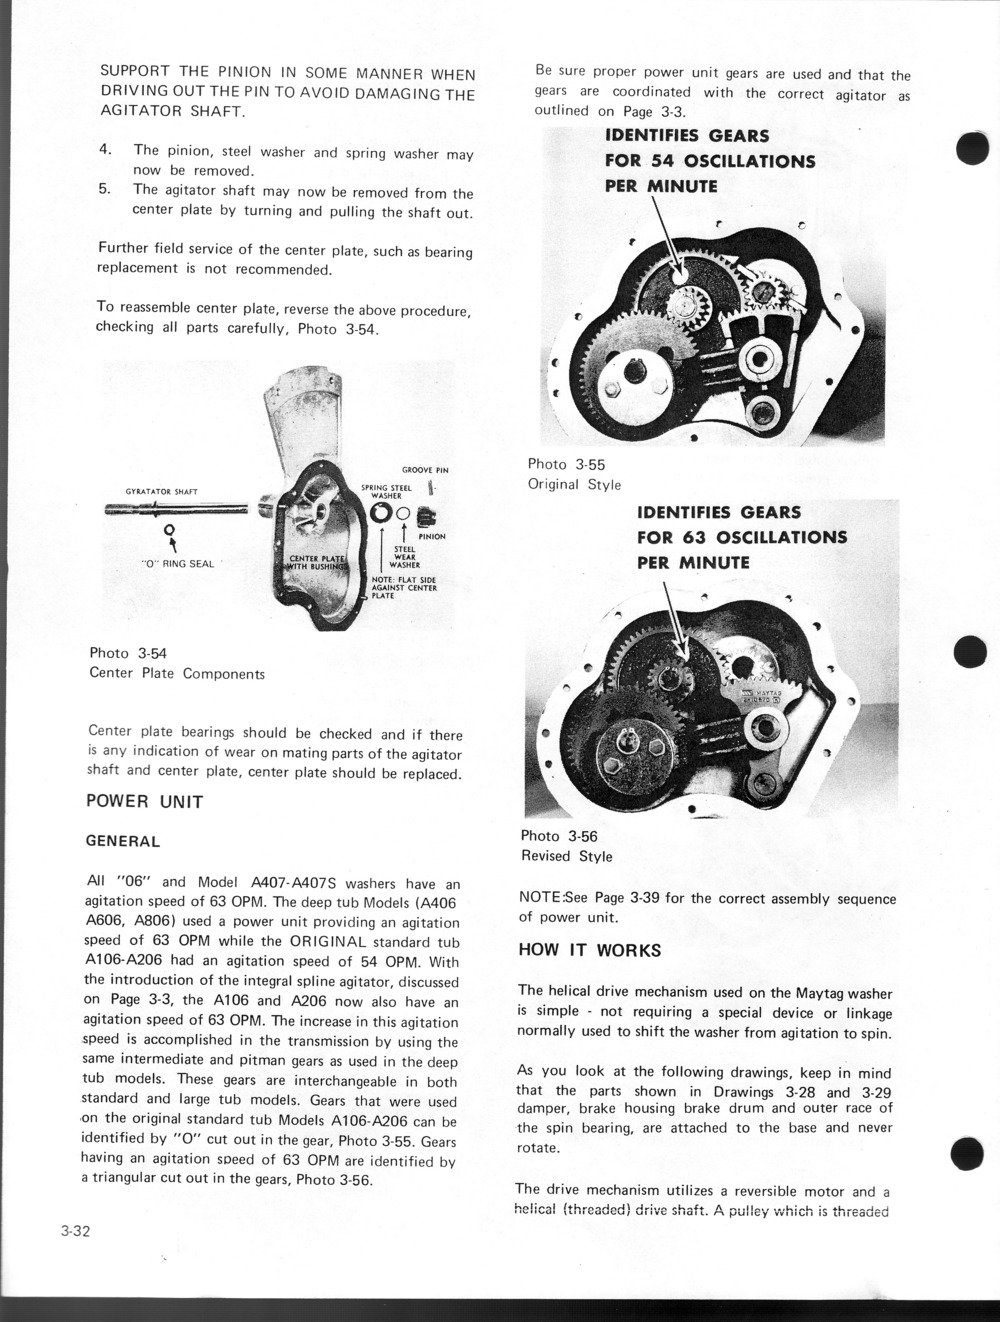
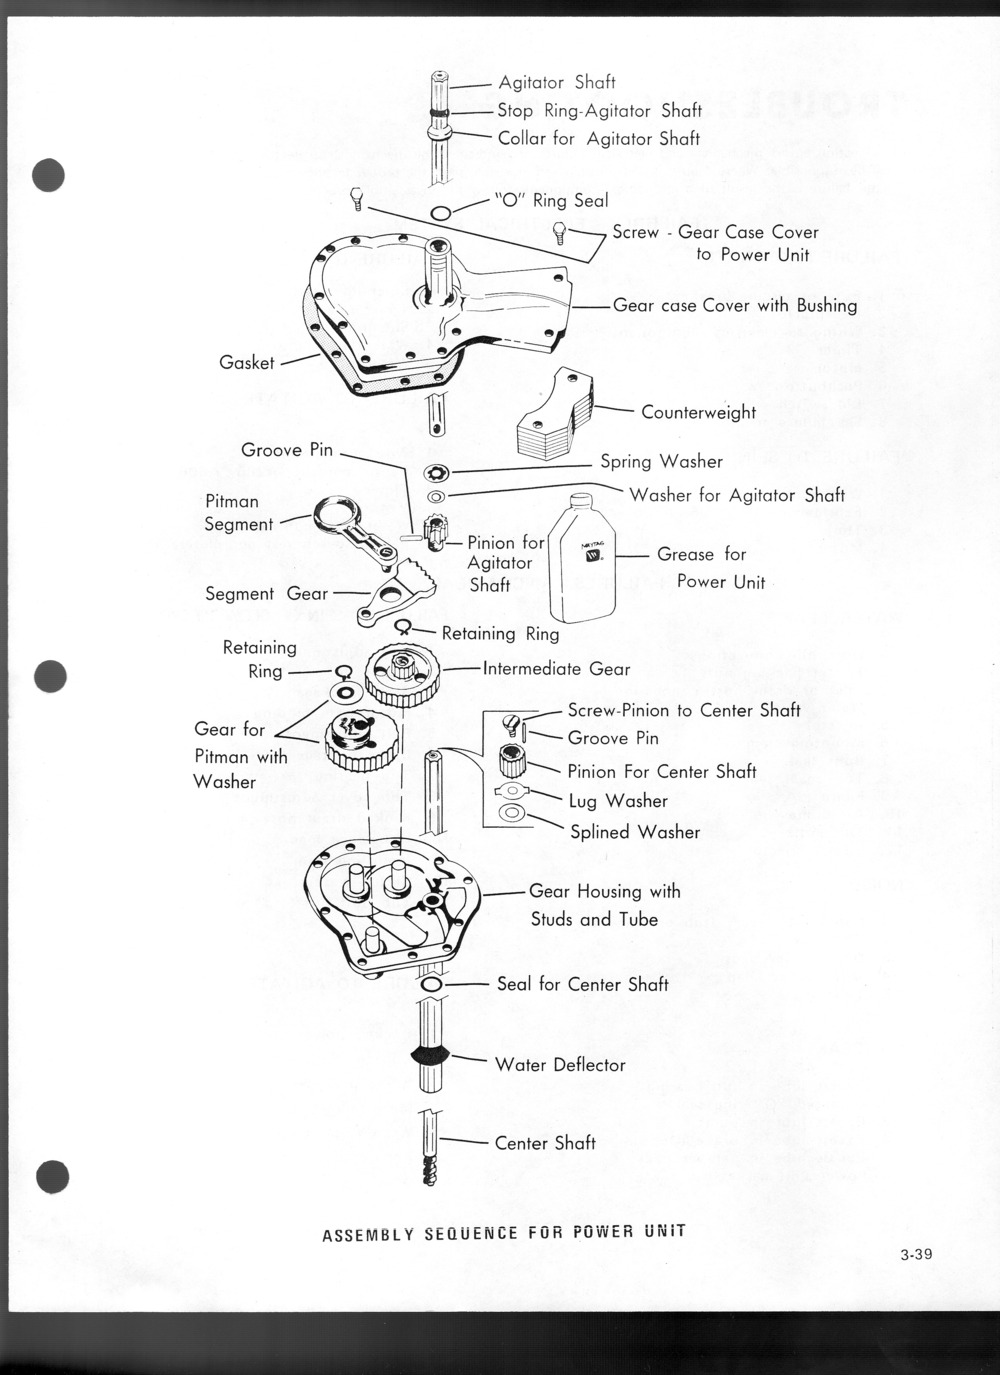
Once the outer tub is removed, lift the transmission straight up out of the brake package. Loosen all bolts, except the counter weight bolts, use a thin putty knife and hammer and go along the transmission seal. Remove the upper housing. Here's something that's highly overlooked, even in this community. The upper trans housing needs to be dissembled and cleaned! The trans oil on the shaft turns to thick goo and is one of the reasons why some of these older units have a slow agitation problem. The shaft will also sometimes have rust on it. There also a wicking in there that need to e re-lubed, My wicking was completely deteriorated. The wicking was eliminated in later transmissions so I didn't bother replacing it. The bearings and shaft still need to be cleaned and relubed with Maytag transmission oil. Driving the groove pin out of the collar was a royal PITA. I ended up taking it to a machine shop and they pressed it out. I also had some rust where the wicking once resided. If you have the same issue, just lightly sand the rust off of the shaft. Squeaky clean everything, lube, and re-assemble. You'll probably need a new groove pin. Part # for a new pin is 210183. 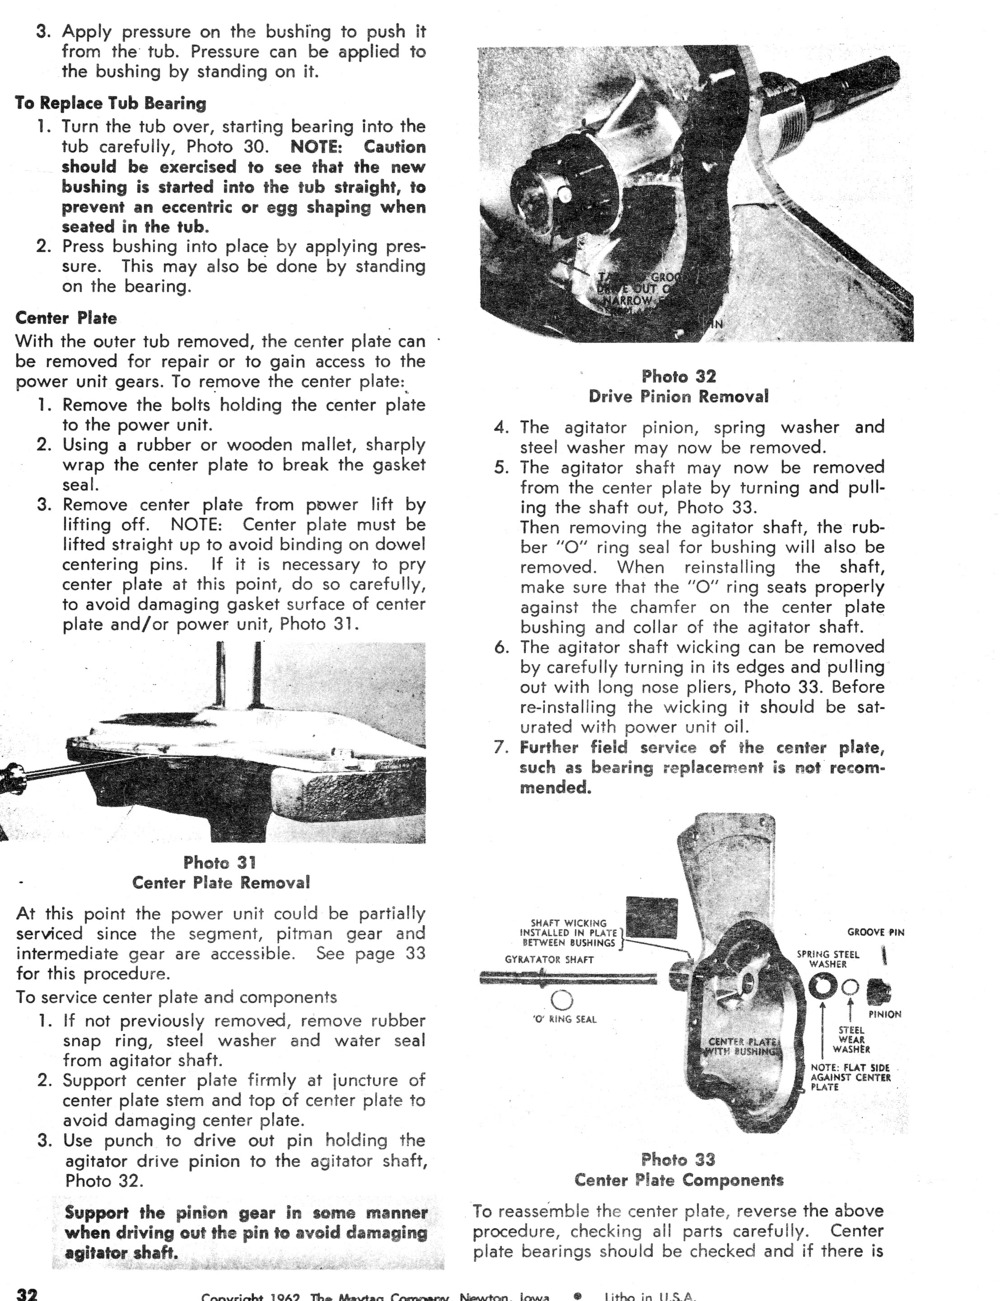
| ||
| Post# 358598 , Reply# 22 6/21/2009 at 20:19 (5,420 days old) by qsd-dan (West) | ||
|
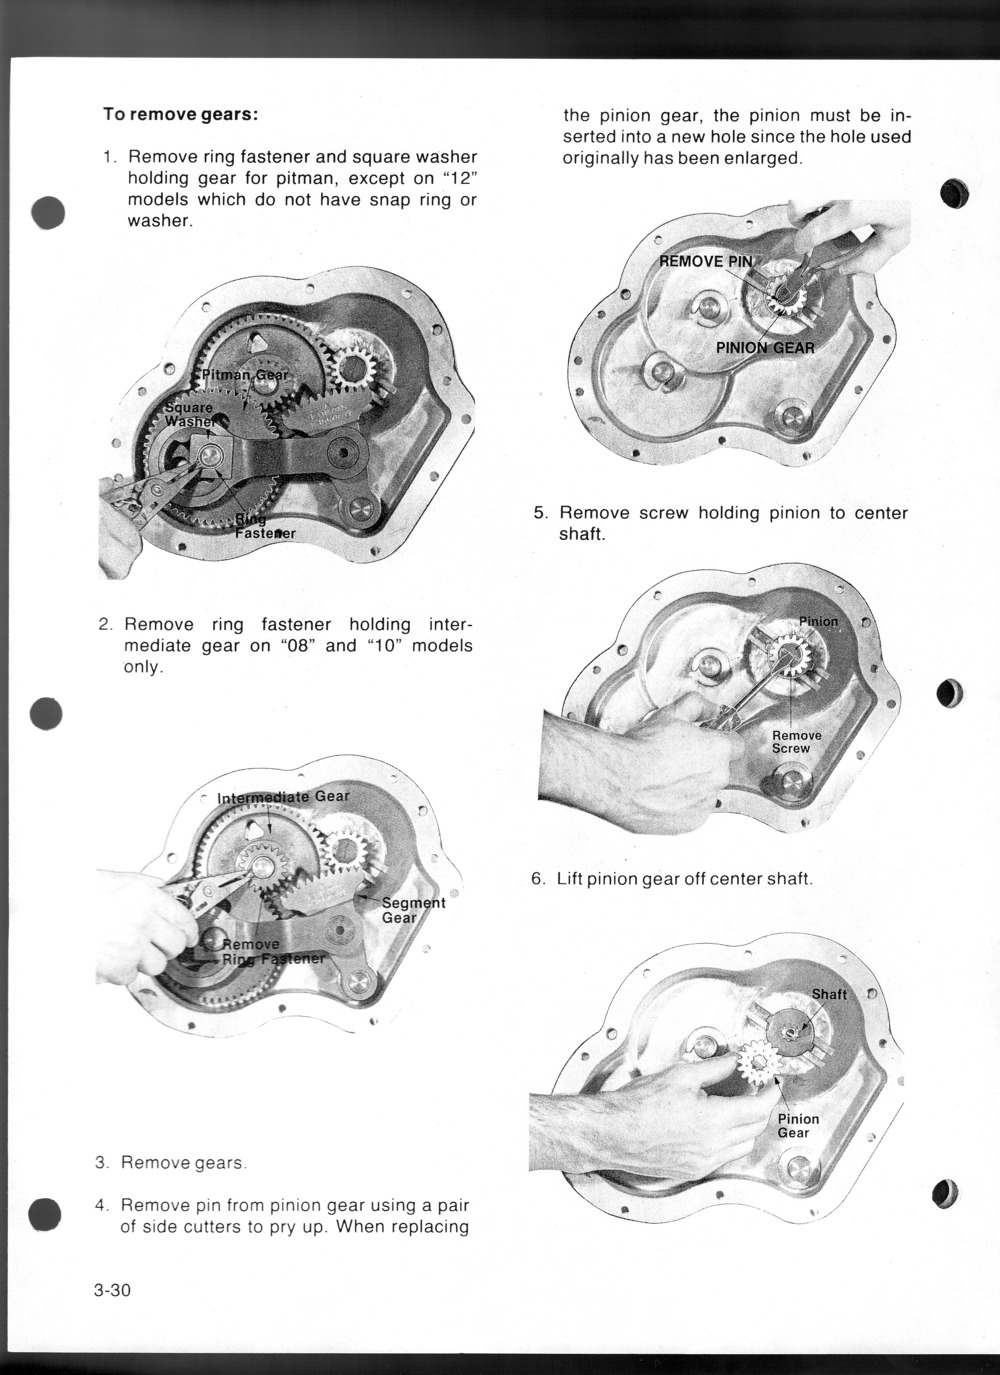
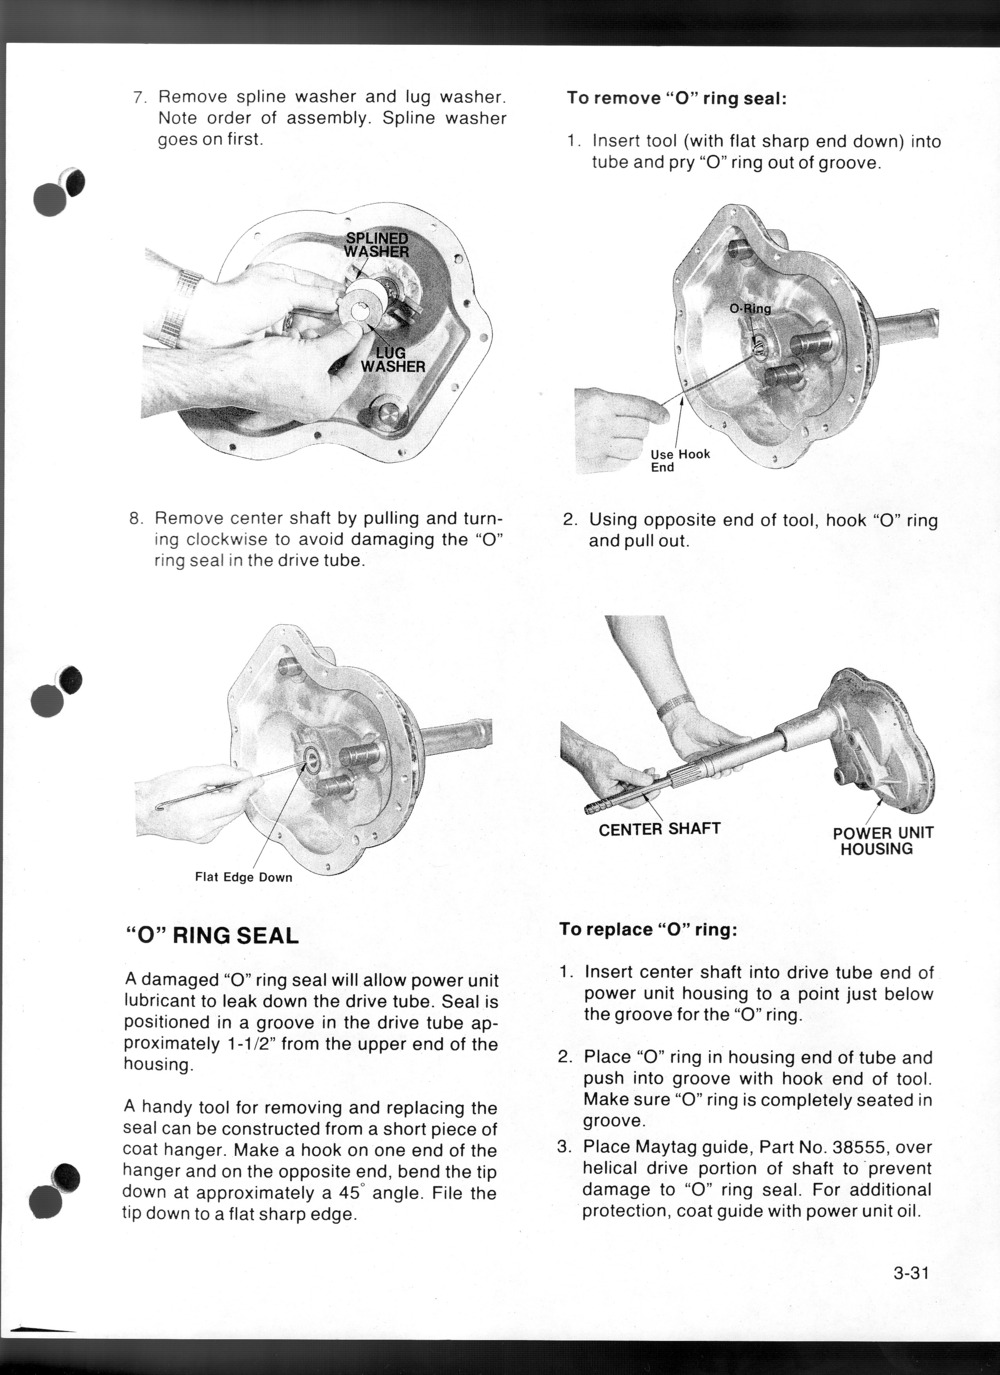
Lower transmission component removal. Check your fiber pinion gear! Mine had cracks everywhere!! A new fiber pinion gear is only $4.20, so I highly recommend purchasing a new one regardless. These parts aren't going to hang around much longer. Also, check for any wear on the bronze and steel clutch washers! I had grooves in mine so they both got replaced. When reassembling, make sure both bronze and steel clutch washers are clean. Even something as small as a human hair will prevent the machine from running. They must be spotless!!!! Make sure to arrange the washers in correct order during assembly. O-ring removal and replacement (finally!!) begins at the end of this page. 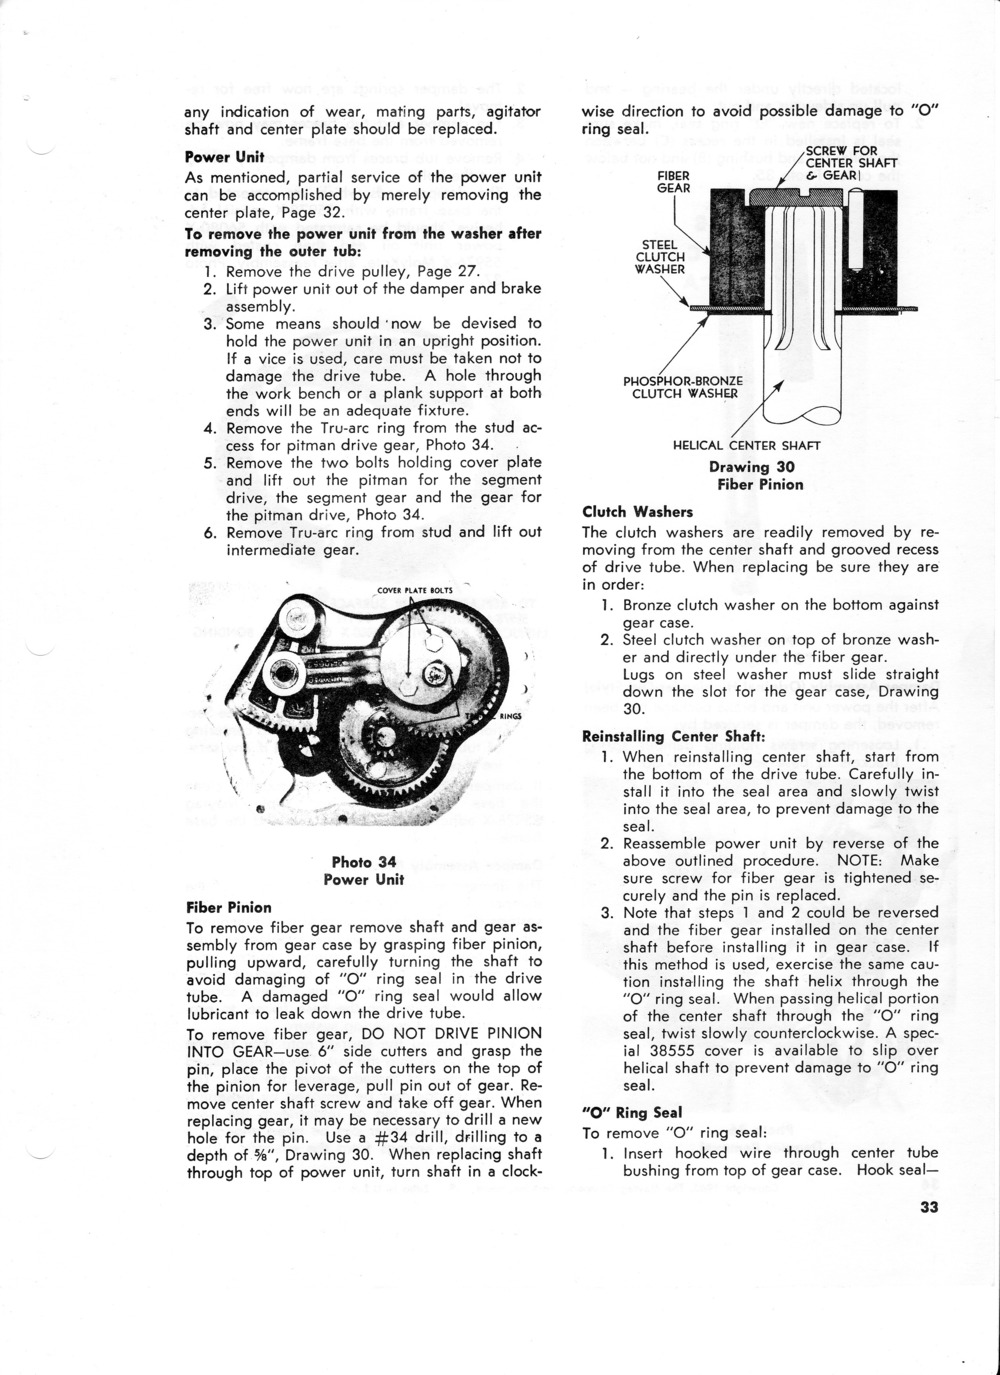
| ||
| Post# 358601 , Reply# 23 6/21/2009 at 20:25 (5,420 days old) by qsd-dan (West) | ||
|
| ||
| Post# 358602 , Reply# 24 6/21/2009 at 20:27 (5,420 days old) by qsd-dan (West) | ||
|
| ||
| Post# 358604 , Reply# 25 6/21/2009 at 20:30 (5,420 days old) by qsd-dan (West) | ||
|
Here we go again!! | ||
| Post# 358605 , Reply# 26 6/21/2009 at 20:31 (5,420 days old) by qsd-dan (West) | ||
|
| ||
| Post# 358607 , Reply# 27 6/21/2009 at 20:37 (5,420 days old) by qsd-dan (West) | ||
|
| ||
| Post# 358608 , Reply# 28 6/21/2009 at 20:39 (5,420 days old) by qsd-dan (West) | ||
|
| ||
| Post# 358609 , Reply# 29 6/21/2009 at 20:41 (5,420 days old) by qsd-dan (West) | ||
|
| ||
| Post# 358610 , Reply# 30 6/21/2009 at 20:43 (5,420 days old) by qsd-dan (West) | ||
|
| ||
| Post# 358611 , Reply# 31 6/21/2009 at 20:45 (5,420 days old) by qsd-dan (West) | ||
|
| ||
| Post# 358613 , Reply# 32 6/21/2009 at 20:49 (5,420 days old) by qsd-dan (West) | ||
|
| ||
| Post# 358614 , Reply# 33 6/21/2009 at 20:50 (5,420 days old) by qsd-dan (West) | ||
|
| ||
| Post# 358615 , Reply# 34 6/21/2009 at 20:52 (5,420 days old) by qsd-dan (West) | ||
|
| ||
| Post# 358617 , Reply# 35 6/21/2009 at 20:53 (5,420 days old) by qsd-dan (West) | ||
|
| ||
| Post# 358619 , Reply# 36 6/21/2009 at 20:56 (5,420 days old) by qsd-dan (West) | ||
|
| ||
| Post# 358620 , Reply# 37 6/21/2009 at 20:58 (5,420 days old) by qsd-dan (West) | ||
|
| ||
| Post# 358625 , Reply# 38 6/21/2009 at 21:11 (5,420 days old) by qsd-dan (West) | ||
|
Parts you'll need 22204012 Stem seal and boot kit (Purchase from Ebay) Y0A4298 Agitator Drive shaft seal 204013 Tub bearing kit (Purchase from ebay) 210632 Transmission gasket 210286 Lower O-ring 211232 Tub cover gasket 211100 Lead washer (You'll need 3) 200744 Tub bolts (You'll need 3) 210183 Groove Pin for upper shaft. You may or may not need it. 210315 Fiber Pinion Parts you may need: 211483 Splined washer 211484 Lug washer 205000 Spring/Glide kit for the sliding motor carriage. Have fun!!!!! | ||
| Post# 359032 , Reply# 40 6/23/2009 at 16:36 (5,418 days old) by qsd-dan (West) | ||
|
DOH!! | ||
| Forum Index: | 
| Other Forums: |

|

|

|

|

|

 Comes to the Rescue!