|
Thread Number: 31878
KitchenAid Briva In-Sink Dishwasher - Repair of Lid Balance "Link" Part# 8572664 & 8529382 |
[Down to Last] |
| Post# 480646 12/9/2010 at 23:36 (4,884 days old) by dishwashercrazy (West Peoria, IL) | ||
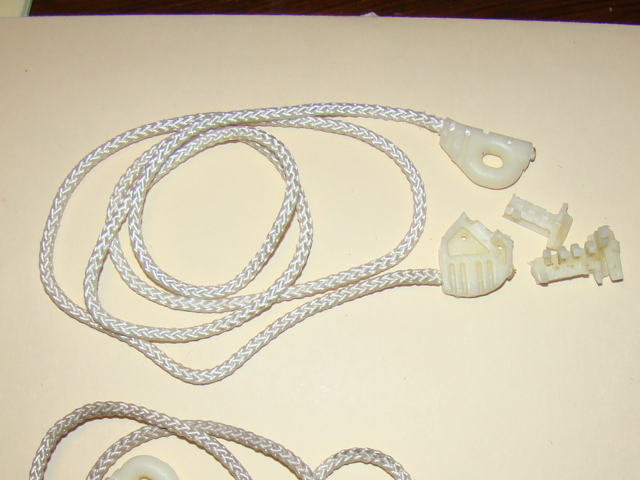
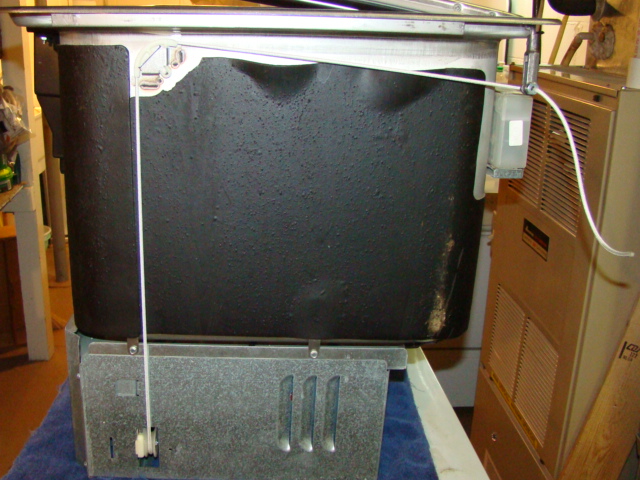
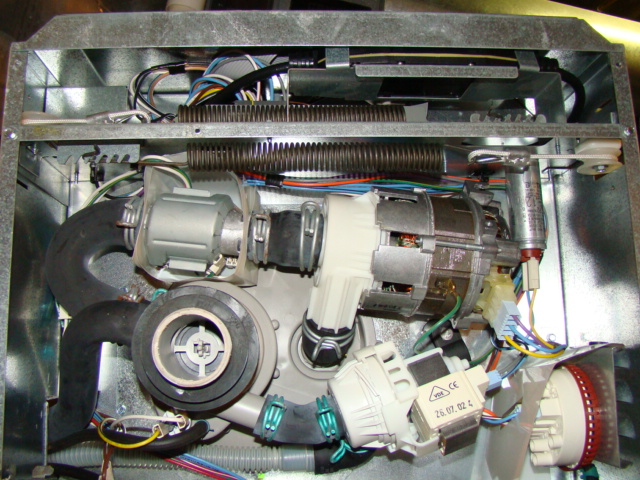
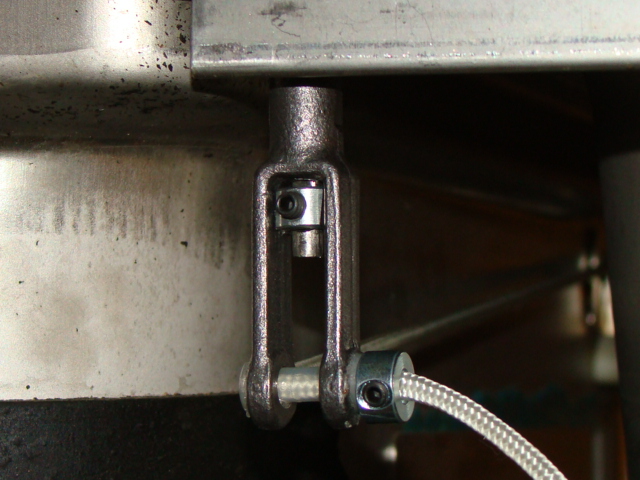
 KitchenAid Briva In-Sink Dishwasher - Repair of Lid Balance "Link" Part# 8572664 & former Part# 8529382 The purpose of this Discussion Thread is to document the procedure that I have used to replace the broken "Link" on my KIDS01EKSS0 Briva. I also have a KIDS36EPSS1 Briva. The following procedure would be equally appropriate, I believe, on any of the Briva models which have the plastic connectors that attach to the Briva's Hinge Pins (Left: 8529383, Right: 8529384). (See first photo below). Background: The KitchenAid Briva, I believe, was introduced in the latter half of 2002 or the beginning of 2003. And I believe that production ceased in 2007. (Please forgive the continued use of "I believe", because I don't have all of the facts, and am simply supposing certain facts when I don't have complete information.) In June, 2009, I purchased a used December 2003 Briva KIDS01EKSS0 on eBay. It arrived with both of the Links broken off. Over the next year and a half, I have been searching for replacement "Links". What I have discovered, I believe, is that the replacement Link part numbers 8572664 and 8529382, were never stocked by individual parts houses. Rather, replacements were always ordered directly from Whirlpool. Well, long story short, Whirlpool in their infinite wisdom, is no longer making these parts available. I continued my pressing of the issue to Whirlpool about discontinuing parts on Dishwashers that were made as few as 3 years earlier. Always with apologies, I kept hearing the same story - no longer available. They even went as far as to offer to exchange my Briva with a brand new standard dishwasher. I explained that I was not interested in a new dishwasher - that I wanted my existing dishwasher fixed with a replacement $26 part. In the process of contacting large mid-west parts suppliers, and small appliance stores, I found a dealer in a nearby town, that has two customers with KitchenAid Briva machines, both with broken Lid Balance "Link" parts. They thought they might have a repair solution, but it apparently was not successful. Even a couple of months ago, I attempted my own fix by interweaving thin copper wire around the plastic connector, hoping that just beefing up and supporting the connector would be sufficient. But when I attached the connectors to the hinges, and closed the lid, the connectors exploded off the hinges. I set the project aside, but I wasn't giving up yet. NOW, this week, I started racking my brain trying to figure out how I might retrofit the dishwasher lid with a replacement for the original "Link". I spent the better part of 90 minutes inside the hardware section of my local Do-It-Best Hardware store, searching for a solution. And along with the assistance of Josh, one of the associates, I had my first workable solution. It required a return visit for further modification and more parts, but I finally had my solution, which is described below. Mike This photo shows the good "Link" on the right side of my other Briva machine. It consists of a nylon cord with a plastic connector attached to the lid hinge; the remainder of the cord passes left over one pulley, down and over a second pulley, then through the cabinet and attaches to an adjustable coiled spring underneath the unit. There is a second "Link" on the left side, similarly routed, and connected underneath to a separate coiled spring. The failure involves the plastic cracking and splitting where it grasps hold of the lid hinge. 
| ||

|
| Post# 480647 , Reply# 1 12/9/2010 at 23:38 (4,884 days old) by dishwashercrazy (West Peoria, IL) | ||
|
| ||
| Post# 480650 , Reply# 2 12/9/2010 at 23:46 (4,884 days old) by dishwashercrazy (West Peoria, IL) | ||
|
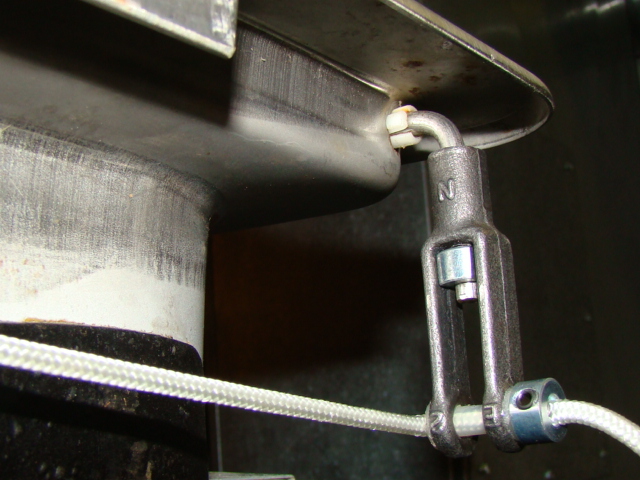
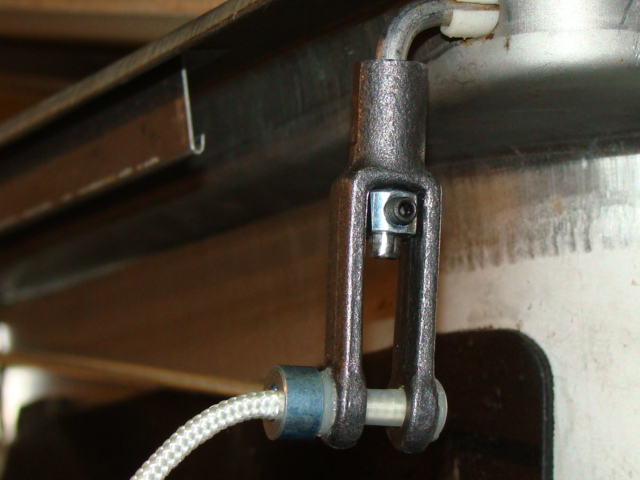
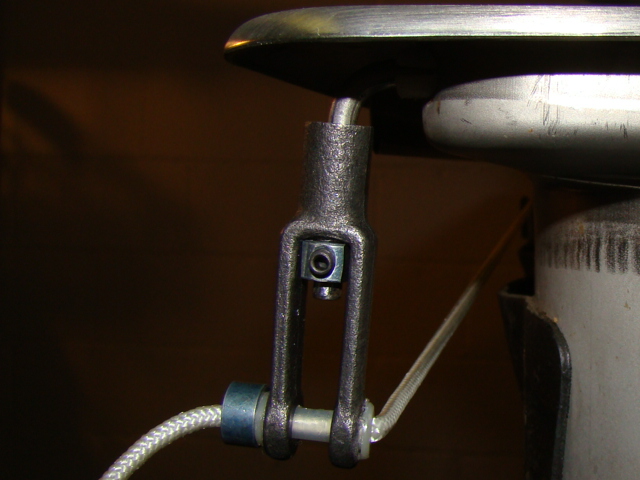
Parts used in the repair for each Link: Hinge removed from lid. Hillman Yoke End (1/4-28) H# 967118 (found at Do-It-Best Hardware - Peoria, in the automotive brake parts section). Package of two Hillman Solid Shaft Collars (3/16 ID x 7/16 OD) H# 883552. Plastic grommet and sleeve glued to cross hole in yoke to prevent snagging of the nylon rope. (I did not use the shorter plastic sleeve shown.) Shown is the original nylon cord, but it turned out to be too short, so 4 feet of nylon lawn mower pull rope was substituted. 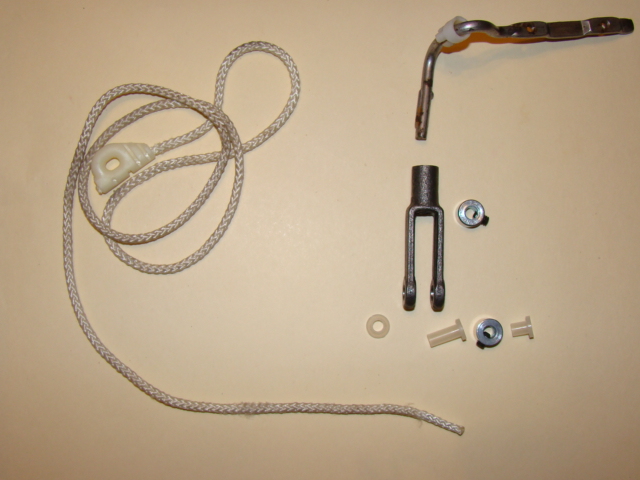
| ||
| Post# 480653 , Reply# 3 12/9/2010 at 23:53 (4,884 days old) by dishwashercrazy (West Peoria, IL) | ||
|
The dishwasher lid hinge has two protruding keys, which needed to be modified. I used the edge of metal file to file down to a flat surface the right half of the protruding key (pointing upward). This was necessary to create a flat surface for the set screw in the clamp, which prevents the yoke from slipping off. Filing off the smaller key was necessary to allow the yoke to slip over the hinge shaft. 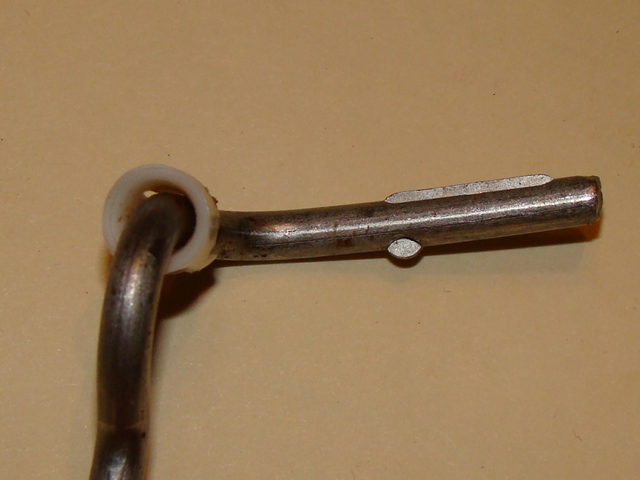
| ||
| Post# 480655 , Reply# 4 12/9/2010 at 23:56 (4,884 days old) by dishwashercrazy (West Peoria, IL) | ||
|
| ||
| Post# 480656 , Reply# 5 12/10/2010 at 00:00 (4,884 days old) by dishwashercrazy (West Peoria, IL) | ||
|
I clamped one of the Solid Shaft Collars in a vice, and filed both sides down enough to fit in between the tines of the yoke. This serves as the clamp on the end of the hinge to prevent the yoke from coming off the end of the hinge. The set screw in this collar snugs down on the flat surface created when I filed down the outer half of the longer key on the hinge shaft. 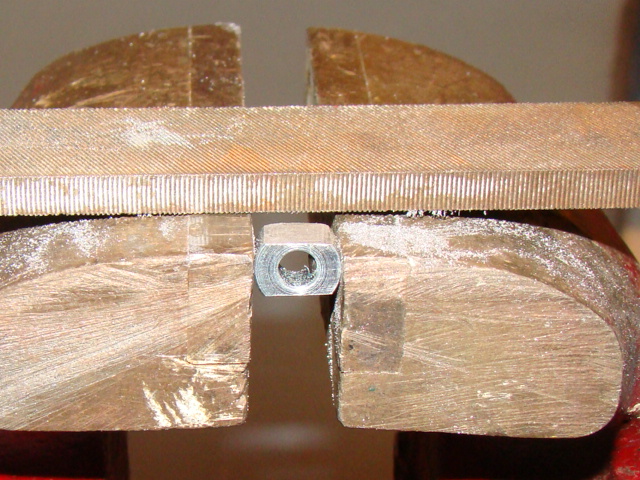
| ||
| Post# 480658 , Reply# 6 12/10/2010 at 00:06 (4,884 days old) by dishwashercrazy (West Peoria, IL) | ||
|
| ||
| Post# 480659 , Reply# 7 12/10/2010 at 00:08 (4,884 days old) by dishwashercrazy (West Peoria, IL) | ||
|
| ||
| Post# 480661 , Reply# 8 12/10/2010 at 00:11 (4,884 days old) by dishwashercrazy (West Peoria, IL) | ||
|
| ||
| Post# 480662 , Reply# 9 12/10/2010 at 00:13 (4,884 days old) by dishwashercrazy (West Peoria, IL) | ||
|
| ||
| Post# 480664 , Reply# 10 12/10/2010 at 00:15 (4,884 days old) by dishwashercrazy (West Peoria, IL) | ||
|
| ||
| Post# 480665 , Reply# 11 12/10/2010 at 00:17 (4,884 days old) by dishwashercrazy (West Peoria, IL) | ||
|
| ||
| Post# 480666 , Reply# 12 12/10/2010 at 00:19 (4,884 days old) by dishwashercrazy (West Peoria, IL) | ||
|
| ||
| Post# 480667 , Reply# 13 12/10/2010 at 00:20 (4,884 days old) by dishwashercrazy (West Peoria, IL) | ||
|
| ||
| Post# 480668 , Reply# 14 12/10/2010 at 00:21 (4,884 days old) by dishwashercrazy (West Peoria, IL) | ||
|
| ||
| Post# 480671 , Reply# 15 12/10/2010 at 00:30 (4,884 days old) by dishwashercrazy (West Peoria, IL) | ||
|
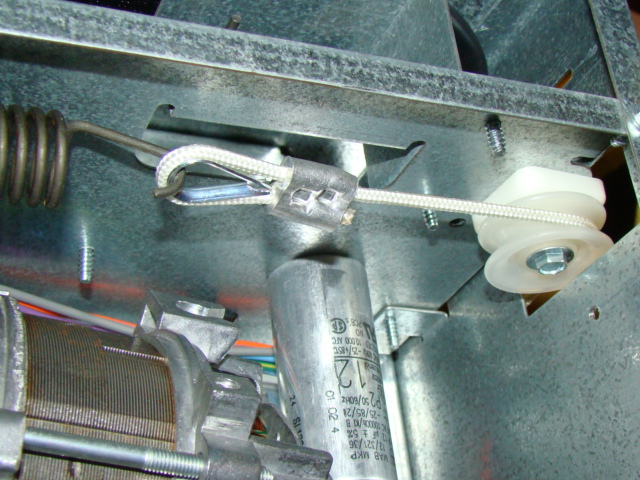
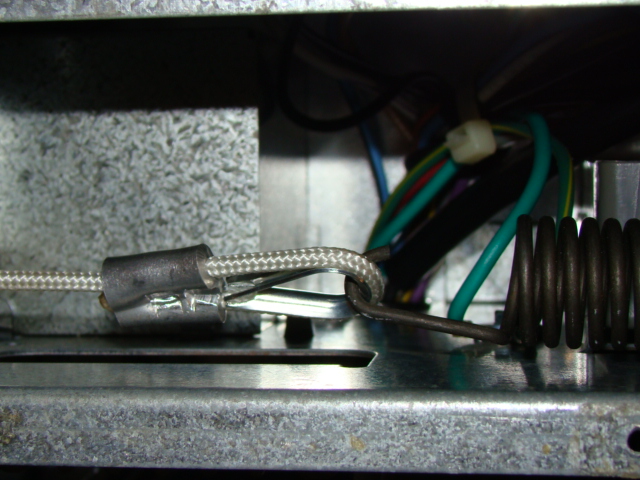
When I began the assembly, I started by hooking the spring in the most loose position, then ran the cord through the pulleys, and finally though the yoke and attached the end clamp to hold tension on the nylon cord. For the time being, I have not cut the excess cord off. Then I was able to move the spring to a tighter position during the adjustment process. The tension should be enough to balance the lid without it flopping back in the full up position, or falling down towards the closed position. 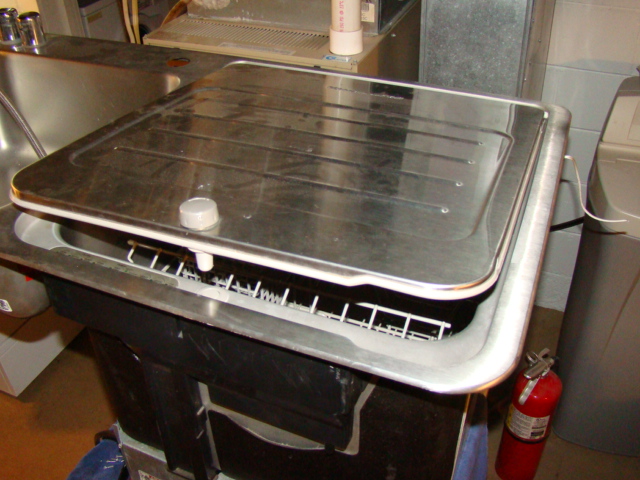
| ||
| Post# 480675 , Reply# 16 12/10/2010 at 00:37 (4,884 days old) by dishwashercrazy (West Peoria, IL) | ||
|
I certainly hope I have explained this process sufficiently. I welcome your suggestions for clarity. I emailed the step by step process to that local appliance dealer. Hopefully they will be able to duplicate what I have done, and have two happy Briva customers once again. The cost of the parts for the two new links was about $38. Mike | ||
Post# 480686 , Reply# 17 12/10/2010 at 01:41 (4,884 days old) by Volvoguy87  (Cincinnati, OH) (Cincinnati, OH) |
||
Wow!
Mike, it looks like you did a better job than WP did at the factory. It looks like it will hold up better over time and now you aren't dependent on WP for those parts ever again.
Who knows, maybe other repair folks and Briva owners will see this and make these repairs and keep their perfectly good dishwashers going, much to the chagrin of WP I'm sure. Great work, Dave | ||
| Post# 480716 , Reply# 18 12/10/2010 at 07:12 (4,884 days old) by fordtech () | ||
|
Great contribution and work! Thanks for the great photos and descriptions. | ||
| Forum Index: | 
| Other Forums: |

|

|

|

|

|

 Comes to the Rescue!