|
Thread Number: 42324
Another Maytag A206 Question |
[Down to Last] |

|
| Post# 623311 , Reply# 1 9/7/2012 at 22:25 (4,241 days old) by stan (Napa CA) | ||
O.K where are  | ||
Post# 623400 , Reply# 2 9/8/2012 at 09:41 (4,241 days old) by combo52  (50 Year Repair Tech Beltsville,Md) (50 Year Repair Tech Beltsville,Md) |
||
Noisey MT Washer Transmission It does sorta sound like there may be something wrong inside the transmission, you can either keep running it and see what happens or tear it apart again.
I would generally recommend that one should not rebuild a washers transmission on ANY brand washer any more than most of us should be rebuilding the engine in your car. There are plenty of good used transmissions for MT washers out there plus you can still get the better NEW orbital style transmission and load sensor agitator for this washer. It really all depends how much time and money you want to spend working on your washer, Good Luck. | ||
| Post# 623911 , Reply# 4 9/10/2012 at 13:41 (4,239 days old) by beekeyknee (Columbia, MO) | ||
Clicking Sound
Hey Doug,
John's right. If one could find a NOS trans. setting around somewhere in town or not too far away, I'd go for it, but unfortunately one doesn't find these old style "Newton trans." setting around in boxes very often. I'd jump on one in a min. if I found it, but they're usually to far away or the owner wants too much money for it. I believe John probably ment to scavenge a nice one out of an older (maybe mid '80's) BOL machine that nobody wants and use it for yours. It's a great idea and I have one out back that I'm gonna do the same thing with. Who knows, I may try and sell some of the other parts to a member just for shipping, if anyone wants them. There's tons of old parts and machines out there. But some parts are specific to certain types of machines and if I can help someone out I would be happy. I commend you on trying to rebuild your machine. It's quite a feat and satisfying when it turns out right. I take it from your first post that you held the tub to stop the tub from indexing and hitting the brake. That is usually a lower thumping sound. It may be that when tightening the mounting stem set screw you accidentally tightened it into one of the three water relief grooves on the trans. neck and during agitation the screw is striking the side of the groove. If this is the case, eventually the screw will sheer off and score the side of the neck and ruin it. If that happens the tub and the trans. will no longer be locked together and during agitation the tub will index severely and during spin the trans. will take off, but the the tub will set still. The agitator would probably try to spin in a tub full of water and clothes. I've never seen it happen, but I imagine the agitator would throw out some water and the fins might break off and shred the clothes. There would probably be some strange noises, maybe a water leak, I don't know. It might happen over time as the set screw slowly made it's groove around the trans. neck. After the groove is complete I don't know what would happen. Probably the above. Others who have seen this, please comment. I would personally like to know what it looks like, but I don't want it to happen to me. It sounds very unpleasant. Anyway, Doug, that higher pitched knocking sound I hear from you video sounds like it could be the old set screw in the groove problem, assuming the rest of your trans. looked in good shape when it was disassembled and you put it back together properly. I don't hear any of that high pitched whine during agitation that usually comes from worn bushings in the gear case cover. That's good. Out of curiosity, what kind of gear oil did you use? I trust that you did a leak test w/o the agitator in place? You could try and take the agitator out, let the machine fill, and let it run with no load on the drive shaft. If the sound leaves, then you could reach down in the machine with something to protect your hands and try to stop the agitator shaft while it's turning to see if the sound returns. That might lead you to something. Or you could take the water level hose off the switch, blow into it until it clicks and clamp it with a pair of vice-grips. You'll have an empty run that way. That's an interesting thing to do. Let us/me know what happens. :) | ||
| Post# 624343 , Reply# 6 9/12/2012 at 02:42 (4,237 days old) by beekeyknee (Columbia, MO) | ||
|
Hi Doug,
You should be able to use it over again. If it were me, I'd wipe off the mating surfaces of the mounting stem and boot seal with a clean, lint-free cloth, put a little zoom-spout on the carbon face of the boot seal and put the mounting stem back in. Put the tub back in, center it well, put your mounting stem cover and spanner nut back in and do another dry run in. If the tub is centered and balanced well you should be able to do the run in with the tub cover off. Then you can pour in some water to check for leaks. That way if you do have a leak, you won't have to take the whole machine apart again. It's bad enough just taking that wash basket and mounting stem in and out of there twice. Hope everything works out alright for you. Brian | ||
| Post# 624475 , Reply# 8 9/12/2012 at 14:31 (4,237 days old) by beekeyknee (Columbia, MO) | ||
|
| ||
| Post# 624611 , Reply# 9 9/13/2012 at 04:54 (4,236 days old) by beekeyknee (Columbia, MO) | ||
|
| ||
| Post# 624663 , Reply# 10 9/13/2012 at 11:22 (4,236 days old) by smokey2367 (NW PA) | ||
|
The one I have was in good shape -- I just tend to like to have a spare in case something goes wrong. I've checked around a salvage yard close by, but I'll I saw were newer machines. They probably squash good Maytags as soon as they come in since they are heavy metal. Doug | ||
| Post# 624812 , Reply# 11 9/14/2012 at 05:10 (4,235 days old) by beekeyknee (Columbia, MO) | ||
|
Look for an older BOL model you wouldn't mind scavenging for parts. You might even be able to sell the parts you don't want and/or start a collection of spares in case of a break down. Sometimes machines can be had cheaply on C/L.
Usually a quick way to tell the condition of an older machine is to reach in an try to pull the agitator off. It can be done in a snap with hardly a person noticing. You might want to take out the fabric softener dispenser first so it doesn't go flying. | ||
| Post# 624902 , Reply# 12 9/14/2012 at 13:38 (4,235 days old) by smokey2367 (NW PA) | ||
|
I'll keep checking at the scrap yard. One day there may be nothing and another day just what I'm looking for. I'll just take my tool box & ninja clothes and see what happens. | ||
| Post# 625011 , Reply# 13 9/14/2012 at 19:51 (4,234 days old) by beekeyknee (Columbia, MO) | ||
|
| ||
| Post# 625679 , Reply# 15 9/17/2012 at 14:35 (4,232 days old) by smokey2367 (NW PA) | ||
|
So, I did things the proper way this time (I hope) and labeled where the grooves were. 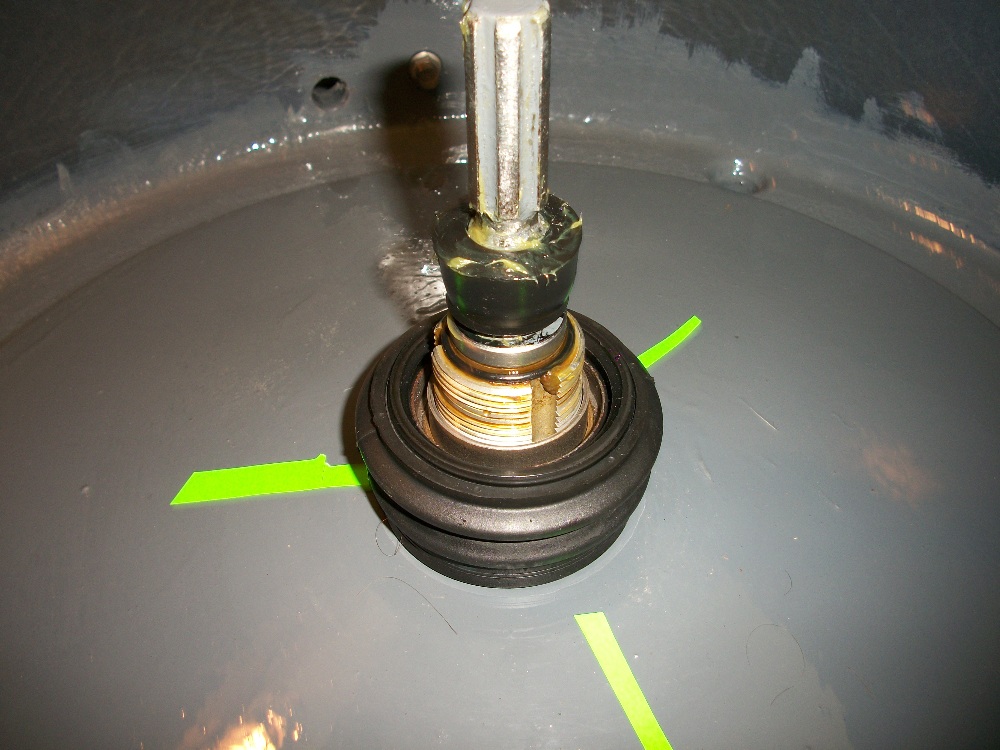
| ||
| Post# 625680 , Reply# 16 9/17/2012 at 14:36 (4,232 days old) by smokey2367 (NW PA) | ||
|
Then I put on the mounting stem and it looks like it should be good 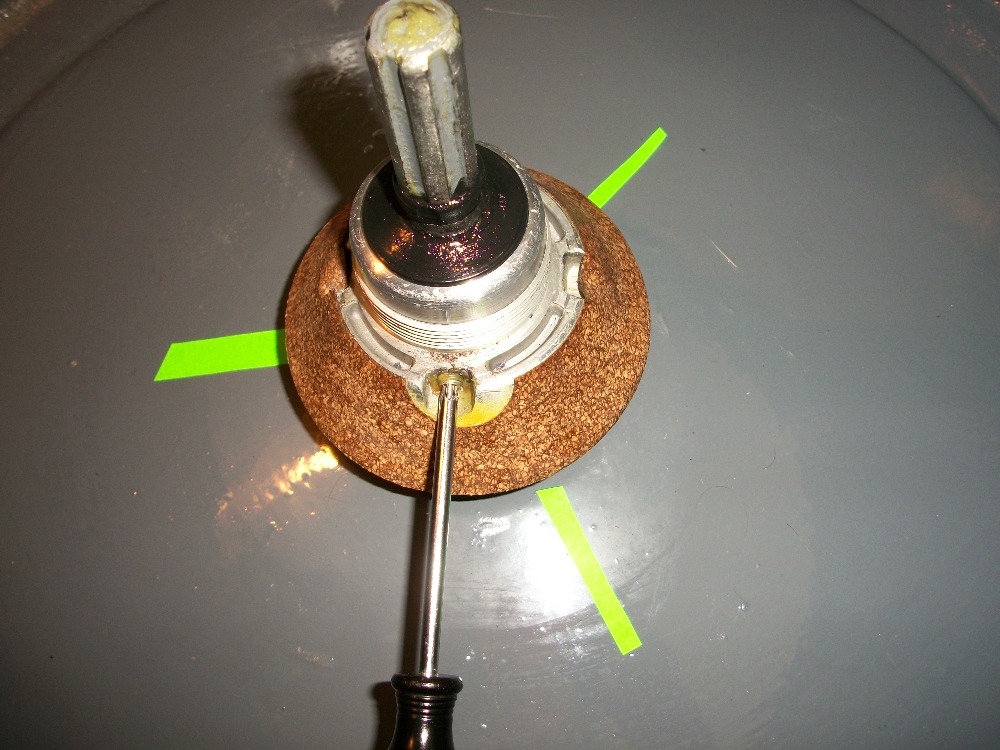
| ||
| Post# 625686 , Reply# 18 9/17/2012 at 14:47 (4,232 days old) by smokey2367 (NW PA) | ||
|
Here's a shorter one with the old agitator back on. The sound seems more constant in the video, but when I was standing there it also seemed to come and go. Any ideas? Thanks -- Doug CLICK HERE TO GO TO smokey2367's LINK | ||
|
Post# 625717 , Reply# 19 9/17/2012 at 18:42 (4,231 days old) by combo52 (50 Year Repair Tech Beltsville,Md) |
||
|
MT DC Care Washer Seal Assembly | ||
| Post# 625805 , Reply# 20 9/18/2012 at 00:43 (4,231 days old) by 70series ( Connecticut.) | ||
|
Ah, that video brings back memories of the very first washload I did for myself. Thanks for posting, James | ||
| Post# 625806 , Reply# 21 9/18/2012 at 00:50 (4,231 days old) by redcarpetdrew (Fairfield, CA) | ||

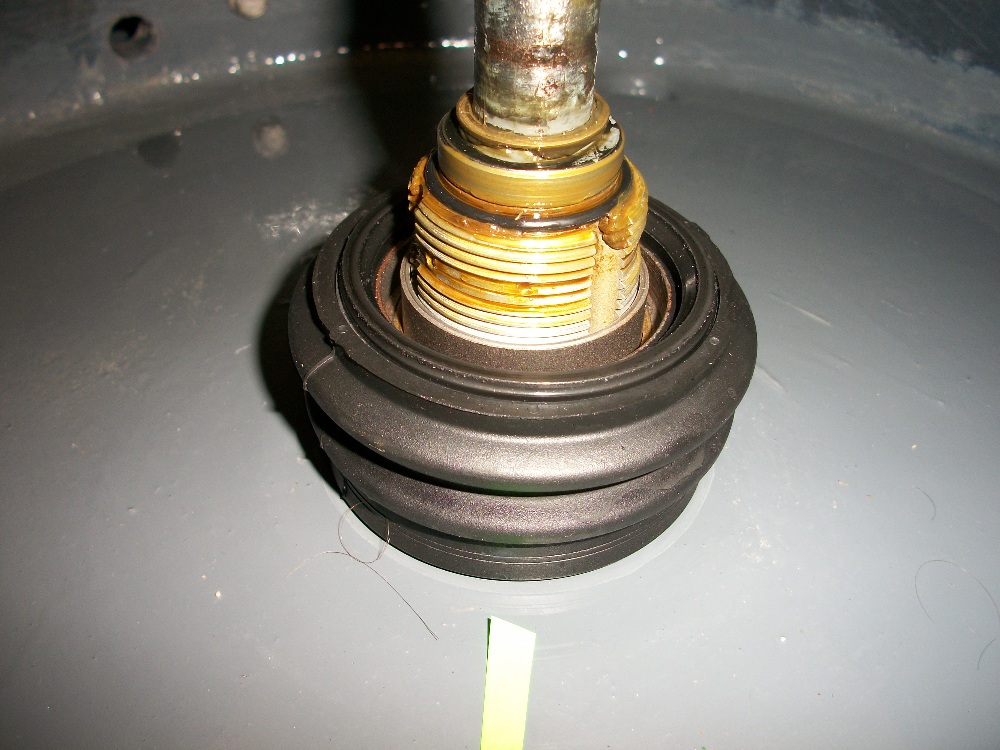
I'm sorry, John, but I must disagree with you this time. The set screw must dig into the 'meat' of the stem. If it makes it into the channel or groove, the screw will move back and forth in that channel due to the torque from the tub and agitator and cause a click or knock noise and eventually shear off, ruining the stem. I've seen it many times from rebuilds done by other companies...
Another thing to check that can make a knock noise during agitation is loose bolts where the tub support arms attach to the damper. Just something to check... RCD | ||
| Post# 625825 , Reply# 22 9/18/2012 at 02:37 (4,231 days old) by beekeyknee (Columbia, MO) | ||
|
Gosh Doug,
I'm kind of at a loss here. When you ran that machine empty with the basket out did you grab that agitator shaft and try to stop it. If it started knocking again that might have directed you to some kind of slop or play somewhere along the drive path. I should have suggested before to put the different agitators on the shaft while you had that basket out and grabbed the column with your hands to give it some resistance to try and get the machine to repeat the noise. Sorry. I don't suppose the splines in the agitator or on the shaft could be worn and causing a knocking sound when the agitator switches direction? Resistance on the agitator with an empty tub might reproduce the symptom. What about stop lug adjustment? Could this be a symptom of this sound, guys? See thread # 28069 in the 2010 archives, Doug. I don't know if it will help or not. It's a step I forgot to mention in my thread # 38714 that I regret. Sorry if has caused anyone any trouble. My manual says that the stop lug is the only adjustment that is made on the clutch-brake package. If a malfunction is present in the wash cycle, the trouble could be either in the brake package, radial bearing, tub bearing and seal assembly, or the transmission. It also says, under trouble-shooting. Machine Noisy In Wash. Transmission trouble - Remove transmission and replace necessary parts. Worn agitator spline - Replace agitator or have it resplined. Brake assembly - Brake shoes worn. Dismantle brake and replace shoes. (If I had to do that, I'd probably just replace the brake.) Pump - Remove and inspect pump. (Doesn't sound like your problem.) Belts - Replace belt. (Doesn't sound like your problem.) Motor pulley loose - Tighten pulley. (Doesn't sound like your problem either.) The only replaceable splines are in the bakelite agitators and I don't think yours is that old. Even if it is, I think replacing an agitator spline can be a dicey procedure. That's about all I know to tell you, Doug. If anyone else has some ideas, please throw them in if you want. Brian p.s. I don't understand why you would have trouble getting the old agitator off. It should pop off and on if well greased. This post was last edited 09/18/2012 at 03:00 | ||
| Post# 625828 , Reply# 23 9/18/2012 at 03:17 (4,231 days old) by beekeyknee (Columbia, MO) | ||
|
| ||
| Post# 625831 , Reply# 24 9/18/2012 at 03:36 (4,231 days old) by alr2903 (TN) | ||
|
Smokey, do you think your Tag has that 60 hz pulley that comes up in discussion around here from time to time. Your agitation is much faster than my center dial tag. I don't know about the knock. Just an observation, faster agitation is a good thing. alr | ||
|
Post# 625854 , Reply# 25 9/18/2012 at 07:39 (4,231 days old) by combo52 (50 Year Repair Tech Beltsville,Md) |
||
|
MT DC Care Washer Seal Assembly Andy we do get to disagree at times that's one of the things that makes this site so informative and fun.
I have probably only replaced a hundred or so of these center assemblies and never had a problem and sometimes when tightening the set screw I could tell that it went in a lot deeper so you must in any case you must really tighten it, so I cannot see why it would hold better in one area that another. I would thing that MT would have designed this better or had detailed instructions how to avoid it being assembled this way if it could really cause a problem.
Hope all is well in Reno I will try and call one of these days, John.
| ||
| Post# 626032 , Reply# 27 9/19/2012 at 00:13 (4,230 days old) by beekeyknee (Columbia, MO) | ||
|
The set screw
Hello John and Andy,
I don't want to get between you guys on a debate, but since I started the subject I feel compelled to remark.
As documented in the Helical Drive Service Manual on page 23 and 24 it reads as follows.
"Note: Previously, the mounting stem used a short "nylok" set screw. When replacing stem use Allen wrench to tighten set screw securely.
Currently a longer set screw is being used. When replacing the mounting stem and tightening the set screw it is possible that the set screw will line up with one of the flutes in the center plate.
This may be determined if when tightening the set screw it turns in flush with the mounting stem. If this is the case, tighten set screw securely as shown in Drawing 25 (Drawing omitted). Then loosen and retighten as shown in Drawing 26 (Drawing omitted). If set screw is too tight when aligned with one of the center plate flutes there is the possibility that it will cause a bind against the agitator shaft and prevent agitation.� If set screw aligns with threads on center plate, tighten set screw securely."
� I took liberties with the last sentence and underlined it to make a point. It is not underlined in the manual.� It is possible that the engineers at Maytag may have discovered, through empirical evidence, that the set screw was better placed on the thicker, threaded part of the center plate to prevent possible problems. As has been noted in the past, a set screw tightened in a flute may not hold as well as it has less metal to "bite" into and in turn could cause indexing of the basket which would strike the set screw during agitation and eventually could cause a groove to be carved around the neck of the center plate. Also during braking, the screw could be placed under severe force and sheer off. Personally, I don't think the people at Maytag would have wrote this in there service manual if there was no reason for it. The machines I have seen seem to do better when they are assembled in this way. � I haven't seen as many machines as John has, I'm sure, but the application seems logical and sound to me. Sorry I didn't post the pictures. They basically just showed the difference between how far in the set screw went in the two positions. Thanks for listening to my ramblings. This post was last edited 09/19/2012 at 01:26 | ||
| Post# 626039 , Reply# 28 9/19/2012 at 01:11 (4,230 days old) by beekeyknee (Columbia, MO) | ||
|
Doug,
There is a spring/thrust washer between the agitator drive shaft pinion and the top gear case cover that is supposed to hold the drive shaft down tight inside the transmission. One can see it between the pinion and the gear case cover when the top is off. It provides quite a bit of resistance when one tries to turn it while it's disassembled. Especially when the cover, orifice and shaft have been cleaned and degreased. This play in the shaft sounds unusual and a bit disturbing. One expects a Maytag to be very quiet and when it's not it's aggravating. You can either put up with it or look for a replacement gear case cover, if that turns out to be what's really wrong. Putting in a new drive shaft is a terrible project and there's no guarantee of success, all though I'm going to give it a try on my 806. I have a back-up plan if it doesn't work. Brian | ||
| Post# 626197 , Reply# 30 9/19/2012 at 21:45 (4,229 days old) by beekeyknee (Columbia, MO) | ||
|
Yeah, I think that's wrong. This could be my fault for not addressing the drive lug setting in my trans. rebuild post. I wish I would have addressed this. I hope it hasn't caused too many people trouble.
Take the screw and the washer off the end of the drive shaft. Spin the pulley slowly on the end of the drive shaft in a clockwise direction until it stops or you feel resistance. Hold it there. With the pulley held in that stopped position as mentioned before, put the drive lug on the end of the shaft with the lug to the left or counterclockwise of the pulley lug. The space between the two lugs should be about 3/8 to 1/4 inch apart. The drive lug is flat on one side and a little rounded on the other. Put the flat side toward the pulley and the rounded side toward you. Then put the washer on the screw and screw it into the bottom of the drive shaft. Now you can let go of the pulley. Put the rubber cap back on. Put some solvent or cleaner on a rag or paper towel and clean down inside the grooves on all the pulleys. Make sure your belts are clean and dry too. Put them back on. Your drive lug adjustment should be correct now. | ||
| Post# 626413 , Reply# 33 9/20/2012 at 19:07 (4,228 days old) by redcarpetdrew (Fairfield, CA) | ||
|
A while back QSD_DAN and I did a "how to" thread on doing a tub bearing and seal on a Maytag. See if this helps...
RCD CLICK HERE TO GO TO redcarpetdrew's LINK | ||
| Post# 626507 , Reply# 34 9/21/2012 at 03:38 (4,228 days old) by beekeyknee (Columbia, MO) | ||
|
Reply # 152 in thread # 38714 is how I did it. I've also used two heavy plastic coat hangers placed 180 degrees apart and sandwiched between the basket and the tub cover for adjustment. And I've just eyed it with the washer top down and pushed the tub cover into the collector tub until I got about a 1/4 inch space between the washer cover and the tub cover. You have to make sure it doesn't move when you're putting the tub gasket and clamp on or it will be all out of whack.
The tub cover's supposed to slip down inside the collector tub. | ||
| Post# 626539 , Reply# 35 9/21/2012 at 10:53 (4,228 days old) by smokey2367 (NW PA) | ||
|
Thanks Brian & Red Carpet Drew -- that helps a lot. I'll give it a try this weekend. Doug | ||
| Forum Index: | 
| Other Forums: |

|

|

|

|

|

 Comes to the Rescue!