|
Thread Number: 44640
Questions and observations about Maytag A700 water valve spares. |
[Down to Last] |
Post# 655245 1/22/2013 at 23:31 (4,104 days old) by d-jones  (Western Pennsylvania (Pittsburgh Area)) (Western Pennsylvania (Pittsburgh Area)) |
||
 | ||

|
|
Post# 655246 , Reply# 1 1/22/2013 at 23:32 (4,104 days old) by d-jones (Western Pennsylvania (Pittsburgh Area)) |
||
|
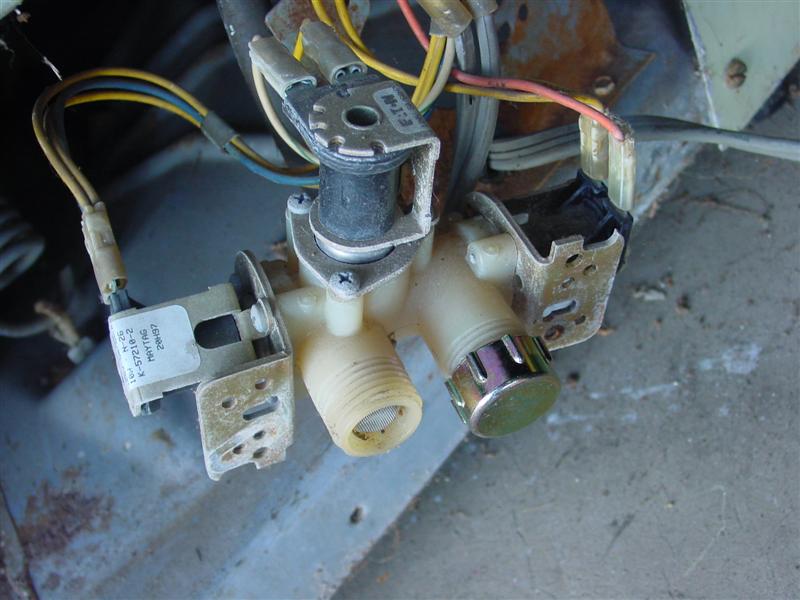
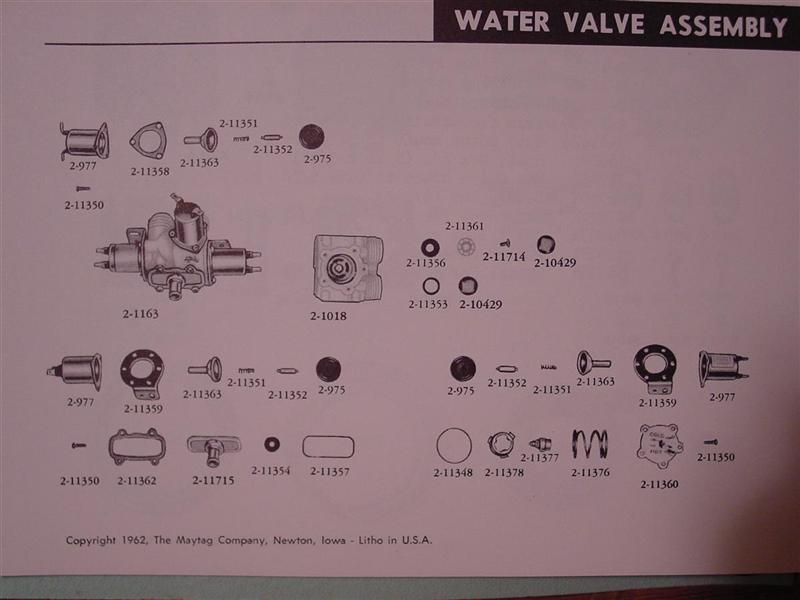
This is a page from a Maytag parts manual showing the original 2-1163 three solenoid valve that would have been installed at the factory. The large cavity seen in the stripped down valve body(pn 2-1018) houses a mechanism that regulates warm water temperature to 100 degrees, plus or minus 5 degrees. The round cover plate (pn 2-11360) mounts on top of this cavity and holds that mechanism in place. This is the valve I�d love to find.
| ||
|
Post# 655247 , Reply# 2 1/22/2013 at 23:33 (4,104 days old) by d-jones (Western Pennsylvania (Pittsburgh Area)) |
||
|
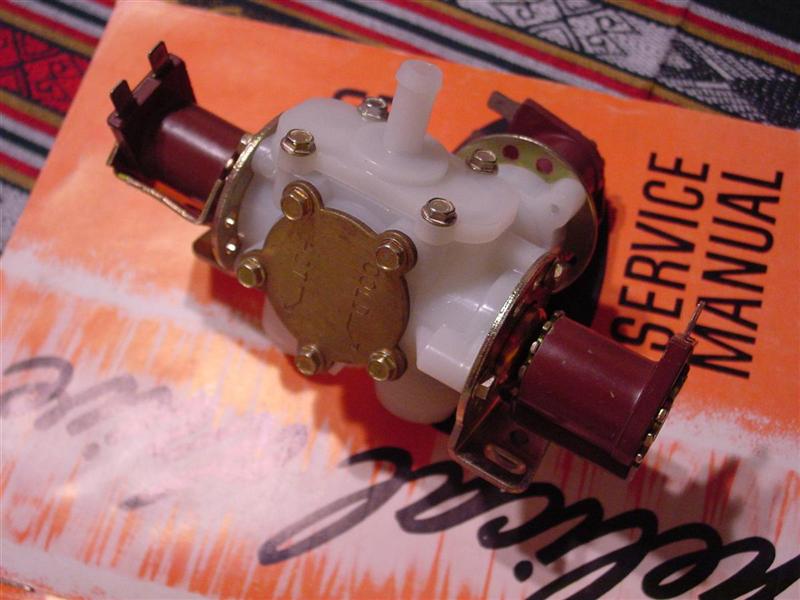
Well, the other day I came across an eBay listing for a valve that looked so much like the 201163 valve used on my washer that I decided I needed to investigate it a little further. So I contacted the seller, but he knew nothing about it other than it was found sitting in a box on a shelf marked 2-1163. So even though the valve in question was clearly not an original Maytag valve, I was really intrigued. Thinking I'd found something interesting I went ahead and bought the valve. It showed up today, and I eagerly sat down at a table with my tools to open it up and have a look. Note the physical similarities to the valve in the Maytag manual.
| ||
|
Post# 655249 , Reply# 3 1/22/2013 at 23:34 (4,104 days old) by d-jones (Western Pennsylvania (Pittsburgh Area)) |
||
|
| ||
|
Post# 655250 , Reply# 4 1/22/2013 at 23:37 (4,104 days old) by d-jones (Western Pennsylvania (Pittsburgh Area)) |
||
|
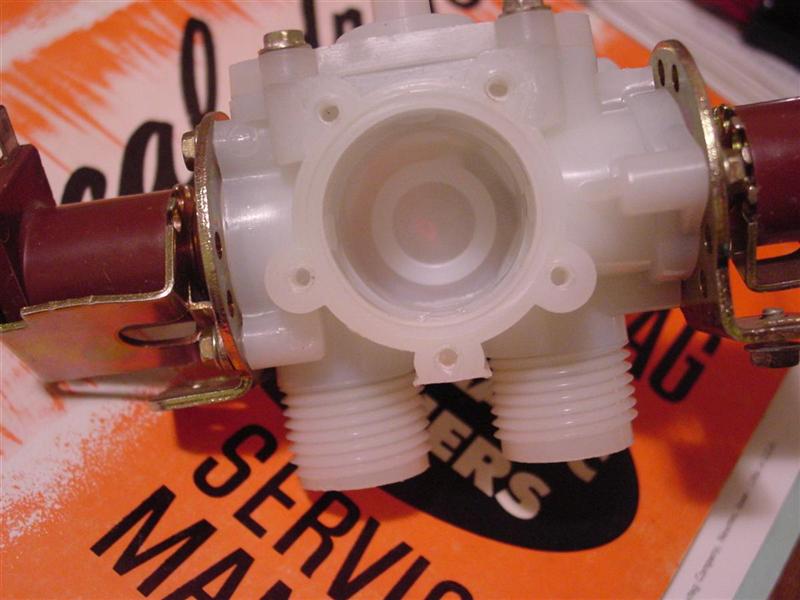
DOH!!!!! There�s nothing in there at all! There I was in a state of absolute vintage parts nirvana, only to be suddenly and unceremoniously whacked over the head with reality. Damn. How disappointing. Why would Horton go to so much trouble with their 221 valve to replicate the Maytag valves physical appearance, and then ignore one of the more important functional aspects of it? Could they have been thinking that as long as it looks the same nobody will notice the change in performance? Or do you suppose there was a version of this Horton valve that had a thermal element at one time? This is is one of those situations where I'd love to hear from members that have worked in appliance repair and perhaps have some experience with Horton or other aftermarket valve makers. Was the Maytag 2-1163 the only valve built for my washer that provided 100 degree warm water?
This post was last edited 01/23/2013 at 00:11 | ||
|
Post# 655324 , Reply# 5 1/23/2013 at 10:26 (4,103 days old) by combo52 (50 Year Repair Tech Beltsville,Md) |
||
Missing Valve Parts ? Interesting that the replacement valve is missing those parts, I have never seen that style valve body that was missing those parts so i don't know whether they may have been removed by someone or if they used up excess valve bodies and made a non thermostatic valve.
The thermostatic valve was an interesting feature to maintain a constant warm water temperature of around 100 degrees, it was especially helpful in areas where the cold water temperature was very cold in the winter or for modern homes where the hot water supply temperature is kept below 120 D. I am sure that I have the parts that your valve needs, call me if you need more information, Kevin B has all my #s, John
| ||
|
Post# 655344 , Reply# 6 1/23/2013 at 12:44 (4,103 days old) by d-jones (Western Pennsylvania (Pittsburgh Area)) |
||
|
Hi John. The idea that the missing parts were removed from the valve would seem like the obvious answer here, except that the part came in a sealed bag. I was so sure of this part that I actually picked up a second one, and when I discovered that the one valve was missing everything that should've been under the metal plate, I made use of a small hole in the bag on the other valve and had a look under its plate as well. Again, there's nothing there. So that leaves me thinking that all Horton 221 valves were made this way deliberately. But of course that begs the question, Why? Why would Horton do this? The only other possibility I can think of is that Horton intended the end user to transfer the thermostatic mechanism from the failed original Maytag valve, into their replacement. But having never seen the inside of an original thermostatic valve, for all I know that's not even possible. 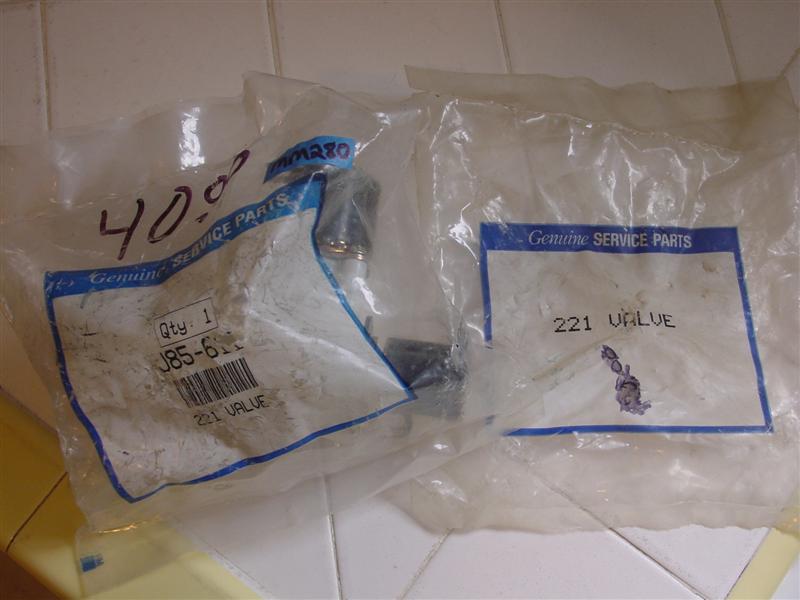
| ||
|
Post# 750151 , Reply# 7 4/14/2014 at 23:47 (3,657 days old) by d-jones (Western Pennsylvania (Pittsburgh Area)) |
||
|
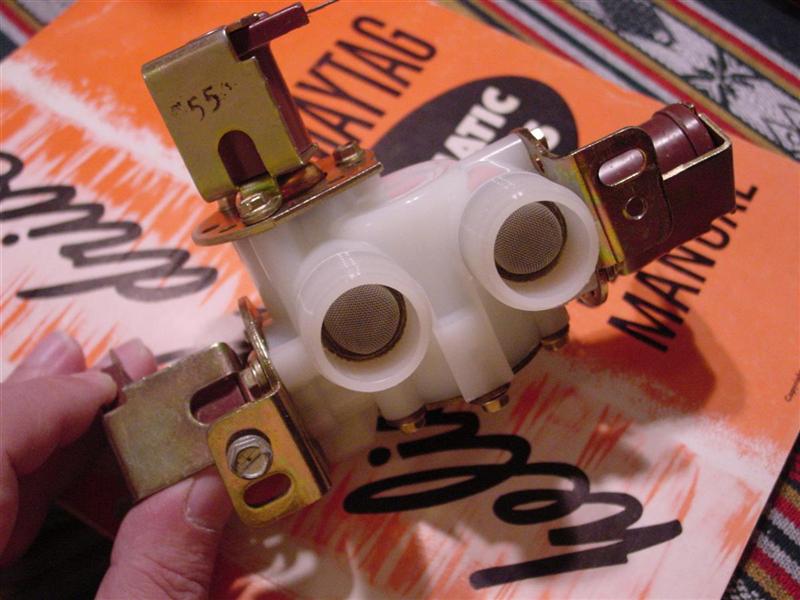
Update! Last February I managed to get my hands on a new old stock thermostatic valve for my A700, but it had been stripped of two of its solenoids and the mounting brackets. Fortunately I was able to borrow these parts from the Horton 221 valve seen to the left, so the thermostatic valve is now complete. But since it needs to go on the machine I was still looking for another to keep as a spare. Well, a bit more than a year of searching has finally paid off, but there's a twist. The other day I was reading through one of my Maytag washer parts manuals for fun(yes, I actually do that sort of thing) and I saw something intriguing. Maytag's washer model 140 uses a thermostatic valve that's nearly identical to the valve used in the later machines. The only difference I could find was the part number of its discharge nozzle. But as a result of that change the part number for the entire valve changed. Instead of the familiar 201163, its part number was 200864.
Anyways, I was feeling lucky, so I did a quick search and immediately found a seller that claimed to have two in stock. I bought them both and they arrived today. In the photo below the difference in nozzle diameter is clearly visible, but since the nozzles are easily swapped from one valve to another this is an absolute non-issue. I'll keep them as spares and when I need them I'll swap the nozzles. 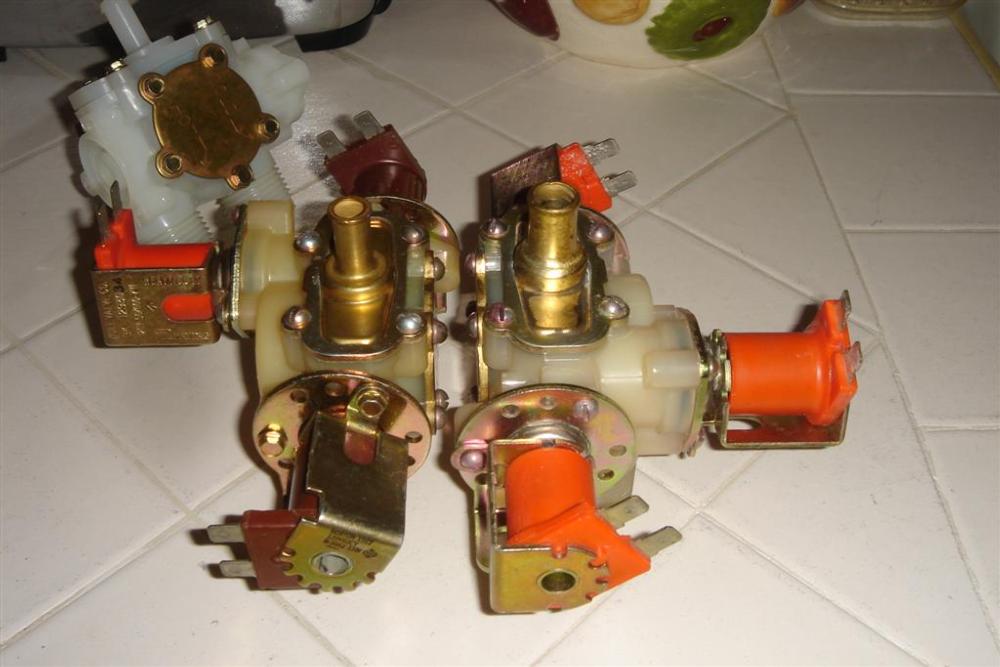
| ||
|
Post# 750152 , Reply# 8 4/14/2014 at 23:49 (3,657 days old) by d-jones (Western Pennsylvania (Pittsburgh Area)) |
||
|
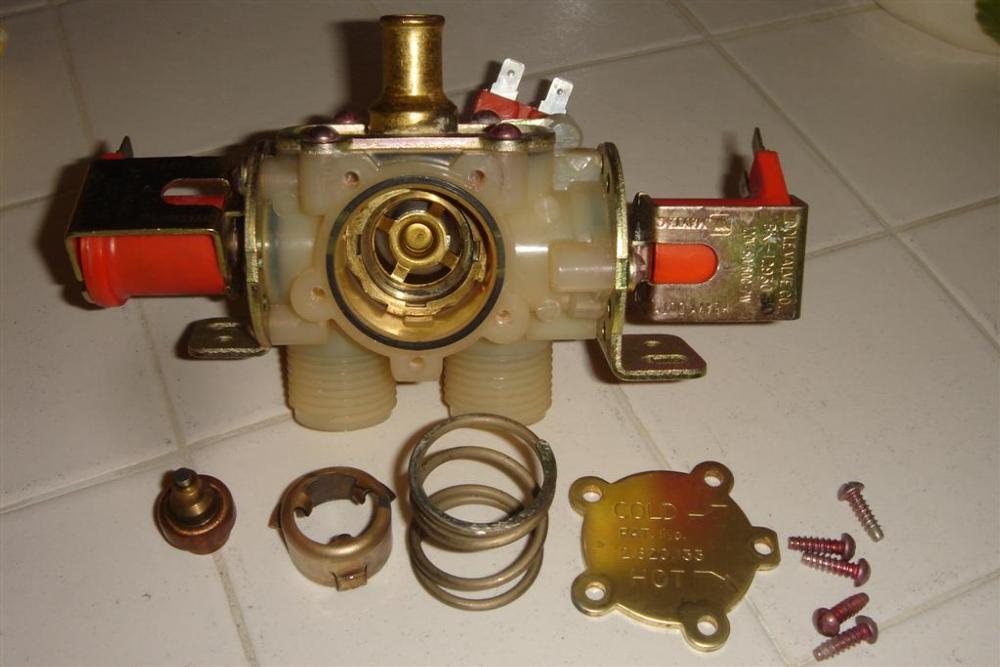
In this shot of the valves insides all of the parts for the thermostatic mechanism are present, and as mentioned above, all of their part numbers are the same as those found in the later valves. Now here�s a safety tip for anyone that ever needs to open one of these up to clean out accumulated mineral deposits. That large spring in the photo is there to prevent the valve from self destructing. Under normal circumstances it holds the thermostatic elements body firmly in place. But when things get jammed up and the internal valve won�t move, as the thermostatic elements piston extends this spring will compress before anything brakes. The bottom line is this is a fairly strong spring. Some of you guys are gorillas that would have no problem holding the cover plate down while you removed or installed the screws�����
| ||
|
Post# 750153 , Reply# 9 4/14/2014 at 23:50 (3,657 days old) by d-jones (Western Pennsylvania (Pittsburgh Area)) |
||
|
����. but for the rest of us a simple clamp will work, and not only save your fingers but possibly the valve. If you should lose your grip while you�re running the first screw in or taking the last one out you run the risk of that spring tension breaking the nylon valve body at the screw hole. That would be bad. Also, with the clamp in place you can take your time running the screws in a few turns by hand before reaching for the screwdriver. The screws are self tapping and are more than capable of cutting new threads each time they�re installed, but why chew up the holes in the valve body needlessly? If you can get a few turns on them by hand then you know you�ve picked up the original threads and aren�t cutting new ones. � Anyways, I was pretty surprised to find these valves under another part number and figured other folks might want to know about this as well, so consider this a heads up. 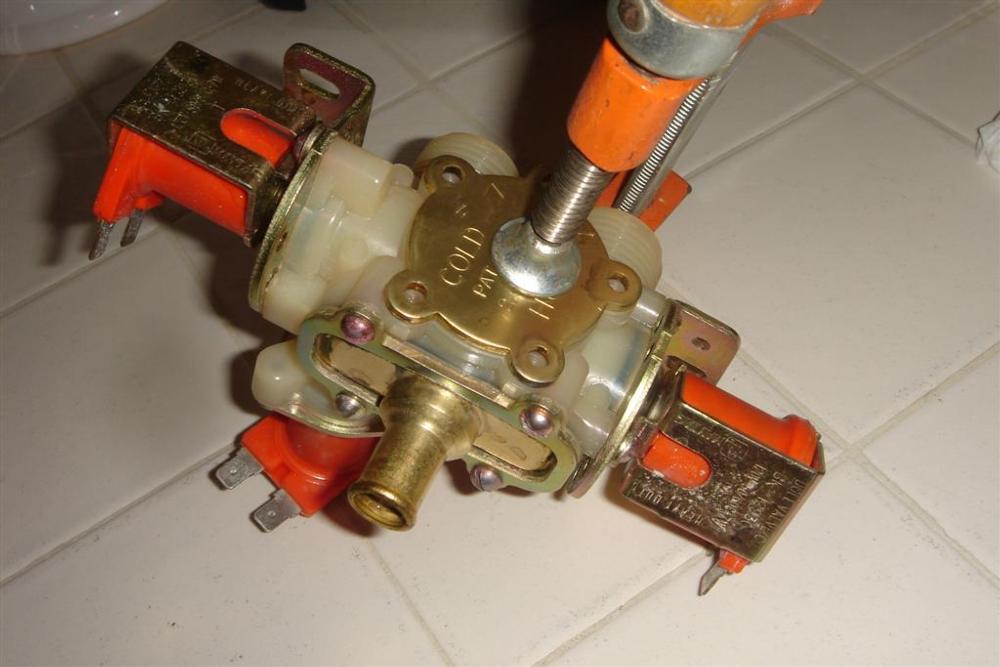
This post was last edited 04/15/2014 at 02:41 | ||
|
Post# 750208 , Reply# 10 4/15/2014 at 07:30 (3,657 days old) by combo52 (50 Year Repair Tech Beltsville,Md) |
||
|
Thermostatic Inlet Valves
Hi David Glad you found some good valves for your restored Maytag's.
I also bought several NIB inlet valves from various parts sources [ only because of your great detective work ] to now find out were missing all of the thermostatic parts. I don't have an answer as to why they did this, but my guesses are that they either did not want to keep making these parts, or they were just trying to cut costs. The big spring is whats makes the piston return to allow more hot water to enter the warm mix as needed. The thermostatic feature works much like a cars thromostat in the cars cooling system. A small thermal element that contains a wax like substance heats up and expands forcing open a valve and when it cools again a strong spring closes the valve again. These washer inlet valves work the same way only as the plunger moves back and forth it can go from using all hot or all cold water or any combination in between. David your suggestion about using a C clamp when dissembling and reassembling these valves is a very good one. | ||
| Post# 750226 , Reply# 11 4/15/2014 at 09:45 (3,656 days old) by dnastrau (Lords Valley, PA) | ||
|
Thermostatic valve reassembly Hi David:
Can you describe how the thermostatic parts are reassembled (order and orientation?)
Thanks!
Andrew S. | ||
|
Post# 750254 , Reply# 12 4/15/2014 at 12:15 (3,656 days old) by d-jones (Western Pennsylvania (Pittsburgh Area)) |
||
|
Hey John - Thanks for your C clamp endorsement, but I have to respectfully disagree with you regarding the purpose of that big spring hiding under the brass cover. While you are correct that spring pressure pushes the piston back as the wax cools, you've got the wrong spring. The spring you're thinking of is labeled 106 in the drawing below, and it's partially hidden from view underneath the piston valve, but if you look closely through the gaps left by the four spokes in its end you can see it in there. As the piston extends and pushes on the piston valve, this spring is compressed between the brass piston valve and the nylon valve body. As the wax cools and shrinks this spring pushes back. Here's a drawing from the original patent filing for this valve that shows how all of these parts relate to each other. In rereading the data it seems I misspoke(one day I'll learn to reread the data BEFORE I post). In the patent filing the large spring labelled 113 in the drawing is described as an overtravel spring, and its purpose is to protect the valve from damage in case the piston should extend too far in response to very hot water. Under normal operating conditions it will not move at all.
If you follow the link below you can download a copy of the patent information for this valve yourself. It's an interesting read
Andrew - Can you see what you're looking for in the drawing? It does show where everything goes, but if you still need more help let me know. CLICK HERE TO GO TO d-jones's LINK 
This post was last edited 04/15/2014 at 15:26 | ||
| Post# 750425 , Reply# 13 4/15/2014 at 23:40 (3,656 days old) by dnastrau (Lords Valley, PA) | ||
|
Thanks David! That illustration is exactly what I needed!
Andrew S. | ||
|
Post# 750461 , Reply# 14 4/16/2014 at 08:00 (3,656 days old) by combo52 (50 Year Repair Tech Beltsville,Md) |
||
|
Dole Plastic bodied thermostatic inlet valves
Hi David thanks for the further explanation on these valves operation, it appears that the smaller spring is actually the spring I was talking about that causing the piston to move back as the valve needs more hot water to maintain the 100F warm mix and the bigger spring you talked about does absorb energy from over expansion of the wax filled thromostat cause by very hot water.
Pretty cool system, these Plastic bodied valves did show up on many brands of automatic washers in 1956. | ||
|
Post# 750531 , Reply# 15 4/16/2014 at 13:43 (3,655 days old) by d-jones (Western Pennsylvania (Pittsburgh Area)) |
||
|
Pretty cool system | ||
| Forum Index: | 
| Other Forums: |

|

|

|

|

|

 Comes to the Rescue!