|
Thread Number: 44861
Maytag Damper Pad Instructions? |
[Down to Last] |
| Post# 658076 2/4/2013 at 16:20 (4,097 days old) by danemodsandy (The Bramford, Apt. 7-E) | ||
|
Hola!
Does anyone here have a link to a really good explanation (hopefully with pictures) of the damper pad replacement procedure on Maytag washers? I need to tackle this on an early (ca. 1968) A806. I understand there's a way to do it without removal of the brake package, which is how I need to do it. I've come a long way with AW members' tutelage, but I'm not that good yet. Any help would be welcome - pads, Polylube and adhesive are on the way! Also belts and motor glides, but that's another story.... | ||

|
Post# 658081 , Reply# 1 2/4/2013 at 17:04 (4,096 days old) by d-jones  (Western Pennsylvania (Pittsburgh Area)) (Western Pennsylvania (Pittsburgh Area)) |
||
 I did this on my parents HA806 when I went through it last year. You'll need to start by removing the cabinet, but that's not nearly as hard as it sounds. Once the cabinet is off, mark the position of all of the nuts that keep tension on the centering springs, then loosen the springs until you're able to disconnect them from the tub braces. At this point the tub is free to wobble around so watch out for that. Now you'll want to tip the tub and base plate back far enough that you'll be able to slip a wooden block(perhaps a short piece of 4x4 from a lumber yard) under the center of the machine. Now when you lower the base plate and tub back down, the brake assembly will come to rest on the block, thereby lifting the damper assembly up away from the base plate high enough that you should be able to replace the pads. If you try to do this with the cabinet in place, the tub cover will crash into the underside of the top panel before you get the clearance you need to reach the damper pads. When you reassemble everything, make sure to run the nuts for the centering springs back to the marked positions. I know it sounds a bit involved, but it really does sound worse than it is. I haven't tried searching through the archives on this, but you may find that someone's already documented this process here. I hope this helps. | ||
|
Post# 658088 , Reply# 2 2/4/2013 at 17:47 (4,096 days old) by Kenmore71 (Minneapolis, MN) |
||

It's not essential to remove the cabinet although it does give you more room to work. The key to doing it this way is to tape the lid down and then remove the 2 bolts that hold the cover down. That way the cover can hinge up the 2-3 inches and give you enough clearance.
Here is the process as described in a Maytag service manual. 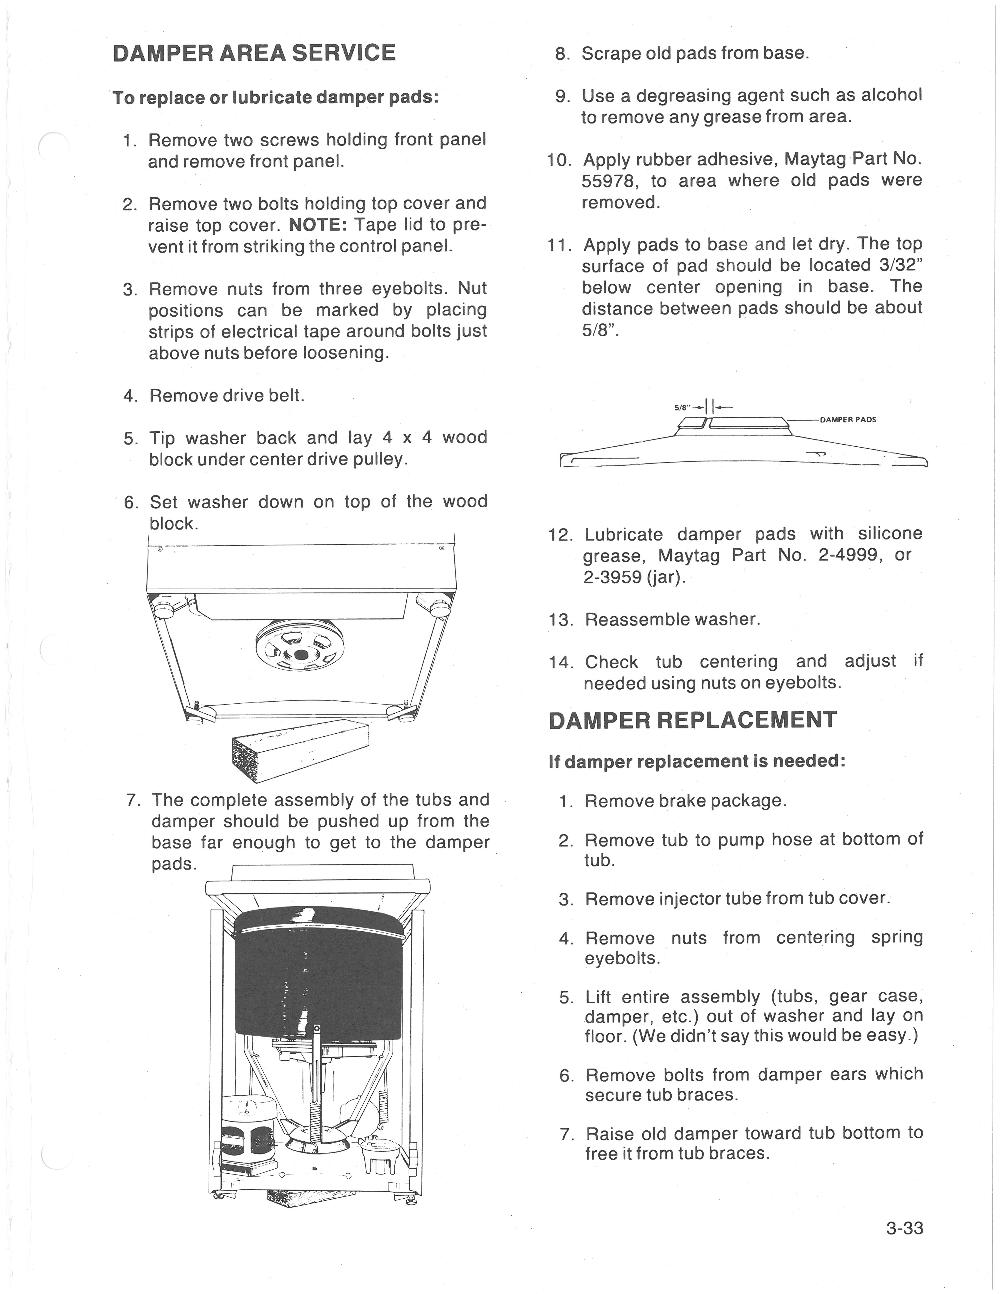
| ||
|
Post# 658090 , Reply# 3 2/4/2013 at 17:58 (4,096 days old) by d-jones (Western Pennsylvania (Pittsburgh Area)) |
||
|
| ||
| Post# 658102 , Reply# 4 2/4/2013 at 19:28 (4,096 days old) by danemodsandy (The Bramford, Apt. 7-E) | ||
|
Aiiiiiiiiiii! | ||
|
Post# 658107 , Reply# 5 2/4/2013 at 19:44 (4,096 days old) by super32 (Blackstone Massachusetts) |
||
 | ||
| Forum Index: | 
| Other Forums: |

|

|

|

|

|

 Comes to the Rescue!


