Thread Number: 46269
KDS-16 with soak cycle Does not fully drain.
[Down to Last]

automaticwasher.org's exclusive eBay Watch:
scroll >>> for more items --- [As an eBay Partner, eBay may compensate automaticwasher.org if you make a purchase using any link to eBay on this page]
Post# 675774   4/27/2013 at 10:04 (4,009 days old) by learning ()        

KDS-16 Does not fully drain.
During the last two to three uses my KDS-16 Dishwasher is not fully drained when the cycle ends.
I observed the functioning of the machine and the drain value does activate at each transition of the cycles and I see the water pouring into the sink drain from above but when the cycle is finished and I open the door there is still water inside. I push the “Cancel Drain” button and the remaining water evacuates out into the sink drain.
I read a thread from 2011 and the items mentioned were timer, overfill valve, and drain solenoid. Not sure any of these are my problem.

Other than possible solutions for this situation I am wondering if it is safe for the machine to be stopped to open the door at each cycle transition to see the water levels etc. I never counted but I have to think that would be about 8-10 open and close on and off cycles and don’t know if I will damage the machine doing that.

How high should the water be at each fill cycle? I assume the water should be nearly totally evacuated at each draining operation.
Your experience on these levels and the safety of opening and closing the door would be greatly appreciated.

Also two other things are going on that may be related. I have had a change in the motor noise. For a few months now the noise was a constant buzzing or humming noise that quieted down once the machine is filled with water. Now it is a sequel at the beginning that stops about midpoint in the 1st prewash and then the machine is pretty quiet. Also while it was making the buzzing or humming noise when it was draining I could hear a dry pumping type sound as the last amounts of water squirt into the sink drain. I know longer hear that dry pumping sound. This makes me wonder if the drain impeller is not pumping efficiently enough to evacuate all the water in the allotted time. I have thought to look in the pump housing but the screw on the top of the wash impeller seems very tight and I don't want to turn too hard to the left in fear of breaking off the screw in the motor shaft. Any tricks on how to free up that screw? (vinegar, liquid wrench veg oil. ect)?

Also I am in the process of replacing the drying motor and when it 1st failed and wouldn’t start to see if it was the timer I manually advanced the timer gently very slightly one click. Don’t know if that has caused the problem. Again the cycles function in the correct amount of time, I see and hear water flowing to fill and drain and the shaft returns to the correct position at the end.
I really enjoy having this great machine and hope that I can correct this situation.
Thanks in advance for the advice.
John


Post# 675793 , Reply# 1   4/27/2013 at 11:15 (4,009 days old) by Kenmore71 (Minneapolis, MN)        

kenmore71's profile picture
Of course you can open the door during the cycle to check to see if it's leaving water. When you first hear water draining, time it. About 45 second later you will hear the drain valve snap shut and the timer will advance to the next fill. That moment is the time to open the door and check to see if it is emptying completely. When you close the door, you will have to push the cycle button that you had first chosen to start the machine again.

I suppose the safety pressure valve could be faulty and that it's overfilling. If that IS the case, though, I suspect that it would be overfilling enough such that machine would be leaking. You can also open the machine while it's washing to check. Just lift the handle and wait a few seconds until the water stops if you want to avoid getting wet!

As to possible causes for this...while I suppose there COULD be a problem with the drain pump impeller, most likely there is an obstruction somewhere. This could be in the pump, one of the hoses, or perhaps the drain valve itself. I would start my investigations with the easiest things first the hoses, then the drain valve and save any investigation of the pump until last.

Here is what the water level is on my KDS-16 for a full fill.


Post# 676083 , Reply# 2   4/28/2013 at 15:37 (4,008 days old) by learning ()        

Kenmore71,
Thanks for the good advise and the picture of the water level. Any thoughts on how to loosen up that screw if I have to look in the pump?


Post# 676092 , Reply# 3   4/28/2013 at 16:34 (4,008 days old) by quincyman (Oldsmar, FL)        
Filter

Clean the filter. Had that happen to me and that was the problem.

Post# 676149 , Reply# 4   4/28/2013 at 21:58 (4,008 days old) by Kenmore71 (Minneapolis, MN)        

kenmore71's profile picture
I read your first post again and I fear that I may be the bearer of bad news. A squealing sound that goes away when water is added is, more often that not, a leaking seal that is allowing water into a bearing. The water quiets down the squealing bearing FOR A WHILE until the the bearing rusts to the point where it seizes.

I've never had the pump apart on a KA dishwasher so I have no ideas to share with you there.

Have you downloaded the KD-16 series service manual from Automatic Ephemera? I've posted the link below. It's a small price to pay for a clean scan of the same manual that KA repairman would have had in tow in 1970!


CLICK HERE TO GO TO Kenmore71's LINK


Post# 676193 , Reply# 5   4/29/2013 at 07:13 (4,007 days old) by combo52 (50 Year Repair Tech Beltsville,Md)        
KDS-16 Draining problems

combo52's profile picture

The most common reasons that these DWs don't drain fully are.


Clogged air-gap on the sink counter-top [ if your DW has one]


A piece if broken glass or other forigen object caught in the drain valve or other blockages in the drain line.


Damaged drain impeller in the pump, this was really very common on 15-20 KA DWs and if the two things above don't turn up the problem you should disassemble the pump and look. The main SS impeller screw will unscrew if you use a good screwdriver, you will not be able to break this screw off with hand force.


Post# 678960 , Reply# 6   5/12/2013 at 14:31 (3,994 days old) by learning ()        

Thank you guys for all the great advise. Sorry for not sending this thank you sooner.I have been occupied with my elderly parents and have been too busy to work on this project or even log on to this site. (I currently have no smart phone) but plan to restart again. I will post my findings.

Post# 678971 , Reply# 7   5/12/2013 at 16:16 (3,994 days old) by learning ()        

I just took 40 min and ran the machine stopping between each cycle.
At the Prewash when the water input valve shuts off I have almost exactly the amount of water that Kenmore71 shows in the pic. After the 1st drain there is still water above the course screen and up into the fine metal screen. With each check the water level is higher at each fill and drain cycle until by the time I get to the end of the fill at the rinse cycle the water in about a 1/3 of the way up the spray arms and the tub is overfilled to the point that a little water splashes out the bottom of the door as the spray arm rotates. I'm not sure why the overflow shut off is not shutting off the input valve but regardless of the condition of the overflow shut off obviously water is accumulating after each cycle. By the time I get to the drying cycle the remaining water is slightly below what the normal level where full should be.
The drain valve stays open for about 1 min. during draining.
The screens are clean and clear and I believe the lines are clear but I think that the flow rate while steady and solid into the sink drain it is not as powerful as I remember.
Would you guys agree that the next step is going into the pump housing? I am still worried about corrosion on the shaft of that screw even though I am sure combo52's experience is correct that it should be o.k. Would I hurt anything if I poured a few drops of vinegar around the screw each day for a week? What about something stronger like liquid wrench? or maybe veg. oil? Or should I just go for it? I have the drain impeller so I would assume that even if it's o.k. I should replace it while I am in there? I really appreciate the assistance that all of you share. All advise is welcome.
Thanks,
John


Post# 679126 , Reply# 8   5/13/2013 at 12:56 (3,993 days old) by barcoboy (Canada)        

barcoboy's profile picture
If you can find a temporary piece of hose that would fit, I would try disconnecting the main drain hose and connect on the temporary hose first, then see if the flow rate when draining is any better. If it is, you've saved yourself having to disassemble the pump.

Post# 679169 , Reply# 9   5/13/2013 at 18:25 (3,993 days old) by stevet (West Melbourne, FL)        
drain hose???

Did you just install this machine? If so, did you connect the drain with one of those corrugated drain lines most ohter brands come with? If so, that could be part of your problem. I did that with my KDS18 when I pulled out the crappy GE profile our house came with. There was so much resistance inside the hose that the 18 would not drain completely either and it had the upgraded Hobart large volume impeller and it still would not do the job. As sugested by Todd, replace the drain hose and drain it into a 5 gallon bucket(which is the recommended troubleshooting method) and see if the problem disappears. If it does, you have your answer. Also make sure there are no kinks in the drain line.

Another thing to check as far as the overfill condition goes, the water level switch is secured to the back of the front cross member on the left side. I would strongly suggest you remove the machine and check the following two items:

On the left side of the sump you will find a small hole which is a nipple welded to the tank or possibly a rubber adapter which connects to the hose that goes to the pressure switch. These get clogged up with food and other debris so you may have to clean it out.
Use something not too invasive like a pipe cleaner or a Q-tip so you don't puncture the rubber hose. The other is the hose itself. If you can get the hose off without breaking anything that would work too. Make sure it is clean and maybe blow lightly into it to make sure the switch clicks.

DO NOT TRY AND ADJUST THE SWITCH.

Eddie Toploader 55 just had the same problem with his machine and this procedure made it all better.

Also...NO PETROLEUM BASED WD 40 OR PB BLASTER ON THE DRAIN IMPELLER OR SEAL. YOU WILL MORE LIKELY DESTROY THE SEAL. Everything will disassemble easily if you use good tools and take your time.

If your machine has never had its seal replaced it probably has the drain impeller with the soft rubber blades which did wear out. They were replaced with a harder material which gave much better life and service so you may find there are no longer any blades to push out the water.

Keep us posted.


Post# 679642 , Reply# 10   5/16/2013 at 07:48 (3,990 days old) by learning ()        

Thought I would have a chance during the week to work on this and report back. Looks like it's the weekend again. Didn't want to wait any longer to thank you guys for the help so far. I will report back on my finding.
John


Post# 681990 , Reply# 11   6/1/2013 at 18:12 (3,974 days old) by learning ()        
Really could use some help!

Guys,
I finally got back into fixing my KDS-16. I determined that I should go ahead and look at the drain impeller. Turns out that the removal was not anywhere as hard as my imagination had created. The problem is the cap that sets within the lower pump housing will not come out. I can see through the opening that in fact my impeller is really worn so that should solve the problem.
I need advise from any and all of you experienced members as to the best way to free that cap nestled in the lower pump housing so I can replace the impeller. Attached is a picture of where I am in this project.
Thank You,
John


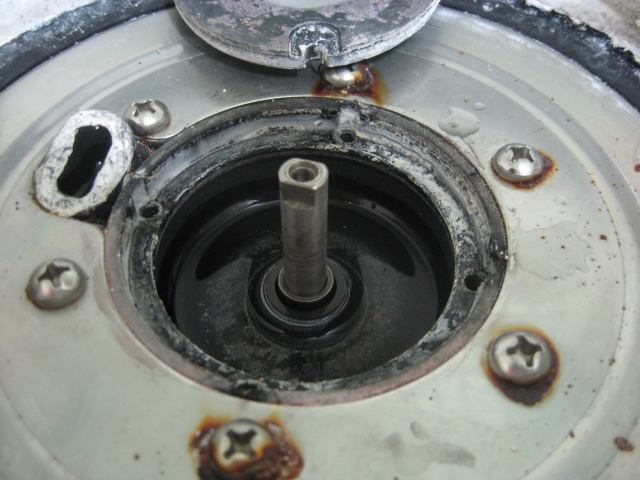
Post# 681992 , Reply# 12   6/1/2013 at 18:18 (3,974 days old) by combo52 (50 Year Repair Tech Beltsville,Md)        
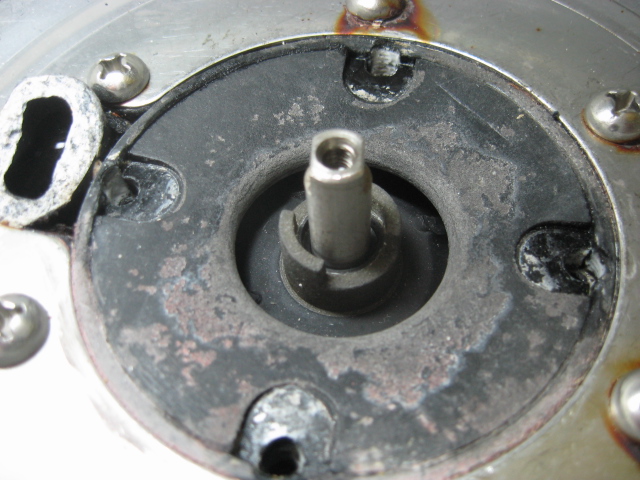
Removing KD-15-17 Drain Impeller Cover

combo52's profile picture

You are most of the way there, Yay, Now just insert a small Phillips screw driver or an awl 1/4" into one of the four holes around the cover and pry outward and the cover will pop right up.


Post# 682010 , Reply# 13   6/1/2013 at 19:45 (3,974 days old) by stevet (West Melbourne, FL)        
Thanks for the memories..

To all those of you out there that had to service these machines on a regular basis, doesn't the sight of that pump coming apart bring back both good and bad memories?

Any Hobart Tech in my age category can tell some horror stories about what we would see when disecting a pump to replace a shaft seal and impeller..

Almost just as bad today as it was then.. in fact, it is now much harder to do the same job on our undercounter machines.. totally different designs except for the SR24 series based on the 18 Kitchenaids but they are no longer produced now!


Post# 682081 , Reply# 14   6/2/2013 at 08:02 (3,973 days old) by Learning ()        

Thank You Combo52 and Stevet!
I will try Prying with a 1/4" awl.
One other thing. If you notice on the photo the water inlet on the left appears to be broken. I assume that becuase of the white/gray porous soap residue appearance that it has been that way for a while. Is this going to be a problem. The piece that is there is tightly stuck to the lower pump housing. I don't plan to touch the lower piece but should I leave it alone or put a bead of sealent or epoxy on it before I reinstall the upper pump housing? If so what sealent/epoxy would you recommend?
Thanks again,
John


Post# 682088 , Reply# 15   6/2/2013 at 09:05 (3,973 days old) by Stevet (West Melbourne, FL)        
Uh Oh!

John,

I hope this does not become one of those horror stories I spoke about!

It looks like that piece broke off the lower pump housing that the wash impeller sat in. Is that what happened?

If so, you will really have to find a replacement part and gently remove the part that is stuck in the lower housing that is still attached to the tank. Then when you reassemble the pump, it will all go together nicely.
These parts are long since gone and NLA, but I have seen them on ebay and there may be guys on here who have some spares. I don't think any sealer would really work nor do you want to epoxy it as you won't be able to take it apart very easily in the future.

Sometimes, when you get involved with these vintage machines, you have to search for a donor machne so you can keep one of them up and running. You can use any 16 or 17 series machine for a donor unless you find an exact match for your machine and then you will have a complete set of spare parts.


Post# 682114 , Reply# 16   6/2/2013 at 12:28 (3,973 days old) by combo52 (50 Year Repair Tech Beltsville,Md)        
Broken Port on The Lower Pump Housing

combo52's profile picture

I am going to give a little difference advice on dealing with this problem, { I have been repairing residential KA DWs for nearly 40 years ] And I have seen this part broken at least a hundred times [ this part breaks off easily if you don't rock it loose after the screws are removed ] You can put epoxy or a good waterproof sealant on it if you wish or you can just screw the upper part back in place, it will form a very good seal when the two broken parts are screwed into place, also do not remove the part that is stuck in place unless you find an intact replacement, that part does not need to be removed to rebuild the drain impeller and water seal.


Post# 682165 , Reply# 17   6/2/2013 at 21:28 (3,973 days old) by learning ()        

Guys,
I really appreciate your help on this project.
This is a really great machine. At the rate I am going it's a restoration not a repair. The other area I am working on is the dryer unit. I think I am all set there. What a great design to just remove those two screws from the front and swing the housing to the left. Someone was using their head with that.
Combo52 in the interest of getting up and running I plan to piece the housing back together may use clear silicone for a seal of leave it as you said.
Stevet, I will start to look for an upper pump housing for a permanent fix. Great idea trying to find a donor machine.
I hope that I can get this machine to a stable point. It has been in our family since new.
Here is the latest pic. Success prying the cap off with a 3/16 awl.
As you can see this is certainly a problem. I am suprised I was draining any water at all!
I was also supprised to see another shim washer under the impeller. Is there anything I have to do on the motor shaft or just set the new impeller and ceramic bushing right over the shaft? I assume the ceramic bushing is in the cup of the impeller. The one I have is hard to identify. I will be getting the impeller this week and hope to have this machine back running by next weekend.

Thanks again to both of you for staying with me. I will keep you posted as things develop.
John


Post# 682166 , Reply# 18   6/2/2013 at 21:39 (3,973 days old) by learning ()        

Here is pic of the under impeller area.
By the way I used an inspection mirror and saw the overflow opening. The opening is not completely bocked so I am thinking of carefully pulling some of the debis into the tub area. I really am not comfortable removing the valve and risking breaking off the connector. Will that make any difference or make it worse? The opeining is not fully blocked so I can go in with a thin object and pull back toward the tank. If you guys don't think that's a good idea I will not attemp.

Thanks again,
John


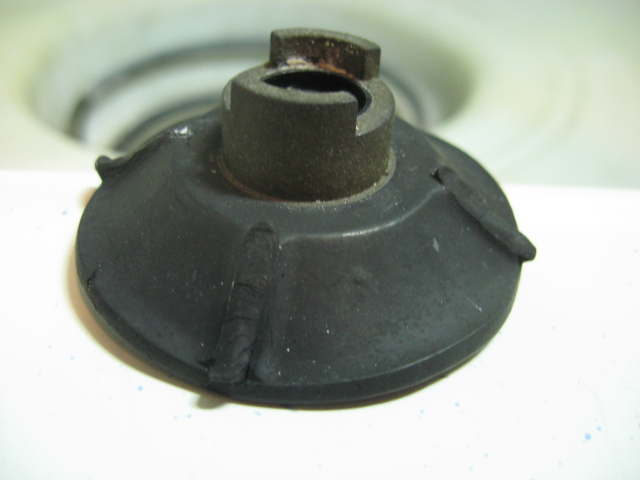
Post# 682220 , Reply# 19   6/3/2013 at 07:05 (3,972 days old) by combo52 (50 Year Repair Tech Beltsville,Md)        
Removing Drain Impeller Bits

combo52's profile picture

The picture of your failed drain impeller is what I expected to see when you first described the problem you were having with poor draining performance. Back when these machines were popular we would often do several drain impeller replacements a DAY, the 18-20 KA DWs also had lots of problems with broken drain impellers from foreign objects getting caught in the pumps. KA didn't didn't cure this problem till the introduced the all new new pump design used in the KD 21 and 22 machines.


I would remove the hose and drain valve and check for any bits of stuff stuck in the hose or drain valve, doing this will not likely cause any problems. You may also want to replace this section of hose and the two clamps unless the original is in great shape, automotive heater hose of the correct diameter  will work great for the temperature and pressure involved here.


John


Post# 683674 , Reply# 20   6/12/2013 at 11:56 (3,963 days old) by learning ()        

Gentlemen,
My repair got delayed again due to working out some health problems that my parents are facing,sorry this has been so drawn out.
You have both been very generous but if I may I have a few last questions before I start.
I recieved my impeller and I notice that there are two cone shaped washers in the bag. Do I install both one on top the the other or just one? I would like to keep one so if I have to get back into the pump (to replace the lower wash pump housing) I have a new washer available or doesn't that matter if the cone washer is flattened?
Also related to the spacers, should I put them back in the same order they came out or mix them up for more even ware?
I am most worried about the spacer on the bottom under the impeller. Should I try to find a new one of those? I don't know if that bares any friction or not. It is not clean like three of the four on the top. The dirty one on top is the one that made contact with the seal.

Does the o-ring seal on top of the impeller need any special seating by itself or just wet it and let it seat by the preasure of the spacers?

Also I think I may have found a lower wash pump housing. I plan to get it but I am worried about damaging the drain housing if I take a chunk out of it while wiggling the broken piece out or from the preasure of installing the new one. I believe that that piece has been broken for some time so my head tells me to leave well enough alone for now and just keep the new one in reserve and put the lower pump housing back together as was suggested and see how that goes. What does your experience tell you.
As always the advise is very appreciated!

Thanks,
John


Post# 683675 , Reply# 21   6/12/2013 at 11:59 (3,963 days old) by learning ()        

Gentlemen,
My repair got delayed again due to working out some health problems that my parents are facing,sorry this has been so drawn out.
You have both been very generous but if I may I have a few last questions before I start.
I recieved my impeller and I notice that there are two cone shaped washers in the bag. Do I install both one on top the the other or just one? I would like to keep one so if I have to get back into the pump (to replace the lower wash pump housing) I have a new washer available or doesn't that matter if the cone washer is flattened?
Also related to the spacers, should I put them back in the same order they came out or mix them up for more even ware?
I am most worried about the spacer on the bottom under the impeller. Should I try to find a new one of those? I don't know if that bares any friction or not. It is not clean like three of the four on the top. The dirty one on top is the one that made contact with the seal.

Does the o-ring seal on top of the impeller need any special seating by itself or just wet it and let it seat by the preasure of the spacers?

Also I think I may have found a lower wash pump housing. I plan to get it but I am worried about damaging the drain housing if I take a chunk out of it while wiggling the broken piece out or from the preasure of installing the new one. I believe that that piece has been broken for some time so my head tells me to leave well enough alone for now and just keep the new one in reserve and put the lower pump housing back together as was suggested and see how that goes. What does your experience tell you.
As always the advise is very appreciated!

Thanks,
John


Forum Index:       Other Forums:                      


Comes to the Rescue!

The Discuss-o-Mat has stopped, buzzer is sounding!!!
If you would like to reply to this thread please log-in...

Discuss-O-MAT Log-In


New Members
Click Here To Sign Up.


automaticwasher.org home
Discuss-o-Mat Forums
Vintage Brochures, Service and Owners Manuals
Fun Vintage Washer Ephemera
See It Wash!
Video Downloads
Audio Downloads
Picture of the Day
Patent of the Day
Photos of our Collections
The Old Aberdeen Farm
Vintage Service Manuals
Vintage washer/dryer/dishwasher to sell?
Technical/service questions?
Looking for Parts?
Website related questions?
Digital Millennium Copyright Act Policy
Our Privacy Policy