|
Thread Number: 46798
1978 Norge bearings? Seal? |
[Down to Last] |
Post# 681581 5/29/2013 at 20:07 (3,977 days old) by akronman  (Akron/Cleveland Ohio) (Akron/Cleveland Ohio) |
||
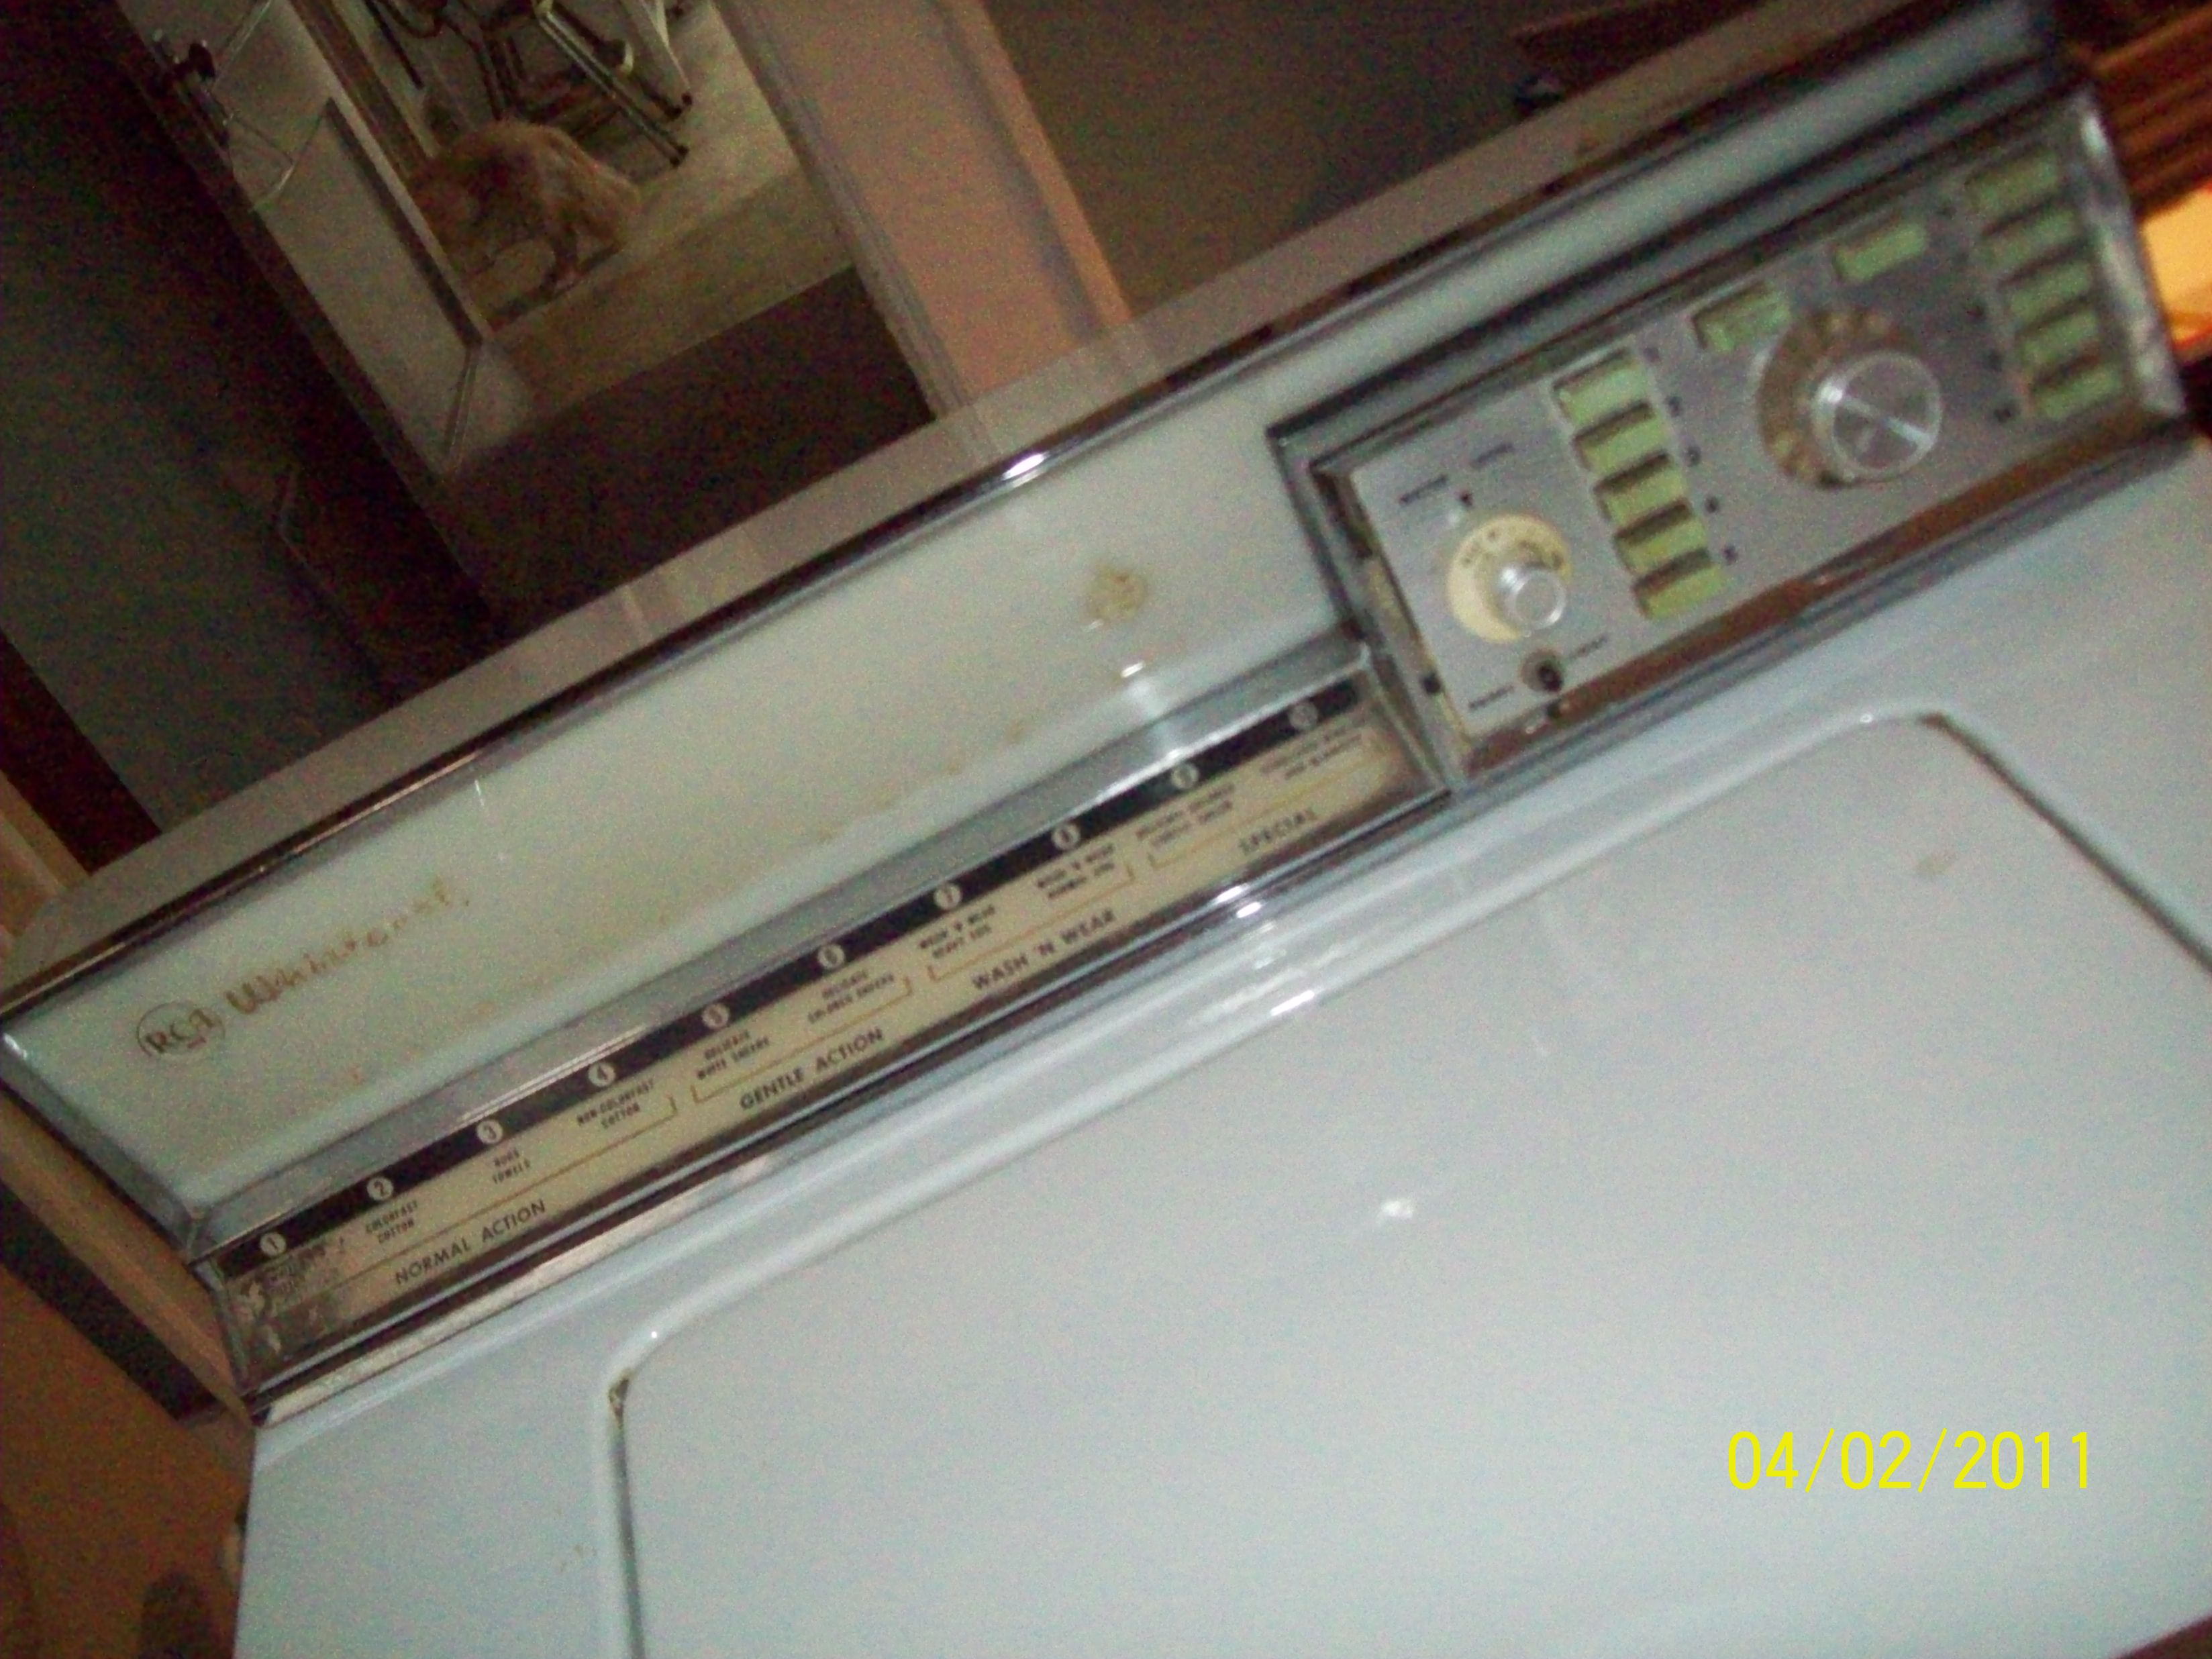 I have a Norge washer, 20#, model LWA2065B, from 76 or 78 (Fedders era), with the white Burp-A-Lator. All has been well until a week ago. Wash agitation was fine, it paused then started neutral drain. When it kicked into spin, it was VERY slow. I waited until almost all water was out, then gave it a hand-push by turning the agitator. It got up to full speed. I did the same again for the final spin, the load was full of towels. I then tried a light load of clothes, agitation fine, then when spin kicked in, a rumbling grinding noise for a few seconds, then the motor overload tripped out. I also noticed a small amount of water dripping from the base. So I don't know if it's bearings--tranny--tub seal, all of the above? 2 loads earlier was a perfect wash, very rapidly something(S) failed entirely. I drained her and let her sit for a week, I just moments ago tried a dry agitation and it was fine. When I turned to spin, almost immediately the motor cut out. There's not a lot of Norge literature out there, and the model #LWA2065B00 doesn't help me anywhere at all, out of 12 parts websites. I have a 1970 Norge(Fedders) Repair Master. It shows both a brake solenoid and a clutch solenoid, mine is a later model with only the loud brake solenoid, so I can only somewhat trust what that book shows.
I love this machine, I have had great luck thru hard work repairing/restoring many other makes, but not much Norge work. til now!
Any advice on where to start, what bearing kit to buy, what to tear into, will be greatly appreciated and photoed and posted. I'll do more reading in the 1970 Repair Master tonight, but can't yet figure why locked up spinning is also giving me a leak. I ain't guessing this is gonna be an easy fix, but after 18 months with that great machine burping away and doing everything loud and well, it will be worth it. 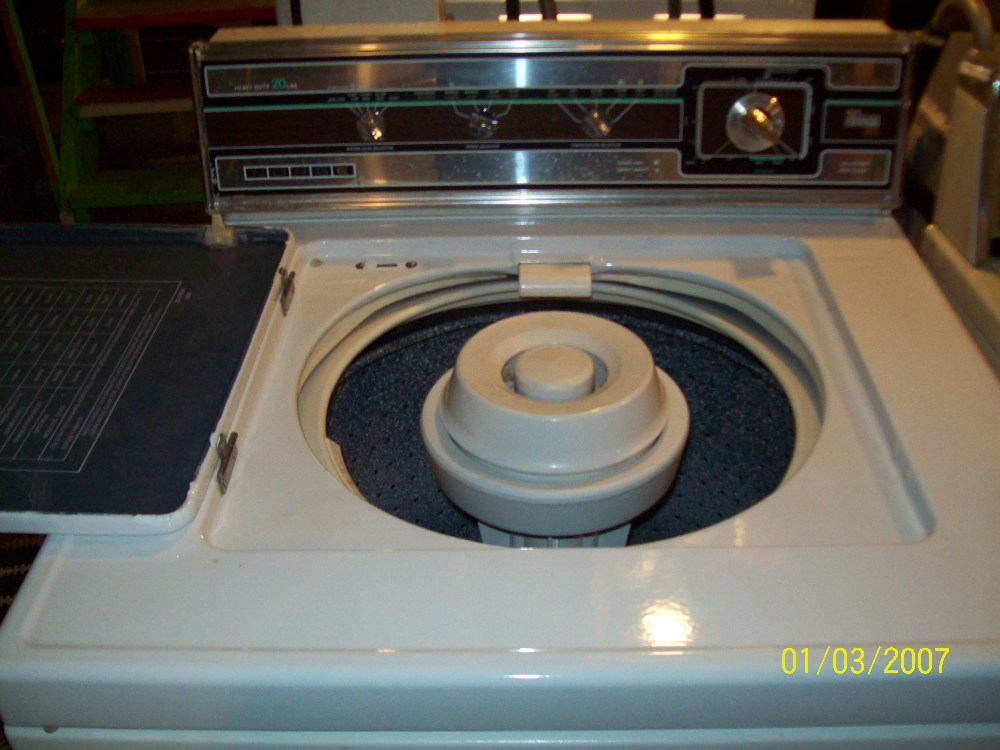
| ||

|
|
Post# 681582 , Reply# 1 5/29/2013 at 20:15 (3,977 days old) by akronman (Akron/Cleveland Ohio) |
||
|
more here's a link to when I first got the machine, for more exact and perfect ID. CLICK HERE TO GO TO akronman's LINK | ||
|
Post# 681584 , Reply# 2 5/29/2013 at 20:22 (3,977 days old) by akronman (Akron/Cleveland Ohio) |
||
|
purchase a kit so far, I have found this kit at RepairClinic, but they are saying unavailable. Is it at least the correct kit? It is listed as Norge, Monkey Wards, Magic Chef, Admiral and Crosley!!!!! Other than that, so far the web is very unhelpful. CLICK HERE TO GO TO akronman's LINK 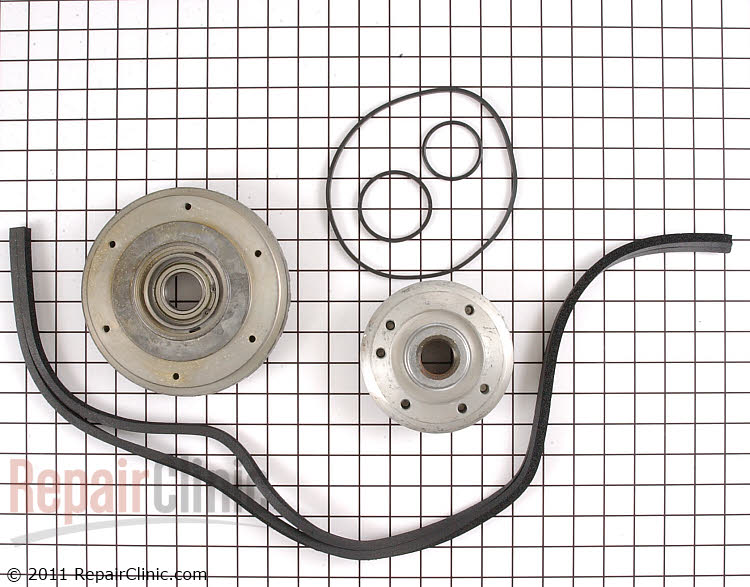
| ||
|
Post# 681585 , Reply# 3 5/29/2013 at 20:31 (3,977 days old) by Unimatic1140 (Minneapolis) |
||
 | ||
| Post# 681587 , Reply# 4 5/29/2013 at 20:35 (3,977 days old) by cfz2882 (Belle Fourche,SD) | ||
|
norge bearing IIRC,Robert replaced a bearing on a ~1964 norge if you can find that thread your later norge may be similar if not the same.Since the motor was overloading on your washer,might be a clutch rather than bearing problem? | ||
|
Post# 681652 , Reply# 5 5/30/2013 at 06:52 (3,977 days old) by combo52 (50 Year Repair Tech Beltsville,Md) |
||
Malfunctioning Norge Washer Hi Mark, it does sound like you are in for a major tub bearing and seal job, but I can't quite figure why the motor is going out on overload when the brake solenoid releases the brake to let the tub start spinning. These washers do not have a clutch as such, when the machine is doing its neutral drain the bottom input shaft going into the bottom of the transmission is turning full speed and a helix spring in the bottom of the transmission is slipping away but applying some driving force trying to make the tr-any and basket spin so the motor load will actually be reduced when the brake solenoid is on and the tub is free to start spinning. Maybe I am not understanding your description of the problem ? Call me if you like, John. | ||
|
Post# 681653 , Reply# 6 5/30/2013 at 06:57 (3,977 days old) by akronman (Akron/Cleveland Ohio) |
||
|
John and Robert John---I will do more investigations before I take anything apart. This will end up being major surgery for sure.
Robert--thanks for the link, excellent! This post was last edited 05/30/2013 at 07:41 | ||
| Post# 681708 , Reply# 7 5/30/2013 at 14:02 (3,977 days old) by redcarpetdrew (Fairfield, CA) | ||
A potentially dumb question... | ||
|
Post# 681742 , Reply# 8 5/30/2013 at 20:05 (3,976 days old) by akronman (Akron/Cleveland Ohio) |
||
|
further investigation The Norge is out of the line up currently, no water, no clothes. I tipped it back to check the belt, all looks fine there. I took off the front to inspect more, all looks fine and the brake solenoid engages. So I plugged her in, put her in a dry agitate and all is well. Then I put her in the spin mode of the pre-wash, and she spins just fine!!!!!! Of course, with no water it immediately kicks into spin, no waiting for a partial neutral drain. As loud as ever, but right up to speed. Then the motor eventually properly stops and she coasts to a stop and then soon the brake engages and the timer stops. So right now all looks well. The motor has the proper tensioning spring in place perfectly, the motor pivots a bit as it switches from CCW to CW for its various functions.
I may have misspoken in the very first posting here, I truly don't rememebr if it was the motor overload cutting out a week ago or the circuit breaker across the room. I am more remembering the breaker on the wall, not the motor overload. Big difference, I know. Does that tell me that agitate windings were dry, but a seal leak let water hit a weak exposed wire in the spin windings instead? Is that my recent problem? But that doesn't explain why 2 times I hand-spun it and it got up to speed, that doesn't explain the rumbling nasty noise before it tripped the breaker. I am pretty sure breaker, not any Norge electric component.
Something tells me it's time to pour a few gallons in and watch down below. I am happy it's running in both agitate and spin right now, but no water and no clothes isn't really a working washer, is it? I'll post more later after the water tests. This one has me thinking a lot and confused for a while, oh well.
A side question---during normal operation, no opening of the lid to sound that loud brake, and no shutting off the machine mid-cycle to engage that loud brake--------the heavy brake band pretty much stays in one exact position on the shaft as it agitates and the shaft doesn't turn, then during spin the band stays tight on that same section and turns exactly with the shaft, right? The only time it really catches and stays in place while the shaft continues to turn is the 3 seconds it brakes everything when the lid is opened or the cycle stopped in the middle? Am I making any sense? Kinda thinking aloud here, typing aloud. | ||
|
Post# 681771 , Reply# 9 5/30/2013 at 23:03 (3,976 days old) by akronman (Akron/Cleveland Ohio) |
||
|
more | ||
|
Post# 681801 , Reply# 10 5/31/2013 at 07:42 (3,976 days old) by combo52 (50 Year Repair Tech Beltsville,Md) |
||
|
Malfunctioning Norge Washer Hi Mark, your further posts mark this failure more plausible, Is this washer plugged into a ground fault circuit?. A slight water leak could differently trip a GF breaker and possibility even a regular one. There is not a separate winding in the motor for wash and spin only a set of start windings and the run windings. You are correct that the brake is not normally used on these Norge style machines with the brake solenoid unless you kill the power or raise the lid when the tub is spinning.
These 20 pound Cap Norges draw a LOT of amps with their silly 3/4 HP motors, if you are going to rebuild and keep this washer as a daily driver I would substitute a 1/2 HP motor at some point, doing this will save you from destroying the timer and water-level switch and having other wiring failures, the bigger motor was NEVER needed and just caused lots of problems.
Keep us posted, John | ||
|
Post# 681813 , Reply# 11 5/31/2013 at 09:22 (3,976 days old) by BrianL (Saddle Brook, New Jersey) |
||
So that begs the question... | ||
|
Post# 681817 , Reply# 12 5/31/2013 at 10:18 (3,976 days old) by akronman (Akron/Cleveland Ohio) |
||
|
Hey John Combo John----this one is only 1/2HP. When I got the machine from Dave Volvoguy in early 2012, it came with a used replacement Norge 1/2 HP motor, which I immediately installed. The original 3/4 had failed, that is why the machine was up for grabs from some local guy.
All my basement is GFCI except for the one outlet for my GE Filter Flo. 2 different late 70's GE's often tripped the GFCI at one exact same spot in the regular cycle, so I put one outlet back to regfular and only use the GE there, who knows.
BAck to the Norge-----Robert's thread on his 64 machine so far looks amazinlgy similar to my 78 Norge----the bearing and seal repair kit is known as LA-2009, there may easily be other kits I don't know off. So far NO LUCK with websearching, etc. CLICK HERE TO GO TO akronman's LINK 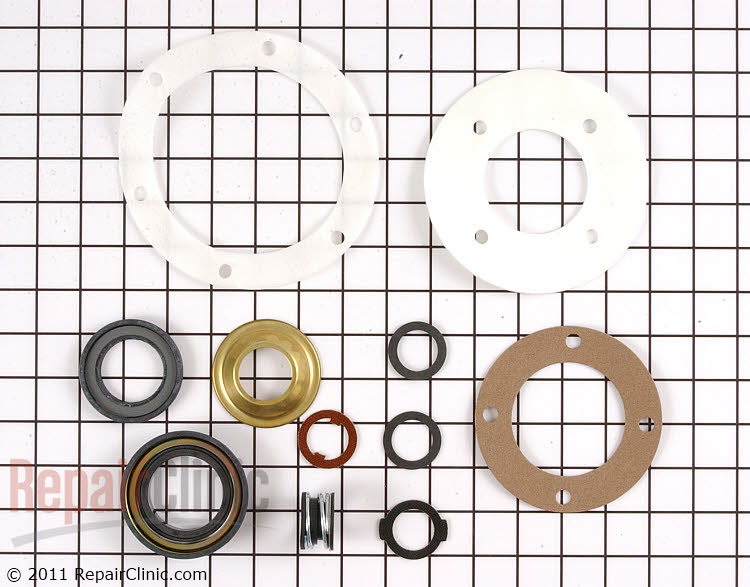
| ||
|
Post# 681818 , Reply# 13 5/31/2013 at 11:13 (3,976 days old) by akronman (Akron/Cleveland Ohio) |
||
|
Oh wow So i called my nearby Appliance Parts store, and $80 later look what I now have. He said it's been on his shelf since 82, his last pricing was 2005, it's his last one. I have no idea if I could have found one cheaper, oh well. As great as my old Norge is, with summer here various laundry projects go a bit slower than in January. I will keep you posted-- Thanks for advice John--Robert--and all 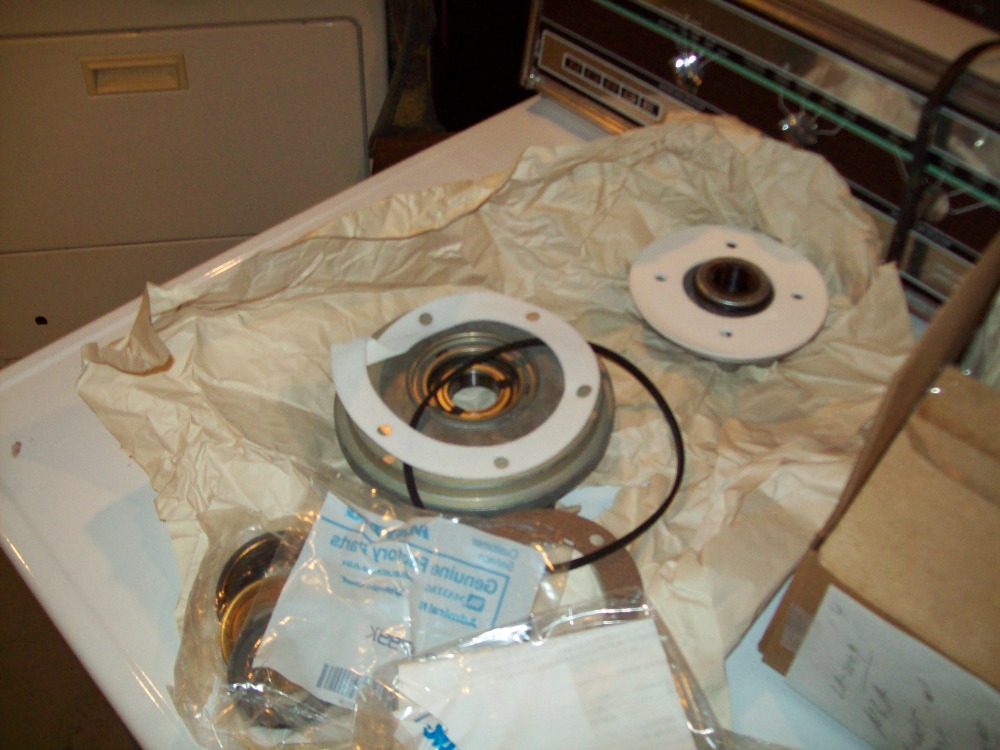
| ||
|
Post# 681821 , Reply# 14 5/31/2013 at 11:35 (3,976 days old) by Unimatic1140 (Minneapolis) |
||
|
| ||
|
Post# 681906 , Reply# 16 6/1/2013 at 08:06 (3,975 days old) by akronman (Akron/Cleveland Ohio) |
||
|
work begins | ||
|
Post# 681907 , Reply# 17 6/1/2013 at 08:09 (3,975 days old) by akronman (Akron/Cleveland Ohio) |
||
|
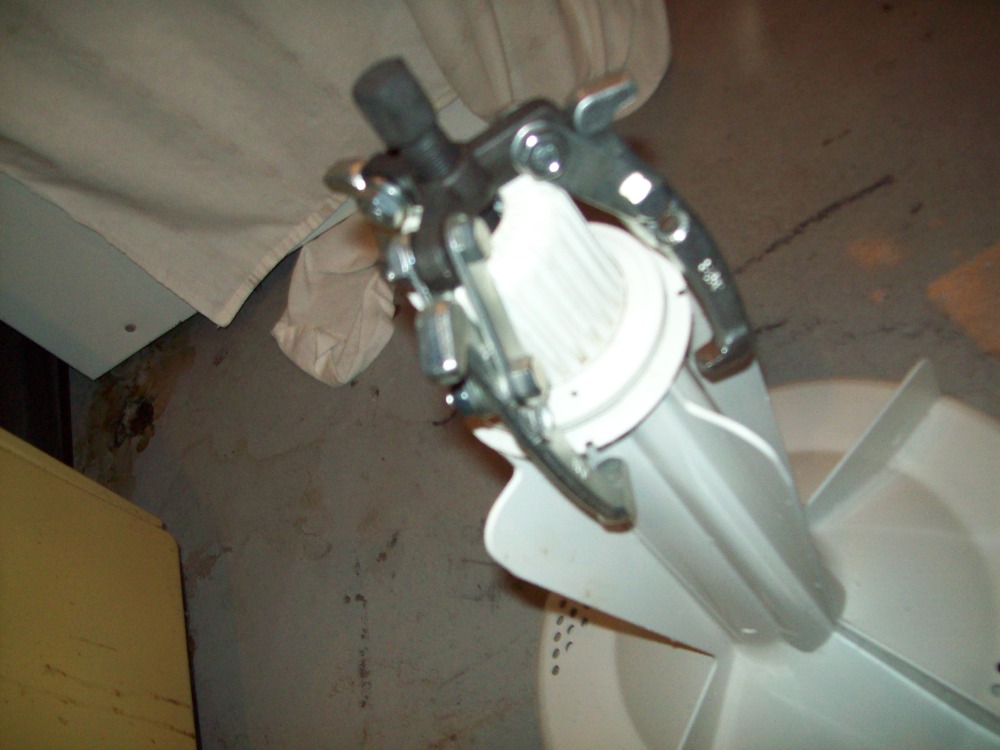
base of agitator post | ||
|
Post# 681908 , Reply# 18 6/1/2013 at 08:11 (3,975 days old) by akronman (Akron/Cleveland Ohio) |
||
|
3 bolts | ||
|
Post# 681909 , Reply# 19 6/1/2013 at 08:17 (3,975 days old) by akronman (Akron/Cleveland Ohio) |
||
|
hurry up and wait so currently, I have coated that base with more PB Blaster, friends will be over at lunch and can add 4 more hands to break away the tub from the agitator post. You can see the remnants of a worn out cork gasket that was underneath the removed rubber ring, it should be easy to fabricate one for re-assembly. 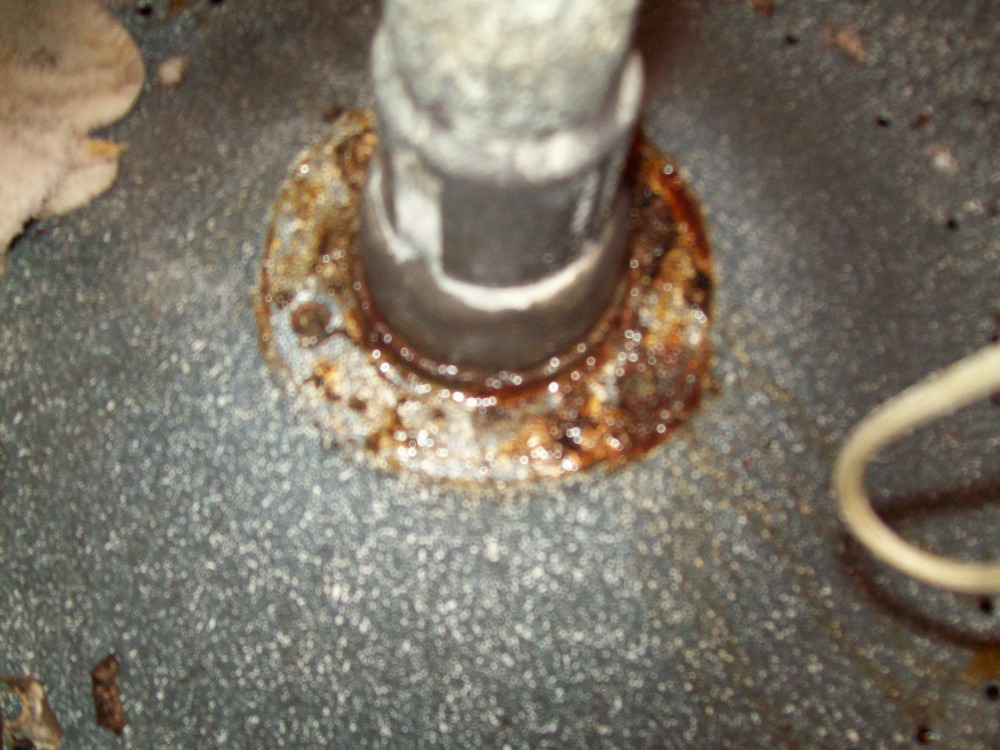
| ||
|
Post# 681911 , Reply# 20 6/1/2013 at 08:26 (3,975 days old) by akronman (Akron/Cleveland Ohio) |
||
|
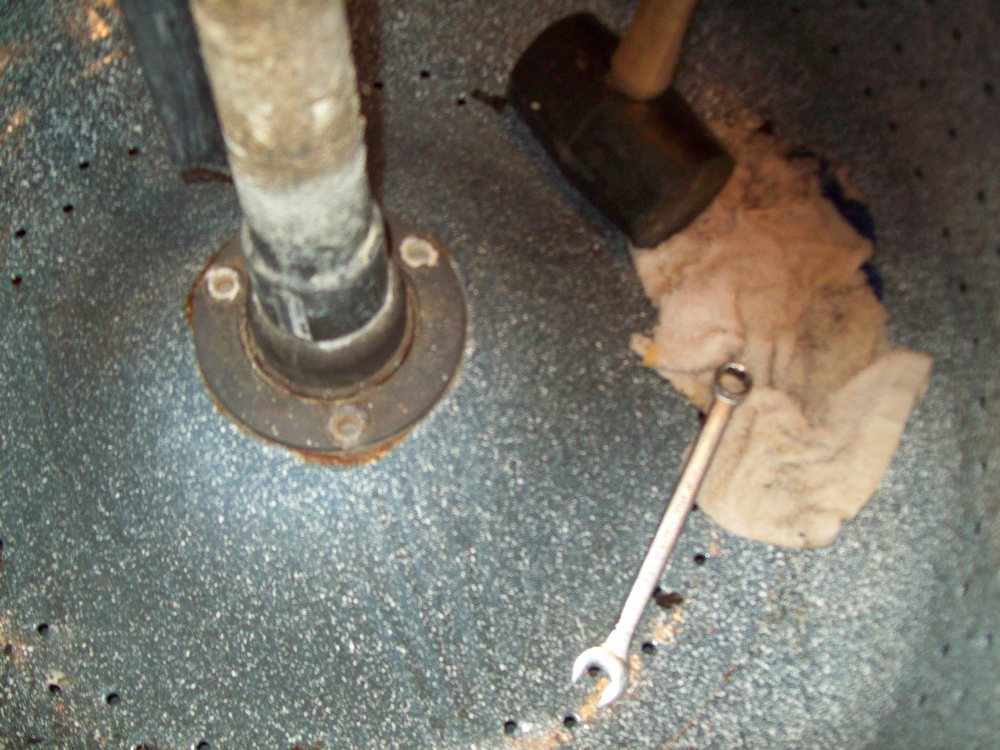
last one for now Here's the splined agitator block. I don't think I have to remove it for the work I'm doing, it can just stay there and be ugly and gross. Earlier styles used a hexagon block, this is 1978 model with that burpalator which is damn good at filtering.
This splined block sits above the water line entirely, and I will actually eventually clean it up(a bit). Is this a case where I should then coat it with a minor amount of white lithium grease or vaseline before re-assembly, to slow down continued corrosion? The picture ain't clear, you've all seen ugly dirty greasy grimy agitator posts before, no new thrills here. 
| ||
|
Post# 681914 , Reply# 21 6/1/2013 at 09:49 (3,975 days old) by combo52 (50 Year Repair Tech Beltsville,Md) |
||
|
Rebuilding The Norge Congratulations on finding the needed parts, YAY. The basket will come out easily now that the bolts have been removed, an easy way to break it loose from the lower flange is to stand in the wash tub and shift your weight from one side to the other, this usually works very quickly [ If you try this have someone spot for you or hold on to the ceiling joists in the basement so you don't get hurt when it breaks loose ].
I would not put any type of lubricant on the agitator drive block upon reassembly. I would remove it and glass bead to clean and if it is in acceptable condition paint it with some type of coating to minimize further corrosion [ I think it would not be too hard to find this part new and I probably have good used ones if you can't find one ]
Why a 3/4 HP motor? I order to be able to claim 20LB capacity and pass ULs electrical testing the machine had to be able to complete a full wash cycle without the motor going out on overload. And while these were big washers the tub capacity was really only about 15 #s capacity. It was also advertising hype for Montgomery Wards as they were always trying to score points against the leader, Sears Kenmore. But unfortunately the bigger motor only made a fair to poor durability washer even less durable. The commercial machines never dared to use the 3/4 HP motors and Norge and Wards continued to sell 18# models with the same size tubs equipped with 1/2HP motors.
The very powerful brake assembly these large capacity Norges used could be a trouble spot, but they did not fail because people lifted the lid too often during spin and thus activating the brake. The brake was used to hold the tub stationary during agitation and the constant tugging back and forth on the break arm and its mounting pivot was what destroyed this assembly. You could open the lid when the washer is spinning at full speed hundreds of times and it would never likely hurt the brake assembly, but the washing action especially if the tub is heavily loaded put a much greater strain on the brake parts than breaking ever would. | ||
|
Post# 682258 , Reply# 22 6/3/2013 at 12:28 (3,973 days old) by akronman (Akron/Cleveland Ohio) |
||
|
troubles? Dis-assembly ok until I noticed this: my new outer tub flange has 6 holes, whereas my tub has 4, not good news. Also, the first of these bolts, 3 seconds after setting the camera down, broke about halfway down its hole. So for now, 2 shots of PB Blaster a day for a few days and then a second effort.
What is the idea behind heating the bolt with a torch? Never tried, but gladly will. 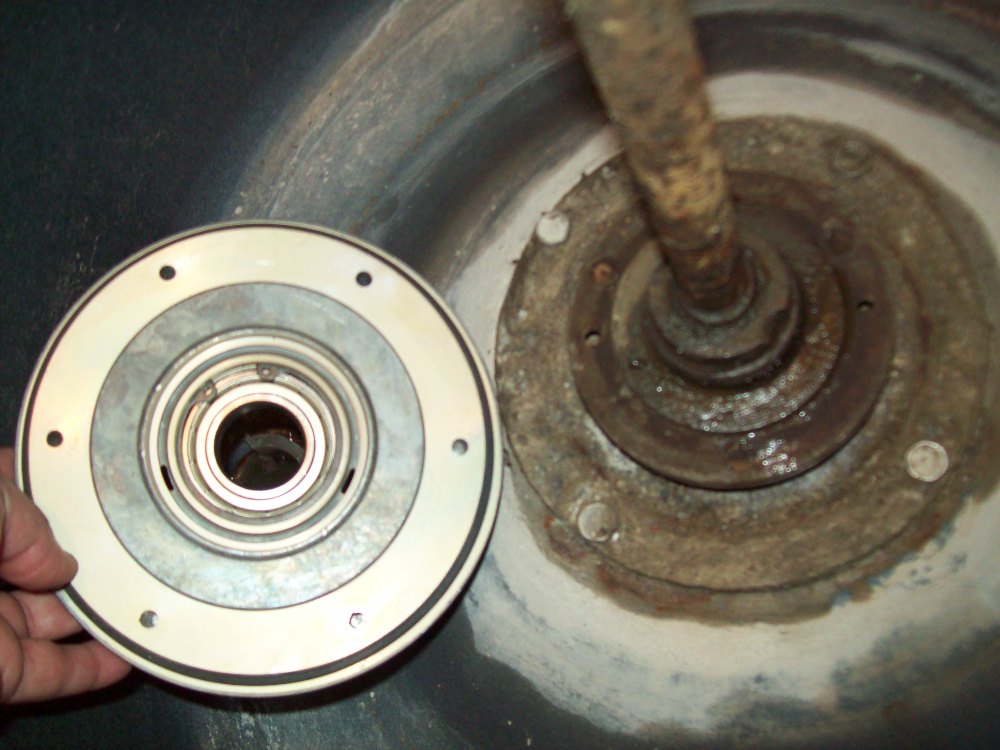
| ||
|
Post# 682259 , Reply# 23 6/3/2013 at 12:30 (3,973 days old) by akronman (Akron/Cleveland Ohio) |
||
|
a bit more | ||
|
Post# 682309 , Reply# 24 6/3/2013 at 18:38 (3,972 days old) by combo52 (50 Year Repair Tech Beltsville,Md) |
||
|
Norge Rebuilding Fun This is why I only ever replaced main bearings and seals in Norge designed and built washers 3 or 4 times [ which was at least two times too many, LOL ] But it can be done and I have great confidence that you will prevail Mark.
On a side note I was talking to my friend Bob in Cleveland, Ohio this morning and he has three Norge or Montgomery Wards solenoid brake style washers that are all in good running condition that he wants to get rid of. Mark you may want to get one to fix yours with or if anyone else wants a REAL NORGE call or Email me and I will get you in touch with Bob. | ||
|
Post# 682452 , Reply# 25 6/4/2013 at 20:32 (3,971 days old) by Unimatic1140 (Minneapolis) |
||
|
Hi Mark, heat prevents bolt breakage without having to wait like when you use a pb-blaster type oil. I would never consider removing rusty bolts without firing them first with a torch, I've broken way too many that way. The only time I don't use a torch is when there is rubber or plastic parts close by that could be damaged by the heat. Also its good to turn the bolt left a bit and then turn it back to the right, slowly but surely going slightly more to the left each time. Do just keep turning it to the left and then back to the right. This sort of "agitating" the bolt loose is a more gentle way of removing old bolts.
As for the two extra holes, just use two part plumbers epoxy putty to seal up the extra holes and you will be fine as long as the part is otherwise the same. | ||
|
Post# 682498 , Reply# 26 6/5/2013 at 02:19 (3,971 days old) by Jetcone (Schenectady-Home of Calrods,Monitor Tops,Toroid Transformers) |
||
Robert is right | ||
|
Post# 682891 , Reply# 27 6/7/2013 at 07:47 (3,969 days old) by akronman (Akron/Cleveland Ohio) |
||
|
more | ||
|
Post# 682893 , Reply# 28 6/7/2013 at 07:51 (3,969 days old) by cuffs054 (MONTICELLO, GA) |
||
|
Akron, that red stuff is paint, right? Or are you beginning to look pale... | ||
|
Post# 682895 , Reply# 29 6/7/2013 at 08:02 (3,969 days old) by akronman (Akron/Cleveland Ohio) |
||
|
not blood | ||
|
Post# 682908 , Reply# 30 6/7/2013 at 09:41 (3,969 days old) by akronman (Akron/Cleveland Ohio) |
||
|
troubles 6 holes versus 4. My outer tub and original support is a 4 hole unit. New one is six. I'd sure rather use the new one, but I doubt like hell I should drill new holes in the outer tub. If it was only metal, I would in a second, but porcelain???? 6 holes at 60 degree spacing versus 4 holes at 90 degrees means only two match up. I will gladly listen to any suggestions, and many thanks.
Also----after breaking one self-tapping screw in the old 4 hole support, I one-at-a-time heated the bolts, rubber mallet smacked them tighter a few times, then looser, back and forth. 2 came out marvelously. So that's a new trick from you guys, thank you. But the final one snapped quite easily. So my original 4 hole tub support has 2 screws out, 2 broken down in the holes. Frankly, if I drill them out, there's quite a bit of clearance beneath the hub to install thru-bolts, washers and nuts on the bottom. 
| ||
|
Post# 682909 , Reply# 31 6/7/2013 at 09:45 (3,969 days old) by akronman (Akron/Cleveland Ohio) |
||
|
more | ||
|
Post# 682910 , Reply# 32 6/7/2013 at 09:52 (3,969 days old) by combo52 (50 Year Repair Tech Beltsville,Md) |
||
|
Norge Rebuild | ||
|
Post# 682912 , Reply# 33 6/7/2013 at 10:04 (3,969 days old) by akronman (Akron/Cleveland Ohio) |
||
|
spin tub Here, instead, is the inner tub new parts. My tub has 3 holes. While the cork and foam/plastic gaskets have 4 holes, the genuine metal tub support is drilled for either 3 or 4 holes, so all will be well there.
My Norge(Fedders) is 1978, Repair Clinic.com is where I got the PN#La-2009 for the overall kit, listed as Crosley/Magic Chef. Somewhere there is likely a more exact PN, but this Norge LWA2065BOO (or leaving off the last few digits, etc) has never come up with a listing on over a dozen websites, so I just bought the only kit I could find, what the hell. The Repair Clinic site let me type in "norge washer bearing seal," to get this LA-2009 kit, but no, it never recognized the actual model #. Seems as though Norge switched the hole count, but the various bearings and washers and seals are all the same.
I have 4 other brand machines currenlty in the line-up, so there's no rush here, I will gladly slowly wait and see your suggestions. This is my one and only Norge, I want to do this RIGHT and ONCE.
I have a 1970 Norge Repair Master, helpful enough but doing a 6 hole versus 4 hole conversion/mismatch is pretty much for this website's ideas, not for Norge.
Also, while it's all apart, any suggestions on oiling/lubing lower down the entire shaft? Bearings near the baseplate? Brake components? The tranny works fine, I won't touch it. The suspension is great, it used to go 640 RPMs on spin and never a trouble. It will be a great loud beast of a machine again soon.
Another ALSO-----no bolts came with this new kit. IS Home Depot gonna have these self-tapping fine pitch bolts for cutting into the aluminum flange holes? 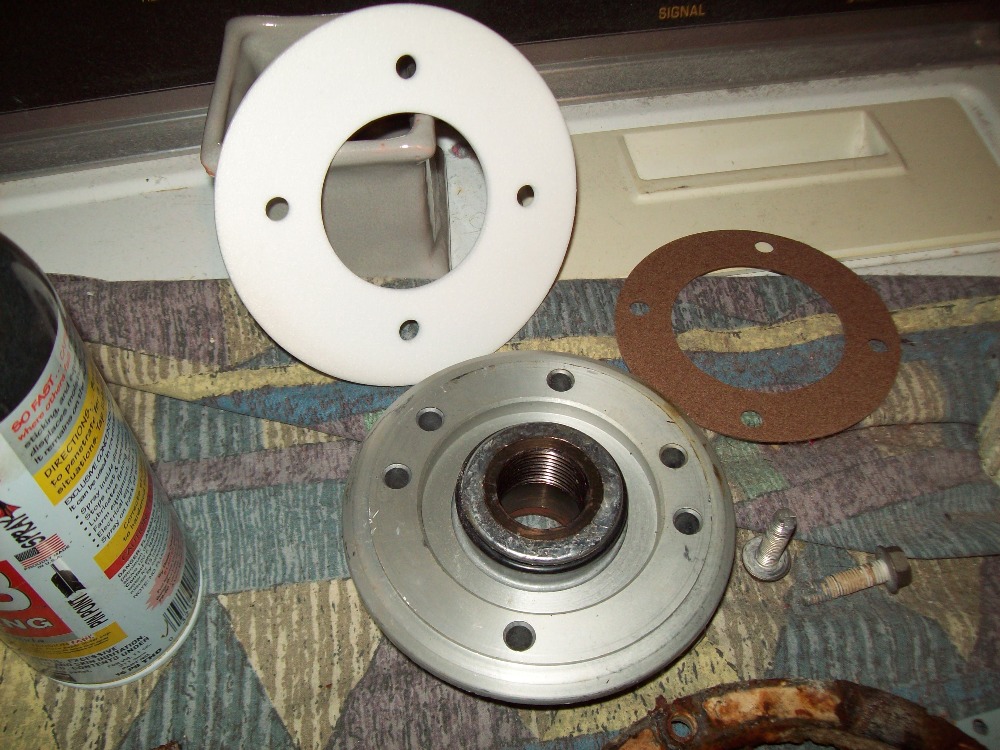
| ||
|
Post# 682914 , Reply# 34 6/7/2013 at 10:13 (3,969 days old) by akronman (Akron/Cleveland Ohio) |
||
|
hey John John---you are one of the all time pro's here, drilling new holes would solve tons of other issues, THANK YOU. The actual hole size in the aluminum hub is smaller also, likely one exact bolt size smaller. So I will find and buy the correct diameter and depth self-tapping bolts before I start any drilling. | ||
|
Post# 682921 , Reply# 35 6/7/2013 at 10:56 (3,969 days old) by kb0nes (Burnsville, MN) |
||
I wouldn't count on Home Depot having anything odd, typically its just standard poor quality hardware that they stock and always in packages sized one less then what you need! These days I get all my hardware (and lots of other stuff) from McMaster-Carr.
Personally I hate self-tapping screws, they are just chosen to cut costs. In this case I'd simply tap the holes and use a standard machine screw. You will get better threads this way and you have less difficulty in finding just the right screws. As a follow along to the stuck screw topic, one great way to prevent stuck threads in the future is the judicious use of Locktite. A single drop of 242 Blue Locktite fills the voids in the thread helix with plastic eliminating any future corrosion. Years later screws just twist out cleanly. Added bonus that the threads are sealed from leakage and vibration loosening too. Better living through chemistry! | ||
| Post# 683002 , Reply# 36 6/7/2013 at 22:07 (3,968 days old) by cfz2882 (Belle Fourche,SD) | ||
|
pump impeller check the pump for broken impeller fins-that style of norge pump is very prone to fins getting stripped off the impeller. | ||
|
Post# 687599 , Reply# 38 7/6/2013 at 11:51 (3,940 days old) by akronman (Akron/Cleveland Ohio) |
||
|
more Upon closer inspection, the brand new 6 hole outer tub flange presents issues. The holes are on a smaller diameter circle than the existing ones, and the bolts would cut into the lip on that inner edge of the tub. Also, the raised portion of the new flange is a smaller diameter than the tub opening, I'd create a real mis-match trying to install that "other Norge" flange. And all those extra holes and cutting into that strengthening lip would weaken the tub. And there’s an old plastic retaining ring for holding down the cork gaskets, it wouldn’t fit either and the new 6 hole model didn’t come with one. A wide variety of reasons are pushing me back to the original 4 hole flange/bearing support.

| ||
|
Post# 687602 , Reply# 39 7/6/2013 at 11:55 (3,940 days old) by akronman (Akron/Cleveland Ohio) |
||
|
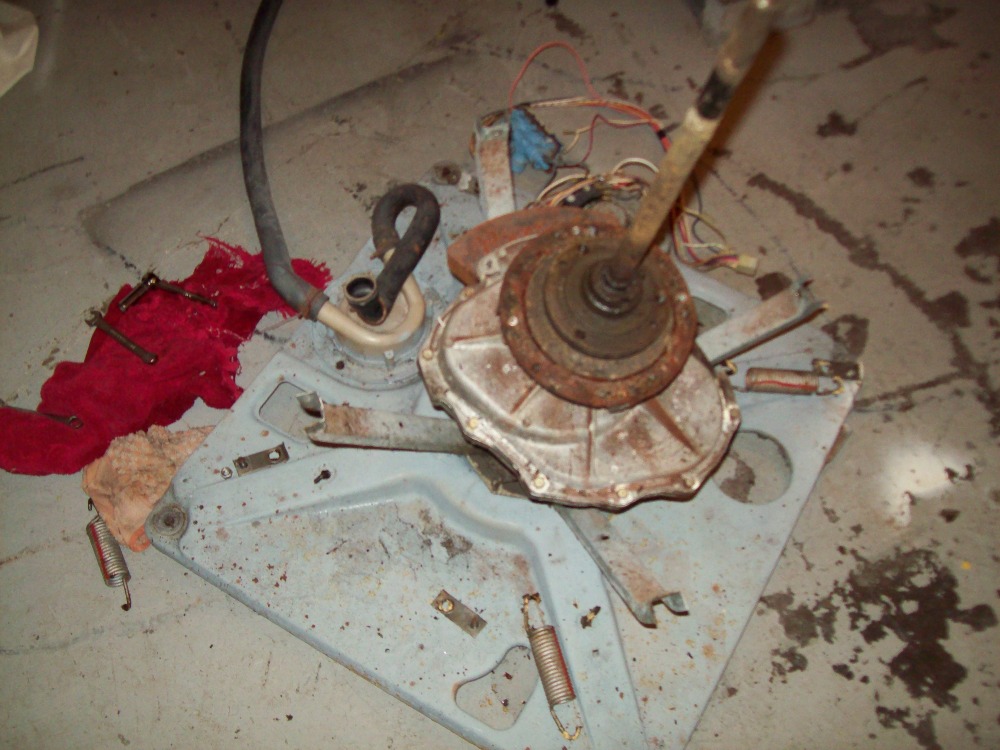
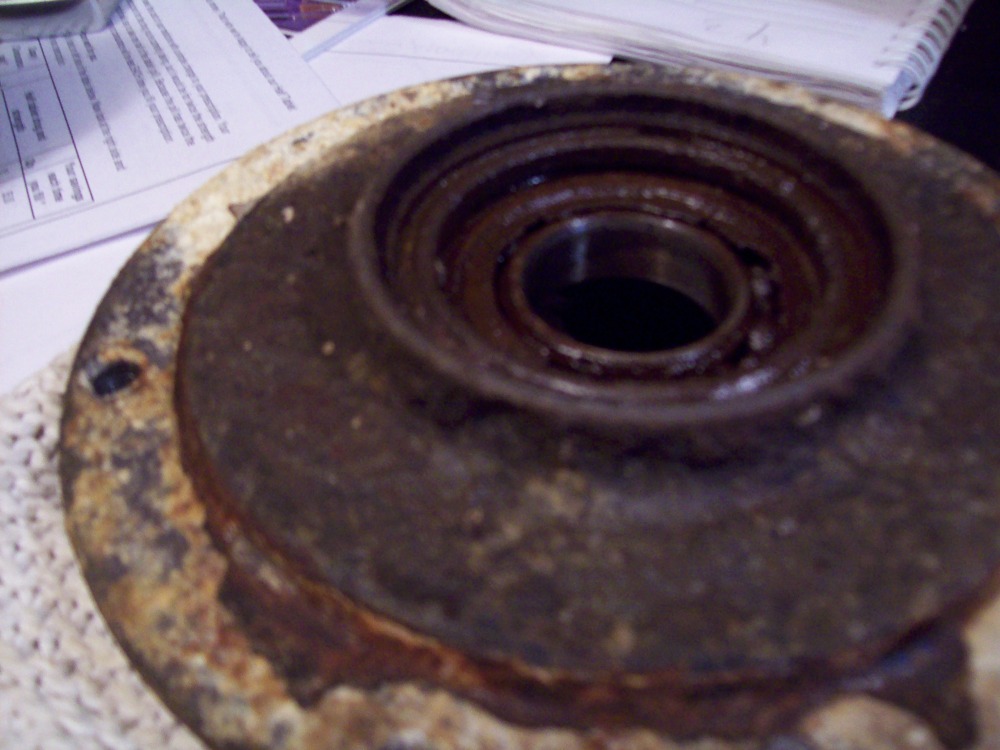
more again So back to the original 1978 outer tub bearing/flange/support. It took 3 weeks and tons of PB blaster, and then a buddy visiting who still talks about his 1968 Mustang 302 Engine Rebuild (Mostly Caps) and couldn’t resist a challenge to finally get the retaining ring out.
So now it’s out but of course the bearing is still in there. I’m doing more PB Blaster and hammering away but am about ready for a professional. Between pressing out this old bearing and pressing in the new, and then drilling out those 2 of 4 holes where the bolts snapped, shouldn’t a decent auto mechanic shop be able to do this work in quick time, relatively easy?
Look at how horrid that 35 year old bearing is, yowza.
Webmaster Robert’s 1964 rebuild, linked above, shows using epoxy and various sealants to make up for the fact that the cheap pot metal is pitted/corroded nasty, I think overall that is the way to go for now.
| ||
|
Post# 690223 , Reply# 40 7/18/2013 at 10:11 (3,928 days old) by akronman (Akron/Cleveland Ohio) |
||
|
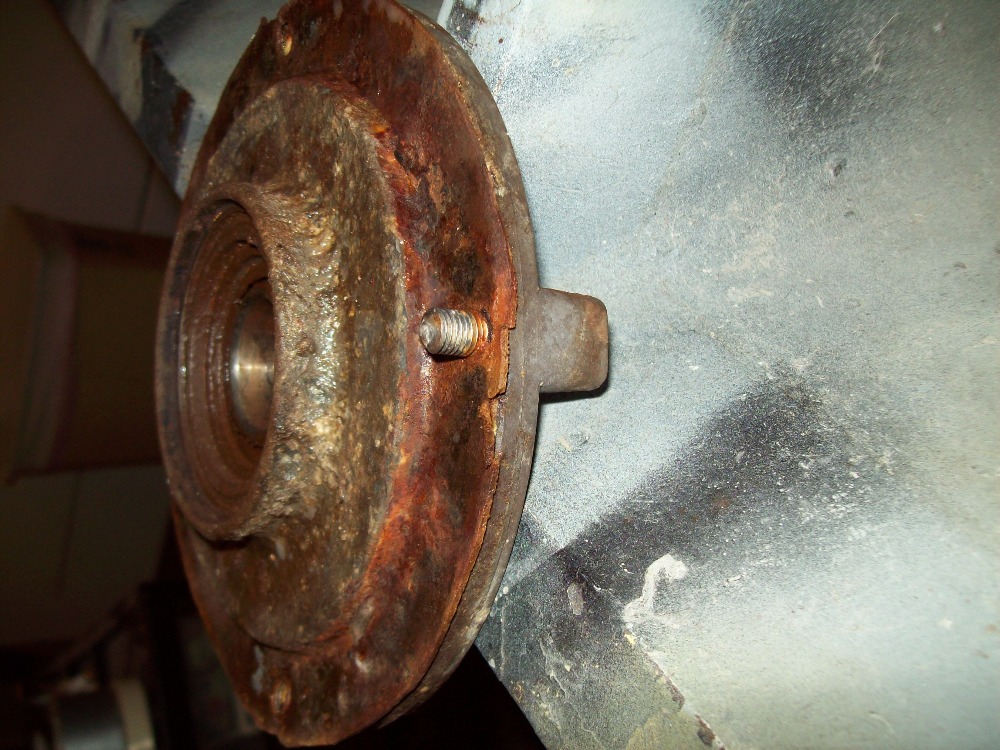
Bearings Storms knocked out phone and web 2 weeks ago and ATT sucks for repairs, but here's the latest:
I took the hub with the old bearing to 3 auto mechanics. 2 said they wouldn't try out of fear of breaking the pot metal, they are used to hardened steel for auto brakes/rotors. Third guy said 50/50 chance, I said try it. He successfully swapped out the bearing, and also drilled out the 2 broken bolts. Yippee!!!!!
I wire brushed all over the place, got all old cork off the thing. You can see there are 2 weep holes, and that the very innermost ring, just above the retaining ring, has some dings in it, not a perfect surface. 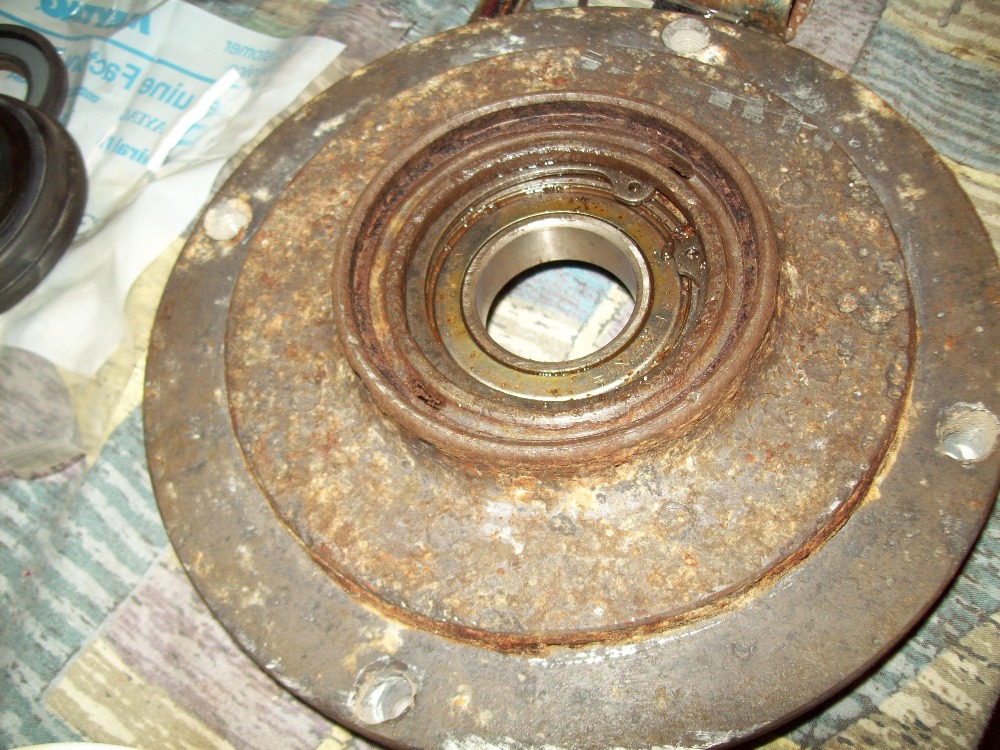
| ||
|
Post# 690225 , Reply# 41 7/18/2013 at 10:19 (3,928 days old) by akronman (Akron/Cleveland Ohio) |
||
|
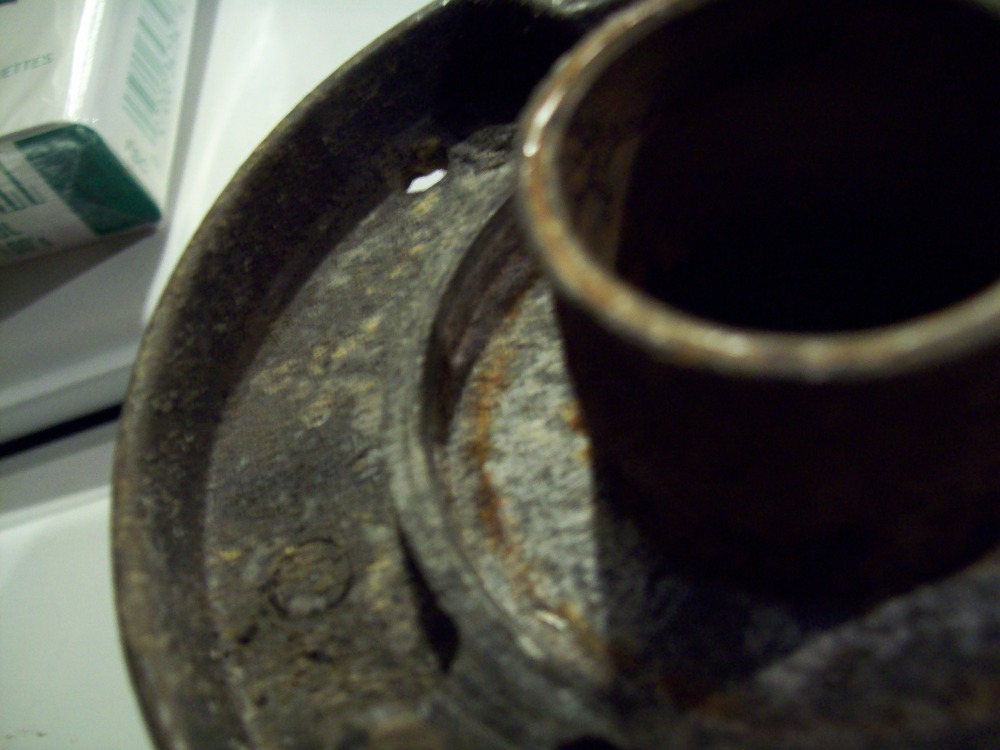
Robert 1964, Mark 1978 The 2 top pics are stoolen from WebMaster Robert's 1964 rebuild of a Norge, referenced above. Bottom 2 shots are mine. I trust Robert's assembly and will get some good epoxy/sealant over the wekend, but I don't understand it all. If I epoxy that ridge where the copper/brass cone sits( innermost blue epoxy) , it will prevent water inside the cone from getting to those weep holes. Also, shouldn't I keep the weep holes open, very careful with epoxy?
I will definitely epoxy the outboard edges per Robert's photos, but am asking for an explanation of how this cone works, what its purpose is. 
| ||
|
Post# 690227 , Reply# 42 7/18/2013 at 10:27 (3,928 days old) by akronman (Akron/Cleveland Ohio) |
||
|
Ceramic seal I am feeling extremely confident since all the origianl cast parts are re-usable, and the seals are all brand new. This is the spin tub hub with the upper ceramic seal removed. My strong guess is epoxy exerywhere the seal seats in it? I know to keep the mating ceramic faces spotlessly clean.
Also, the closer I get to re-assembly, it is seeming smarter and smarter to install both these hubs on the tranny/shaft/post before I re-install the 2 tubs. That way I can see everything, epoxy everything, etc. How tightly do I mate these surfaces, how much compression on that spring/ceramic/mating surface? 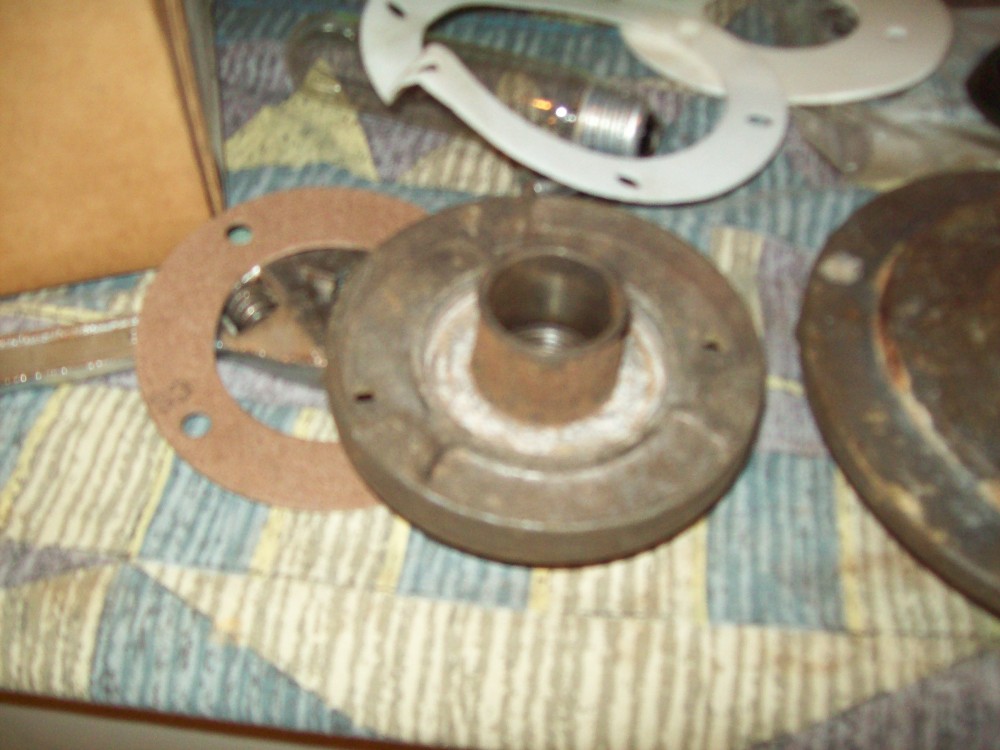
| ||
|
Post# 690228 , Reply# 43 7/18/2013 at 10:33 (3,928 days old) by akronman (Akron/Cleveland Ohio) |
||
|
last pic for now This pic shows more, no epoxy yet. Won't epoxy seal off the outer edge of this cone, keeping any lost water inside on the bearings? I want to do all this RIGHT and ONCE, and I appreciate all advice. I have meant to document and post all, but AT&T SUCKS!!!!!!!!!!!! I lost 3 days of work to waiting for them to no-show already. Day 4 is rescheduled for Monday, wish me luck.
Dumb question: Does this cone form a grease cup around the shaft? Am I to fill it with White Litium grease? Is that the purpose? 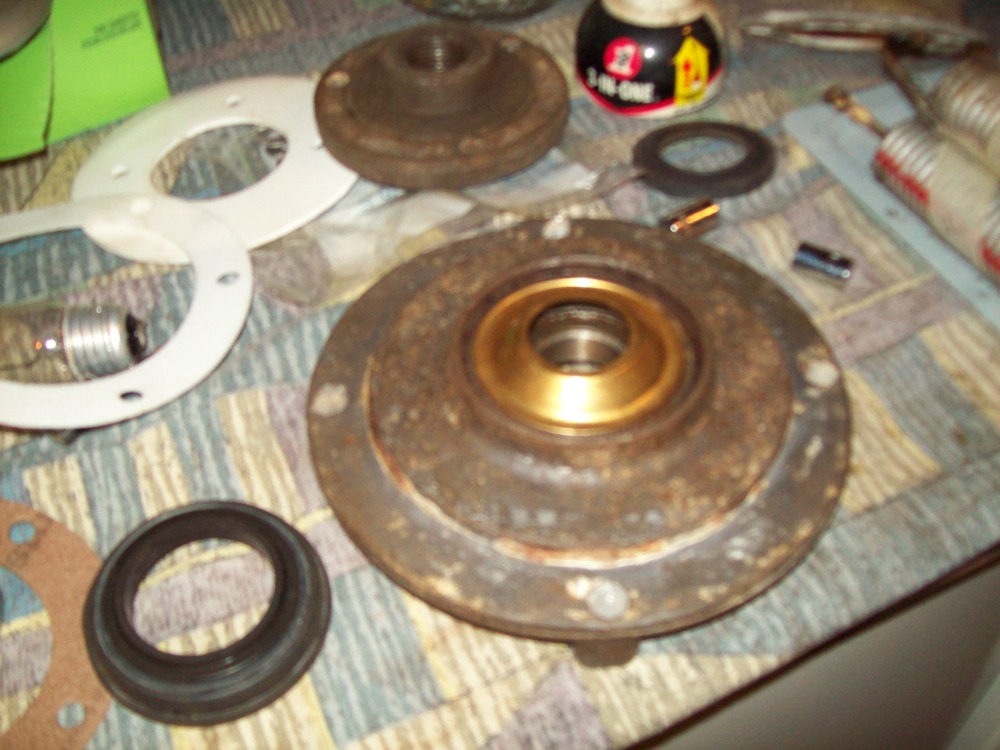
| ||
|
Post# 690249 , Reply# 44 7/18/2013 at 12:20 (3,928 days old) by combo52 (50 Year Repair Tech Beltsville,Md) |
||
|
Brass colored Cone | ||
|
Post# 690251 , Reply# 45 7/18/2013 at 12:25 (3,928 days old) by akronman (Akron/Cleveland Ohio) |
||
|
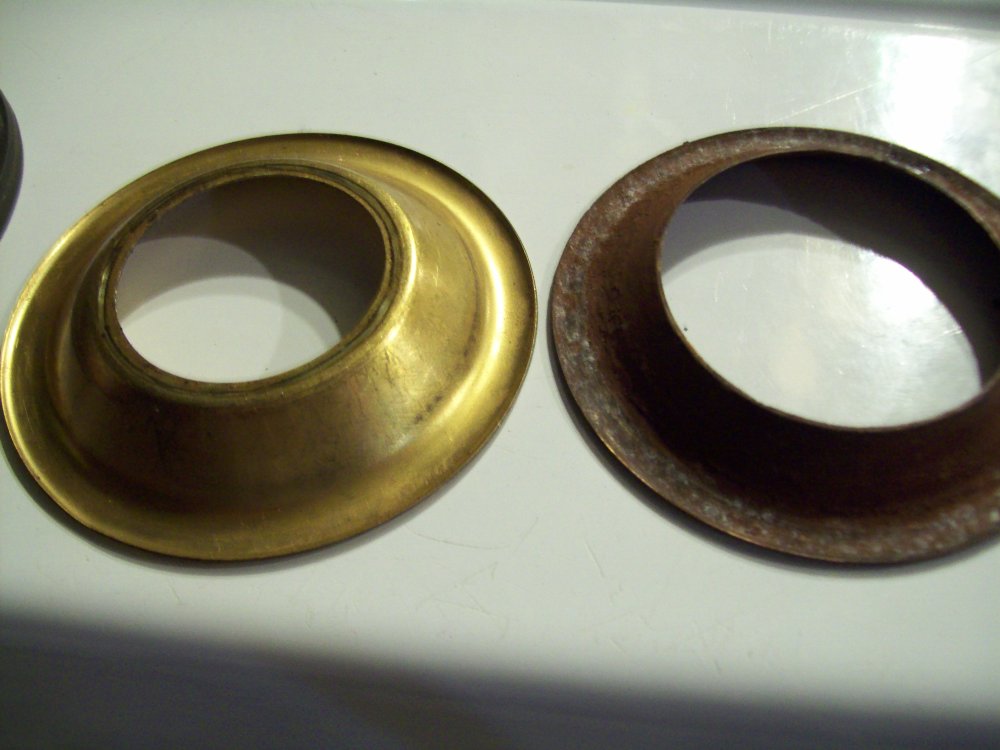
more No epoxy yet, but just fiiting things together, it seems like I am quite wrong above. The brass/copper cone is pictured wrong. It should be like a bowl, not a hat, so the center of the spin hub sits down against it, right on top of the bearing, and therefore the 2 entire hubs and seals all meat properly for compression sealing. Agreed?Sort of seems like then any stray water drops would be spun up and out to those weep holes. Proper assembly therefore will compress those ceramic/spring seals, I can now see how it properly works.
Also, various pics way up the chain show some white plastic gasketing, and some cork. With the mismatch between various items from a different Norge, I was able to cut both spin tub gaskets to fit, and will epoxy/RTV/seal both sides during assembly. However, I will have to cut new ones for the outer tub, both sides. Where does one get thin sheet cork? All will have epoxy, but I want the cork also. During dissassembly of the 35 year old machine, everything looked like cork, not whatever that plastic foam sheet is. | ||
|
Post# 690441 , Reply# 46 7/19/2013 at 12:25 (3,927 days old) by akronman (Akron/Cleveland Ohio) |
||
|
Paging Robert and John Combo Guys---Pros---Read a bit above and compare that brass cone ring. Roberts pics show it up, like a hat or a tepee letting out smoke. So far, with no epoxy or permanent installation, my "fit-together" strongly suggests that it should be down like a bowl or funnel. Then the inner tub flange screws down and seats immediately against the innermost brass flat spot, which is pressing directly on to the bearing itself. Please check photos---I unfortunately have storm/tornado/ATT&T troubles and can't log on at home--but will checkback before final assembly------
Horrible photo here, but it shows my belief that the center of the ring is down directly against the bearing, not up. 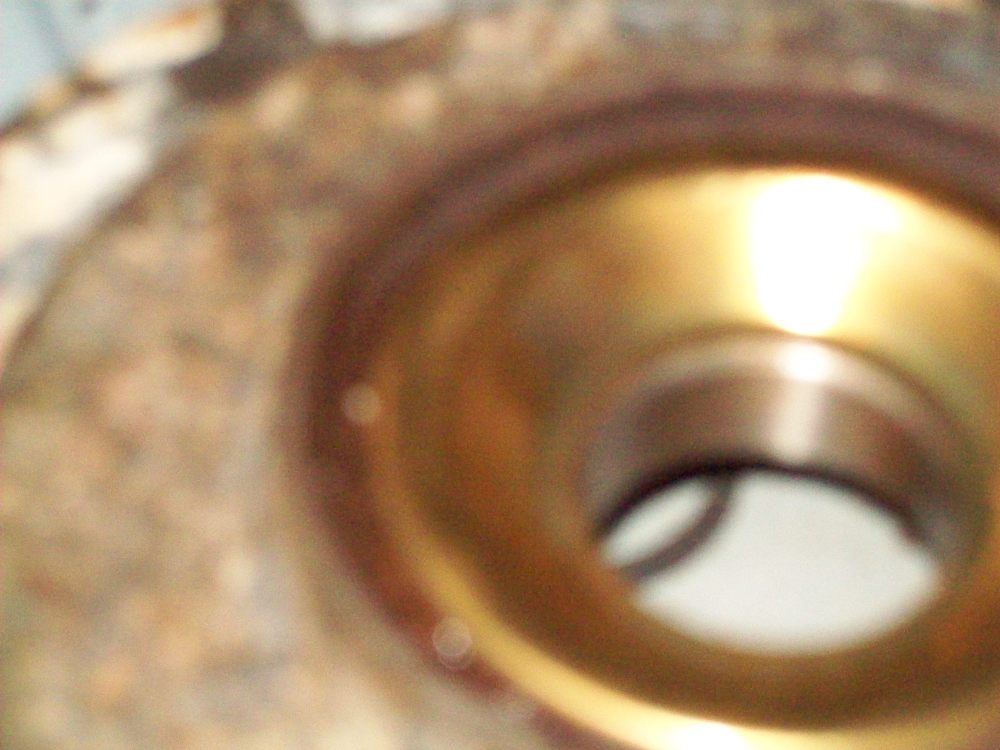
| ||
|
Post# 690571 , Reply# 47 7/19/2013 at 19:03 (3,926 days old) by combo52 (50 Year Repair Tech Beltsville,Md) |
||
|
Brass colored Cone | ||
|
Post# 690687 , Reply# 48 7/20/2013 at 09:13 (3,926 days old) by akronman (Akron/Cleveland Ohio) |
||
|
Hey John | ||
| Post# 690738 , Reply# 49 7/20/2013 at 14:08 (3,926 days old) by norgeway (mocksville n c ) | ||
|
I bet you one thing! You aint never had a washer that will wash a filth big load clean as that thing will!!John may be right, he knows about a million times more about washers than I do, but I still wouldnt let that brake stop a spinning load of clothes, just my opinion. | ||
| Post# 690741 , Reply# 50 7/20/2013 at 14:24 (3,926 days old) by norgeway (mocksville n c ) | ||
|
LOL! Filth big load....Well, I used to be able to spell!!! | ||
|
Post# 690942 , Reply# 52 7/21/2013 at 12:46 (3,925 days old) by akronman (Akron/Cleveland Ohio) |
||
|
Better pics | ||
|
Post# 690944 , Reply# 53 7/21/2013 at 12:50 (3,925 days old) by akronman (Akron/Cleveland Ohio) |
||
|
next | ||
|
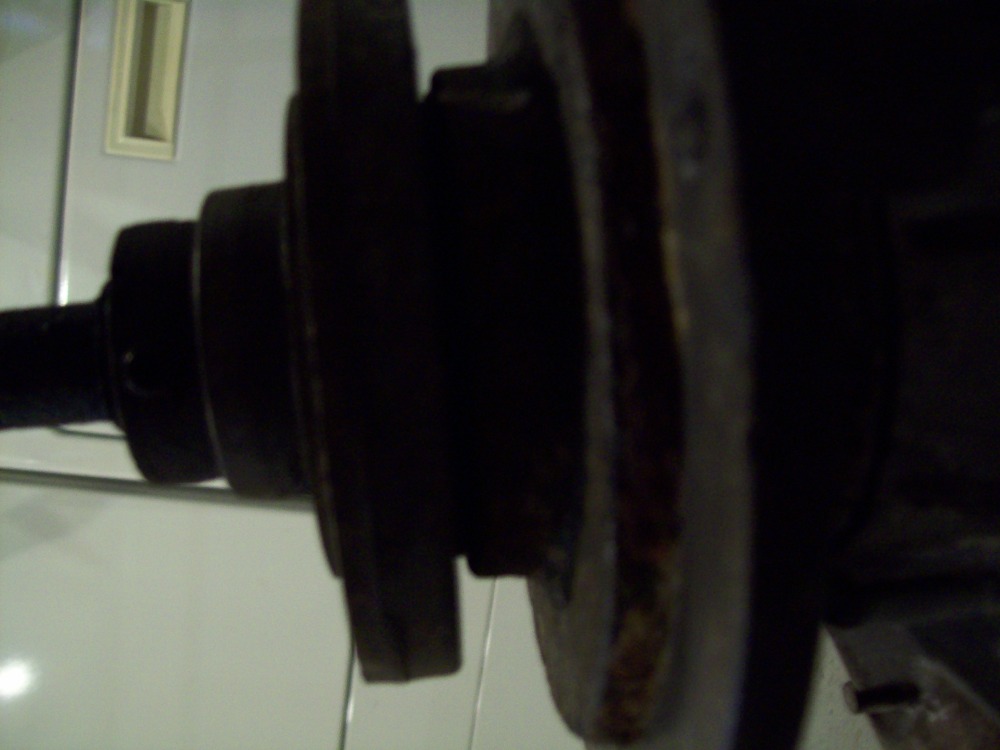
Post# 690945 , Reply# 54 7/21/2013 at 12:55 (3,925 days old) by akronman (Akron/Cleveland Ohio) |
||
|
assembly | ||
| Forum Index: | 
| Other Forums: |

|

|

|

|

|

 Comes to the Rescue!