|
Thread Number: 48853
Filter-Flo set (dryer) update |
[Down to Last] |
| Post# 707664 10/6/2013 at 22:30 (3,853 days old) by keny (Detroit, Michigan) | ||

So far i've managed to get the dryer into the basement. The washer should be brought in tomorrow, or when I can get some assistance.
Cosmetically, the machine looks very clean. I was assured that it functioned �perfectly� and had no issues. Yeah, right. My first job was to take the back of the machine off, and vacuum all the dust and lint from wherever I could reach. It wasn't really that dirty, but taking a better look in the cabinet I found tucked under the exhaust pipe, two wires hanging (yellow and orange), attached to the wires was what looks like a burned or melted sensor or thermostat. That's only a guess from me, as to what the part really is. That was attached to a heat or flame resistant burned looking, crumbling cardboard-like material. I hope it isn't asbestos. A photo is attached. At any rate, I took my life in my hands, and plugged the thing in. No, it isn't connected to the gas line yet! It worked fine otherwise; drum tumbled, timer advanced, glow-coil or whatever it's called, lit up. So, with what looks like a displaced burned part, the dryer set-up is on hold for the moment. By the way, there is no obvious spot that I can see, where this part would have been attached or fit into. Also, looking a the schematic found in the console, I don't see any part represented that has a yellow and orange wire connected to it. The machine's model number is DDG9280DBLWH. I'd like to use this machine if can be used safely, assuming a new part can be found, and if there's clear direction as to where the part should be placed. I'd really rather not burn the house down. Experienced advice would be appreciated. Thanks. 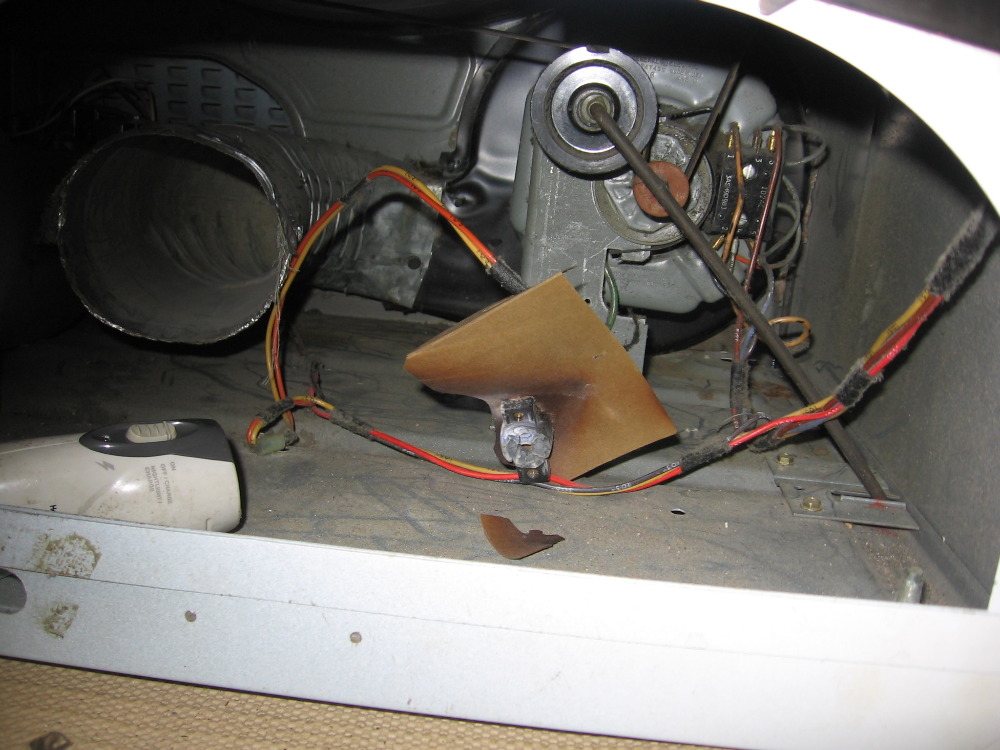
| ||

|
Post# 707671 , Reply# 1 10/6/2013 at 23:24 (3,853 days old) by akronman  (Akron/Cleveland Ohio) (Akron/Cleveland Ohio) |
||
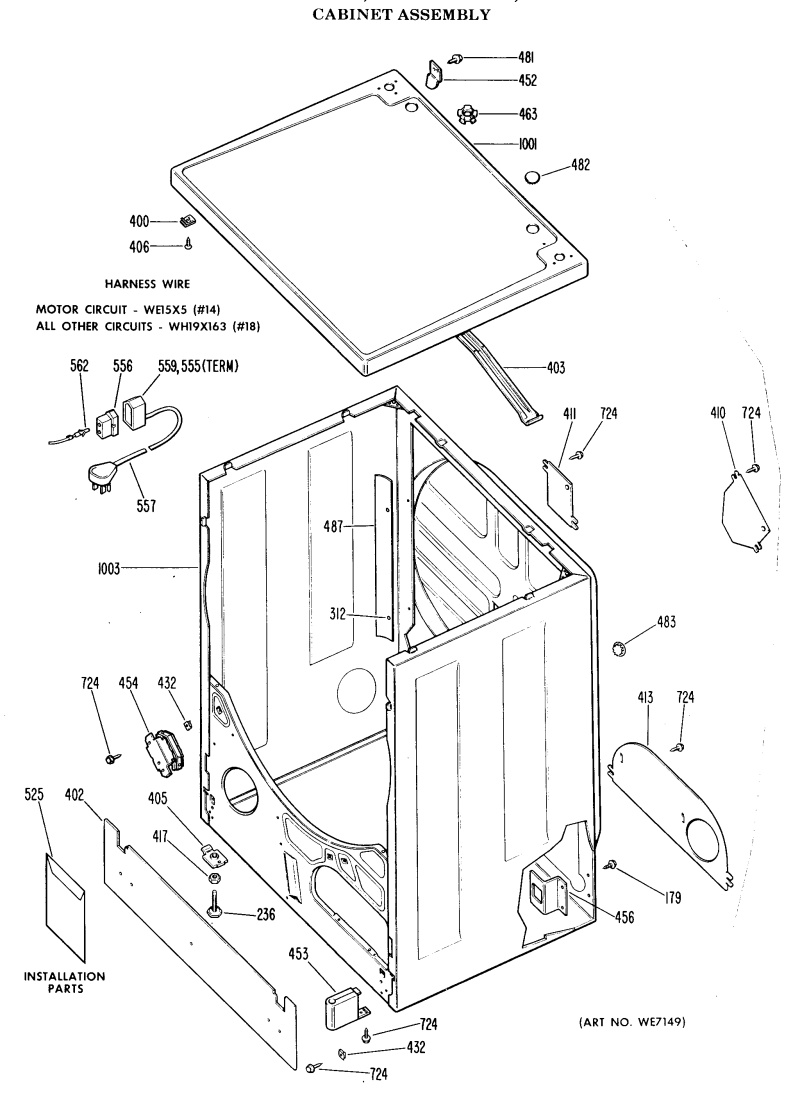
hmmm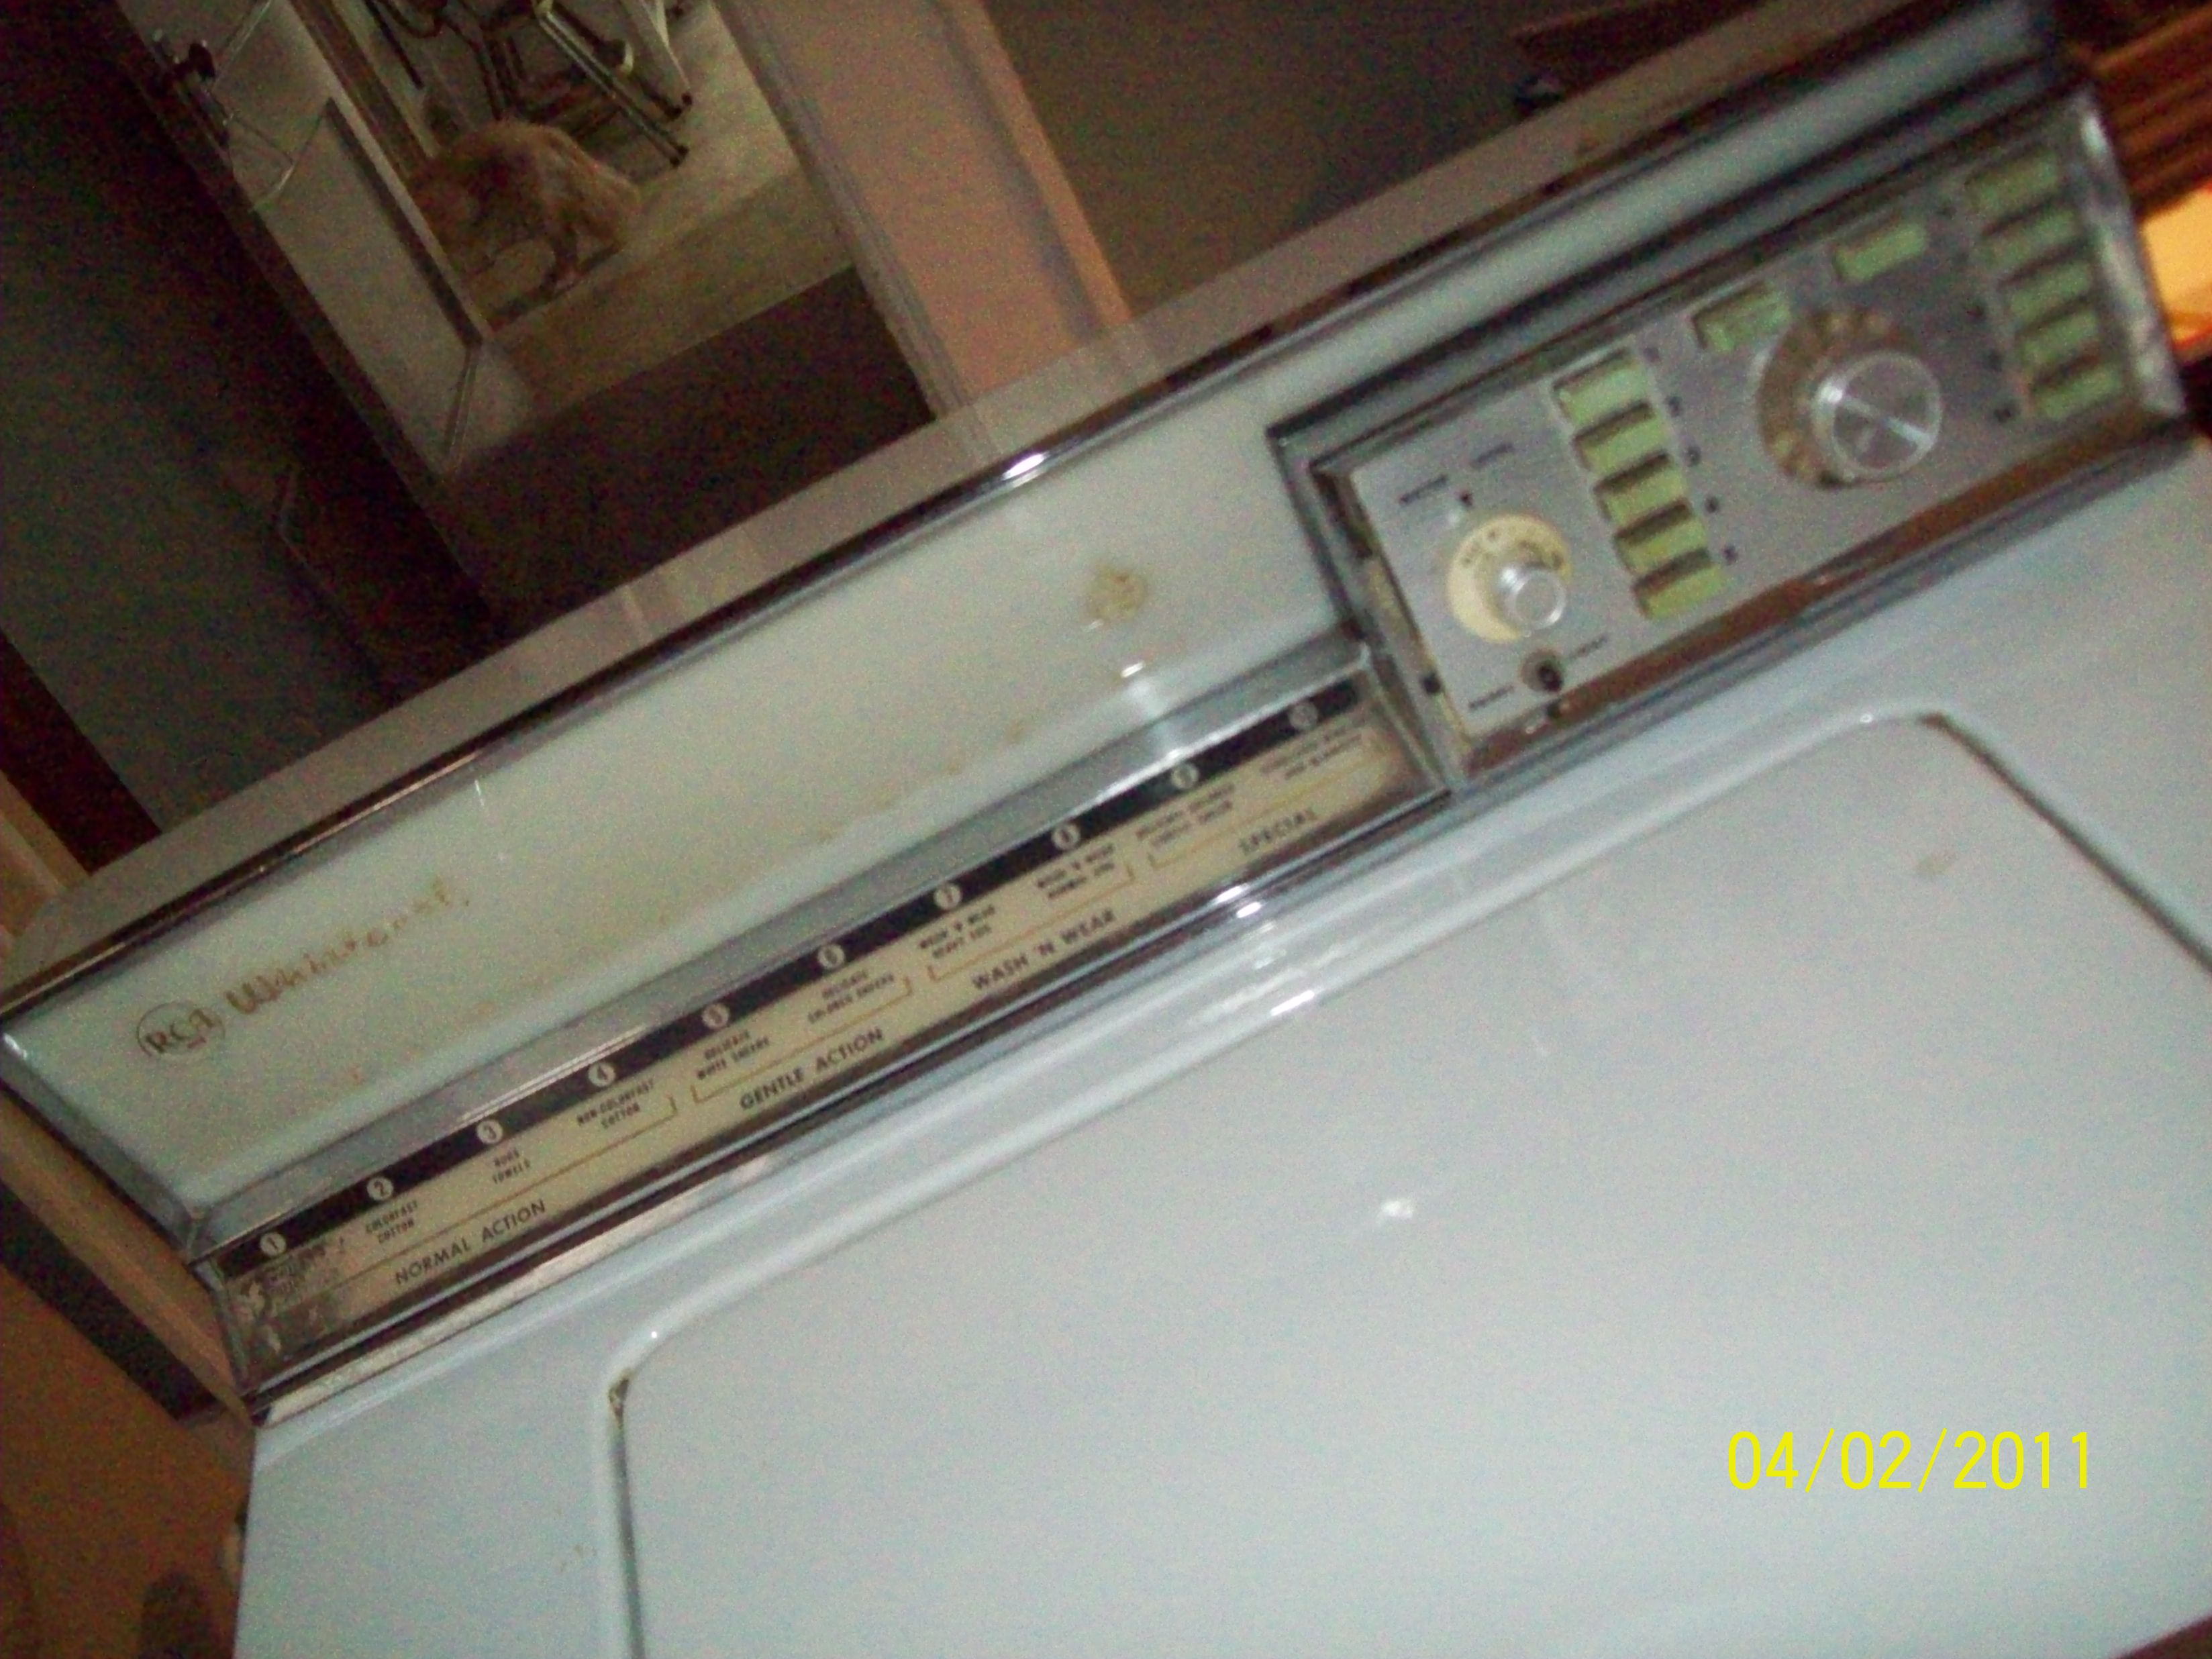 I'm guessing it's supposed to fit immediately under the lint filter, inside the front of the machine. Since that's off the machine, you probably didn't see the opening. GE dryers have LOTS of wires going to the front cover, door sitch, lights, thermos near the filter, etc, that need to be carefully removed before taking off the front.
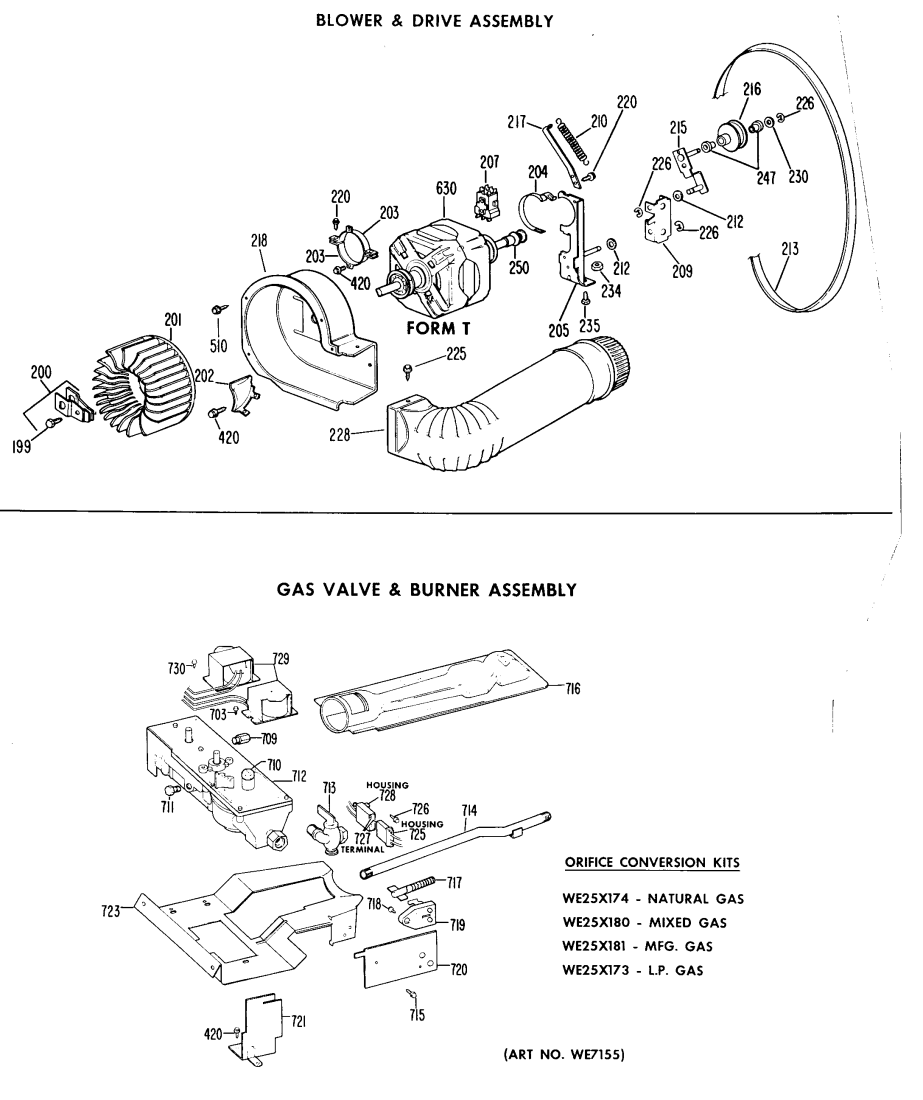
Look at items 272 and 273 on this drawing. And item 305 is the stiff cardboard.
Download all the pics from that website, the diagrams are quite helpful. Then steal the GE pn #WE???? and go on Ebay for cheaper thermostats.
YES YOU NEED IT IN PLACE BEFORE HOOKING UP THE GAS. Hopefully this helps. GE made good reliable dryers, you are smart to do this tune-up then you'll get years of reliable and safe use.
CLICK HERE TO GO TO akronman's LINK 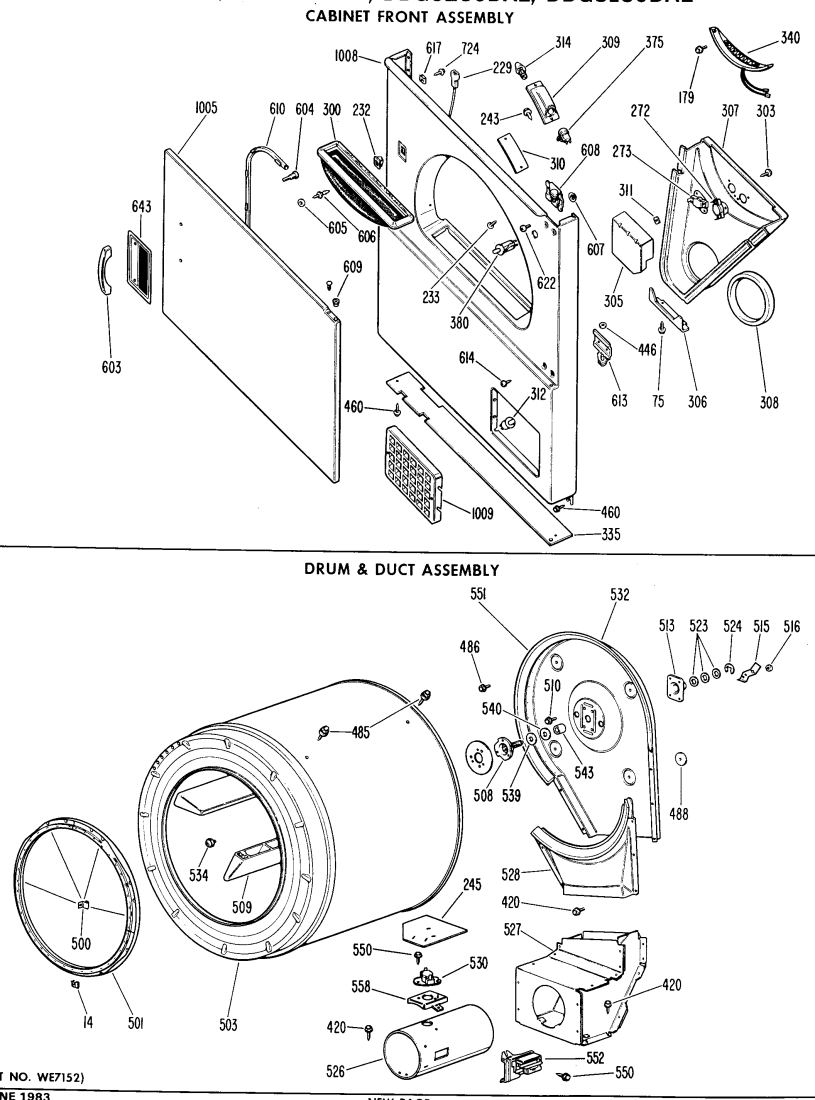
| ||
|
Post# 707672 , Reply# 2 10/6/2013 at 23:28 (3,853 days old) by akronman (Akron/Cleveland Ohio) |
||
|
maybe maybe if you or a previous repairman were unaware of that thermo's wires needing to be removed before taking of the entire front of the machine, maybe it just pulled from the 2 screw holes and simply needs cleaned and re-installed in place. Between lights, door switch, and thermostats, there's lots of wire to re-attach to the front end while holding the entire assembly just an inch away from the cabinet, just barely enough space to see and remove or re-install all the darn wires with your very skinniest fingers.. | ||
|
Post# 707673 , Reply# 3 10/6/2013 at 23:32 (3,853 days old) by akronman (Akron/Cleveland Ohio) |
||
|
more | ||
|
Post# 707674 , Reply# 4 10/6/2013 at 23:32 (3,853 days old) by akronman (Akron/Cleveland Ohio) |
||
|
more | ||
|
Post# 707675 , Reply# 5 10/6/2013 at 23:34 (3,853 days old) by akronman (Akron/Cleveland Ohio) |
||
|
last pic | ||
|
Post# 707676 , Reply# 6 10/6/2013 at 23:36 (3,853 days old) by akronman (Akron/Cleveland Ohio) |
||
|
Ebay | ||
|
Post# 707677 , Reply# 7 10/6/2013 at 23:38 (3,853 days old) by akronman (Akron/Cleveland Ohio) |
||
|
here's the other | ||
|
Post# 707678 , Reply# 8 10/6/2013 at 23:44 (3,853 days old) by akronman (Akron/Cleveland Ohio) |
||
|
also in my reply#3, check out item 454, the glides. At some point in a GE dryer's life, these need to be replaced. They are a metal quarter circle bolt on piece with a nylon strip over a felt wick. If the nylon is in good shape, just get a few drops of oil on the wick. Otherwise, torn up nylon, etc, buy new glides and you'll get 20 years of life for the dryer. CLICK HERE TO GO TO akronman's LINK on eBay 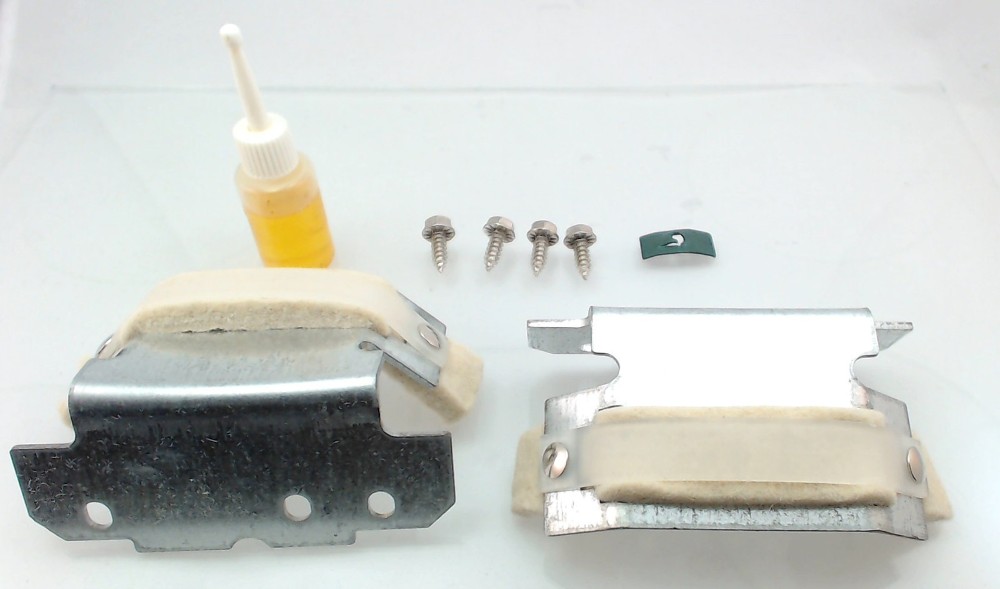
| ||
|
Post# 707680 , Reply# 9 10/6/2013 at 23:51 (3,853 days old) by akronman (Akron/Cleveland Ohio) |
||
|
oh I took another good look at your pic. You have the rear off, not the front. No wonder you can't see where it's missing. Remove the lint filter and take a good look, the empty spot should be visiblem maybe underneath a cardboard dust cover.. And watch carefully where you thread those wires and the wire guides, they will run right near the edge of the turning drum.
Yes, I know I type too much | ||
|
Post# 707703 , Reply# 10 10/7/2013 at 07:58 (3,852 days old) by Yogitunes (New Jersey) |
||

I have to take a look at mine to be sure....its just that those wires are attached at the base with a clamp, and that scorched cardboard makes me think this was near the burner somehow.....
otherwise Mark may be right, look for an open port in the exhaust port below the lint filter....something may be missing | ||
|
Post# 707705 , Reply# 11 10/7/2013 at 08:05 (3,852 days old) by combo52 (50 Year Repair Tech Beltsville,Md) |
||
BURNED UP HI-LIMIT THERMOSTAT The burned part in your first picture Ken is a hi-Limit thermostat Item # 530 in Marks first post { it is not anywhere near the lint filter ]. It should be an easy fix, GE had a lot of problems with this dryer design if the machine had anything less than a perfect [ and short ] exhaust duct run to the outside, the electric versions even worse.
Glad to see you collecting again Ken, you should call sometime and I can help you figure out how to deal with this new appliance acquisition, John. | ||
|
Post# 707707 , Reply# 12 10/7/2013 at 08:18 (3,852 days old) by akronman (Akron/Cleveland Ohio) |
||
|
oh John--Martin------2 or 3 heads are better than one for sure, thanks. Always something new to learn. Here's the link, it's GE PN#WE4X592 CLICK HERE TO GO TO akronman's LINK on eBay | ||
|
Post# 707709 , Reply# 13 10/7/2013 at 08:39 (3,852 days old) by Jetcone (Schenectady-Home of Calrods,Monitor Tops,Toroid Transformers) |
||
Yay!  | ||
|
Post# 707772 , Reply# 14 10/7/2013 at 16:19 (3,852 days old) by Yogitunes (New Jersey) |
||
|
| ||
|
Post# 707783 , Reply# 15 10/7/2013 at 17:17 (3,852 days old) by akronman (Akron/Cleveland Ohio) |
||
|
Martin----John---- | ||
| Post# 707828 , Reply# 16 10/7/2013 at 20:30 (3,852 days old) by keny (Detroit, Michigan) | ||
|
Message received
Thanks for all the info everyone.
I do see the opening above the burner assembly. My other concern is the heat resistant material (part 245, above). Does it just sit on top of the sensor. If it's available, I�ll get that as well. I don't know how these partially plastic parts can take the high temperatures just above the heater tube, but apparently they do. Also, I took a look at the glides, and one does have torn plastic, so I'll get replacements for that as well. Especially as I assume the drum will need to be removed to replace the sensor. I've never gotten parts through e-bay. If I can't find them locally at a competitive price, I'll go ahead with those. Jon � I don't know if I'm collecting appliances again, but if the trend continues, I'll need to contact my doctor to adjust my meds! Now, on a related subject . . . The washer also has problems, But these look major. Details at 11:00 (23:00) or so. | ||
|
Post# 707835 , Reply# 17 10/7/2013 at 20:52 (3,852 days old) by combo52 (50 Year Repair Tech Beltsville,Md) |
||
|
BURNED UP HI-LIMIT THERMOSTAT The brown thing around the thermostat [ #245 ] is just Hi-Temperature cardboard, it was designed to protect the insulation on the wires that connect to the thermostat, you don't really need it if you dress the wires so they cannot contact any hot metal parts. The bigger problem on these dryers is the rear drum seal, if it is not in great condition then the Hi-Temp T can be literally burned and as mentioned before the vent system that the dryer is connected to. John. | ||
| Forum Index: | 
| Other Forums: |

|

|

|

|

|

 Comes to the Rescue!