|
Thread Number: 48912
Wiring a PDE701 |
[Down to Last] |
| Post# 708391 10/10/2013 at 14:13 (3,843 days old) by bluejay (Havre de Grace, MD) | ||

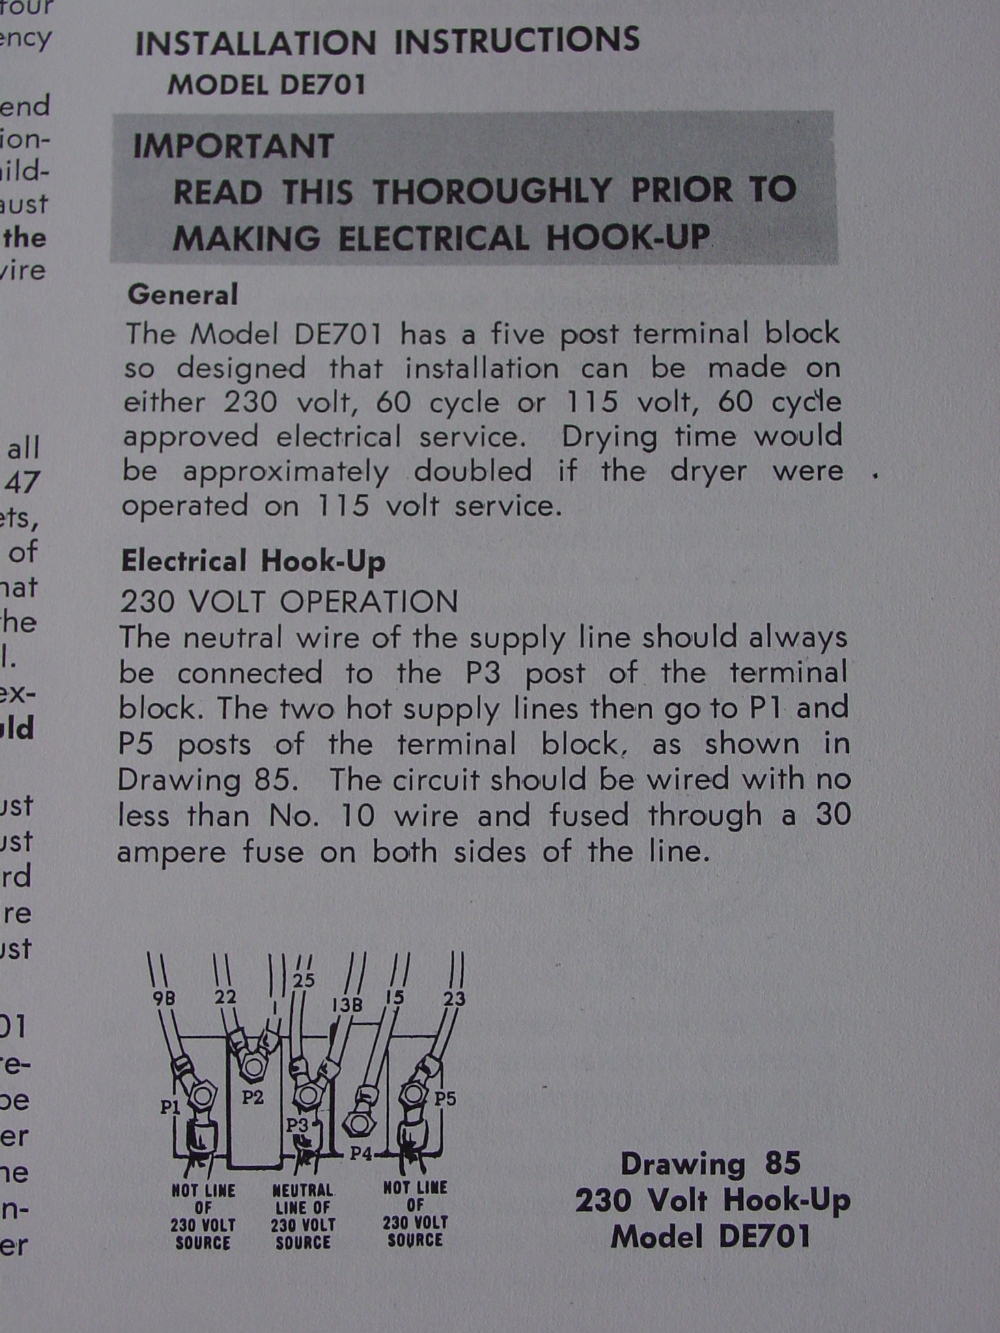
I'm relatively new to the site and have scored my first matching set of Maytags. I'm familiar with the dryer, as we currently own a DE700, but I've run into a bit of a stumbling block. The dryer was originally hard-wired into the house; I need to convert it to a 3 prong. Where can I find a wiring diagram for this (and subsequently, where does that random black wire attach to)? I've attached a picture of the wiring block; I imagine it's fairly simple, but our DE700 came already wired so I didn't have to fiddle with the electrical at all.
The set came from the thread linked below. The dryer appears to have been used very little. There was hardly any lint buildup inside, and the drum and door seal look new. It does need new belts, which I already have; I believe it has the original belts still installed. I also procured the original shipping container for the dryer. I was also provided with an automatic spritzer, which is supposed to keep clothes wrinkle free (I will never use this, but it's a cool piece of memorabilia). It came in a piece of the original washer container, which is pretty cool. Any help that anyone could provide would be much appreciated! CLICK HERE TO GO TO bluejay's LINK 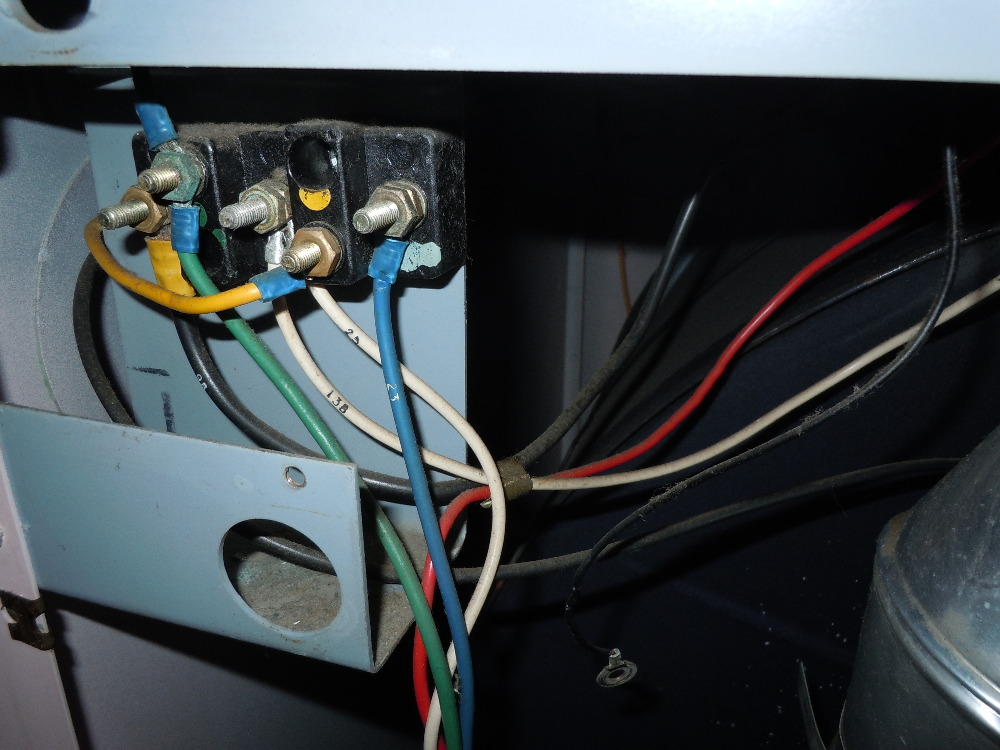
| ||

|
Post# 708402 , Reply# 1 10/10/2013 at 14:35 (3,843 days old) by turquoisedude  (.) (.) |
||

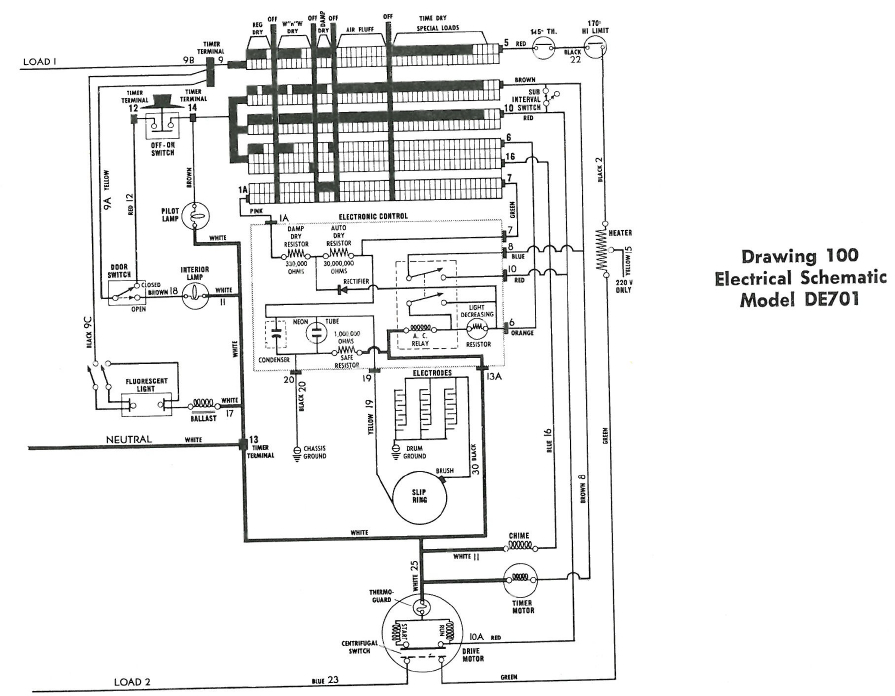
It's not a great picture, but here's the diagram for my '63 DE700.
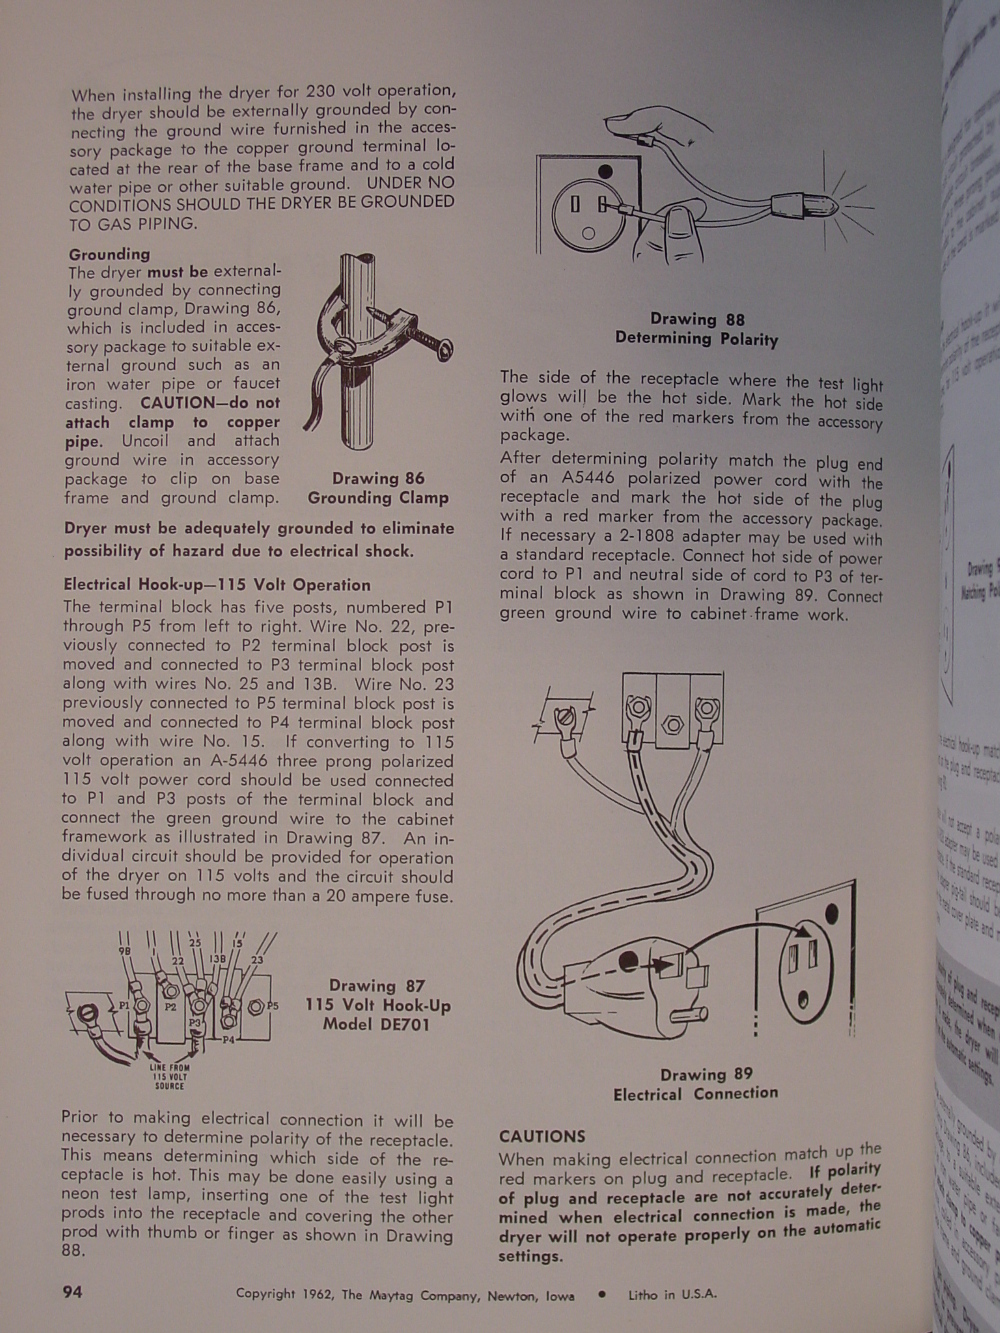
I believe that with a US 3-wire cord the middle conductor is the neutral one; that would be attached to the middle terminal of the wiring block where the white wires from the dryer are attached. The other two 'line' conductors would go on the terminals where you see the black and blue wires (one to the black, one to the blue). The yellow wire looks like a jumper for 115v operation. Please, if I am wrong, someone correct me!! I'm used to the Canadian four-wire dryer cords!! 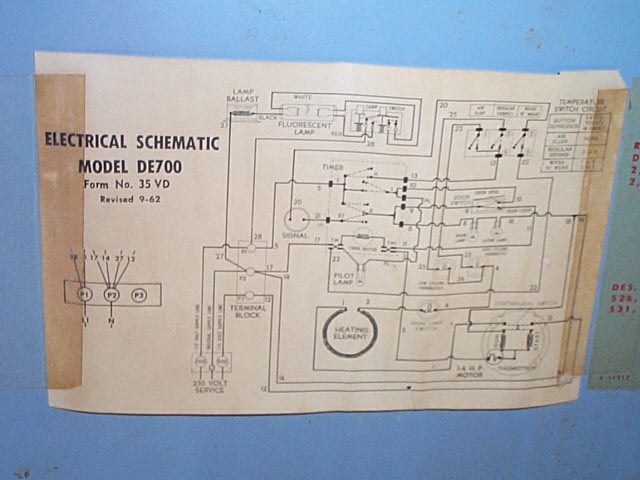
| ||
| Post# 708406 , Reply# 2 10/10/2013 at 14:47 (3,843 days old) by bluejay (Havre de Grace, MD) | ||
|
Oh cool, thanks! I didn't realize the DE700 and DE701 diagrams were interchangable. I can check the back of our DE700 to see if the diagram is there. I can see the spot on the PDE701 where it used to be, but it is long gone. I've also got to try and figure out where the random black wire (pictured to the right of the block, just dangling in the air) hooks up to. I think it may go up to the timer, but I'm honestly not sure.
| ||
|
Post# 708408 , Reply# 3 10/10/2013 at 14:51 (3,843 days old) by turquoisedude (.) |
||
|
| ||
| Post# 708414 , Reply# 4 10/10/2013 at 15:18 (3,843 days old) by bluejay (Havre de Grace, MD) | ||
|
So the black wire goes to a secondary wiring block which appears to have a giant capacitor on it. The wires that come off of this go directly into the timer. The wire is the 2nd from the left. Also, you can tell I haven't finished the de-linting process. :)
Interesting side note, the PDE701 was made in 1962. Our DE700 was made in August 1963. The latter has the germicidal light, but the PDE701 does not. 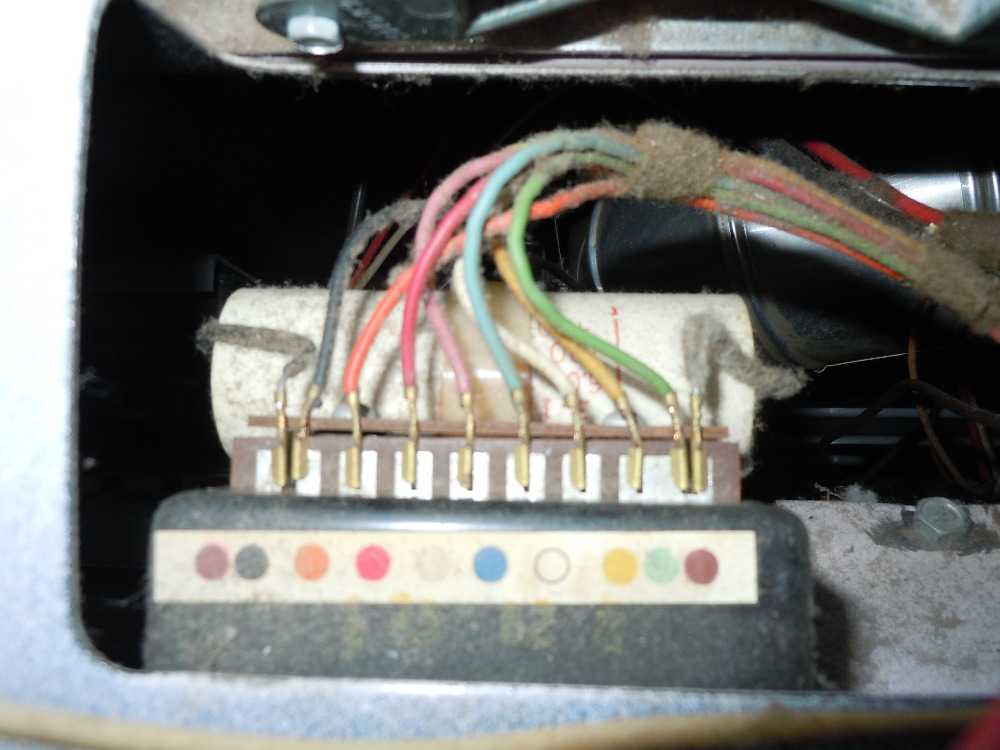
| ||
|
Post# 708422 , Reply# 5 10/10/2013 at 15:47 (3,843 days old) by turquoisedude (.) |
||
|
| ||
| Post# 708437 , Reply# 6 10/10/2013 at 16:25 (3,843 days old) by bluejay (Havre de Grace, MD) | ||
|
| ||
|
Post# 708447 , Reply# 7 10/10/2013 at 17:32 (3,843 days old) by d-jones (Western Pennsylvania (Pittsburgh Area)) |
||
 | ||
|
Post# 708448 , Reply# 8 10/10/2013 at 17:33 (3,843 days old) by d-jones (Western Pennsylvania (Pittsburgh Area)) |
||
|
| ||
| Post# 708451 , Reply# 9 10/10/2013 at 17:44 (3,843 days old) by bluejay (Havre de Grace, MD) | ||
|
| ||
| Post# 708814 , Reply# 10 10/12/2013 at 14:55 (3,841 days old) by bluejay (Havre de Grace, MD) | ||
|
| ||
|
Post# 708816 , Reply# 11 10/12/2013 at 15:17 (3,841 days old) by d-jones (Western Pennsylvania (Pittsburgh Area)) |
||
|
| ||
| Post# 708819 , Reply# 12 10/12/2013 at 15:30 (3,841 days old) by bluejay (Havre de Grace, MD) | ||
|
| ||
|
Post# 708842 , Reply# 13 10/12/2013 at 17:44 (3,841 days old) by Kenmore71 (Minneapolis, MN) |
||
 | ||
|
Post# 708861 , Reply# 14 10/12/2013 at 19:12 (3,841 days old) by combo52 (50 Year Repair Tech Beltsville,Md) |
||
Loose Black Wire | ||
| Post# 710456 , Reply# 15 10/20/2013 at 15:47 (3,833 days old) by bluejay (Havre de Grace, MD) | ||
|
Update: I have the dryer completely wired and grounded; we'll be hooking her up next weekend. I decided to spend a little time inspecting the bearings and I'm glad we did, as one of them was almost completely dry. The motor has been reinstalled, the inside of the cabinet has been cleaned (there wasn't much in the way of lint build up), and all that remains is to secure one batch of wires and screw the back plate back on.
I'll post a picture once I have her up and running in our laundry room. Thank you guys for the advice on the wiring! | ||
| Forum Index: | 
| Other Forums: |

|

|

|

|

|

 Comes to the Rescue!