|
Thread Number: 48991
Advice on Restoring Maytag A2MP & 60-W |
[Down to Last] |

|
Post# 709570 , Reply# 1 10/16/2013 at 00:49 (3,838 days old) by d-jones  (Western Pennsylvania (Pittsburgh Area)) (Western Pennsylvania (Pittsburgh Area)) |
||
 Congratulations on your new vintage machines and welcome to the blog. You've certainly come to the right place. I don't have any experience with the AMP machines so I can't help you much there, but there's an elderly gentleman here in Burbank that's been working on Maytags since he was a kid. He's a storehouse of knowledge and he has a pretty good supply of AMP parts. His business is called Ralph's Maytag Shop(Ralph was his father) and he's located on Victory blvd. It'd be worth it to give him a call if you need any parts, meanwhile there are a number of folks on this blog that can provide advice on repairs. | ||
| Post# 709680 , Reply# 2 10/16/2013 at 15:00 (3,837 days old) by quiggsdj () | ||
|
I've been advised to post pictures: 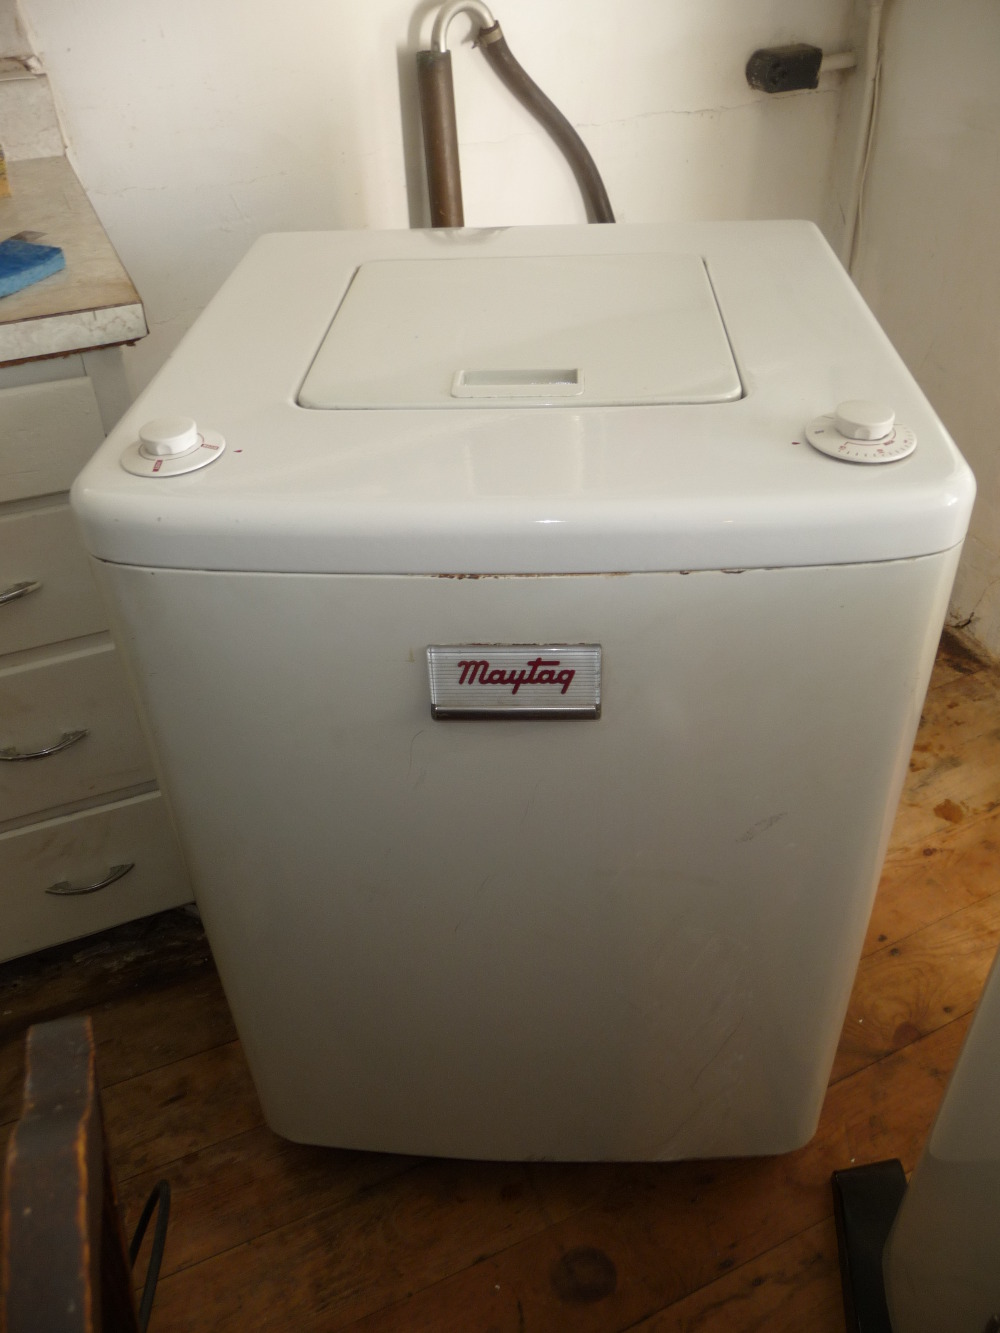
| ||
| Post# 709681 , Reply# 3 10/16/2013 at 15:02 (3,837 days old) by quiggsdj () | ||
|
more 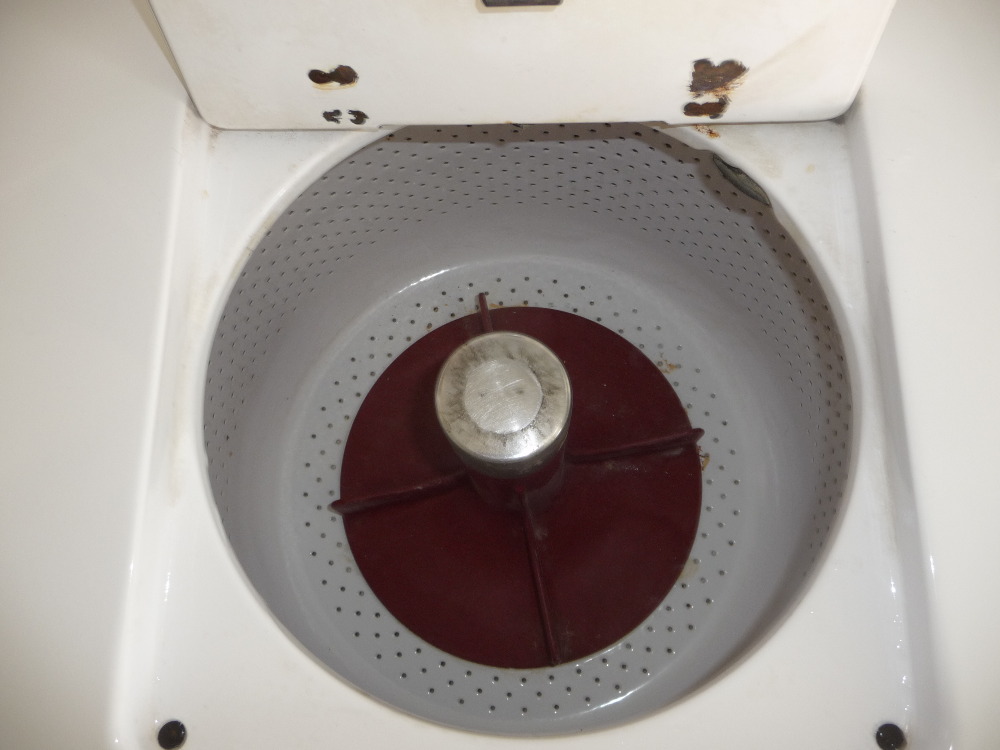
| ||
| Post# 709682 , Reply# 4 10/16/2013 at 15:02 (3,837 days old) by quiggsdj () | ||
|
more 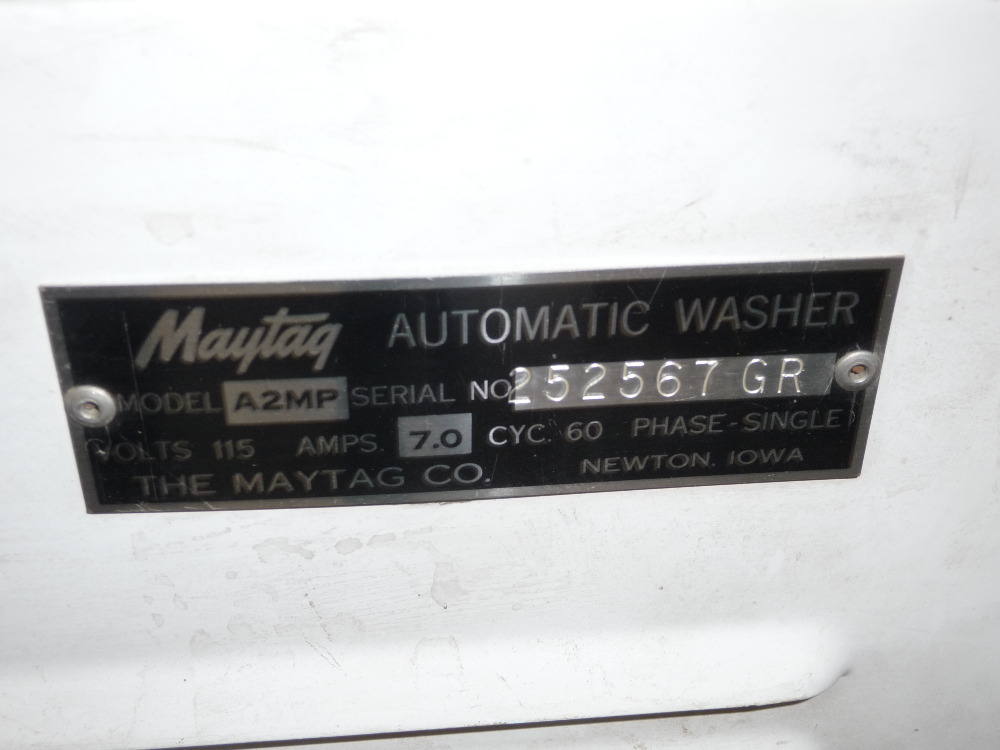
| ||
| Post# 709683 , Reply# 5 10/16/2013 at 15:03 (3,837 days old) by quiggsdj () | ||
|
more 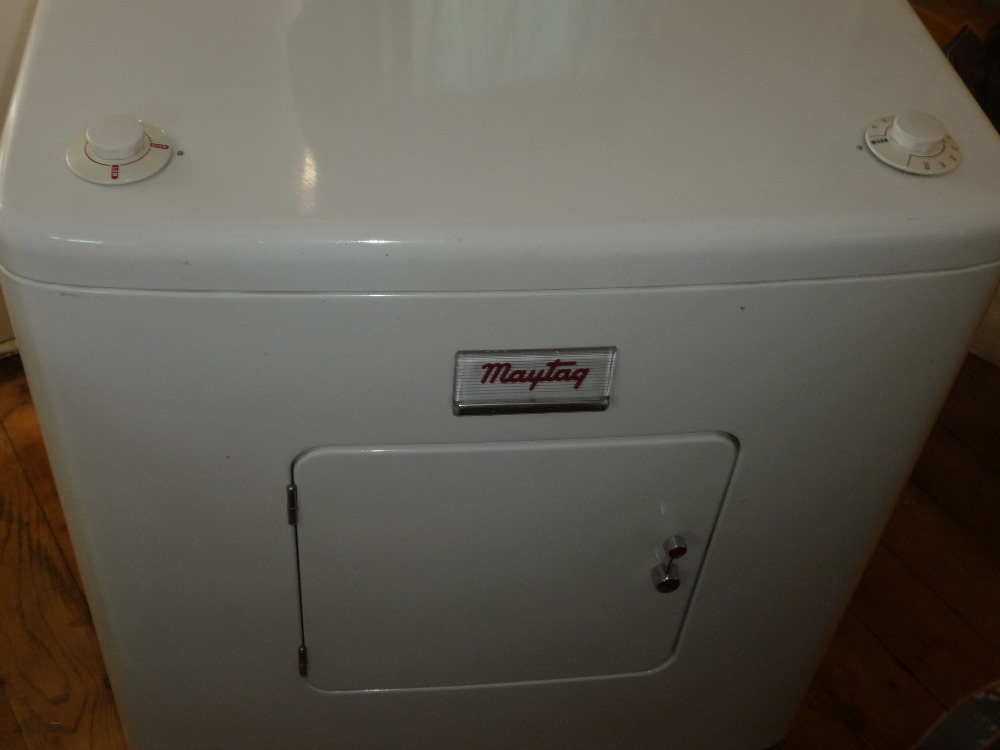
| ||
| Post# 709684 , Reply# 6 10/16/2013 at 15:04 (3,837 days old) by quiggsdj () | ||
|
more 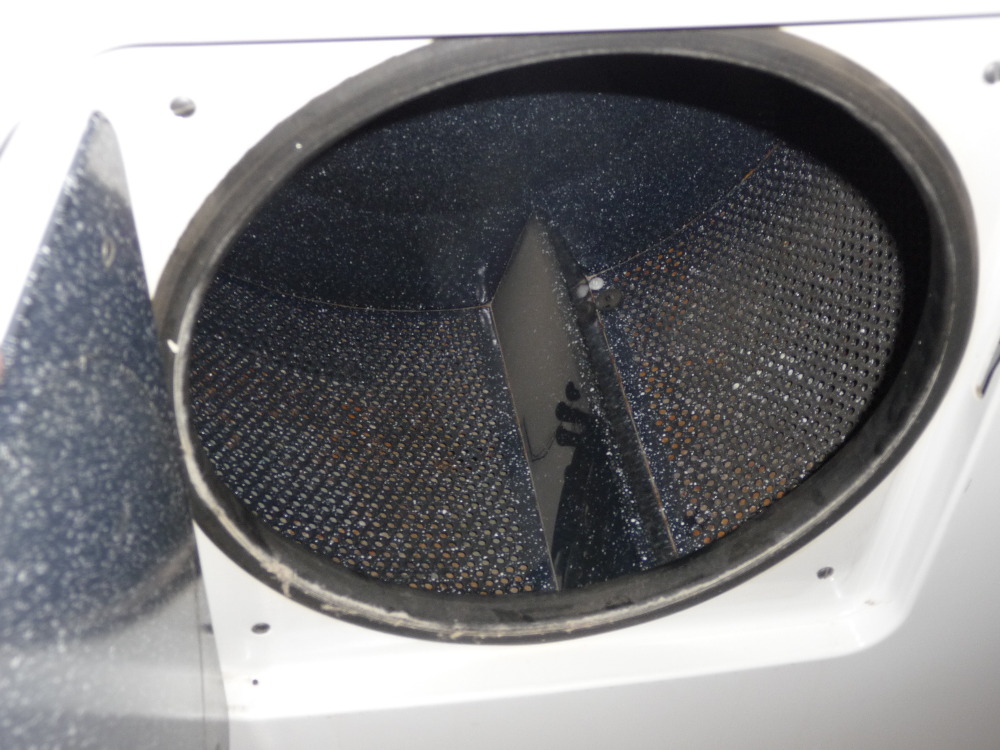
| ||
| Post# 709685 , Reply# 7 10/16/2013 at 15:05 (3,837 days old) by quiggsdj () | ||
|
more 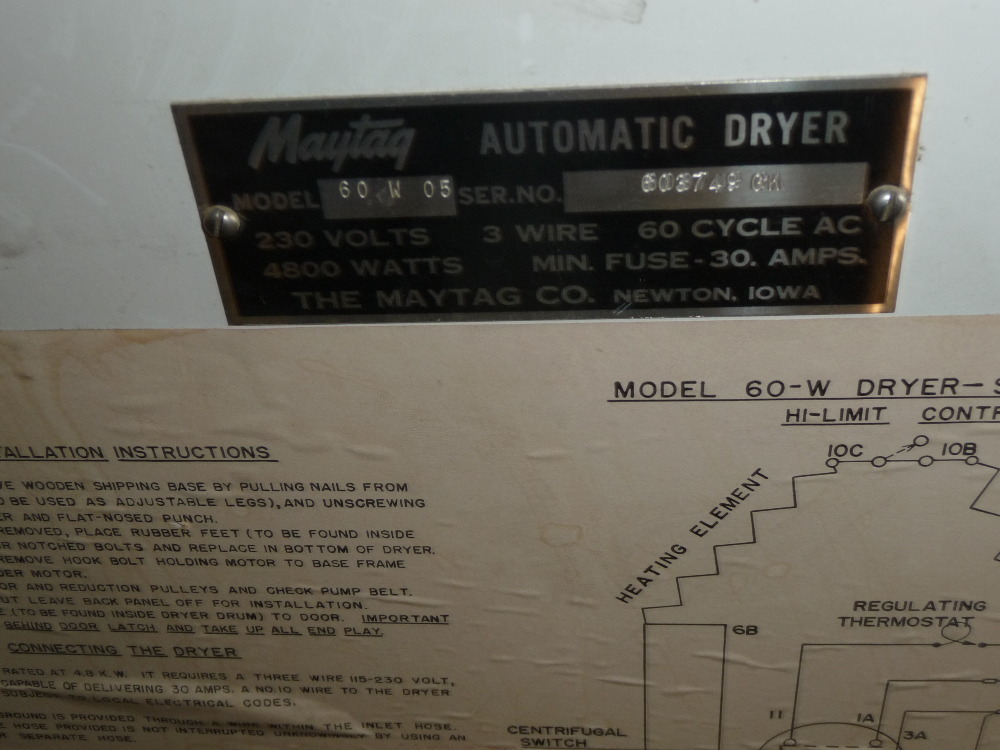
| ||
|
Post# 709688 , Reply# 8 10/16/2013 at 15:29 (3,837 days old) by swestoyz (Cedar Falls, IA) |
||

Congrats on the amazing finds! I found a similar pair a few years ago. The 60W was Maytag's first production dryer, with yours being built in August of '53. The dryer I found was made in April of '53, making it the earliest known of any example that has shown up over the years. Your dryer is right up there in the top 5 oldest Maytag dryers known to exist!
There is a lot on this site about repairing and restoring the AMP washer. I haven't torn into my dryer yet. Someday. CLICK HERE TO GO TO swestoyz's LINK | ||
|
Post# 709699 , Reply# 9 10/16/2013 at 16:35 (3,837 days old) by d-jones (Western Pennsylvania (Pittsburgh Area)) |
||
|
In going through my manuals this morning I find that I have the parts catalog for your dryer. I recently purchased the parts manuals for the AMP, A2MP, and A3MP on line as well. They aren't here yet, but if you haven't found a set of your own by the time they get here I can scan the one you need and email it to you.
Thanks for posting the pictures of these machines. They seem to be in really nice shape. | ||
| Post# 709701 , Reply# 11 10/16/2013 at 16:45 (3,837 days old) by quiggsdj () | ||
|
To d-jones: Thanks for that offer. Kenmore71 has kindly e-mailed me scans of his manuals, and they appear to be all I will need (provided there's not too much difference between the AMP and its successor A2MP). | ||
|
Post# 709741 , Reply# 12 10/16/2013 at 20:22 (3,837 days old) by swestoyz (Cedar Falls, IA) |
||
|
Hey there -
A few things to note before powering up your AMP. More than likely, it has sat around for more than a few years. Due to that, there are some precautionary things to look at prior to powering this beauty up.
Remember to ask questions if you've got any issues or concerns. Study the service manual carefully to get a good understanding of the washer prior to digging into it.
Your dryer should have the revised, fixed motor mount with the idler pulley for the pump. You may need to take the belt to a belt shop and have them size it for you. The water trip switch assembly is quite interesting on these. I'm thinking Mark (Kenmore71) has the service manual scanned for this. Hopefully he can be of some assistance.
Good luck!
Ben | ||
| Post# 709749 , Reply# 13 10/16/2013 at 21:02 (3,837 days old) by quiggsdj () | ||
|
Ben: Outstanding effort - thanks!! I intend to spend the day on this tomorrow; I'll post the results. | ||
| Post# 709755 , Reply# 14 10/16/2013 at 21:47 (3,837 days old) by quiggsdj () | ||
|
Well, I got Martha's skirt off, and found out her true age: I read this as "Nov 6 1953". 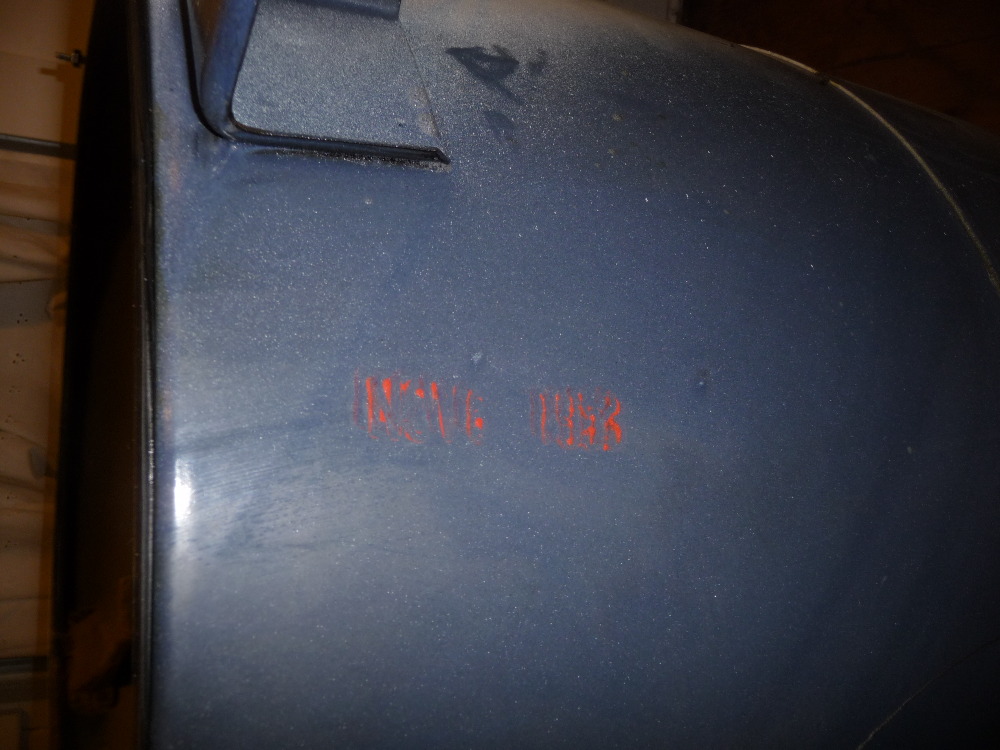
| ||
| Post# 709756 , Reply# 15 10/16/2013 at 21:48 (3,837 days old) by quiggsdj () | ||
|
And here's another from the front of the tub: 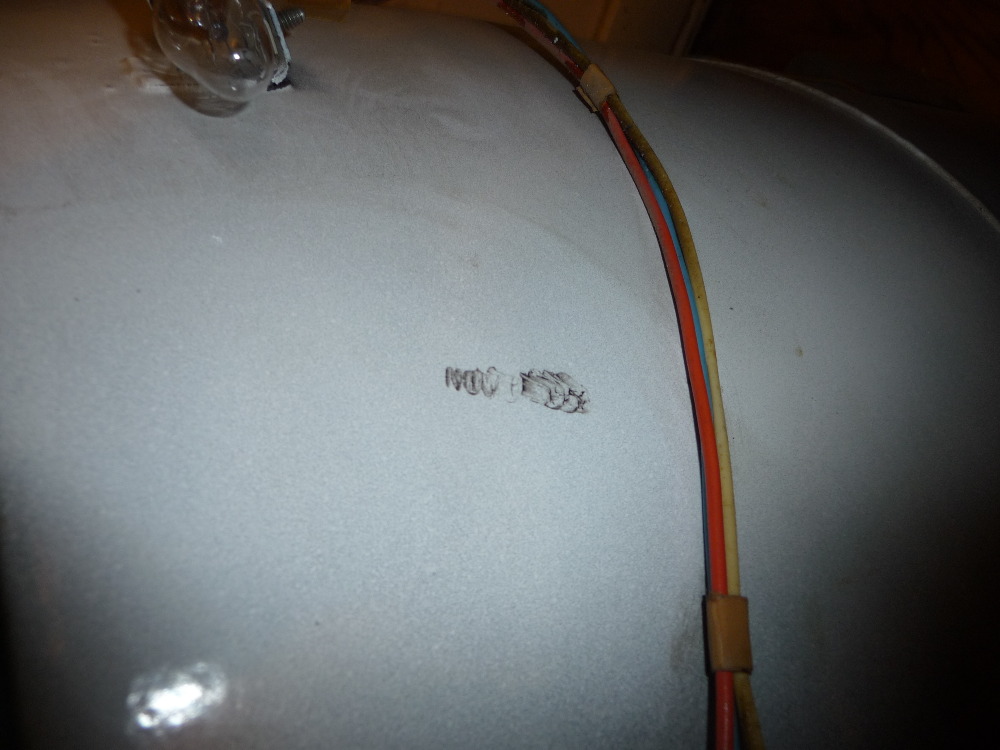
| ||
| Post# 709757 , Reply# 16 10/16/2013 at 21:50 (3,837 days old) by quiggsdj () | ||
|
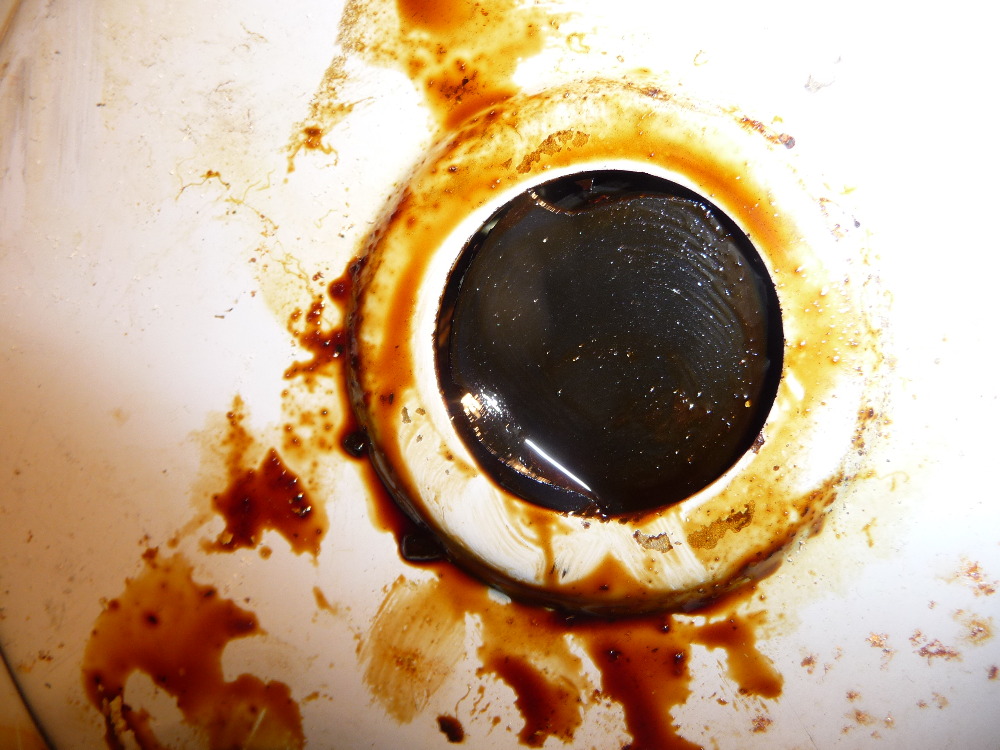
And here's the first casualty. This didn't happen until I removed the cabinet. I don't know what this is (it's not water) or where it comes from, but it's probably not a good thing. 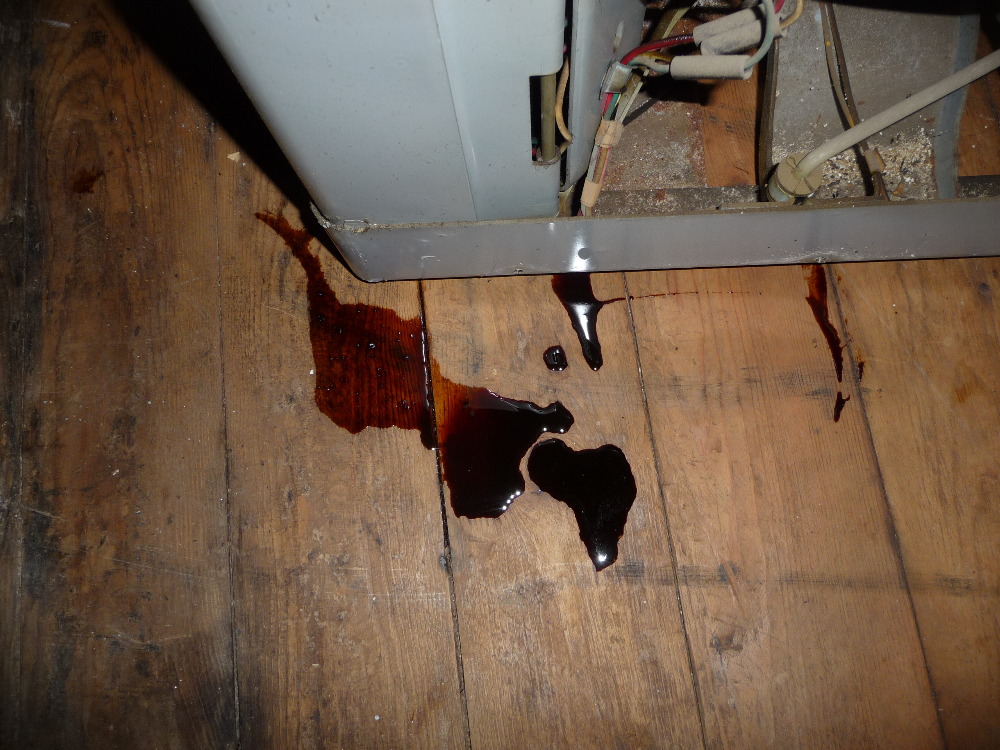
| ||
|
Post# 709816 , Reply# 17 10/17/2013 at 10:05 (3,836 days old) by swestoyz (Cedar Falls, IA) |
||
|
Wow, that is cool. The outer tub of your AMP was made only 3 days after mine. That's pretty sweet!
More than likely the oil you see has spilled from the clutch. I've torn apart AMP's where the clutch was almost dry and there some clutches where they have completely filled with oil from the transmission leaking down. A little oil is OK in the clutch. Once you get the machine up and running you'll be able to tell if the transmission is low on oil by the noise it makes. If it's pretty quiet with no groaning then it's fine, if it groans loudly through the whole wash then it's leaked out most of it's oil. Ben | ||
|
Post# 709845 , Reply# 19 10/17/2013 at 13:05 (3,836 days old) by swestoyz (Cedar Falls, IA) |
||
|
Yes, the RMA belt number Greg referenced will work on the AMP's. It will not work on later Helical drive design Maytags, but the helical drive belt I referenced earlier is backwards compatible with the AMP as the helical belt is designed to slip and act as a clutch. AMP's don't need the belt to clutch but the belt is the same physical size.
The part numbers they are referencing by the pound sure sound like wringer grease part numbers. These transmissions were filled with a 70w non-detergent like oil, which is probably what they are referring to as the 'power-unit' oil. It would have been the same oil used in the clutch. The only thing that seals the transmission internally is an o-ring that becomes hard with time, and eventually the transmission oil will seep past this o-ring down the input shaft. This is the Achilles heel to all Maytag automatics (helical and AMP). There's a good possibility that the o-ring on this Maytag has started leaking. Ben This post was last edited 10/17/2013 at 13:23 | ||
|
Post# 709846 , Reply# 20 10/17/2013 at 13:16 (3,836 days old) by Unimatic1140 (Minneapolis) |
||
Congratulations on a wonderful vintage find. I have a similar washer (AMP) and use it from time to time.
Here is the service manual for that washer.... http://www.ebay.com/itm/1948-Maytag-Auto... | ||
| Post# 709882 , Reply# 22 10/17/2013 at 16:44 (3,836 days old) by quiggsdj () | ||
|
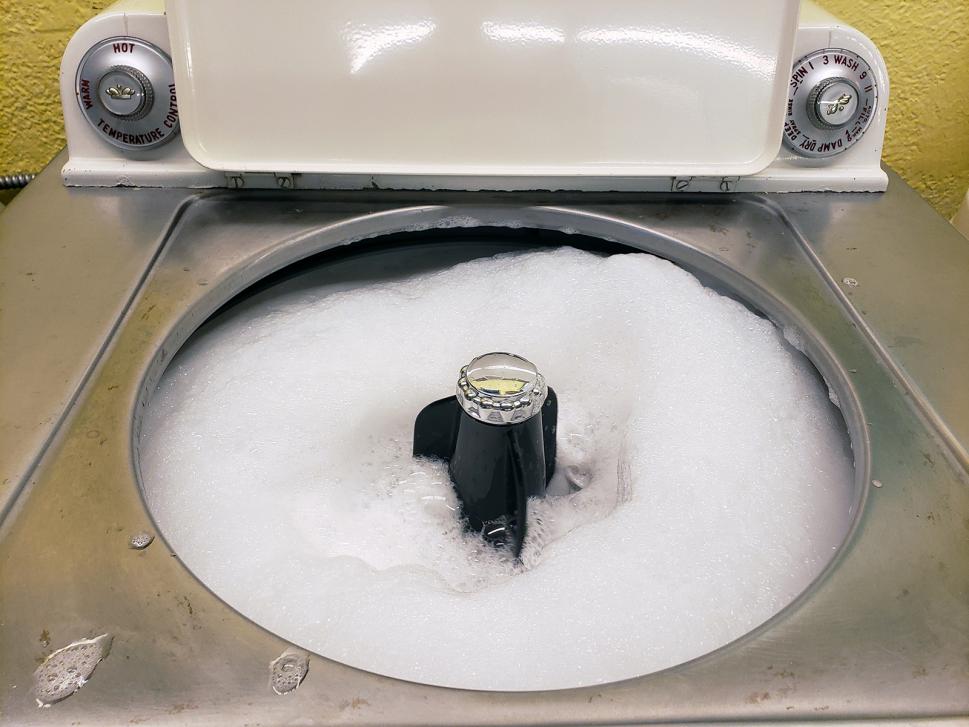
And here are some really clogged screens on the water intakes. I'd like to clean/replace them, but that can't be done without removing the entire valve assembly. Again: do I risk it? 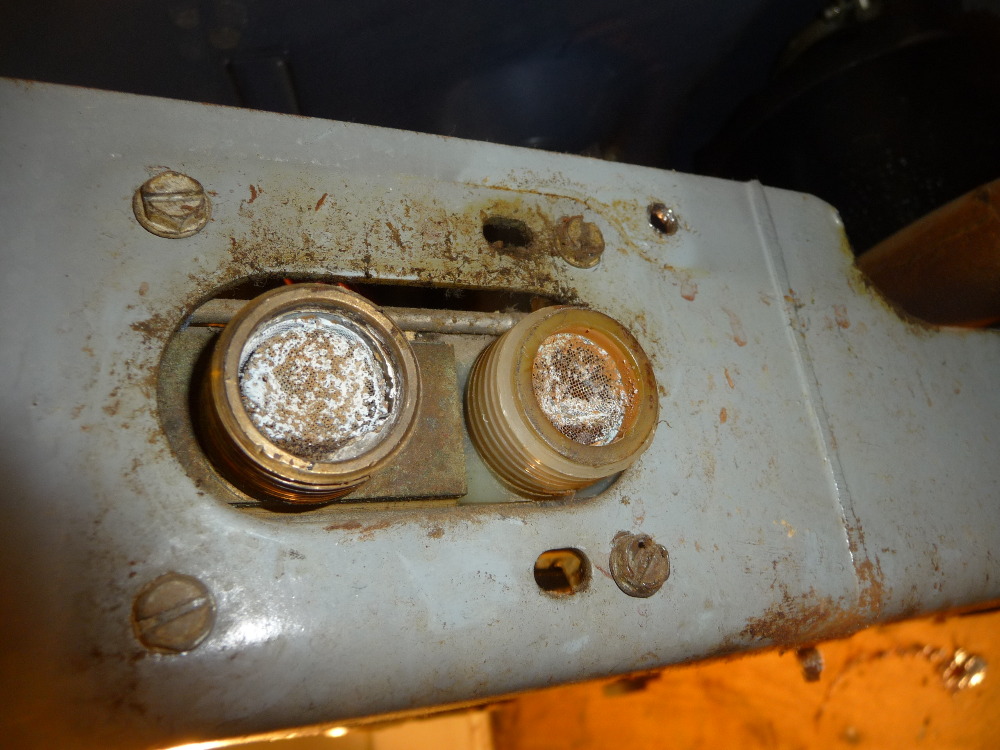
| ||
|
Post# 709965 , Reply# 24 10/18/2013 at 10:53 (3,835 days old) by swestoyz (Cedar Falls, IA) |
||
|
Hey there -
Sorry about taking a while to get back to you. Actually, things look pretty good! You've got a solid project there judging from the most recent photos. I was expecting to see more oil on the clutch housing but it seems that it truly was just the stopper that caused the leak. My take on things like this is to do it right and not use a work around. This being because this item will spin and you never know if a work-around is going to hold. The water valve doesn't look bad at all - just some dirty screens. Pull the valve out or just pull the screens with the valve in place. Clean them (I usually soak them in vinegar when there is scale present but you can try brushing them) and re-install. The pump doesn't look horribly bad either. The white stuff is excess soap that may have seeped from the gasket or leaked from the tub outlet hose. You mentioned that you tried removing soap scum from the outer tub, so I'm not surprised to see it on the pump as well. I would leave it as is for testing purposes. Ben | ||
| Post# 710024 , Reply# 27 10/18/2013 at 18:09 (3,835 days old) by quiggsdj () | ||
|
Postscript Could this have anything to do with the fact that I'm doing all this with the tub empty, so there's no weight pushing it down into whatever? | ||
|
Post# 710041 , Reply# 28 10/18/2013 at 19:36 (3,835 days old) by Unimatic1140 (Minneapolis) |
||
|
Could this have anything to do with the fact that I'm doing all this with the tub empty
No the machine should actually pick up speed faster without the weight of water and clothes. There is a chance that the brake isn't releasing. With the machine unplugged can you depress the brake release solenoid manually and easily turn the wash basket? Then with it powered on and operating can you see the brake release via the solenoid operate in the same way? | ||
| Post# 710056 , Reply# 29 10/18/2013 at 20:19 (3,835 days old) by quiggsdj () | ||
|
Unimatic: "With the machine unplugged can you depress the brake release solenoid manually and easily turn the wash basket?" NO - I can't even budge the basket! | ||
| Post# 710071 , Reply# 30 10/18/2013 at 21:17 (3,835 days old) by quiggsdj () | ||
|
update Unimatic: "With the machine unplugged can you depress the brake release solenoid manually and easily turn the wash basket?" OK, with another person holding the solenoid, the basket can be turned, but just barely. | ||
|
Post# 710104 , Reply# 31 10/18/2013 at 23:20 (3,835 days old) by Unimatic1140 (Minneapolis) |
||
|
| ||
| Post# 710187 , Reply# 32 10/19/2013 at 09:28 (3,834 days old) by quiggsdj () | ||
|
Yes - via Mark K, I have the 1952 AMP manual, which I trust is close enough for this 1953 A2MP. | ||
|
Post# 710206 , Reply# 33 10/19/2013 at 12:17 (3,834 days old) by Kenmore71 (Minneapolis, MN) |
||
 Actually the 1952 manual that I sent you contains 7 supplements and covers ALL models (AM, AMP, A2MP, A3MP, A4MP, 101P, 102P and the 121P. The A2MP gets no mention in that manual but I think that mainly has to do with the fact that, for all intents and purposes, the A2MP was basically an A3MP which was still installed in an original AMP cabinet. | ||
| Post# 710209 , Reply# 34 10/19/2013 at 12:55 (3,834 days old) by quiggsdj () | ||
|
Mark - I wasn't sure, because I've seen (on eBay) a manual which lists the A2MP right on the cover (the cover also bears a copyright of 1950, which makes no sense). | ||
|
Post# 710215 , Reply# 35 10/19/2013 at 13:13 (3,834 days old) by d-jones (Western Pennsylvania (Pittsburgh Area)) |
||
|
(the cover also bears a copyright of 1950, which makes no sense). As an aircraft mechanic I received numerous revisions to the aircraft maintenance manuals from the manufacturers that had no independent copyright. They were covered under the existing copyright of the manual they were going into. So perhaps the service manual was updated without the need for an entirely new copyright. | ||
|
Post# 710219 , Reply# 36 10/19/2013 at 13:32 (3,834 days old) by Unimatic1140 (Minneapolis) |
||
|
| ||
|
Post# 710339 , Reply# 38 10/19/2013 at 23:19 (3,834 days old) by Unimatic1140 (Minneapolis) |
||
|
This older thread might help with the disassembly if it comes to that:
www.automaticwasher.org/cgi-bin/T... I'm note sure if you can inspect the break assembly without taking a bit of the machine apart, I just don't remember, its been at least 8 years since I worked on one of those. | ||
| Post# 710441 , Reply# 39 10/20/2013 at 12:18 (3,833 days old) by quiggsdj () | ||
|
Can I do the big tear-down without removing the agitator? That sounds like the less-risky next option. | ||
|
Post# 710450 , Reply# 40 10/20/2013 at 14:30 (3,833 days old) by Kenmore71 (Minneapolis, MN) |
||
|
There is no need to remove the agitator. Once you remove the outer cabinet you can remove the entire 3 tub assembly with the power unit intact.
Starting on page 22 of the service manual follow steps 3, 5, 8 & 9 (skipping the other steps)
You will need 2 people to remove the cabinet and it will be very helpful to have two people to remove the whole assembly and turn it over. | ||
| Post# 710490 , Reply# 41 10/20/2013 at 19:50 (3,833 days old) by quiggsdj () | ||
|
The tub etc. assembly is just not coming loose from the frame etc. Was I supposed to disassemble the clutch at some point, or is the shaft just supposed to slide right out of that? | ||
| Post# 710497 , Reply# 42 10/20/2013 at 20:07 (3,833 days old) by quiggsdj () | ||
|
And also: If I'm supposed to remove the clutch, how might I simulate the function of the super special "Clutch Puller Tool No. 38304"? I have no idea what that might look like. | ||
|
Post# 710502 , Reply# 43 10/20/2013 at 20:27 (3,833 days old) by swestoyz (Cedar Falls, IA) |
||
|
If I remember right pulling the clutch is a pain, but I usually keep pulling and it eventually comes off ( doesn't hurt to tap with a small hammer). Make sure to pull the T-Key and the screw above the brake. Also pull the full flume.
All of this is detailed with much more explanation in the manual. Hope everything goes smoothly. Ben | ||
| Post# 710505 , Reply# 44 10/20/2013 at 22:28 (3,833 days old) by quiggsdj () | ||
|
Thanks Ben. Actually, the manual says nothing about pulling the clutch, but just from looking at the situation it seems obviously necessary. | ||
| Post# 711496 , Reply# 45 10/26/2013 at 13:48 (3,827 days old) by quiggsdj () | ||
|
A new problem First the big picture (I'm doing this b/c I don't know how to combine photos into a single post), showing location of the problem: 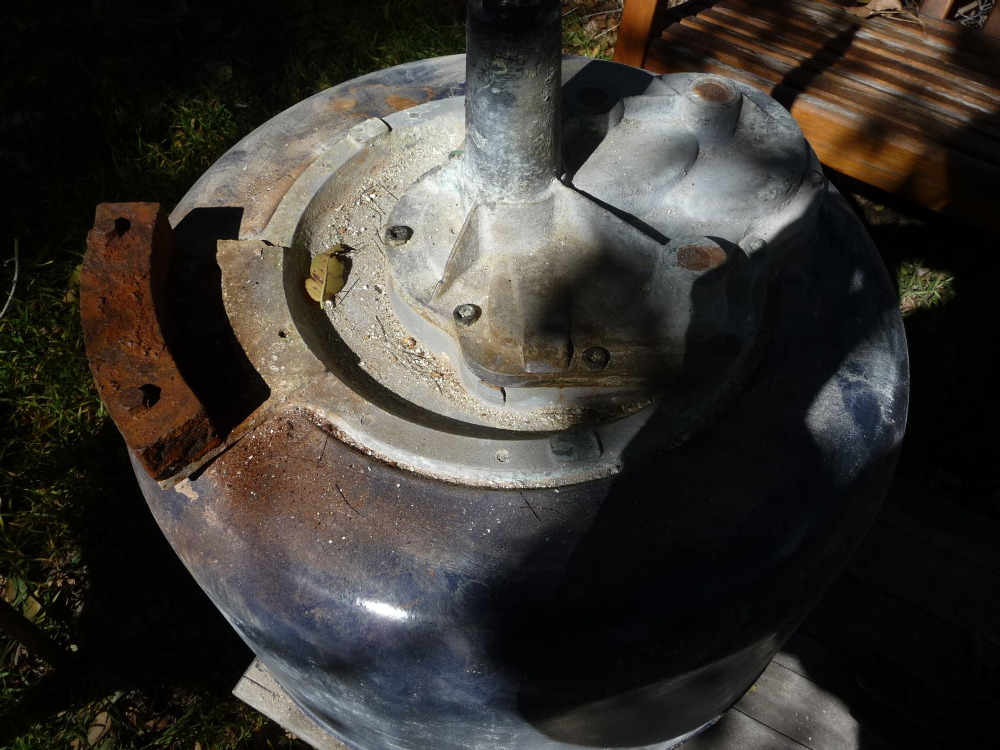
| ||
| Post# 711497 , Reply# 46 10/26/2013 at 13:49 (3,827 days old) by quiggsdj () | ||
|
Close-up 1: 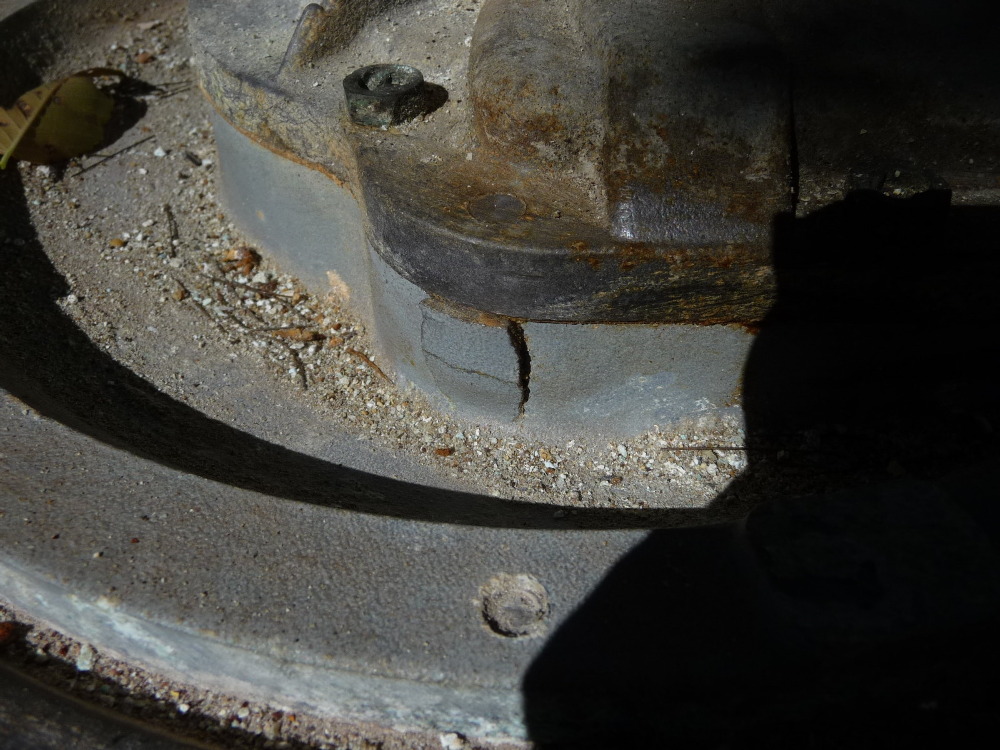
| ||
| Post# 711498 , Reply# 47 10/26/2013 at 13:51 (3,827 days old) by quiggsdj () | ||
|
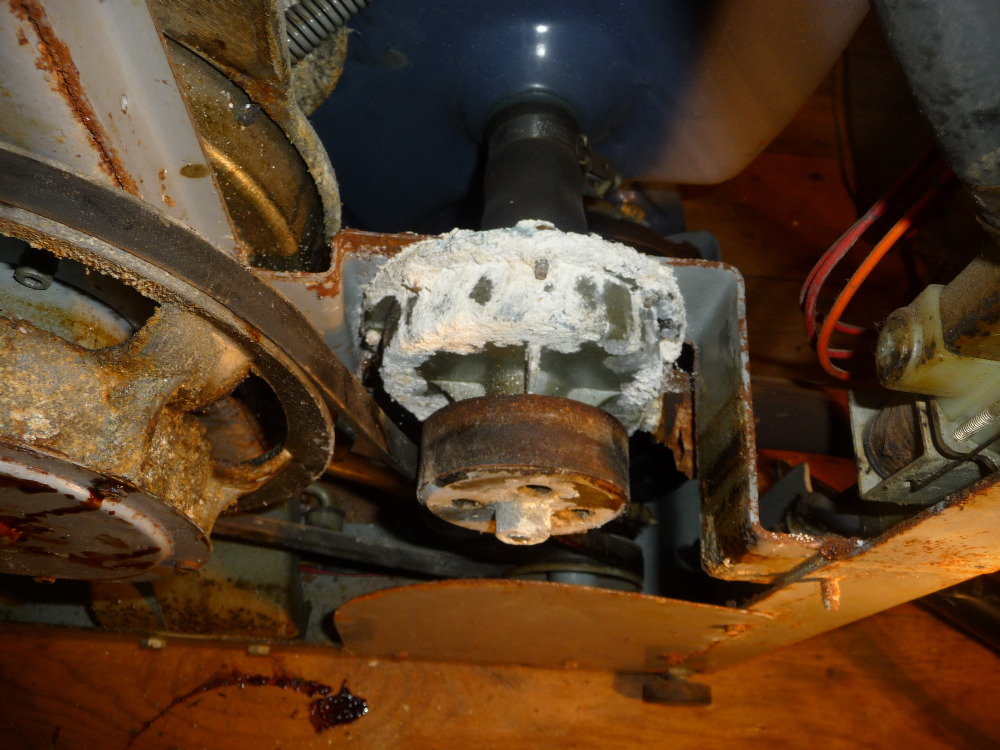
Close-up 2. Is this something I need to fix? If so, how? Was there fluid on the other side of that crack that now needs to be replaced? I've been really leery of opening up that transmission (gasket anyone?) -- should I be? 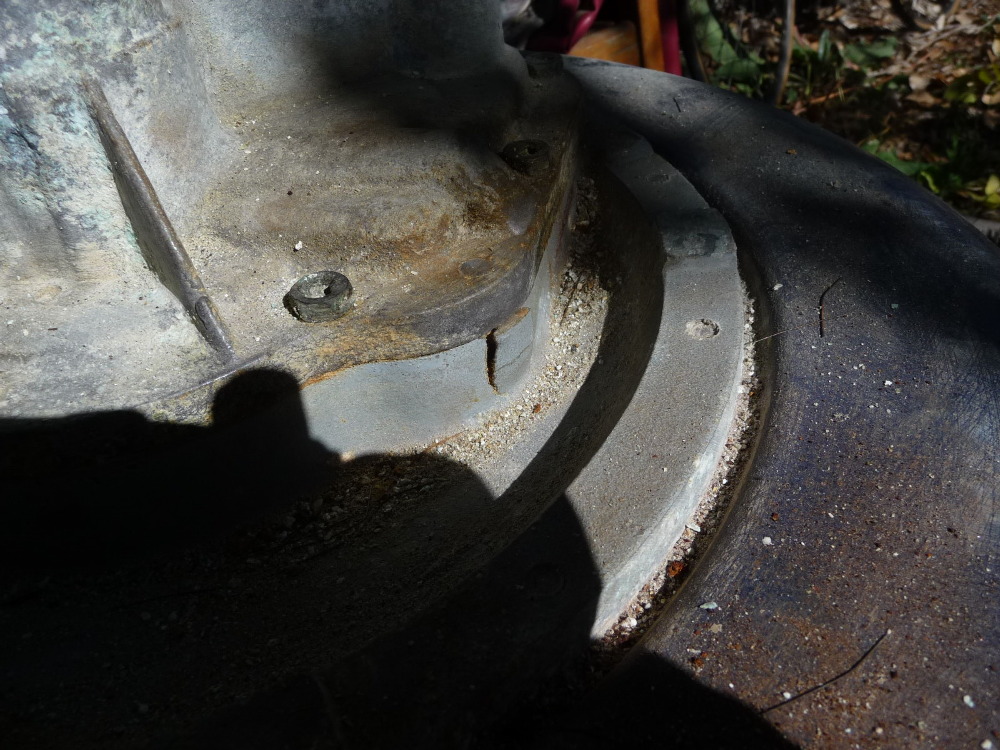
| ||
|
Post# 711555 , Reply# 48 10/26/2013 at 19:17 (3,827 days old) by d-jones (Western Pennsylvania (Pittsburgh Area)) |
||
|
That large cast aluminum device forms the upper half of the gear housing(as you can probably already see), and there are two steel alignment pins in it that I have to assume are used to help orient the lower gear housing. You can see the end of one of them right there adjacent to the blown out piece. It's possible that the pin began to swell with corrosion and that led to the failure you see there, but that's just speculation on my part. Since the broken off section is no longer serving any useful purpose, I'd try pulling it off to get a look at that pin.
There should be as much material behind the pin as there was in front of it, so unless it's blown out too you may not have an oil leak here. But if it was my machine I'd want to disassemble things enough to make sure there were no cracks that went all the way through. If they aren't available(though I suspect they are)gaskets can be made without too much trouble, and then you'd have a good opportunity to change the oil as well. | ||
| Post# 711683 , Reply# 49 10/27/2013 at 12:43 (3,826 days old) by quiggsdj () | ||
|
D-jones: Thanks, that sounds reasonable. What oil should I use? | ||
|
Post# 711699 , Reply# 50 10/27/2013 at 15:03 (3,826 days old) by d-jones (Western Pennsylvania (Pittsburgh Area)) |
||
|
What oil should I use? That's actually been discussed on this blog several times with lots of varying opinions. As you're already aware the service manual calls out 1 and 3/4 pounds of 56080X, which I believe translates to the newer part number 056080. For all I know there's a newer number as well. Others argue that modern off the shelf substitutes will work just as well if not better. You should be able to find some of these discussions by digging around in the archives a bit. You can actually learn quite a bit by reading through the back and forth comments of some of this blogs heavy weights. This post was last edited 10/27/2013 at 19:23 | ||
| Post# 714042 , Reply# 51 11/8/2013 at 22:57 (3,814 days old) by quiggsdj () | ||
|
Happy Update On Martha's 60th birthday -- Nov. 6 2013 -- I got her fully up and running. The only hitch was that the house drain couldn't handle her output! | ||
|
Post# 714049 , Reply# 52 11/8/2013 at 23:34 (3,814 days old) by d-jones (Western Pennsylvania (Pittsburgh Area)) |
||
|
| ||
| Post# 714181 , Reply# 53 11/9/2013 at 14:51 (3,813 days old) by dnastrau (Lords Valley, PA) | ||
|
Pump Great job! What did you do about the bad pump? | ||
| Forum Index: | 
| Other Forums: |

|

|

|

|

|

 Comes to the Rescue!