|
Thread Number: 53813
Maytag Update... |
[Down to Last] |
Post# 761197 6/3/2014 at 15:12 (3,606 days old) by tennblondie78  (Bowling Green, KY) (Bowling Green, KY) |
||
|
I thought I would share an update with everyone on my Maytags. I have named them: The washer is Ethel and the dryer is Fred. Those names just seemed fitting for some reason. I have had Ethel running; she has done 6 loads of laundry flawlessly so far. She is so smooth and quiet! Not a hint of cabinet shake or noise during the cycle at all. I see no signs of her damper pads showing, and I got on my hands and knees. I couldn't believe how smooth and silent the spin was compared to my Whirlpool Ultimate Care II washer I am using now. I took some videos of the maiden wash. I ran it with quite a bit of bleach for my own peace of mind and washed the rags I used to clean her up with. I then ran regular laundry loads. I took pics and videos. I am going to treat her to a new Maytag belt set, but she doesn't know about that yet. It's a surprise! She told me to ask if everyone could please keep an eye out for a new dial face for her and buttons, as she is slightly vain. Ethel is naked right now, her cabinet and base has been painted. She asked Fred to turn around until her cabinet was back in place. :)
But... Much to Ethel's enjoyment, I took Fred apart, too. He hasn't been tested yet because I don't have a way to plug him in anywhere in the garage. He was full of the usual dryer junk: gum wrappers, buttons, pony tail holders and LINT. Holy Mother of All Things Combustible, was that thing a FIRE HAZARD. I have never in my life seen such. I swear lint has permanently embedded itself into the plastic parts. (Just kidding, but still...) I don't think it has been cleaned out since 1976. If I had the lint tested I'm sure it would contain a high amount of polyester. LOL! I have cleaned him out thoroughly. I scrubbed the drum out in the front yard while getting very strange looks from passers by. I have replaced his rollers, axles and glides. It looks like I may have put the glides on turned backward, with the tabbed portion toward the inside of the drum rather than toward the edge. Will that make a big difference? Do I need to drill the rivets back out and turn them around? I did find that the grid portion on the inlet duct that the filter slides into has a broken area. I haven't had any luck so far finding a replacement. I'm wondering if that, coupled with the missing light lens, was part of the cause for all of the lint buildup. (I have a new lens, BTW...) Anywho, let's get to the good stuff... Pics and videos!! Yes, there are some "girlie garments" sloshing around in the videos, but I figure our inner 4th graders could use a snicker... LOL! | ||

|
|
Post# 761199 , Reply# 1 6/3/2014 at 15:19 (3,606 days old) by tennblondie78 (Bowling Green, KY) |
||
|
This post has been removed by the member who posted it. | ||
|
Post# 761202 , Reply# 2 6/3/2014 at 15:24 (3,606 days old) by tennblondie78 (Bowling Green, KY) |
||
|
Here's Fred
How do you post videos? Don't hate me 'cause I'm stupid... :)
| ||
|
Post# 761205 , Reply# 3 6/3/2014 at 15:35 (3,606 days old) by goatfarmer (South Bend, home of Champions) |
||
 We had a newer Maytag dryer, a DE 511 that was missing the lens for the interior lamp. I couldn't believe how much cr@p was ingested into the guts of that dryer through the small hole that was there.
BTW, I didn't know you needed any buttons. I have the wash/spin speed buttons, in better shape than yours. Send me a mailing address, and I'll send 'em out. | ||
|
Post# 761211 , Reply# 4 6/3/2014 at 15:51 (3,606 days old) by tennblondie78 (Bowling Green, KY) |
||
|
| ||
|
Post# 761213 , Reply# 5 6/3/2014 at 16:09 (3,606 days old) by Yogitunes (New Jersey) |
||

Congrats....Ethel May(if I am correct is her maiden name on the show) is a perfect name for the washer....
a little clean up now will pay off in years of service for you.... if you have a compressor, that is best for cleaning out lint and dust from every nook and cranny on Fred! .... keep us posted..... | ||
| Post# 761237 , Reply# 6 6/3/2014 at 17:30 (3,606 days old) by danemodsandy (The Bramford, Apt. 7-E) | ||
|
Hi Stephanie:
I'm going to leave the roller question to someone who knows more than I, but I can help on a couple of things, so here goes:
YES, that missing drum light lens can let incredible amounts of lint into the cabinet, so that's a lot of your problem right there. BUT - that still leaves the filter/duct assembly on the front bulkhead, which from your description, does need replacement. The problem is - so far as I know, the part is no longer available. I hope someone here can help you with a good used one. It's not anything horrendous to change out, just a little time and a nut driver. The filter/duct assembly terminates down at the blower wheel, so having all that out will be an excellent opportunity to clean out the blower wheel if you haven't done so already. Sounds like you're making excellent progress! Keep us posted.... | ||
|
Post# 761245 , Reply# 7 6/3/2014 at 17:50 (3,606 days old) by tennblondie78 (Bowling Green, KY) |
||
|
I have tried to find that duct assembly, but there are none to be had on ebay right now. I did see that when they still made a replacement part for that, it was white. Mine is gray. I guess it's just cheaper to make the replacement parts all in white. The lint filter has been replaced at some point, because it is white instead of the correct gray. I eventually want to replace it with one of the correct color. I don't think that will be as hard to find. I find part of the fun is finding the parts you need.
| ||
| Post# 761252 , Reply# 8 6/3/2014 at 18:07 (3,606 days old) by e2l-arry (LAKEWOOD COLORADO) | ||
|
Ethyl May Potter is her maiden name As mentioned on their trip to California when they stop by her childhood home in Albuquerque. "Ethyl May Potter, We never forget her!" | ||
|
Post# 761253 , Reply# 9 6/3/2014 at 18:09 (3,606 days old) by tennblondie78 (Bowling Green, KY) |
||
|
Ethel May | ||
|
Post# 761257 , Reply# 10 6/3/2014 at 18:27 (3,606 days old) by Yogitunes (New Jersey) |
||
|
Parts warehouse.....
if this helps......may not hurt to call and ask....worst they can say is no.....
you may also do better to use the part number more than just the model specific alone.....for these dryers, parts like a blower wheel or shroud were all the same thru most all models.... a pic may help them as well locate one......... also if your on ebay, and find a seller posting a lot of Maytag parts, just send him a question, they may have one, just not listed at the moment... CLICK HERE TO GO TO Yogitunes's LINK on Lancaster Craigslist | ||
|
Post# 761284 , Reply# 11 6/3/2014 at 19:24 (3,606 days old) by ultramatic (New York City) |
||
 | ||
|
Post# 761312 , Reply# 12 6/3/2014 at 20:44 (3,606 days old) by Launderess (Quiet Please, There�s a Lady on Stage) |
||
Later On When They All Moved To Conn
In the episode where Lucy thinks she lost her wedding ring when mixing the cement for the BBQ that was being built (in truth Ricky found it and hid it to teach his wife a lesson), the next morning seeing the thing put back together totally wrong all heck breaks loose.
After Ricky is finished with Lucy, Fred turns to Ethel and says: "Ethel May Mertz, were you in on the shenanigans"? Trying to sound all angry and authoritative. To wit Ethel responds striking a mighty blow for 1950's housewives across America: "Yes, I was in on the shenanigans, and I am dead tried from lifting those heavy bricks all night; and if you say just one more word to me Fred Mertz I'm going to take *YOU* apart and put you back together the wrong way..." All Fred could say was "just asking honey bunch" as he turns meekly away jiggling his keys in his trouser pockets. *LOL* | ||
|
Post# 761316 , Reply# 13 6/3/2014 at 20:54 (3,606 days old) by gansky1 (Omaha, The Home of the TV Dinner!) |
||

Nice restoration work, you have a good set there! Your delight and enthusiasm for your first vintage washer-dryer set is infectious, it's fun to see the "x-mas morning" in others but we'll have to wait for candy in the stocking until later, ok? :-)
Is the broken part on the filter in the grille facing inside the drum? If not to large of hole, just file the rough edges so they can't snag clothes tumbling by and it should be fine until you find a replacement. (You can post a link to your vid in the text of your posting, or in the link to share box right below the text-entry box.) | ||
|
Post# 761391 , Reply# 14 6/4/2014 at 07:21 (3,605 days old) by tennblondie78 (Bowling Green, KY) |
||
|
Infectious...
Yes, I do feel like a kid on Christmas morning. I'm very excited to have them and I love working on them. I have to struggle to not let myself get too "perfectionist." I have wanted a set like this for so long, I just want them to be perfect so they will be nice and happy for a long time. I just found out last night yout have to put the videos on you tube first to be able to link to them, so I will work on that tonight. I don't have a channel on there yet. THe hole is on the grille facing the inside of the dryer. I will do like what was suggested and smooth the edges down until I can find another.
| ||
|
Post# 761392 , Reply# 15 6/4/2014 at 07:21 (3,605 days old) by lorainfurniture (Cleveland ) |
||
|
I'm missing something What's the problem with the duct assembly? Good job on getting those machines back in action | ||
|
Post# 761393 , Reply# 16 6/4/2014 at 07:24 (3,605 days old) by tennblondie78 (Bowling Green, KY) |
||
|
Lorainfurniture,
There's a place where there's about 4 squares in the grille that faces the inside of the dryer broken out in the top corner of the duct assembly. There's also some pretty deep hit marks on the rest of it, like something heavy and solid, such as shoes, were dried in there at some point. This dryer was packed pretty full of lint, and I'm worried that hole was part of the cause. | ||
|
Post# 761395 , Reply# 17 6/4/2014 at 07:28 (3,605 days old) by tennblondie78 (Bowling Green, KY) |
||
|
| ||
| Post# 761406 , Reply# 18 6/4/2014 at 09:07 (3,605 days old) by danemodsandy (The Bramford, Apt. 7-E) | ||
|
Stephanie:
That whole filter/duct assembly is prone to heat warpage if the dryer is poorly maintained and packed with lint; heat doesn't vent out properly, and the heat buildup warps that assembly. That could be the cause of the rubbing if the assembly is deformed. My Almond 806 dryer had that problem when I got it. A new assembly cured the problem, of course. I was lucky in that I had a parts machine available with a good assembly.
My dryer was so packed with lint that the blower wheel would not turn; its housing was packed solid with it. The heating element was burned out, as well. All better now. The dryer has run over four years now without further issues. 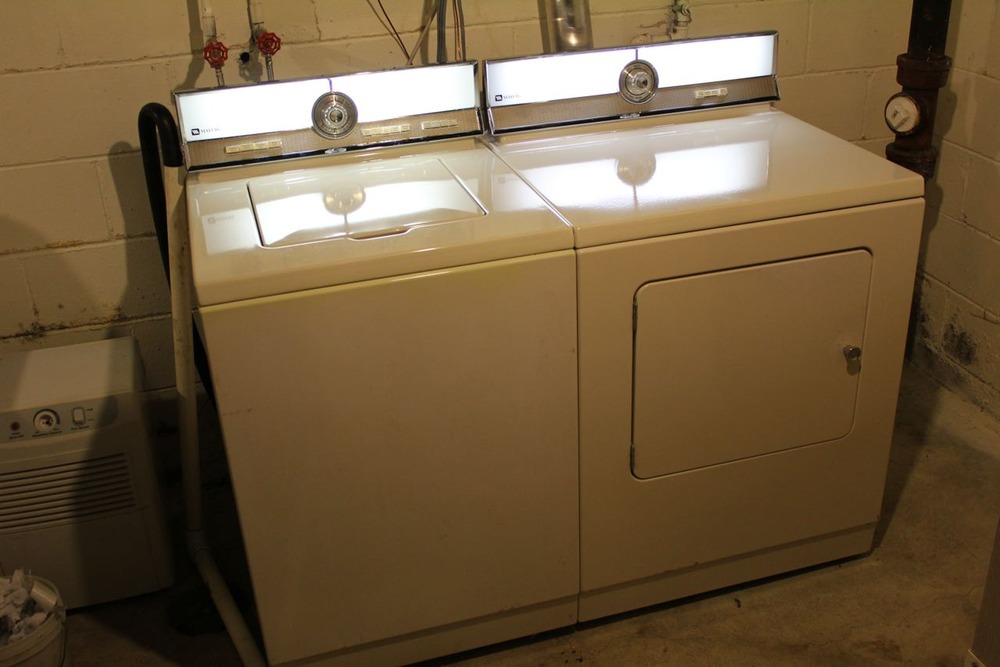
| ||
|
Post# 761409 , Reply# 19 6/4/2014 at 09:23 (3,605 days old) by Yogitunes (New Jersey) |
||
|
| ||
|
Post# 761411 , Reply# 20 6/4/2014 at 09:29 (3,605 days old) by tennblondie78 (Bowling Green, KY) |
||
|
Thanks, Martin, I will look for a blower assembly. I noticed one of the insulators was cracked on the heating element. I got a replacement insulator, but afterward I saw I could have gotten a whole new element for just a few dollars more. :( Since this washer is a few inches narrower than my current washer, I will have no problem keeping space between Fred and Ethel. Lol!
| ||
| Post# 761414 , Reply# 21 6/4/2014 at 09:54 (3,605 days old) by danemodsandy (The Bramford, Apt. 7-E) | ||
|
Martin:
I've had that situation on floors supported by wooden subflooring, but if you'll look at the Almond pair above, they're on concrete, and they're dead level, with damper springs in good adjustment and good damper pads.
There hasn't been any rubbing in this instance. When the washer is in spin, you can hardly tell it, things are so smooth and quiet. I think the rubbing problem has to do with tiny problems that combine to create vibration. | ||
|
Post# 761427 , Reply# 22 6/4/2014 at 11:20 (3,605 days old) by DADoES (TX,�U.S. of A.) |
||
|
Machine spacing
�
I have also advised a couple times that washers & dryers should be positioned with a bit of space between.� For a while back in the day I had our Whirlys positioned touching each other.� They were on a concrete slab (garage).� When they were moved some years later, abrasion was found to have had occurred on the panels. | ||
|
Post# 761474 , Reply# 23 6/4/2014 at 16:02 (3,605 days old) by goatfarmer (South Bend, home of Champions) |
||
|
| ||
|
Post# 761705 , Reply# 25 6/5/2014 at 14:15 (3,604 days old) by d-jones (Western Pennsylvania (Pittsburgh Area)) |
||
 | ||
| Post# 761721 , Reply# 26 6/5/2014 at 14:59 (3,604 days old) by hippiedoll ( arizona ) | ||
what a beautiful job you're doing there | ||
|
Post# 763205 , Reply# 27 6/12/2014 at 09:25 (3,597 days old) by tennblondie78 (Bowling Green, KY) |
||
|
They are done!
Here's some pics of them all snuggled in their new home. :) They got a q-tip detail and a wax job on the porcelain tops and console chrome yesterday. I will also include some before and afters. The severe rusting on the washer base was caused from the injector tube. I pulled the flume completely out and replaced it with a solid piece of PVC. Any and all rust was sanded and painted with rust converter before the enamel was applied. They really light up my little laundry room!!!
| ||
| Post# 763206 , Reply# 28 6/12/2014 at 09:41 (3,597 days old) by ken (NYS) | ||
 | ||
|
Post# 763219 , Reply# 29 6/12/2014 at 11:44 (3,597 days old) by RevvinKevin (Tinseltown - Shakey Town - La-La Land) |
||
|
YAY STEPHANIE!!! | ||
|
Post# 763222 , Reply# 30 6/12/2014 at 11:57 (3,597 days old) by swestoyz (Cedar Falls, IA) |
||
 | ||
| Post# 763223 , Reply# 31 6/12/2014 at 11:59 (3,597 days old) by mrb627 (Buford, GA) | ||
Holy Crap! | ||
|
Post# 763231 , Reply# 32 6/12/2014 at 12:32 (3,597 days old) by tennblondie78 (Bowling Green, KY) |
||
|
Thanks, guys!
Kevin, I opened up a king-size tub of elbow grease on that rust. I scraped the scaling off first with a metal putty knife and then sanded. And sanded. And sanded. I then covered everything in 3 coats of Rustoleum Rust Reformer and then either gray or white appliance enamel. I sanded and painted the washer cabinet inside and out as well. Gray on the inside first, then white on the outside. I removed every switch, cleaned thoroughly, and put back together. Same with the buttons and dials. I put new rollers and axles, drum glides, belt and light lens on the dryer. I got a new blower fan for it in yesterday. I will replace that this weekend. The original is warped badly. I noticed when I dry a load of clothes, they are still slightly damp when I use the "Regular Dryness and Regular Heat" settings. Is this normal or should I replace the moisture sensor? I removed and cleaned it, but it made no difference.
| ||
|
Post# 763232 , Reply# 33 6/12/2014 at 12:36 (3,597 days old) by RevvinKevin (Tinseltown - Shakey Town - La-La Land) |
||
|
a king-size tub of elbow grease | ||
|
Post# 763233 , Reply# 34 6/12/2014 at 12:39 (3,597 days old) by DADoES (TX,�U.S. of A.) |
||
|
| ||
|
Post# 763235 , Reply# 35 6/12/2014 at 12:44 (3,597 days old) by tennblondie78 (Bowling Green, KY) |
||
|
| ||
| Post# 763245 , Reply# 36 6/12/2014 at 13:46 (3,597 days old) by hippiedoll ( arizona ) | ||
|
OH WOW STEPHANIE!!!
you really did an OUTTA SIGHT job on your "fred & ethel"!!! they look beautiful!!!
i really admire your dedication to getting them up & running. they definitely look fantastic!!! i would definitely love to find an "ethel" of my own. i'm afraid that at the moment, there's no room for a "fred" here (yet!). hm hm hm...... thanks for sharing the pictures & your progress. i can only imagine the sense of pride and accomplishment you must feel everytime you take a peek into your laundryroom!!! they look totally awesome!!! WAY TO GO GIRL!!! ;o) | ||
|
Post# 763252 , Reply# 37 6/12/2014 at 14:07 (3,597 days old) by tennblondie78 (Bowling Green, KY) |
||
|
| ||
|
Post# 763283 , Reply# 38 6/12/2014 at 16:08 (3,597 days old) by goatfarmer (South Bend, home of Champions) |
||
|
| ||
| Post# 763307 , Reply# 39 6/12/2014 at 17:55 (3,597 days old) by scoots (Chattanooga TN) | ||
Gorgious revival of older Maytags | ||
|
Post# 763331 , Reply# 40 6/12/2014 at 19:50 (3,597 days old) by washerlover (The Big Island, Hawai�i) |
||
 | ||
|
Post# 763333 , Reply# 41 6/12/2014 at 19:55 (3,597 days old) by tennblondie78 (Bowling Green, KY) |
||
|
| ||
| Post# 763356 , Reply# 42 6/12/2014 at 21:30 (3,597 days old) by hippiedoll ( arizona ) | ||
|
what!!???!! | ||
|
Post# 763357 , Reply# 43 6/12/2014 at 21:32 (3,597 days old) by pdub (Portland, Oregon) |
||
 | ||
| Post# 763361 , Reply# 44 6/12/2014 at 21:58 (3,597 days old) by murando531 (Augusta, Georgia - US) | ||

That is an absolutely gorgeous set of machines you have!! You did an excellent job on restoring them. I hope to one day do the same to an electronic board Lady Kenmore belt-drive like my grandmother used to have. Seeing your treasures reminds me of how I always wanted the Maytag A-series' that are in the basement on That 70's Show! Haha
| ||
|
Post# 763362 , Reply# 45 6/12/2014 at 22:01 (3,597 days old) by GadgetGary (Bristol,CT) |
||
Great pics! | ||
| Post# 763363 , Reply# 46 6/12/2014 at 22:15 (3,597 days old) by redcarpetdrew (Fairfield, CA) | ||
I'm proud of you, Steph!
I knew you could do it, and from what I'm learning about you, it's just so You to fix the stuff that no one but you would have ever known about. I wish my trainee techs had your work ethic and pride in what you do. Ever think about moving to Nevada? I could and would love to train you up and show my other techs how it's really done!
RCD This post was last edited 06/13/2014 at 00:52 | ||
| Post# 763392 , Reply# 47 6/13/2014 at 06:04 (3,596 days old) by toploader55 (Massachusetts Sand Bar, Cape Cod) | ||
Great Restoration. | ||
|
Post# 763404 , Reply# 48 6/13/2014 at 07:20 (3,596 days old) by tennblondie78 (Bowling Green, KY) |
||
|
Y'all | ||
|
Post# 763411 , Reply# 49 6/13/2014 at 08:12 (3,596 days old) by pulltostart (Mobile, AL) |
||
Stephanie | ||
|
Post# 763412 , Reply# 50 6/13/2014 at 08:29 (3,596 days old) by tennblondie78 (Bowling Green, KY) |
||
|
| ||
|
Post# 763414 , Reply# 51 6/13/2014 at 08:42 (3,596 days old) by sambootoo (Moody, AL) |
||
|
Good job!! Interested in coming down to B'ham to help me with a few of my projects? I just can't seem to find the time to accomplish what I'd like. Your attention to detail would certainly suit me to a T! | ||
|
Post# 763415 , Reply# 52 6/13/2014 at 08:50 (3,596 days old) by jetcone (Schenectady-Home of Calrods,Monitor Tops,Toroid Transformers) |
||
Stunning Job Stephanie! I concur with Greg its like Christmas morning - yet now you will be using machines YOU brought back to life and believe me - you'll feel that every time you turn the dial to wash !!
Good on ya!
BTW that baseplate is stunning !!
And I would LOVE some hints on a mixmaster! Mine is all floured up and overheating! I'll be watching.
| ||
|
Post# 763432 , Reply# 53 6/13/2014 at 12:42 (3,596 days old) by Yogitunes (New Jersey) |
||
|
Excellent.....you could not have found a better set...and especially the lights...I always say, if your gonna have only one set, make it TOL if possible, with ever option...
and finally, someone who can improvise, I too have replaced a broken injector valve with a piece of plastic pipe, secured in place, works like a charm....I also removed the restrictor inside the inlet valve for a faster fill.... I also like adding a third spring to the motor carriage for less slippage.... some of us even turbocharge them, but its not for everyone! | ||
| Post# 763436 , Reply# 54 6/13/2014 at 13:36 (3,596 days old) by rickr (.) | ||
 | ||
| Post# 763440 , Reply# 55 6/13/2014 at 13:52 (3,596 days old) by hippiedoll ( arizona ) | ||
|
.I also removed the restrictor inside the inlet valve...
hey yogitunes,
are you talking about that plastic cone shaped piece that goes somewhere in the filling hose to make the water more of a "spray", when the washer is first filling??? if that's what you are talking about, i've wondered if i could take the filling hose off the tub and remove that little plastic cone shaped piece to have a regular water flow, into the washtub, instead of it being like a spray??? one time, i stuck my finger up inside the hole, when the washer was filling and i must've move something cuz the water was more pouring out than spraying out. but just for a few minutes. and i think i like the "pour" of water better than the spray. i'll be waiting to hear back from you on that. and yes stephanie, i definitely admire you gusto and "can do it" attitude!!! :o) | ||
|
Post# 763448 , Reply# 56 6/13/2014 at 15:09 (3,596 days old) by Yogitunes (New Jersey) |
||
|
not exactly......what your talking about is moving, or rather turning the fill flume a little to direct the spray onto the clothes, more than behind the tub.....it sprays by way of hitting the balance ring, and splattering out....each machine fals a little different, for example of this machine I am working on, the flume is more towards the 9 o'clock position, some are more near the 11 o'clock...but if you note in the pics, I can turn it some to change the direction....
there is a before and after for the air gap, first the original, and then with the replacement of a 3/4" CPVC piece of pipe and a few clamps, secured in place, good as new, no more leaks..... from the back removing just the valve holder to gain access.....remove 8 screws, and take off the solenoids....remove the oblong plug from the top, and using pliers or a small screwdriver, remove the restrictor, replace that plug, slide the solenoids back on, and secure with the screws, and hook up yor water again....easy as pie the last pic, although I have to get more, there is an extra slot on some motor tracks for the third spring, as this one goes next to the left one.....just gives it a little more grip.... hope this helps.....if you need more info, let me know.... | ||
|
Post# 763449 , Reply# 57 6/13/2014 at 15:17 (3,596 days old) by joelippard (Hickory) |
||
Good Job! | ||
| Forum Index: | 
| Other Forums: |

|

|

|

|

|

 Comes to the Rescue!


;)
;)
;)
;)
;)
;)
;)
;)