Thread Number: 54743
BD Rebuild
[Down to Last]

automaticwasher.org's exclusive eBay Watch:
scroll >>> for more items --- [As an eBay Partner, eBay may compensate automaticwasher.org if you make a purchase using any link to eBay on this page]
Post# 771425   7/17/2014 at 01:48 (3,563 days old) by 114jwh (Vancouver)        

So with all the posts over the last few months detailing the rebuilding of various machines I decided I was inspired enough to try my first rebuild.

I got my hands on an old Inglis belt drive last year and although it seemed like it had very little wear from the outside, as I've now learned looks can be deceiving!

Everything seemed to work really well however the spin was a bit loud. It was sort of a rattling sound that seemed to echo if that makes any sense. In any event I used that as an excuse to tear the thing apart and give it a going over with some new parts.


  View Full Size


Post# 771428 , Reply# 1   7/17/2014 at 01:57 (3,563 days old) by 114jwh (Vancouver)        

So I got my hands on some parts to make the mechanicals like new again and started the process of taking the thing apart.

First up was removing the top, getting the agitator off and then removing the inner basket. The inner basket is pretty worn out and I'm still on the hunt for a replacement but the outer tub didn't seem too bad. I've seen far worse in various posts so I was encouraged.

So far so good....


  Photos...       <              >      Photo 1 of 2         View Full Size
Post# 771433 , Reply# 2   7/17/2014 at 02:06 (3,563 days old) by 114jwh (Vancouver)        

The block seemed to come out fairly easily too and I didn't have any trouble with the tub bolts either. Corbin clamps are not my friend however and I think they were designed to make life difficult and challenge ones patience (if you don't have those special pliers that is). If I manage to get this machine back together none of them will be making the return trip :)

Once all was disconnected the outer tub didn't want to budge. Strange I thought but the transmission was coming out anyway so I decided to move onto that for the time being. Maybe putting it on it's side for a bit would help the cause.....


  View Full Size


This post was last edited 07/17/2014 at 02:31
Post# 771436 , Reply# 3   7/17/2014 at 02:24 (3,563 days old) by 114jwh (Vancouver)        

Now it was time to play a game the machine thought....lets see if I can push this person over the deep end.

Once all the brace and transmission bolts were removed I proceeded to pull the gearcase/basket drive out.....no dice. It moved about 4 inches and wasn't going anywhere. I wasn't thrilled about the drops of oil dripping out of the transmission so decided to separate it from the basket drive and pull it out on it's own.....no problem there. With just the basket drive remaining I pulled and pulled and pulled and it just laughed at me :)

So I sat it upright, stuck a socket in the centerpost and gave it a few whacks with the hammer thinking it would just pop out.......still laughing at me.

I continued on this journey for over an hour and I'm now hard of hearing. I thought it must be binding on the upper bearing somehow so if I could just push it past it would just fall out. Well that happened and it still didn't fall out....still laughing at me.

I kept going with this pounding process for at least another hour and then FINALLY it gave up and fell out. I tipped the machine over and this is what it looked like....


  Photos...       <              >      Photo 1 of 3         View Full Size
Post# 771438 , Reply# 4   7/17/2014 at 02:30 (3,563 days old) by 114jwh (Vancouver)        

That spin tube was in such terrible shape it took the bearing with it! Although I have no experience with this kind of thing I've read may posts about this process and haven't ever read that this happens very often!

In addition, when I took the pump off (original I think) it looks like Kujo chewed on it at some point....

Based on all this I don't know how it even ran!


  View Full Size
Post# 771446 , Reply# 5   7/17/2014 at 02:56 (3,563 days old) by 114jwh (Vancouver)        

In any event I thought that by now the tub would just lift off.....no dice on that still.

Upon closer inspection it seems like there is a significant amount of rust near the bottom and it looked like the tub seal had moulded itself to the centerpost. I chipped away at it the best I could and ended up having to cut out the seal and pry it away to get the thing out. Finally victory once again however I did end up bending the lip on the tub a bit and it's corroded so badly at the base of the centerpost I'm hoping it's not too far gone to be saved.

That's it for today....tomorrow I need to get my hands on some kind of rust paint to paint over the spots in the tub & centerpost. Then I need to figure out how to use the bearing tool to put in new bearings....it nor the bearings themselves came with any instructions.

Wish me luck!


  Photos...       <              >      Photo 1 of 4         View Full Size
Post# 771467 , Reply# 6   7/17/2014 at 08:01 (3,563 days old) by gansky1 (Omaha, The Home of the TV Dinner!)        

gansky1's profile picture

Great start on a big job, but that pretty Inglis is worth the effort.


Post# 771522 , Reply# 7   7/17/2014 at 11:45 (3,563 days old) by PhilR (Quebec Canada)        

philr's profile picture

That's a really nice machine! Keep us updated! And thanks for the links for the parts manuals!


Post# 771558 , Reply# 8   7/17/2014 at 16:40 (3,563 days old) by hippiedoll ( arizona )        
GOOD LUCK !!!

hippiedoll's profile picture
on rebuilding this inglis washer!!!

GREAT pictures. and i love how you gave the washer an "impish" kind of personality, like playing tug of war with you.
hm hm hm......

i'll be checking this thread on your progress!!
thanks for sharing the rebuilding of your inglis washer...

:o)


Post# 771612 , Reply# 9   7/18/2014 at 00:20 (3,563 days old) by eddy1210 (Burnaby BC Canada)        

eddy1210's profile picture
Way to go James! You really dove in head first LOL. All those same issues I've had too on my BD's. This will be a wonderful machine when you finish. Can't wait to see this in person.

Post# 771635 , Reply# 10   7/18/2014 at 09:56 (3,562 days old) by swestoyz (Cedar Falls, IA)        

swestoyz's profile picture

Way to dig into a project!  Ultimately, most belt drive Whirlpools need this type of attention these days if they are going to be put into any regular use.  Thankfully most parts are still relatively easy to procure, some easier than others.  If you need help looking for parts, let me know.


Ben


Post# 771647 , Reply# 11   7/18/2014 at 11:57 (3,562 days old) by 114jwh (Vancouver)        

So yesterday was another joyful day of washing machine repair. First off I went to the store and bought some clear POR 15 to paint the centerpost and outer tub. I also had to return the new pump I bought because it didn't seem like the pulley was turning very smoothly. The guy told me they are just like that when they are new but he exchanged it anyway. Anyone heard of that before?

Anyway, while the paint was drying I took apart the motor and oiled the wicks on the bearings on either end and greased the start winding shaft. Easy easy!

Next was to replace the agitator shaft. Haven't seen much on that process here but upon inspection it appears that the whole transmission needed to be taken apart......as you'll see in a sec, good thing I did!


  Photos...       <              >      Photo 1 of 2         View Full Size
Post# 771650 , Reply# 12   7/18/2014 at 12:09 (3,562 days old) by 114jwh (Vancouver)        

Wasn't too thrilled about taking a transmission apart but I did it anyway because I had nothing to do while the paint was drying.

First off, remove the basket support on the agitator shaft (?)(set screw on the side), wig wag (set screw on the side), pulley (set screw on the side), cam guide (?)(screw on top), spin & agitate cams (they just pull out) and then remove the screws holding the top and bottom down. I kept these screws in order as I took them out as some are different sizes......the less thinking when putting it back together the better :)

Had to pry apart the two halves as they haven't seen the light of day since 1966.....here is what it looks like....pretty cool to see!


  Photos...       <              >      Photo 1 of 2         View Full Size
Post# 771652 , Reply# 13   7/18/2014 at 12:25 (3,562 days old) by 114jwh (Vancouver)        

Turns out it was good I did this as the agitator shaft spring was busted (no I didn' pick up the transmission by the shaft). Kit 285672 comes with a new spring and a new seal. Always a good idea to replace when you are replacing the agitator shaft apparently.

Anyway, to replace the shaft itself just lift off the gear and fork from the shaft, pull the old shaft out (bit of twisting necessary) and put the new one back on. Replace the seal (probably sitting underneath the agitator shaft hole on the top cover) and spring after the fork/gear are still in place and you're golden!

The gasket and oil looked fine so I left them as is. I could not find SAE60 non-detergent oil for the life of me or I probably would have replaced it anyway. WP sells it but it's $33 for 15 ounces - highway robbery!

I did add about a tablespoon of oil as a bit had probably leaked out hear and there over the years. I had some SAE30 non-detergent oil in the garage and didn't think it would matter in the grand scheme of things for that little amount (at least in my lifetime anyway). Please don't tell anyone though :)

Cleaned it up a bit afterwards (don't know why) and it looks like new again!


  Photos...       <              >      Photo 1 of 2         View Full Size
Post# 771655 , Reply# 14   7/18/2014 at 12:36 (3,562 days old) by 114jwh (Vancouver)        

Put a second coat of POR 15 now as it had dried to the touch and then came back to the transmission as I had to put back the top pieces. The pulleys were fine but when it came to the agitate cam bar I almost thought I would never get it back on! Apparently there is a special tool for this but of course I didn't have it. Screwdrivers didn't work and so I ended up using the hook from a bungee cord and pulling it up while a helper pushed the cam in. It did work after about 8 tries but of course the hook was now stuck underneath too. Ended up just hammering that out.

Let me tell you the whole transmission almost want flying :)

Now what to do about the basket drive?


Post# 771659 , Reply# 15   7/18/2014 at 12:46 (3,562 days old) by 114jwh (Vancouver)        

Here I have to choices. I do have a brand new 383923 basket drive I could use or I could rebuild the old one with a brand new spin tube. There is a difference between the two as safety regulations that came into effect after this machine was built required that the spin stopped quicker than it did before when the lid was opened.

So should I be a purist and rebuild the old one or make life easy and not have to worry about it and use the new one. What's everyone's vote?

I'm leaning towards the new one but the parts from the old one seem like they are still in good shape (after I sawed off that old spin tube) so I'll have to think on it.....


  Photos...       <              >      Photo 1 of 2         View Full Size
Post# 771752 , Reply# 16   7/18/2014 at 20:48 (3,562 days old) by kenmore70 (New York)        

James,

I'm actually doing a gearcase overhall too, for the first time on a 1971 Kenmore, so it was good to see your pictures. I was wondering how you got the retainer ring back on the agitator shaft after you installed the new spring and seal. With the new spring it's very hard to push it down to get that ring on, I think I will need another set of hands. Just wondering if you had a 'technique' or if anyone else has any ideas. Thanks


Post# 771995 , Reply# 17   7/20/2014 at 00:30 (3,560 days old) by 114jwh (Vancouver)        

I didn't do anything special Tom. I just stacked everything on the agitator shaft in the order it was supposed to go, put the lid on top and held it closed while I hand screwed a couple of the screws in.

One word of advice, make sure the gearcase screws go back in the same spot they came from. Some of them are longer and function to attach the transmission braces from the other side when you put the machine back together.

Good luck and hope it goes well!


Post# 771997 , Reply# 18   7/20/2014 at 00:40 (3,560 days old) by 114jwh (Vancouver)        
One thing I noticed during this process....

...and not sure if this is just an Inglis thing or this occurred with WP in the US too. I've noticed a couple of different manufacturer stamps on some of the parts as I've been disassembling things, namely the agitator (stamped GE) and the gearcase cover (Hoover). Not something you would necessarily expect.

  Photos...       <              >      Photo 1 of 2         View Full Size
Post# 771999 , Reply# 19   7/20/2014 at 00:57 (3,560 days old) by 114jwh (Vancouver)        

So I decided to give the old basket drive a new lease on life....I cleaned it up, greased/oiled everything that should be and installed a new spin tube. One thing that came up however was that the bronze T-bearing would not fit into the bottom of the tube completely. I could force it but it would have been stuck there forever. I'm not sure if the spin tube was not designed to work with this very old style T-bearing, it was a manufacturing flaw or it just wasn't spec'd properly as it was an aftermarket part.

In any event I just lightly sanded the bore of the spin tube with a Dremel until it fit perfectly!

I've also taken a picture of the instructions that came with the NOS basket drive kit I bought in case anyone needed them in the future. Because this is the newer fast brake design going into a machine that had the old brake design there are a few modifications that need to be made when installing. The kit came with everything you need to modify.


  Photos...       <              >      Photo 1 of 3         View Full Size


This post was last edited 07/20/2014 at 02:16
Post# 772000 , Reply# 20   7/20/2014 at 00:58 (3,560 days old) by PhilR (Quebec Canada)        
Hoover and GE!

philr's profile picture

That's interesting! 


Post# 772001 , Reply# 21   7/20/2014 at 01:19 (3,560 days old) by 114jwh (Vancouver)        

Now it was time to install new centerpost bearings/seals. Once I figured out how to use the bearing installation tool that part was pretty straight forward. The service manual calls for Rykon Grease #2 when you are installing the bearings but I hadn't ever heard of it. So what's the next best thing? Why not "Red & Tacky" #2 instead? It was grease, the description made it sound like an appropriate alternative and I had it sitting on my shelf already. Plus the red reminded me of strawberry pie and I'm probably kind of tacky so it seemed like an OK thing to do :)

The tough part for me was getting that top seal in place in the centerpost. The rubber is pretty easy to tear and you really have to bang it in. I did destroy one in trying to get it in.

I ended up using the hose end of a crevice tool from a vacuum as it was a perfect fit for the seal. I banged it lightly in with a hammer and eventually it cooperated and seated itself correctly. The crevice tool didn't fare so well and is now half as long as it used to be :(

So now that the motor, basket drive and gearcase and a brand new pump were all ready to go into the baseplate...


  Photos...       <              >      Photo 1 of 4         View Full Size
Post# 772002 , Reply# 22   7/20/2014 at 01:30 (3,560 days old) by 114jwh (Vancouver)        

Everything starting to go back together....Of course I was so excited I forget the belt and had to take things apart again :(

  View Full Size
Post# 772006 , Reply# 23   7/20/2014 at 02:30 (3,560 days old) by 114jwh (Vancouver)        

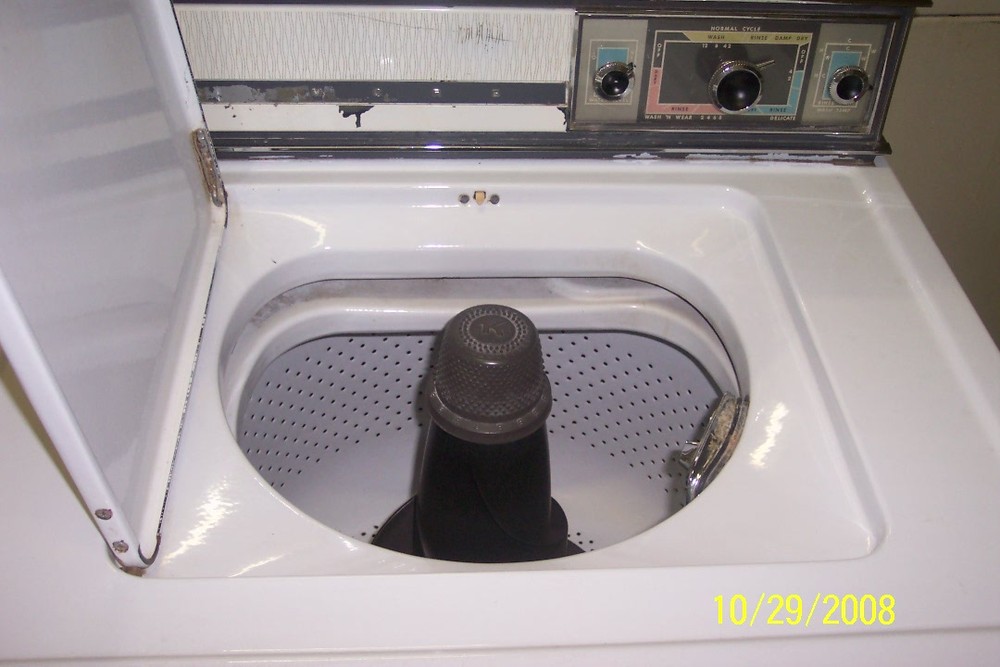
All put back together and well, here it is!


Post# 772007 , Reply# 24   7/20/2014 at 02:51 (3,560 days old) by 114jwh (Vancouver)        

And it even spins too!


Post# 772008 , Reply# 25   7/20/2014 at 03:17 (3,560 days old) by 114jwh (Vancouver)        

It's actually a lot quieter than it comes across in the videos and much quieter than it was before. I've done about three loads so far and no problems but I know that doesn't mean there won't be.

I did run into two snags....when I initially water tested the outer tub it was leaking slowly out of one of the tub bolts. I had replaced these with the tub repair kit 76673, there wasn't any rust near any of the screw holes in the tub and they were tight so I don't really know what happened. I ended up taking it out, flipping the seal over and retightening and it hasn't dripped since. Strange...

I also noticed when I manually engaged the spin the agitator still rotated a bit. I'm just going to leave it as is as I think it may go away after everything has had a chance to work itself in a bit.

The pump did leak about three drops but I think it may have just been because it was new and the seals were still seating themselves as it didn't leak anymore after that.

Other than that everything seems to be all good!

Thanks to everyone for all your detailed posts in the past. They really helped me with this project.


Post# 772009 , Reply# 26   7/20/2014 at 03:34 (3,560 days old) by 114jwh (Vancouver)        

All done and back in place. I listed out all the parts that I used as it may help save someone the effort of locating the part numbers in the future:

285036 - Agitator Shaft
285134 - Centerpost Seal/Bearing Kit
383921 - Spin Tube
076673 - Tub Repair Kit (4 tub bolts and rubber washers)
383727 - Tub Grommet
085114 - Rubber Foot Pad (4)
014857 - Bearing Installer
350365 - 2 Port Pump
285672 - Agitator Spring/Seal Kit
383923 - Basket Drive Long (purchased but didn't end up using)
095089 - Transmission Cork Gasket (purchased but didn't end up using)
350211 - Agitator Drive Block (reused the old one so didn't end up using)
350243 - Agitator Stud


Post# 772052 , Reply# 27   7/20/2014 at 08:45 (3,560 days old) by combo52 (50 Year Repair Tech Beltsville,Md)        
Impressive Rebuild

combo52's profile picture
James you did a great job. I followed your rebuild thread but stayed out of the way as every time you ran into a problem you quickly figured out what to do about it. If this is your first BD rebuild you really aced it, I have rebuilt at least 100 or maybe many more WP build BD washers over the last 40 years.

You made good decisions about not changing the oil in the transmission and the need to change the transmission gasket, when there was a problem with the fit of the tee bearing etc. After all this is a washing-machine, not a jet plane that our life depends on and your rebuild could easily last nearly as long as the machine lasted originally if it has the same amount of use as it got originally.

If the water pump that you got was an aftermarket one the problem you described is all too common, I would try to find a new orignal stock FSP pump as you are likely to need it, luckily they are still around.

James you certainly have a lot of mechanical sense, what other types of things things have you worked on or rebuilt?

John L.


Post# 772067 , Reply# 28   7/20/2014 at 10:21 (3,560 days old) by Kenmoreguy64 (Charlotte, NC)        

kenmoreguy64's profile picture
James,

I'll echo what John said, VERY nicely done.

Several times during your updates I wanted to respond with something, but I kept telling myself "this guy doesn't need our help, he's doing just fine on his own!". Sounds like you consulted many archived posts --- way to go on that, I'm glad our old comments were useful!

I had to nod with supportive "Yep, been there and that has happened to me too" sort of acknowledgement in several of your updates. Now that you are all finished I'll mention a few:

- The impellers on new pumps don't rotate as freely as used pumps in many cases, though after some use they loosen up. I have noticed a couple new pumps drip a few drops of water when first used, especially if they were truly NOS and had sat on a shelf for many years. As in your case, its usually not a big deal. Both the 350365 2-port and the 350367 4-port are still being made in Brazil and imported to the U.S. for replacement parts.

- Your original spin tube was pretty ugly. I've had others like that and it really can be a battle of wills to get them out. If you do this sort of work again on another lucky machine, try turning or rotating the basket drive/spin tube back and fourth as you pull on it. That has always worked for me, and it also can allow you to skip the gym for a couple days afterward. This may work better on the fast-brake 1971 and newer machines. You are quite correct though, we usually do not see the bearing come out with the tube!!! I was surprised to see that.

- Getting the agitate cam bar back into place after a gearcase rebuild is not a fun job. Yes I've heard that there is or was a tool available, but I don't have it. My solution has been to pull up on the agitator shaft while holding the gearcase itself to the floor with my feet. Then a second person fishes the cam bar through the slots while I hold the shaft up. Its not the most elegant operation, but it has always worked for me. I used to have my Dad do the bar installation and I'd rebuild a couple gearcases at once and take them all to his house and do all the bar installations at the same time.

- Its neat that you had the original metal pump!! I have heard that the ports rot off, exactly as you experienced. I have rebuilt about 75 of these machines now, and never seen a metal pump. Did your pump bolts have the washers on them? They are needed with the plastic bodied pump.

- You are lucky that you were able to get all those parts, though you didn't mention if they were hard to find or easy. BDs were produced several years longer in Canada after they were discontinued in the U.S. Parts may be easier to come by up there? Finding an agitator shaft, spin tube, and complete basket drive is possible here, but they are no longer on every parts store's shelves.

- You mentioned that your original wash basket is worn. I think Paul / Turquoisedude had the same problem with his Inglis recently. If I recall, he painted it with a white coat of POR-15? That might be a solution for you if you wish to improve this later?

Anyway James, Like John, I'm very impressed. You did an exceptional job for your first BD overhaul!

Gordon


Post# 772091 , Reply# 29   7/20/2014 at 11:56 (3,560 days old) by turquoisedude (.)        

turquoisedude's profile picture

Congratulations, James!!  What a cool washer and what a great job you've done!  


For the tub, the product Gordon made reference to is called 'Wite-Coat' made by the folks who make POR-15.  It's a bit pricey, not terrifically easy to work with (you do need to work fast) but it puts a rock-solid finish on a wash tub!  I've been using the '66 Inglis Sterling for a few months now with no signs of degradation or wear.  I'd definitely recommend it.   


Here's the before and after pictures of what 'Roger' Sterling's tub looked like:


  Photos...       <              >      Photo 1 of 2         View Full Size
Post# 772110 , Reply# 30   7/20/2014 at 14:44 (3,560 days old) by 114jwh (Vancouver)        

Thanks so much John and Gordon - I really appreciate it. I have to say that I read many archived posts that were a tremendous help throughout this project and most of them involved feedback and experience from both of you. You both have so much knowledge and myself and probably many others are grateful that you've taken the time to share it over the years.

John, I've actually rebuilt a few old outboard motors and other various things in the past but this was the first time for a washing machine. It probably took me a lot longer than it should have but like anything else it was a bit of a learning experience along the way. If I ever do it again I think I could get it done much quicker!

The pump was aftermarket so I will keep an eye out for an FSP.. What I would love to also do is get my hands on a diverter valve to add the suds saver. The function is built into the timer so it's just a matter of adding the hardware and a few changes under the hood.

Gordon, I was lucky in that I know someone in the parts industry that was able to get me most of the parts that I listed. They were aftermarket so some do seem to require slight retrofitting here and there due to the very specific tolerances involved but I found the quality to be on par with the original, the prices were exceptional and given the scarcity of parts for these old machines beggars can't be choosers! Yes, I read somewhere about the pump bolts so I made sure they had the washers before I put it in.

If I didn't have this source I probably could have scrounged up most of what I needed but it likely would have been from about 4-5 different parts suppliers just because they have a few of this and that sitting on their shelves. Although it seems that the BD shared some parts with DD machines, the DD machines are also no longer being made and in an age of buy new instead of repair I think almost all these parts will be close to obsolete in the next few years. Now is the time to stock up I think while you can.

You're right - I believe the BD design was around longer here than in the US. It seems like over the years Inglis took much longer to catch up to their counterparts in the US in terms of design changes. However, they rarely ever show up around here on places like Craigslist etc so I don't know that many more are still around.

Paul, thank you also for posting your progress on your restoration - this also helped me along the way. It looks like your tub is the same as mine - the white coating they originally used sure didn't hold up as well as the standard grey. I may end up painting mine too. Mine is very rough, chalkboard like. How did the White-Coat do at smoothing it out? I was surprised at how well the clear POR-15 smoothed everything out in the outer tub and centerpost so may try that as an undercoating first.

Thanks to everyone for all the kind words along the way, was really nice to hear.


Post# 772275 , Reply# 31   7/21/2014 at 09:06 (3,559 days old) by swestoyz (Cedar Falls, IA)        

swestoyz's profile picture

Bravo James on the wonderful restoration!  Now that you've gotten through one, you certainly tackle any washer rebuild now.  A freshly rebuilt belt drive can be music to the ears.


I can't speak much about the other MFG casting logos that you've found, but here in the states, GM would have different divisions cast engine parts for other divisions, starting in the 70's.  It isn't uncommon to find a Pontiac code on a Cadillac intake during the smog-era.


Ben


Forum Index:       Other Forums:                      


Comes to the Rescue!

The Discuss-o-Mat has stopped, buzzer is sounding!!!
If you would like to reply to this thread please log-in...

Discuss-O-MAT Log-In


New Members
Click Here To Sign Up.


automaticwasher.org home
Discuss-o-Mat Forums
Vintage Brochures, Service and Owners Manuals
Fun Vintage Washer Ephemera
See It Wash!
Video Downloads
Audio Downloads
Picture of the Day
Patent of the Day
Photos of our Collections
The Old Aberdeen Farm
Vintage Service Manuals
Vintage washer/dryer/dishwasher to sell?
Technical/service questions?
Looking for Parts?
Website related questions?
Digital Millennium Copyright Act Policy
Our Privacy Policy