|
Thread Number: 59293
/ Tag: Vintage Automatic Washers
70's Lady Kenmore Agitator Removal |
[Down to Last] |

|
Post# 818876 , Reply# 1 4/11/2015 at 22:08 (3,295 days old) by Yogitunes  (New Jersey) (New Jersey) |
||

first of all..Welcome to the club....
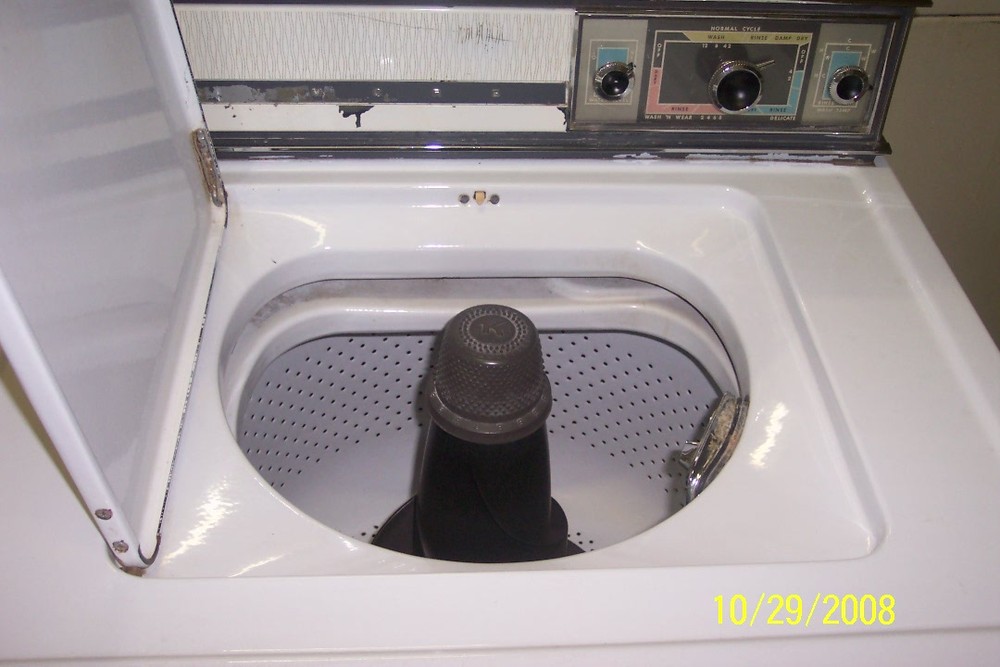
and that is one beautiful top of the line set....you must have just about every option.... those dual actions, as well as a few others can be tricky to get them removed.... but here we go....well, this is at least one option.... items you will need: two towels a 2x4 about two or three foot long and two ratcheting tie downs since this is a Kenmore with that side opening lid, and the long dispenser, your going to lay the two towels, folded up, at the 7 and 2 o'clock position, then take the 2x4 and set across the towels, then with the two tie downs, loop them under the agitator in a cross formation, and up and over the board......and start with each adding 2 to 3 clicks on each one until the agitator slides up and off.... this has to be the simplest and quickest way I have gotten some tough ones off.....there are other methods....but this should be able to be done with simple things you have around the house.... let us know how you make out..... | ||
| Post# 818945 , Reply# 2 4/12/2015 at 09:39 (3,295 days old) by bendixmark (Winchester Mass) | ||
|
removal Disconnect the hot hose from the washer and and let it pour slowly on the agitator spline for 5 minutes, the agitator should now pull off. | ||
|
Post# 818998 , Reply# 4 4/12/2015 at 18:33 (3,294 days old) by whirlykenmore78 (Prior Lake MN (GMT-0500 CDT.)) |
||
Great set!!!!!!!!!!!!
A set of these are on my bucket list. My Grandparents had one in harvest gold and they were AMAZING! I saw them even wash my aunt's horse blankets, 2 @ A TIME! They got clean too. When Gramps sold the house the machines were 29 years old and still going strong. Clearly some of the best machines Whirlpool ever made.
WK78 | ||
|
Post# 819023 , Reply# 6 4/12/2015 at 22:58 (3,294 days old) by Kenmoreguy64 (Charlotte, NC) |
||
Ethan,
Question...there were two versions of this agitator, at least in the early days when your washer was made. The first version used a center spring to help hold the auger off the base agitator just so much as needed to make the auger engage the drive notches. A newer version was quickly released which uses a revised auger with two red drive shoes inside the auger. Which version do you have? The reason I ask is because these agitators will often get stuck like this as (unfortunately) the agitator shaft splines rust and expand, which freezes the agitator on to the shaft. I have literally picked up machines off the floor briefly trying to get agitators off. When I have spares I have driven a large screw driver into the top to split it open. They always are then easy to remove but the agitator is then ruined. If you have the first version of this agitator, replacement bases are probably impossible to find, but I have four of them left over from machines that I swapped in newer versions. You are welcome to one if you want to break out the agitator base. I know this sounds a rough way to get it out, but it will work if you get desperate. The only other suggestion I can think of is to use an Agitamer if you can find one. These are rubber diaphragms that go under the agitator base and are filled with water. As it fills and expands, it exerts pressure from underneath the agitator and will eventually free the stuck offender. You could also try the hot water again but pour it directly onto the top of the agitator instead of filling the tub. Good luck!!!!! Let us know how it goes! Gordon | ||
|
Post# 819026 , Reply# 7 4/12/2015 at 23:35 (3,294 days old) by Kenmoreguy64 (Charlotte, NC) |
||
|
Ethan,
I have more info for you. I looked up your model on Sears' parts website. The parts diagram for the agitator shows the first version with the spring. That is good if you want one of my old ones. When you get the agitator off, we need to examine the shaft splines. If they are rusted there will unfortunately be another problem to deal with. Gordon | ||
| Post# 819027 , Reply# 8 4/12/2015 at 23:58 (3,294 days old) by arris (Rochester New York) | ||
Man
Looks like that's a bitch..... don't you love it when people neglect things ??? I had one like that.... used some rust buster.. would tap with a hammer lightly, apply more rust buster.. after 3 days of doing that mine came out...........I was pretty fed up at that point and started pulling and pulling.. it came out........... so fast it hit me in the nose, and gave me a bloody nose.. but it came out... have you tried spraying it with anything like that ?? tapped it, let it sit and try again ????
| ||
|
Post# 819063 , Reply# 10 4/13/2015 at 08:23 (3,294 days old) by Yogitunes (New Jersey) |
||
|
just apply any sort of rust buster, penetrating fluid, WD-40, etc....down the center where the bolt goes, it may take a while to seep down, and you may have to apply several times....
very few times this has not worked, unfortunately this may be one of them, but give it your best shot first, and as a last resort, it may have to be broken off.... | ||
|
Post# 819102 , Reply# 12 4/13/2015 at 14:04 (3,293 days old) by Yogitunes (New Jersey) |
||
|
yeah, its going to take a little bit of time......I had one that took almost three days, just by leaving the tension on there, and constantly adding more penetrating fluid....blind luck, it let loose on its own....
who knows, you may want to venture with some trial agitators, just for fun, or to see different results from each one...I too prefer the DualAction, but interesting results from a RotoSwirl, RotoFlex, PentaVane, PentaSwirl, or even a Surgilator! | ||
| Post# 819156 , Reply# 13 4/13/2015 at 20:34 (3,293 days old) by arris (Rochester New York) | ||
|
Agitator | ||
| Post# 819159 , Reply# 14 4/13/2015 at 21:14 (3,293 days old) by bendixmark (Winchester Mass) | ||
|
hot water Did you pour hot water over the agitator spline as I suggested?Filling the tub with hot water wont do a thing.You want the hot water over the spline where the bolt goes to make it expand,this almost never fails for me.Heat it up pound then pull the agitator from the bottom with all you have got. | ||
|
Post# 819168 , Reply# 16 4/13/2015 at 22:38 (3,293 days old) by Kenmoreguy64 (Charlotte, NC) |
||
|
Leaky tub
Ethan,
You mentioned that the tub is leaking and that you don't know what seals to buy. Have you ascertained where the water is coming from? Your tub has five seal points, any one of which could be causing the problem. The most likely ones are the centerpost tub seal or gasket, which is part number 383727. These are only a few bucks to purchase and fail often in belt drives. The other frequent culprit is the tub outlet hose, which is what the tub filters and drains from. This is part number 96386 and is NLA now from Whirlpool as they haven't been used in production since summer 1981. If your machine is leaking here, the left front corner of the baseplate will be wet or possibly already rusting. The third place is where the bleach hose from the triple dispenser enters the tub....front right corner, at 4 o'clock or so. This special hose may not be very plentiful in supply. They can be helped with sealant and reused. The other two places are less common leak sources. First, the air dome in right rear corner could be leaking, New air domes with seals can still be found or the old one can be sealed with sealer. I doubt this is your problem. The last is the tub mounted lint filter, left rear at 10 o'clock. You will have wet filter hoses and a wet baseplate in this area if there is a leak here. My guess is either the center gasket or the outlet hose, sometimes it's both. I have changed both of these as heavy maintenance items when I already have a machine apart for other reasons. Maybe your parts place still has the 96386 outlet hose in stock. Question -- are you sure the pump is ok? I hope this has helped! I hope also that the tub doesn't have a rust hole developing. These can be pesky for sure but we'll help you there as well if you need it. Gordon | ||
|
Post# 819209 , Reply# 17 4/14/2015 at 07:24 (3,293 days old) by combo52 (50 Year Repair Tech Beltsville,Md) |
||
GETTING A STUCK AGITATOR OUT OF A BD WASHER Hi Ethan, and Welcome to the group.
The only way I ever had much luck getting really stuck agitators out of these washers is to really heat the top area of the agitator and along with the straps or agita-tamer you might have a decent chance. I heat the agitator top area with BOILING water, or a heat gun for quite a while [ almost to the point of softening the polypropylene plastic agitator a little], hot water from the water heater is just not hot enough to do much good.
And really the best thing to do is just break it out as Gordon suggested and get a replacement agitator from him, this is what I often do if a replacement is available. | ||
|
Post# 819273 , Reply# 20 4/14/2015 at 22:20 (3,292 days old) by Kenmoreguy64 (Charlotte, NC) |
||
|
Wow Ethan....
You've got some work on your hands.
Starting with the basket....that rust hole is probably not a big deal but I would cover the area with POR-15 to try to stop any further deterioration --- on both sides of the tub center tube. The centerpost has indeed lost a good bit of surface area. If you think it is still sufficiently strong as not to break, my solution would be to clean it thoroughly, paint it liberally with POR, then when dry, I would rub on a layer of two part epoxy and make sure it is flush with the rest of the centerpost. This will build you a new sealing surface. Just make sure it is smooth. The tub...Boy, if these were still available, that tub would be a tosser for sure. Try to re-form the round edges of the centerpost area as your first step. POR-15 the entire area as a lot of porcelain is missing there. Once the sealing edges are straightened back out, try putting sealant on the new 383727 gasket, insert the gasket, then seat the tub in the machine before the sealant dries. Then, fill the area all around that mangled tub lip with two part epoxy. Believe it or not it has worked, well enough for my own use on a stricken machine. Not sure I'd want to warranty that to a customer but for me it has worked. You can use two part epoxy on the air dome hole as well. I think I would paint the surface rush on the baseplate with POR-15 as well. Like I said, you have your work cut out for you, but it's worth a shot! Gordon | ||
| Post# 819277 , Reply# 21 4/14/2015 at 22:29 (3,292 days old) by arris (Rochester New York) | ||
|
CenterPost
For the centerpost you may want to look for a sheet metal/machine fabrication shop...I have one in my area that installed a new centerpost for my 75 LDA9800 WP.. here is a picture after the install... as far as the outer tub.. there was a place in Grand Junction CO that had many outer tubs.. you will need to take in inside dimensions and the height... I cannot remember the name of the place off the top of my head.. you could google appliance repair/parts in Grand Junction C.O. not sure if they would have an inner tub.. there is an appliance salvage in AZ to.. when I remember the name will send it. attached is my new centerpost... Jim
View Full Size
| ||
| Post# 819278 , Reply# 22 4/14/2015 at 22:32 (3,292 days old) by arris (Rochester New York) | ||
|
CenterPost | ||
| Post# 819282 , Reply# 23 4/14/2015 at 22:35 (3,292 days old) by flyingethan (Oklahoma City) | ||
|
Arris, Did the machine shop make you a new centerpost, refinish the old one or just install one that you had into the base? That sure is a pretty picture. | ||
| Post# 819285 , Reply# 24 4/14/2015 at 22:46 (3,292 days old) by arris (Rochester New York) | ||
|
Machine Shop
I bought 10ft of stainless tubing, the inside diameter was smaller than the original but the outside was the same. In order for the bearings to fit they had to mill some down on the inside. they measured the old one removed it, cut my stainless to the correct length and installed the new one. For the baseplate mine was in very good shape very little rust.. I sanded it, put a coat of primmer on, then painted it.. I think I,m gonna put a coat of Epoxy on it...
I had shoulder surgery for a torn Rotator cuff in December, and was not able to do much work on it.. but now I'm doing pretty good so gonna start putting it back together. before I do though I think I'm going to go to the machine shop with my outer tub and see if they could make a new one.. just for the heck of it.... before it goes back in the machine, figure all they can do is say NO.... Jim | ||
| Post# 819343 , Reply# 25 4/15/2015 at 07:52 (3,292 days old) by flyingethan (Oklahoma City) | ||
|
Fantastic effort. I am going to see if I can replicate your efforts. Where there's a will there's a way. If I can have a new post made and get a hold of a another tub I don't see why this washer can't last another 40 years. Let the hunt begin. What kind of business did you buy the stainless steel tube from? | ||
| Post# 819377 , Reply# 26 4/15/2015 at 11:52 (3,292 days old) by arris (Rochester New York) | ||
|
Stainless | ||
| Post# 819404 , Reply# 27 4/15/2015 at 14:31 (3,291 days old) by flyingethan (Oklahoma City) | ||
|
KenmoreGuy64, is there a particular sealant that you would recommend if I was going to try and reuse the tub and basket? | ||
|
Post# 819441 , Reply# 28 4/15/2015 at 19:40 (3,291 days old) by Combo52 (50 Year Repair Tech Beltsville,Md) |
||
|
Hi Ethan I am glad the boiling water suggestion worked.
I would look for a good donor basket outer tub and base plate the rust is bad enough around the hole in the basket that that basket will break in the not-too-distant future. The rusted center post is also in danger of rusting through and Breaking.
If you want to try fixing the rusted center post we had good luck with buying thin wal stainless steel tubing then sanding the rust off the center post and slipping the stainless steel tubing over the rusty Center post and then welding it at the top and the bottom doing this is much easier than trying to replace the entire center post and you're much less likely to have problems with alignment.
The best type of sealant to use around holes in the outer tub is 100% silicone rubber RTV sealant it's easy to get and works very well. | ||
| Post# 819600 , Reply# 30 4/16/2015 at 21:32 (3,290 days old) by bendixmark (Winchester Mass) | ||
|
sealant You want to use clear non flowing silicone that blue stuff wont last. | ||
|
Post# 819930 , Reply# 32 4/18/2015 at 19:35 (3,288 days old) by combo52 (50 Year Repair Tech Beltsville,Md) |
||
|
Great progress on a Leaky LKM Washer The thin SS tube over the center-post works great, we have done it on four washers so far.
It is easy to remove the lint filter, you just unscrew the pot-metal ring on the inside of the outer-tub and the filter lifts off. I would replace the LF while you are doing all this work, the new filter comes with new mounting nut and gasket as well.
The bleach hose can be softened [again] with boiling water or a heat gun and pushed in from the outside of the OT and cleaned and reinstalled with a good sealant. | ||
| Post# 820223 , Reply# 36 4/20/2015 at 21:17 (3,286 days old) by flyingethan (Oklahoma City) | ||
|
Combo52, Where did you buy your stainless steel tubing from? The machine shop that I am using can't find the correct size tubing in stainless steel. | ||
| Post# 820234 , Reply# 37 4/20/2015 at 23:12 (3,286 days old) by flyingethan (Oklahoma City) | ||
|
Another question for everyone. Do you think it's a good idea to add/ change my gear case oil while I have the washer apart? I've never noticed it leaking any oil. I see what looks like a drain plug on the the gear case. Looks like the natural place to drain and replace the oil. | ||
|
Post# 820279 , Reply# 38 4/21/2015 at 06:21 (3,286 days old) by combo52 (50 Year Repair Tech Beltsville,Md) |
||
|
Rebuilding A KM Washer Hi Ethan, Great progress, You may want to change the oil but there may be several even important things that you should be doing if you want to possibly get upwards of another 20 years use out of this washer.
My Friend Smitty got us around 4 feet of the thin wall SS tubing from a supplier in NJ, I will talk to him shortly and see if he can figure out where it came from, I would like to get some more myself as I have at least another dozen BD WP-KM washers that I want to rebuild in the future as well as rebuilding some for other folks in the group. You would be much better off with SS tubing, the orignal center post was heavily plated to prevent rust, the problem with just painting it is if you get even a tiny gap in the paint it may rust pretty fast. The other way we have talked about preserving these old center posts was to cover them with a vinyl-plastic type sheath. My vacuum cleaner butty Jason has said that it might be possible to get heat shrink tubing large enough to cover a center post and shrink it in place over the center post old or new to protect it from water. I will ask him about this as well when I see him a little later.
There is no drain plug on the transmission for oil changing purposes, I can tell you how to check the oil quantity and quality so you can determine if it is really necessary.
If you send me an Email with your phone# and best time to call I can describe in much better detail, John L. | ||
|
Post# 820303 , Reply# 39 4/21/2015 at 10:13 (3,286 days old) by kb0nes (Burnsville, MN) |
||
What is the outside diameter of the center post? I'm guessing it is a bit over 2". In this size range 304SS tube is still stepping in 1/8" increments for the most part. Give me the diameter and I will find a source. There are many online metal retailers today so the options are great, even for small quantities.
The heat shrinkable tube idea seems like a excellent way to extend the life of the center post. I looked at Raychem and 3M to see if they have an adhesive lined product but most stop at about 1" dia. If you coated the center post with a good adhesive before shrinking that should keep the water out. The center post on Ethan's machine may need a bit more support then the heat shrink tubing though. | ||
|
Post# 822490 , Reply# 43 5/7/2015 at 18:52 (3,269 days old) by combo52 (50 Year Repair Tech Beltsville,Md) |
||
|
The Lady Kenmore Rebuild | ||
|
Post# 830911 , Reply# 46 7/5/2015 at 20:17 (3,210 days old) by washerlover (The Big Island, Hawai�i) |
||
 | ||
|
Post# 830914 , Reply# 47 7/5/2015 at 21:13 (3,210 days old) by DADoES (TX,�U.S. of A.) |
||
|
| ||
| Post# 830927 , Reply# 48 7/6/2015 at 00:11 (3,210 days old) by 70series ( Connecticut.) | ||
|
Congratulations on getting that fantastic set up and running again! I look forward to the video. | ||
|
Post# 830944 , Reply# 49 7/6/2015 at 07:05 (3,210 days old) by combo52 (50 Year Repair Tech Beltsville,Md) |
||
|
Yay Ethan Glad you stuck with this project and got it all done, it is always great to see a restoration project finished. I hope you get many good years out of this washer.
I would love to have the black lid for the Triple-Dispenser that you have on your machine for a black pair I have, let me know if you would consider trading it for an Avocado one, Thanks John L. | ||
| Post# 831063 , Reply# 50 7/6/2015 at 21:24 (3,209 days old) by flyingethan (Oklahoma City) | ||
|
Thanks everyone. Combo52, John L., I would love to trade for an avocado lid for the triple dispenser. However, mine is not black. Actually it was white and I painted it black. If you still want to trade let me know. I will work on the video. | ||
|
Post# 831149 , Reply# 51 7/7/2015 at 07:17 (3,209 days old) by combo52 (50 Year Repair Tech Beltsville,Md) |
||
|
76 LKM Washer | ||
| Post# 831606 , Reply# 52 7/9/2015 at 23:25 (3,206 days old) by flyingethan (Oklahoma City) | ||
|
Okay, here's one youtube video. I am in the process of loading another one. Enjoy! | ||
| Forum Index: | 
| Other Forums: |

|

|

|

|

|

 Comes to the Rescue!


;)
;)
;)
;)
;)
;)
;)
;)
;)
;)
;)
;)