Thread Number: 59849  /  Tag: Vintage Automatic Washers
1979 Hotpoint 1509/10 overhaul
[Down to Last]

automaticwasher.org's exclusive eBay Watch:
scroll >>> for more items --- [As an eBay Partner, eBay may compensate automaticwasher.org if you make a purchase using any link to eBay on this page]
Post# 825099   5/25/2015 at 16:05 (3,250 days old) by triumphtoledo (Shropshire/Worcestershire)        

And so here it starts… Before stripping the machine down, I sought to sort out the slow spin. On the forum experts’ advice, I took the clutch shoes off, found they were a bit stiff, cleaned, lubricated and cleaned the glaze off the friction material. The housing was also cleaned out with automotive brake cleaner. Once back together, the spin is far improved. Yay!

I took a close look at the cabinet and it is pretty sound; only a few rust marks and paint yellowing that is to be expected after forty years. Sadly, a jet wash will not sort it alone but I plan to sort the rust, followed by flatting the finish, applying filler primer and a wet spray top-coat.

The adhesive kick strip is in OK order but it is not worth refitting it. To ‘replace’ it, I shall wet spray a new one, as well as repainting the top cover. I shall get my local paint shop to mix up a near match, using the kick strip as a sample colour. The sales sticker peeled off but was not in very good order. I have photographed it in high-resolution, so a copy could be made if needs be, to enhance the retro look.

R


  View Full Size


Post# 825102 , Reply# 1   5/25/2015 at 16:15 (3,250 days old) by ooversanwashers ()        
hope it goes well

Will this be your daily washer after completion?
Oh and do you have a lid for it?

Thanks


Post# 825103 , Reply# 2   5/25/2015 at 16:16 (3,250 days old) by triumphtoledo (Shropshire/Worcestershire)        
Stripping part 1

The main fault with this machine is a nasty leak, which was dripping down from the support shaft. It appears that the leak has been present for some considerable time and I do not think that any past efforts have been made to remedy it.
Goodness knows what the old dear washed her clothes in – battery acid by looking at the state of the gubbins beneath the agitator. Everything was either covered in slime, limescale or rotted aluminium.

Amazingly, the central nut came off without too much of a fight, as did the 6 bolts that hold the support plate to the bowl support. The main rubber seal came off easily too but the seal hid lots of white dust and general mess.

This is where things got tricky. The drum support was badly rotted, as well as the top plate – the plate itself was down to ¼ of its original thickness in some places, where it has been eaten away.

The support plate is held in place by two steel bolts and a thick steel plate, which, unsurprisingly, had welded themselves together. The bolt heads snapped off straightaway, meaning that, once the outer drum bowl was removed, the angle grinder was wielded but I had to resort to breaking the drum support off the gearbox shaft in lumps…


  Photos...       <              >      Photo 1 of 3         View Full Size
Post# 825104 , Reply# 3   5/25/2015 at 16:27 (3,250 days old) by triumphtoledo (Shropshire/Worcestershire)        
Stripping part 2

With the drum support lying in pieces around my workshop, I removed the outer bowl, take it outside and pressure wash the gunk out.

With the leak dripping down the support tube for goodness knows how long, I unbolted it and found a rather sad looking bearing, covered in rusty, dried-out grease. The bearing also felt a bit notchy, when spun, so I plan to replace it.

The support tube had corroded on the top, so I have renoved it, using chemical metal (see pics).


  Photos...       <              >      Photo 1 of 4         View Full Size
Post# 825107 , Reply# 4   5/25/2015 at 16:33 (3,250 days old) by triumphtoledo (Shropshire/Worcestershire)        
new parts

New drum support, plate kit, top bearing seal & tripod kit (not pictured) and bottom seal ordered.

Sadly, the counterface that fits on top of the support shaft is toast. Anyone know if replacements are available.


  Photos...       <              >      Photo 1 of 2         View Full Size
Post# 825213 , Reply# 5   5/26/2015 at 07:35 (3,250 days old) by ServisChris (Southampton, Hampshire UK)        
Blimey!

servischris's profile picture
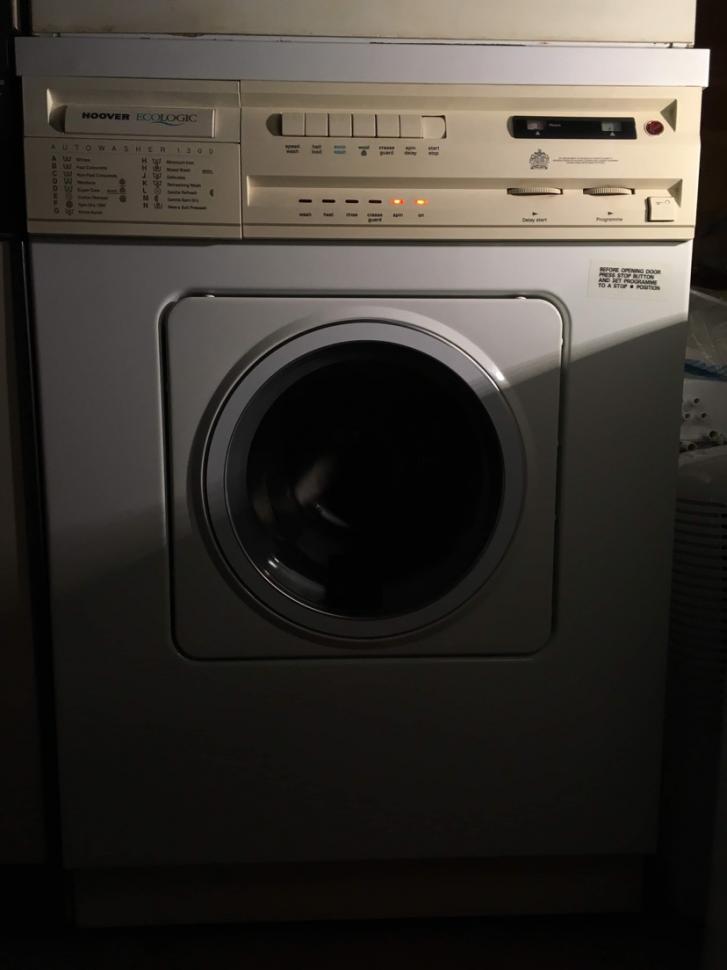
You're certainly braver than me! I've stripped everything out of many washers and vacs and rebuilt them from scratch, but I wouldnt want to try a Hotpoint top loader. I had a 9605 that I gave to another collector, never had to work on it fortunatley

Hope the refurb works out well, I don't know much about the top loaders other than cosmetic information!

Chris


Post# 825277 , Reply# 6   5/26/2015 at 17:27 (3,249 days old) by sesteve (London, UK)        

sesteve's profile picture
hi Rob

Cracking on apace there. Hope you got the user manual ok. That is some corrosion which is mainly due to a build up of detergent so I guess it looks like this machine has done nothing but warm washes with non dissolving powder.

I've attached a link to a new counter face and they also have the counter face mount. Keep us updated

S :)


CLICK HERE TO GO TO sesteve's LINK


Post# 825423 , Reply# 7   5/27/2015 at 15:51 (3,248 days old) by triumphtoledo (Shropshire/Worcestershire)        
Quick query

Does anyone know what oil the gearbox takes? Part number 151442?

Post# 825806 , Reply# 8   5/30/2015 at 13:38 (3,246 days old) by triumphtoledo (Shropshire/Worcestershire)        
...

Does anyone know?

Post# 825879 , Reply# 9   5/31/2015 at 02:50 (3,245 days old) by fido ()        

I would probably just bung in some SAE90 gear oil but you could ask on UKWhitegoods for a definitive answer.

Post# 826565 , Reply# 10   6/4/2015 at 08:46 (3,241 days old) by triumphtoledo (Shropshire/Worcestershire)        
Update

Thanks for the suggestion about the oil - I tried UK Whitegoods but nobody could give me precise details about what the original oil actually was, so far. The consensus is for me to use EP80/90, classic car spec, so it will not eat away at any soft metal bushes.

Anyway, as an update, the top bearing is off, the chassis has been derusted and repainted in epoxy mastic rust proofing paint - an excellent 2-pack product that I recommend highly (from Rustbuster - www.rust.co.uk...)

The outer tube for the shaft had some rust damage, which was cleaned up - some welding was needed but it's done now...

The other issue is that the counterface (part number 151245), which fits on top of the support tube is cracked and chipped, presumably caused by corrosion exerting pressure on it. While the plastic mounting is available new, the counterface is obsolete and the usual suspects says its in stock but then find it is not.

I even found the original OE supplier to Hotpoint of these counterfaces, who even found the drawings, but has no spare stock left - as they were junked many years ago. Commissioning a new replacement to be made is a (very) uneconomical exercise.

So, does anyone have an undamaged one from a machine being broken?

R


  Photos...       <              >      Photo 1 of 4         View Full Size
Post# 826680 , Reply# 11   6/5/2015 at 04:43 (3,240 days old) by sesteve (London, UK)        

sesteve's profile picture
hi Rob

Looking good - I need to spray the base of mine so thanks for the tip on the paint - will have to get some.

I've had a quick look on-line using the following part numbers and some are showing as in stock - not sure which companies you have tried.
C00146357, C00146336 and 151245

Give those ago and check in case it throws up results that you have not seen.

S :)


Post# 826710 , Reply# 12   6/5/2015 at 09:53 (3,240 days old) by triumphtoledo (Shropshire/Worcestershire)        
Counterface

Thanks Steve - yup, I have googled those numbers already and have contacted the displayed companies - none of which have one :(

Post# 826721 , Reply# 13   6/5/2015 at 12:44 (3,240 days old) by sesteve (London, UK)        

sesteve's profile picture
Bugger. I'll have a root about when I get back after the weekend amongst my spare bits in case I have one. I can't remember if I replaced the counter face in the machine I fixed the leak on. If I did then I would have kept the old one so if would be better than no counter seal. I'll drop you a message if I find it. S

Post# 827135 , Reply# 14   6/9/2015 at 04:37 (3,236 days old) by triumphtoledo (Shropshire/Worcestershire)        
quick update

Managed to spend 20 minutes on the machine last night, so we are now on putting it back together. I fitted the new top bearing, tolerance ring, washers and circlip to the main transmission outer shaft.

I also sucked out the old gearbox oil and refilled with old-style EP80/90, with a new good squirts of Lucas oil.

When a counterface is located, I shall continue with the rest of the overhaul...

R


Post# 827140 , Reply# 15   6/9/2015 at 05:39 (3,236 days old) by chestermikeuk (Rainhill *Home of the RailwayTrials* Merseyside,UK)        
Hotpoint Top Loading Automatics....

chestermikeuk's profile picture
Hi Rob great restoration for the old washer, there is a repair guy we use in Norfolk who repairs Hotpoint top loaders, (he`s renovating my 1501 at the moment) and has a machine shop so can make new / old parts when required, his name is Mark Hill from Mark One domestics and his contact email is hillm2622@gmail.com

I re-sprayed my 1509 lid and back panel a few years ago, the paint match was Citroen Midnight Blue paint from Halfords, Looking forward to seeing yours all back together after the restore!!


CLICK HERE TO GO TO chestermikeuk's LINK


  View Full Size
Post# 827556 , Reply# 16   6/11/2015 at 11:03 (3,234 days old) by triumphtoledo (Shropshire/Worcestershire)        
Thanks chestermike

Thanks for the advice. I went to Halfords for some Citroen/Peugeot Midnight Blue but it is not being stocked anymore.

I think what I shall do is get some paint mixed up at my local professional paint suppliers, which should be able to match up the original colour from the console wrap. The trouble is, the minimum quantity is 1/2 litre.

Does anyone need their Liberators painting??!

R


Post# 827557 , Reply# 17   6/11/2015 at 11:06 (3,234 days old) by triumphtoledo (Shropshire/Worcestershire)        
Cabinet – part 1

As I wait for an elusive counterface to arrive, I have taken advantage of an afternoon’s nice weather and addressed the cabinet.

As you can see, the original cabinet wore rust spots and, once the triangular sales sticker was removed, it was obvious how much the paint had discoloured, from a bright white, to a dirty, yellowish hue.

There was also a nasty scrape on the side, as well.

The chances of a second-hand cabinet needing no repairs would be so remote and so I decided to repair the original part, particularly as the rust was only superficial.

R


  Photos...       <              >      Photo 1 of 3         View Full Size
Post# 827561 , Reply# 18   6/11/2015 at 11:09 (3,234 days old) by triumphtoledo (Shropshire/Worcestershire)        
Cabinet – part 2

Car bodyfiller took care of the dent, while I flatted down the rest with 100 grit wet-and-dry sandpaper, using my orbital sander.

There were quite a few more rust spots hiding beneath the paint and, to avoid them spreading, the brown iron oxide was either ground out with the sandpaper, or treated with a rust converter solution.

I find Hammerite’s product to be a bit wimpy in this regard – I used Bilt Hambers’ version instead, which is more heavy duty.

If the rust were left, it could spread under the paint, causing it to blister and fall off.

I used a flap disc to remove the heavier corrosion at the top of the cabinet, followed by the rust converter.

R


  Photos...       <              >      Photo 1 of 6         View Full Size
Post# 827563 , Reply# 19   6/11/2015 at 11:11 (3,234 days old) by triumphtoledo (Shropshire/Worcestershire)        
Cabinet – part 3

The bare metal has to be treated with an etch-primer, to ensure that the new paint doesn’t fall off again.

As the cabinet was so patchy, I decided to spray the whole thing with three light coats of etch. As its name describes, the paint is slightly acidic, so it ‘eats’ its way into the metal, giving a great bond and rust resistance.

R


  Photos...       <              >      Photo 1 of 2         View Full Size
Post# 827565 , Reply# 20   6/11/2015 at 11:14 (3,234 days old) by triumphtoledo (Shropshire/Worcestershire)        
Cabinet – part 4

Finally for today, to ensure an even surface, particularly on the area that had car body filler applied, three coats of filler primer were sprayed over the etch. This product sprays on like custard, the idea being that it covers all the bumps and imperfections, which you can sand back, to give an even surface afterwards.

Afterwards, I used a simple can of black spray paint to provide a ‘guide’ coat. When I sand the filler primer back (with 400 grit wet-and-dry), the surface is even, when all the black paint is gone. The filler primer needs leaving for at least 48 hours to cure, before it can be worked on further.

Once done, I hope that the cabinet shall then be ready for its last coat of top-coat, in white, maybe next week.

R


  Photos...       <              >      Photo 1 of 2         View Full Size
Post# 827582 , Reply# 21   6/11/2015 at 13:15 (3,234 days old) by ooversanwashers ()        

Great work looks like its coming along nicely.

Thanks :)


Post# 827648 , Reply# 22   6/12/2015 at 06:10 (3,233 days old) by sesteve (London, UK)        

sesteve's profile picture
Hey Rob

Counterface on its way to you - hopefully you will get it tomorrow. You make this cabinet restoration look really easy but I'm sure if I had a go it would look terrible. I thought it looked really good with the etch primer so its going to look fantastic when you've finished it. I'll have to send you my Hoovermatic 3314L for you to work on when you are done. Its in a sorry state cosmetically and I haven't got round to sorting it out yet!

S


  Photos...       <              >      Photo 1 of 2         View Full Size
Post# 827660 , Reply# 23   6/12/2015 at 07:25 (3,233 days old) by triumphtoledo (Shropshire/Worcestershire)        
A thousand thanks...

Cheers Steve for mailing out the counter-face. I look forward very much to its arrival.

As I used to work in an automotive paint-shop, renovating a cabinet is no different to car bodywork - it is all pressed steel, hence my transfer of skills.

The most time consuming bit is stripping to bare metal, which anyone can do. The etch-priming looks great from a distance but it is only a thin later of paint and paint tends to exaggerate any imperfections, not cover it up. That's why the filler primer stage is important.

I have some car bodywork stuff to do at home later in the year/2016 and so etch priming a washer cabinet, while I am doing, say a door or a roof, is not a problem.

R


Post# 827665 , Reply# 24   6/12/2015 at 07:47 (3,233 days old) by triumphtoledo (Shropshire/Worcestershire)        
Liberator 'blue'

My paint man has mixed up a 1/3 of a litre of the closest we can get to the blue/grey colour that is used for the kick-strip and the console.

It is RAF Grey, British Standard Code 633. The picture shows the console wrapper against the colour. I plan to simply mask the cabinet up, when the white paint is applied - the effect will be the same.

The minimum amount of paint that I could order is 1/3 of a litre and so if anyone needs consoles/lids painting in the next fortnight, let me know.

R


  View Full Size
Post# 828069 , Reply# 25   6/15/2015 at 07:59 (3,230 days old) by triumphtoledo (Shropshire/Worcestershire)        
Cabinet - part 4

Filler primer rubbed down and cabinet sprayed with four coats of top-coat.

R


  Photos...       <              >      Photo 1 of 3         View Full Size
Post# 828090 , Reply# 26   6/15/2015 at 13:09 (3,230 days old) by triumphdolomite (Staffs(UK))        
Paint Job

That's looking good Rob, what paint have you used? Is it appliance white or an automotive paint. Triumph white 19?
Ian


Post# 828155 , Reply# 27   6/16/2015 at 02:48 (3,229 days old) by triumphtoledo (Shropshire/Worcestershire)        
white paint

HI Ian,
Thanks for your kind words. No, the paint is not a BL colour; I selected a bright white from a basic colour chart and it was mixed for me.

The final finish is very good and I am pretty pleased with it. I shall simply mask off the bottom part of the cabinet later in the week and spray the blue/grey finish to replicate the kick strip - the console section also needs stripping and repainting as well, which I shall do, when I can grab a few hours.

R


Post# 828159 , Reply# 28   6/16/2015 at 02:59 (3,229 days old) by triumphtoledo (Shropshire/Worcestershire)        
Mechanical update

Thanks to sesteve, who provided a very good used counterface, I was able to reassemble the machine over the weekend.

The counterface was fitted with a new rubber mount (the original had gone so hard, I thought it was made from plastic) and was glued into the rebuilt support tube. While I thought that the original rubber bellows would be OK to reuse, I am glad that I bought a new one, because the old one had perished around its 'neck.'

On the advice of James Rankin, I also glued the main carbon seal assembly to the bowl support.

The outer drum was scrubbed clean, the heater soaked in limescale remover (which appeared to make no difference) and bolted to the chassis. The wiring was connected up and the outer bowl was refitted, followed by the new clamp kit and top seal/tripod kit.

R


  Photos...       <              >      Photo 1 of 7         View Full Size
Post# 828161 , Reply# 29   6/16/2015 at 03:05 (3,229 days old) by triumphtoledo (Shropshire/Worcestershire)        
Friction damper repair tip

It seems as though the friction dampers suffer from the friction material falling off and being lost.

With replacements being either obsolete or very expensive, I found that cutting a section of friction material from a car brake pad and glueing it to the friction damper body works!

R


  View Full Size
Post# 828164 , Reply# 30   6/16/2015 at 04:46 (3,229 days old) by mjp2002 ()        
Limescale

Could you not soak the heater element in vinegar or part fill the tub with vinegar and water and bring the water up to 85oC on programme 1 like you would descale a kettle?

Post# 828191 , Reply# 31   6/16/2015 at 09:20 (3,229 days old) by sesteve (London, UK)        

sesteve's profile picture
Wow - the paint job looks great and the colour match is really good - it is a bluey grey colour so look forward to seeing the finished result. What kind of white paint is it?

Glad the counterface arrived. Its funny but the service manual covering the 1504 is more detailed than the later ones. It says in there to glue the bottom seal to the bowl support and to grease the inside of the drive nut as well as the gearbox outer tube. I have found that the sealing ring for the bellows seal is a real pain to deal with - there is no obvious way of ensuring that it is tight enough so hopefully the debor glue should help in your case.

The other funny thing with my 1504 was that it was missing bits - water slinger, spring washer and cork washer. I have a suspicion that these were not used originally - the service manual does say of the cork washer - where fitted - but its not clear on the others! Perhaps they were design improvements.

Good work on the dampers too. They have quite a grip so its good you managed to prise them open to get them glued in. Almost done now!

S :)


Post# 828508 , Reply# 32   6/18/2015 at 16:45 (3,226 days old) by triumphtoledo (Shropshire/Worcestershire)        
Aggghhhh!


Sorry for the minor delay, a few things have been getting in the way recently but I have managed to spend some time trying to get the machine running.

I managed to get a couple of test washes done and, guess what? It leaks! Water is still dripping from the support tube. I’ve had the machine apart four times, trying different techniques and I can conclude that it is definitely coming from the bottom seal/support.

I doubt that the support tube is at fault, as it was checked for flatness and the bowl support is in its original position, far enough down the outer shaft (thanks Stephen for the tip!).

What I think is that the outer tube is allowing water to come up the support tube and down, through the bottom seal and down through the support. This may be because I had to remove quite a bit of corrosion from it, so maybe it is no longer thick enough. Either that, or the bottom seal was faulty.

So, before I get completely sick of it, I think that I will have to strip the machine down totally this time and replace the upper gearbox support tub with a second-hand part – Ian, does that offer of taking that scrap top-loader off your hands still standing?! I can collect Saturday en-route to parents…

R


Post# 829182 , Reply# 33   6/23/2015 at 08:53 (3,222 days old) by triumphtoledo (Shropshire/Worcestershire)        
Quick update... spares machine

Thanks to Ian, I collected a donor machine (9600 was it Ian?) and dropped it at my house at 5.00pm on Sunday.

By 9.00pm, it was stripped completely and I am taking the best of both machines for the 1509/10.

The transmission top half and support tube are in much better condition (with hardly any play). I have now stripped the 1509 down (again) and mated the late transmission top with the original bottom half. Interestingly, 10mm bolts are used on the later models, 11mm on the older.

Also, the transmission casing is galvanised on the later models, not so on the earlier. Not everything on the earlier models is better, obviously. Mine had rust inside the gearbox, and the new oil was filthy, so it was drained out again and everything cleaned up and derusted, before yet more new oil was added.

The top seal for the outer tub is also different, thicker and seemingly more effective and so that shall go on the older machine too.

If anyone needs any parts from the spares machine, please get in touch. The cabinet is in really nice order and it would be a shame for me to cut it up. Let me know if anything is needed. I think Stephen has dibs on some suspension dampers...

R


  Photos...       <              >      Photo 1 of 4         View Full Size
Post# 829186 , Reply# 34   6/23/2015 at 09:22 (3,222 days old) by triumphtoledo (Shropshire/Worcestershire)        
Final cabinet pics

Well, the machine may leak and not work but, hey, I have finished the cabinet.

Rather than reuse the split, faded and tatty kick-strip (which would have been a nightmare to stick down), I decided to mask up the bottom three inches of the cabinet and spray along the entire front and side lengths, which is not only easier to mask but also gives a bit of extra protection against knocks.

The console trims were all stripped back to bare metal, etch-primed and painted. The side sections are very thick - no wonder Hotpoint changed them to plastic later, to save costs.

Anyway, I tried to reproduce the original mottled effect and, while the result is not 100% even, it's not bad for someone who is used to painting things shiny.

R


  Photos...       <              >      Photo 1 of 3         View Full Size
Post# 829204 , Reply# 35   6/23/2015 at 11:54 (3,222 days old) by sesteve (London, UK)        

sesteve's profile picture
Hey Rob

Glad you picked up the donor machine - and it great condition too - I would have the cabinet for my 9605 but its a bit far to collect for me so will have to sort out the scratch on it another way and yes please to the dampers.

Is that a doily in the bottom of the outer tub amongst the limescale and goodness knows what else? Seems like there is a lot of gunk in that machine too. Could you see what was wrong with the gearbox on it as you stripped it down? The cabinet is looking good with the kick strip so will look really smart when it is finished.

I've attached the 4 pages from the 1504 model so you can see the additional detail in case it helps.

Cheers
S


  Photos...       <              >      Photo 1 of 4         View Full Size
Post# 829217 , Reply# 36   6/23/2015 at 13:46 (3,222 days old) by triumphdolomite (Staffs(UK))        
9605

Rob
Glad everything is coming on ok and its going to provide the spares you need. Looking forward to seeing everything back together and working. Thanks for the strawberries, delicious!

Steve
It was my daily driver for 10 years or so, and the first machine I purchased when I left home. I took it out of service as it was throwing oil about inside and onto the floor and over the belt and clutch and struggling to get upto any sort of useful speed on spin. I decided to let Rob have this rather than the 9600 I have in similar condition as I'm not sure that there is a 9600 in preservation.
I must say that I'm horrified at all the gunk in the outer tub, I know the water here is quite hard but where all the fluff has come from I haven't a clue, Yes it is a doiley! I knew it was in there somewhere as I'd lost it when doing some washing for my Mum about 7 or 8 years ago at least. It looks to have survived remarkably well considering all the 60 and 95 deg washing I used to do. I have to admit I have now inherited the rest of the matching set!

Ian


Post# 829236 , Reply# 37   6/23/2015 at 16:35 (3,221 days old) by sesteve (London, UK)        

sesteve's profile picture
Hi Ian.

Did you have it from new as that would explain why it's in such good nick? I'm guessing the top oil seal must have failed for that to happen - it wasn't getting into the wash as well was it? There is a design flaw with all the top loader models. The well for the heater is a collection pit for all manner of fluff and other bits that go through the machine. It would have been better if the well had extended into the drain outlet as the heater is interlinked to the water level so should have been fine to drain out at the end. I'm dreading looking at my 1509 - I washed a couple of cheap sofa throws that I bought from Sainsburys when I moved in. The filter tray was totally clogged and there wasn't a lot left of the throws! The rest of it must be stuck round the heater.

At least the limescale shows you were doing high temperature washes but you must have done lots of loads in it for that much and the doily may be fine after a wash in the machine rather than under it.

Steve :)


Post# 829291 , Reply# 38   6/24/2015 at 02:34 (3,221 days old) by triumphtoledo (Shropshire/Worcestershire)        
Latest update after assembly

Well, I put the machine innards back together yesterday, filled it up with water and - IT LEAKS!

The water still is coming from the centre of the support tube. I tore it down again last night and removed the main seal from the bottom of the bowl support, cleaned its mount and reglued it into place.

I then cleaned the main shaft of grease and silicon-sealed the support to the shaft and left it overnight to cure.

This morning, I filled the machine with water before work and - drip, drip, drip - still emanating from the centre of the support shaft.

Other than replacing the bottom seal with another new one, I am out of ideas.

In summary, the machine has had a good second-hand support tube and top shaft, a new bowl mount, main seal and top seal kit and new gaiter that seals the support tube to the outer drum. I will add that the main seal and top hat kit was a pattern Qualtex part, as I could not obtain genuine.

Does anyone have any suggestions as to where to go next?

R


  View Full Size
Post# 829292 , Reply# 39   6/24/2015 at 04:16 (3,221 days old) by sesteve (London, UK)        

sesteve's profile picture
Hi Rob

At what level was the water when it started leaking? If you fill the machine up gradually then it would point to which seal could be letting by. I've done a crappy drawing to show the 4 levels to check.

1. Looking at where it is leaking which appears to be the inside of the counterface I would say that the counterface mount and counterface should be ok - to prove you could fill up just so the bellows seal is covered. If it starts leaking then it is either of those or the joint between the face seal and the counterface. I'm not sure if there is a right and wrong way round to mount the face seal but it looks right from your pictures. It could be that the face seal is not sitting flat between the bowl support and the counterface either because the seal is distorted or the debor glue has not held it on level.

2. If that's ok and it doesn't leak, fill it up to the top of the bowl support just below the top of the bowl clamp. If it starts leaking here then it could be the o-ring in the bowl support.

3. If that's fine then fill further to below the top of the top seal

4. If that is ok fill to above the drive nut. If it leaks here then it could be the seal between the drive nut couterface and the top seal. Have you fitted the water slinger and o rings at the top of the shaft as shown in the drawings? These are not always included in the seal kits.

Hopefully that will at least identify which point is weak.
S


  Photos...       <              >      Photo 1 of 2         View Full Size
Post# 829293 , Reply# 40   6/24/2015 at 04:19 (3,221 days old) by sesteve (London, UK)        

sesteve's profile picture
Hi Rob

At what level was the water when it started leaking. If you fill the machine up gradually then it would point to which seal could be letting by. I've done a crappy drawing to show the 4 levels to check.

1. Looking at where it is leaking which appears to be the inside of the counterface I would say that the counterface mount and counterface should be ok - to prove you could fill up just so the bellows seal is covered. If it starts leaking then it is either of those or the joint between the face seal and the counterface. I'm not sure if there is a right and wrong way round to mount the face seal but it looks right from your pictures. It could be that the face seal is not sitting flat between the bowl support and the counterface either because the seal is distorted or the debor glue has not held in on level.

2. If that's ok and it doesn't leak, fill it up to the top of the bowl support just below the top of the bowl clamp. If it starts leaking here then it could be the o-ring in the bowl support.

3. If that's fine then fill further to below the top of the top seal

4. If that is ok fill to above the drive nut. If it leaks here then it could be the seal between the drive nut couterface and the top seal. Have you fitted the water slinger and o rings at the top of the shaft as shown in the drawings? These are not always included in the seal kits.

Hopefully that will at least identify which point is weak.
S


  Photos...       <              >      Photo 1 of 2         View Full Size
Post# 829294 , Reply# 41   6/24/2015 at 04:22 (3,221 days old) by triumphtoledo (Shropshire/Worcestershire)        
leak

Blimey Steve, thanks for your input and diagram.

Basically, the machine leaks when it hits your level 2. If then allowed to drain back to your level 1, it still leaks.

I have sealed the O Ring in the support with silicon and Debor in the past and it seems to make no difference. Perhaps I should get a new face seal and try that??

R


Post# 829297 , Reply# 42   6/24/2015 at 04:43 (3,221 days old) by sesteve (London, UK)        

sesteve's profile picture
I know how frustrating these things can be so happy to try and help. So it is either the o-ring, the face seal where it meets the bowl support or the face seal where it meets the counterface. Hmmm! What was the face seal like from the donor machine? is it worth trying that to see if that solves it? If so then you could get a new one. If not then the o ring could be changed. Is the bowl support a nice tight fit on the shaft? It might be better not to put the debor or sealant on this. Just checking that you raised the gearbox before you tightened the bowl support - don't want to accuse you of sucking eggs but that will help push the seals tightly together?

I'm not sure if it is worth putting the machine on to see if a bit of action allows things to bed in. I'm sure when I did my first seal on one of these I had similar issues but once it had done a cycle it seemed to solve itself and has been fine since.

S


Post# 829298 , Reply# 43   6/24/2015 at 04:58 (3,221 days old) by triumphtoledo (Shropshire/Worcestershire)        
re

Thanks again Steve,

You are not teaching me to suck eggs, just verifying that I have done everything properly.

The face seal from the old machine (and the one that came out of this one) was pretty knackered, really. The carbon seal itself had ground down level to the rubber backing.

The bowl support was fairly rotten, although not completely past it. I could fit it to this machine and see if it works.

The gearbox was raised, before fitting the bowl support (using an old plastic oil can!) Otherwise, the rectangular clamp section would not have located in its recess.

Regarding using the machine, while it is like this, it is an option, although the water coming out is a regular drip and so I am unsure if it would resolve itself – but if that’s the only way, maybe I should try it…

R


Post# 829398 , Reply# 44   6/24/2015 at 16:05 (3,220 days old) by triumphtoledo (Shropshire/Worcestershire)        
I may have found the cause...

On Steve's suggestion, I have refitted the spares machine's carbon seal to the new bowl support (not glued in, just plonked on) and the leak has virtually stopped. Before, it would take around 10 minutes for the drips to appear, there have been less than ten drips in 5 hours.

So, it appears that a brand-new part was to blame.

A new, new bottom seal has been ordered but I shall leave the machine with water in it overnight and see how things are in the morning.

Meanwhile, I have assembled the console - pics below :)

R


  Photos...       <              >      Photo 1 of 3         View Full Size
Post# 829403 , Reply# 45   6/24/2015 at 16:56 (3,220 days old) by triumphdolomite (Staffs(UK))        

Rob
I'm glad it looks like you might have solved the problem, its looking smart now. Hopefully you should have it fixed before long.

Steve
Yes I bought it on staff purchase when Alstom still had an agreement with Hotpoint/Creda from the old English Electric days, we didn't get much knocked off though, 10 or 15% I think it was. I used to wonder how much scale was lurking in the bottom as there was usually a helping of very gritty fluff in the filter tray. It did work quite hard and Heavy Soil was nearly always selected to get the proper temperatures. I'd not noticed if it was oiling the load, once the spin efficiency started to drop as it was in the middle of winter I took it out of service. I think one of the problems with the 9600 I decided to keep is that it passes oil over into the wash.
I must admit to having washed some odd things in it in the past. A set of Dolomite carpets comes to mind, prog 7 gentle action I think it was......

Ian


Post# 829416 , Reply# 46   6/24/2015 at 18:24 (3,220 days old) by supermaticjames (Donegal, Ireland)        

Glad to see you are still keeping at it. You will get there in the end! I sure you know this already but it it very important that the machine is put on spin for at least two minutes so that the two carbon faces bed together. It is also important for the gyrator to be fitted prior to any water tests so that the top carbon face under the tripod is given a chance to bed together before the water fills the void within the gyrator. alternatively you can do what I did and trick the machine into thinking it is filled with water and allow it to agitate a while.

Keep up the good work!

James


Post# 829466 , Reply# 47   6/25/2015 at 02:54 (3,220 days old) by triumphtoledo (Shropshire/Worcestershire)        
This morning's result

Well, I checked the machine this morning, after leaving the water level half-way up the top-hat seal overnight (see pic) and the support tube was totally dry, as was the gearbox top.

I took the support bowl off and the counterface's inner area was dry too (see pic), proving that the old seal is doing its job, despite being rather worn.

James, thanks for the tip about putting the machine on spin, before filling the tub. Although there is no reference in my workshop manual on this, I did put the machine on several spin cycles with the new seal in place, to allow the surfaces to bed-in, and it still leaked.

I even rubbed the carbon face evenly with 180 grit wet-and-dry, in case it was distorted but it made no difference. I cannot see anything physically wrong with the new seal but, as the old seal is doing the job, I cannot see where else the blame lies.

A new seal has been ordered and I shall report back on its effectiveness...

R


  Photos...       <              >      Photo 1 of 2         View Full Size
Post# 829514 , Reply# 48   6/25/2015 at 11:02 (3,220 days old) by sesteve (London, UK)        

sesteve's profile picture
Well done Rob

At least you know what it is so hopefully a new seal will solve it permanently. Console looks great too. What are the machines behind the 1509? I don't recognise the valve configuration of the one on the right.

Ian - dolomite carpets sounds like a challenge for the toploader! Did it do the trick? I tried washing feather pillows once over - never again!!

S


Post# 829550 , Reply# 49   6/25/2015 at 16:00 (3,219 days old) by triumphtoledo (Shropshire/Worcestershire)        
Other machines

Cheers Steve,
The other machines are, on the left, a Bosch V696 washer dryer (used earlier this year, when our separate dryer stopped working and was a lifesaver with a messy toddler in the house), the other one is a Hoover Logic A3586 (a timeline 1200), I think, which has been completely reconditioned.

R


Post# 829556 , Reply# 50   6/25/2015 at 16:47 (3,219 days old) by matchboxpaul (U.K)        

Hi Rob.

Always nice to see a restoration job come back together. Must be one of the most thorough overhaul jobs conducted on one of these for many a year.

Keep on posting the updates!
Regards
Paul


Post# 829964 , Reply# 51   6/28/2015 at 16:41 (3,216 days old) by triumphdolomite (Staffs(UK))        
Carpet

Steve
It managed the carpets ok, front foot mats, sill carpets and gearbox tunnel piece. I did take the horsehair backing off beforehand though:-) Just needed to be rearranged before spin to get the balance right.
Please don't try this Rob after all your hard work!!!
Ian


Post# 831011 , Reply# 52   7/6/2015 at 15:57 (3,208 days old) by triumphtoledo (Shropshire/Worcestershire)        
getting closer...

After suffering multiple nightmares and waking up in cold sweats after dreaming about leaky Hotpoints, I was whisked away by the family for a week’s worth of therapy.

On returning from holiday, yet another new bottom carbon seal was waiting on the doormat, which was fitted, the machine reassembled (again) and set on a spin, before the bowl being filled with water.

While not entirely leak-free (but with the number of drips being in single figures after an hour of standing full of water), it was a massive improvement over the previous Qualtex seal.

So, I decided to reunite the body with the chassis, not before breaking the interlock switch, whoops! Thankfully, the spares machine yielded another one (thanks again Ian!).

The later machine’s top seal was also a tight fit between the outer bowl and lid console, which will be more effective in stopping my utility room filling up with steam, when running a hot wash.

The spares machine also yielded its galvanised cover that sits above the rear air-break vent, at the top of the outer bowl, as the original had gone very rusty.

I had a sheet of self-adhesive car soundproofing spare, which was stuck to the inside of the cabinet before it was screwed to the chassis. The machine has now been connected up and the small leak seems to have stopped, after running three full washes.

When full of clothes, the spin was really lack-lustre, so the spares machine donated its clutch shoes that were a little worn and so I screwed several nuts to each end of the friction linings, to weigh them down a bit. The spin appears to be much better, although the next few washes will determine how effective the ‘repair’ has been.

I shall run a few more washes over the ensuing few days (when the family has generated more dirty laundry) and will report back, hopefully, with no bad news and some final reveal pictures…

R


Post# 831220 , Reply# 53   7/7/2015 at 14:23 (3,208 days old) by matchboxpaul (U.K)        

Cannot wait for the grand unveil.

Wonderful machines the 1509's, with the /10 being the pinnacle and great that you were able to save one.

Paul


Post# 831250 , Reply# 54   7/7/2015 at 16:49 (3,207 days old) by triumphdolomite (Staffs(UK))        

Rob
Glad that you've managed to stop the dripping and it seems to be performing better. The clutch shoes shouldn't be too worn as I changed them two or three years before I took it out of service.
Ian


Post# 831357 , Reply# 55   7/8/2015 at 08:57 (3,207 days old) by sesteve (London, UK)        

sesteve's profile picture
Hi Rob

Glad its all back together and look forward to seeing the final result. The position of those microswitches makes them very vulnerable to breaking - I broke my one so stole one off the 9605 - must remember to sort that out! I'm guessing the seal has bedded in which has stopped the leaks. I ran my 1504 this weekend after overhauling it and no leaks at all with a 42 year old seal so I was really surprised.

Have you stuck the soundproofing material to all of the inside of the cabinet. I was considering sticking felt underlay to the outer tub of one of my machines to improve its energy use and speed up the heating process for hot washes so will be interesting to see if you notice a difference.

So I'm guessing you will be allowed to keep this in the house now if its going in your utility room! With all the hard work you've put into it it deserves to be pride of place.

Cheers
S :)


Post# 831402 , Reply# 56   7/8/2015 at 15:24 (3,207 days old) by triumphtoledo (Shropshire/Worcestershire)        
re

Thanks guys for your kind words.

Ian.
That explains why the shoes didn't look that worn. The machine ramps up to full spin very quickly now and the spin performance is better than our 1100rpm Bosch. The cycles are very quick but I am not convinced, yet, that its cleaning performance is superior. However, I managed to fit in a bed mattress cover that I would otherwise have had to send to the laundrette, so result on that score! Your donor machine continues to be useful in supplying smaler pieces that are in better condition.

Steve.
I haven't forgotten that I have some friction material & a damper. I am glad for you that your 1504 is not being as much of a headache as mine. I stuck soundproofing on the inside of the cabinet to reduce any noisy drumming, while on spin. I'm unsure how much sticking insulation to the outer tub would make much of a difference to its energy efficiency, unless it is a metal tub.

Anyway, my machine is now in to the utility room and doesn't appear to be leaking and so I hope that the job is now down.

I'll take and get some pics up tomorrow :)

R


Post# 831483 , Reply# 57   7/9/2015 at 03:21 (3,206 days old) by triumphtoledo (Shropshire/Worcestershire)        
The Reveal...

Well, here it is.

I shall let the pictures do the talking but I am very grateful to all supporters of the project, without whom the machine would have ended up in Kidderminster's recycling dump, especially Ian, Steve and James. Thanks guys!

I ‘ll report back on how I find the machine’s performance - the extra stickers are there mainly for the wife, so she doesn't boil my smalls dry!

R


  Photos...       <              >      Photo 1 of 7         View Full Size
Post# 833430 , Reply# 58   7/23/2015 at 13:51 (3,192 days old) by triumphtoledo (Shropshire/Worcestershire)        
update after beng a daily driver

Well, the machine is up and running and has been in constant use for the last three weeks.

First impressions are both good and bad. It’s quick, rinses very well and the spin is not bad either.

Obviously, it’s a water hog and requires more detergent than our front-loading Bosch (but much quicker). It’s noisy on wash but not on spin. Some of my dark cottons have come out more ‘bobbled’ than with the front loads and sheets some out very creased (but well spun!)

Washing very dirty clothes and rags requires loads of water anyway, which is where the machine comes into its own.

Unfortunately, the dreaded leak has returned but appears to be intermittent. Drat! It seems to be getting worse but I’m keeping a close eye on it. There’s a small puddle beneath the machine after each wash so it’s not tragic but still irritating.

I think the bottom thermostat bung may be leaking slightly too but only a few drops each wash. At least they are inexpensive and available.

The other things to cement its money pit repute is the flyback thermostat fell apart last week. Turning the knob from 0 to the first notch got harder and harder; on removing the part, the relay disintegrated. Relays are available but the complete thermostat flyback was only £10 more, so I fitted that, all for £27 all in. Being a late 1509/10, no modifications were needed, according to the instructions enclosed with the part.

Later on, I’ll scan and upload the instructions, which may be of use for anyone else.

R


Post# 833437 , Reply# 59   7/23/2015 at 14:58 (3,192 days old) by chestermikeuk (Rainhill *Home of the RailwayTrials* Merseyside,UK)        
Hotpoint 1509/10 ..

chestermikeuk's profile picture
Congratulations Rob, your hard work paid off, its looking fab, great machines to use even if it has its foibles compared to a low water Bosch.

Enjoy your washing!!


Post# 833556 , Reply# 60   7/24/2015 at 09:36 (3,191 days old) by sesteve (London, UK)        

sesteve's profile picture
Well done again. As they say perseverance pays off - apparently and you have certainly persevered with this one.

I'm a bit surprised that it is noisy on the wash as generally the noisiest part is the draining but having said that they all sound slightly different to each other. The noise on my 1509 lessoned quite a bit once I'd sorted out the clutch shoes as one of them had jammed in position and now it makes the same amount of noise for wash and spin.

Is the leak coming from the dreaded support tube? I think that the debor glue that you used to put the counterface in may be causing the problem as it looks from the photos like it could interfere with the movement of the face seal and allow the seals to part when they are moving. Could be worth clearing that out and seeing if that works. Otherwise I think I'm out of suggestions.

Hope you get it sorted
S :)


Post# 833636 , Reply# 61   7/24/2015 at 17:12 (3,190 days old) by supermaticjames (Donegal, Ireland)        

Hi Rob,

I'm glad you stuck with it after all the challenges it has thrown at you. It is a credit to yourself and it looks stunning!

Like me, you have had to strip the 1509 down several times to get it right, I agree with Stephen in saying that the support tube carbon face looks suspect with all that Debor. Try cleaning it up with acetone when you get the time to look at it.

I can imagine your frustration because I would feel the exact same if my 15790 started leaking now but luckily so far so good in my case.

Best of luck!

James


Post# 833999 , Reply# 62   7/27/2015 at 04:14 (3,188 days old) by electron1100 (England)        
Great

electron1100's profile picture
This has been a great thread about a great machine, I still think these are the best machines Hotpoint ever produced.

I too had a few problems with leaks on mine but not to the extent you had with faulty seals, fortunately mine worked but I had a leak after everything else occur on one of the thermostat seals,oh and one of the thermostats stopped working! I remember water testing it just as you did, and the exasperation I felt when there was a drip GRRRRR.....ha ha :-)

But once I had sorted that and everything else what a great machine to use.

I am so pleased you stuck it out and got the beauty up and running


Post# 834604 , Reply# 63   7/31/2015 at 08:18 (3,184 days old) by triumphtoledo (Shropshire/Worcestershire)        
The nightmare ends (for now...)

I have had to tear the machine back down three times, as the small leak escalated grew to a puddle, after every wash.

I took the support tube out, which came originally from the donor machine, which Ian donated to the cause, for which I am very grateful.

To be sure, I took out the counter-face and found a hole in its mounting. Once that was renewed and everything Debored back together, the machine still leaked.

I stripped the machine again and replaced the bottom seal (for the second time) after I found that the carbon face wore some pitting. Back together – still leaking.

I then refaced the rubber seals, took off all Debor sealant and used silicon sealent instead. Back together – the leak had slowed but was still there.

I refitted the original top-hat seal (under the agitator) – the leak persisted. Fitted the old and crusty top-hat seal from the donor machine – no more leaks.

After a boil wash, two 40 degrees washes and a cold wash, not a drop has come down the support tube.

A few weeks ago, the flyback also stopped working – basically the knob had become very stiff to operate. While trying to sort it, the delicate wires from the internal solenoid crumbled. Thankfully, I managed to procure a new flyback, the fitting instructions for which are copied below, in case anyone needs to reference them in the future.

Once again, thanks to everyone that offered advice and even spares to get this old machine running again – it has been quite a journey – one that I hope has now come to an end!

R


  Photos...       <              >      Photo 1 of 2         View Full Size
Post# 834662 , Reply# 64   7/31/2015 at 16:10 (3,183 days old) by triumphdolomite (Staffs(UK))        
Success

Rob
Congratulations on finally getting everything watertight.
Ian


Post# 834954 , Reply# 65   8/3/2015 at 13:40 (3,181 days old) by triumphtoledo (Shropshire/Worcestershire)        
re

Cheers Ian,
I’ve been using the machine daily, to see how it copes and, so far, not a drop of a leak has come back.

I am tempted to put the back on but that really would tempt fate.

In fact, the machine came into its own yesterday; as we had a huge load of white to get washed (thanks to young Catherine becoming toxic), including bedding, towels, shirts etc. In truth, I think I overloaded it. We put the machine on at 3pm on a 60 degrees wash; the clothes were line dried and back in the house for 7pm, perfectly clean.

With a modern washer, we would have had to use the dryer to get them done in that time…

R


Post# 835171 , Reply# 66   8/5/2015 at 10:04 (3,179 days old) by sesteve (London, UK)        

sesteve's profile picture
Well done Rob

Glad you have finally cracked it and I know what you mean about not tempting fate with the back panel but hopefully it can go back on now! Seems like the old seals are better than the new!

Despite being a water guzzler, the quick wash times are a real bonus and the spin is pretty thorough too. I sometimes put mine on late in the evening and use the rinse hold until the morning so I can peg out before I head to work - now that's a test for the seals!

S


Post# 835173 , Reply# 67   8/5/2015 at 10:15 (3,179 days old) by keymatic (London / UK)        

keymatic's profile picture
Hi Rob,

Just a quick question regarding your 9605, with the "Rinse Hold" does it agitate for long after releasing the button ?

My aunt had one and my mum had a 1509 but i can't remember the sequence. I have managed to get hold of a brand new 9605W as a back up for my 1504.

Cheers
Keith


  View Full Size
Post# 835188 , Reply# 68   8/5/2015 at 11:14 (3,179 days old) by triumphtoledo (Shropshire/Worcestershire)        
re

HI Steve,
Thanks - I had the machine full of water on test for a morning and had no leaks, so I presume that it would stand-up to an overnight rinse-hold. I agree that the spin is pretty effective, although ask me again in the winter.

I need to get some parts to you - a friction damper, a bit of car brake pad and I think I may have a used (but good order) water slinger somewhere. I also found that the cork washer/spring/rubber washer at the top could all be replaced with a sturdy tap washer, if the centre hole was made a little larger. I can send that as well, if you wish.

Hi Keymatic,
I don't know about the 9605 final rinse agitation, as Ian provided me with the machine and it did not work, He would know. On the 1509, it fills with water and just stops, if the rinse hold button is held. When pressed down, it agitates for a few minutes or so (never timed it!)

R


Post# 835196 , Reply# 69   8/5/2015 at 12:17 (3,179 days old) by SuperElectronic (London, UK)        
2 minutes...

...is how long a 96-series top loader will agitate after rinse hold, having already agitated for 1-2 minutes. I've attached the timer chart below for full reference.

I'm fairly sure the 1509 and its ilk agitate for 2 minutes only on the final rinse before pausing for 40 seconds then draining.


Post# 835229 , Reply# 70   8/5/2015 at 16:26 (3,178 days old) by sesteve (London, UK)        

sesteve's profile picture
Hi Rob

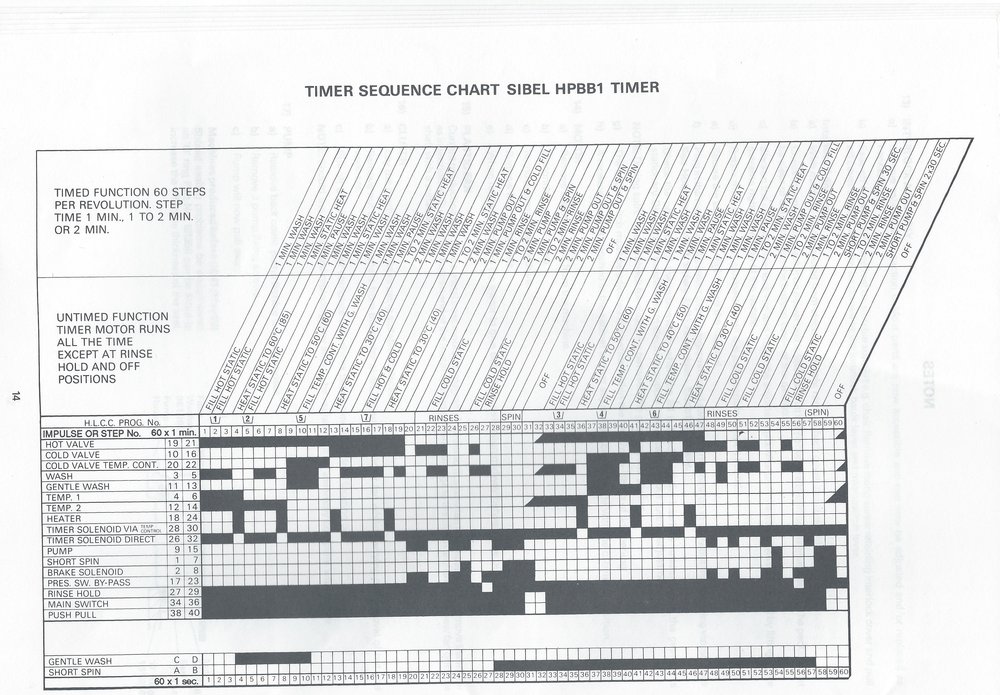
Those parts would be great if you don't mind. Let me know if you want something for postage. I think I gave you my address in one of the emails I sent previously.

Hi Keith. Well done on getting the 9605. Hopefully you won't need it as a backup as the 1504 will keep on going for a long time yet but it's a great backup machine to have. The main difference is the brake being applied after the spins so no coasting which I thought was a bit harsh and also the first agitated rinse along with the brittle console covers of course. I've got a service manual I can send you if you want - it tells you how to disable the agitated fill sequence if this machine has it.

I just checked the manual for the 1509 and the rinse hold kicks in as soon as the machine is full and will agitate for 3 impulses at 40 seconds each so you are right Al 2 mins as well


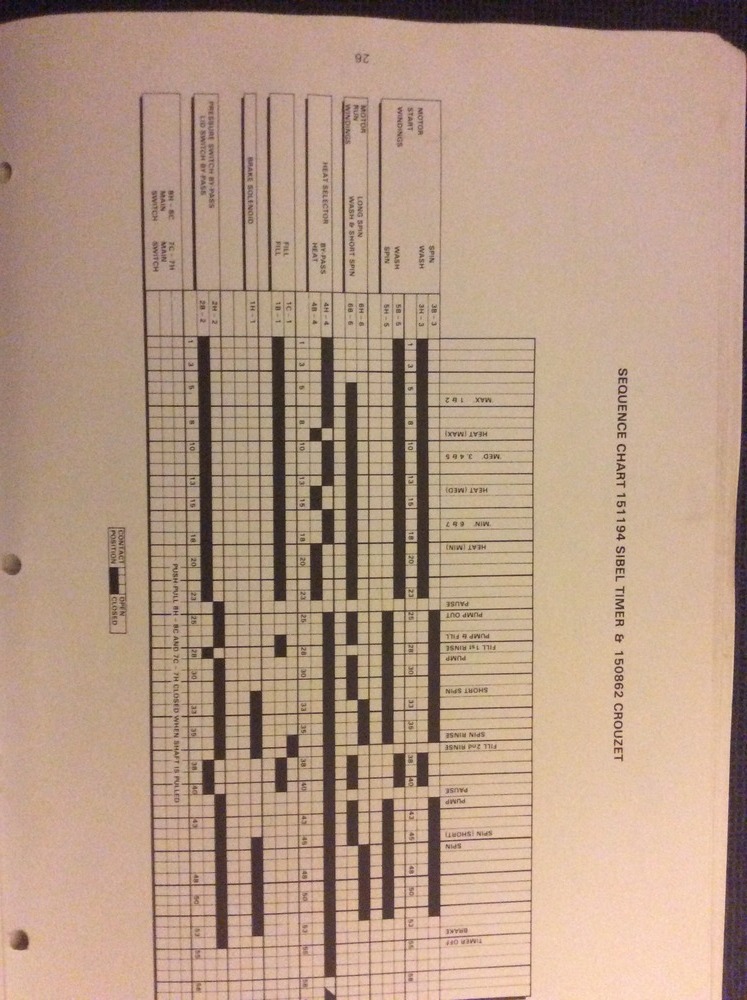
Post# 835308 , Reply# 71   8/6/2015 at 03:11 (3,178 days old) by keymatic (London / UK)        

keymatic's profile picture
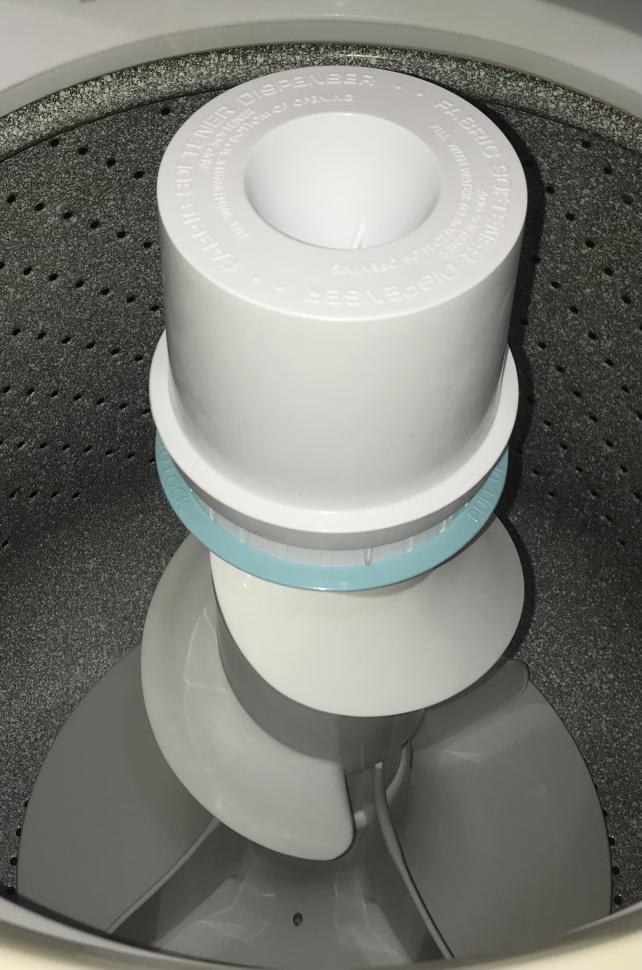
Hi Rob, thanks for confirming that..it will make life easier if i do decide to use it as currently I have to be around to add the fabric conditioner on the 1504, not really a problem and i have been doing it for over 10yrs now but would be nice to leave the machine with the Rinse Hold option.
It was such a steal at £150 for a brand new 9605 - i think towards the end of manufacturing they were selling for around the £500.
Many thanks for the info
Cheers
Keith


  View Full Size
Post# 835575 , Reply# 72   8/7/2015 at 13:46 (3,177 days old) by triumphtoledo (Shropshire/Worcestershire)        

Blimey Keith - yes, £150 is a bargain for a new vertical-type top loader. My renovated 1509 owes me not much less than that...

Steve - I am having a "workshop day" tomorrow, so will try and get together those bits for you - nothing due for the postage - just take it as a big thanks for all your help.

R


Post# 835580 , Reply# 73   8/7/2015 at 15:04 (3,177 days old) by maytaga806 (Howell, Michigan)        

maytaga806's profile picture
Looks good! So those machines recirculate water for the lint filter on top? Do they use a separate pump?

Dan


Post# 836046 , Reply# 74   8/11/2015 at 02:35 (3,173 days old) by triumphtoledo (Shropshire/Worcestershire)        
Hi Dan...

Yes, the machine recirculates water into the lint tray at the top but it does not utilises a separate pump. Instead, the drain pump rotates in the opposite direction. The drain pump is mechanical and is driven by the main motor by a separate flexible drive (i.e. a piece of canvass!)

R


Post# 836053 , Reply# 75   8/11/2015 at 05:09 (3,173 days old) by keymatic (London / UK)        

keymatic's profile picture
Hi Rob,

Yep it was a steal at £150 !! - I think the 1504 has done it's time, what with being in use for well over 10yrs now and never going wrong, plus being over 44 years old.
One question i would throw out to all is can the lid-latch be permanently disengaged ? I know on my aunt's machine i could only open the lid about an inch before the action stopped. On my 1504 it was easy to disable the safety mechanism as it was purely a micro switch, however on the new machine i think its a bit more complicated. As the machine is way outside my collecting timeframe im not over sure on all the technical stuff.

Many Thanks
Keith


Post# 836086 , Reply# 76   8/11/2015 at 09:09 (3,173 days old) by sesteve (London, UK)        

sesteve's profile picture
Hi Keith

I've attached some info on the lid interlock. The microswitch is located in the lid latch assembly and I guess if you override the microswitch you can use the machine with the lid open as the rest of the interlock is to stop you opening the lid when the gearbox is rotating.

What did you do on your 1504 as is really difficult to defeat it physically whereas the 9506 you just need to stick something in the hole for the lid peg.

S


  Photos...       <              >      Photo 1 of 3         View Full Size

Forum Index:       Other Forums:                      


Comes to the Rescue!

The Discuss-o-Mat has stopped, buzzer is sounding!!!
If you would like to reply to this thread please log-in...

Discuss-O-MAT Log-In


New Members
Click Here To Sign Up.


automaticwasher.org home
Discuss-o-Mat Forums
Vintage Brochures, Service and Owners Manuals
Fun Vintage Washer Ephemera
See It Wash!
Video Downloads
Audio Downloads
Picture of the Day
Patent of the Day
Photos of our Collections
The Old Aberdeen Farm
Vintage Service Manuals
Vintage washer/dryer/dishwasher to sell?
Technical/service questions?
Looking for Parts?
Website related questions?
Digital Millennium Copyright Act Policy
Our Privacy Policy