|
Thread Number: 80270
/ Tag: Vintage Automatic Washers
My Maytag Highlander Pair |
[Down to Last] |
Post# 1042188 8/19/2019 at 08:15 (1,706 days old) by maranoman  (Des Moines, Iowa) (Des Moines, Iowa) |
||
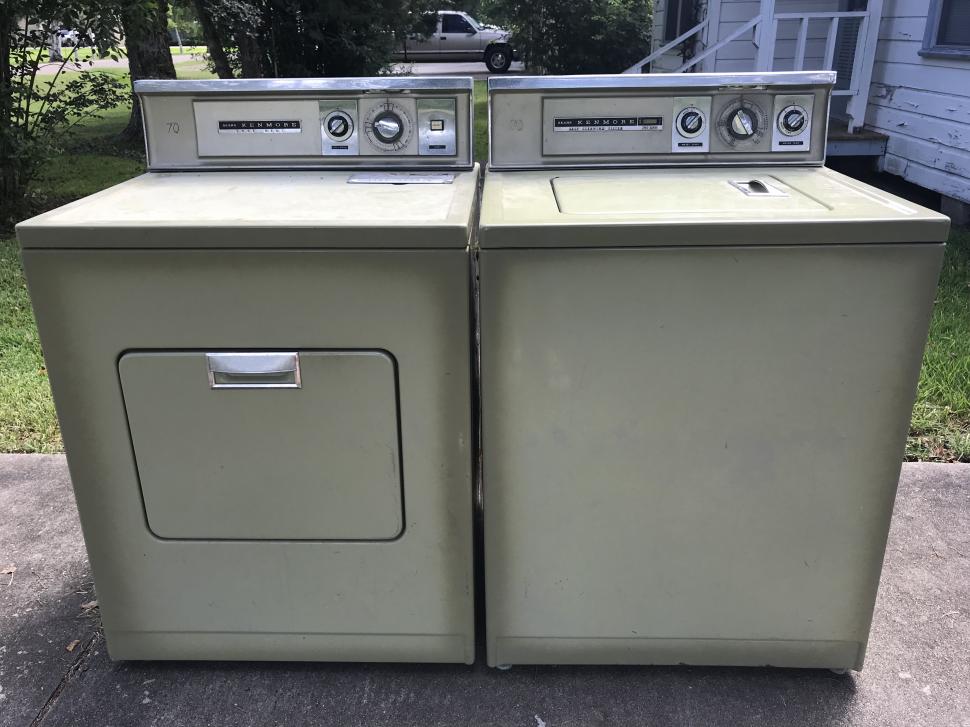
I recently found a 1959 Maytag Highlander Model 124 washer on Craigslist here in Des Moines. After several attempts to contact the seller, she finally responded and I headed over to her house on the east side of Des Moines just 3 blocks from the Iowa State Fairgrounds. The seller told me that her mother bought the Highlander new and used it for a few years before replacing it with a larger Whirlpool washer. She kept the Maytag in her basement as a backup but it pretty much stood unused since the 1970's.
While I was at her house, I plugged it in just to see if she would spin and she did! I paid her $65 and my son and I hauled it out of her basement. After getting it home, she wouldn't spin anymore - the motor would try to get started but it just kept tripping the thermo guard on top of the control panel. Oh well, I planned to do a complete mechanical overhaul anyway. Here are some initial pictures. - Jeff This post was last edited 08/19/2019 at 13:28 | ||

|
|
Post# 1042193 , Reply# 1 8/19/2019 at 08:38 (1,706 days old) by maranoman (Des Moines, Iowa) |
||
|
I did say pair, didn't I?
A few days after I bought the Highlander washer, I saw a NOS 2-746 inlet valve listed on eBay. The seller was in Cedar, Iowa, which is about 70 miles southeast of Des Moines. After buying the valve, I contacted the seller to see if he had any other Highlander parts and I sent him a picture of my washer. He told me he was a former Maytag dealer and that he didn't have any other old washer parts, but he did know where I could find a matching dryer that was still running.
Turns out his parents who lived in nearby Fremont, Iowa still had a Model 67 dryer in their basement. The couple were in their 90's and used a newer laundry pair on the main level and he thought they would be willing to let the old dryer go. This past weekend I drove down to Fremont to see what they had. While not in as nice of shape as the washer, the dryer did indeed run and heat. The front door seal was still somewhat soft but starting to crack in spots. The dryer top had the usual patina composed of scratches and stains, and the control panel was missing some paint. They had to pull the fuse from the electrical box since the dryer was wired directly up to it. The serial number indicated that the dryer was built in 1958. I paid $60 for the dryer and hauled it back to Des Moines. I still can't believe my luck in finding a matching Highlander pair within weeks of each other! I hope to use this thread to keep you up to date on the restoration progress of this reunited Highlander pair. Here are some initial pictures of the dryer. - Jeff This post was last edited 08/19/2019 at 13:28 | ||
|
Post# 1042194 , Reply# 2 8/19/2019 at 08:41 (1,706 days old) by Ultramatic (New York City) |
||
Congratulations! | ||
| Post# 1042200 , Reply# 3 8/19/2019 at 09:44 (1,706 days old) by Repairguy (Danbury, Texas) | ||
 | ||
|
Post# 1042203 , Reply# 4 8/19/2019 at 10:06 (1,706 days old) by turquoisedude (.) |
||
 | ||
|
Post# 1042273 , Reply# 7 8/19/2019 at 23:17 (1,705 days old) by DaveAMKrayoGuy (Oak Park, MI) |
||
 | ||
| Post# 1042275 , Reply# 8 8/19/2019 at 23:49 (1,705 days old) by hippiedoll ( arizona ) | ||
very cool!  | ||
| Post# 1042289 , Reply# 9 8/20/2019 at 06:23 (1,705 days old) by Tomdawg (Des moines) | ||
|
In Des Moines?! I would love to see it in person sometime! | ||
|
Post# 1042298 , Reply# 11 8/20/2019 at 07:37 (1,705 days old) by gansky1 (Omaha, The Home of the TV Dinner!) |
||
 | ||
| Post# 1042407 , Reply# 12 8/21/2019 at 16:34 (1,703 days old) by eurekastar (Amarillo, Texas) | ||
|
| ||
|
Post# 1050664 , Reply# 13 11/11/2019 at 10:01 (1,622 days old) by maranoman (Des Moines, Iowa) |
||
|
Making Progress on the Highlander Washer
It has been a few months since I updated the progress on the restoration of my Maytag Highlander pair. In September, I started the process of dismantling the 124 washer and took stock of what would need to be replaced. The transmission was leaving a pretty sizable puddle of oil on my garage floor, so I decided that it needed to be addressed as soon as possible.
To get to that point, I would first need to remove the agitator. Easier said than done! I tried all the tricks mentioned in this forum previously to no avail. Ben (swestoyz) let me know that he would be in Des Moines to see Jerry Seinfeld in concert and I invited him to stop over (insert Ben and Jerry ice cream joke here.) He brought along his Maytag agitator remover and within a few minutes we heard a pop and the agitator was off with the spline intact! Ben was even surprised on how easy it came off and how nice everything looked under the agitator. I was so happy to have that agitator off intact that I forgot to take any pictures of the process! So instead, here is some content about the agitator puller from Maytag's February issue of "Let's Talk Service." | ||
|
Post# 1050665 , Reply# 14 11/11/2019 at 10:18 (1,622 days old) by maranoman (Des Moines, Iowa) |
||
|
Over to Cedar Falls to Rebuild the Transmission
While Ben was in town and had his empty Tahoe with him, I sent him home with a Maytag DG712 that I had picked up for free in Fort Dodge, Iowa a month earlier. In return, Ben offered to help me rebuild the Highlander's transmission and throw in some spare parts he had as well (transmission parts, a door seal for my Highlander 67C dryer, a spare 124 washer top cover, an early Maytag base and inner/outer tubs.)
I proceeded to breakdown the transmission and clean it up in preparation for my trip to Cedar Falls, which happened on October 12. After arriving at Ben's house, he showed me his amazing collection and then we started on the transmission. The hardest part really was removing the old o-ring seal from the center shaft. Ben tried for awhile, then I tried for awhile, then Ben tried again and was finally successful with extracting it. Putting it all back together was not so hard with Ben there. I'm pretty sure it took us only a couple of hours but without him, I'm sure it would have been a weekend long project for me! Here are some pictures of the transmission tear-down and rebuild, including one with me failing to dislodge the o-ring. This post was last edited 11/11/2019 at 11:27 | ||
|
Post# 1050673 , Reply# 15 11/11/2019 at 11:13 (1,621 days old) by maranoman (Des Moines, Iowa) |
||
|
Choosing a Base
My Highander 124 washer has a serial number of 241029 RG. It came with the pivoting motor rather than the sliding motor carriage design that Maytag switched to that year. In fact, they started the sliding motor-mount design with serial number 241485 RG, which means mine was one of the last 500 or so pivoting motor machines.
Once Maytag ended their pivot motor design, they changed the base to accommodate the mounting of the sliding motor carriage. The original base was part number 2-722. The replacement base was part number 2-1727. This was announced in a 1959 "Let's Talk Service" bulletin included in my photos for this post. When I left Cedar Falls, in my trunk was a base from a 1961 Maytag A700 washer that Ben had given me as part of the trade for the DG712 dryer. We both assumed that the A700 would have used a 2-1727 base and that it would have the necessary square slots to accommodate the same tub supports and springs as the ones used on my 124. Ben's base would allow me to use the more conventional sliding carriage motor mount design that Maytag used until the end of the dependable care washer production. I know some here liked the pivoting motor design better. Ben's personal experience with a pivot-base model 142 was that it had a hard time getting up to speed. Before I started prepping Ben's base for new paint, I put the A700 and the 124 bases next to each other to compare them. I then realized that Ben's base lacked the necessary slots I would need to attach my tub support arms and springs. Ben looked to see if he had the original springs and supports for the A700, but they were gone. So it looks like I will be using the original base and the pivoting-motor for my Highlander washer after all. That's OK - there something to be said about keeping a machine all-original! In the photos below you will see my 124's serial number tag, the Let's Talk Service bulletin announcing the new base design in 1959, my 124 base, a drawing of the 2-1527 base and Ben's A700 base. | ||
|
Post# 1050675 , Reply# 16 11/11/2019 at 11:26 (1,621 days old) by maranoman (Des Moines, Iowa) |
||
|
Base Rust Removal and Paint
Another reason for wanting to use Ben's A700 base was that my original 124 base looked like it had spent part of it's life under the sea. It was pretty darn rusty.
But Maytag used some pretty thick steel and fortunately, none of the rust had penetrated the base. I spent a couple of hours grinding away at it and ultimately removed as much as possible. I then used KBS Coatings 3-stage rust conversion and sealing system (link below) to treat and seal the base. While the paint was drying, I cleaned up the base feet. Pictures below. CLICK HERE TO GO TO maranoman's LINK | ||
|
Post# 1050678 , Reply# 17 11/11/2019 at 11:35 (1,621 days old) by maranoman (Des Moines, Iowa) |
||
|
Cleaning up Inner and Outer Tubs
Ben had traded me a decent set of inner/outer tubs. My original set was pretty worn and the porcelain that did show was very dull. Ben's set had definitely lived an easier life.
Out came the Lime-Away and CLR and an afternoon was spent cleaning both tubs up. I'm please with the way the outer tub cleaned up. I need to spend some more time on the inner tub - I'm forced to work outside on this type of work and as I was working on the inner tub, a cold front dipped into Iowa and the temperature started flirting with the freezing mark before I could finish. Next weekend promises the return of "warmer weather" (40's) so hopefully I will finish the inner tub then. | ||
|
Post# 1050680 , Reply# 18 11/11/2019 at 11:47 (1,621 days old) by maranoman (Des Moines, Iowa) |
||
|
Damper Pads
I'm on the fence with what to do with my damper pads. They are in decent condition and are not loose. However, the machine is 60 years old and who knows how much longer the adhesive will hold. And while I have the machine broken down, it makes sense to replace them, right?
But what to replace them with? I have not had luck finding the original damper pads (2-11335) anywhere. If someone has a set they are willing to sell me, please let me know. Otherwise, has anyone ever tried using the newer damper pads (203956) on these machines? The sizes are definitely different with the newer ones being larger. Are they about the same thickness? Has anyone tried cutting the newer damper pads down to match the side of the old ones? | ||
|
Post# 1050691 , Reply# 19 11/11/2019 at 13:33 (1,621 days old) by LowEfficiency (Iowa) |
||
 | ||
| Post# 1050706 , Reply# 20 11/11/2019 at 15:04 (1,621 days old) by qsd-dan (West) | ||
|
Fantastic job Jeff!!
You can use the newer damper pads on these older bases and is standard operating procedure when I restore these older washers. 2 of the 3 pads can be glued on as is. The 3rd pad needs to be trimmed for proper spacing. I always swap in bases from the later end production of this generation when possible which uses the later motor carriage design and are equipped with much larger suspension springs that provide lots of room for adjustments (and are still backwards compatible for older designs). The newer damper pad/silicone grease combo is slicker, allowing tighter spring tensions without transferring vibrations to the cabinet. It's a benefit for these older suspension designs and when properly adjusted, mimics the superior '66-06 design. Hope this helps. | ||
|
Post# 1050710 , Reply# 21 11/11/2019 at 15:41 (1,621 days old) by Washerlover (The Big Island, Hawai�i) |
||

Funny in the photo of the water inlet with �C/H� that seem to be backwards compared to standard hot and cold configurations where hot is on the left, cold on the right. But I also thought it odd that the Maytag washers spin �backwards� compared to most (Speed Queen comes to mind as well with the counterclockwise spin direction) and the dryer door opens the �wrong� way as well, as again, most other makes seem to set up with the washer on the left and dryer on the right.
I�m by no means bashing Maytag at all, as I have become a big fan of Maytag as of late..! Just merely an observation. | ||
|
Post# 1050740 , Reply# 22 11/11/2019 at 19:06 (1,621 days old) by Combo52 (50 Year Repair Tech Beltsville,Md) |
||
Fantastic restoration Jeff
Many many years ago my brother Jeff and I completely rebuilt a Maytag 123 the first helical drive washer Maytag built.
I always had a soft spot for this early design washer we sold it to a customer of ours and he went on to use the machine for another at least 15 years is his only washer raising two kids with it. If you�re doing this is a restoration project I would definitely leave it original the original pivoting motor was a superior idea that MT should�ve gone on to perfect. It is true that the later centering springs were a huge improvement so if you�re going to use it for an every day driver you might as will update it maybe even a couple generations but otherwise I�d leave it alone I�d probably leave the original damper pads also just make sure they�re glued firmly in place reglue them if necessary. Keep us posted with the progress. You probably don�t need them but I have lots of parts for old helical drive washers and HOH dryers let me know if you need anything. | ||
| Forum Index: | 
| Other Forums: |

|

|

|

|

|

 Comes to the Rescue!


;)
;)
;)
;)
;)
;)
;)
;)
;)
;)
;)
;)
;)
;)
;)
;)