|
Thread Number: 86939
/ Tag: Vintage Automatic Washers
My Early Maytag A806 Rework Progress |
[Down to Last] |
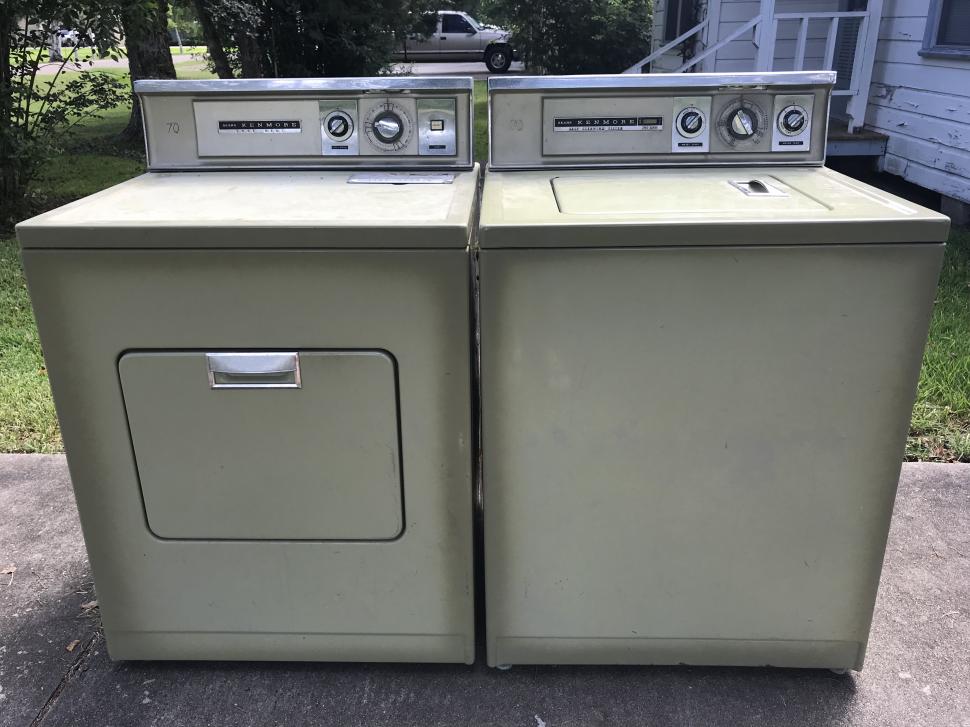
Post# 1115100 4/19/2021 at 18:52 (1,096 days old) by d-jones  (Western Pennsylvania (Pittsburgh Area)) (Western Pennsylvania (Pittsburgh Area)) |
||

So this is it. I started the tear-down this afternoon, and right away I was surprised to find tower clamps installed throughout on this machine. Tower clamps haven't been easy to find for quite some time, so to me that would indicate just how long it's been since this thing had any real work done to it. I'll clean them up and try to reuse them, but no promises. There's quite a bit of corrosion on the base plate that'll need removing. I'll have to see how that goes. I have a new old stock replacement, but I'd rather not use it if I don't have to.
2nd photo - Tear-down coming along. 3rd photo - Done for the day. I've got a bunch of stuff loaded in the trunk to take to work where I can use the sand blaster on some corrosion issues, but for the most part this machine is in descent shape. More tomorrow. | ||

|
|
Post# 1115133 , Reply# 1 4/20/2021 at 11:05 (1,095 days old) by LowEfficiency (Iowa) |
||
 (Link to the prior thread for anyone finding this in the future: www.automaticwasher.org/c...) Looks like the pump is still the multi-part serviceable type as well. Is there any evidence that the timer was replaced? (Could the Kingston timer be original?) | ||
|
Post# 1115135 , Reply# 2 4/20/2021 at 11:55 (1,095 days old) by d-jones (Western Pennsylvania (Pittsburgh Area)) |
||
|
I noticed that little detail on the pump as well. I'm going to clean this one up and try to use it, but that may not be possible. As for the timer, I'm inclined to agree with Dan on this. Mallory timers are more commonly found on the early machines, but since I don't know when Maytag began using Kingstons I can't say if it possibly left the factory with one or not. However, since my two other 70s 806's have Kingston timers I'd prefer this early one to have a Mallory. Bye the way, thanks for posting the link. I should've though of that. | ||
|
Post# 1115136 , Reply# 3 4/20/2021 at 12:56 (1,095 days old) by swestoyz (Cedar Falls, IA) |
||

Maytag started sourcing Kingston timers as early as the 00 series machines in the fall of 1961 as well as the 02 line (A302/A502/A702), so it is very well possible that this came from the factory with a Kingston version of the non Suds early A806 2-3182 (dash 1).
Good luck with your restoration! Crossing fingers is it spouse approved when you're finished. Ben | ||
|
Post# 1115140 , Reply# 4 4/20/2021 at 13:38 (1,095 days old) by d-jones (Western Pennsylvania (Pittsburgh Area)) |
||
|
Thanks for clearing that up, swestoyz. | ||
| Post# 1115146 , Reply# 5 4/20/2021 at 15:15 (1,095 days old) by Good-Shepherd (New Jersey) | ||
|
Stainless steel lint filter They are rare as hens teeth and a steel motor splash cover. Never seen a machine with iron stains that bad, diluted Muriatic acid should clean that up. Definitely worthy of a good refurb. Base plate should be okay after sandblasting unless badly pitted. | ||
|
Post# 1115156 , Reply# 6 4/20/2021 at 16:39 (1,095 days old) by LowEfficiency (Iowa) |
||
|
>> Base plate should be okay after sandblasting unless badly pitted. I'd bet money it will be fine too. The base on my "free" A408 was in far worse shape, and after 2 1/2 years of use as our primary washer, it has still held together! For a machine like this, I think I'd take originality over perfection, even if the plate wasn't "perfect" after the sandblasting. | ||
|
Post# 1115158 , Reply# 7 4/20/2021 at 17:07 (1,095 days old) by d-jones (Western Pennsylvania (Pittsburgh Area)) |
||
|
Dave - | ||
|
Post# 1115160 , Reply# 8 4/20/2021 at 17:41 (1,095 days old) by d-jones (Western Pennsylvania (Pittsburgh Area)) |
||
|
In other news
I was able to spend some time cleaning after work today, so a little more progress to report. The motor shield and the mounting panel for the water valves both had corrosion to deal with, so they got blasted today.
Photo 2 - Fortunately the rust came off easily with very little pitting left behind. The Maytag Gray paint on the underside of the motor shield is in perfect shape, so it's at a paint shop now waiting for a specialist to match the color for me. I've been using Rustoleum Ghost Gray for Maytag base plates and structures, but it's not quite the same shade and has a gloss finish which isn't really correct, so this time I'll do it right. Photo 3 - This has already been cleaned quite a bit, but some of the crud was being really stubborn, so a quick trip to the store for some CLR, Bon-Ami, and Brillo pads later...... Photo 4 - and finally some real progress. The heaviest crud had collected around the tub light lens for some odd reason, but careful use of a flat tip screw driver blade removed it. Not done yet, but close. There's still more cleaning to be done on this tub cover and I still need to remove that rust spots it has and treat the areas so it doesn't come back. Photo 5 - The underside had little actual rust, but a lot of staining. Photo 6 - And it's gone, or at least mostly gone. I'll finish it up tomorrow(hopefully). I had to wrap things up so I could get to the paint shop before they closed. | ||
| Post# 1115164 , Reply# 9 4/20/2021 at 18:11 (1,095 days old) by Good-Shepherd (New Jersey) | ||
|
Brillo pads later.. Brillo pads will scratch the shit out the porcelain. If "the crud" doesn't clean up with a soft sponge and Bon-Ami it is hard water deposits, use diluted muriatic acid to dissolve, it will save a lot of labor and damage to the finish. | ||
|
Post# 1115167 , Reply# 10 4/20/2021 at 18:34 (1,095 days old) by d-jones (Western Pennsylvania (Pittsburgh Area)) |
||
|
Perhaps you�re being too aggressive with it. | ||
| Post# 1115177 , Reply# 11 4/20/2021 at 19:45 (1,095 days old) by Good-Shepherd (New Jersey) | ||
|
acid idea sounds interesting. Works a lot better than hard scrubbing, deposits just dissolve then flush well with water. | ||
|
Post# 1115244 , Reply# 12 4/21/2021 at 13:14 (1,094 days old) by d-jones (Western Pennsylvania (Pittsburgh Area)) |
||
|
Just a quick note. I bought some muriatic acid to try and was both pleased and disappointed. Disappointed in that it seemed to have no effect on the deposits I was trying to remove, but pleasantly surprised with the way it obliterated the rust that had formed in a few places where the porcelain was missing. That was a great discovery. As for the lackluster performance on the mineral deposits, does it matter that the bottle I purchased is only 34% Hydrochloric acid? I got the only brand they had in the store (it's made by Sunnyside). Does it come in higher concentrations, and would that make a difference?
Regardless, I'll definitely be keeping this stuff around for rust removal.
View Full Size
| ||
|
Post# 1115253 , Reply# 14 4/21/2021 at 16:00 (1,094 days old) by d-jones (Western Pennsylvania (Pittsburgh Area)) |
||
|
Well thanks for trying, Douglas.... but I gave it my best effort with the acid and failed. I don't know what it was that collected around all the little the drain holes, but it took this polishing wheel and compound to finally get through it. I've never had this much trouble cleaning a tub cover before, but thankfully it's done. Now I'm off to the paint shop with the lid to get the porcelain color matched and pick up the Maytag Gray.
View Full Size
| ||
|
Post# 1115364 , Reply# 15 4/22/2021 at 21:12 (1,093 days old) by d-jones (Western Pennsylvania (Pittsburgh Area)) |
||
|
It doesn�t look like that much was done today, but this took a while. The front panel was cleaned up and prepped for sanding. The console was disassembled and each of the parts cleaned. The console itself was then polished up, and apart from some minor pitting it came out well. The real pain in the pants was the wiring harness. It was dirty and a bit sticky throughout, so each of the wires was carefully cleaned making sure to leave the wire numbers intact. Each of the tie wraps is located where 1/2 inch gray cloth tape had been wrapped around the harness. That tape was dried out and brittle to the point of uselessness, but with a quick search of the internet I found some new 1/2 inch gray cloth tape to replace it. With any luck the finished harness will look pretty much like the original. I picked up the cabinet paint yesterday after work, then when I got home the new timer was waiting on my front porch. This evening when I got home a set of new Maytag rubber feet was waiting in the mailbox, so things are slowly moving forward.
View Full Size
| ||
| Post# 1115378 , Reply# 16 4/23/2021 at 00:33 (1,093 days old) by qsd-dan (West) | ||
|
things are slowly moving forward | ||
|
Post# 1115406 , Reply# 17 4/23/2021 at 13:57 (1,092 days old) by d-jones (Western Pennsylvania (Pittsburgh Area)) |
||
|
"That's some of the quickest progress and dedication I've seen on this site in quite a while." � Well thanks, Dan. I guess I'm in a hurry to get this done and out of my friends garage, so things can't happen fast enough to suit me. Now just a quick note. In what can only be described as a stroke of luck, I was doing some touch up painting on the the corporate jet that I help maintain and I had a little bit of paint left over. Just out of curiosity I thought I'd see how closely it matched the porcelain on the chipped top panel. It turned out to be about as close to a perfect match as I've ever seen, so I went ahead and filled them all in. By the time I get a few layers built up and polish it out even with the surrounding porcelain I doubt anyone would be able to spot the repairs. See for yourselves.
View Full Size
This post was last edited 04/23/2021 at 17:34 | ||
|
Post# 1115476 , Reply# 18 4/24/2021 at 14:05 (1,091 days old) by d-jones (Western Pennsylvania (Pittsburgh Area)) |
||
|
A bit more progress to report today.
First, Dan wanted to know the serial number, so I got that this morning. It's 215247DD. Then I was able to further disassemble the machine.
Photo 1 - I got this brake removal tool years ago in case I should happen to need it some day. Someday was today and it was quite helpful. I know some folks don't care for it but it worked great for me. Photo 2 - Finally free, the base plate has been loaded in the trunk of my car for a trip out to the hangar, along with just about all of the remaining parts. Photo 3 - Except for this bit here. It'll have to wait a few more days for its turn. Photo 4 - This was a disappointment. There is corrosion on the polished inner surface of the damper leaving it very rough in a few places. To my knowledge this sort of thing isn't repairable, so I'll be replacing this part. | ||
|
Post# 1115480 , Reply# 19 4/24/2021 at 14:57 (1,091 days old) by hobbyapocalypse (Northeast Pennsylvania) |
||
|
At what point is a damper unusable | ||
| Post# 1115486 , Reply# 21 4/24/2021 at 15:59 (1,091 days old) by qsd-dan (West) | ||
|
Birthed from Newton, IA in February 1967.
Your filling, painting, and blending skill are very impressive with the cabinet top. The aluminum damper face may polish out if you're willing to experiment with some compounds. At least keep it as a spare since they're already getting hard to find without gouges from the base. | ||
|
Post# 1115488 , Reply# 22 4/24/2021 at 17:10 (1,091 days old) by appnut (TX) |
||
|
| ||
|
Post# 1115498 , Reply# 23 4/24/2021 at 19:58 (1,091 days old) by d-jones (Western Pennsylvania (Pittsburgh Area)) |
||
|
I understand that this isn't the normal way to disassemble a Maytag washer, but the darn agitator stubbornly refused to cooperate and let go this morning, so I had no choice. The base plate absolutely had to come off so I could take it to the hangar and rework it, so upside down it is, at least for now. I also seem to remember someone on this blog saying that letting a Maytag helical drive transmission sit upside down can feed fresh lubricating oil to the upper bearing, so maybe sitting around upside down for a while is a good thing. LOL.
After reading the comments about the damper I guess I'll try cleaning it up and see how that goes. So Joseph, Douglas, and Dan, the damper restoration effort is for you guys. Maybe I'll get lucky and it'll be okay. Thanks for the information on this machines date of manufacture, Dan. That falls right in line with what you said in the initial thread in Shoppers Square. I also had a look at the lint filter today since you mentioned it was unique for more than just the stainless top. Do you happen to know how long this type remained in production? I've never seen another with this type of lint screen, so I'm guessing not long. Edit - One other thing I forgot to mention. Upon disassembly I found the brake rotor bearing (200835) inner race badly cracked. A minor setback. This seems to be a part that's still available, at least for now.
View Full Size
This post was last edited 04/24/2021 at 20:56 | ||
| Post# 1115506 , Reply# 24 4/24/2021 at 21:40 (1,091 days old) by eurekastar (Amarillo, Texas) | ||
|
I love seeing the progress you're making! Thanks for letting us have a look at the wonderful work you're doing! I restored an A407 then converted it to an A606. However, your skills are far superior to mine! I had fun learning, but it took making a lot of mistakes, as well as a lot of help from the kind people on this site! | ||
| Post# 1115526 , Reply# 26 4/25/2021 at 08:29 (1,091 days old) by sprog (Boston) | ||
Paint Question... | ||
|
Post# 1115530 , Reply# 27 4/25/2021 at 10:52 (1,090 days old) by d-jones (Western Pennsylvania (Pittsburgh Area)) |
||
|
Hi Chris
Unfortunately, I don't know what brand the paint is. It was mixed for us at a service center and provided in two one quart cans, one base and one hardener. The labels on both cans are generic, offering little information beyond mixing instructions. The fact that the color was such a perfect match for the top panel porcelain was just dumb luck. What I can tell you though is that due to the environment that corporate jet aircraft operate in, paint made specifically for them tends to be pretty high quality. I'm sure that isn't very helpful to you, but I'll continue to update the touch up paint progress until it's finished. Hopefully that will prove useful.
| ||
| Post# 1115579 , Reply# 28 4/25/2021 at 20:03 (1,090 days old) by latchlock8111 (Sulphur Springs Tx) | ||
|
Inner damper surface To smooth out the aluminum try fine sandpaper and wd-40 for the sanding lubricant. 1500 grit would be my start point. Wear rubber gloves as it is messy and will stain the fingers. | ||
| Post# 1115665 , Reply# 29 4/26/2021 at 18:15 (1,089 days old) by qsd-dan (West) | ||
|
| ||
|
Post# 1115666 , Reply# 30 4/26/2021 at 19:09 (1,089 days old) by d-jones (Western Pennsylvania (Pittsburgh Area)) |
||
|
Thanks for the tips, guys.
Whether I reuse this damper or not I'll give repairing it a try. I did purchase a new one though that's on its way here now, just in case it should be needed.
Photo 1 - Today there was a fair amount of panic surrounding this cracked brake rotor bearing. I had looked it up and found several on the internet, but when I tried to actually order it today each of the suppliers discovered they didn't actually have one available. There's one listed on Amazon for an outrageous price that I didn't care to pay, so I got out the local phone book and miracle of miracles, a local guy here in Pittsburgh has one, so crisis averted. Photo 2 - The rest of the day was spent cleaning up the base plate. It was covered in sticky filth and thick old oil which had to be removed before any sanding can be done. It took hours to complete and I ended up having to purchase a mini steam cleaner to complete the job. So though it doesn't look like much was done, I'm worn out. In other news, the gray cloth tape arrived today, along with a new correct ballast transformer. I always manage to damage them while removing them from the machine. Maybe one day I'll figure out how to do it. I apologize for the slightly blurred photos today. It seems I got something on the camera lens that went unnoticed until I uploaded them just now. | ||
| Post# 1115667 , Reply# 31 4/26/2021 at 19:22 (1,089 days old) by qsd-dan (West) | ||
|
| ||
| Post# 1115670 , Reply# 32 4/26/2021 at 20:04 (1,089 days old) by Good-Shepherd (New Jersey) | ||
|
sticky filth and thick old oil Thats the original Maytag trans grease/lube. Even using gasoline it takes a while to clean a disassembled trans. BTW- I wouldn't sand blast off the paint in good shape on underside of the base plate, it has a zinc primer and should be fine to paint over. | ||
|
Post# 1115812 , Reply# 33 4/28/2021 at 10:52 (1,087 days old) by d-jones (Western Pennsylvania (Pittsburgh Area)) |
||
|
Corrosion removed from the base and front panel. I need to get the cabinet in here now so it can be prepped, then everything can be primed and painted. Some of the pitting on the base was so deep it'll have to be filled before I can continue with primer.
Photo 2 - Most of the paint on the underside was fine so I left it alone. Only the corrosion was removed. But I did notice that the base plate color is different than the color on the motor shield, and it's quite shiny, so a new batch of paint was mixed to match the base. I'll likely use it on all of the gray parts. Getting close to painting. | ||
|
Post# 1116454 , Reply# 34 5/5/2021 at 20:21 (1,080 days old) by d-jones (Western Pennsylvania (Pittsburgh Area)) |
||
|
Sorry for the delay here.
I'm at the point where I need to prime and paint, but I can't paint in the hangar due to the over-spray problem and unfortunately the weather here in Pittsburgh has been too wet to paint outside. As soon as I get a day without rain or drizzle I'll be able to at least get the priming done, perhaps even paint. Meanwhile I've continued to order some much needed new parts and work on restoring others. With any luck I'll have something worth posting soon.
| ||
| Post# 1116460 , Reply# 35 5/5/2021 at 22:14 (1,080 days old) by Good-Shepherd (New Jersey) | ||
|
I'm at the point where I need to prime Are you going to use a zinc primer like Maytag did at the factory? That would be a nice touch since you're going first class on this rebuild. | ||
|
Post# 1116533 , Reply# 36 5/6/2021 at 17:23 (1,079 days old) by d-jones (Western Pennsylvania (Pittsburgh Area)) |
||
|
Minor progress. I was able to get the primer surfacer applied to the base this afternoon and sanded smooth. It came out well, but I'll likely hit it with another coat of ordinary primer before painting it. I also used Evapo-Rust to remove any remaining rust from the underside of the top panel. Now I just need to touch up a few small spots to prevent a return.
Douglas - I looked for any source of zinc primer locally and found nothing, so I went ahead without it. Hopefully if I get really good coverage with the paint it'll be enough to prevent any issues going forward.
View Full Size
| ||
|
Post# 1121344 , Reply# 37 6/25/2021 at 09:16 (1,030 days old) by d-jones (Western Pennsylvania (Pittsburgh Area)) |
||
|
Quick update. Getting the cabinet ready for paint. Some corrosion had to be removed, then lots of little chips and scratches that needed filling, and the process of priming and sanding until they're all properly smoothed out is time consuming, but things are moving along. The initial progress may have given the impression that this would go faster. Sorry about that.
View Full Size
| ||
|
Post# 1129987 , Reply# 38 9/30/2021 at 10:36 (932 days old) by d-jones (Western Pennsylvania (Pittsburgh Area)) |
||
|
Here we are at the end of September...... and I'm finally ready to paint. My original plan had been to paint outside, but the weather here in Pittsburgh hasn't been cooperating. It's either been raining and humid, hot and humid, or windy and humid. The humidity has finally dropped back to normal, but the wind continues to be a problem. I want this to come out well so I decided I'd have to paint in the hangar, which means I had to purchase this tent like temporary storage shed to control the over-spray (and keep my job). Anyways, after sanding and priming, sanding and priming, then sanding and priming some more, all the little chips and scratches on the cabinet, front panel, and control panel dog house have been filled and smoothed over. I expect to have the painting finished over the next couple of days.
View Full Size
This post was last edited 09/30/2021 at 12:45 | ||
| Post# 1129992 , Reply# 39 9/30/2021 at 11:56 (932 days old) by qsd-dan (West) | ||
|
| ||
|
Post# 1129996 , Reply# 40 9/30/2021 at 12:55 (932 days old) by d-jones (Western Pennsylvania (Pittsburgh Area)) |
||
|
Hi Dan. The inside of the cabinet has been prepped for paint as well, so yes, it's getting painted. I figure an extra layer of protection against corrosion can't hurt, so why not. It'll make things brighter in there when the front panel comes off for maintenance as well. Honestly, I'm a little nervous. It's been a long time since I've used a spray gun, so hopefully the relearning curve won't be too steep. Keep your fingers crossed. | ||
| Post# 1129998 , Reply# 41 9/30/2021 at 13:30 (932 days old) by Repairguy (Danbury, Texas) | ||
 | ||
|
Post# 1130001 , Reply# 42 9/30/2021 at 14:35 (932 days old) by Ultramatic (New York City) |
||
Bravo David! | ||
|
Post# 1130242 , Reply# 43 10/3/2021 at 10:19 (929 days old) by d-jones (Western Pennsylvania (Pittsburgh Area)) |
||
|
Just a quick update.
The cabinet, front panel, and control panel dog house have now been painted, but what a nightmare. Things began going wrong when I ran out of white base coat before the first coat of paint had even been fully applied. The guys at the paint store had figured one quart would do. I hadn't painted anything with a spray gun in twenty years at least, so I went with that. I ended rushing back to the store to buy two more quarts and used just about all of it. Also, I had assumed regular paint thinner would be suitable for cleaning the spray gun, but it turned out the paint requires lacquer thinner to clean up. Yikes. That would have been good to know before I started painting. Then while applying the second coat of base color, both a run and a sag formed on the right side of the cabinet. Fortunately lacquer dries rather quickly, so I was able to use 1000 grit wet sand paper to cut the ridges off both and smooth them out completely. Finally after a great deal of panic and frustration the clear coat went on without a hitch. The whole process lasted from about noon to eight thirty in the evening. There are some dust particles settled into the clear coat, but once completely dry they will polish out. Tomorrow morning the paint will have cured enough to handle, so I'll post some photos of the painted parts then. I could've taken pictures last night, but it was the end of a very long and frustrating day. I just plain forgot until I was already on the road home.
| ||
|
Post# 1130324 , Reply# 44 10/4/2021 at 09:45 (928 days old) by d-jones (Western Pennsylvania (Pittsburgh Area)) |
||
|
As promised here are a couple of photos of the painted cabinet. It came out pretty well. Thankfully the only visible flaws are in the clear coat, so they will be sanded smooth with 1000 or 1500 grit wet sand paper and polished out, making them disappear completely. That's one of the things I really like about base coat clear coat systems. Mistakes are much easier to correct. Now I need to get the base plate painted. | ||
| Post# 1130344 , Reply# 45 10/4/2021 at 11:59 (928 days old) by Repairguy (Danbury, Texas) | ||
|
| ||
|
Post# 1130350 , Reply# 46 10/4/2021 at 12:29 (928 days old) by d-jones (Western Pennsylvania (Pittsburgh Area)) |
||
|
Thanks, Melvin! I'm pretty happy with the way it turned out so far. With any luck I'll be able to complete the polishing without screwing it up. Now I have another problem that finally needs to be dealt with. I can't get the darn agitator to let go. It seems to be completely stuck. Dan tells me it's a rare one, so I'm trying to be extremely careful with it. I've looked for an Agi-Tamer, but those seem to have disappeared from the marketplace. I really need to get it out so I can go through the transmission, but until then I'm about as stuck as the agitator is. | ||
|
Post# 1130371 , Reply# 48 10/4/2021 at 16:53 (928 days old) by d-jones (Western Pennsylvania (Pittsburgh Area)) |
||
|
One last picture I forgot to include the little doghouse in the photos. This had a large sag in the paint along to top near the front edge. I was able to cut the ridge off it by wet sanding and then polish it out. No trace is left.
Ken - Thanks for the tip on agitator removal. At this point any ideas are helpful.
View Full Size
| ||
|
Post# 1130379 , Reply# 49 10/4/2021 at 17:57 (928 days old) by Ultramatic (New York City) |
||
|
| ||
|
Post# 1130397 , Reply# 50 10/4/2021 at 20:19 (928 days old) by d-jones (Western Pennsylvania (Pittsburgh Area)) |
||
|
Thanks Louis | ||
| Post# 1130398 , Reply# 51 10/4/2021 at 20:21 (928 days old) by eurekastar (Amarillo, Texas) | ||
|
| ||
| Post# 1130403 , Reply# 52 10/4/2021 at 20:40 (928 days old) by qsd-dan (West) | ||
|
These early Powerfins used the older style metal drive block inside agitator that rusts overtime and binds itself to the agitator shaft if not removed frequently and lubed. They're an absolute bastard to get off, if it can be done at all. My early '67 806 with original 8 vane is giving me the same hell. I may end up drilling a small hole down the center of the of the agitator and try feeding some penetrating oil to the shaft, hoping for the best. I just don't feel comfortable with A: Drilling a hole and guessing where the drive block ends and the agitator shaft begins and B: Permanently sealing the hole in the agitator without water intrusion problem in the long-term, if not short-term future. | ||
|
Post# 1130406 , Reply# 53 10/4/2021 at 21:32 (928 days old) by LowEfficiency (Iowa) |
||
|
>> Then while applying the second coat of base color, both a run and a sag formed on the right side of the >> cabinet. Fortunately lacquer dries rather quickly, so I was able to use 1000 grit wet sand paper to cut >> the ridges off both and smooth them out completely. For the future, there's a neat little tool called a "Run Razor" that the automotive painting supply places sell that could have helped here. It's a little plastic piece, which holds a razor blade at an angle. A screw can be turned to flex the center of the blade downward, very precisely, to just barely skim the surface of the paint. It works great to plane down runs without cutting below the surface or creating local depressions when sanding out high spots. | ||
|
Post# 1130409 , Reply# 54 10/4/2021 at 22:18 (928 days old) by d-jones (Western Pennsylvania (Pittsburgh Area)) |
||
|
| ||
|
Post# 1130411 , Reply# 55 10/4/2021 at 22:43 (928 days old) by combo52 (50 Year Repair Tech Beltsville,Md) |
||
Stuck Maytag Agitator Hi David, your paint job looks great, your restoration reminds me of some of the restored cars I have seen that are actually better than factory build quality when done .
If you end up breaking the agitator out I have an extra original one like your machine has that you can have since you are doing such a terrific restoration and trying to see it original.
John L. | ||
|
Post# 1130416 , Reply# 56 10/5/2021 at 00:43 (928 days old) by D-jones (Western Pennsylvania (Pittsburgh Area)) |
||
|
| ||
|
Post# 1130455 , Reply# 57 10/5/2021 at 13:43 (927 days old) by d-jones (Western Pennsylvania (Pittsburgh Area)) |
||
|
The base plate has finally been painted, and that's the last of the big painting projects for this washer. All that's left now are a few random small parts to be done with a spray can. I'm relieved to have this behind me to say the least.
View Full Size
| ||
|
Post# 1130463 , Reply# 58 10/5/2021 at 15:26 (927 days old) by Ultramatic (New York City) |
||
|
| ||
|
Post# 1130464 , Reply# 59 10/5/2021 at 15:38 (927 days old) by d-jones (Western Pennsylvania (Pittsburgh Area)) |
||
|
"Wow. It's going to be better than new!" | ||
|
Post# 1131025 , Reply# 60 10/12/2021 at 15:27 (920 days old) by d-jones (Western Pennsylvania (Pittsburgh Area)) |
||
|
Anyone that's been following this thread is aware that progress has been blocked by a stuck agitator. I was unaware of the metal drive block issue until Dan mentioned it, and since then I've been trying to think of some way to remove the agitator that doesn't involve its destruction. John made an extremely generous offer of one he has if I should end up trashing mine, but I'm determined to make a serious attempt at removing it undamaged before I take him up on it. To that end I've come up with this idea seen below. I can't simply pull up from the bottom flange as it will just flex until it buckles or breaks. That leaves the barrel. Its inner diameter is almost exactly three inches, so I'm thinking when a three inch diameter rubber expansion plug is tightened up inside the barrel it should expand enough to get a really good grip on it. When coupled with a slide hammer I might then be able to tap it loose. That way the load applied by the hammer will transfer directly to the drive block with little room for flex. Dan's idea of drilling a hole in the top center to add some penetrating oil seems pretty solid to me, so if it still won't let go I may do that as well to help things along. Unfortunately I'm heading out of town for a couple weeks and won't be able to try this out until I get back. In the mean time, maybe Dan is willing to try it out on his and let us know how it goes.
View Full Size
| ||
|
Post# 1131034 , Reply# 61 10/12/2021 at 19:12 (920 days old) by kenwashesmonday (Carlstadt, NJ) |
||
|
I wish I took a picture of it 16 years ago, but I threaded clothes line up and down through the middle of the agitator, with the lint filter removed, and attached the web to the slide hammer. I don't think your expanding plug it going to do it. | ||
|
Post# 1131040 , Reply# 62 10/12/2021 at 22:36 (920 days old) by d-jones (Western Pennsylvania (Pittsburgh Area)) |
||
|
I don't think your expanding plug it going to do it.
You may prove right, but I'm going to try it anyways. In the aircraft industry we use expanding rubber plugs to block off the wing tank vents so that we can pressurize the tank and perform leak checks. Once installed and tightened up so that the rubber is properly expanded you couldn't pull the darn things out if your life depended on it, so I'm still hopeful. Whether it works or fails I'll post the results here. The problem in this case is I'm not up against a hardened rubber stop ring, it's a rusted metal drive block that's causing the trouble, so I'm concerned about wrapping anything around the thin support flanges that could damage them.
| ||
|
Post# 1131041 , Reply# 63 10/13/2021 at 07:34 (920 days old) by combo52 (50 Year Repair Tech Beltsville,Md) |
||
|
Removing A Stuck MT Agitator | ||
|
Post# 1131042 , Reply# 64 10/13/2021 at 07:42 (920 days old) by d-jones (Western Pennsylvania (Pittsburgh Area)) |
||
|
Thanks, John! | ||
|
Post# 1131045 , Reply# 65 10/13/2021 at 08:07 (920 days old) by swestoyz (Cedar Falls, IA) |
||
|
Not that I am a betting man, but if I were to throw a wager out, regardless of the pulling method, my best bet would say that the agitator would pull up off the spline leaving that drat thing on the transmission shaft, rather than it coming off intact with the spline remaining in the agitator.
I've encountered this many times, albeit more on the Bakelite agitators than the poly, but I too have pulled an early poly agitator right off the spline. And when that happens it's time to get the Dremel out and often the shaft is toast. The rust bond between the pot metal spline and the steel shaft is almost always too strong to slip it off. The methods of folks using massive amounts of heat/rope/etc. seem to be more successful on the integral spline agitators (made after Nov 1967). Good luck to you in your quest! The restoration efforts you've put into this machine have been a flawless example of perfection. Ben | ||
|
Post# 1131052 , Reply# 66 10/13/2021 at 12:14 (919 days old) by robbinsandmyers (Conn) |
||
 | ||
|
Post# 1132676 , Reply# 67 11/4/2021 at 13:15 (897 days old) by d-jones (Western Pennsylvania (Pittsburgh Area)) |
||
|
Good news and bad news The good news is the expandable plug worked like a champ. The first photo shows my complete set up. For the slide hammer I used a rather large and heavy cast socket. Unfortunately, as I tightened up the expanding plug I went too far and blew out the the plastic barrel towards the top where I initially placed it. The damage is seen in the last photo. Trust me when I say this made me feel like an absolute blithering idiot. I believe there are adhesives specifically made for this type of plastic. If so I'll try to repair it. The break is pretty clean and closes up really tight, so I'm hopeful. It's also in an area that's under no stress during use so hopefully once a repair is made it'll last.
Photo 2 - The plug is installed down towards the bottom of the barrel (where it should have been in the first place) and nicely snugged up. Learn from my mistake and don't over tighten. As the rubber plug expands the outward pressure it exerts can be enormous.
Photo 3 - The rest of the assembly is attached. At this point about a half dozen medium blows with the socket popped the agitator off clean. In fact, once it was correctly placed and installed this otherwise immovable agitator was easily removed. This method is well worth considering for anyone else dealing with this problem as long as you don't over tighten the darn plug.
Photo 4 - As for the agitator shaft, I think many of us have seen far worse posted on this site. Now I can finally get on with the rest of the overhaul.
Photo 5 - The damage. Again, I'm really embarrassed by this totally preventable situation. I should have been more cautious as I tightened up that plug. | ||
|
Post# 1132680 , Reply# 68 11/4/2021 at 14:09 (897 days old) by swestoyz (Cedar Falls, IA) |
||
|
| ||
|
Post# 1132751 , Reply# 69 11/5/2021 at 11:37 (896 days old) by d-jones (Western Pennsylvania (Pittsburgh Area)) |
||
|
The nut wouldn't budge yesterday, So I soaked it in Mouse Milk overnight. (photo 1) This morning it started moving with the second tap of the hammer and came off easily.
Photo 2 - The inside surface of the outer tub has a little bit of rust to deal with, but is in pretty good shape overall, especially when one considers the age of this machine.
Photo 3 - Ready for a good cleaning. I plan to leave the outer tub installed the way you see it until I finish cleaning it up. The little wheeled platform makes moving it around a breeze.
Photo 4 - Initial cleaning of the outer tub inner surface completed. Now the rust is clearly visible. It's being treated with a rust remover now. We'll have to wait and see how that goes.
Ben - I was pleasantly surprised by how well and easily that expandable plug and slide hammer idea worked as well, so no payout is necessary, LOL. Hopefully the idea will prove useful to others as well. This post was last edited 11/05/2021 at 14:01 | ||
|
Post# 1132815 , Reply# 70 11/6/2021 at 11:00 (895 days old) by robbinsandmyers (Conn) |
||
|
| ||
|
Post# 1132856 , Reply# 71 11/6/2021 at 21:36 (895 days old) by d-jones (Western Pennsylvania (Pittsburgh Area)) |
||
|
John | ||
|
Post# 1132868 , Reply# 72 11/7/2021 at 00:29 (895 days old) by robbinsandmyers (Conn) |
||
|
| ||
|
Post# 1132890 , Reply# 73 11/7/2021 at 10:29 (894 days old) by D-jones (Western Pennsylvania (Pittsburgh Area)) |
||
|
| ||
|
Post# 1135139 , Reply# 74 12/2/2021 at 23:37 (869 days old) by d-jones (Western Pennsylvania (Pittsburgh Area)) |
||
|
A bit more progress to report.
Photo 1. With the transmission now finally separated from the tub, I made this little stand to hold it upright so I could work on it.
Photo 2. It took some effort, but the transmission halves were separated giving me my first look at the inner workings. The oil was really thick and sticky, so I placed the lower half in a large funnel atop a waste oil drum and let it sit for several hours to drain. Photo 3. The oil is drained and it�s had an initial cleaning. The condition of the nylon gear surprised me. It�s covered in cracks and looks as though it was on the verge of failing. Photo 4. A better view of the nylon gear. Based on this I�m now a bit concerned about the nylon gears in my other machines. Can anyone tell me if this cracking is unusual or rare? Photo 5. Disassembled and cleaned up. I�m waiting for a few more parts to arrive so I can put it all back together. | ||
| Post# 1135140 , Reply# 75 12/2/2021 at 23:46 (869 days old) by qsd-dan (West) | ||
|
Can anyone tell me if this cracking is unusual or rare?
| ||
|
Post# 1135141 , Reply# 76 12/2/2021 at 23:51 (869 days old) by d-jones (Western Pennsylvania (Pittsburgh Area)) |
||
|
Dan
Now that all the old sticky oil has been removed it rotates rather freely with no slop. At least it seems that way to me. Granted, I have no prior experience with these things so nothing to compare it to. I still haven�t removed the agitator shaft from the upper half of the transmission, so I can�t comment on the physical condition of those bearings either.
| ||
|
Post# 1135429 , Reply# 77 12/6/2021 at 07:02 (866 days old) by combo52 (50 Year Repair Tech Beltsville,Md) |
||
|
MT Transmission Rebuild Good progress David, Its looks like there was some water in this transmission from the rust on top of the gears, it would be ideal to find a better top half for this transmission rebuild to find one that never had any water in the agitate shaft area.
It is interesting that these nylon pinion gears are failing with time, back in time even through the 80s we never saw one of these gears fail, but all things [ especially plastic ] will fail in time and while all appliance makers have troubles with plastic and rubber parts deteriorating Maytag was particularly bad when it came to their quality of plastics and rubber parts.
John L. | ||
|
Post# 1137752 , Reply# 78 12/29/2021 at 12:05 (842 days old) by LowEfficiency (Iowa) |
||
|
>> Photo 4. A better view of the nylon gear. Based on this I�m now a bit concerned about the nylon gears in my other machines.
If it helps, I would think that the nylon gear should cause limited damage if it failed? There wouldn't be any metal debris floating around. If the nylon gear put up a fight (say a tooth sheared but the hub remained intact and pinned to the splines), it's at worst going to lock up when the comparatively soft nylon bits lodge between other gears or what is left of the nylon pinion. If it failed completely (gear split away from the splines, or teeth sheared and were ejected), it could end up just free-spinning. I'm not saying there is no risk - just that it may not be worth worrying about (aka, going through the whole disassembly/replacement process) if the transmission is otherwise working fine. This is all just speculation of course - it's hard to predict failure modes for long-life parts that don't fail often... | ||
| Post# 1137767 , Reply# 79 12/29/2021 at 13:35 (842 days old) by Volvoguy87 (Cincinnati, OH) | ||
This is impressive! | ||
|
Post# 1137781 , Reply# 80 12/29/2021 at 15:50 (842 days old) by maranoman (Des Moines, Iowa) |
||
Can anyone tell me if this cracking is unusual or rare?
Over the past week, I worked on 4 Maytag transmissions. I cracked them open, drained the oil, disassembled the interior parts and cleaned them, replaced the lower shaft o-rings, and reassembled after filling with new gear oil. I also filled the slightly pitted agitator shafts with JB Weld, sanded them and coated them with marine epoxy paint (from KBS Coatings.)
I inspected the nylon gears closely but did not see any cracking on any of them. These transmissions came from a variety of 06 through 12 series machines. | ||
| Post# 1137789 , Reply# 81 12/29/2021 at 16:40 (842 days old) by Good-Shepherd (New Jersey) | ||
|
after filling with new gear oil What gear oil are you using? | ||
|
Post# 1137868 , Reply# 82 12/30/2021 at 15:01 (841 days old) by d-jones (Western Pennsylvania (Pittsburgh Area)) |
||
|
A bit more to add. First, thanks for the compliments and the encouragement. It's been slow going lately due to things that are quite stuck and uncooperative. I want to do this right, and after breaking my agitator I figured I'd better slow down some and be a bit more cautious. Your comments and advice have been very helpful. With that in mind I have a few more pictures for you.
Photo 1. This is how the damper and tub supports looked once removed. I initially thought the damper wash shot, but thanks to advice from Joseph (Hobbyapocalypes) I decided to try cleaning it up.
Photo 2. The damper and other parts after bead blasting to remove corrosion.
photo 3. The inner surface of the damper was then polished up using a small high speed buffing wheel and compound. It came out much better than I thought it would and will be reinstalled.
I'm still wrestling with the drive gear on the agitator shaft. I have a new shaft that I'd like to use on this machine, or at the very least send the old one out for plating, but so far I've been unable to get the groove pin out that holds the drive gear in place and I'm afraid of breaking something. I've been thinking of drilling into the end of the pin to hollow it out a bit, but that could risk damaging the other parts if I'm off by even a small amount. Any thoughts? | ||
| Post# 1137896 , Reply# 83 12/30/2021 at 19:01 (841 days old) by Good-Shepherd (New Jersey) | ||
|
Any thoughts? Have the pin pressed out by a machine shop or if you want to DIY I'd apply some heat with a torch first. Probably thats how the pin was installed at the factory. | ||
|
Post# 1137936 , Reply# 84 12/31/2021 at 01:59 (841 days old) by neptunebob (Pittsburgh, PA) |
||
Should I try to save a Maytag> My sister the dentist has a DC Maytag that I talked her into buying 30 years ago. The best washer she had, but her Maytag repairman has retired. Now it is making a roaring noise on spin. Her laundry room is up a hill and steps and hard to get to, but I could get it out of there if the washer could be restored. Should I try to save it? Kind of have to make a decision, as she has to do laundry and I would have to tell if it should not be taken away. Thanks, Bob. | ||
| Post# 1137990 , Reply# 85 12/31/2021 at 17:05 (840 days old) by qsd-dan (West) | ||
|
| ||
| Post# 1137996 , Reply# 86 12/31/2021 at 17:59 (840 days old) by Steveo (Chagrin Falls, OH) | ||
|
David, great work so far!! Thank you for sharing with us! Awaiting the finished product...I know it'll be fantastic! | ||
|
Post# 1158358 , Reply# 87 8/31/2022 at 22:22 (597 days old) by d-jones (Western Pennsylvania (Pittsburgh Area)) |
||
|
Long overdue update
I tried repeatedly to get the groove pin out of the steel pinion gear and failed, so a machine shop finally removed it for me. That was last week. Today I picked up a new agitator shaft and steel pinion gear, and just placed an order for four groove pins from an outfit that had them in stock. I saw a post by qsd-dan in another thread regarding potential problems for new agitator shafts in old bearings, so there may be an issue there. We'll see. The same shop that had the agitator shaft today also had a new old stock Mallory timer for this machine, which based on the physical evidence was the original timer it had, so that was a huge pleasant surprise. Anyways, it's not much but it is progress. More soon, I hope.
| ||
| Post# 1158423 , Reply# 88 9/1/2022 at 13:09 (596 days old) by qsd-dan (West) | ||
|
| ||
| Post# 1158425 , Reply# 89 9/1/2022 at 13:16 (596 days old) by qsd-dan (West) | ||
|
| ||
|
Post# 1158426 , Reply# 90 9/1/2022 at 13:16 (596 days old) by d-jones (Western Pennsylvania (Pittsburgh Area)) |
||
|
Dan
Very interesting that it�s the older style lint filter screen with the later style plastic top instead of stainless. How is that even possible? As for the groove pin, I found a company that said they had ten in stock. I ordered four. I�ll let you know when they show up. I spoke to the machinist today and took the new pinion gear and shaft to him. Because of your warning that I read elsewhere on the blog I had him check the fit of the new shaft against the old bearings. He feels the top bearing gives the shaft a little too much play, so he�s going to machine a new one and install it.
This post was last edited 09/01/2022 at 13:59 | ||
| Post# 1158438 , Reply# 91 9/1/2022 at 14:16 (596 days old) by qsd-dan (West) | ||
|
I never saw one of these older filters without the chrome ring. I'm guessing the glue came off at some point or it was purposely removed.
Glad you found some of those grove pins, they're so difficult to find now. I came across some while cleaning and organizing a few weeks back, that's why I asked. Were you able to find a new pinion gear? | ||
|
Post# 1158442 , Reply# 92 9/1/2022 at 14:38 (596 days old) by d-jones (Western Pennsylvania (Pittsburgh Area)) |
||
|
New Pinion Gear
I found several of them. Fortunately I only need one......for now. The new gear is a little different from the one that came off in that it's cut like a gear from end to end having no smaller diameter smooth portion where the groove pin goes. Probably just a simplification to reduce cost. Another thing I have a question about is the o-ring seal (part number 210690). Per the parts manual and the service manual that o-ring sits beneath the shoulder on the agitator shaft and rests between a chamfer on the center plate bushing and the collar on the shaft. I see no evidence of a chamfer on the center plate bushing and no o-ring was present when disassembled. If the o-ring broke and went away would that steel shoulder on the agitator shaft be able to wear through the chamfer on that bushing?
This post was last edited 09/01/2022 at 16:11 | ||
|
Post# 1158467 , Reply# 93 9/1/2022 at 18:55 (596 days old) by combo52 (50 Year Repair Tech Beltsville,Md) |
||
|
Early 06 MT Lint Filters | ||
|
Post# 1158471 , Reply# 94 9/1/2022 at 19:05 (596 days old) by d-jones (Western Pennsylvania (Pittsburgh Area)) |
||
|
| ||
|
Post# 1158551 , Reply# 95 9/3/2022 at 00:44 (595 days old) by d-jones (Western Pennsylvania (Pittsburgh Area)) |
||
|
Does no one have an answer to the question in reply 92? | ||
| Post# 1158562 , Reply# 96 9/3/2022 at 08:43 (595 days old) by qsd-dan (West) | ||
|
| ||
|
Post# 1158576 , Reply# 97 9/3/2022 at 14:04 (594 days old) by d-jones (Western Pennsylvania (Pittsburgh Area)) |
||
|
That's odd
It's clearly described in my manual for the earlier models, like the A700 and A702. It's also listed in the A806 parts manual for series 00. Isn't series 00 the earliest variant?
View Full Size
| ||
|
Post# 1158581 , Reply# 98 9/3/2022 at 15:37 (594 days old) by LowEfficiency (Iowa) |
||
|
>> I tried repeatedly to get the groove pin out of the steel pinion gear and >> failed, so a machine shop finally removed it for me. They are just as difficult to get back in as well. When we rebuilt the transmission for our A308, we had two "groov pins" on hand - and at that time, no others were available anywhere. The first pin actually mushroomed from the force when attempting to hammer it in, making it unusable. For the second one, we chucked it in a drill press and filed the diameter down before installation, and it was still a bear to install. | ||
|
Post# 1158582 , Reply# 99 9/3/2022 at 15:42 (594 days old) by D-jones (Western Pennsylvania (Pittsburgh Area)) |
||
|
Dave | ||
| Post# 1158663 , Reply# 100 9/4/2022 at 15:22 (593 days old) by qsd-dan (West) | ||
|
They are just as difficult to get back in as well.
The pre '75's are easy, just use a vice.
You can still use a vice on the post '74's full length gear but must use a sacrificial socket on the opposite side of the pin. Once the pin is close to flush, use a grade 8 bolt of the same size to push it further into the hole. You need a beefy vice to accomplish it though. I blew up a 70 year old smaller vice pushing the pin out. | ||
| Post# 1158668 , Reply# 101 9/4/2022 at 17:14 (593 days old) by Good-Shepherd (New Jersey) | ||
|
pin actually mushroomed from the force The gear should've first been heated with a propane torch,, thats likely how it was installed at the factory. Same way piston wrist pins are installed on connecting rods. | ||
|
Post# 1159559 , Reply# 102 9/14/2022 at 15:50 (583 days old) by d-jones (Western Pennsylvania (Pittsburgh Area)) |
||
|
Interesting idea, Douglas I'll bounce that off the machinist when he gets to that point. Right now he has all of the parts and will be machining a new upper agitator shaft bushing/bearing for the upper transmission housing. There was noticeable play there versus the lower one. Once the steel pinion gear was removed and he got the agitator shaft out a fair amount of corrosion was found between its two bearing journals. That corrosion had to be forced past the upper shaft bearing and may very well have done additional damage to it in the process. � As a side note, I have a question for anyone with knowledge on the subject. There was no wicking material between the two bearings in the upper housing. Is it worth installing some? If yes, what would be the best material to use? If no, what's the best lube to apply to those bearings upon reassembly to keep it going for another twenty years? I'll need to deal with this issue soon. This post was last edited 09/14/2022 at 19:42 | ||
|
Post# 1159620 , Reply# 103 9/15/2022 at 22:03 (582 days old) by combo52 (50 Year Repair Tech Beltsville,Md) |
||
|
Wicking between the agitator shaft bearings?
I have thought about this since I read your post the other day and can not decide whether it would help or not. On one hand it might keep the upper bearing better lubricated but on the other hand if just a few drops of moisture get past the top bearing and seal it might hold the moisture in that area and harm the shaft and bearing sooner.
When you look at the entire design of a MT helical drive transmission it is really amazing they worked as well as they did.
Having an oil seal at the bottom of the input shaft where metal dust will cause seal wear is never a good idea, then having no oil delivery to the top agitator shaft bearing and no vent in the transmission so any moisture can evaporate out.
While many other washer designs also had significant design problems as well this all really goes to show how low stressed a washers driveline is, you certainly could never design airplanes this crudely and have then stay in the air very long.
John L. | ||
| Post# 1159626 , Reply# 104 9/15/2022 at 23:28 (582 days old) by qsd-dan (West) | ||
|
Maytag installed a wicking pad between both sleeve bearings in the pre '66 washers. I have a couple of them somewhere, I'll see if I can find one and take a picture. I faintly remember their instructions recommending to clean them in solvent and re-lube with Maytag transmission oil during a rebuild.
You can see a picture in the following thread at Reply #21. www.automaticwasher.org/c... | ||
| Post# 1159627 , Reply# 105 9/15/2022 at 23:49 (582 days old) by qsd-dan (West) | ||
|
"Having an oil seal at the bottom of the input shaft where metal dust will cause seal wear is never a good idea"
If there's metal filings circulating through the transmission, a leaking lower o-ring seal will be the least of ones problems. "Then having no oil delivery to the top agitator shaft bearing" 🙄 Have you ever been inside one of these transmissions? There's an oil gallery drilled into the upper housing that lubes the upper sleeve bearing during the spin cycle. "And no vent in the transmission so any moisture can evaporate out." AMP models had a vent but they were deleted for the helical models. I don't think one is really needed though. Any water intrusion inside the transmission is from a bad stem/boot/A4298 seal. A vent isn't going to remedy that problem. | ||
|
Post# 1159649 , Reply# 106 9/16/2022 at 12:12 (581 days old) by d-jones (Western Pennsylvania (Pittsburgh Area)) |
||
|
Dan and John Thanks for your comments, though I notice both of you shied away from making a recommendation. The comment about the oil gallery raises a question in my mind. During the spin cycle, wouldn't the oil in the transmission be flung to the outer edges by centrifugal force, away from the agitator shaft and the oil gallery? Is this gallery small enough that capillary pull is drawing the oil up instead? The transmission is at the machine shop at the moment so I can't have a look at it, and I don't recall noticing the gallery before. But the mention of it is intriguing to say the least. If I were to install a wicking pad, what material would be most suited for it? I'm considering a bit of industrial wool felt. | ||
| Post# 1159659 , Reply# 107 9/16/2022 at 17:59 (581 days old) by qsd-dan (West) | ||
|
I don't recall noticing the gallery before.
Here's a picture of the upper housing from Brian's transmission rebuild thread with the oil gallery at the 12 o'clock position www.automaticwasher.org/c...
I'm not sure what the proper wicking material is but I recall the one Maytag sourced was very tightly wound and had an almost leather feel to it. I'll see if I can locate it out and reply with dimensions.
View Full Size
| ||
|
Post# 1160663 , Reply# 108 9/29/2022 at 21:20 (568 days old) by d-jones (Western Pennsylvania (Pittsburgh Area)) |
||
|
I got the upper half of the transmission back from the machine shop this afternoon, so I need to consider which oil to use in it. So far I'm considering the oil made by Maytag for these transmissions. It's still available but getting harder to find. Most likely the stuff I'm finding is new old stock. The other option is 75/90 Royal Purple synthetic gear oil. Dan mentioned using this in another thread and it's readily available. Any thoughts?
Another question - The machine shop used high tensile brass to make the new bearings. Based on the color of the old ones I suspect they're bronze. High tensile brass is frequently used for bushings/bearings, but if the originals are bronze I wonder if brass will hold up. | ||
| Post# 1160669 , Reply# 109 9/29/2022 at 22:25 (568 days old) by qsd-dan (West) | ||
|
| ||
| Forum Index: | 
| Other Forums: |

|

|

|

|

|

 Comes to the Rescue!


;)
;)
;)
;)
;)
;)
;)
;)
;)
;)
;)
;)
;)
;)
;)
;)
;)
;)
;)
;)
;)
;)