Thread Number: 87380  /  Tag: Ranges, Stoves, Ovens
New Find - 1958 GE Range
[Down to Last]

automaticwasher.org's exclusive eBay Watch:
scroll >>> for more items --- [As an eBay Partner, eBay may compensate automaticwasher.org if you make a purchase using any link to eBay on this page]
Post# 1119424   6/5/2021 at 20:45 (1,048 days old) by 114jwh (Vancouver)        

Hello folks

Thought I would share one of my latest finds. Its a GE Canadian version of the 1958 J304!

I believe this was actually sold as a 1959 in Canada based on the ad I found. I did locate some ads for an identical model in 1958 but there wasn't a window in the door.

Some of the differences I notice between the CAN and US model are the full width oven door (no chrome inside), the storage drawer is actually a warming drawer with the switch & lamp on the panel and of course, fuse box under the warming drawer.

It has its share of problems but cosmetically, its in really great shape after I spent hours and hours cleaning and fixing up the broken top control panel.

Here is a few pics


  Photos...       <              >      Photo 1 of 3         View Full Size


This post was last edited 06/06/2021 at 02:38


Post# 1119428 , Reply# 1   6/5/2021 at 21:00 (1,048 days old) by 114jwh (Vancouver)        

It had been sitting in a storage shed since it was decomissioned about 50 years ago. No meat probe or griddle unfortunately. It also appears the automatic calrod failed years ago and the sensor in the center of the burner was removed. I believe it was re-wired at that point as an on/off only burner using the inner/both coil switch

My plan is to replace the thermostat (picture attached) with an infinite switch so I can retain the slide control for that burner. I'm just trying to figure out a plan but the GE parts catalogue indicates to use WB21X156 infinite switch to accomplish this and a conversion kit which is long ago NLA.

One of the door springs and link is missing and the pull out broiler unit needs replacement. I believe you buy the element, reuse the reflector pan by drilling out the rivets on the mounts and using screws to mount the new one.

The clock needs a new telechron rotor, the existing one isn't able to be revived.

Two of the 6" burners are pretty warped and the spiders are broken so need a couple of those two.

More to come as I progress!


  Photos...       <              >      Photo 1 of 5         View Full Size
Post# 1119464 , Reply# 2   6/6/2021 at 07:28 (1,047 days old) by pulltostart (Mobile, AL)        
Beautiful Stove!

pulltostart's profile picture

Wow - looks great all cleaned up.  That console is definitely 1958 - in the US, but maybe not in Canada?  GE did some strange things with their Canadian products, the cabinet is a good example.  The US stove had a completely different cabinet and the oven door was not the complete 30" width of the stove.  Best of luck with finding the parts you need.  Please keep us posted with your progress.


lawrence


Post# 1119509 , Reply# 3   6/6/2021 at 16:15 (1,047 days old) by 114jwh (Vancouver)        

A few more pics. Yes very different cabinet from the ones I've seen on this site and making the storage drawer a warming drawer is quite different too.

Something also clearly happened with the broil element on this one!


  Photos...       <              >      Photo 1 of 4         View Full Size
Post# 1119585 , Reply# 4   6/7/2021 at 10:17 (1,046 days old) by firedome (Binghamton NY & Lake Champlain VT)        
1958 GE range...

firedome's profile picture
ww have the 40" version in canary yellow. These are great performing ranges and well worth the effort. Many parts are available but Auto Calrod parts are scarce and as it's is often a problem area conversion to standard operation is the usual answer.

Post# 1120143 , Reply# 5   6/13/2021 at 12:01 (1,040 days old) by 114jwh (Vancouver)        
Tilt-Lock Hi-Rise vs Standard 2 Coil Calrod Burners

Hey Everyone - question for the experts. Can the older GE standard two coil calrods be interchanged with the tilt-lock hi-rise 2 coil burners when replacing? The reason I ask is after reading some older posts about these, the standard burners don't have removable trim rings, making them much more difficult to clean. Tilt-locks seem more user friendly as the trim ring is removable.

The circumference seems to be the same size, the only differences I see is the tilt-locks sit a bit more proud of the cooktop than the standards which doesn't seem to be a bit deal but I'm not sure about the installation. Does the tilt-lock mechanism require a cooktop designed specifically to accommodate or will they install fine regardless of original setup?

The two right 6" burners on this stove have broken spiders and the old automatic calrod burner has a hole in the center where the sensor used to be so I have to replace these three anyway. Just trying to figure out what the best replacement would be. Of course, going with tilt-locks would require purchasing trim rings separately but thats OK.

Thanks in advance!


Post# 1124645 , Reply# 6   8/1/2021 at 11:26 (991 days old) by 114jwh (Vancouver)        
Replacing the Automatic Calrod

Update!

I'm in the process of replacing the Automatic Calrod (and all its components) with an infinite switch and I'm now at the stage I need to wire everything together. I'm using a two coil wire in burner which would be straightforward to wire up to this infinite switch if it wasn't for the coil selector switch and the griddle receptacle.

Normally, I would jump one end of the inner and outer coil together and connect this to H1 on the switch. The other end of each of the two coils (normally common when wired with a fixed heat switch) is already jumped together permanently and this connection goes to H2 on the switch.

However, I would like to retain both the inner coil only switch and the griddle receptacle and wondering if anyone has ideas on whether this is feasible with this setup and if so how to go about doing it.

As I understand it, the griddle receptacle is actually just a switch so that when the griddle is plugged in, both left burners are controlled by the switch for the left front.

Here is a picture I found online for the wiring diagram of a generic infinite switch to a two coil burner. 2nd picture is the actual wiring diagram for this range.


  Photos...       <              >      Photo 1 of 2         View Full Size
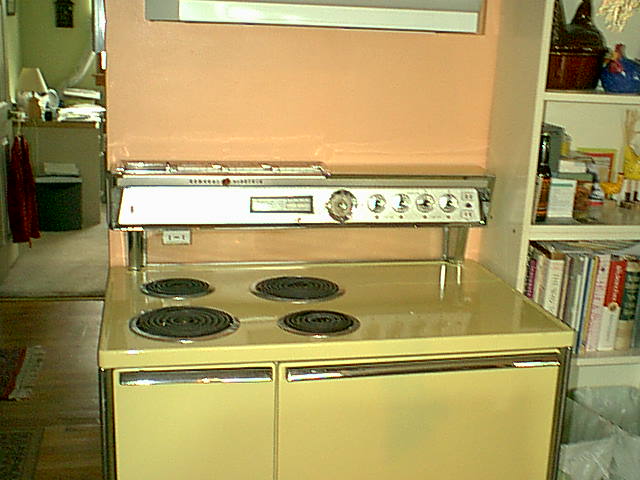
Post# 1124733 , Reply# 7   8/2/2021 at 07:03 (990 days old) by combo52 (50 Year Repair Tech Beltsville,Md)        
Vintage GE Surface Elements

combo52's profile picture

 Hi James, The GE Tilt-Lock and standard elements [ with trim rings attached ] are completely interchangeable, I got you message and Email and will try to look it over later today when time allows.


John L.


Post# 1128140 , Reply# 8   9/9/2021 at 02:03 (953 days old) by 114jwh (Vancouver)        
Progress and set back!

So I was able to successfully replace the broken NLA Automatic Calrod system with an infinite switch and a standard two coil Calrod 8" burner. I was not able to locate the conversion kit GE sold so you could use the existing slide control with the new infinite switch but I was able to make it work anyway with a bit of re-engineering of the nylon gear that connects the slide with the switch. Through this process was also able to retain the inner coil only switch and the grill receptacle functionality. So far works great!

I was also able to find a NOS broil element. With these you re-use the existing reflector pan by drilling out the rivets in the clips that hold the element in place. Then fasten the clips using screws/nuts to secure the new element on the old pan.

I also found a telechron rotor to replace the broken one and the clock now works great!

I replaced the broken burners as well with direct replacements as GE still sells these.

Also found a used plug in grill!


Post# 1128141 , Reply# 9   9/9/2021 at 02:25 (953 days old) by 114jwh (Vancouver)        
Now onto the setbacks....

So when I initially found this range and was cleaning things up I found a mouse skeleton in the back where the bake element wiring connects. I cleaned this up and didnt think much about it at the time.

I'm afraid however this little guy might have had a friend still in the recesses of the fiberglass insulation somewhere. When I powered up the oven for the first time there was a bit of a strange smell when things started heating up :( In addition, the oven light and panel light flicker a bit sporadically and I'm thinking that something may have chewed a wire somewhere in the range that isn't visible.

So to tackle this it looks like I'm going to have to pull out the oven liner. Not a job I'm looking forward to but seems like the only way I can access the hidden wiring and replace the insulation. It appears to me its just standard hardware store 2-3" thick fiberglass insulation surrounding the liner. Can anyone confirm if there is anything special about this insulation?

In addition, I will need to replace the contacts for the broil element receptacle. I pulled the old ones out from the ceramic block and they are badly corroded and pitted. I can hear them arcing once in awhile when the oven is on. Unfortunately these seem hard to come by - there is some on ebay but an outrageous price with shipping to Canada. Looks like Gemline part CB106 and GE part WB5X5002.

And still looking for a meat probe if anyone has any laying around or any leads.

Thats it for now. Thanks everyone!


Post# 1128160 , Reply# 10   9/9/2021 at 06:59 (952 days old) by spacepig (Floridas Emerald Coast)        
I wish I would have seen this post earlier.

spacepig's profile picture
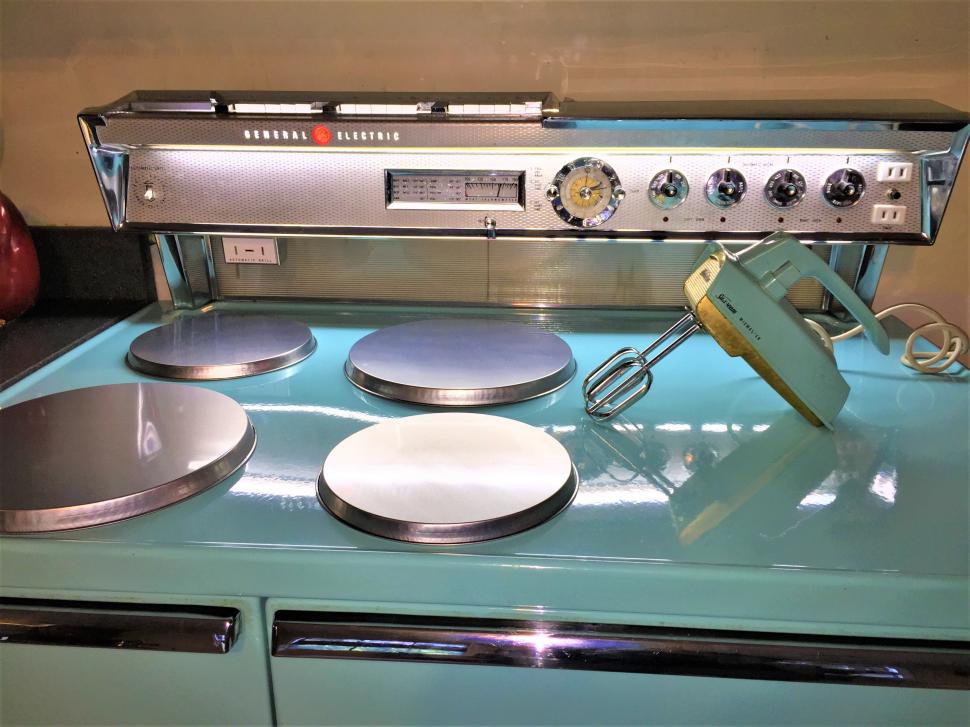
I have a '58 GE with the same problem of the automatic calrod burner not working and would have loved to have seen in progress pictures of your replacement. We were going to replace the calrod element with a regular one and replace the slide control with a set of buttons like the others. However, the last time we tried that we shorted something out and that scared us sufficiently to not try anything like that again without having some kind of guide. Would it possible to get pictures of how you have the infinite switch connected?

Post# 1128181 , Reply# 11   9/9/2021 at 10:52 (952 days old) by 114jwh (Vancouver)        

Hi Jeannine

I'll see if I took any pictures while I was doing this and post.

Basically I came up with three options in my head before deciding which way to go with replacing the automatic calrod system.

Option 1 is to pull out the inner coil switch on the panel and mount/wire the infinite switch there with an aftermarket control knob. This option would be the easiest but you'd be left with the slide control at the top that does nothing and no inner coil only control.

Option 2 is to obtain a push button switch and mount it in place of the slide control. This option is easy too but sourcing the pushbutton switch is difficult with the correct matching buttons and they seem to be expensive.

Option 3 was to re-engineer the slide control lever to use with the infinite switch. This is the best option aesthetically but more complicated however ultimately the route I went.

Gotta run but I'll post more later.


Post# 1128197 , Reply# 12   9/9/2021 at 17:09 (952 days old) by spacepig (Floridas Emerald Coast)        

spacepig's profile picture
James, thanks for the reply. In regards to the options you listed:

1--never thought of putting an infinite switch in place of the calrod switch. Having some use of the burner would be better than none, which is what we have now.

2--We do have a set of buttons which I'm assuming are correct and a regular burner for replacement. However, would have to come up with a way to mount the buttons to the panel, since the slide level piece attaches completely different. Honestly, other than finding a working automatic calrod burner, I thought this would be our only option.

3--Never considered doing this as I didn't think that would be an option. Would like to hear more about this one.

I've attached a picture of my lovely stove, Estelle.

Jeannine


  View Full Size
Post# 1128217 , Reply# 13   9/9/2021 at 20:11 (952 days old) by Ultramatic (New York City)        

ultramatic's profile picture


What a gorgeous stove! Congratulations!


Post# 1128234 , Reply# 14   9/9/2021 at 23:19 (952 days old) by 114jwh (Vancouver)        

Hi Jeannine

If you have the correct push button already (it should be the same as the ones used for the other burners), it would be really easy. Once you remove the AC components the pushbutton will mount directly with no modification. The holes are there in the correct place already to mount the pushbutton and you would simply wire it using your wiring diagram as a guide referencing the right side burners. The inner coil switch would become redundant because the push button already dictates which combination of coils should be energized to achieve the selected heat. So I would just leave it there unconnected to keep the space filled for aesthetic purposes.

With Option 3, you'll need to buy WB21X156 infinite switch. This was the GE recommendation to replace the system once the AC parts became NLA. Normally, you would also purchase an installation kit to allow you to use the slide control lever with this infinite switch with no fuss. Unfortunately this is nowhere to be found so I had to make do without it. The thing about the WB21X156 switch is it has the correct stem length and includes a bracket to mount it at the correct height for it to connect to the nylon gears that the slide lever moves. The tricky thing I had to overcome is the circular nylon gear attaches onto the old Hotpoint thermostat differently than the D shaped stem on the new infinite switch. I ended up cutting a small groove into the top of the gear across the existing round mounting hole. I cut the head off a small finishing nail and embedded it into the grove I cut to create the D shape necessary to fit the gear onto the D shaped shaft so it would turn the switch. I filled the groove with some epoxy and put a push nut on top to hold it onto the stem. I can give you some more instructions on this step if you decide to go this route but you may figure out a better idea than I did once you look at everything.

The grill receptacle is another matter. If you don't have the correct grill then things will be simple. If you do have the correct grill and want to retain the bridging feature between the two burners then this will add some steps to the wiring. Either way some wiring will also need to be modified on the left rear burner but it isn't complicated.

I used a standard GE WB30X354 two coil burner to replace the old AC burner.

I'm really sorry for being so wordy with this and hope it makes a little bit of sense.

The first picture is the before picture of the old AC system with the original Hotpoint thermostat. The second picture is of the new setup with the infinite switch and old gear mounted but not yet installed. Third pic is one of the push button switches.


  Photos...       <              >      Photo 1 of 3         View Full Size
Post# 1129097 , Reply# 15   9/19/2021 at 16:11 (942 days old) by 114jwh (Vancouver)        
GE Meat Probe

Hi Everyone - does anyone happen to have a spare meat probe / meat thermometer lying around they would be willing to sell me?

I found a picture of the original to show what it looks like but I think there were several variations over the years. I expect as long as they have the correct plug with the two terminals offset from each other they should be interchangeable? I actually suspect that GE didn't even make them - I think they were made by a separate company that supplied the same ones to several manufacturers. Feel free to correct me if I'm wrong on any of these points.

Thanks in advance to anyone that can help!


  View Full Size
Post# 1129099 , Reply# 16   9/19/2021 at 16:33 (942 days old) by luxflairguy (Wilmington NC)        

James! We need a better picture of the thermometer! We can't see the end that goes into the oven wall...it is one probe or two! Greg

Post# 1129103 , Reply# 17   9/19/2021 at 17:05 (942 days old) by 114jwh (Vancouver)        

Hi Greg - thanks for the reply. Here is a picture of what the receptacle looks like. The probe would have two little flat terminals / blades in an offset position from each other. I'll see if I can also find a better picture of what the plug end looks like.

  View Full Size
Post# 1129105 , Reply# 18   9/19/2021 at 17:20 (942 days old) by luxflairguy (Wilmington NC)        

Thanks! This will make it easier for members to diagnose!


Forum Index:       Other Forums:                      


Comes to the Rescue!

The Discuss-o-Mat has stopped, buzzer is sounding!!!
If you would like to reply to this thread please log-in...

Discuss-O-MAT Log-In


New Members
Click Here To Sign Up.


automaticwasher.org home
Discuss-o-Mat Forums
Vintage Brochures, Service and Owners Manuals
Fun Vintage Washer Ephemera
See It Wash!
Video Downloads
Audio Downloads
Picture of the Day
Patent of the Day
Photos of our Collections
The Old Aberdeen Farm
Vintage Service Manuals
Vintage washer/dryer/dishwasher to sell?
Technical/service questions?
Looking for Parts?
Website related questions?
Digital Millennium Copyright Act Policy
Our Privacy Policy