|
Thread Number: 9674
RCA Whirlpool matching washer/dryer set |
[Down to Last] |
Post# 178856 12/28/2006 at 18:50 (6,327 days old) by sudsmaster  (SF Bay Area, California) (SF Bay Area, California) |
||

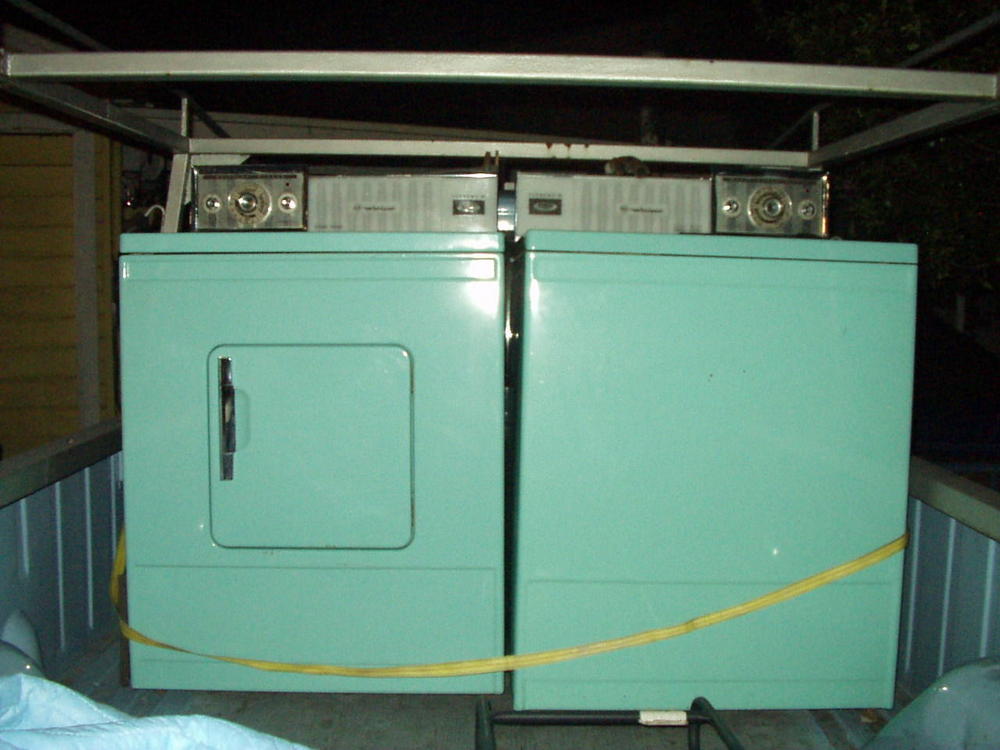
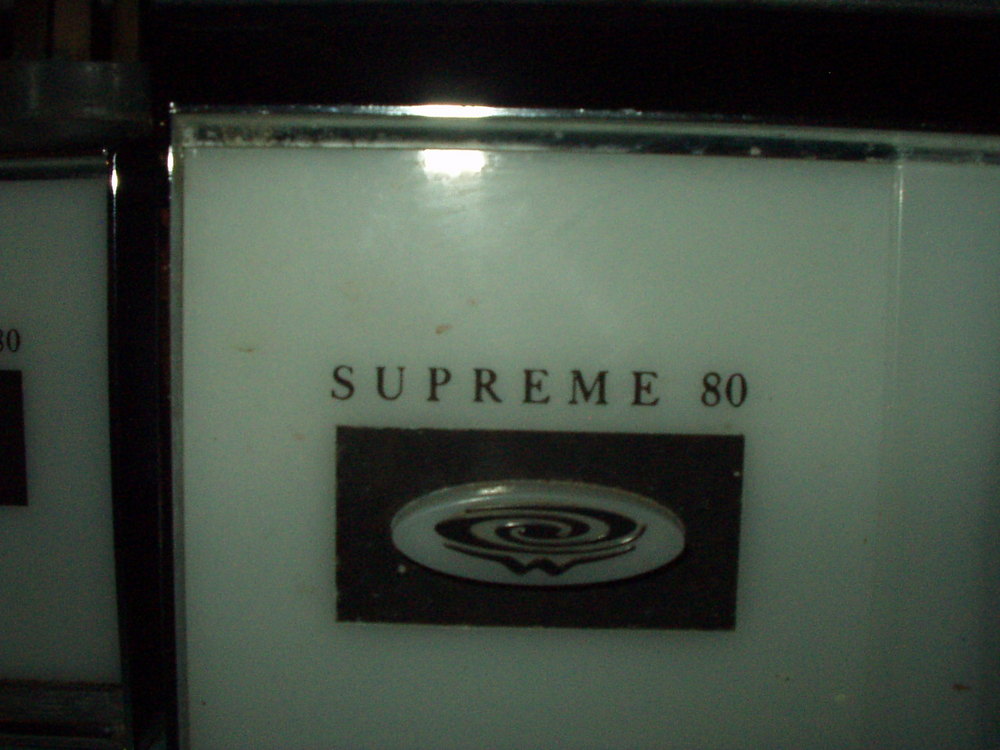
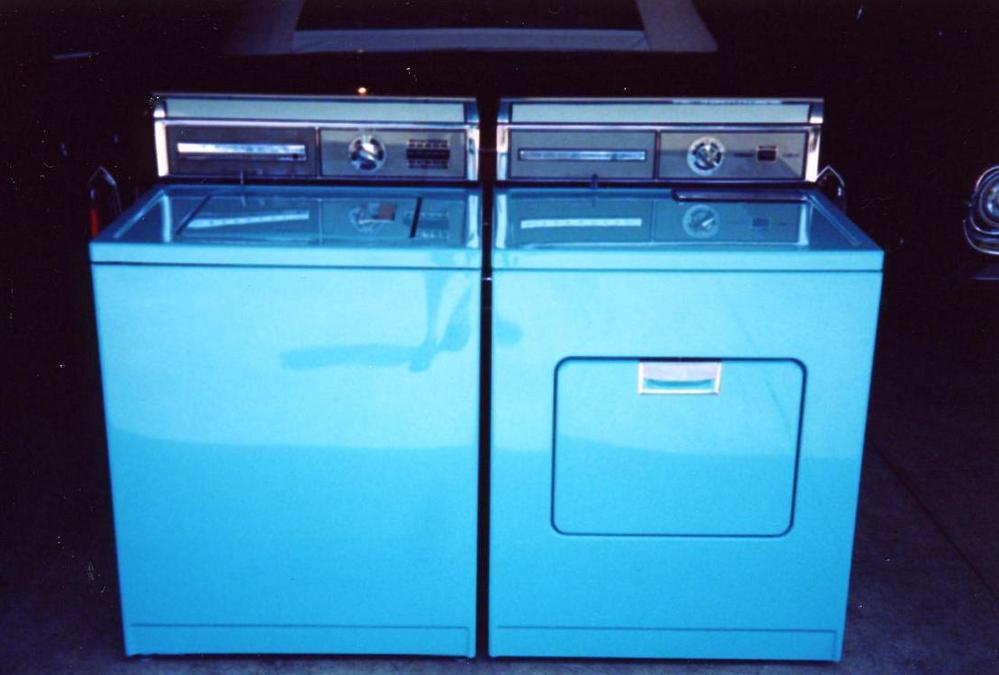
I'm going to look at a matching old RCA Whirlpool "Supreme" matching set tonite. Turquoise, with lighted control panels. Will post photos later after I see them. The design looks like it could be 60's or 70's, not sure when RCA divested itself of Whirlpool. I'm assuming the washer is a belt drive type, similar to the design they had until the direct drive shredmores of the 90's. I like that they are a matching set, in pretty good shape, with lighted panels. So far I have GE, Maytag, and Frigidaire (sort of modern front loader) in my growing collection, so this would certainly broaden it. Not so hot about turquoise, but since they're going on display in the workshop it won't be an issue. Anybody care to comment? | ||

|
|
Post# 178873 , Reply# 1 12/28/2006 at 19:10 (6,327 days old) by goatfarmer (South Bend, home of Champions) |
||
 | ||
|
Post# 178897 , Reply# 3 12/28/2006 at 20:22 (6,327 days old) by sudsmaster (SF Bay Area, California) |
||
|
I confess I prefer plain appliance white for vintage washers/stoves/fridges etc. Has a nice clean look, easier to touch up, goes with just about any other color, doesn't show dents or dust a readily, etc. Although I'd have to say that the old 60's Frigidaire washers looked pretty good in turquoise, maybe even better than in white. Any comments on the old Whirlpool washer mechanism of the 60's? | ||
|
Post# 178899 , Reply# 4 12/28/2006 at 20:30 (6,327 days old) by sudsmaster (SF Bay Area, California) |
||
|
| ||
|
Post# 178969 , Reply# 5 12/28/2006 at 23:48 (6,327 days old) by rapidry1000 (San Francisco) |
||
|
Turquoise Whirlpool This matching set is being advertised on Craigslist San Francisco. There is also another listing for a bottom of the line Kenmore washer probably from the mid 60's that is being offered for free in Petaluma about 40 minutes north of San Francisco. The Kenmore works. | ||
|
Post# 178989 , Reply# 6 12/29/2006 at 01:19 (6,327 days old) by sudsmaster (SF Bay Area, California) |
||
|
| ||
|
Post# 178994 , Reply# 7 12/29/2006 at 01:40 (6,327 days old) by sudsmaster (SF Bay Area, California) |
||
|
First photos | ||
|
Post# 178995 , Reply# 8 12/29/2006 at 01:44 (6,327 days old) by sudsmaster (SF Bay Area, California) |
||
|
| ||
|
Post# 178996 , Reply# 9 12/29/2006 at 01:47 (6,327 days old) by sudsmaster (SF Bay Area, California) |
||
|
| ||
|
Post# 178997 , Reply# 10 12/29/2006 at 01:49 (6,327 days old) by sudsmaster (SF Bay Area, California) |
||
|
| ||
|
Post# 178998 , Reply# 11 12/29/2006 at 01:50 (6,327 days old) by sudsmaster (SF Bay Area, California) |
||
|
| ||
|
Post# 178999 , Reply# 12 12/29/2006 at 01:52 (6,327 days old) by sudsmaster (SF Bay Area, California) |
||
|
| ||
|
Post# 179002 , Reply# 13 12/29/2006 at 01:54 (6,327 days old) by sudsmaster (SF Bay Area, California) |
||
|
| ||
|
Post# 179003 , Reply# 14 12/29/2006 at 02:00 (6,327 days old) by appnut (TX) |
||
|
| ||
|
Post# 179007 , Reply# 15 12/29/2006 at 02:06 (6,327 days old) by sudsmaster (SF Bay Area, California) |
||
|
Thanks, Bob! I'm completely exhausted. Truck got a flat on the way home (and that's the short version), so didn't get home until past 11 pm. This weekend I'll try plugging the washer in to see if it will run a full cycle (gotta go get some cold water Tide!!!) without dripping or spewing grease all over the neighborhood. I *think* I have a suitable 220 outlet in the workshop to plug the dryer into, but not completely sure at this point. If not the main house has one, but it would be a tight fit (and nowhere to send the exhaust except out the door). | ||
|
Post# 179008 , Reply# 16 12/29/2006 at 02:07 (6,327 days old) by appnut (TX) |
||
|
| ||
|
Post# 179009 , Reply# 17 12/29/2006 at 02:14 (6,327 days old) by sudsmaster (SF Bay Area, California) |
||
|
Hey Bob, no problem. I tried jacking up the truck twice with the silly little twirly jack that comes with a '78 Dodge D100 truck. It worked just fine, except it couldn't get the tire off the ground. Tried it twice. Then found a pay phone and called Triple-A and the seller. They showed up at the same time, AAA with a real jack and the seller with some water and cookies. LOL. I'm a little embarrassed about how I got the flat... I got lost in the city I grew up in (although I have never been real familiar with that area). I wound up making a U turn and ground a front tire against a high curb (I was hoping the wheel would climb the curb instead of grind it). Quite a few blocks later, still lost, the tire blew. With a cartoon classic POP! and then a "Peeeeeeeeuuuuuuuu!". Quite a night. But I made it home ok and now it's time for bed even though I'm too amped to sleep. | ||
|
Post# 179011 , Reply# 18 12/29/2006 at 02:15 (6,327 days old) by dadoes (TX,�U.S. of A.) |
||
|
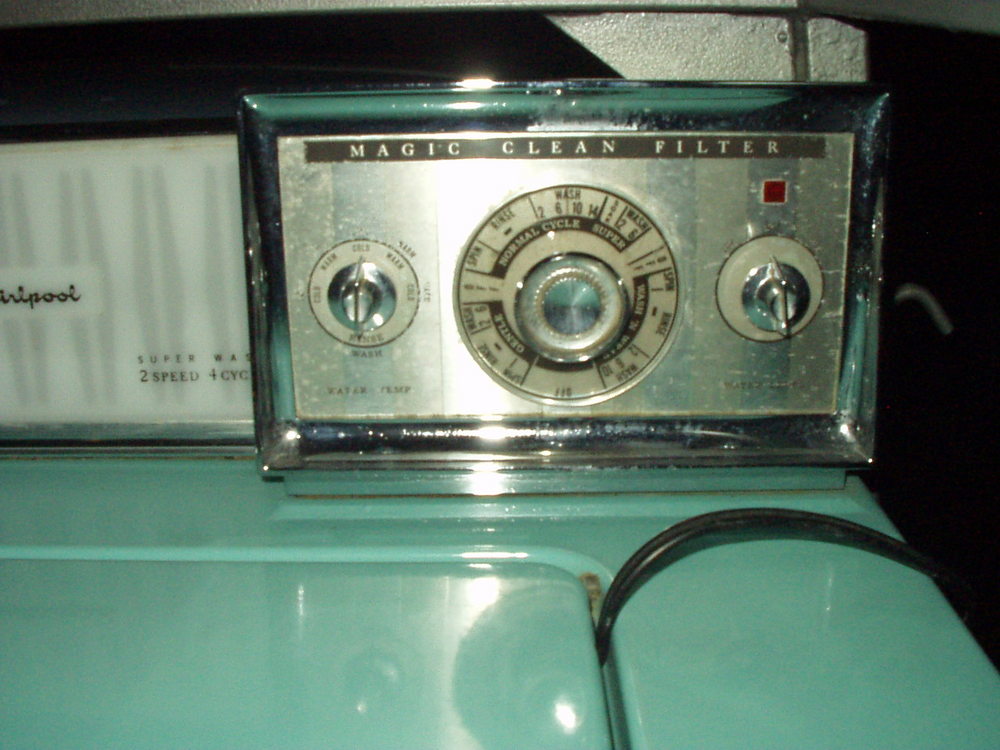
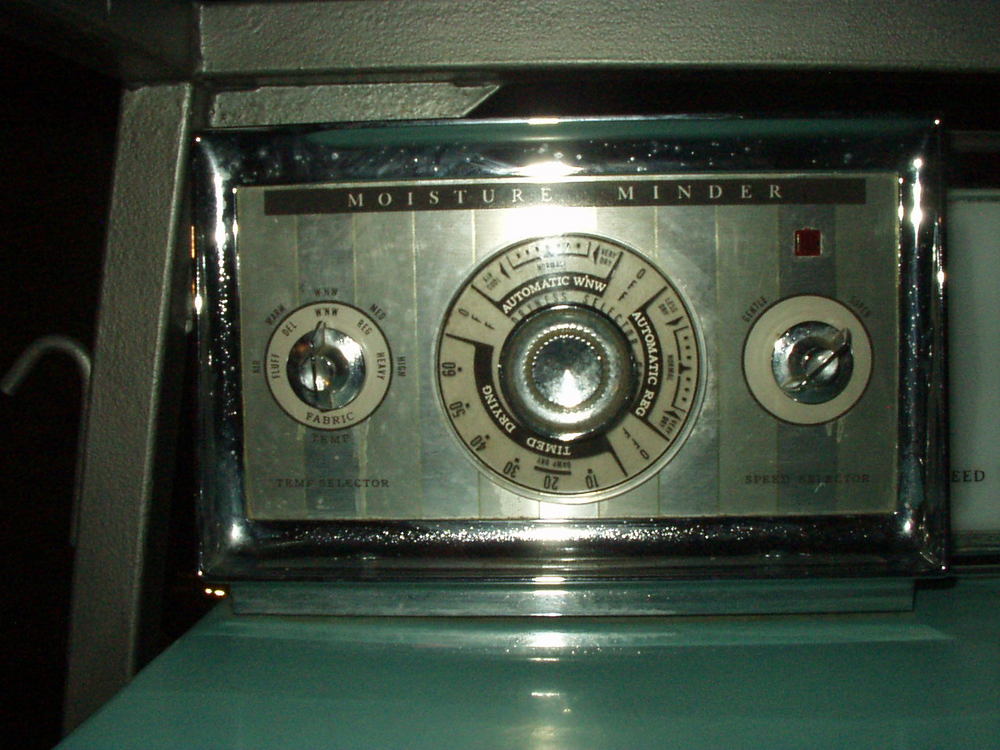
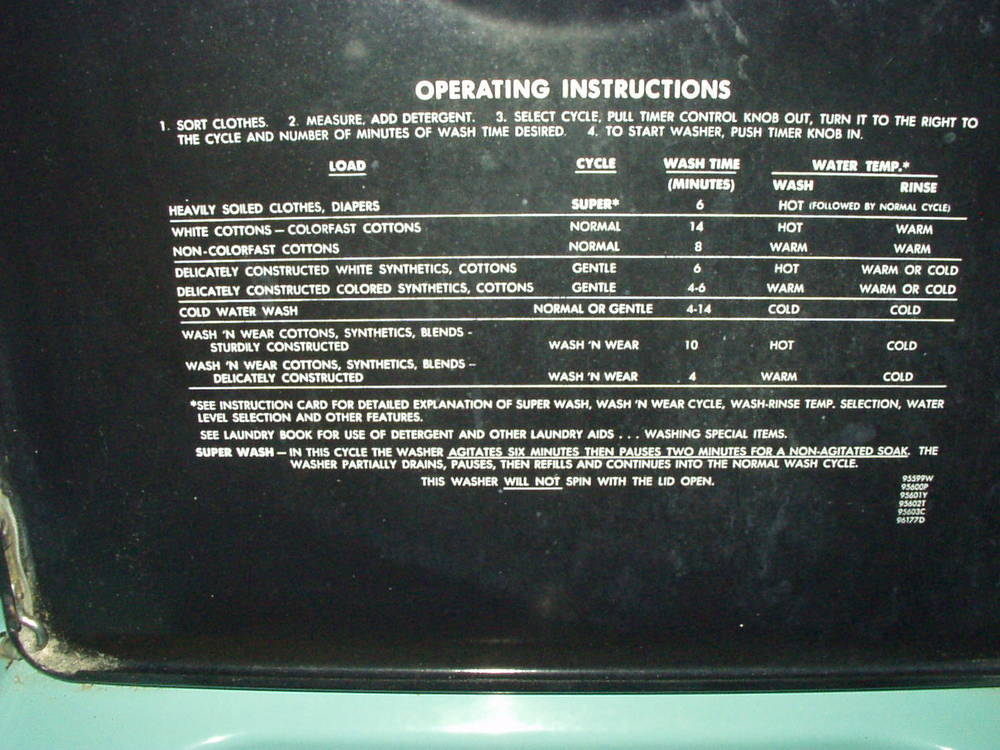
Kewl set! LPA/LPE/LPI is 1965-1966ish, I think. We had an LME-4600 dryer, bought in 1964. Two speeds on the dryer refers to airflow rate, not tumble speed. If it's a belt-drive blower design, the blower pulley is two speed with the belt being moved by a shift arm mechanically operated by a cable on the speed control. If it's the direct-drive blower design, airflow rate is controlled by a damper door in the exhaust system. I'm not sure if Whirlpool may also at some point in time have included a dual-stage heating element or gas burner as part of the two speed feature. Super Wash runs a 2, 4, or 6 minute prewash, a pause for two mins (one timer increment), a partial drain (until the pressure switch resets) with pause for remainder of the drain increment, then continues on through the Normal cycle. Usage instructions called for 1-1/2 to 2x detergent dosage for Super Wash. Imperial models of the time included Super Wash on Wash-n-Wear (later Perm Press) as well. Notice there's a larger "Off" section in front of W-n-W. The timer cams may include the sequence for Super Wash there, but it isn't electrically active. | ||
|
Post# 179012 , Reply# 19 12/29/2006 at 02:18 (6,327 days old) by sudsmaster (SF Bay Area, California) |
||
|
| ||
|
Post# 179013 , Reply# 20 12/29/2006 at 02:19 (6,327 days old) by dadoes (TX,�U.S. of A.) |
||
|
| ||
|
Post# 179014 , Reply# 21 12/29/2006 at 02:19 (6,327 days old) by sudsmaster (SF Bay Area, California) |
||
|
| ||
|
Post# 179016 , Reply# 22 12/29/2006 at 02:23 (6,327 days old) by appnut (TX) |
||
|
| ||
| Post# 179017 , Reply# 23 12/29/2006 at 02:25 (6,327 days old) by scott55405 () | ||
|
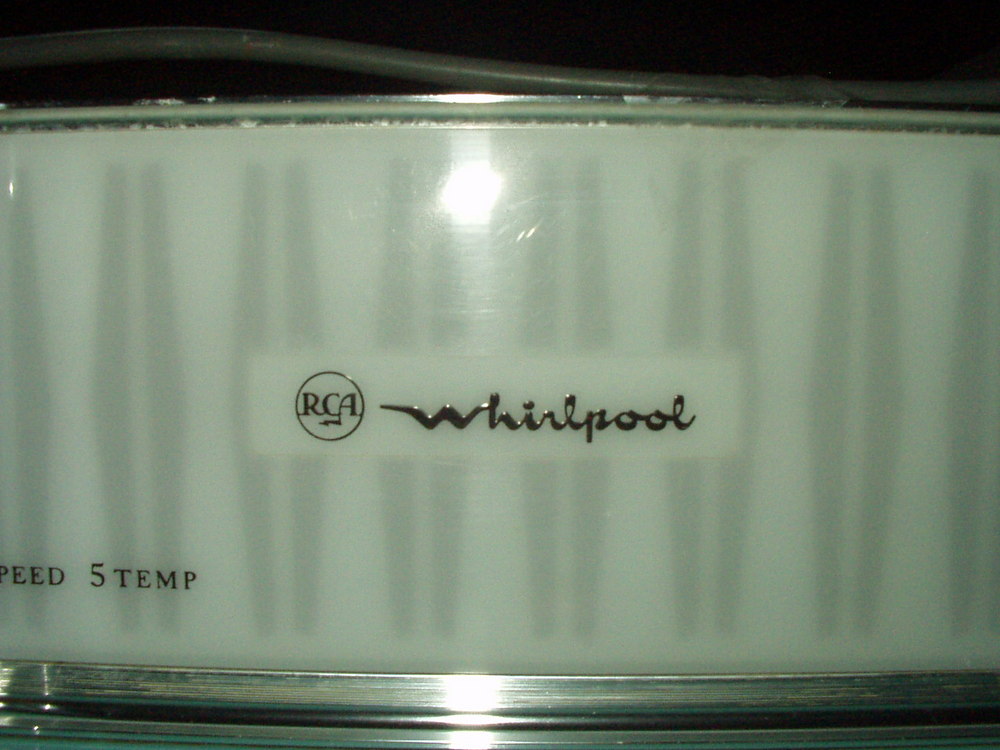
Very cool machines, what a wonderful find! I believe 1967 was the last year for "RCA Whirlpool." | ||
|
Post# 179018 , Reply# 24 12/29/2006 at 02:25 (6,327 days old) by dadoes (TX,�U.S. of A.) |
||
|
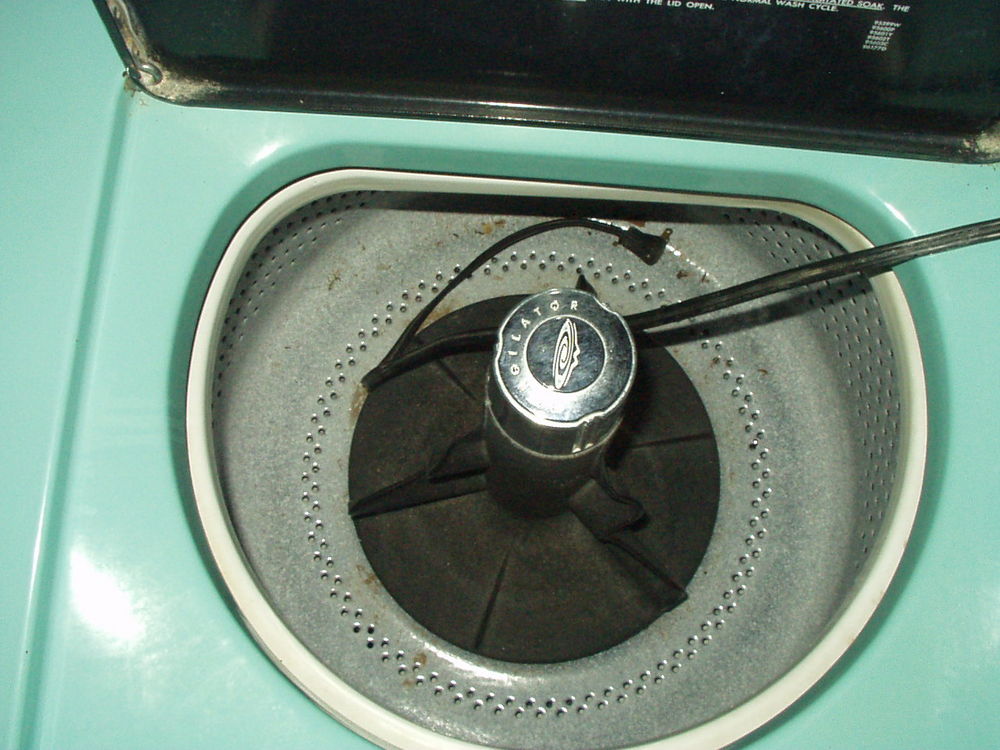
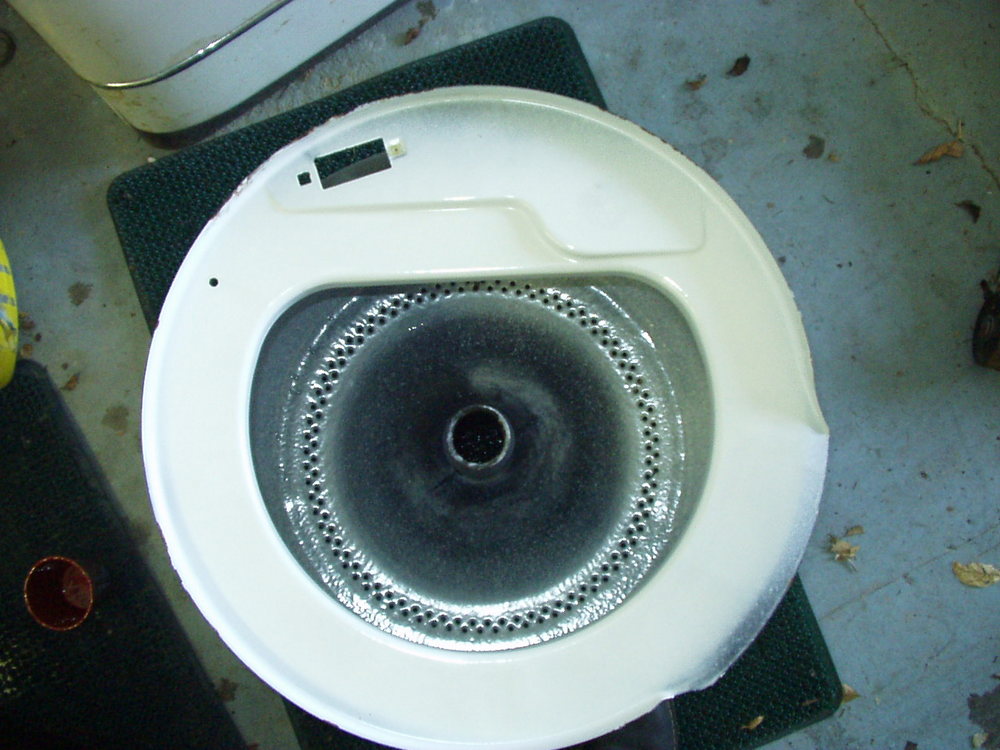
Magic Clean filter is the recirculating, self-cleaning lint filter. The red (neon?) light above the water level control is supposed to light up during wash and rinse agitation to indicate the filter is doing its thing. It back-flushes during drain to clear the collected lint. Look under the machine, this one may be a disc mounted at either the left or right rear corner.
| ||
|
Post# 179020 , Reply# 25 12/29/2006 at 02:29 (6,327 days old) by sudsmaster (SF Bay Area, California) |
||
|
| ||
|
Post# 179021 , Reply# 26 12/29/2006 at 02:31 (6,327 days old) by sudsmaster (SF Bay Area, California) |
||
|
| ||
|
Post# 179023 , Reply# 27 12/29/2006 at 02:45 (6,327 days old) by dadoes (TX,�U.S. of A.) |
||
|
| ||
|
Post# 179025 , Reply# 28 12/29/2006 at 02:58 (6,327 days old) by dadoes (TX,�U.S. of A.) |
||
|
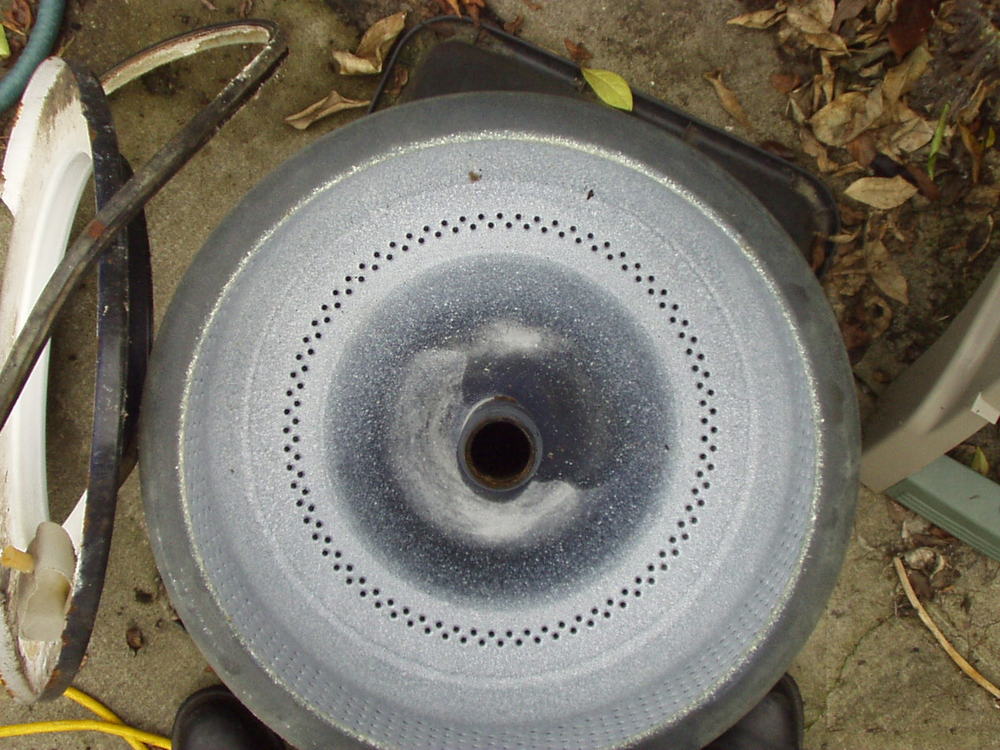
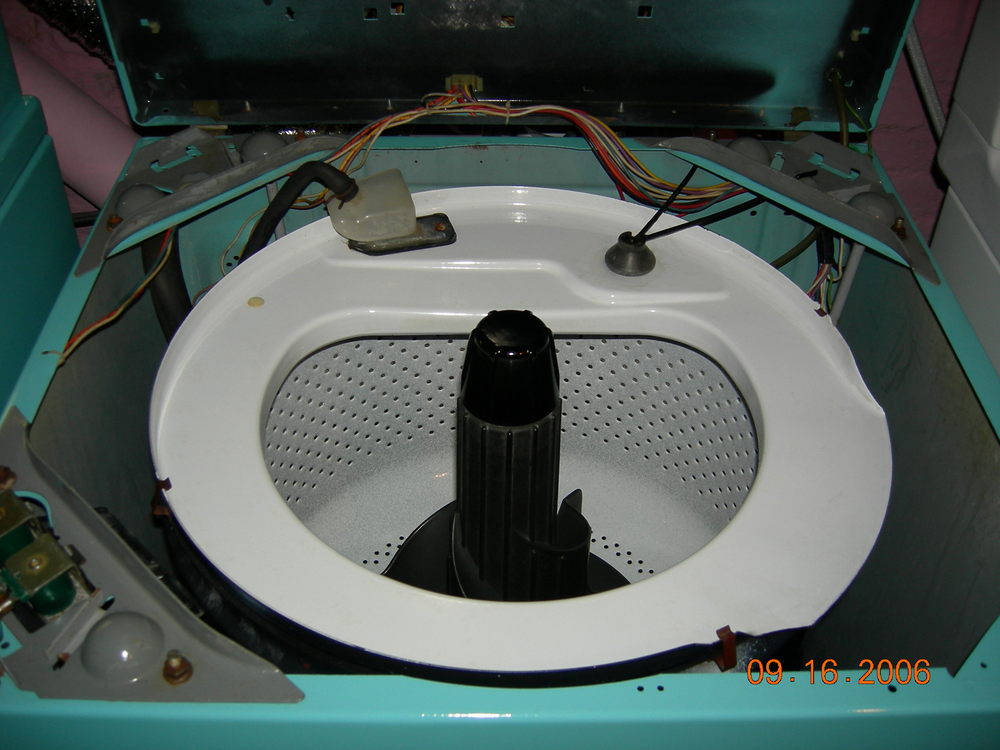
Bakelite agitators mount on a hexagonal drive block which is pressed onto the agitator shaft. The drive block may be either metal or plastic, not sure which on this model. Early models used a metal drive block and a keyed shaft. Later the tranny drive shaft was splined all the way 'round and the drive block was possibly still metal for a while, then changed to plastic or nylon. Unscrew the cap and pull the agitator to see it. The double-threaded nut for the agitator cap may unscrew and come off as part of the cap, or the cap may come off with the nut left in the drive block. When agitators changed from bakelite to plastic, the hexagonal drive block was eliminated and the agitator pressed directly onto the splined tranny shaft.
| ||
|
Post# 179120 , Reply# 29 12/29/2006 at 10:39 (6,327 days old) by peteski50 (New York) |
||
Beautiful Set! | ||
|
Post# 179246 , Reply# 30 12/29/2006 at 19:24 (6,326 days old) by sudsmaster (SF Bay Area, California) |
||
|
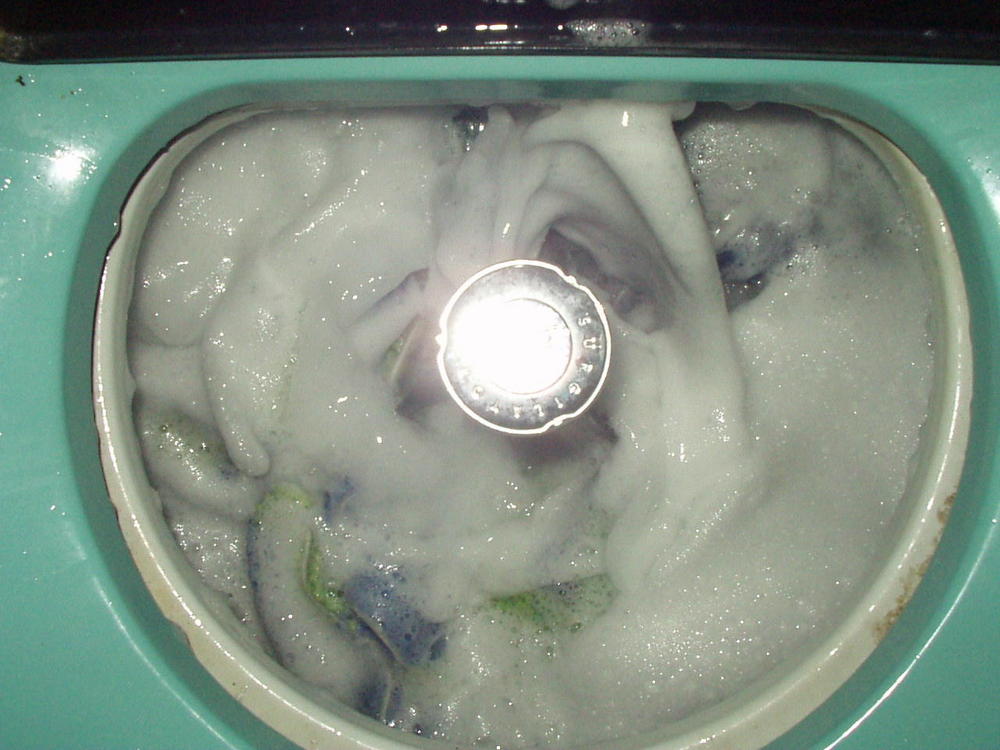
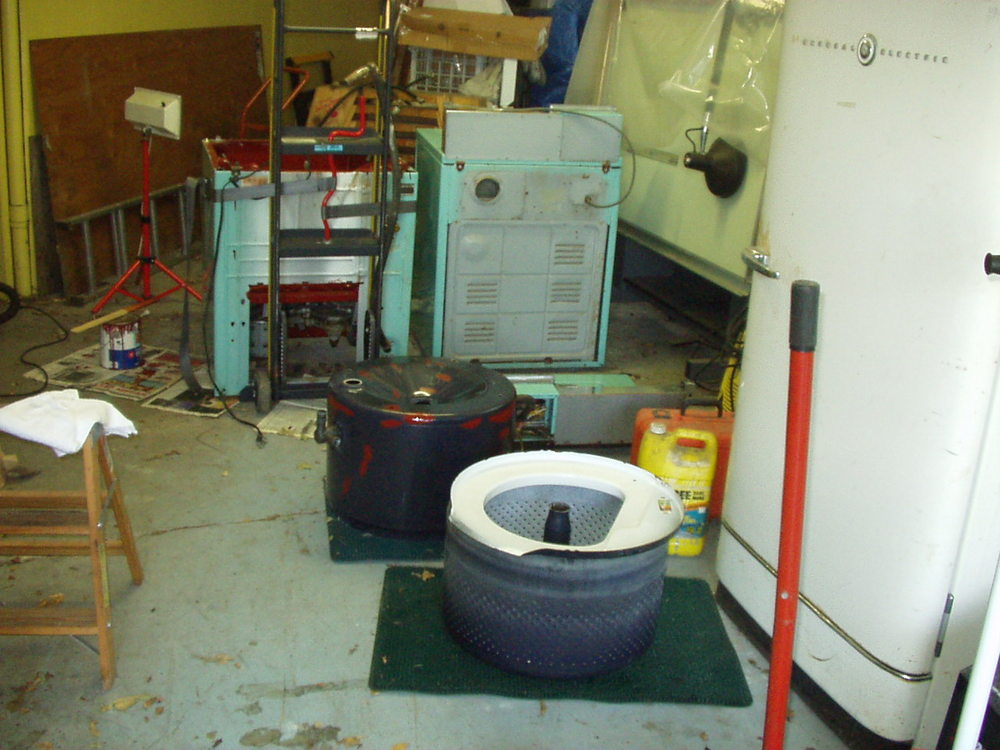
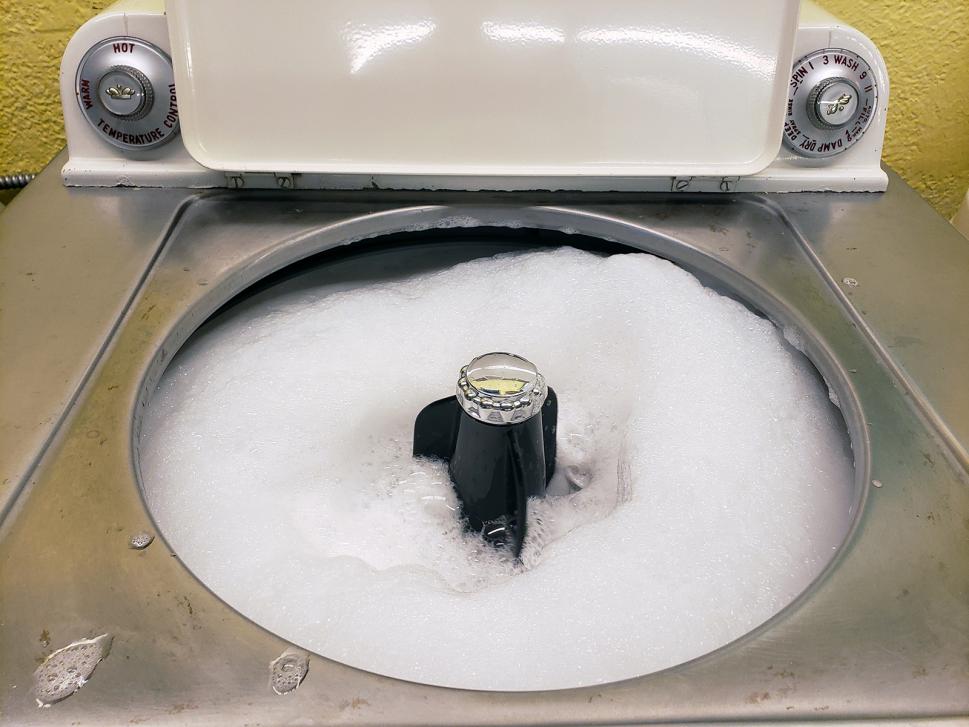
The Good News: I just put the washer through it's paces, in the courtyard. Cold water, but Cold Water Tide came through quite nicely (although I over-dosed the throw rugs, and had to run a second rinse). Timer advanced normally, agitation normal, neutral drain and spin normal. The Bad News: It's a LEAKER! LOL. Looks like a fairly major leak from the front of the machine. I couldn't quite see what was up there from the back, but I'm guessing it's the pump area. Hopefully it's just a bad hose connection or something, but I'll have to open the washer up (or turn it on its face) to see what's up with that. Will post photo of the wash action in a bit. | ||
|
Post# 179257 , Reply# 31 12/29/2006 at 20:01 (6,326 days old) by sudsmaster (SF Bay Area, California) |
||
|
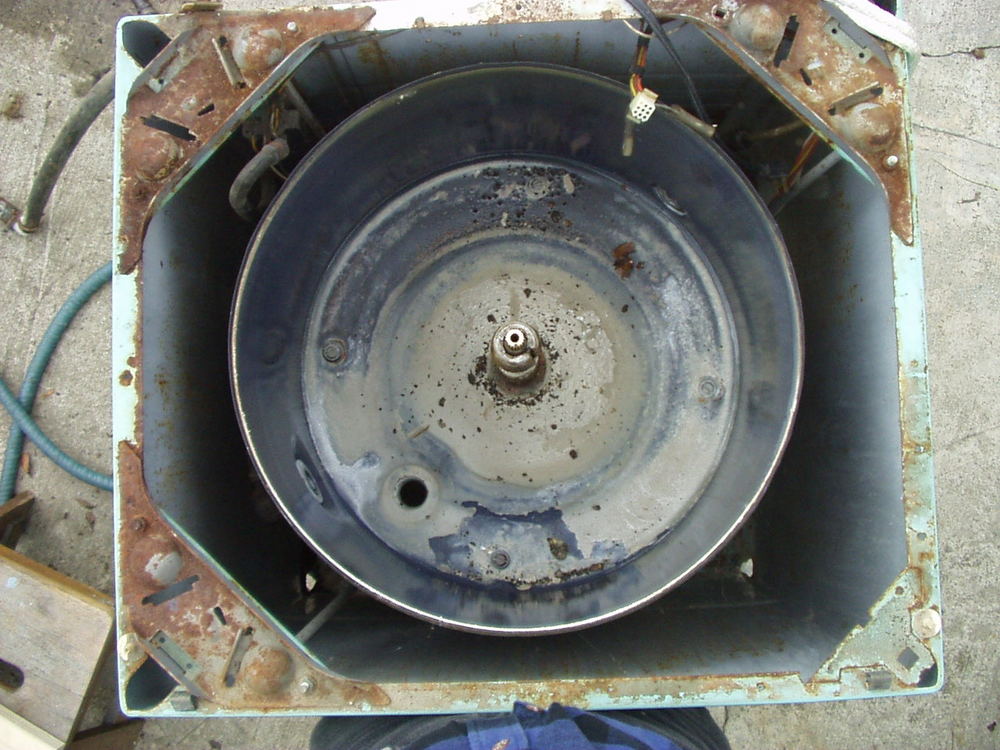
Leak is at drain
At the front of the machine (I tilted it back) there's a rubber fitting that connects the outer tub, through a sheet metal support, to a sediment trap (looks like one, at least) and from there to the pump. The sediment trap is an opaque plastic cylinder about 2 inches dia and about 8 inches long. Where it attaches to the tub, the rubber fitting is rather thin, and it has obviously cracked and is no good any more. I'm not sure, but I'm thinking that replacing the drain rubber fitting will involve two challenges: 1) Finding the replacement part 2) Installing the replacement part. I'm suspecting the tub will have to be separated from the support to allow the new fitting to be installed, since it looks like it gets compressed between the two. Alternatively I might be able to find a plumbing fitting that will fit around what's left of the rubber drain fitting and also the sediment trap, with two hose clamps to hold it all in place. But I think that might be a dodgy fix that could be prone to sudden failure. Anybody have a clue as to how to proceed? Thanks! | ||
|
Post# 179264 , Reply# 33 12/29/2006 at 20:14 (6,326 days old) by sudsmaster (SF Bay Area, California) |
||
|
Wash action | ||
|
Post# 179266 , Reply# 34 12/29/2006 at 20:16 (6,326 days old) by sudsmaster (SF Bay Area, California) |
||
|
Frontal, Thanks. I took off the back of the control panel and there's lots of room in there for a flourescent light. It is on my list of things to add... and I'll probably include some sort of switch so it can be turned on or off regardless of washer state. I figure the top of the line machine (probably the Imperial 90 version) had the light installed. | ||
|
Post# 179274 , Reply# 37 12/29/2006 at 20:53 (6,326 days old) by dadoes (TX,�U.S. of A.) |
||
|
I think this is the part to which you are referring. www.repairclinic.com/0081.aspQUES... It's fairly major to replace. The inner basket must be pulled, and the outer tub as well. | ||
|
Post# 179275 , Reply# 38 12/29/2006 at 20:55 (6,326 days old) by appnut (TX) |
||
|
| ||
| Post# 179276 , Reply# 39 12/29/2006 at 21:01 (6,326 days old) by pturo (Syracuse, New York) | ||
|
Sorry to be redundant, and repeatitive as well.(Hah) There was a little power surge here from the space heater, so I hit send twice. (unplug the space heater from the specially dedicated computer circuit, Phil, duh?) I seem to be running out of plugs these days, however. | ||
|
Post# 179285 , Reply# 40 12/29/2006 at 22:04 (6,326 days old) by sudsmaster (SF Bay Area, California) |
||
|
Glenn, Thanks, that indeed appears to be the part in question. Amazing that a $10 part could involve so much work. I can't quite figure why Whirlpool didn't just attach (weld) a metal tube to the bottom of the outer tub, to extend past the support, so that a rubber connection between it and the "button trap" could more easily be replaced. After all, rubber will eventually go bad... I don't mind a fairly major repair, as long as it doesn't require tools that I don't possess. Then again, I could probably make most tools as needed - if I knew what it looked like. If I have to pull the inner drum, outet tub, should I plan on replacing any seals or other parts while I'm at it? I'm assuming the agitator will need to come out; are there any special concerns about how to pull it? | ||
|
Post# 179310 , Reply# 41 12/30/2006 at 00:30 (6,326 days old) by dadoes (TX,�U.S. of A.) |
||
|
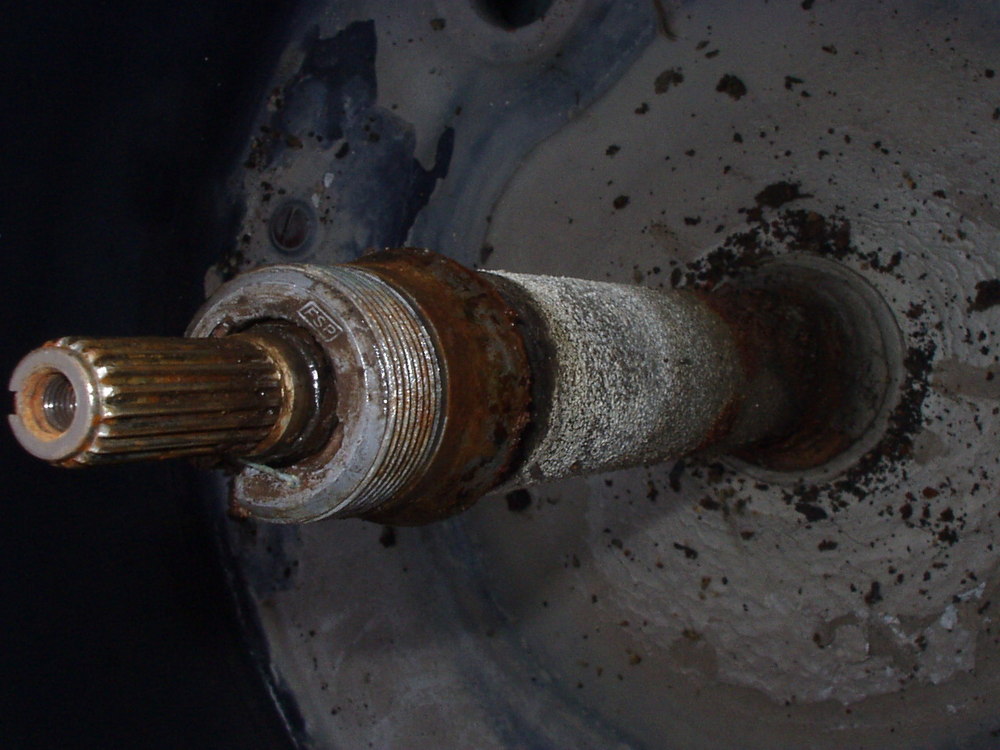
You'll need a spanner wrench to remove the basket nut. There's a "donut" seal at center of the outer tub to seal around the baseplate centerpost, which may need to be replaced (the donut seal, not the centerpost -- unfortunately centerposts aren't separately replaceable, which would be a very good thing if they were!). The centerpost may be rusted and crudded, which will need to be cleaned up in order to pull the tub and seal up. Depending on condition of the basket drive block, it may need replacing as part of the job. The four (or five?) big screws that mount the outer tub to the baseplate have gaskets which may or may not need replacing. Of course in the process of all this the outer tub should be examined for rust spots that may need attention. Check your model number for parts at Repair Clinic, they have the spanner wrench available (although you may find one at a better price from another source), and probably any other parts you may need. If the model is too old to come up in their database, do a generic search for Whirlpool and washing machine. | ||
|
Post# 179314 , Reply# 42 12/30/2006 at 02:33 (6,326 days old) by sudsmaster (SF Bay Area, California) |
||
|
Thanks again, Glenn. I looked at some drawings in a generic repair manual, which has a chapter on the belt drive Whirlpool. The basket nut looks like it might take a generic type of spanner wrench, I have a couple already (and one would not be too difficult to make in the shop, time permitting). I will check with a local parts shop for the availability of outer tub grommet, basket drive block, centerpost donut seal, and the outer tub to baseplate gaskets. At the very least I know I will need an outer tub grommet (the thing that ripped), so if they have that I will get it right away. The rest is a process of discovery ;-). | ||
| Post# 179344 , Reply# 44 12/30/2006 at 10:05 (6,326 days old) by rickr (.) | ||

Hi Suds! Congratulations on your classic Whirlpools! They are beautiful!! I would restore the machines, if I were you. If you want a great step by step manual for the process, go to "Restorations" from the home page of this web site. Robert did a wonderful step by step instruction on his restoration of his 1957 Lady Kenmore. Go to that, and simply print the whole thing out. You will then have a great instruction manual, with photos included. Just follow the instructions, and you will be fine. The 1957 Kenmore machine is the same as yours, for what you need to do. | ||
|
Post# 179447 , Reply# 45 12/30/2006 at 18:27 (6,325 days old) by sudsmaster (SF Bay Area, California) |
||
|
| ||
|
Post# 179452 , Reply# 46 12/30/2006 at 19:29 (6,325 days old) by sudsmaster (SF Bay Area, California) |
||
|
I answer my own question but have a new one
Initially I assumed the spanner nut was right hand (normal) thread. But after my thin generic spanner wrench failed to remove it, I went to the appliance parts store and got one similar to what Robert shows in his restoration pages. I also asked the parts guys if the nut was right or left hand threaded. They all said left hand thread. So with the proper wrench in hand, I tried to treat it like a leftie, but no go. I made a scratch mark on the nut and post, and could see that I had moved it about 1/8 inch. So I tried treating it like a rh thread again, and Bingo!, the nut loosened I was able to get it off. But now..... the inner drum won't just pull up and out of the washer. I'm wondering if I jammed the post for the spanner nut into something too much with the over-tightening of the spanner nut... or what... Right now I sprayed some WD40 in there and am hoping things will loosen up. I don't see any convenient way of forcing the inner tub up... although there are some air holes on the center tube near the top, that theoretically I could put some hooks into and use a 2x4 and rope lever... hmmmm.... Ahh, the combination of WD40, 2x4's and rope and elbow grease did the trick. I cut one 2x4 so that it fit the diameter of the wash basket, put a rope around it, and then used a longer 2x4 to lift the assembly), and some wiggling of the basket free. Now it's on to remove the drive block (gently!) and then the outer tub. I am *hoping* that I don't have to drop the tranny to remove the tub. I guess I'll find out. So far things look pretty good. There's a lot of "mud" under the wash basket, around the cone shaped rise in the tub. Almost like clay. Weird. But that all will get washed out soon enough. The frame is a bit rusty at the top, that all will get treated with a wire brush and some Jasco chromium phosphate rust converter, and then primed and painted baby blue (because I happen to have LOTS of cans of baby blue paint). The machine is not in as bad shape as Robert's Lady Kenmore, but it definitely has seen some moist conditions (probably the unheated porch laundry room in granny's house where it came from). There is a very strong family resemblance, only minor mechanical differences, I think. The presence of the germicidal light on his machine is giving me some thought of adding a light to this one. Perhaps not germicidal, though, maybe just a nice little light to help see into the tub. And of course I'll be adding a flourescent tube fixture to the control panel before all this is done. | ||
| Post# 179463 , Reply# 47 12/30/2006 at 20:13 (6,325 days old) by spinout (Phoenix) | ||
|
Anything in Turquiose is good and these are beautiful. A tube of GE silicon II clear window & door sealant can really help with small leaks on these machines around the tub screws and drain grommet, especially if there is corrosion in those areas. | ||
|
Post# 179479 , Reply# 48 12/30/2006 at 20:54 (6,325 days old) by sudsmaster (SF Bay Area, California) |
||
|
| ||
| Post# 179497 , Reply# 49 12/30/2006 at 22:53 (6,325 days old) by rickr (.) | ||
|
| ||
|
Post# 179505 , Reply# 50 12/30/2006 at 23:32 (6,325 days old) by sudsmaster (SF Bay Area, California) |
||
|
Thanks, Rickr. I was able to get the tub grommet, the center post donut, some tub cover clips, and a set of tub bolts/gaskets at a local parts store. And at much less than repair clinic wanted for same. I remains to be seen if I can pull the drive block without destroying it, LOL. I will keep you in mind in case the washer needs any more parts (likely). | ||
| Post# 179513 , Reply# 51 12/31/2006 at 00:02 (6,325 days old) by rickr (.) | ||
|
Cool Whirlpool!
I play some heat on the drive block with a torch, then just kinda pry up on it. You can try that, or put a vice grip on it, and pound it you have to. The heat really helps, but don't get it too hot.Check the drive block for wear also. If it is worn, it can cause the bakelite Surgilator to crack under the chrome cap. On the console lights, you can use a mini florescent in there, if you want. I used a mini florescent unit from an undercounter light (cut top part of lamp away) in the restoration of this 61 Whirlpool. I attached the wiring to the terminals on the timer so the lamp would be on when the machine was running. I traded the machine to a friend a few years ago, so I no longer own it. But here is a pix. I think the mini florescent looks just awesome in this machine. 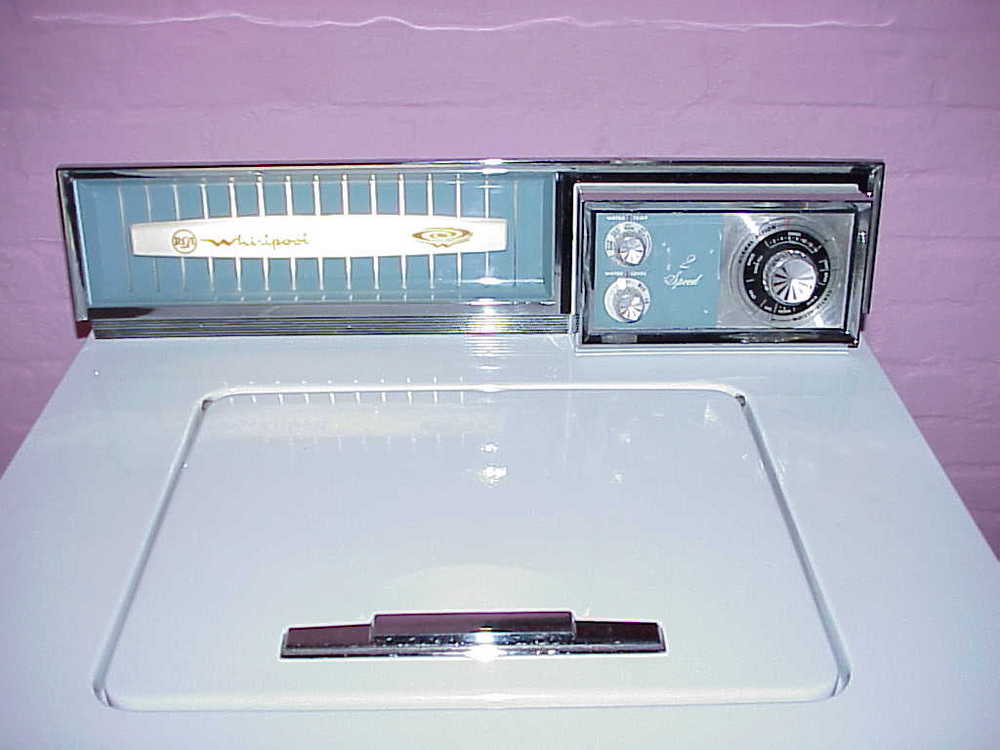
| ||
| Post# 179516 , Reply# 52 12/31/2006 at 00:06 (6,325 days old) by rickr (.) | ||
|
another.... | ||
|
Post# 179538 , Reply# 53 12/31/2006 at 01:30 (6,325 days old) by sudsmaster (SF Bay Area, California) |
||
|
Very nice Whirlpool, Rick. And that Maytag dryer isn't too shabby either! I was debating on whether to attach the light to the line current with a toggle switch on the back of the panel, or to the timer terminals. I just am not sure which timer terminal to attach to... motor, pump, or what? Which is energized all the time when the machine is on? I have a couple of extra under-counter mini flourscents that should fit nicely behind the opaque area of the control panels. There's plenty of room in there, and even a pass-through with a notch for an electrical grommet already... which leads me to believe the top of the line (or Kenmore) models had the lighting installed. | ||
|
Post# 179539 , Reply# 54 12/31/2006 at 01:31 (6,325 days old) by sudsmaster (SF Bay Area, California) |
||
|
| ||
|
Post# 179544 , Reply# 55 12/31/2006 at 02:28 (6,325 days old) by dadoes (TX,�U.S. of A.) |
||
|
| ||
|
Post# 179545 , Reply# 56 12/31/2006 at 02:37 (6,325 days old) by sudsmaster (SF Bay Area, California) |
||
|
Yaaaay! | ||
| Post# 179573 , Reply# 57 12/31/2006 at 08:45 (6,325 days old) by northwesty (Renton, WA) | ||
|
Hope you are taking some photos of the restoration I have been following the restoration with interest - would love to see a few pics of all your hard work. Sounds like things are going well. Thanks and good luck. These pictures are great references Happy new year. | ||
| Post# 179582 , Reply# 58 12/31/2006 at 09:29 (6,325 days old) by rickr (.) | ||
|
Morning Suds, I just used a meter and found one that was always hot when the machine was running. I think there was a blank one in there that was prolly for the light. Been a few years. I put some metal silver reflective furnace tape on the back cover on the console to reflect all the light forward, so the light would really punch through the front. You can find that metal tape at most hardware stores, if you want to add that. Oh, your WP's will just be awesome when they are finished! Can't wait to see them! | ||
|
Post# 179612 , Reply# 59 12/31/2006 at 11:46 (6,325 days old) by sudsmaster (SF Bay Area, California) |
||
|
| ||
|
Post# 179705 , Reply# 60 12/31/2006 at 17:14 (6,324 days old) by sudsmaster (SF Bay Area, California) |
||
|
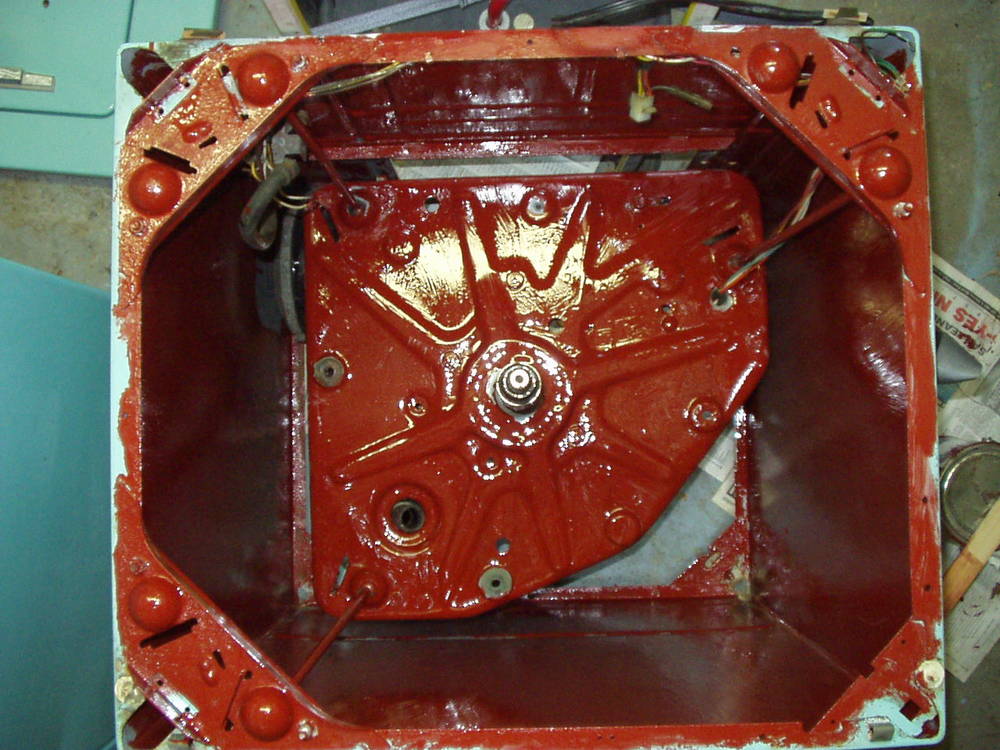
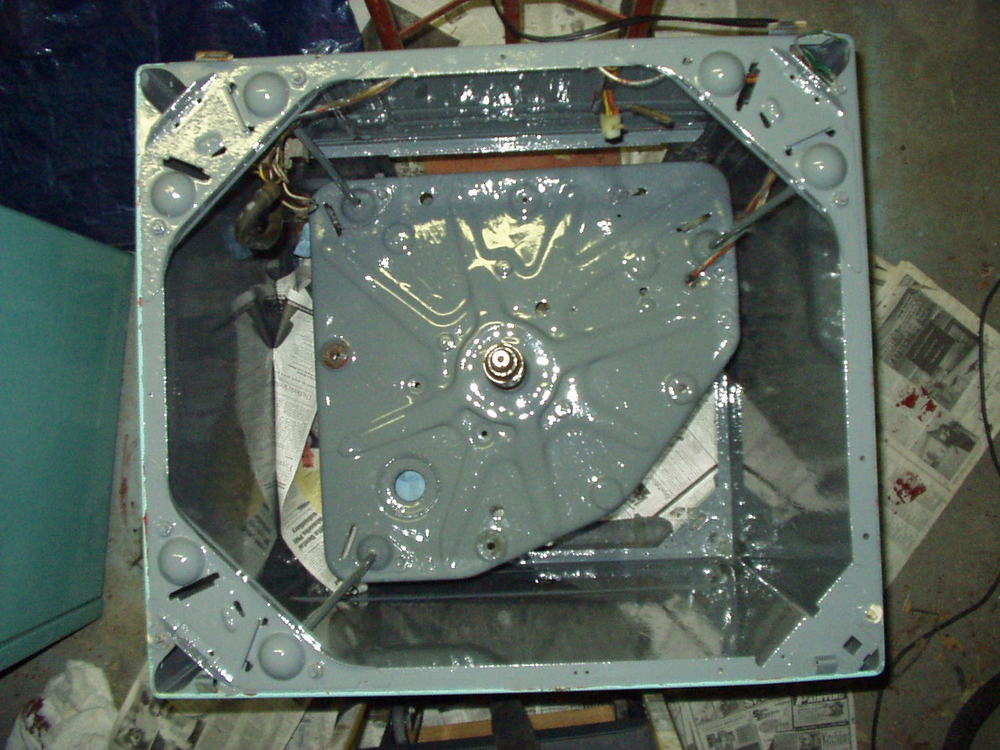
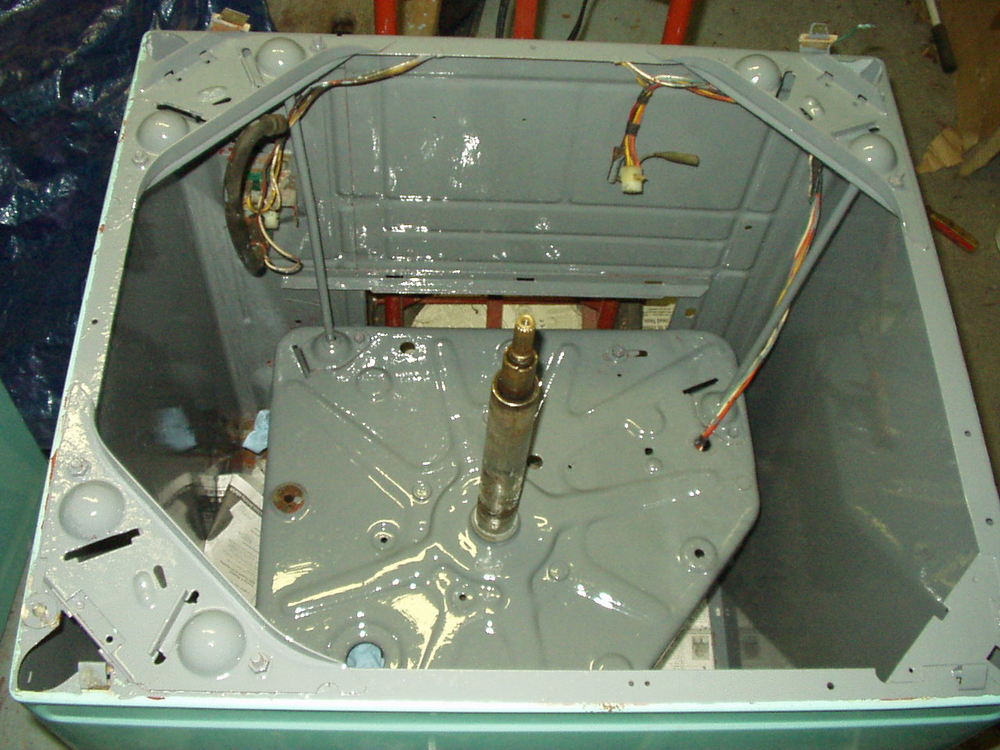
OK, got the outer tub out - the worst part was removing the hose clamps on the recirculating filter fitting to the tub. There is more rust to be found... one of the mounting holes has an extra hole due to rust-through. I think I can fix it with some JB Weld (epoxy plastic weld), and maybe a larger rubber washer and stainless washer (the ones I got with the repair kit are almost big enough). There are also what look like rust specks elsewhere in the bottom of the inside of the outer tub... I will see if I can use Jasco rust renovator on them (as long as it doesn't damage the remaining porcelain. The alternative is to look for a replacement outer tub (unlikely) or have the hole welded up and the tub re-porcelainized. I work with welders so that's no problem, but the re-porcelainizing might be tricky; I don't know of any shops in the area that do that. Since this washer will see only occasional use, I'm thinking the JB Weld is the way to go. The base plate has rust in areas where there was leakage from above; the worst will be treated with Jasco, and the the entire base plate will get a brush-on coat Rustoleam fish oil red rust preventative primer. I will treat the inside of the cabinet with the Rustoleum red primer also. I might omit the top coat since the red primer needs to age quite a while before it will allow a coat of paint to really stick, and it will never been seen once the washer is assembled. The drive block came of very easily, so I think it can be re-used no problem. The centerpost is heavily rusted between 1 inch and four inches up. The top still has its chrome plating. I chipped away the worst of the rust, the rest will get the Jasco treatment. Fortunately there's still good chrome and smoot paint where the center seal "donut" will seat. And there was no sign of leakage past the center seal. I will have to mask off these areas when I get out the Jasco, since it eats paint. If anyone knows where I can get a replacement outer tub... | ||
|
Post# 179706 , Reply# 61 12/31/2006 at 17:20 (6,324 days old) by sudsmaster (SF Bay Area, California) |
||
|
| ||
|
Post# 179708 , Reply# 62 12/31/2006 at 17:24 (6,324 days old) by sudsmaster (SF Bay Area, California) |
||
|
| ||
|
Post# 179709 , Reply# 63 12/31/2006 at 17:26 (6,324 days old) by sudsmaster (SF Bay Area, California) |
||
|
| ||
| Post# 179725 , Reply# 64 12/31/2006 at 18:12 (6,324 days old) by rickr (.) | ||
|
I have had holes in the tub welded, then clean the area VERY well, and coat it with epoxy. Use POR-15 on the center post, and it will be fine. You can order a can of that online. The threaded basket drive deal has to come off, before you can pull the outer tub. I burn the center seal with a torch, when the seal doesn't want to let loose from the center post. There is a metal ring in the original, but not in the replacement. Have fun cleaning that mess up. <: I use a scraper, then steel wool. Cool pixs! Thanks for sharing. | ||
|
Post# 179803 , Reply# 65 12/31/2006 at 22:19 (6,324 days old) by sudsmaster (SF Bay Area, California) |
||
|
Rick, The drive block came off very easily. I just used a ball peen hammer to tap it out, there was no problem. Pulling the tub was a different matter. The tub to base plate bolts were a challenge. The one in the front was no problem, but on most of the other three I had to use a 1/4" impact wrench to break the bolts free. In one case I had to use the wrench with a long extension on the nut, and then a very large long screwdriver on the screw, and I was just able to hold both and break the nut free. Then the tub itself didn't want to come out. I figured it was stuck on the center tube, so by spraying lots of WD40 on it, and turning it back and forth as I pulled up and rocked on it, it finally came out. I'm not too worried about the hole next to the tub bolt. I think JBWeld will be able to hold it pretty good, especially if I follow that up with an oversize rubber washer backed by an oversize fender washer. I think I may even have some stainless ones in the shop somewhere. The tiny rust specks in part of the inside bottom of the tub are another worry. Kind of weird that they are there at all. Some of them came off with scraping, revealing good porcelain underneath, so I'm not entirely sure if they are rust or some sort of deposit. In any case, I may be on the lookout for a BOL Whirlpool standard machine of that era, so I can pull the tub and use it to replace this one, someday. It would be interesting to see how the repairs hold up... | ||
| Post# 179907 , Reply# 67 1/1/2007 at 10:47 (6,324 days old) by rickr (.) | ||
|
small rust spots in the tub
Hey Suds, Happy New Year! I finished up at 56 Kenmore this fall. It came from a junkyard, and was in very poor condition. Someone had placed a leaky car battery on the console, and the battery acid ran down through the machine, and laid in the tub until it evaporated. The tub really took a beating, but I was able to save it. I cleaned it up, and removed the rust, then poured a large tube of mixed epoxy at the rear of the tub. Spread it around there where the acid had done the damage,a nd let it dry for several days. It has worked out very well. Been using the machine since October. Pulled the spin basked out on xmas eve day, just to see what was going on in there. Everything looks just fine. These belt drive machines tend to leave a bit of water at the rear of the tub anyway, so it just sits there as the drain is at the left front corner. Chances are, even if you find a doner machine, the tub may look like yours, or perhaps be even worse. I have pixs of the restored tub, but they have not been processed yet. 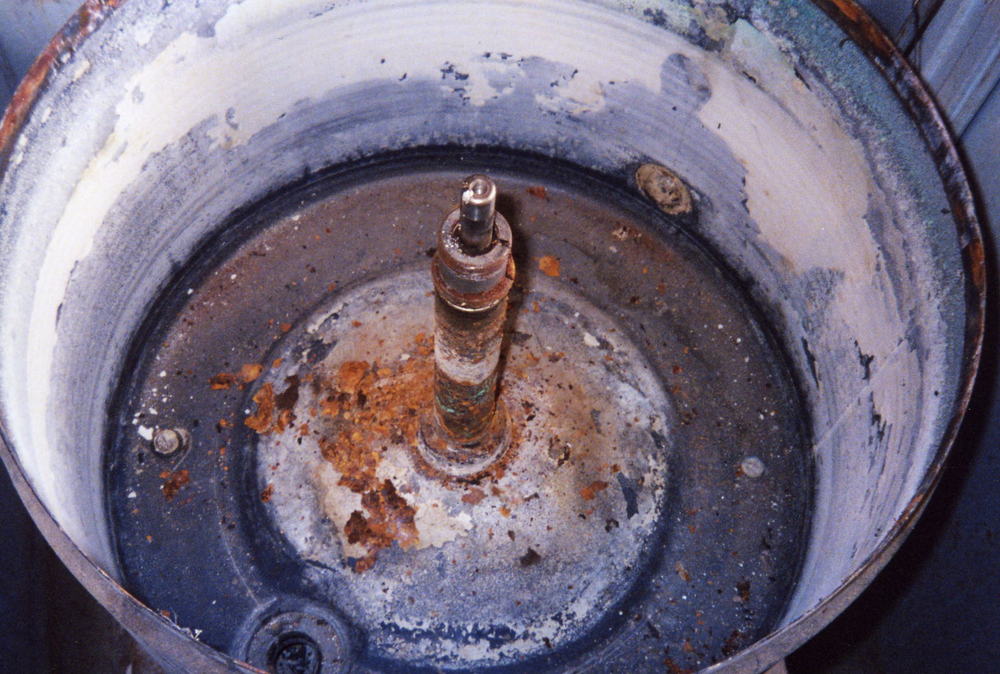
| ||
|
Post# 180028 , Reply# 68 1/1/2007 at 17:40 (6,323 days old) by sudsmaster (SF Bay Area, California) |
||
|
Gyrafoam, Thanks. What sort of lacquer will stand up to modern detergents and hot water? Is there a recommended brand? And what exactly is POR-15 (not that I will not soon look it up on Google... ;-) Rickr, What type of epoxy did you use? I have been thinking of using an epoxy type concrete floor paint to treat the tub. If it will stand up to auto traffic/solvents it should be ok with laundry. | ||
|
Post# 180029 , Reply# 69 1/1/2007 at 17:55 (6,323 days old) by sudsmaster (SF Bay Area, California) |
||
|
| ||
|
Post# 180031 , Reply# 70 1/1/2007 at 18:00 (6,323 days old) by sudsmaster (SF Bay Area, California) |
||
|
| ||
|
Post# 180032 , Reply# 71 1/1/2007 at 18:03 (6,323 days old) by sudsmaster (SF Bay Area, California) |
||
|
| ||
| Post# 180035 , Reply# 72 1/1/2007 at 18:52 (6,323 days old) by rickr (.) | ||
|
Yo Suds!
Doing a great job Suds! I hate rust, a dirty tub, or tub ring. Gross! I don't want any of that shit next to my skin, or staining clothes. I just used the regular epoxy glue, the large twin syringe type. But I am sure the epoxy paint would work well too. The main thing to remember, is to CLEAN the surface, so the epoxy will stick to it. I clean it VERY well, then use paint thinner to remove any greasy film, so the epoxy can bond well. At the rate your going, you will be learning to love the classic belt drives, before you know it. Can't wait to see the lighted maiden wash! | ||
|
Post# 180188 , Reply# 73 1/2/2007 at 00:36 (6,323 days old) by volvoguy87 (Cincinnati, OH) |
||
Epoxy
I am in the Historic Preservation business and I use epoxy to repair all sorts of things, especially rotten window sashes. I like Abatron epoxy, it is a bit pricy, but worth it. I can make it look like the epoxy repair doesn't even exist, but I always tell people its there. If you use epoxy, just be certain you remove all of the offending material, such as wood rot or rust, before you apply the epoxy. Clean is the name of the game. Nice work, keep it up, Dave | ||
|
Post# 180200 , Reply# 75 1/2/2007 at 02:39 (6,323 days old) by sudsmaster (SF Bay Area, California) |
||
|
| ||
|
Post# 180262 , Reply# 77 1/2/2007 at 13:20 (6,323 days old) by unimatic1140 (Minneapolis) |
||
Rich, what a beautiful find!!! I'm so glad you got these, you are going to enjoy them so much, I just love Turquoise! And great Restoration job and pictures!!! By the way, for future reference, the nice thing about POR-15 (POR stands for "Paint Over Rust") is you paint right over the rust, as it does not stick very well to metal that is not rusted. I used POR-15 on my '57 Lady Kenmore and it worked perfectly. | ||
|
Post# 180360 , Reply# 78 1/2/2007 at 20:04 (6,322 days old) by sudsmaster (SF Bay Area, California) |
||
|
Gyro, Thanks, I found the POR-15 website. It probably is rather similar to other rust preventative primers like Rust Destroyer, but I think it's a separate company. You never know. There seem to be a lot of so-called rust renovator type of paint primers. And some work better than others. Common to all, however, is the need for proper surface prep. I will look for the Rustoleum "Crystal Clear Lacquer". I googled "Bakelite Lacquer" and learned that there actually is a type of lacquer made of liquid Bakelite. It's apparently used to coat electrical wiring, etc. However I was unable to find any purveyor of such a substance. I suspect it's a bit toxic. Also, I learned that the filler in Bakelite could be wood flour, or asbestos. So I will be careful when I handle the agitator, and I don't think I'll be sanding or grinding it much :-). Robert, Thanks. I didn't think I cared much for turquoise, but once I saw this pair the whole effect was a bit magical. They would probably look good in my pale green patio kitchen... And thanks for having posted all the photos of your Lady Kenmore restoration. It helped a lot to see your descriptions of the various parts. The part about bearing/spin tube/seal replacement was good. I wasn't planning on doing that this go-round. There is slight play in the agitator shaft. I don't know if this is normal or not. There is no sign of water intrusion, though, as black grease is readily visible, and the washer seemed to have a normal sound signature during my one test of it. This was the first time I've pulled an agitator, wash basket, and tub. I was really surprised at the hard water mineral precipitate that coated the underside of the wash basket cone and the bottom of the outer tub. I blame it all on the phase-out of phosphates in laundry detergents - which has left consumers with little choice but to use washing soda (sodium carbonate), which we all know will form a nasty precipitate with minerals. There was this yucky light gray layer of clay-type mud, and then what really was like a thin layer of "cement" underneath it. In some areas I was able to chip the precipitate "cement" away by sliding a single edge razor under the edge - it came up in big flakes. In other areas it's stuck fast and I think only a harsh acid treatment (like Zud or muriatic) would dissolve it. And of course those treatments will also attack the vitrified enamel coating. | ||
|
Post# 180369 , Reply# 80 1/2/2007 at 21:28 (6,322 days old) by gansky1 (Omaha, The Home of the TV Dinner!) |
||
 | ||
| Post# 180394 , Reply# 81 1/3/2007 at 01:12 (6,322 days old) by spinout (Phoenix) | ||
|
On rust removal... Has anyone tried using electrolytic rust removal techniques on a project like this? It could make the process much easier. I have used it for other tasks with excellent results. >I agree with the comments about the use of laquer thinner as a preferred solvent. | ||
|
Post# 180472 , Reply# 82 1/3/2007 at 14:43 (6,322 days old) by sudsmaster (SF Bay Area, California) |
||
|
Typically I use Brake Clean to prepare a metal surface for painting. In critical applications, such as for an automobile, I'll use a metal etch on the bare metal as well. Brake Clean is just acetone, which is very good at removing grease and not leaving a residue. It's just more convenient because it's an aerosol. | ||
|
Post# 180584 , Reply# 83 1/3/2007 at 22:38 (6,321 days old) by sudsmaster (SF Bay Area, California) |
||
|
I checked into the suspension rod balls (and I am trying like heck not to make a joke of this) but the price was a bit much; $7.50 per ball, need six, so that's almost $50 for parts I'm not so sure this washer needs anyway. Perhaps I will remove one of the upper rod brackets and see how the ball looks and feels. Can't hurt to just look. I haven't heard of electrolytic rust removal, but I suspect it might require immersion, which might be tough for an entire washer :-). Tonight it started drizzling so I'm putting off further painting until it clears up (by Saturday for sure). Meanwhile I'm warming up the paint cans in the laundry area. | ||
| Post# 180587 , Reply# 84 1/3/2007 at 22:46 (6,321 days old) by rickr (.) | ||
|
hard balls? | ||
| Post# 180592 , Reply# 85 1/3/2007 at 22:53 (6,321 days old) by rickr (.) | ||
|
all good | ||
|
Post# 180601 , Reply# 86 1/3/2007 at 23:10 (6,321 days old) by sudsmaster (SF Bay Area, California) |
||
|
| ||
| Post# 180654 , Reply# 87 1/4/2007 at 08:05 (6,321 days old) by rickr (.) | ||
|
| ||
|
Post# 182069 , Reply# 88 1/9/2007 at 22:36 (6,315 days old) by sudsmaster (SF Bay Area, California) |
||
|
Interior paint | ||
|
Post# 182454 , Reply# 89 1/11/2007 at 00:40 (6,314 days old) by sudsmaster (SF Bay Area, California) |
||
|
The entire interior has been primered with an anti-rust primer ("Rust Destroyer"), and then given a coat of Rustoleum Navy Gray oil based enamel. It's slow drying, and the brush work is by no means a smooth finish, but it's a pretty good barrier to any further rusting from within. The exterior of the cabinet has some scratches that have sprouted surface rust, and some rust at the base. I am planning on dealing with these after the washer is reassembled. At the very least, some sanding, rust treatment, and touch-up will be needed. Perhaps a complete respray of the outside of the cabinet is in order, but that will need to wait for warmer and drier weather. I'll also need to have some enamel type paint mixed up to match the turquoise of the porcelain top. There are some small areas of rust or red primer visible beyond the tape line in the photo. These will be rubbed out where possible, or slated for touch-up when I get to the exterior work. | ||
|
Post# 182460 , Reply# 90 1/11/2007 at 02:00 (6,314 days old) by sudsmaster (SF Bay Area, California) |
||
|
| ||
| Post# 182461 , Reply# 91 1/11/2007 at 02:07 (6,314 days old) by northwesty (Renton, WA) | ||
|
The restoration is coming along great It sure looks nice. | ||
| Post# 182507 , Reply# 92 1/11/2007 at 09:32 (6,314 days old) by rickr (.) | ||
|
| ||
|
Post# 182638 , Reply# 93 1/12/2007 at 02:02 (6,313 days old) by sudsmaster (SF Bay Area, California) |
||
|
| ||
| Post# 182680 , Reply# 94 1/12/2007 at 08:04 (6,313 days old) by rickr (.) | ||
|
| ||
|
Post# 182806 , Reply# 95 1/12/2007 at 20:24 (6,312 days old) by sudsmaster (SF Bay Area, California) |
||
|
I would pull the spin basket and clean the crud out | ||
| Forum Index: | 
| Other Forums: |

|

|

|

|

|

 Comes to the Rescue!