|
Thread Number: 40789
Introducing the 2012 Maytag DG8/306 |
[Down to Last] |
Post# 603394 6/13/2012 at 17:55 (4,335 days old) by Kenmore71  (Minneapolis, MN) (Minneapolis, MN) |
||
 | ||

|
|
Post# 603396 , Reply# 1 6/13/2012 at 17:56 (4,335 days old) by Kenmore71 (Minneapolis, MN) |
||
|
| ||
|
Post# 603400 , Reply# 2 6/13/2012 at 18:19 (4,335 days old) by wayupnorth (On a lake between Bangor and Bar Harbor, Maine) |
||
 | ||
|
Post# 603535 , Reply# 3 6/14/2012 at 09:00 (4,334 days old) by bajaespuma (Connecticut) |
||
 | ||
|
Post# 603539 , Reply# 4 6/14/2012 at 09:12 (4,334 days old) by RevvinKevin (Tinseltown - Shakey Town - La-La Land) |
||
|
I... NEVER... knew.... | ||
|
Post# 603548 , Reply# 5 6/14/2012 at 09:36 (4,334 days old) by Kenmore71 (Minneapolis, MN) |
||
|
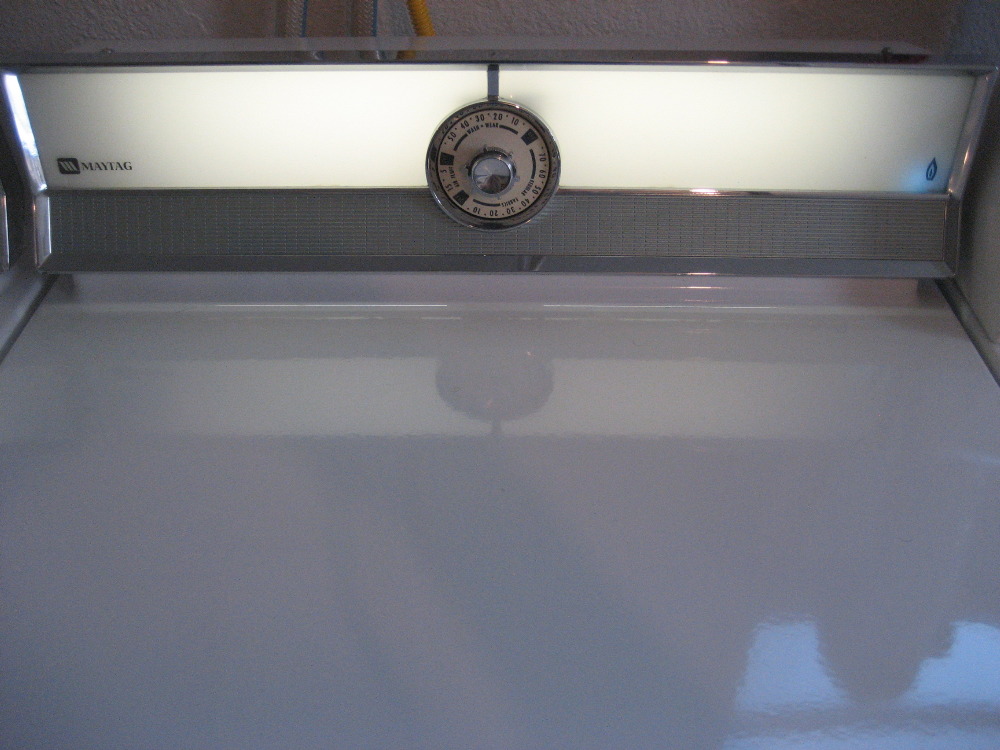
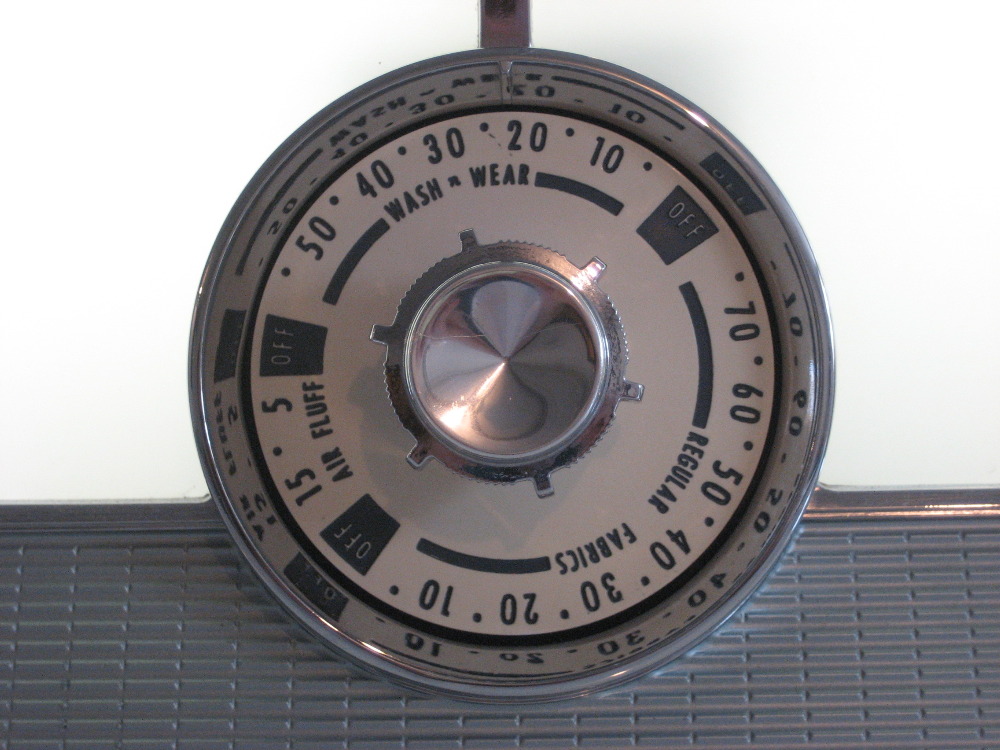
After over a year of tinkering, experimenting, replacing controls, new capacitors, etc... I was still having trouble getting consistent results with the auto dry control. I just replaced the entire control mechanism with a 306 timer. At least now I know that the dang thing will shut off!!!
Kevin--I put a c7 christmas bulb behind the gas flame. It just kinda "begged" for it. :) I have it hooked into the burner circuit AFTER the cycling stat. It glows whenever the burner is actually firing. When I had the electronic control, I had it wired before the cycling stat so that I knew when the cycle was in dry mode or cool down. With the timer, I always know what stage the cycle is in so I thought it would be more fun to have the light going on and off with the actual burner. I was waiting to see how long it was going to take for someone to notice the "oddness" of the modifications... | ||
|
Post# 603562 , Reply# 6 6/14/2012 at 09:58 (4,334 days old) by combo52 (50 Year Repair Tech Beltsville,Md) |
||
DG 806 That won't always shut off. Mark did you try soldering the terminals directly onto the circuit board and if yours is old enough to have the wire wound baffles you can cut one or two baffles out of the sensor circuit. While these machines can be a bit trying at times we haven't ever had one that these or other fixes wouldn't fix. Call me if you need any questions.
PS I do like the little blue light, and it is the best looking DG306 ever. | ||
|
Post# 603573 , Reply# 7 6/14/2012 at 11:03 (4,334 days old) by sudsmaster (SF Bay Area, California) |
||
wayupnorth's profile picture I loved how the older washe
Well, of course, the manufacturers fully expected every buyer to get a full set, with the dryer, which also usually had a matching "Wash 'N Wear" setting.
But even today the most modern perm press fabrics in use washed and dried in the most modern equipment could still usually benefit from a touch-up with an iron after drying. Which is not to say they get it. | ||
|
Post# 603584 , Reply# 8 6/14/2012 at 11:50 (4,334 days old) by Kenmore71 (Minneapolis, MN) |
||
|
John, I had tried nearly everything with that machine including rewiring the baffles, taking baffles in and out of the circuit, using different capacitance capacitors all the way from 5 to 12 uP. I hadn't gotten to the point of soldering yet, although I had replaced most of the brass connectors on the electronic control.
It seemed as though everytime there was a major shift in humidity everything that was in perfect balance before would go out AGAIN. Last summer I had it working perfectly on just one baffle. Then as winter came on, I ended up adding the other two baffles back in to get the dryness right. As it got warmer and more humid in the basement it started overdrying again. The thought doing a biennial addition and removal of baffle circuits through the burner access door was less than appealing. I grew weary. I still have all of the parts in a shoebox that will be lovingly stored marked "1967 DG806 electronic control" | ||
| Forum Index: | 
| Other Forums: |

|

|

|

|

|

 Comes to the Rescue!