|
Thread Number: 41351
HA806 Lives Again! |
[Down to Last] |
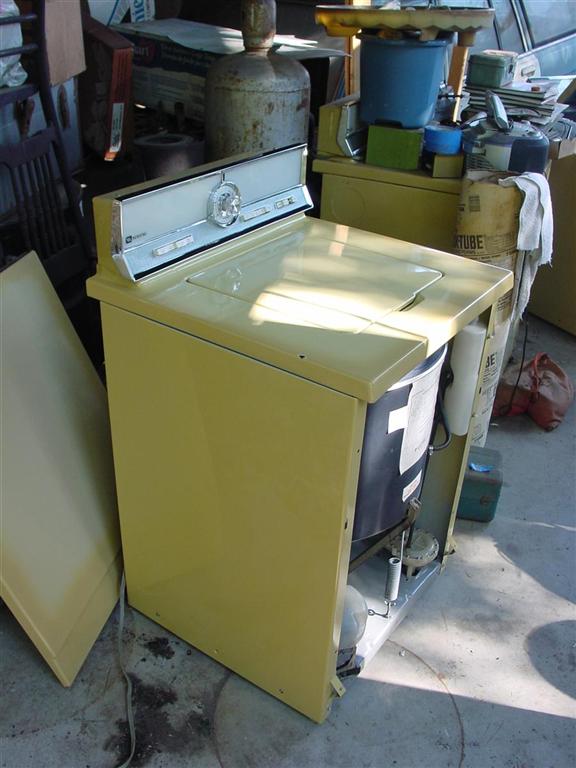
Post# 611068 7/19/2012 at 02:12 (4,299 days old) by d-jones  (Western Pennsylvania (Pittsburgh Area)) (Western Pennsylvania (Pittsburgh Area)) |
||

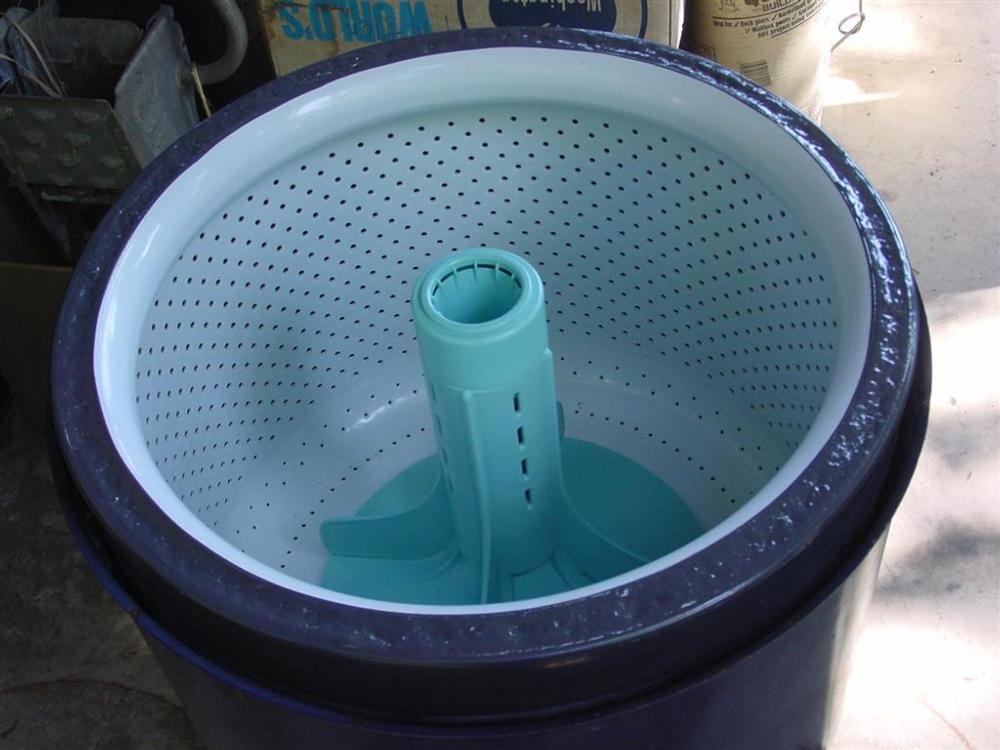
I've been going through this machine for my parents for a while now and have already posted some of the earlier work here, so I won't bore you by repeating anything. I left off with the cabinet repainted and the tub and agitator cleaned up, so we'll go on from there. I had mentioned that a gap had opened up all the way around the tub between the ballast and the inner porcelain coated skin, and that some corrosion had formed there. Not knowing what else to do about it, and wanting to make sure it didn't have an opportunity to grow, I cleaned it up and sealed the ballast while overlapping the adjoining porcelain by about an eighth of an inch. I know some of you will think I'm nuts and tell me I wasted my time, but nobody spoke up when I asked about it so I did the best I could. And to be honest, I think it looks pretty nice this way.
| ||

|
|
Post# 611070 , Reply# 1 7/19/2012 at 02:21 (4,299 days old) by d-jones (Western Pennsylvania (Pittsburgh Area)) |
||
|
Damper pads lubed
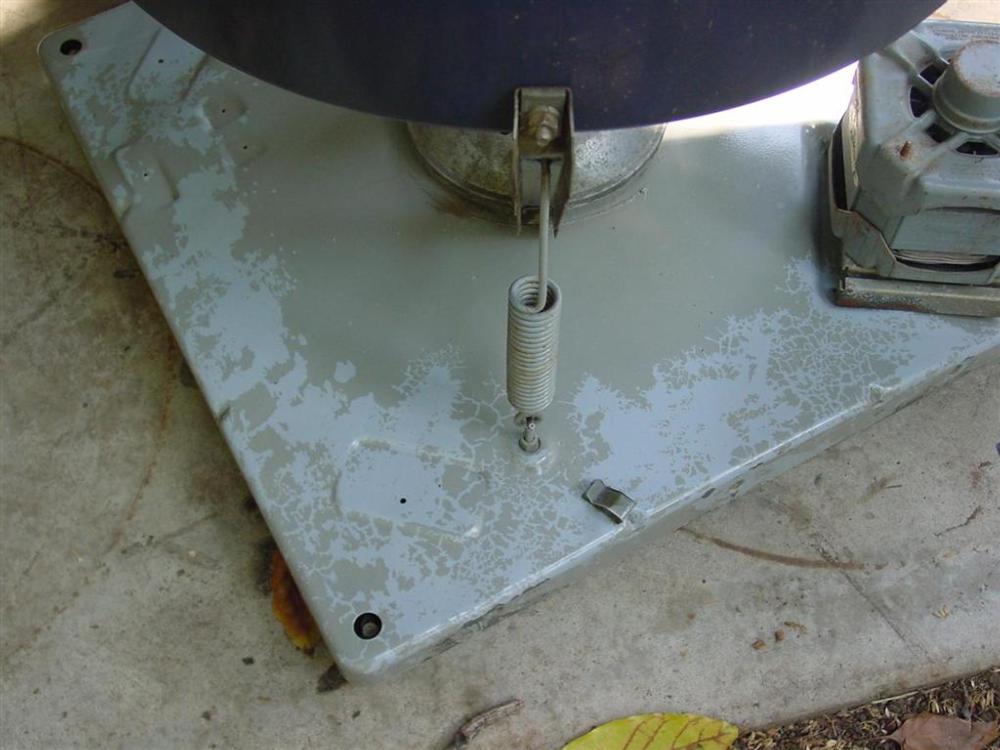
Prior to lubing the damper pads I cleaned up the base plate, and something odd happened. The top layer of dark gray paint let go in quite a few places, revealing an apparently undamaged lighter gray paint underneath. It looks terrible, but I couldn't find any corrosion or bare metal anywhere on the base plate, so I decided to leave it this way. After all, this won't normally be seen, so I'm not going to fret over it. At this point, the damper pads have been lubed and the cabinet is about to go back on.
| ||
|
Post# 611076 , Reply# 2 7/19/2012 at 02:31 (4,299 days old) by d-jones (Western Pennsylvania (Pittsburgh Area)) |
||
|
Cabinet install
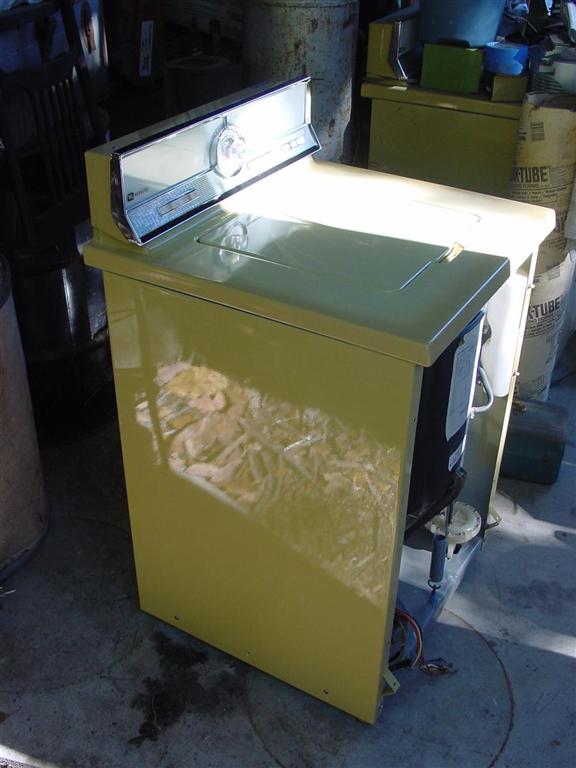
The cabinet is back in place with four screws(just in case it should need to come off again)and the top panel is laid in place to check the color match. I think everyone will agree that the guy at the Sherwin Williams Automotive Paint store did a pretty good job matching the original harvest gold. Here you can see the cleaned up bleach dispenser bottle. I ended up scraping away as much gunk as I could with bent pieces of wire, but for the remaining deposits that wouldn't let go or couldn't be reached, I poured some coarse sand into the bottle and shook it for a while. That finally did the trick.
| ||
|
Post# 611083 , Reply# 3 7/19/2012 at 02:39 (4,299 days old) by d-jones (Western Pennsylvania (Pittsburgh Area)) |
||
|
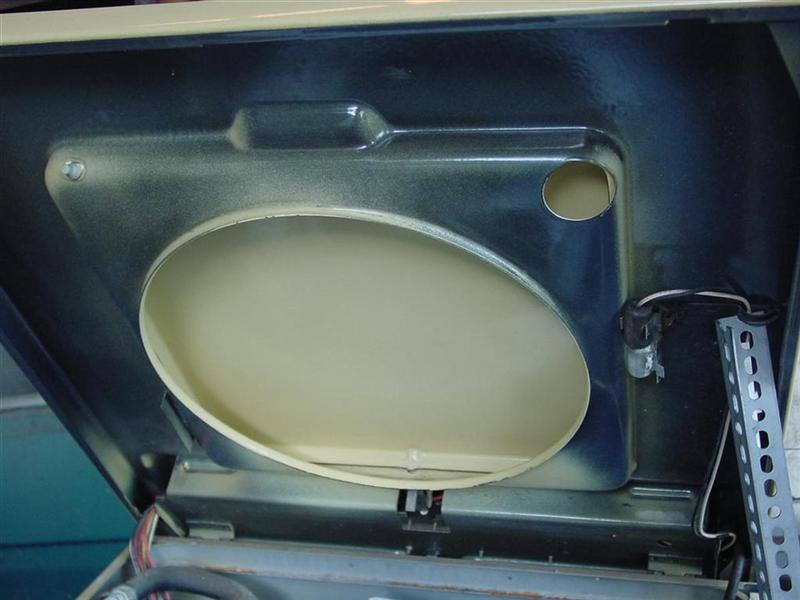
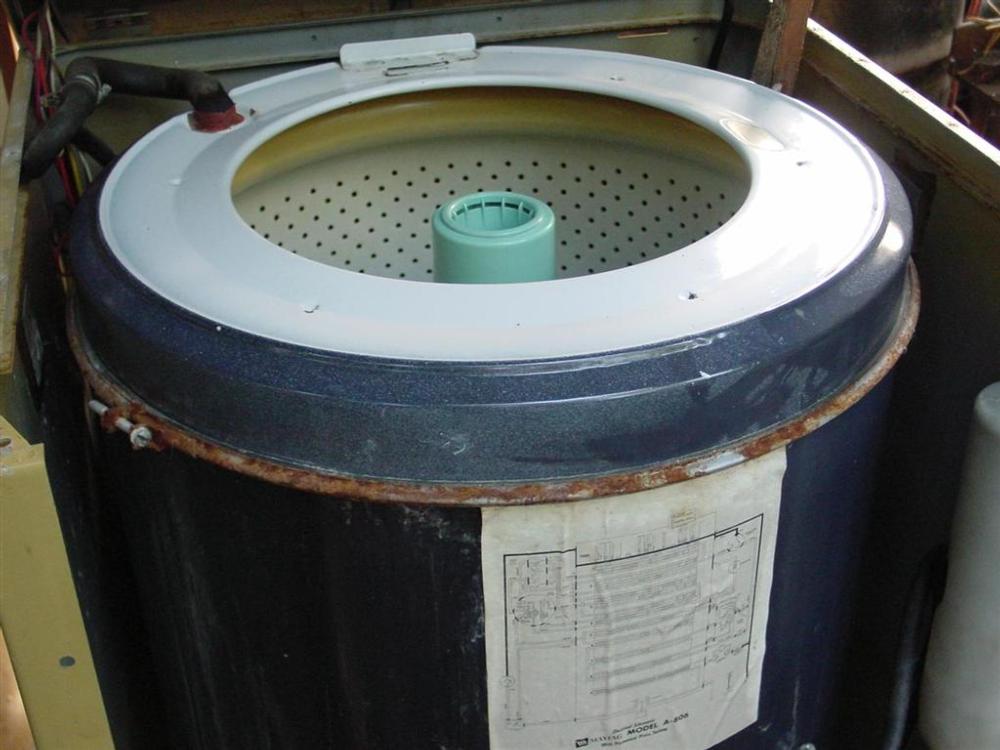
Corrosion!
Here I had to make a decision about the top panel. The original one looked nice from the outside, but underneath I found some heavy pitted and scaly corrosion formed as you can see. I was tempted to clean this up and use it, but on the top side right above the bleach dispenser fill port, some corrosion was beginning to form under the porcelain. I'm pretty sure it's the same corrosion from underneath that's eaten its way clear through, so I went to have a look at the top panel on the donor machine.
| ||
|
Post# 611088 , Reply# 4 7/19/2012 at 02:42 (4,299 days old) by d-jones (Western Pennsylvania (Pittsburgh Area)) |
||
|
No Corrosion! | ||
|
Post# 611095 , Reply# 5 7/19/2012 at 02:49 (4,299 days old) by d-jones (Western Pennsylvania (Pittsburgh Area)) |
||
|
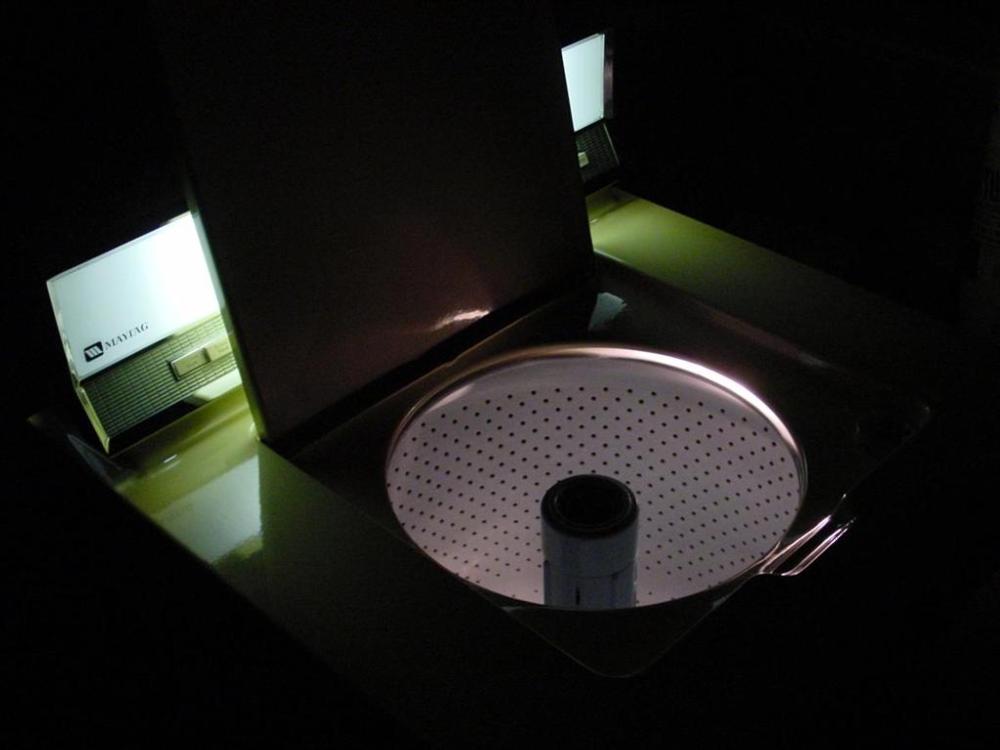
New top panel intalled.
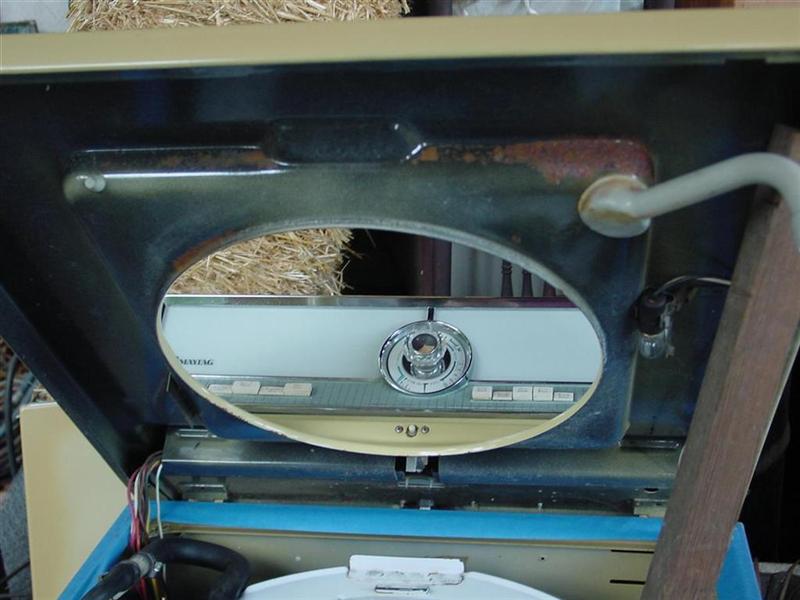
Here the new top panel is in place, chip and all. I actually think the color match with this panel is a little closer than it was with the other one, and the control panel and chrome trim are in much better condition on this one as well. Since I took the whole top panel, I now don't have to waste my time moving them over. So in spite of the chip, I'm happy with the choice I made.
| ||
|
Post# 611101 , Reply# 6 7/19/2012 at 02:55 (4,299 days old) by d-jones (Western Pennsylvania (Pittsburgh Area)) |
||
|
Light check
This is the first time power was applied to the machine since I got it, so I checked to see that the lights were working and the spin cycle worked. Everything seemed fine at this point, so it was time for ops and leak checks. But that would require that the machine be moved closer to the house. The only way to get it there was to carry it,(too many rocks and other obstacles) so that would have to wait.
| ||
|
Post# 611102 , Reply# 7 7/19/2012 at 03:01 (4,299 days old) by d-jones (Western Pennsylvania (Pittsburgh Area)) |
||
|
On the back porch at last. | ||
|
Post# 611105 , Reply# 8 7/19/2012 at 03:04 (4,299 days old) by d-jones (Western Pennsylvania (Pittsburgh Area)) |
||
|
Small load test | ||
|
Post# 611108 , Reply# 9 7/19/2012 at 03:22 (4,299 days old) by d-jones (Western Pennsylvania (Pittsburgh Area)) |
||
|
As I suspected
The problem was right here. In my haste to check the lights earlier, I d forgotten to connect the little tube you see here to the diaphragm. The build up of air pressure in this tube as the water rises is the only way the machine knows what the water level is. Without this tube the water will keep rising until it spills out on the floor. DOH!
By the way, I noticed something else while I was in here. The small load button doesn't actually do anything other than release any other button that may have been pushed. When pushed, each of the other buttons pushes down on the angled bar in the switch, the larger the load size being selected, the more the button bushes down on the bar, which in turn pushes against the diaphragm. But the small load button doesn't even touch the bar, so if all the buttons were out at the same time(which is possible) the washer would still fill to the small load level. 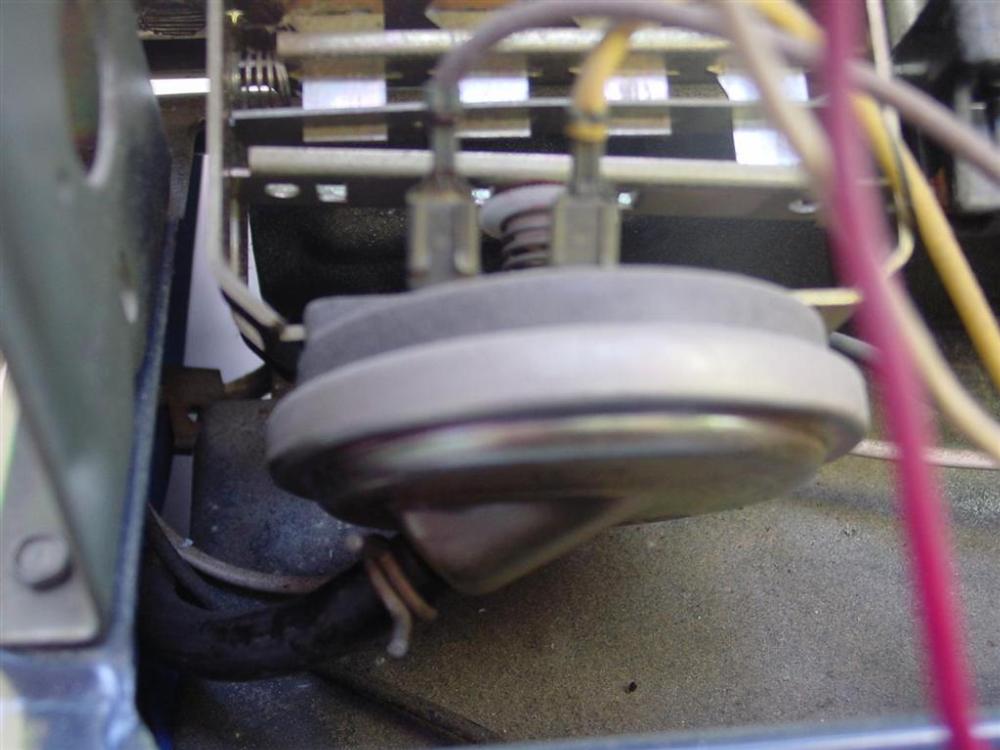
| ||
|
Post# 611109 , Reply# 10 7/19/2012 at 03:34 (4,299 days old) by d-jones (Western Pennsylvania (Pittsburgh Area)) |
||
|
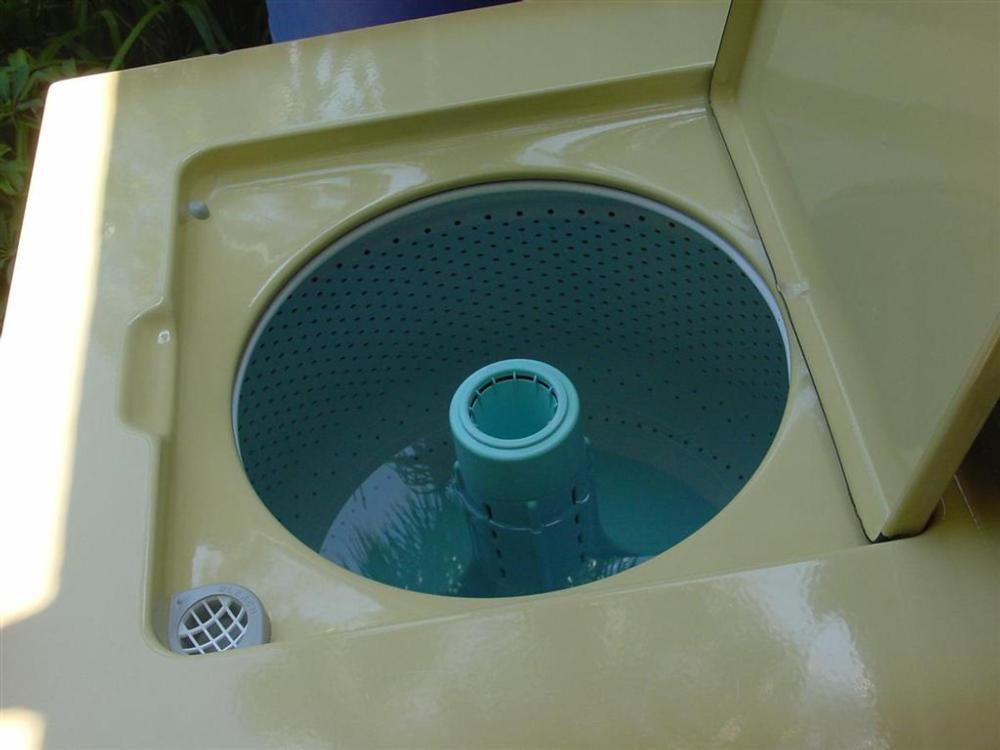
Successful small load fill test
This time it worked. Funny how having everything hooked up correctly make problems go away. The little floaties and sinkies you see were apparently trapped in the outer tub and took this opportunity to come out and visit, but they were all swept away by the spin cycle that followed. For the remaining checks the water was perfectly clear. Note how the lint filter can't possibly work at this setting.
It's getting late now so I'll finish this in the morning. 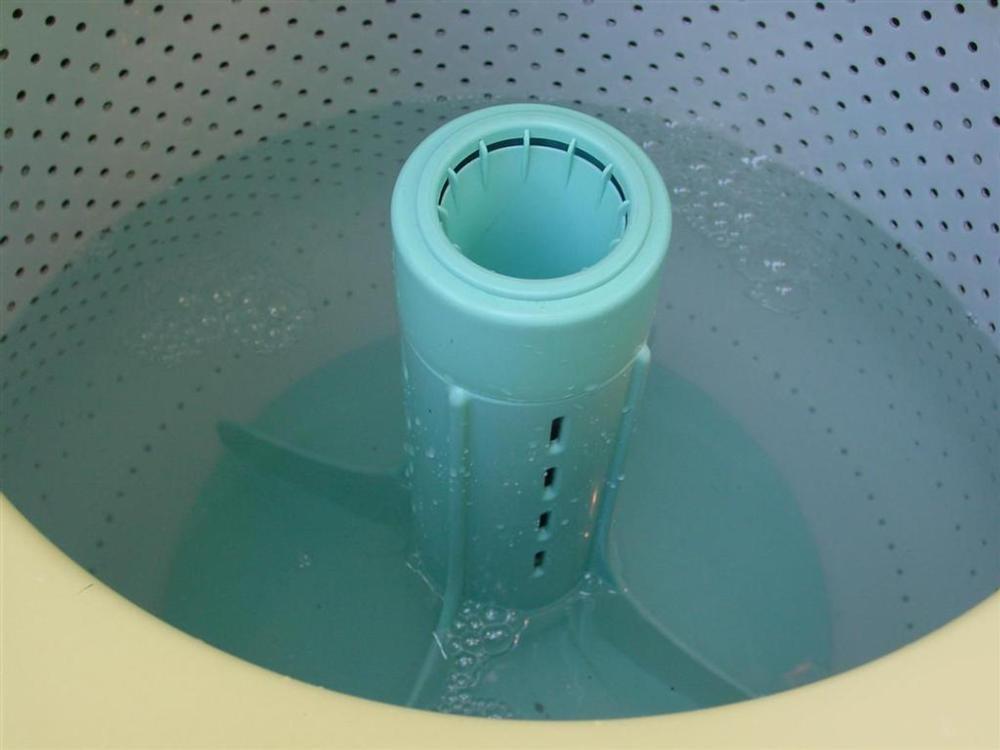
| ||
|
Post# 611115 , Reply# 11 7/19/2012 at 06:01 (4,299 days old) by Frigilux (The Minnesota Prairie) |
||
 | ||
|
Post# 611174 , Reply# 12 7/19/2012 at 11:18 (4,299 days old) by d-jones (Western Pennsylvania (Pittsburgh Area)) |
||
|
I'm back, so let's continue where we left off.
When I picked up the machine back in October of last year, it had the ugliest V band clamp I've ever seen. The drain holes in the tub cover were all thoroughly plugged up, so my guess is that water that splashed onto the tub cover must have rolled over the edge and down the side. Before I cleaned it up there were lots of streaks down the outside side of the outer tub that would seem to prove that. It had to go.
| ||
|
Post# 611175 , Reply# 13 7/19/2012 at 11:28 (4,299 days old) by d-jones (Western Pennsylvania (Pittsburgh Area)) |
||
|
Spin cycle
Here we are merrily spinning away the water from the small load test. I was a little surprised at the force of the water coming off the pump. I was able to stand there by the machine holding the drain hose and water some nearby plants growing in the yard. The new V band clamp is in place, but for whatever reason I still hadn't gotten around to replacing the missing button in the control panel. If you look closely you can see the blurred image of the power unit spinning by.
| ||
|
Post# 611177 , Reply# 14 7/19/2012 at 11:36 (4,299 days old) by d-jones (Western Pennsylvania (Pittsburgh Area)) |
||
|
Fill tests finished.
Here we are at the large load fill level after having stopped along the way at medium and normal. The medium fill level just barely covered the first hole on the barrel of the agitator, while the normal fill level stopped midway through the third. As you can see, the water at the large fill level is high enough to float the empty fabric softener cup. I hadn't expected that, but I'm told that's how it's supposed to be.

| ||
|
Post# 611181 , Reply# 15 7/19/2012 at 11:43 (4,299 days old) by d-jones (Western Pennsylvania (Pittsburgh Area)) |
||
|
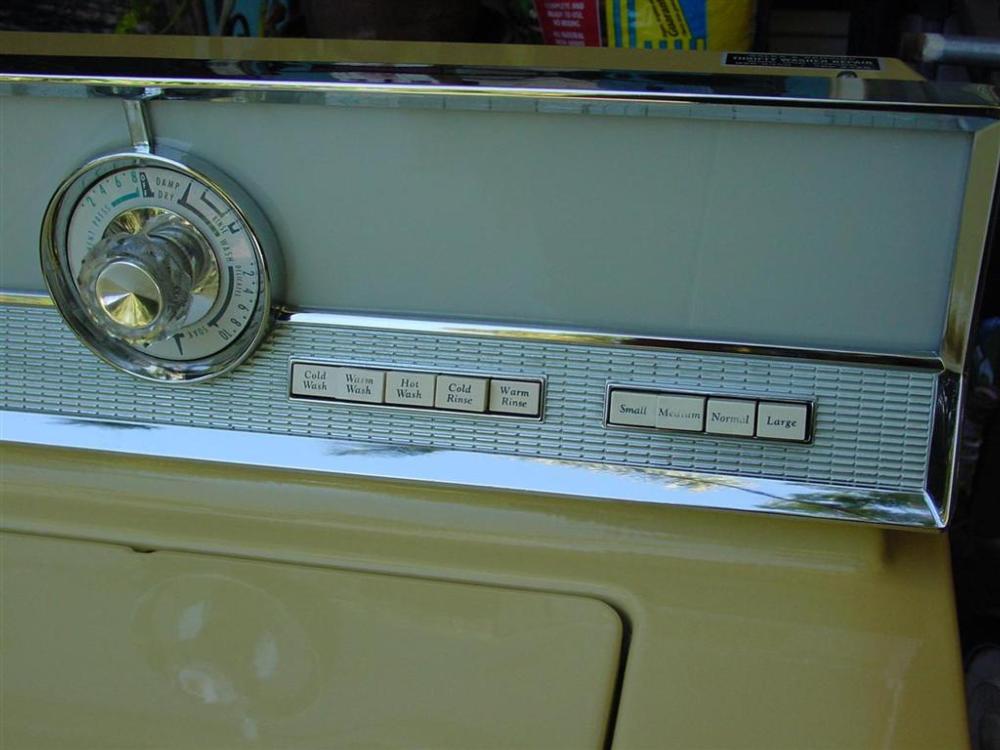
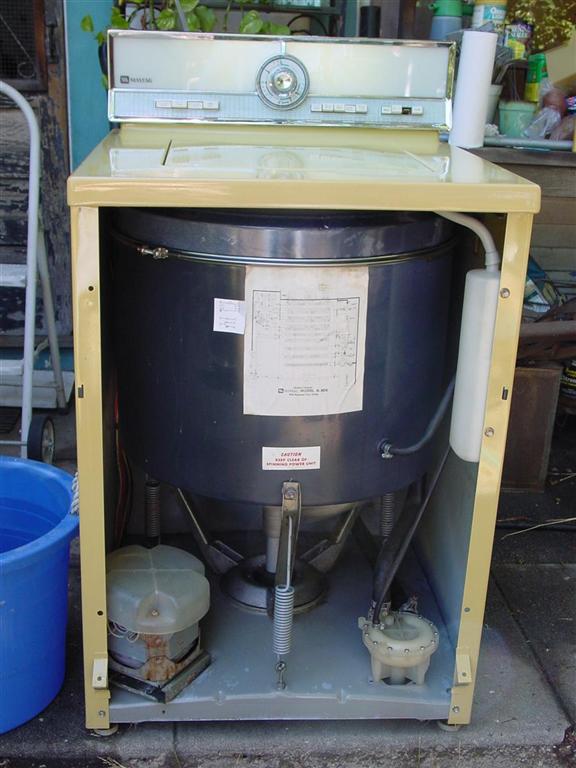
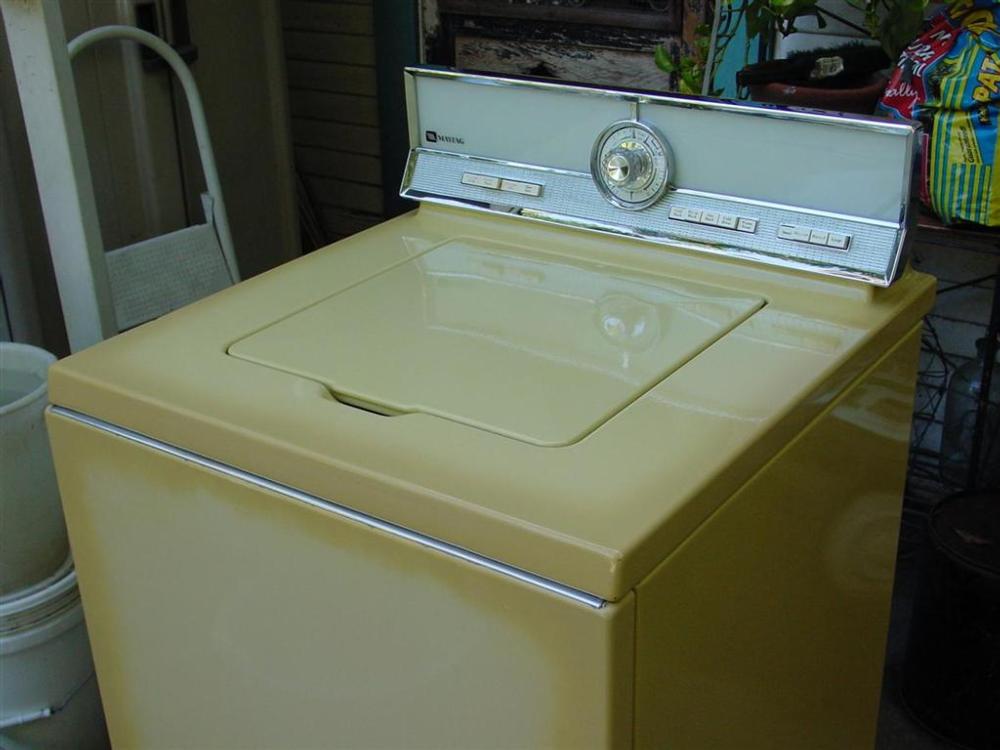
Front panel reinstalled for good.
The washer was put through its paces pretty thoroughly, and did everything it was supposed to do. No leaks were found anywhere during the tests so the front panel is finally reinstalled for good, or at least until needs to come off again for maintenance. As you can see, I've finally gotten around to installing the missing button. I'm really pleased with the way this turned out.
| ||
|
Post# 611182 , Reply# 16 7/19/2012 at 11:46 (4,299 days old) by d-jones (Western Pennsylvania (Pittsburgh Area)) |
||
|
The control panel is almost perfect | ||
|
Post# 611184 , Reply# 17 7/19/2012 at 11:53 (4,299 days old) by d-jones (Western Pennsylvania (Pittsburgh Area)) |
||
|
Data plate reattached
One of the last things done prior to moving the machine inside was to pop rivet the data plate back on. Since the guys at the body shop painted the entire back panel as carefully as they did the sides, I think it's fair to say that this is now one of the nicest backsides on any Maytag out there, so I thought I'd sneak in this photo of it.

| ||
|
Post# 611186 , Reply# 18 7/19/2012 at 12:10 (4,299 days old) by d-jones (Western Pennsylvania (Pittsburgh Area)) |
||
|
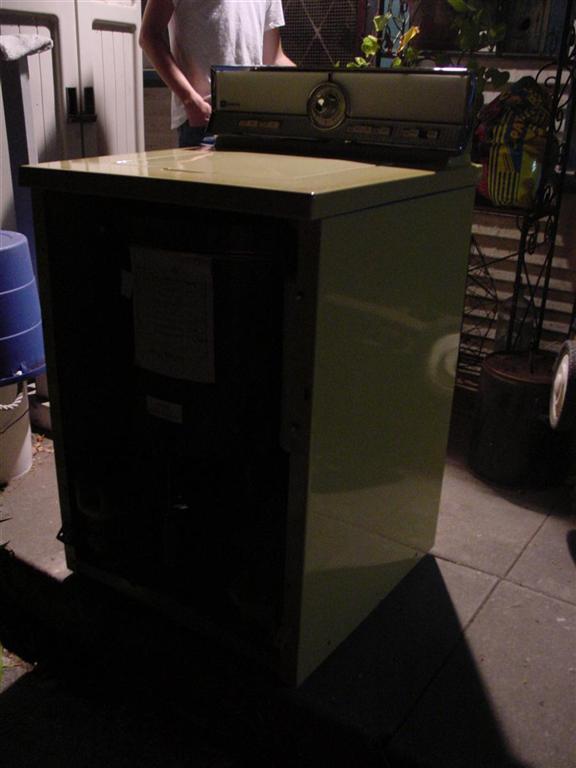
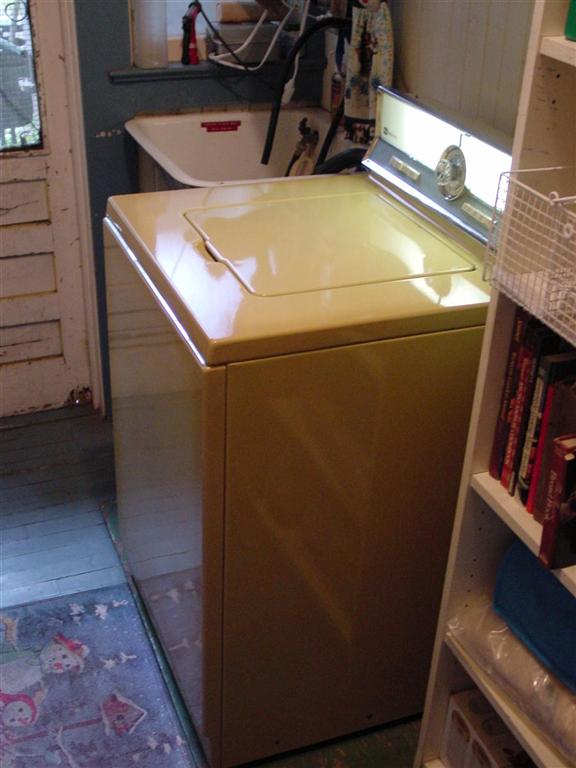
In its new home at last
Here it is installed in its new home. The process began back in October of last year and took longer than I'd expected. Not because of the machine, but because of the limited time I had available to work on it. Everything I did could have easily been accomplished in a couple of weeks worth of serious effort, perhaps even less. Fortunately, the G.E. Filter flow held on long enough to finish the project, but as we moved it off the porch to make way for the Maytag, we found evidence of more new leaks, so my dad is greatly relieved to not have to go in and find them anymore, and my mom thinks the new Maytag is beautiful. So in the end, everyone's happy, including the Maytag.
| ||
| Post# 611205 , Reply# 19 7/19/2012 at 14:15 (4,299 days old) by cmlrobison (Ontario, NY) | ||
|
Happy Maytag! Happy to be restored, happy to be loved and happy to be functional again - Well done, David! | ||
|
Post# 611212 , Reply# 20 7/19/2012 at 14:48 (4,299 days old) by RevvinKEVIN (Tinseltown - Shakey Town - La-La Land) |
||
|
| ||
|
Post# 611240 , Reply# 21 7/19/2012 at 19:23 (4,298 days old) by lotsosudz (Sacramento, CA) |
||
What no video? | ||
|
Post# 611251 , Reply# 22 7/19/2012 at 20:34 (4,298 days old) by d-jones (Western Pennsylvania (Pittsburgh Area)) |
||
|
Thanks guys!
I really appreciate the compliments. This machine was being prepared for my parents, so I wanted it to turn out well, and I really think it has. It's nice to know that you all agree. And you know Eugene, when I think of all the things my parents did for me growing up, this machine doesn't even begin to pay them back. Not that they're expecting to be paid back, but you know what I mean. It really is a small price to pay, and it was kind of fun, too. ;-)
So now Christina, I get to start going through that fantastic dryer you found for me. Thankfully, someone here on this blog went though a HoH dryer not too long ago and posted some detailed information about it. I can't remember who it was exactly, and the dryer may even have been electric, but I'm sure some of the information will prove useful. I'm actually kind of anxious to get started on it, so sorry Kevin, and David, I've already got another project right in front of me. By the way, I stopped by my folks place this afternoon and ran the first load of laundry through the Maytag. I wanted to be there to see first hand if something should happen to go wrong. I needn't have worried. It ran flawlessly and with excellent turnover of the load. After putting all that work into this machine, it was kind of fun to watch. 
| ||
| Post# 611254 , Reply# 23 7/19/2012 at 21:15 (4,298 days old) by mrb627 (Buford, GA) | ||
Nice Work... | ||
|
Post# 611257 , Reply# 24 7/19/2012 at 21:56 (4,298 days old) by d-jones (Western Pennsylvania (Pittsburgh Area)) |
||
|
Hi Malcolm
If by re-enameled you mean repainted with enamel paint as opposed to porcelain enamel, the paint was just shy of one hundred dollars. That included the paint, the hardener, the reducer, and the custom color matching. Then another fifty dollars went to a local body shop that I've dealt with in the past to apply the paint for me. Quite a few shops wouldn't want to be bothered with a small job like this, so it was very nice of them to agree to do it, and they did an excellent job as well.
| ||
| Post# 611262 , Reply# 25 7/19/2012 at 22:32 (4,298 days old) by tecnopolis (Ocala/Dunnellon, Florida 34481) | ||
 | ||
|
Post# 611266 , Reply# 26 7/19/2012 at 22:58 (4,298 days old) by rp2813 (Sannazay) |
||
Beautiful Job! | ||
|
Post# 611274 , Reply# 27 7/20/2012 at 01:20 (4,298 days old) by pdub (Portland, Oregon) |
||
fantastic!
What a great restoration David. That Maytag should last forever. Thank you for the info on the repainting as well. I too have always wanted to know what it would cost to have a body shop repaint so the machine would look factory fresh.
You went to a lot of little details that others might skip over and I think it is a great gift to give your parents. Congratulations. Patrick | ||
| Post# 611275 , Reply# 28 7/20/2012 at 01:24 (4,298 days old) by cmlrobison (Ontario, NY) | ||
|
Looking forward to your dryer project, David. Keep us posted. | ||
| Post# 611307 , Reply# 29 7/20/2012 at 08:02 (4,298 days old) by mrb627 (Buford, GA) | ||
|
Paint Job | ||
|
Post# 611349 , Reply# 30 7/20/2012 at 13:30 (4,298 days old) by d-jones (Western Pennsylvania (Pittsburgh Area)) |
||
|
Gobsmacked, Alex?
I had to look that up, but having done so, all I can say is thanks, that's quite a compliment!
Now then, Patrick and Malcolm, I agree completely that repainting a cabinet can make a huge difference in the appearance of a machine, and bring a restoration up to a whole new level. Frequently, the porcelain top panels on vintage machines survive in very good condition, while the rest of the painted cabinet truly shows its age. Sometimes careful use of rubbing compound can restore faded paint to its original color and shine, but when it can't, painting is the only option. The cost of the materials is pretty well fixed, so there isn't much any of us can do about that. But if you have the space at home(I don't)to set up a simple spray booth, you can save the cost of having the paint applied. Obviously, it's not worth the trouble to do this for one machine, but if you're one of those folks(like many on this blog)that always has a project going, then you may want to consider it. I used to work at a place that did a great deal of work on corporate jets, including painting. Though the shop often did entire paint jobs on these aircraft, most of the time they were repairing damaged paint in one particular area. To prevent the over-spray from going everywhere, they would construct a framework of PVC pipes around the work area, and wrap it in plastic. These structures were sometimes large, but frequently small, and as I watched them setting one up one morning, I couldn't help thinking how easy it would be to build a framework of PVC pipes that would form a small spray booth for home use, and could be folded away and stored when not needed, perhaps even folded up to the ceiling of a garage. Then a small rotating platform could be made using plywood and some common pipe fittings so you can turn your project instead of walking around it. Just add a spray gun and a compressor and you'd be ready to go. If I had the space I'd be very tempted to try it. | ||
| Forum Index: | 
| Other Forums: |

|

|

|

|

|

 Comes to the Rescue!