Thread Number: 41892
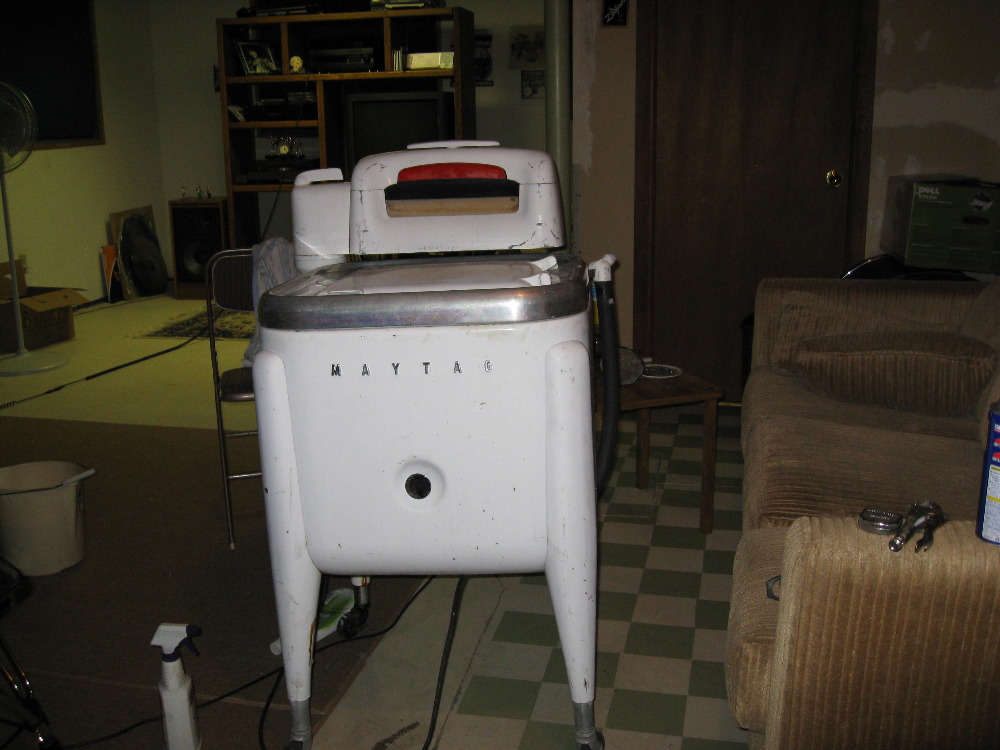
MOVING A MAYTAG E2L
[Down to Last]

automaticwasher.org's exclusive eBay Watch:
scroll >>> for more items --- [As an eBay Partner, eBay may compensate automaticwasher.org if you make a purchase using any link to eBay on this page]
Post# 617287   8/15/2012 at 17:43 (4,269 days old) by e2l-arry (LAKEWOOD COLORADO)        

I just joined this club as I purchased my first vintage washer yesterday, a Maytag E2L, and will be bring it home this Saturday. Does anyone know if it's OK to lay these flat in the back of a truck or do they need to remain upright? My concern is that if I lay it flat and travel 30 miles that way that oil from the transmission or wringer post might leak. I have access to a covered pick up which would necessitate laying it down. If that's no good I can rent a van and bring it home upright. Any input will be appreciated. I'll start posting pictures when I get it home. It'll need some clean up and TLC but it'll be sweet when I'm finished. Everything works, no rust, been sitting in a garage for over 20 years and I got it for $25.00 on CL.
WOO!HOO!


Post# 617295 , Reply# 1   8/15/2012 at 18:17 (4,269 days old) by qsd-dan (West)        

qsd-dan's profile picture

My concern is that if I lay it flat and travel 30 miles that way that oil from the transmission or wringer post might leak.

Yup, it must remain upright at all times or it'll begin leaking trans oil out the vent hole in less than 30 seconds.


BTW, congrats! Hope pics will surface soon after its arrival.


Post# 617317 , Reply# 2   8/15/2012 at 20:03 (4,269 days old) by e2l-arry (LAKEWOOD COLORADO)        

Thanks Dan, That's what I was thinking might happen if I laid it flat. The van it is then. Where is this vent hole? I mean, if I have to take it horizontal to get it loaded or unloaded, which side should be facing up? Front, back, right side or left. If the location of the vent hole would even make a difference. And as far as I can tell, I think this is a mid-60's E2L. It has the black agitator with the red safety release. There's no Maytag decal on the front but it does say M A Y T A G on the front in raised letters. One web site said that was around 1965. Can anyone confirm that?

Post# 617340 , Reply# 3   8/15/2012 at 20:49 (4,269 days old) by Electronicontrl (Grand Rapids, MI)        
Nice find

electronicontrl's profile picture
And for $25.00. Nice!
I agree, best to keep it upright. You can move the wringer control to the "swing" position and lift the wringer head up & off the base and that makes the machine easier to transport. (Careful the wringer head is HEAVY).
I use my avocado Maytag E2LPS at least once a month.
Congrats! and welcome!


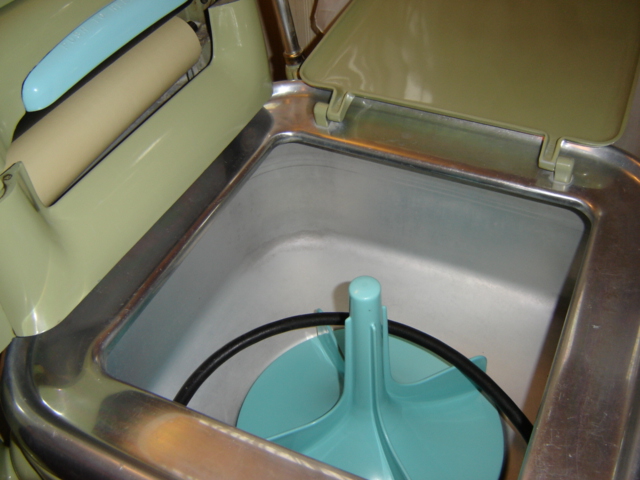
Post# 617390 , Reply# 4   8/15/2012 at 22:19 (4,269 days old) by stan (Napa CA)        
Hi Larry

stan's profile picture
I'll third that up right moving idea. LOL

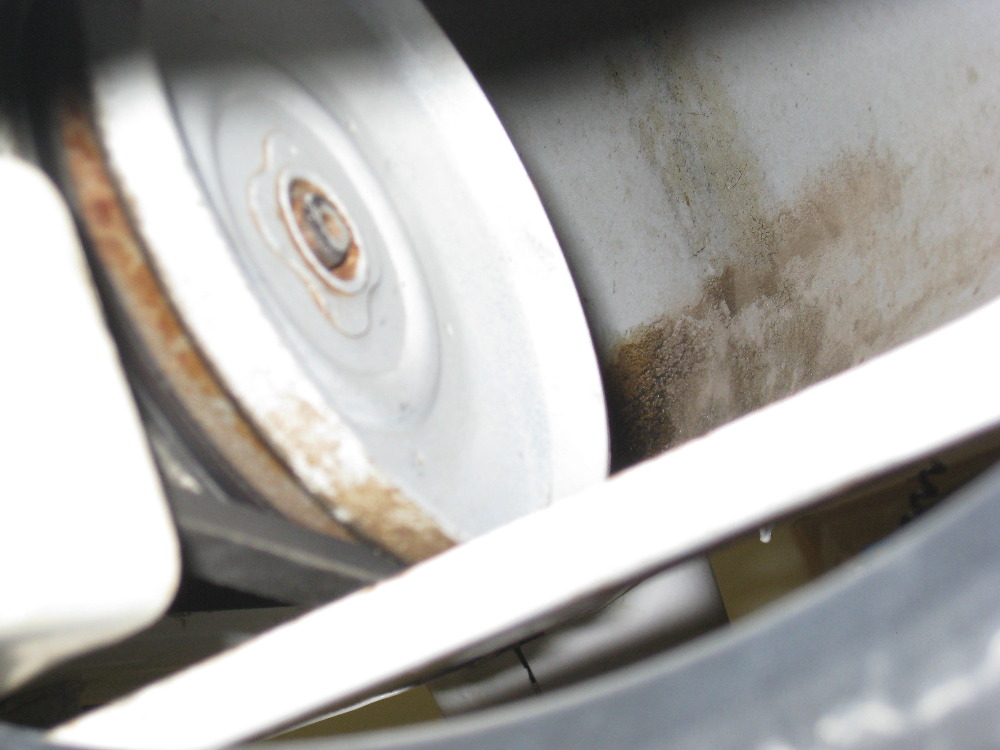
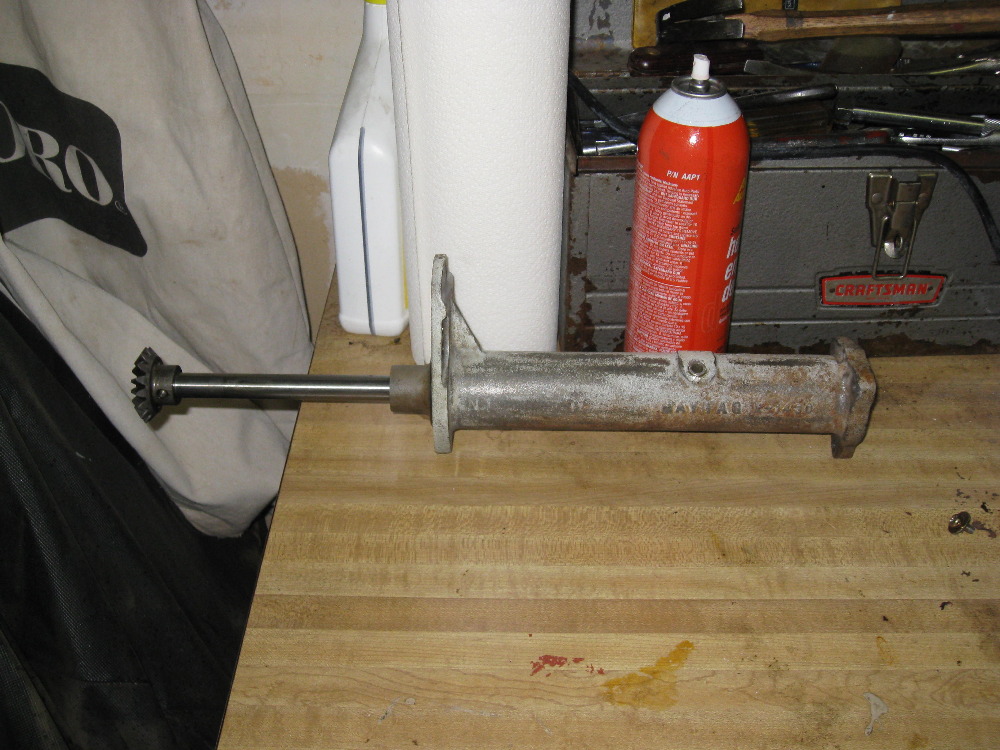
The raised MAYTAG on the front, I believe puts it somewhere after 1960?

The vent hole, is on top of the right angle drive. (The part that's coming off the power unit, going towards left leg, where the wringer is) Sometimes it hard to see, but if you run your hand across the top, you'll feel it.
Post pic's when you can!

HTH, and welcome to the forum.


Post# 617405 , Reply# 5   8/15/2012 at 23:07 (4,269 days old) by e2l-arry (LAKEWOOD COLORADO)        

Sounds like transporting it upright is what I'll do. I've been reading some of these posts for awhile and it's confusing about adding oil or grease to these machines. Can you or can't you and do you need to or don't you and so on. We had a 1965 Maytag automatic w/ suds saver. It replaced my mother's 1952 Kenmore with suds return. Hear that Stan? My mother had it over 20 years. Then gave it to my brother after they moved to Florida. It started leaking oil when my Mom still had it. There was no way, that we knew of anyway, to replenish it. My brother used it another 5 years before it must have finally lost enough oil and either the motor or transmission burnt out and it went to the washer bone yard.

Great pictures in here. I like the 1970 Avacado Green E2LPS, Is that original? It looks showroom new! Thanks for the tip on taking the wringer off. That'll make the move easier. I'll upload pictures of mine this weekend. Keep a picture history so to speak. Cosmetically it's not perfect. Some scrapes and scratches and the finish is rather dull. I'm lucky there's no rust and it runs. So 1st order of business is to clean it up inside and out. The agitator was still on so and I've read horror stories about them being stuck. I though it was common practice to take the agitator off when finished? That's what my Grandma did with her Speed Queen when she was through. So I'll clean it up and do a test wash load to check for leaks and overall performance. Then decide what's next. I'd like to sand it down, prime and paint it. I saw at Home Depot they sell an appliance enamel Rustoleum.

I'm so looking forward to this weekend! I'll be sure to keep you posted.

Larry


Post# 617420 , Reply# 6   8/15/2012 at 23:43 (4,269 days old) by rp2813 (Sannazay)        

rp2813's profile picture

Try Meguiar's Car Cleaner/Wax on the finish and see if you can revive it.  You may not be able to reproduce the same durability of the original finish even with Rustoleum enamel. 


You can hide scratches by using a small bottle of white appliance touch-up -- very sparingly -- the brush should have barely any product on it and you should apply by lightly dabbing just enough to obscure the scratch.  Go slow.  Less is more.  Slather it on and it will be very obvious.  I used this method on a vintage refrigerator and I can't even find the repaired areas anymore.  Use the Meguiars after doing all of the touch-up work.  It made the original enamel finish on my fridge shine like new.


Post# 617438 , Reply# 7   8/16/2012 at 02:02 (4,269 days old) by stan (Napa CA)        
Larry

stan's profile picture
Thats a very good question about the oil!! I have asked here before, and really never got a answer that I was comfortable with.

I have read on another thread here where someone claimed that he added spindle oil thru the side cover of the power unit while the machine was laying on it side?? However I have talked to Phil at Phils Maytag (someone many of us here have gotten parts and advice from) some years back and If I remember right, he said no? And I defiantly remember him saying that it could not be added thru the wringer post, and have it reach the power unit.

I have a service manual for the machine, and I have studied it carefully, and can not see any way to add oil to the PU other than removing the PU from the tub, and adding gear lube directly to the to the top, and re bolting it back on. In that case it may require new seals ect if going that far! (now I think i want to get a hold of Phil and ask) LOL

Think the MeGuire's is a good choice as well. MeGuire's also make a "fine cut cleaner" that will remove scratches and imperfections and then follow with the cleaner/wax that Ralph suggested.

Since it's a E model, you may also have a little work to do to restore the brilliance to the aluminum tub, and crown. If so I would suggest you do that part first, then move on the the body, wheels ect.
If I had mine to do over I think after getting the crown clean and polished, I would have sprayed a clear lacquer over it, then dealt with the body, as I'm always re polishing the crown from water spots.
The E is a good machine for overnight soaking, as it holds the heat of the water for a long period of time.

Glad to hear that the 52 lasted so long, they were great machines!

Stan


Post# 617465 , Reply# 8   8/16/2012 at 06:38 (4,268 days old) by maytagmike (Burlington, Vt)        
my mom's maytag

maytagmike's profile picture
I have the exact same maytag with the raised letters on the front. moms machine was manf in july 1962 and mom bought it right around the same time.

Post# 617624 , Reply# 9   8/16/2012 at 17:51 (4,268 days old) by e2l-arry (LAKEWOOD COLORADO)        
meguire's

Good call. I'll stop be the Auto Zone and pick up some Meguires tomorrow. I thought about rubbing compound and car wax but thought that then if I did decide to paint it would never stick. But then again, if you prep it correctly there should be no trace of wax or anything else. I even have a buffer I use on an old car, 71 Chevelle convertible, that might help the finish. I KNOW I'm going to be going at this thing non-stop once I get it home.

I found something on line yesterday where I downloaded a Maytag Operator's manual in a PDF file for only $1.99. It didn't tell me anything about the operation of the machine I didn't already know but was crystal clear on the steps to loosen and tighten back down the wringer. The rest was just on washing the "new" synthetic fabrics and other ancient laundry topics like using bluing, tinting and starch. A different time indeed!
"Sherman, set the Wayback machine for the year 1945"
"Right Mr. Peabody!"


Post# 617684 , Reply# 10   8/16/2012 at 21:40 (4,268 days old) by geoffdelp (SAUK RAPIDS)        

Hi all ... Stan is right; there really is no way to add transmission oil into the power unit of a Maytag wringer without removing the tub and the center plate. Also correct that once the center plate is removed, gaskets should be replaced. If your tub has the hex-head bolts, it is easier to remove using a 1/2 drive on a socket wrench. If it has the old brass gulmite bolts with the rubber washer/retainer seal, you will need the special gulmite wrench. Not sure but Phil is a wonderful resource for parts, etc.

You can move a Maytag wringer by laying it down ... but ... you MUST lay it down on it's front ... or where the "Maytag" decal is. Removing the wringer head is also a must if you do that. If you have oil/water that comes from the right angle drive, it means that you have a leak in the water retainer in the center seal and water has entered the transmission and pushed itself into the right angle drive.

These wonderful machines were meant to be used and if they have sat for long period of time, the gaskets sometimes have a tendency to dry out. I've even had oil leaks stop with continued use; that's not always the case, however. A lot of these machines were abused with overloading and improper care ... so ... it's a Catch-22; if you have one of these machines you might want to consider learning to strip it down to the transmission and get new gaskets and transmission oil. You might also want to learn to remove the right angle drive and get the proper lubrication to pack the wringer post. Again, Phil should have all of these parts/fluids necessary. I don't have his email address handy but he seems to have a lot of things available on eBay.

Good luck and I hope you enjoy washing in your E2L!!


Post# 617687 , Reply# 11   8/16/2012 at 22:19 (4,268 days old) by stan (Napa CA)        
Hi Geoff

stan's profile picture
glad you stopped by for this,
hearing this from you, confirms it for me, so don't feel the need to ask Phil! LOL

My E2LP (1954) on occasion leaks thick grease out of the breather (right angle) dose'nt "appear" to have water in it, so I leave well enough alone??


Post# 617743 , Reply# 12   8/17/2012 at 02:49 (4,268 days old) by e2l-arry (LAKEWOOD COLORADO)        
HI GEOFF

Glad you stopped by. Just joined the other day but have been reading posts for a long time. As I have said, you seem to be the "GO TO" guy on these Maytags!

Thanks and I'll keep you posted once I give the patient a thorough going over on it's maiden physical. Once cleaned I figured I'd fill her with hot water and check for leaks. Might as well do a load of whites since it's filled anyway. We'll see how far I can get with it.


Larry


Post# 617792 , Reply# 13   8/17/2012 at 08:54 (4,267 days old) by geoffdelp (SAUK RAPIDS)        

Stan ... the thick grease coming out of the breather hole could be one of two things. The wringer post is packed with a heavy lubrication that reminds you of Vaseline but oilier and Maytag would pack at least a half pound of it into the post at the time of manufacturing. Through the years, that lubrication breaks down and can seep into the right angle drive. Or ... it could be that water has entered the transmission through the center plate seal causing the transmission lubrication (like heavy motor oil) to become thick and forcing its way into the right angle drive.

Whenever I've seen that in machines I've repaired, I've always taken the transmission, right angle drive and wringer post out to clean, re-gasket and refill with the correct lubrication. It will run for years and years after that. It will be like new. It's worth the effort if you want to keep the machine.

The wringer head is another story and "if it 'aint broke, don't fix it"!! :-) There are a lot of gears in the wringer head and it takes a whole pound of the thick lubrication to re-pack successfully. I bet Phil would be able to fix a wringer head just like that!!

Larry ... put some hot water in the machine first and make sure you don't have any water leaks!! I usually put enough to cover the bottom of the agitator and if there is no leaks, I shut the lid and run it for a few minutes ... to be sure. I've had hoses break with full tubs of water; fortunately, that's only happened in the garage!! BUT ... running the old gal with a tub of hot water is PERFECT to clean it out and get the lubrication flowing again.

Good luck; send pictures!!


Post# 618028 , Reply# 14   8/18/2012 at 01:30 (4,267 days old) by stan (Napa CA)        
Thanks Geoff

stan's profile picture
for the info!

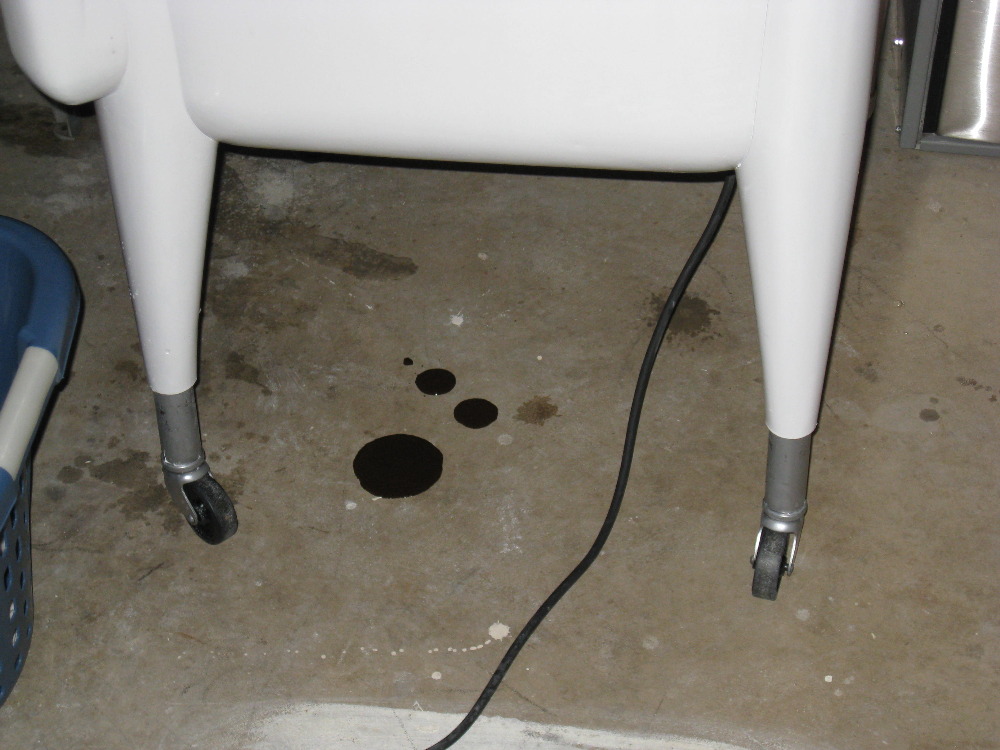
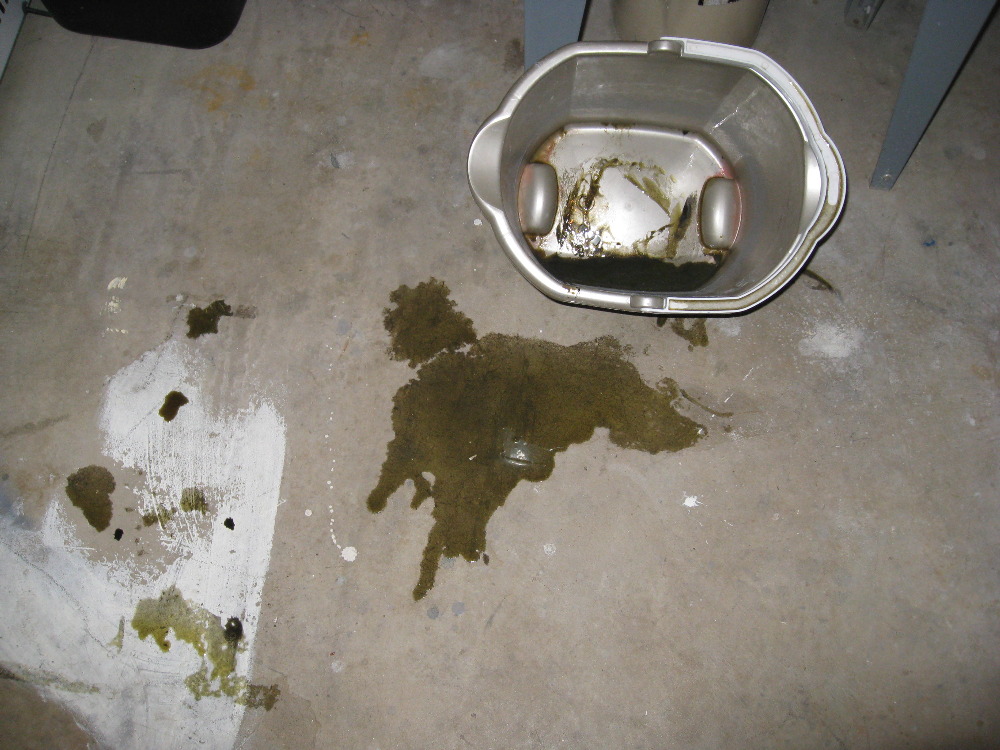
Yes I do plan in keeping the machine, and as of now it is the daily driver for the household laundry.

I believe, or I hope it's the the "first" of the two things you mentioned LOL

Im assuming the oil in the power unit is 90 weight gear oil, and the right angle and wringer post is packed with something like wheel bearing grease? ?

As I mentioned this only happens on occasion (oil Leak) from that location, and is usually about the size of a nickel, on the floor, with a little more that gets caught on the cross frame, from where it actually drips off of.
The machine seems to run fine otherwise!

Do you think it's time to take it seriously ?

Stan


Post# 618047 , Reply# 15   8/18/2012 at 03:33 (4,267 days old) by rp2813 (Sannazay)        
PDF file for only $1.99

rp2813's profile picture

Larry, it sounds like you pulled up the "Automatic Ephemera" site which was just recently launched by our webmaster here.   There are a lot of interesting appliance documents in the library there.  You might find service & repair information there at some point in the future.


Ralph


Post# 618061 , Reply# 16   8/18/2012 at 09:12 (4,266 days old) by laundromat (Hilo, Hawaii)        

laundromat's profile picture
That looks like the one I was just given to by a friend here in Rosedale. We were in "comformation" at Church and classmates in school. His Dad replaced an older model with a newer the last of which were made around 1972. She used it three times and hated it so it has been covered with plastic in a corner all by its lonesome until I found it and was happily told I could have it. I need to get the weight so I can have it shipped to Hawaii.It is my favorite style of single tub wringer washers.

Post# 618077 , Reply# 17   8/18/2012 at 11:17 (4,266 days old) by e2l-arry (LAKEWOOD COLORADO)        
SHIPPING WEIGHT

When I was doing a Google search on Maytag wringer washers I can across some sites that will bid on LTL (Less Than truck Load) shipping. I've seen the weight listed anywhere from 150 to 200 pounds. There was some variety in the dimensions too. Some had 3' x 3' but most had it 24" x 23",which I think is closer to the actual size. I can measure mine when I get it for exact dimensions. Geoff Delp on this site had a good idea about removing the wringer. For me that will make the moving easier but in your case I'm sure they'd go by total weight and size for costing. Shipping will be pricy but I don't expect you come across too many of these classic machines in Hawaii.

Good Luck!


Post# 618189 , Reply# 18   8/18/2012 at 21:14 (4,266 days old) by e2l-arry (LAKEWOOD COLORADO)        
PROBLEMS!!!

Well, I got it home and cleaned it up. Scrubbed it down. The paint was badly oxidized but it looked better after it was washed. Now some wax and touch up paint and it'll be pretty as a picture.

I did notice when I saw it Monday that the agitator switch was bent upwards. I looked under the machine and all I could figure was it got bent by accident some how. I was able to straighten it out with a pair of vice grips. One problem solved. Smooth sailing?

Then, just as I feared, the agitator is as stuck as can be. I actually lifted the machine off the ground, sans wringer. I bought some WD-40 with the adjustable nozzle and tried to get some under the agitator. While doing that I noticed the top of the agitator had been glued and broke off when I gave it a tug. So if the WD doesn't work I can bust it off. I already ordered a new one. It'll be aqua instead of black but that doesn't bother me. I also ordered the new rubber ring the holds the agitator down when the machine is full of water.

Then when I was looking under the hood I noticed that the belt was badly worn so I ordered one of those as well.

So before I worked on the cosmetics any further I rolled it up to the utility tub. The door to the utility room in my basement was too narrow so I had to take the door off. Still wouldn't fit so I had to remover the door frame as well. Always something, that's for sure.

Wait! It gets better! So I start to fill the tub and I left the room for 30 seconds. I figure by now I'd earned a beer. When I got back, you guessed it. WATER ALL OVER THE FLOOR!!! So I grabbed the drain hose and emptied as fast as I could. I stuck a bucket under the machine and had a look hoping it was only a bad drain hose. No such luck. The water was coming out all over the PU. So now I'm figuring I need to do a whole rebuild. Or is it as simple as a new gasket between the PU and the washer bottom? But I don't think it's that simple because it looked to me like water was coming out at ever possible connection or seal. I'm not sure where to even start with this but feel I'm certainly capable of the task.

Any advise on how to start? or where to start? Or where to get a gasket kit? I really was hoping to wash for the first time in 44 years with a wringer washer but looks like I'll have to wait a few more week/months???


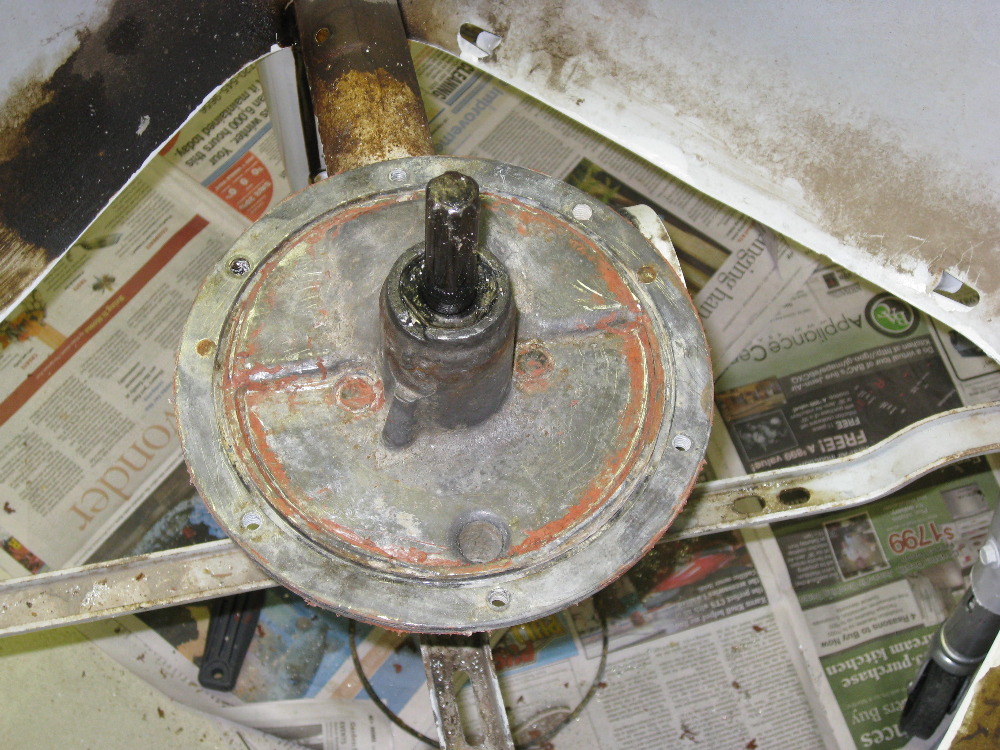
Post# 618193 , Reply# 19   8/18/2012 at 21:36 (4,266 days old) by e2l-arry (LAKEWOOD COLORADO)        
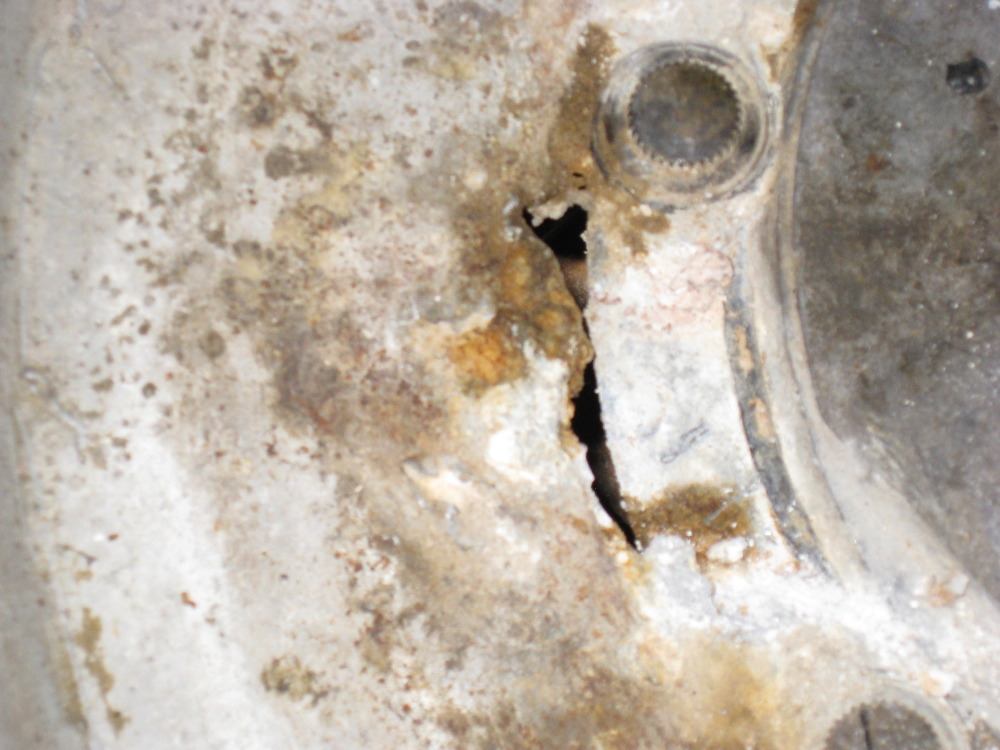
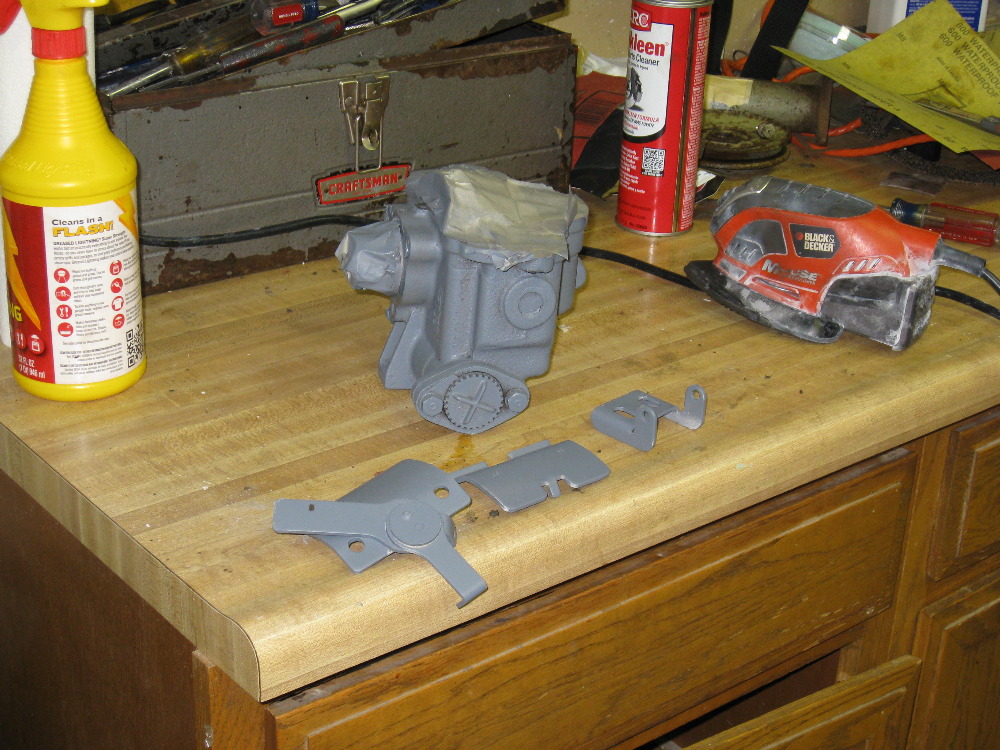
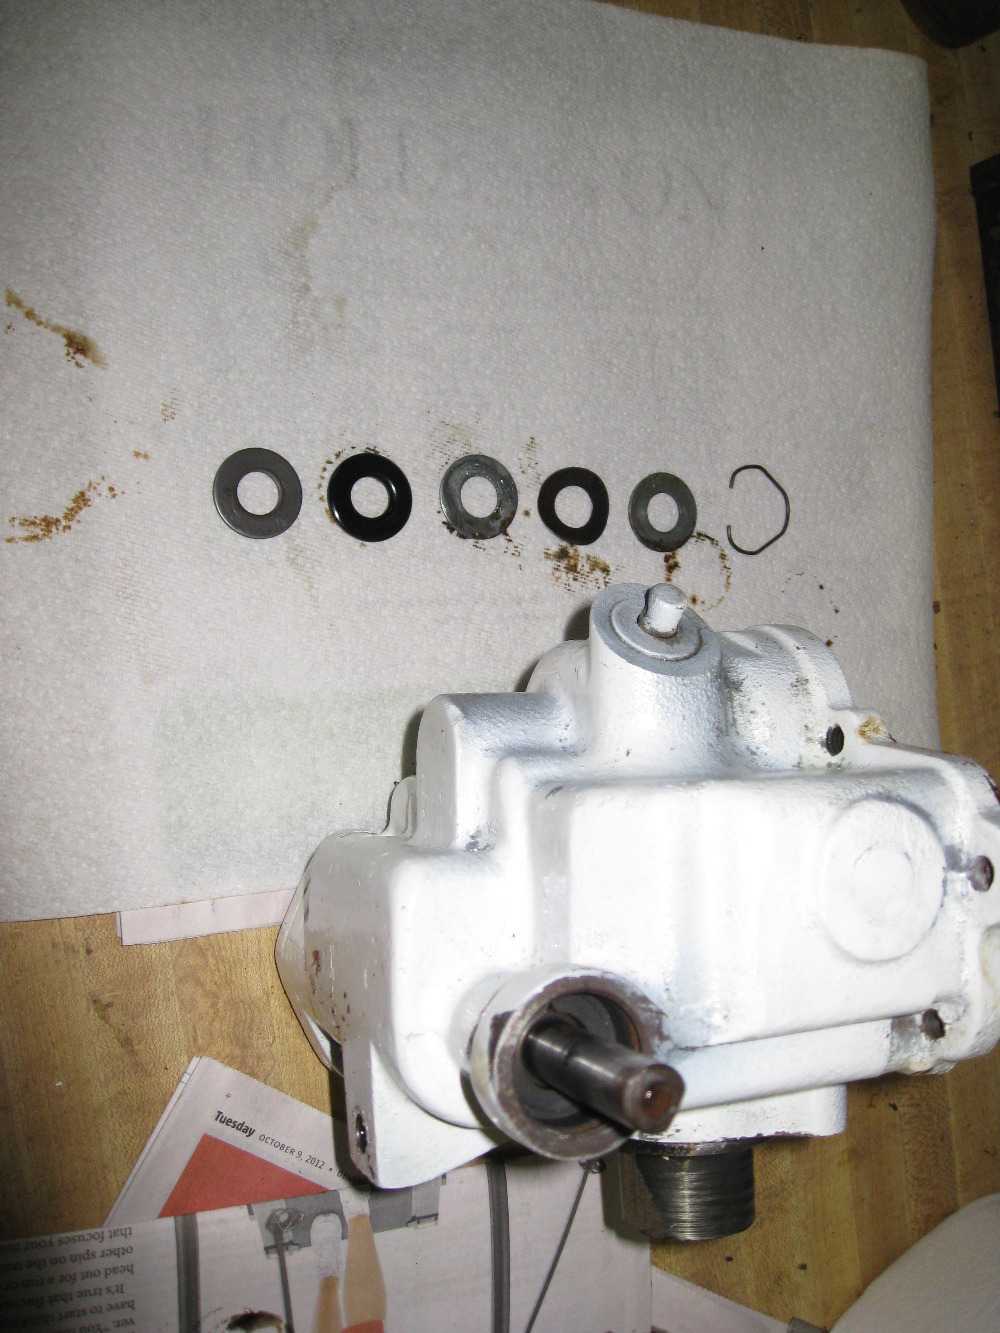
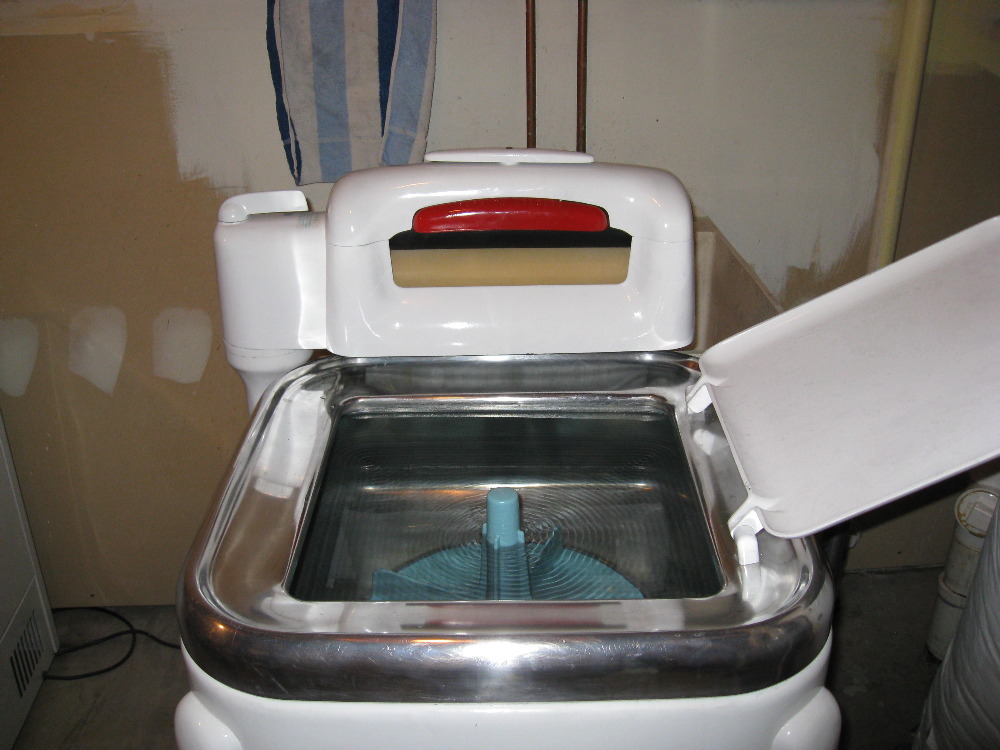
GASKETS

I just found a gasket kit for Maytag wringer washers. On Ebay it said it was for "vintage 80's Maytag Wringer Washers. I think mine is a 60's version but it's that same isn't it? Her a picture of my broken agitator.

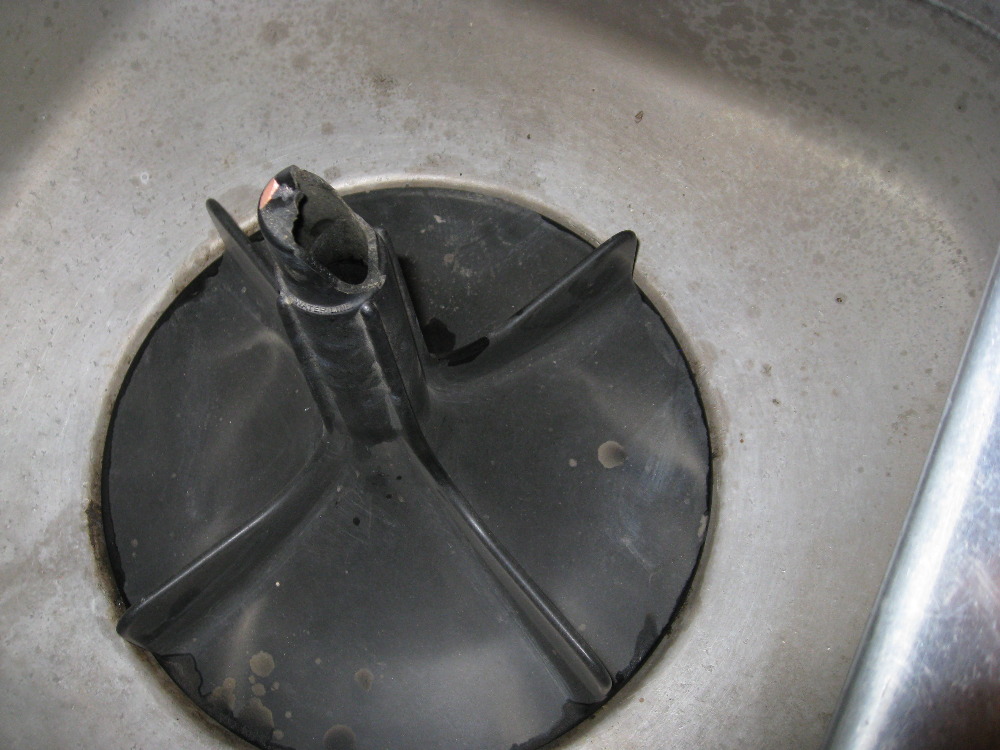
Post# 618271 , Reply# 20   8/19/2012 at 02:02 (4,266 days old) by stan (Napa CA)        
Hi Larry

stan's profile picture
I was hoping that you were going to be able to fill and go, but no such luck! Damm!

Rest assured we are here to help in our own way!

Geoff will probably be along and will have very good tips for you. Until then...the gaskets are the same (60's to 80's)
You might as well do the best you can to remove the agitator, and see what kind of bolts are under, that hold the PU on, if they are the gulmite bolts, you'll have to start looking for a gulmite wrench. Think it's impossible to get the WD 40 to reach the spot it would need to, with agitator still on, unless you can squirt it down the the broken spot and have it reach? (wishful thinking)
It may require laying a 2 by 6 by 3 ft board across the top of the machine, and using a couple of strong straps slid under two sides of the agitator, brought up over the board and over a steering wheel puller, or small floor jack rigged up to lift the agitator straight up off the post. Once the agitator is off, you could try another water test to make sure removing the PU is necessary. Sometimes it's just one bolt that water seeps thru, and makes it look worse from underneath than it really is ( again this is total wishful thinking, but no harm in trying at this point) LOL.
Have you plugged the machine in without water to make sure the electric motor is working?
Also from the pics, it looks as though the machine is gravity drain only??

Sounds like the cosmetics will have to come later, you have a little work to do first. Keep us posted! pics

Stan


Post# 618335 , Reply# 21   8/19/2012 at 10:32 (4,265 days old) by e2l-arry (LAKEWOOD COLORADO)        
Hi Stan

We had the same idea about WD-40 down the agitator broken spot go I gave it a good spray through the top. Now I can see a puddle of it down there. So I don't know if the agitator is hollow all the way through or if the WD-40 is puddled up on top of the seals or something. Anyway, it's sat over night and later today I'll try it again. If it's still stuck I'll start chipping away at the broken agitator and remove it in pieces. I'm curious as to what's under there, bolt-wise myself. I'm HOPING that they are the 1/2" vs. those funky gulmite bolts. I'm also thinking I'll need a repair manual since I've never re-built one of these before. Where did you get yours? I'm going to look and see if I can download one.

You are correct, This is gravity drain. It' works out because I have a floor drain close to the machine.

I was trying to open up the wringer and I lifted the top half completely off. Ooops! So I thought I'd clean that while it's out and oil the bearings. I hope I can get that back together.

Before I bought this I did see it run. They plugged it in and the agitator moved and the wringer worked. I wish I'd have thought to ask them to put a bucket of water in it too. Oh well, for 25 bucks you can't expect too much. Even with all the stuff I've orders I'm only at around $110.00. There was one listed for $150.00 but that didn't even have a motor.

I'll let you know how I make out with the agitator.

Larry


Post# 618339 , Reply# 22   8/19/2012 at 10:47 (4,265 days old) by wringer (x)        
Hi Larry,

There is a metal spline inside the agitator center at the bottom. It could be a plastic one but I doubt it since this is an older unit. The metal spline inside the agitator is what has "frozen" to the drive gear coming out of the PU. Your problem comes from someone never removing the agitator after a washing and lubing it occasionally. I have never had to deal with this but have talked with people who have and it seems to be a situation that takes some time correcting. The metal spline is put into the agitator with a type of machine that forces it in with leverage. I have had splines removed and replaced by the Amish here. Good luck in your restoration. When done you will have a Maytag that will last for years. I have an E, J and N that are used as daily drivers. One to wash and the other two for 2 rinses. Geoff has all of the answers here as he has done this all before. His machines are beauties. And, his knowledge goes very deep. Best of luck to you !

I have purchased many parts from Phil in NY and talked to him at great length about these beauties. He is a very nice guy and is very helpful. His prices are reasonable also.

Jim


Post# 618355 , Reply# 23   8/19/2012 at 12:32 (4,265 days old) by stan (Napa CA)        
Hi Larry

stan's profile picture
The top half should go back on easy, just turn the tension bar back and forth as your trying to drop it in, and you'll figure it out!
Another common problem with these machines is the "index slide" in the wringer. This is the part that locks the wringer into position when you are putting clothes thru. Many time this is broken from someone manhandling it! (very easy fix with new part)


Post# 618416 , Reply# 24   8/19/2012 at 16:03 (4,265 days old) by e2l-arry (LAKEWOOD COLORADO)        
found the leak

I got the agitator off. I had to break in into a thousand pieces but it's off. The spline is still stuck though so I haven't figured that out. I might not need to. That machine was a mess I'd say that agitator had never been off. I cleaned it a little and noticed right by 4 of the 6 bolts that attach the PU holes have rusted through. Here's a picture. So now my question is can these be patched or is this machine only useful as a planter? There are 4 holes the size of a dime to nickle. I dropped screw drivers through 3 of them to help with the picture. As usual, any help will be GREATLY appreciated. I feel like I'm fighting a loosing game here.

Larry


Post# 618523 , Reply# 25   8/19/2012 at 23:45 (4,265 days old) by stan (Napa CA)        
Hi Larry

stan's profile picture
Don't give up yet!
You might want to Google around a bit, and find a some aluminum patching, probably a fiberglass resin, and cloth kit found in a auto supply will work, since it's not going to show, like a fender on a car, it dose'nt have to be perfect, just water tight, they also make patching for aluminum boats that should work!

If it were me I'd try to patch, then check to see if tub holds water, if so, then go a head and remove what's stuck to the post. if it is leaking badly into the PU, you'll know quick enough, as water and oil will start to come out of the weep hole as mentioned up thread.
Looks like it will take a little time and elbow grease to get that loose from the post, but you'll get it!

If you get that far, you can start to clean the tub with hot water,and a S.OS pad with light pressure, then hot water and detergent, and 2000 grit sandpaper, to bring back some shine. Same for the crown! (you'll rinse a lot of dark grey water away, but thats normal)

Now if you actually get THAT far, the I would spray some clear lacquer on just the crown (masking everything else off) as I wish I had done with mine!

As best as I can see, it looks like you have the gulmite bolt on yours? Hopefully you won't have to mess with them!

Hang in there Larry! If you get flustered, walk away for a while, it aint going anywhere. Take your time

HTH

Stan


Post# 618548 , Reply# 26   8/20/2012 at 03:23 (4,265 days old) by stan (Napa CA)        
The more I look

stan's profile picture
at that last photo. they more I feel that there is nothing leaking into that PU? Just call it a hunch!

If those holes can be patched, and if you can get something under that left over agitator spine, to lift it off (blow torch heat gun may help) I think you'll be O.K!

I have lots of ideas of how to make the machine look new, but you got to get past this first!

Forgot to ask if you found the lint screen (sediment trap) under the agitator?

I have a service manual for this machine in a PDF I think? for sure I have it on a disk. Let me know if I can help you with that at least.

Stan


Post# 618549 , Reply# 27   8/20/2012 at 03:39 (4,265 days old) by qsd-dan (West)        

qsd-dan's profile picture

I fully agree with what Stan says above. He provided great advice.


You may be able to patch smaller holes with JB Weld. Once all of the holes are patched up, coat the rest of the rust with something like POR-15 which will encapsulate and prevent any further rusting.


You'll need to chisel the drive block off of the agitator shaft. That's supposed to remain inside the agitator. You new agitator will come with a plastic one already installed inside of it.


Don't give up yet! She's still got plenty of life and many loads left in her.


Post# 618696 , Reply# 28   8/20/2012 at 15:50 (4,264 days old) by stan (Napa CA)        
Rust

stan's profile picture
is the oxidation of iron!

So IMHO Im not sure about the Por 15 for this application? But I've never used Por 15 either so maybe?
Remember what ever it's patched with, has to stand up to hot water and detergent (why I think a boat patch 'maybe" is best)

Aluminum, will oxidize in a short period of time... reason why I suggested cleaning and polishing the crown, and spraying with the clear lacquer (to stop oxidation) just for cosmetic reasons.

The holes are caused by corrosion (not rust) most likely from modern detergents that are heavily dosed with Washing soda (a corrosive to aluminum) Chlorine Bleach (also corrosive) and obvious neglect (someone never removing the agitator, rinsing, and properly draining out, and wiping the machine dry) You can kind of tell from their location (lowest point where water would set the longest)

Keep us up to date Larry


Post# 618725 , Reply# 29   8/20/2012 at 18:23 (4,264 days old) by e2l-arry (LAKEWOOD COLORADO)        
Hi Guys

Well,it's been a ride all right. I heard from Phil at Phil's Maytag. He said he thought that if the bottom of the tub had holes that surely there would be water in the transmission and I should cut my losses and use it as a ice cooler for Coors light. Which beats using it as a planter anyway. I told him that after seeing the condition of the machine that I was going to rebuild it anyway. Sadly, this machine has been seriously neglected but I still think I can get it to a usable state.

I just looked up J-B Weld and I liked what I read. I found this site when googling aluminum repair yesterday. The site is www.aluminumrepair.com... and for $65.00 you get these brazing rods and you can use a propane torch to fill holes and cracks in aluminum. They have a video and it looks pretty cool and I think I could master that. But, I'd be heating the area of the bolts to 700 + degrees and I'm sure that would destroy the gaskets so I'll only go that route if I take the PU out. Now that Dan's turned me on to the J-B Weld, that's an easier and cheaper alternative. Then at least like Stan says, I could at lease verify if water has entered the tranny or not.

Here's the other thing, you should have seen the mound of gunk under that agitator! There was the black mound that turned out to be the drain screen. I thought only the pump models had those? It was totally plugged and a few of the holes are rusted out but that's no biggie. I did fine buttons, a pin and even razor blade as well and pieces of cork. I have to assume that's parts off a gasket. Another bad omen! Makes me think even more the PU has to be removed.

The good news is Phil offered to cancel my order for the new agitator and drain hose I ordered. I don't want to cancel but maybe suspend the order?? He did have a gulmite wrench for $35.00. I don't want to spend good money after bad though. Phil also said cutting oil, which I have applied should free up the spline stuck to the shaft.

So Stan, you have the manuals. I'm pretty mechanical but do you think I'd be getting in over my head re-building the transmission? How complex does it look to you? I don't know about replacement parts, if there are any other then the gasket set, which I've already ordered as well. I'm inclined to make this a fall weekend spare time project and get this machine running. Who doesn't like a good challenge every now and again?

Thanks again guys. Your input is invaluable!

Larry


Post# 618826 , Reply# 30   8/20/2012 at 22:47 (4,264 days old) by stan (Napa CA)        
hi Larry

stan's profile picture
It's really not complicated at all

but to tell you the truth I would avoid going there unless you have to! Think of it like "your the Doctor and it's the patient" First do no harm LOL

For what it's worth...
It just dose'nt make sense to me that you have to "assume" that water has gotten into the PU without hard evidence!
Since the motor works and there is still a belt turning the agitator, why not run the machine, (motor and belt) for an hour or so.
(cant hold water now anyway) and see if anything leaks out of the weep hole, and listen to how the gears sound. If it sounds O.K and there is no seepage, then lets "assume" that water has NOT gotten into it!
If your prepared to do a tare down now, then you'll be prepared later. Do you see my point?

If it were me, I'd go ahead and get a new agitator, your going to have to anyway if your going to restore it later!
(and keep it a washing machine)
In the mean time, patch the holes to make sure the tub holds water. Then run the machine and see! There is nothing lost at this point. If evidence shows up later, that water IS getting in, then you still have'nt lost anything, because you were ready to do a tare down in the first place.

Even if water has gotten into the PU, it still may not be necessary to "rebuild" it, more like cleaning and refilling with the correct gear oil.
(if you could see inside, you'd see what I mean. Not much to go wrong in there)

I'll try to email you a PDF file of the service manual. (if you want) If that dose not work then I'll be in touch to snail mail it to you on a disk.

I understand that having a pump on it may not bother you now, because of the floor drain you have, but you should know, if you don't already, that one can be added in the future without a lot of effort. Phil has them. I think for about $45.00

Sure wish this had gone a little easier for you, but they are fun little projects!

Let me know

Stan


Post# 618828 , Reply# 31   8/20/2012 at 22:59 (4,264 days old) by e2l-arry (LAKEWOOD COLORADO)        
Phil

I've traded a couple of emails with Phil tonight. You guys are right, he's a great guy and fantastic help. He told me they used to have a patch for the bottoms of these but they're no longer available. But he did have a gulmite wrench that I bought and will be sending me CD's of the service manual when my order ships. His prices are very reasonable. Essentially when removing the PU all you're doing is checking/replacing the 90 wt. gear oil and gaskets? Or do you remove the components, gears, and whatever else is in there and soak in solvent or something? I saw a post on a google search where one guy said he soaked them in coca cola because water had rusted them! I think I might as well remove the transmission though. When moving this machine I did notice a lot of thick oil down the leg of the wringer side. Plus I think I can do a better of patching with the PU out.

The saga continues!!


Post# 618830 , Reply# 32   8/20/2012 at 23:05 (4,264 days old) by stan (Napa CA)        
Oil

stan's profile picture
coming down from the leg is a different issue.
Remember these are old ladies, they often make funny noises, and have little leaks now and then! LOL No to worry too much.


Post# 618975 , Reply# 33   8/21/2012 at 13:10 (4,263 days old) by e2l-arry (LAKEWOOD COLORADO)        
Service Manual

Hi Stan,
Phil is sending me a service manual on CD. But if you could email me a PDF copy in the meantime, that would get me a jump on things.

I took a wire brush to it and found some of the holes are bigger than I thought so now not sure if J-B Weld epoxy is the way to go or the HTS 2000 used for aluminum fabrication and repair. Here a picture of the biggest corrosion. The web site says it's stronger than the original aluminum. I'm thinking I need that because if I ever do remove the P U, the holes are so close to the bolt I'm afraid removing the gulmite bolts would just tear away big chunks of the tub. Then it would really only be good for a cooler, a leaky one at that.

I've been soaking the spline in cutting oil. I think tonight I'll go at it with a heat gun and see if it will loosen


Post# 620098 , Reply# 34   8/25/2012 at 15:42 (4,259 days old) by e2l-arry (LAKEWOOD COLORADO)        
1st week!

Well, I've officially had the machine a week now. In that time I've had to fix the agitator on/off shaft. The first time I pulled on it the thing broke loose from the activator switch on the P.U. Then the wringer was messed up. It wouldn't lock in the up position and the tension set on the top only moved in 1 direction. So I pulled the wringer top off and disassembled, re-assembled and it's working perfectly now. I also replaced the belt with the new one that arrived yesterday. Still waiting on the new agitator and drain hose although I do know that they've shipped

The biggest accomplishment was getting that spline off! That took me 4 days! Cutting oil, a heat gun, brute force and nothing! I finally went at it with a saber saw. I was careful not to go to deep and risk ruining the shaft. So once I was almost through, I stopped and popped it apart with a screwdriver and hammer.

I think I've fixed the corroded through spots in the bottom on the tub. I sanded and prepped the area then patched with some J-B Weld. I checked this morning and it's solid! Now I'm going to top that with a coating of 3M # 800 Industrial Sealant when that arrives. It's not sold retail so that was a little tricky to get ordered but it's on it's way. Then for the water test. I think it will be fine but keep your fingers crossed!

After I replaced the belt I ran the machine for and hour and 1/2 last night with the agitator in the on position and the wringer running. Everything was fine. No oil or grease leaks so things are looking up!

Now it's back to the garage for the second coat of primer I put on the lid. I'm going to try the Rust-Oleum white appliance epoxy on it and see how it looks. If it looks good I'll do the wringer next, then the whole machine. There are just too many nicks and scratches to try and touch up. I've seen a few pictures of washers that have been painted (Stan's) and his results are quite impressive. It can be done so I'll be checking out the various techniques used.

More pictures soon!

Larry


Post# 620968 , Reply# 35   8/28/2012 at 23:09 (4,256 days old) by stan (Napa CA)        
thanks Larry

stan's profile picture
i'll be interested in the final outcome!

Post# 621148 , Reply# 36   8/29/2012 at 18:38 (4,255 days old) by e2l-arry (LAKEWOOD COLORADO)        
tub repairs

Here's a picture of the patched tub. I used J-B Weld to patch the 4 holes. The bottom doesn't look to pretty because I covered the weld patched with the 3M #800 Industrial Sealant. Then, since it's spreadable and I had plenty, I covered the entire bottom where there was corrosion to encapsulate it and prevent further damage. This takes up to 3 days to cure. Not likely in Colorado's dry climate but I'm giving it 3 day anyway.

Post# 621149 , Reply# 37   8/29/2012 at 18:41 (4,255 days old) by e2l-arry (LAKEWOOD COLORADO)        
With drain filter

Now with the newly painted drain filter. It covers some of the patchwork and the agitator will cover it all. I thought only pump models came with the screen but mine had one?

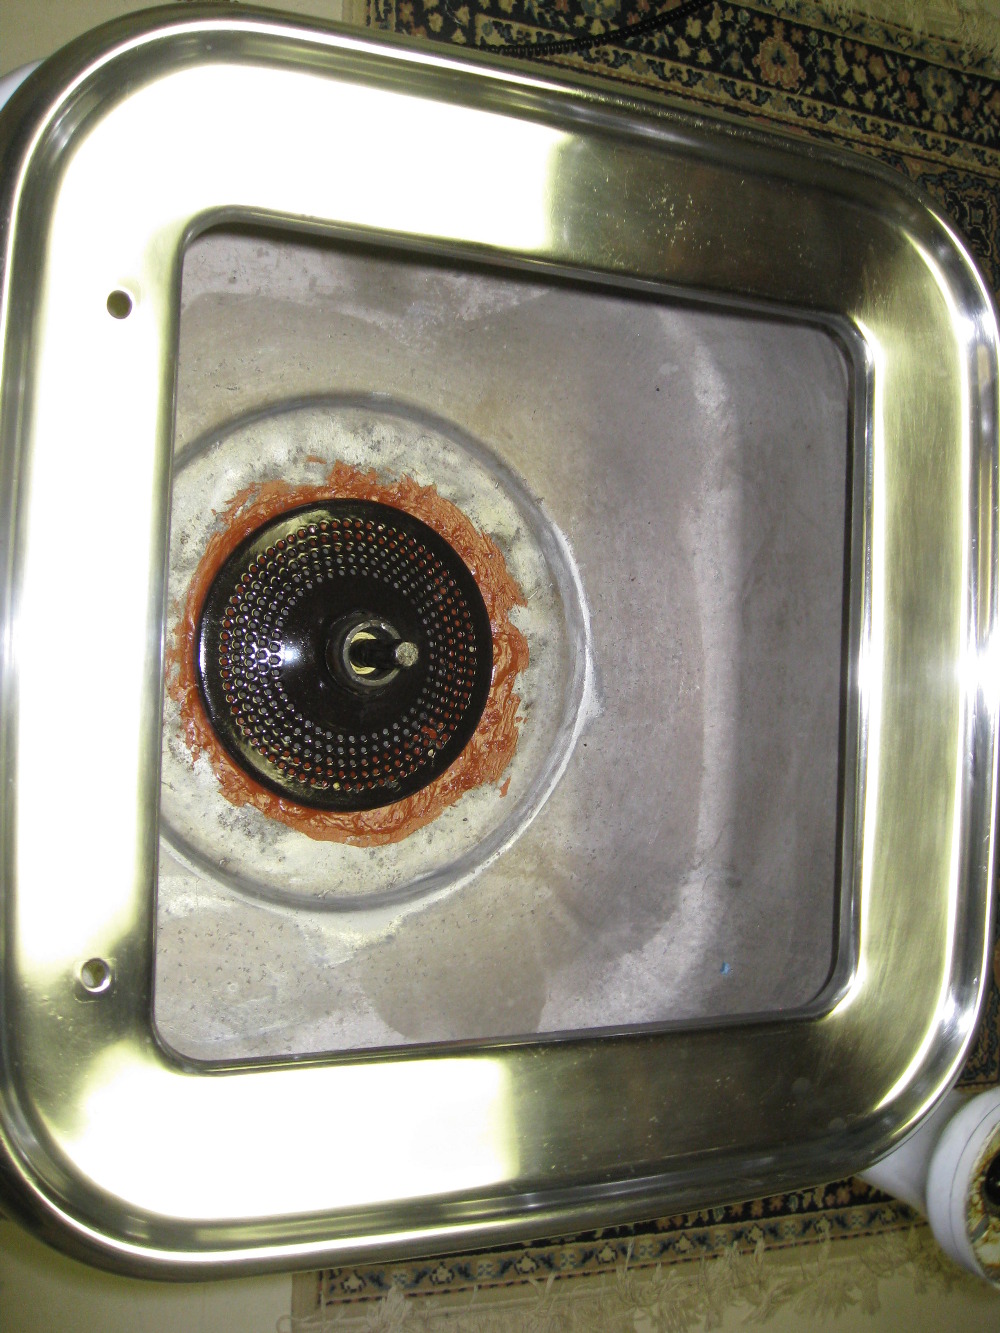
Post# 621150 , Reply# 38   8/29/2012 at 18:43 (4,255 days old) by e2l-arry (LAKEWOOD COLORADO)        
The finish

Here with the new agitator. I used Mother's Mag & Aluminum Polish on the crown. I found it at the Auto Parts store. Make it shine mike a baby's forehead!

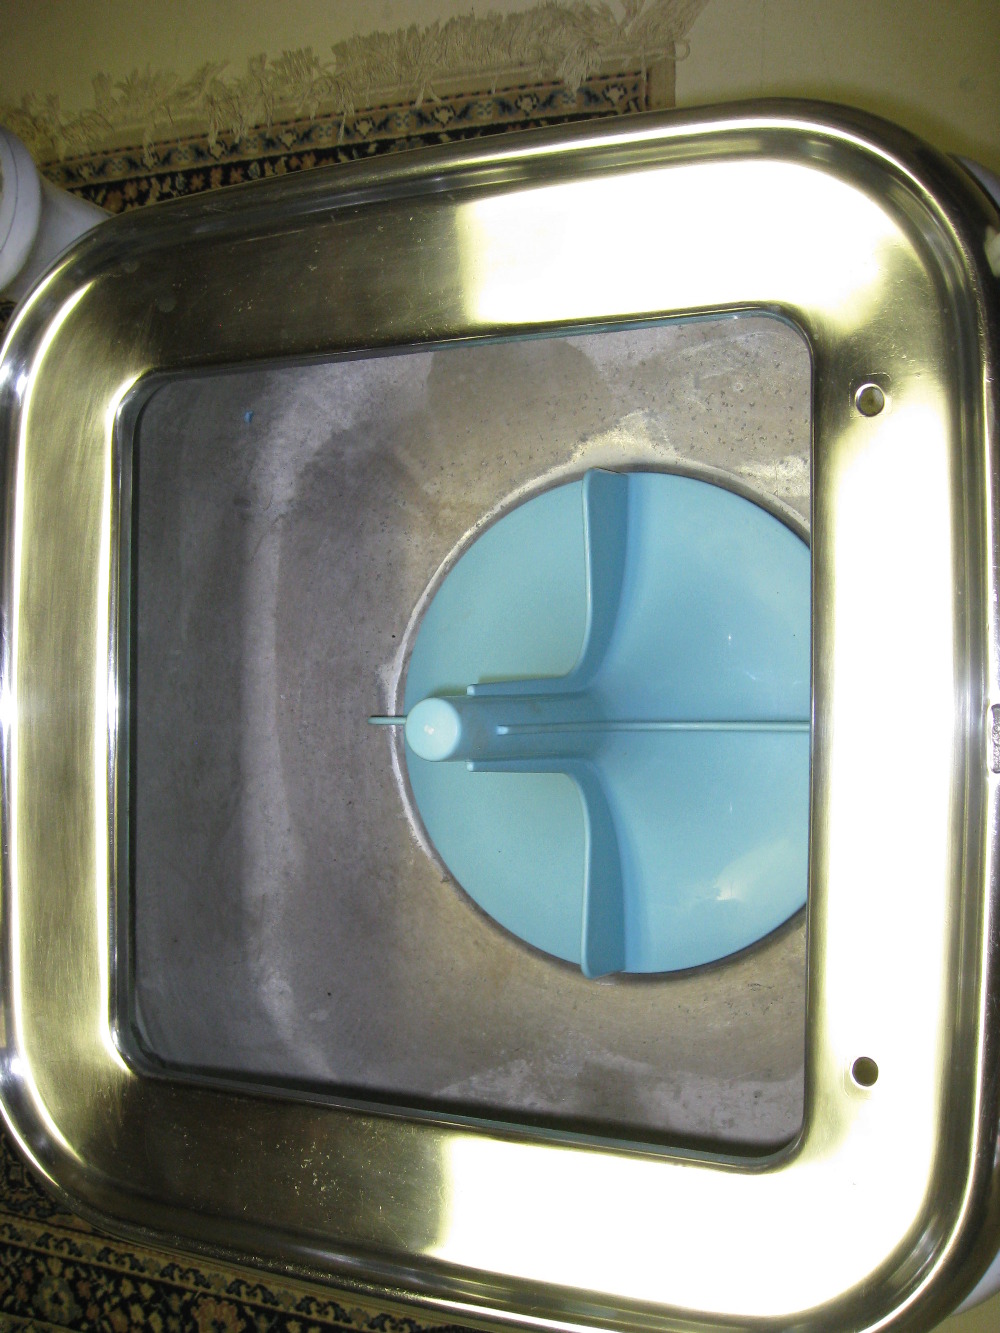
Post# 621151 , Reply# 39   8/29/2012 at 18:46 (4,255 days old) by e2l-arry (LAKEWOOD COLORADO)        
Next!

On to the wringer! The sealant will be ready Thursday and I ordered a new center plate agitator seal. If that shows up by Friday I hope to have a water test this weekend. Once I get there I'll tackle getting the tub back into shape.

Post# 621226 , Reply# 40   8/30/2012 at 00:15 (4,255 days old) by stan (Napa CA)        
all looks

stan's profile picture
really good!
Is that the appliance spray paint ?


Post# 621238 , Reply# 41   8/30/2012 at 02:16 (4,255 days old) by qsd-dan (West)        

qsd-dan's profile picture

Looks great, Larry!


It's starting to come together and won't be long before you're rewarded with some clean laundry out of those wringer rolls.


Post# 621340 , Reply# 42   8/30/2012 at 13:28 (4,254 days old) by e2l-arry (LAKEWOOD COLORADO)        
Paint

Yes, that's the Rust-Oleum Appliance Epoxy White. I bought another can and it's working fine. I complained on line to the Rust-Oleum people and they're refunding my $5.00 for the first can that splattered all over. Sometimes it pays to be the squeaky wheel.

My agitator seal arrived today! The last part of the puzzle. And tomorrow's the end of the 3 day (maximum) cure time for the 3M sealer so tomorrow night will be the next water test.

It won't be long now!

Larry


Post# 621391 , Reply# 43   8/30/2012 at 17:43 (4,254 days old) by mickeyd (Hamburg NY)        
The crown is out of sight beautiful

mickeyd's profile picture

Thanks for the hint. You really made a silk purse out of a pig's ear. You'll be so happy washing in her. I can feel your excitement.


Post# 621638 , Reply# 44   8/31/2012 at 18:29 (4,253 days old) by e2l-arry (LAKEWOOD COLORADO)        

Well, I gave it the water test and at first all appeared well. But there was a small leak. About 1 or 2 drop per minute so very minor compared to last time. I crawled under and saw the general area where the leak was. So there must be a very small leak path so I put more of my 3M #800 Sealant all around the area I suspect of leaking. Also re-sealed around all 6 bolts. It appeared from underneath to be some leak path between the tub and the P.U. So I laid the machine down, front side down of course, and was able to apply a bead of sealant all around the P.U. and the tub from the bottom as well. Now, since I have another 3 days of curing time, no washing this weekend. I went back to working on painting the wringer. When going after scrapes and scratched I always end up with bare metal so I have to prime. I primed the top yesterday and painted this afternoon. I also sanded and primed the bottom half today and that will be ready for painting tomorrow. Slow but steady but I am seeing progress! Here's a picture of the painted top 1/2 and the primer on the bottom.

Later,

Larry


CLICK HERE TO GO TO e2l-arry's LINK


Post# 622401 , Reply# 45   9/3/2012 at 19:37 (4,250 days old) by e2l-arry (LAKEWOOD COLORADO)        
We have lift off!

Today I had a successful wash run. Filler her with Hot water and powdered Tide and did 4 loads of wash. No leaks, no problems, everything worked exactly as it's supposed to work. Cleaned up the tub like Stan suggested with SOS pads and 2,000 grit wet sand paper. It finally came together. I painted the wringer and the top lid. Now I'll move onto the washer body!

Post# 622404 , Reply# 46   9/3/2012 at 19:40 (4,250 days old) by e2l-arry (LAKEWOOD COLORADO)        
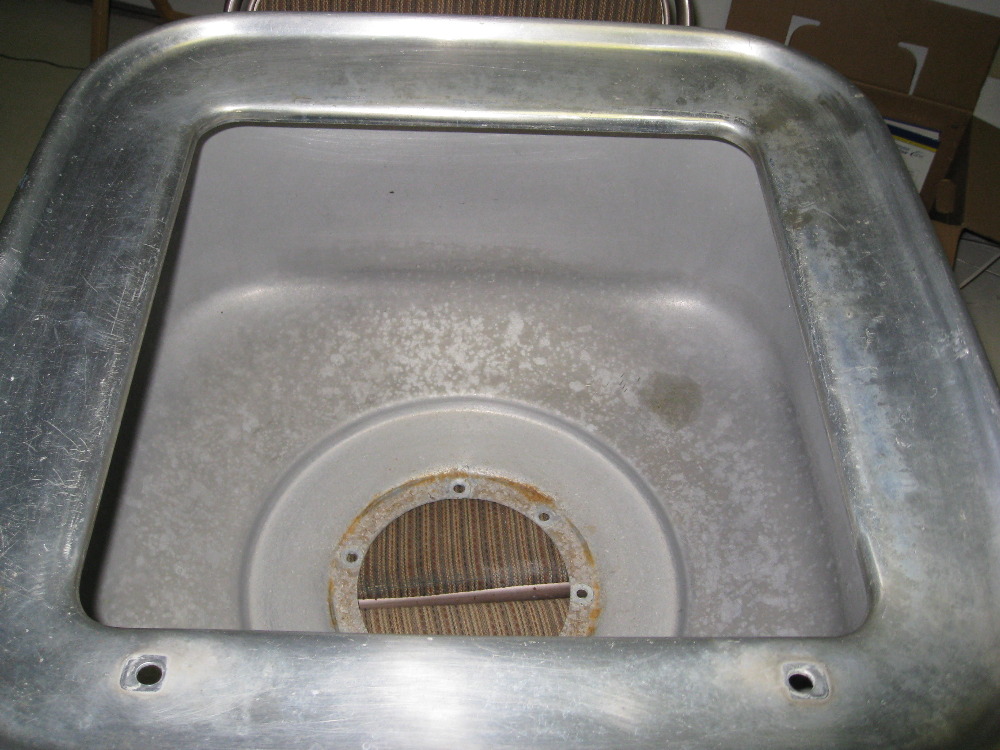
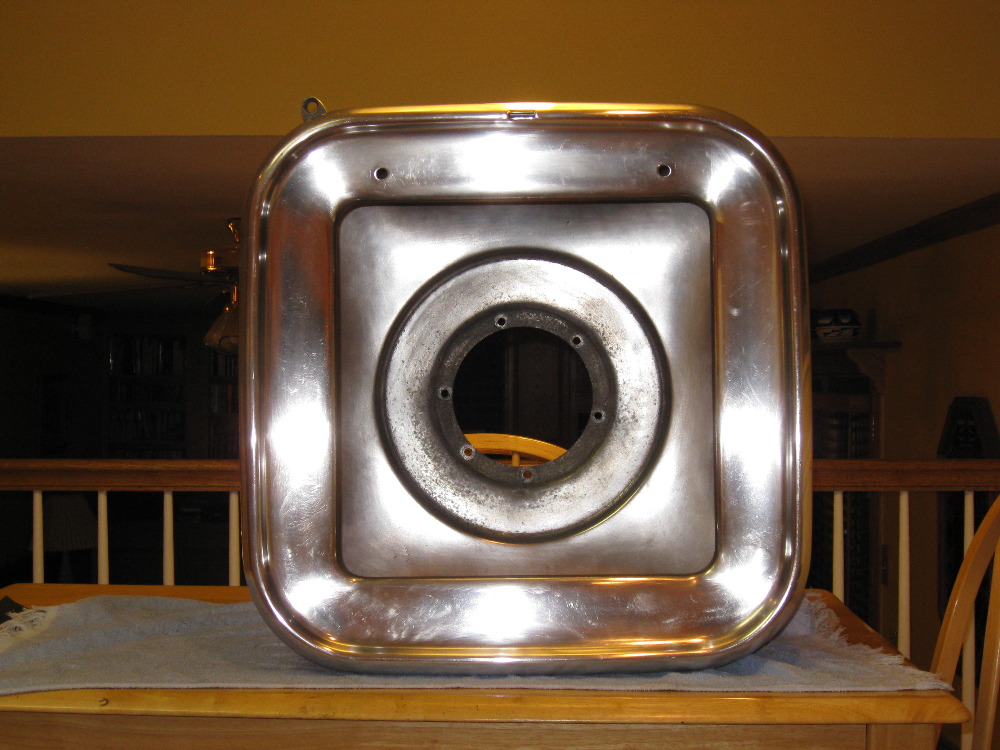
The tub

Here's the tub after some clean up and polishing.

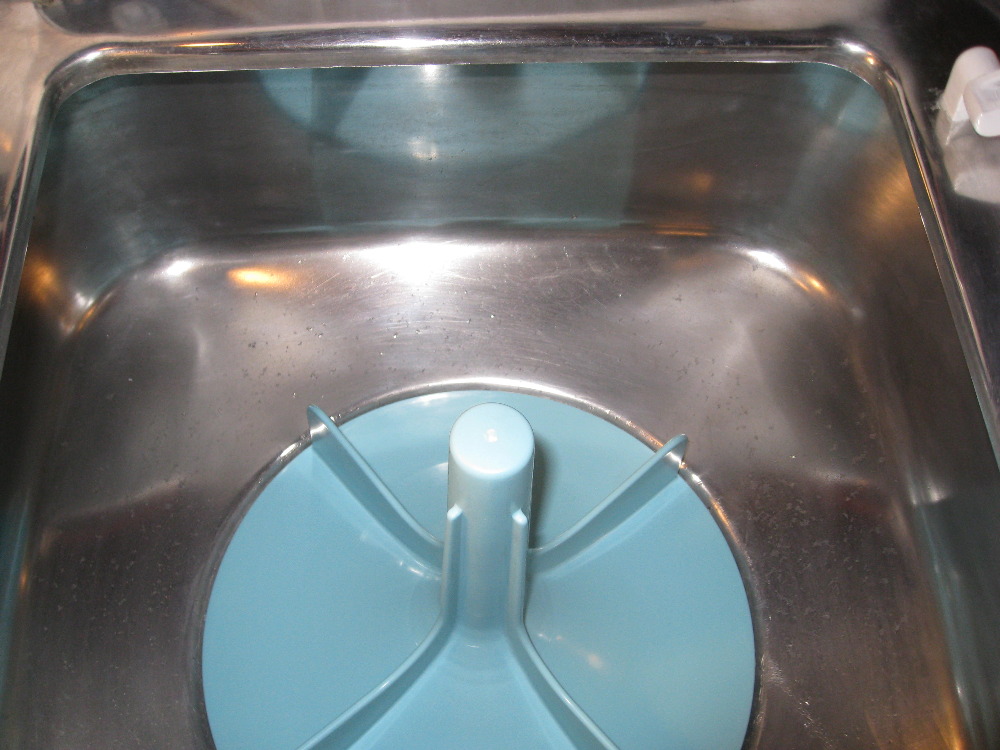
Post# 622405 , Reply# 47   9/3/2012 at 19:41 (4,250 days old) by e2l-arry (LAKEWOOD COLORADO)        
My E2l as on 09/03/12

Coming along!

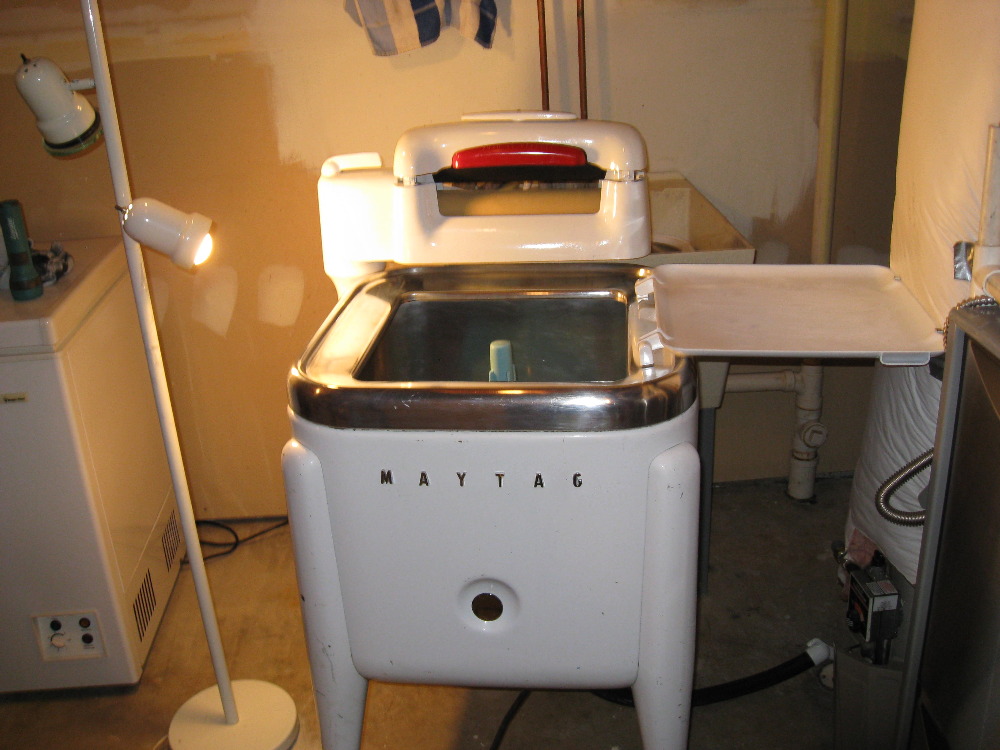
Post# 622420 , Reply# 48   9/3/2012 at 20:40 (4,250 days old) by mickeyd (Hamburg NY)        
Can't believe how beautiful she is

mickeyd's profile picture

and how great the tub came out. What a transformation. Spectacular. Wait till Geoff D. sees this! Maytag Wringer Heaven.


Post# 622618 , Reply# 49   9/4/2012 at 19:58 (4,249 days old) by stan (Napa CA)        
Release bar

stan's profile picture
looks really good too Larry!
Just noticed it in your photos here, and on the computer, instead of my phone LOL

Appliance Epoxy Spray looks good too!

Mystery paint on body to be discussed later LOL


Post# 622735 , Reply# 50   9/5/2012 at 10:49 (4,248 days old) by wringer (x)        
I would

have never believed this had I not seen and read it with my own eyes. You have done a wonderful job of getting this beauty back on her castors. I use my E2LS as a daily driver and love her. In fact, I use all 3 of my girls weekly. One for washing and the other two for rinsing. ENJOY !!!!!

Jim


Post# 622883 , Reply# 51   9/5/2012 at 22:58 (4,248 days old) by e2l-arry (LAKEWOOD COLORADO)        
Sanded and Primed

the washer itself, or do they call that the skirt? tonight. A coat of paint over the weekend. Wait 3 days and apply the finishing coat and I've got myself a pretty sweet Maytag EL2 conventional washer!

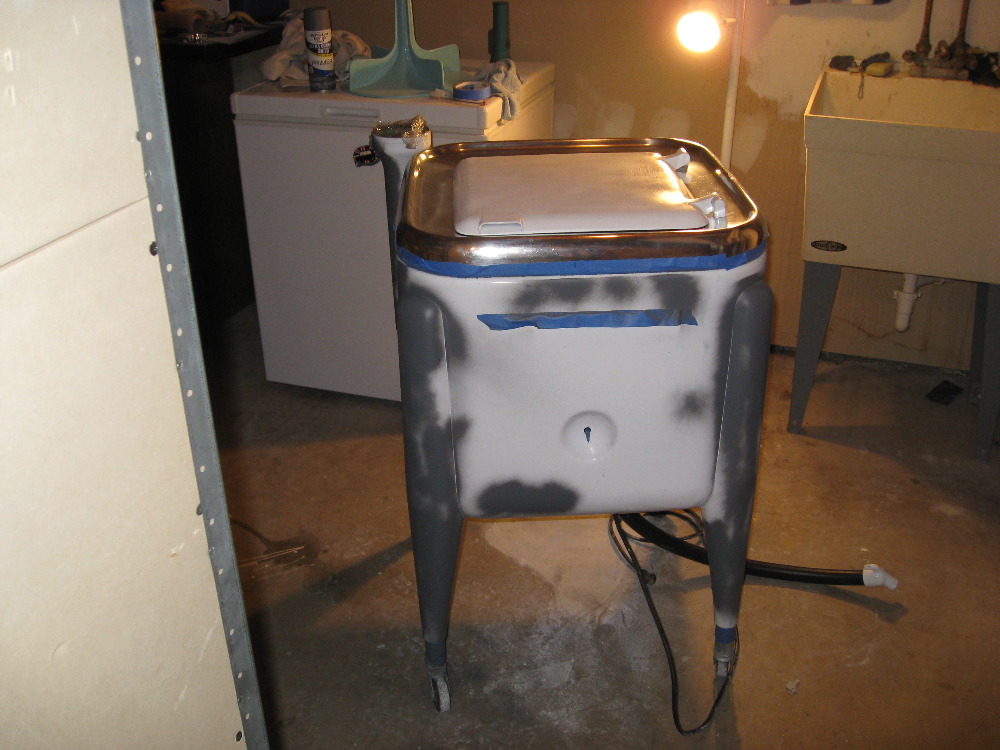
Post# 623312 , Reply# 52   9/7/2012 at 22:27 (4,246 days old) by stan (Napa CA)        
Larry

stan's profile picture
is that the floor drain under the sink?

Post# 623342 , Reply# 53   9/8/2012 at 02:01 (4,246 days old) by e2l-arry (LAKEWOOD COLORADO)        
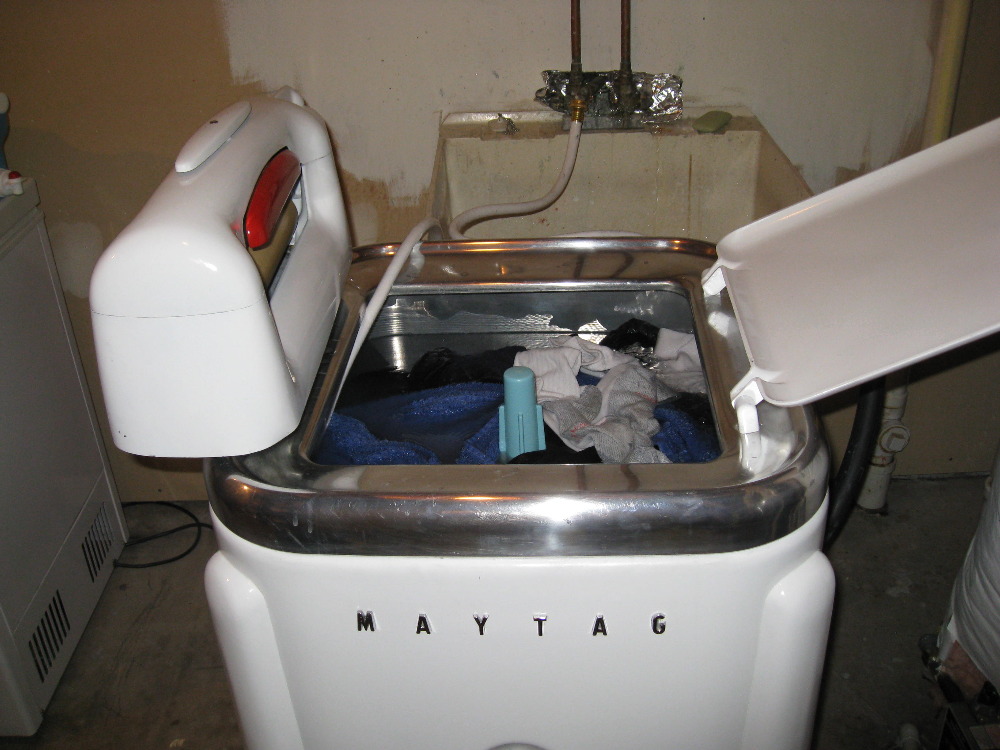
The floor drain

is next to the water heater, Page 47, a few frames up shows it with the hose in the floor drain. It works OK but I think you're right. Once the smoke clears, I'd like to add a pump.

Post# 623508 , Reply# 54   9/8/2012 at 23:31 (4,245 days old) by e2l-arry (LAKEWOOD COLORADO)        
Today,

I worked on the casters. It appears the extensions were chrome plated. But from the point of exposure down, whatever plating that was there had been worn away. So I decided to clean with steel wool, wash and de-grease, then paint with a metallic flat silver I've used on he wheels of one of my cars. So I know it will last. Here are 2 sets painted and 2 waiting to be painted.

Post# 624577 , Reply# 55   9/12/2012 at 23:41 (4,241 days old) by stan (Napa CA)        
since you have the laundry sink

stan's profile picture
you might want to think about ordering a pump for it?

Post# 624680 , Reply# 56   9/13/2012 at 13:27 (4,240 days old) by e2l-arry (LAKEWOOD COLORADO)        
I probably will

order a pump from Phil eventually. They sure look simple enough to install. Especially after some of the obstacles I've encountered! Wouldn't you know I jumped the gun and just bought a new drain hose for the gravity feed. If I understand correctly, I'll need an entirely different drain hose configuration for the pump model. But even if that's the case it's only something like another $20.00?? My floor drain is somewhat awkward to get to because of the lay out. So I know I'll get tired of that soon enough!

I've finished the painting last night. Looks good! (If I do say so myself)


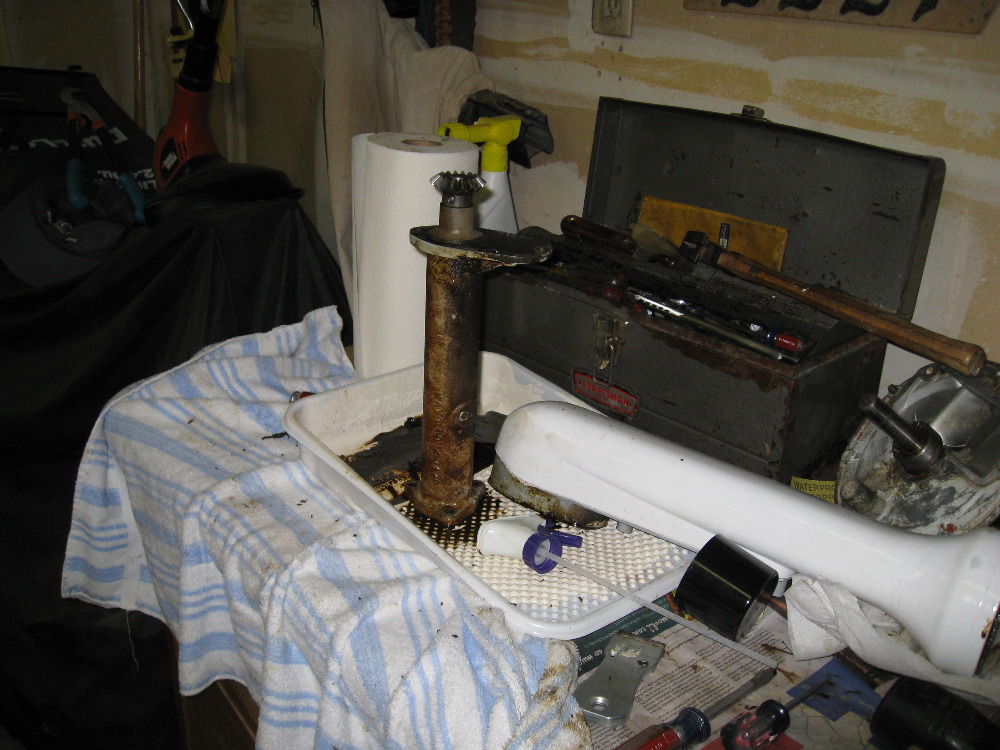
Post# 624771 , Reply# 57   9/13/2012 at 21:22 (4,240 days old) by e2l-arry (LAKEWOOD COLORADO)        
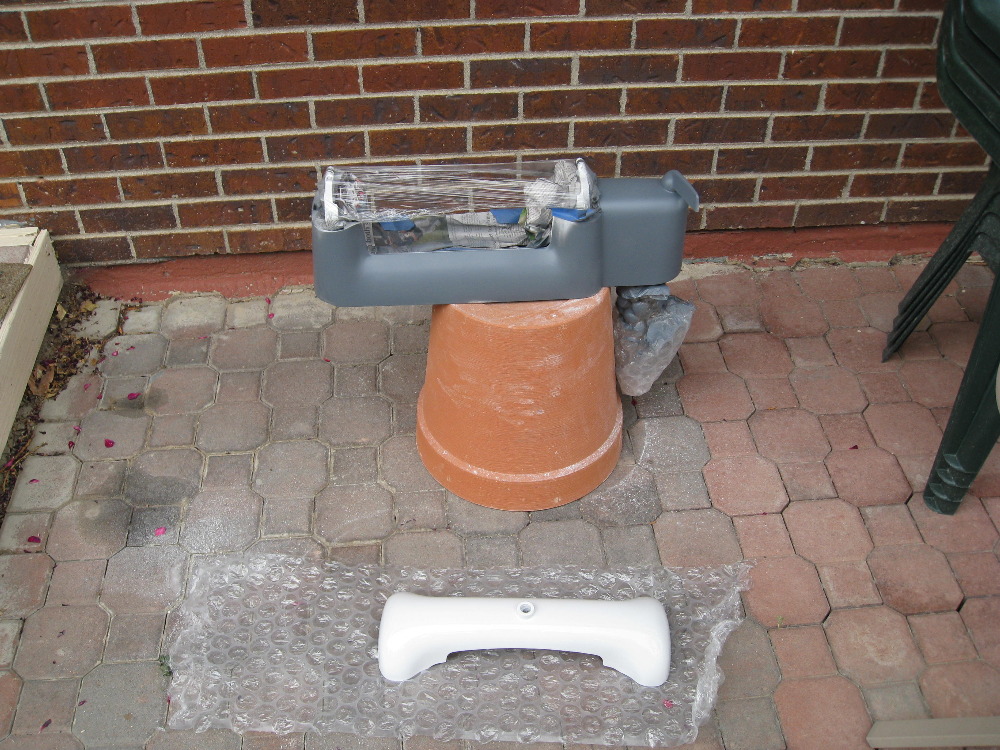
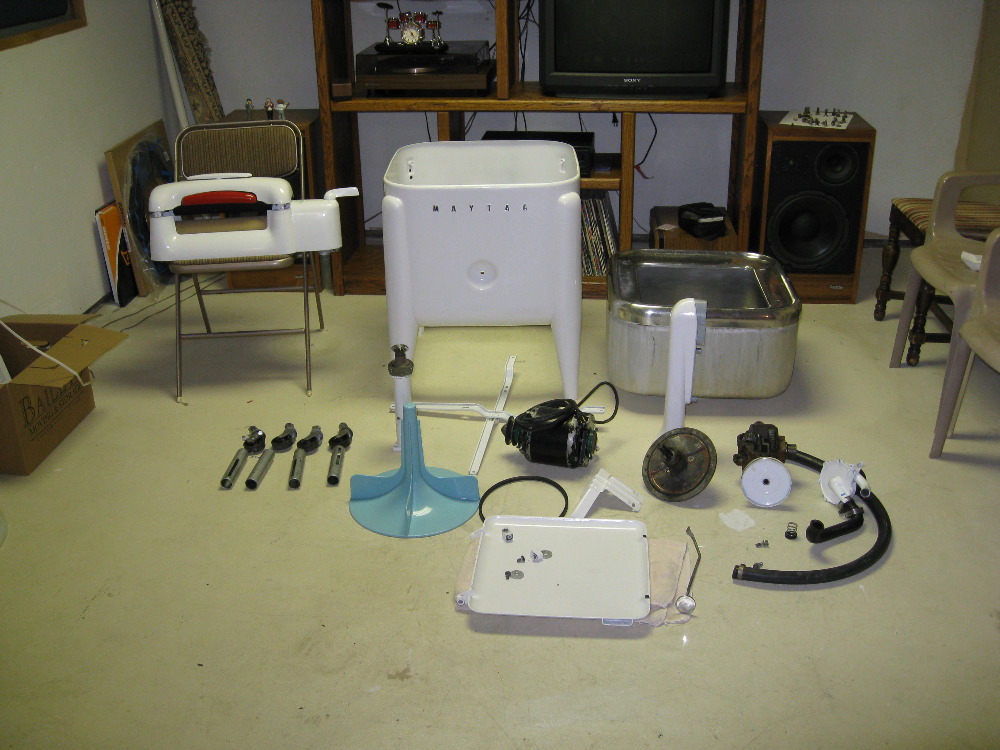
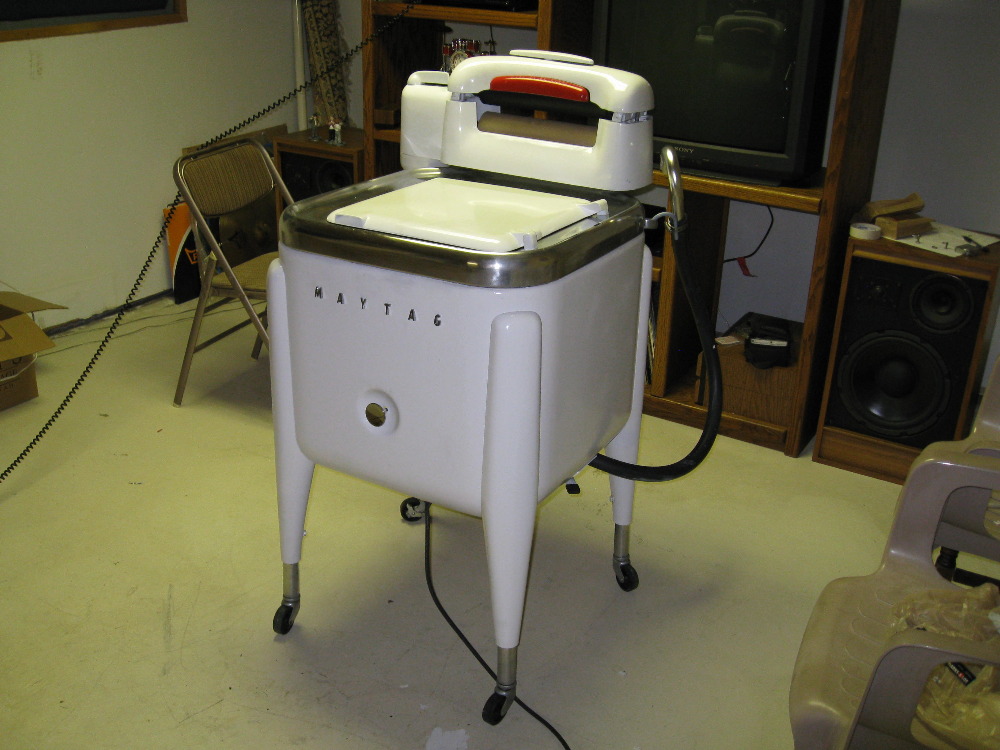
Today

09/13/12 I tried to stage it as the first picture I posted last month. Sort of a before/after thing.

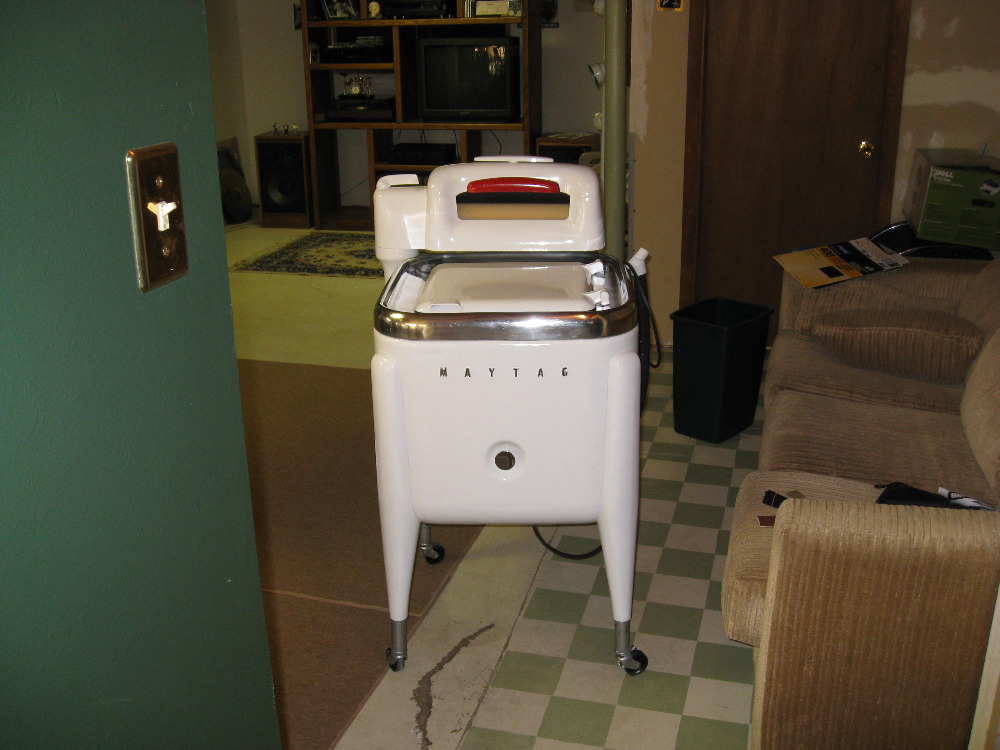
Post# 624862 , Reply# 58   9/14/2012 at 09:53 (4,239 days old) by wringer (x)        
WOW !!

You did a beautiful job!!! Don't forget to keep the wringer rolls separated so they won't stick together. You are entitled to be very proud of your work and all of the effort you put into her that others would not have done. Enjoy !!

Jim


Post# 624956 , Reply# 59   9/14/2012 at 16:18 (4,239 days old) by e2l-arry (LAKEWOOD COLORADO)        
Thanks Jim!

I do usually keep the wringer open when not in use. This was a staged picture to pose it as the first pic i took when I got it home and the wringer was broken so it was closed. Here's another picture with it open as usual.

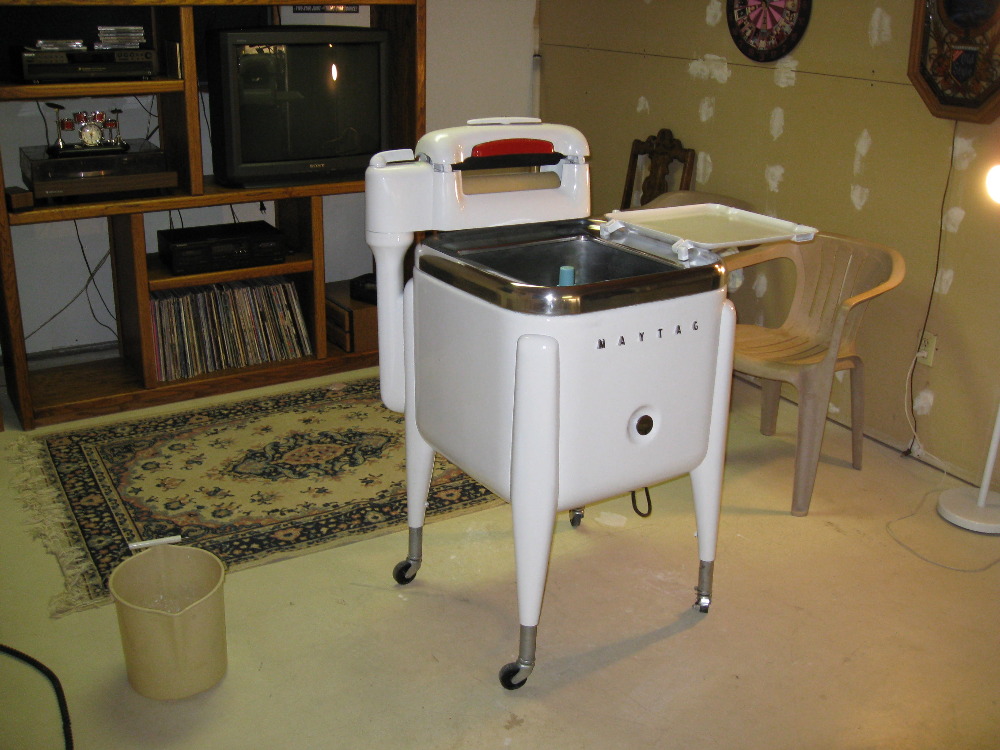
Post# 624984 , Reply# 60   9/14/2012 at 18:09 (4,239 days old) by mickeyd (Hamburg NY)        
About the hose issue

mickeyd's profile picture
The alumium hook might srew on, if your hose end is threaded, but it would be at an angle. The pump is so much fun, but the original hose is tight and short. I replaced mine with a longer, more pliable one. Guessing you'd only want the real deal.

It's almost mind-boggling what you've done. She looks like she just walked off the Newton runway. Congrats!


Post# 625009 , Reply# 61   9/14/2012 at 19:39 (4,239 days old) by e2l-arry (LAKEWOOD COLORADO)        
Thanks Mike!

Yep, I just got the new drain hose and this one isn't threaded. The original one was threaded but this machine has obviously always been gravity drain.

So I used her extensively this afternoon (5 loads) and yep I'm gonna want a pump. The floor drain is hit or miss. No matter what, you're gonna make a mess before it's secured into the drain hole. Plus mine isn't easy to reach. If nothing else, I can customize my new drain hose to go from the tub to the pump. Cut it off there and buy the parts from the pump to the "hook" to the sink?

Here's another picture. I put the decal on the wringer. They weren't on the 1964 models, only after the release bar (red) and agitator (black) changed to turquoise
but I found one on line and it does match the color on the new agitator.

Where is Hamburg NY? It sounds familiar. My Dad's family is from Kenmore NY and we used to road trip it to Grandma's every summer. Are you anywhere near Buffalo?

Larry


Post# 625032 , Reply# 62   9/14/2012 at 21:48 (4,239 days old) by geoffdelp (SAUK RAPIDS)        

Oh, Larry; that's BEAUTIFUL! You did an excellent job on her. Aren't those machines amazing? I just love how they wash and wash; they do such an excellent job. You should be really proud; good job. :-) The tub and paint job is amazing! No wonder women made them the #1 conventional washer choice in America!!

Before you go through the pump expense, have you tried a 5 gallon bucket for emptying? I have a floor drain in my laundry room and it's messy. I have a floor drain on the outside of my laundry room walk-out door and that works great. BUT ... in the dead of winter when I use a non-pump model, I find it only takes 4 of the 5 gallon buckets to empty my machine into a stationary rinse tub. It's not so bad and goes really fast. Just a thought.

Enjoy ... we are!!


Post# 625070 , Reply# 63   9/15/2012 at 01:18 (4,239 days old) by bradross (New Westminster, BC., Canada)        
Amazing job, Larry!

bradross's profile picture
Larry, I've been so pre-occupied with the restoration of my Model 30 that I haven't kept up - until now - on the AMAZING restoration of your model E2L! You have truly put some luvin' into it - along with a LOT of hard work (as I can attest!) Wish I had more room than just an apartment to do restoration work - the painting is my real challenge, plus not having things like a work bench, vice, etc. Some day hopefully I'll have more room - would be fun to do these restorations on a regular basis. Plus more room to add to the collection!

Once again - kudos on the magnificent restoration work! Now have fun using it, as I do mine!


Post# 625172 , Reply# 64   9/15/2012 at 13:00 (4,238 days old) by mickeyd (Hamburg NY)        
Larry

mickeyd's profile picture

There is a handful of us from Western New York, and yes, Hamburg is the next big thing west of Buffalo while Kenmore is the next big thing east of it. I'm just ten minutes from downtown on Lakeshore road, and Kemmore is another 15-20 minutes out Delaware Avenue, less on the Expressways. Small world. How cool.


For me, half the fun of the Maytag Conventional is the pump, and while I don't like the hose, the pump itself is right out of this world, a great deep rumble, very fast, and very big. You will be amazed at how quickly it flushes 18 gallons of water back into the ocean ;+>


This post was last edited 09/15/2012 at 16:29
Post# 625202 , Reply# 65   9/15/2012 at 15:58 (4,238 days old) by Westie2 ()        

Larry on my mothers Maytag E2L dad got a hose that she could sccrew on the end of the drain hose and place in the floor drain then lower the Maytag hose was slower draing but did not get the floor wet at all. She had hoses on the bottom ofeach of her 3 rinse tubs One tub was by itself the other two were as one unit. on the two tegether was a Y hose that went to one to drain.  She also in good weather ran the longer hose to the outside to drain.


Post# 625208 , Reply# 66   9/15/2012 at 16:52 (4,238 days old) by e2l-arry (LAKEWOOD COLORADO)        
Thanks Everyone!

Mike -I know Delaware Ave. well. My Dads house was 2 blocks off Delaware on the corner of Tremaine and Eugene. Tell me how and what you used to configure the drain hose to accommodate the pump if you don't mind. If I get a pump from Phil for $45.00, then copy what you did that could save me about $25.00 by NOT having to buy another new hose with the pump.

Geoff - Nice to hear from you again. I was beginning to wonder what happened to you? Thanks for the 5 gal bucket tip. That's how we used to have to empty Grandma's Speed Queen because it was in the kitchen and no pump on her model. That's an option over trying to hit the floor drain just right. I ended up with soggy shoes a couple of times! Guess I don't have my routine perfected yet. One of these days when I get the urge to do some tinkering, I'll add a pump. I think that'll add to the fun. But right now, after these last 4 weeks, I'm about tinkered out.

Brad - I've been following your thread and love the videos! We had the same problem with the corroded aluminum tub. I freaked when I saw that and thought the machine was a goner. Some of the guys here talked me through that though and I did patch with the J-B Weld the covered with some 3-M #800 sealant. It took me a couple of tries until I was totally "leak free" How did your patch job work? I saw you lucked out with a paint match! Was that a spray? As far as my painting went, Stan was the Man! His method was more work then spraying but what's the fun in doing this the easy way? He sent me a picture of his E2LP and I liked what I saw so I used his method. I don't want to reveal any of his "trade secrets" but I'm sure he'd share with you if you're interested. I do have a name and address of a guy that sells all the Maytag decals. Let me know if you need that information.

HAPPY WASH DAYS everyone!

Larry


Post# 625248 , Reply# 67   9/15/2012 at 20:11 (4,238 days old) by bradross (New Westminster, BC., Canada)        
Patching the tub ...

bradross's profile picture
Larry, I initially used J-B Weld in the tubes (epoxy), which hardens terrifically, but is hard to put on smoothly and difficult to sand. So...I changed to the J-B Weld "Steel Stik", which is a putty and quite easy to work with. You have just a couple of minutes to put it into place and smooth it out before it hardens "like steel"! I sanded it quite smooth and it's totally leak free. My crack was on the top edge of the sediment trap, so rather visible, and therefore wanted a product that would match the metal, which the SteelStik does beautifully.

The green paint is a color called "Leaf Rising" by Valspar from Lowe's. Not sure of its durability - it takes several days to really get hard. I've already put a small scratch on the lid - but no big deal, I'll just touch it up.

Regarding the decals, I've been in touch with Kevin Fisher, the "decalguy" in Ohio. I'm going to order them from him in the near future.

P.S. Glad you've been enjoying the vids - I've done 8 in total.


Post# 625400 , Reply# 68   9/16/2012 at 12:31 (4,237 days old) by mickeyd (Hamburg NY)        

mickeyd's profile picture
Your work is so exceptional that I keep forgetting you're brand new here. That means you probably do NOT have an easy dozen or more drain hoses hanging around the basement and the garage. Many here do. Almost any hose will fit the white steel port--3/4 or an inch, I forget--with a nice banded clamp with the screw. This one sports a five buck hose from True Value.

I was underneath the E2LP yesterday and realized that it is the big fly wheel that left such a strong memory of super-sized. I think you will really enjoy the pump. If using the machine for rinsing, and have a particularly sudsy load, you can get an underflow rinse going: high pressure inlet of fresh water with the pump on. Lots O' fun.


Would you reveal your trade/occupation/ career or hobby that has afforded such skill?


Post# 625401 , Reply# 69   9/16/2012 at 12:44 (4,237 days old) by wringer (x)        
Mr Mickeyd,

Please tell me where you purchased the gray thingie on the E in the pic that is a hook shape that you have your hose through (talk about improper sentence structure and I do it LOL). I would love to have one to fill my wringers from a garden hose. Hope they are still available.

THANKS !!

Jim


Post# 625411 , Reply# 70   9/16/2012 at 13:27 (4,237 days old) by mickeyd (Hamburg NY)        
Jim

mickeyd's profile picture
We've never had a confessional thread about what it's really like to be a washer man, but I'm in and out of the "Washer Parts" aisle of every big box, hardware, appliance, and plumbing store in town. This item came with a straight gray hose, and the space-age hook. I CAN'T remember which venue had it, it's a few years old, less than 5, but I'll see if it's still stocked in my usual spots during the next few bike rides. Five bucks.

In the garden section at Walmart you can get a few cool new fixtures to attach to the garden hose, one has a long arm with an adjustable spray pattern. Ironic, that whichever spray pattern you select, it is distinctly similar to any one of the spray rinses in all the various automatics. The "Maytag" one is especially recognizable. Just go mosey around and see what's out there when you're free and don't have to shop for a whole bunch of stuff; you'll "get it" right away. Also, if you have any elbows or faucets hanging around, see if any can be retrofitted onto your hose. You can rig a lot of stuff, once you let your imagination fly.

Don't laugh, but you just gave me a new idea for outdoor washing-- a really cool lawn sprinkler attached to a Plexiglas lid for one of the wringer washers. What a fill that would be! Of course, the agitator would have to be in motion, and the sprinkler upside-down, naturally.


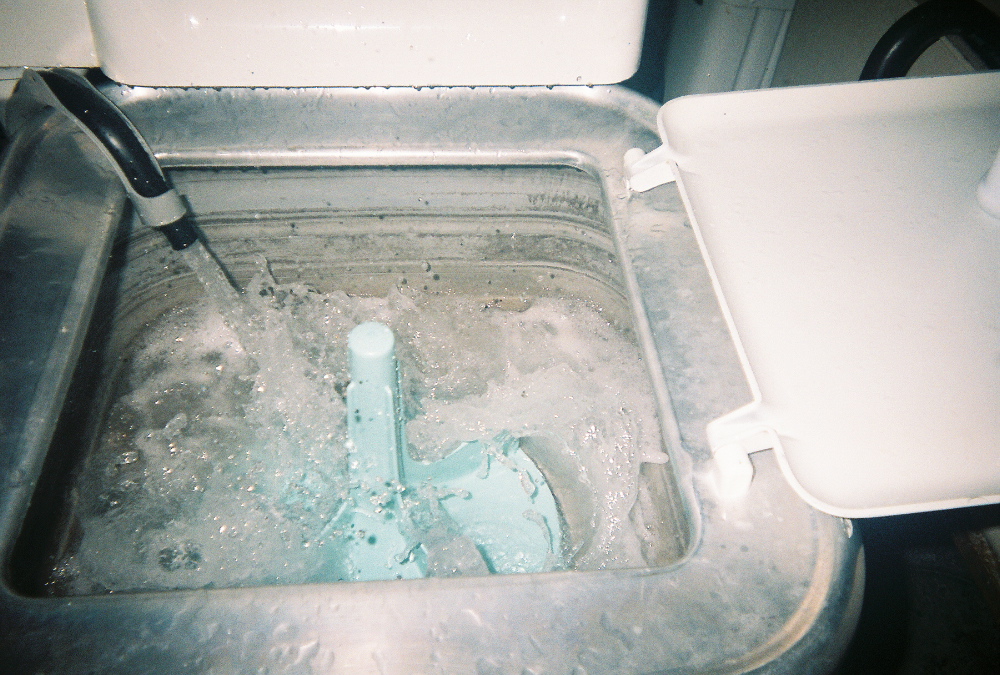
This post was last edited 09/16/2012 at 14:29
Post# 625459 , Reply# 71   9/16/2012 at 16:09 (4,237 days old) by e2l-arry (LAKEWOOD COLORADO)        
Hey Mike

My paid profession is that of a Purchasing Agent for a medical device manufacturer here in Colorado so it has noting to do with restoring vintage Maytags. I guess it's just a a knack of mine but I can make (almost) anything old appear new. Or at least better than it was when I got it. I just take good care of my "stuff". My niece was over last weekend and she thought I had a brand new Weber grill. I told her it's the one I've had for 15 years, just cleaned it is all. Most of the time it's just good old elbow grease. Stan tipped me off on cleaning the tub with SOS pads and 2,000 grit wet sand paper. He also gave lots of coaching on the painting. I did the lid and the wringer with Rust-Oleum Appliance white epoxy spray. That worked OK except for the occasional splatter but those parts I could take outside. I'd have smothered if I did that in the basement. The rest of the machine was done with Rust-Oleum oil based paint rolled on. I used Stan's formulation that really reduced any roller marks. Luckily, the white epoxy from the spray and the oil based can were a complete match. Usually white is very hard to match. Sometimes you just have to get creative with these things. If you're lucky, they usually work out.

I did have a scare when I last used it though. Right at the beginning of the wash the motor stopped. It hummed but all motion in the machine stopped. Then it was like some internal breaker shut the motor off to protect it. I unplugged and re-plugged and it did the same thing so I thought. "Bad motor". But then I wondered if maybe the motor couldn't turn the pulley and I tried it by hand and it did appear stuck. I'm not sure how but I get it free and once it was loose again I plugged it in again and it worked just fine for the next 5 wash loads. So now I don't know if there's trouble a brewin' on the horizon of if this was just some fluke that worked itself out from a machine that's been neglected and stored for 25 years? Anyone ever had a similar problem? I don't want to add a pump just now if there's a chance I'll be pulling the Power Unit out soon. AYE CARUMBA!


Post# 625465 , Reply# 72   9/16/2012 at 16:28 (4,237 days old) by bradross (New Westminster, BC., Canada)        
Larry - motor seizing and humming...

bradross's profile picture
Hello again, Larry ... the old motor in my Model 30 does that sometimes as well, when I initially plug it in. At first, I panicked also, but then discovered if I just wiggled the pulley or belt a little, the motor runs just fine. Maybe it's a lubrication issue. I've never had that happen on my Model E2LP, but then, it is in VERY good shape, and is a 1977 model - not a 1933, like the 30.

Post# 625474 , Reply# 73   9/16/2012 at 17:38 (4,237 days old) by e2l-arry (LAKEWOOD COLORADO)        
That's good to hear Brad

Not that you're having a problem with the motor. But that it's a relatively easy fix. Even if the motor eventually quits, I'd 100 times rather replace an electric motor than pull out and operate on the Power Unit. Even in the Maytag Service manual they recommend to replace the whole thing rather than try to repair one. But I doubt replacement P.U.s are available these days leaving no other option other than to perform surgery. Which again, I'd rather not do.

Post# 625574 , Reply# 74   9/17/2012 at 04:38 (4,236 days old) by stan (Napa CA)        
Hi Larry

stan's profile picture
Thanks for the nod on the paint. That was very nice of you,

The paint formula and technic is for anyone that wants it, just ask me and I'll explain it.


Post# 625610 , Reply# 75   9/17/2012 at 08:51 (4,236 days old) by wringer (x)        
So, I gave you

an idea with my question? Well, I don't want to burst your bubble but I charge for any ideas I may convey to members LOL. That being said, the sprinkler does sound workable. Thanks for the info you gave me. I will be making a special trip just for that soon. I also thought as I read your reply about this; Put a male end on the fill hose then attach a Maytag pump model hook (if one can be found)to the hose. The next time I go to Amish Maytag heaven I will ask about one. They may just have a goose neck laying around.

Also, if anyone ever needs a Maytag Wringer part they can't find I may be able to find it for you here in Ohio. They DO NOT remove parts from machines that can be restored but do have a lot of units that for some reason can't be restored they sell parts from. They would also rebuild the PU if they have one should you want it. But, all that is up to you.

Jim


Post# 625652 , Reply# 76   9/17/2012 at 13:48 (4,236 days old) by geoffdelp (SAUK RAPIDS)        

Larry and Brad ... I would encourage both of you to remove your motors and take them to an electric motor service for a thorough going-over. Also, to be on the safe side, make sure your cords are in excellent shape and DON'T replace them with a 2-prong; make sure you get a 3-prong plug. Our local service has black cords; they look good! You'll save frustration in the long run by doing this bit of service.

If your motor is stopping during wash, you could have a other issues. It could be the motor overloads too easily or you have problems with the transmission binding up or it could be as simple as the belt slipping. By having the motor serviced, you can eliminate from this equation.

Putting pumps on these machines is great and I like using a pump! DON'T FORGET ... you have to replace the fly wheel on the transmission with a larger version (normally sold with the pump). The pump wheel needs to grab the side of the fly wheel to work. It's a lot easier to do with tub removal. Getting the proper grip on an Allen wrench to remove the set-bolt on the fly wheel is tough underneath. It can be done, however. You will need to make sure to line up the pump wheel with the fly wheel so it grabs properly. I've just always found it easier to remove the tub, take off the center plate and then attack the fly wheel and add the pump and lever. You can play around with it easier from the top.


Post# 625674 , Reply# 77   9/17/2012 at 14:11 (4,236 days old) by stan (Napa CA)        
Hi Geoff

stan's profile picture
Larry and I talked about replacing the cord with a three prong, but on the other end, (motor) where would the third (ground wire) go? what would it be grounded to.

The outlet I'm plugging mine into, isn't grounded anyway (old house) ?
Have also suggested a "electric motor shop" as well


Post# 625689 , Reply# 78   9/17/2012 at 15:04 (4,236 days old) by geoffdelp (SAUK RAPIDS)        

Stan ... it could ground on the screw that holds the plate on that you unscrew to gain access to the plug ends. On "most" of the motors I've used, there's been a 3rd neutral screw on the inside near the other 2 that grounds itself to the motor cover (I would presume).

I've seen 2 prong plug adapters that have a grounding wire that drops down and you screw it into the middle screw of the switch plate that you have covering your outlet. Still the only problem with that is you are grabbing a 2-prong cord with wet (or at least damp) hands! As long as that cord is good shape, I suppose ... I mean ... our mothers and grandmothers never got a shock! Or if they did, I never heard about it.

Maytag boasted about the number of insulated wires in their cord for the wringer washer ... 72, I do believe?


Post# 625712 , Reply# 79   9/17/2012 at 18:08 (4,236 days old) by mickeyd (Hamburg NY)        
Geoff to the rescue

mickeyd's profile picture

The giant fly wheel must be the reason behind the pump's superiority to the other wringer's I've used: Norge, Speed Queen, and Kemore. Wondering what the Easy pump is like on their wringers.


Scratching my head when you guys had me under her skirt the other day and seeing that the pump was not remarkable in size, while the fly wheel seemed huge. Why does it drain so fast and sound so powerful? It's the fly wheel.


Post# 625713 , Reply# 80   9/17/2012 at 18:34 (4,236 days old) by e2l-arry (LAKEWOOD COLORADO)        
THE MOTOR

Just might be the problem after all. I did some checking on line today and from what I can tell these use a split phase motor. At least that's what I suspected since there's no evidence of a capacitor anywhere on the outside of the motor. The site said they're very common in under 1 HP applications. I'm no electrician but from what I understand, larger motors need a capacitor to provide power at start up and capacitors retain charge like a battery to provide it. Split phase use some other method to get them up to speed. Something about a start up winding separate from the main winding. Now this makes sense to be because mine fails shortly after start up. I plugged it in this afternoon and it quit in the first couple of minutes. Once I got it running like I did Friday it ran fine. so I suspect something is failing between the start up winding and transitioning to the main winding. Anyway, I'm going to remove it from the machine tonight and see what information, if any, I can get from the motor casing itself. I also read that these a simple enough to replace with like motors from W.W Granger or the like. They said it's more cost effective to replace vs. repair so if I can find a good match replacement match I'll likely just go for that.If not I'll find a shop in Denver that reworks small motors. Then of course replace with a 3 pronged grounded plug. I do remember as a kid with wet hands getting a good shock unplugging Grandma's washer

As far as the replacement pulley fro the pump, it looks like mine would already accommodate one. It's flat on the one side but had a 1/2" lip on the other. Here's a picture. Geoff, is that what it looks like or would I still have to trade this out for a pulley with an even bigger lip for the pump?


FUN! FUN! FUN!!

Larry


Post# 625738 , Reply# 81   9/17/2012 at 19:52 (4,236 days old) by qsd-dan (West)        

qsd-dan's profile picture
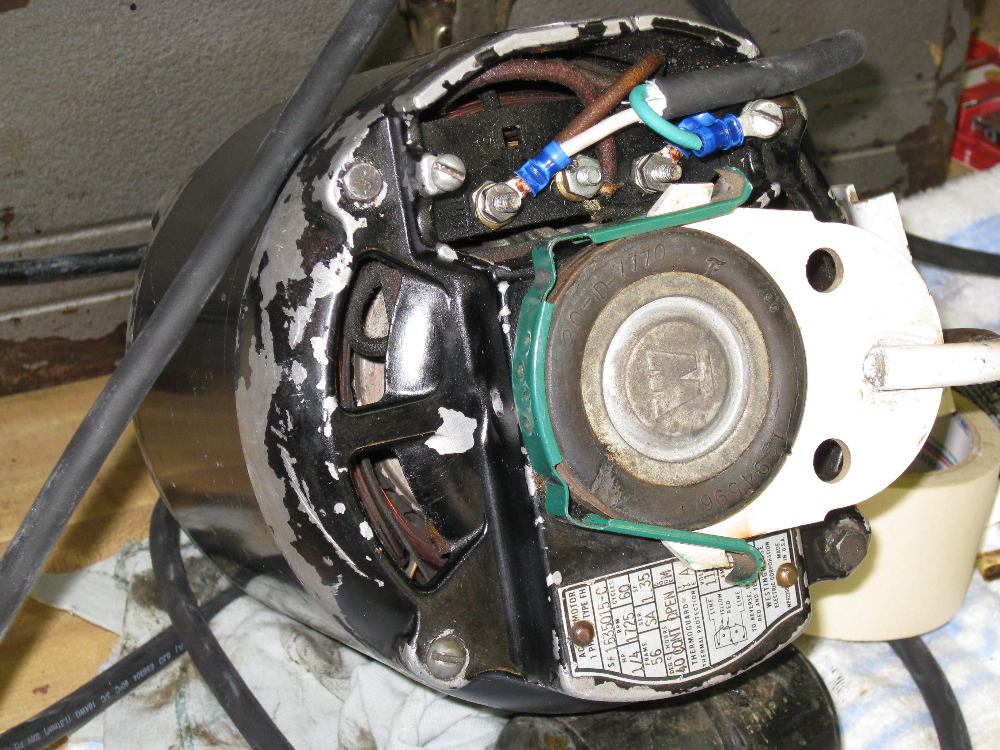
I wonder if it's a lubrication problem?

On earlier model units, the original motors had 2 oiling ports at each end of the shaft and could be oiled without removing the motor.

Later model motors needed to be completely disassembled in order to oil them. IIRC, Maytag recommended a dealer to disassemble and oil the motor every 5 years for these style motors.

I purchased an older model motor with oil ports on Ebay last year to replace the original newer style motor that's currently in my E2LPS. This will allow me to periodically (over) oil the motor without having to remove it. It'll get fully disassembled, cleaned, shimmed, oiled, and assembled before I swap it in.


Post# 625752 , Reply# 82   9/17/2012 at 20:25 (4,236 days old) by stan (Napa CA)        
Larry

stan's profile picture
if your going to pull that baby out, I'd try what Dan suggested first.
Again, nothing lost by trying the least path of resistance!
Once your in (disassembled) you may spot the problem yourself, and "fingers crossed" it be something simple,
Still feel your doing it a world of good just running it, and getting things moving!

Thanks Geoff for the info! I plug mine into a power strip and turn on and off the the switch there, instead of plugging, and un plugging from this 100 year old outlet! LOL.
But glad to know it's possible, and that there may be a third neutral screw.


Post# 625759 , Reply# 83   9/17/2012 at 20:57 (4,236 days old) by e2l-arry (LAKEWOOD COLORADO)        
It's out!

But there's not a whole lot to disassemble from what I can see. It would take a professional to get it out of it's casing so I won't go there. I do see where the 2 oiling ports are so maybe a few drops of 3 in 1? I can try that and give it a good cleaning while I'm at it I might as well replace the power cord. I had second thoughts about just replacing the motor. It would have to be dimensionaly the same or I may never get it hooked back into the Maytag brace. It's running now, quiet as a mouse. I'll see if it shuts off here in a minute but not being hooked up to anything lightens the load so won't really simulate real use. So I'll oil it up, re-install tomorrow and see it that cures it. I'm all for an easy fix when at all possible.

Post# 625762 , Reply# 84   9/17/2012 at 21:19 (4,236 days old) by qsd-dan (West)        
so maybe a few drops of 3 in 1?

qsd-dan's profile picture
Just make sure you're using the blue 3 in 1 bottle and NOT the red one!

Post# 625771 , Reply# 85   9/17/2012 at 21:37 (4,236 days old) by e2l-arry (LAKEWOOD COLORADO)        
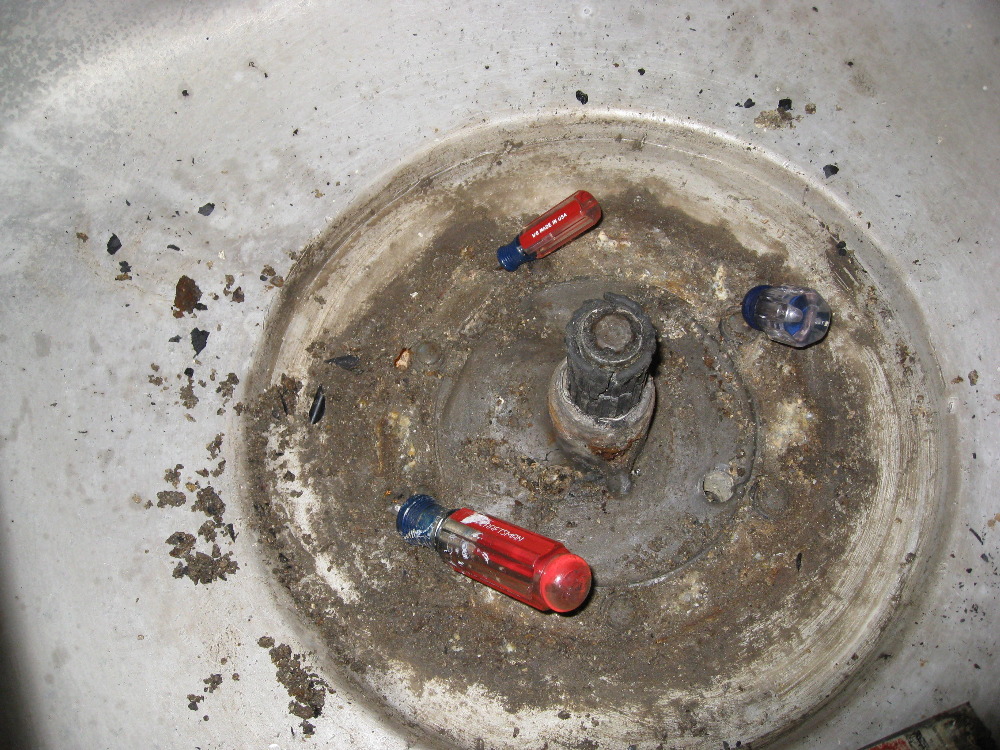
UH OH,

I already used the red one. What's the difference?

Post# 625773 , Reply# 86   9/17/2012 at 21:50 (4,236 days old) by qsd-dan (West)        

qsd-dan's profile picture
Blue Can = 20 weight turbine oil that lacks detergents, paraffins, and naptha.

Red Can = 10 weight oil that contains detergents and paraffins. It also contains naptha which gets dirt into suspension, then evaporates and leaves dirt on the bearing surface. Dirt being ground into the bearing while operating will quickly wear out the bearings.


Post# 625779 , Reply# 87   9/17/2012 at 22:19 (4,236 days old) by e2l-arry (LAKEWOOD COLORADO)        
Oh well,

I already used a few drops in each port. So I put the thing in the dishwasher and ran it on pots n' pans cycle to remove it all. Just kidding! Should I try to flush it out with some WD-40 or leave bad enough alone? It spins quite freely anyway. I found a metal shaving under the cover where the plug connects to the motor. Maybe that did something, shorting between terminals and then maybe not. Tomorrow I'm going to put on a new grounded cord and try it again. If it still has issues I found a small electric motor repair shop locally. Says they've been in business over 40 years and can handle all repair or replacement needs.

Post# 625788 , Reply# 88   9/17/2012 at 22:58 (4,236 days old) by qsd-dan (West)        

qsd-dan's profile picture
It'll probably be ok. You may want to pick up a blue 3 in 1 bottle and squirt some turbine oil in the ports to dilute the other oil. It's also the proper lubricant to use.

Most people way back when used anything that remotely resembled oil in these applications, especially vintage fans with oil ports. Those fans are still running decades later, so you should be fine.


Post# 626001 , Reply# 89   9/18/2012 at 20:36 (4,235 days old) by e2l-arry (LAKEWOOD COLORADO)        
Well, the motor is fine!

But the transmission is most likely hosed! DAMN! I took out the motor and cleaned, oiled and replaced the power cord with a new grounded one. That cord! It looked fine but where it connected to the motor was a mess. All brittle and cracked. The black wire was all electrical tape and the white one was brittle and cracked in about 5 places. So, I put it back in the machine hoping all world be well. And it was. For about 4 minutes. Then it froze but now instead of the motor just humming it continued to run slipping the belt. So I unplug and the PU pulley is frozen. I can't turn it in the direction it's supposed to go. I can back it up a a few revolutions freeing it, then go forward and it loosens up. Plug her back in and it'll run 5 or 6 minutes and it happens all over again. It's done it about 4 times now in about 25 minutes. So . . . she may look good, . . . but she no run so good! Now I'm stumped. Anyone want to buy some newly painted E2L parts! LOL!

Post# 626007 , Reply# 90   9/18/2012 at 21:06 (4,235 days old) by geoffdelp (SAUK RAPIDS)        

Now, now, now Larry ... here comes your chance to learn about the transmission! Don't give up yet! You can have the chance now to really clean up the machine and once you're done, you will have a machine that will run and run.

Did you get a service manual for these machines yet? I think I still see them on eBay or doesn't Phil have one that is on CD? Double-check and it's time to start reading it.

REMOVE THAT TUB. Start there. Doesn't Phil have a reasonably priced used tub to sell you? Take out that transmission. Remove the center plate and look inside. Clean it well and get that pulley moving again. It's bound somehow. Maybe it just needs a good clean out and thrust adjustment. Could be as simple as that!

Replace all of those gaskets; the service manual will show you how. Once you're done with everything, spray those parts underneath with primer and then white paint; that machine will look and run like new!!

Just try it; you might like it!! :-) It can be pretty rewarding and you will probably be surprised at how simple it really is!!


Post# 626014 , Reply# 91   9/18/2012 at 21:45 (4,235 days old) by e2l-arry (LAKEWOOD COLORADO)        
Thanks Geoff

I'm up for that challenge but my only obstacle it that tub. It's practically welded/glued/cemented to the center plate. I'm sure with enough time and effort I can get it out. How difficult is it to get a "normal" tub out? The Service Manual says something like "You'll probably need help removing the tub." Once this one is out, it will be toast. Phil did say he still has a few so I'll be checking with him tomorrow. This can't be as difficult as getting that stuck agitator spline off.

I do already have a Service and Parts manual so I've been reading up. On the re-assembly of the power unit they mention the final adjustment of the thrust bearing? A few notches until the pulley gets stiff then back off a notch or 2 and lock it in place. Is that something I should try or could I end up making things worse? It's funny but after the 3 stalls in 15 minutes, it ran for over an hour and 1/2 with no issues. The occasional weird noise but that's normal on this machine.

So not to worry. I've invested too much time and got her too pretty to give up now. Truth is, I've discovered over the last month that I like having a project. And this Maytag is the project that just keeps giving!!


Post# 626022 , Reply# 92   9/18/2012 at 22:21 (4,235 days old) by geoffdelp (SAUK RAPIDS)        

Larry ... Don't mess with the thrust unless you have to. Try cleaning out the transmission first. Parts cleaner works best and you don't have to disassemble all the transmission parts. I've had them feel "frozen" before and after emptying the old fluid (some has even jelled because of water getting into it)and thoroughly cleaning with liquid parts cleaner ... soaking if necessary ... I've gotten the transmission to free up nicely. These machines just need TLC.

The reason why they say you might need help removing the tub is: original cast aluminum tub were HEAVY and/or secondly, the spun aluminum tubs need to be slowly removed ... 2 sides first then the other 2 sides, next 2 sides ... you sort of "shimmy" it out of there. It's easier with one person on one side and another on the other side and both pulling up at the same time. The spun aluminum tubs are super light.

Once you get that tub out of there, you'll feel better that you can get to the center plate/transmission. Don't forget to utilize Phil; he's a WEALTH of information and has the parts to boot!!

Be prepared for a lot of dripping oil/transmission fluid. Take it apart over something like an old blanket or drop cloth or plastic; it's easier to clean up!

Have fun! I sure like playing around with those machines.


Post# 626034 , Reply# 93   9/19/2012 at 00:19 (4,235 days old) by stan (Napa CA)        
I'm soo

stan's profile picture
butt hurt! LOL
after all Larrys work you'd think he would have been rewarded with a working machine! I guess no good deed... Damn it!

Think we should all admire his tenacity on this!
I'd have pushed the SOB into the river, if I'd gone to this trouble. (but I digress)

Chin up dude, we are with you, keep going!


Post# 626091 , Reply# 94   9/19/2012 at 09:44 (4,234 days old) by wringer (x)        
Larry,


I was sad to read of your latest situation with your baby this AM. Thank goodness Geoff is on board here for his expertise and knowledge. He is right about Phil. I worked with Phil on info and parts for a few years prior to my finding the Amish shop here. I am wondering if maybe a dremel (spelling?) may be helpful in removing the cement around the tub bolts without damaging the notches on them? Just a thought. New ones are available if you do ruin them when removing them. Geoff can correct me on this but I think the later models may have had hex bolts in them????? Not so certain that a screen would fit down over them tho ???? There is one thing for certain, and that is the fact that you have not given up on this good ole gal. Please do keep us informed on your progress !! I think that between Phil and Geoff you will do OK here and she will run for years and years. Good Luck !

Jim


Post# 626093 , Reply# 95   9/19/2012 at 09:48 (4,234 days old) by wringer (x)        
Note to Mr. Mickeyd,

Well, I went to Lowe's yesterday and found an aluminum plain ends goose neck that is 1" in dia. My 5/8" fill hose fits right through it and now I have things going in the right direction for filling tubs not having to worry about the hose coming out of the tub. Of course, it was made in China. Just thought I would let you know that I have accomplished my project and am wondering how you are doing on the lawn sprinkler system????????? LOL. Best to all !

Jim


Post# 626097 , Reply# 96   9/19/2012 at 10:50 (4,234 days old) by mickeyd (Hamburg NY)        
HI Jim

mickeyd's profile picture

I'll get on it right away today, or first thing in the morning, LOL.


Glad you found it. There's always a way to rig automatic, valve-like filling on a conventional, YAY !


LARRY: If I'm reading right, your motor stalling has stopped. So it's all good, I presume. My Norge did the same thing 4 or 5 times at the beginning of summer after a year and a half of hibernation, but now it's fine and hasn't stalled since the end of June. Her skirt goes to the floor, so I had to lay her down to get at the belt, which was a real pain in the banana, but I kept at it, patiently attending to her demands, and she finally healed.


This post was last edited 09/19/2012 at 11:57
Post# 626128 , Reply# 97   9/19/2012 at 13:35 (4,234 days old) by geoffdelp (SAUK RAPIDS)        

Jim is right; the hex head bolts are available and are SO MUCH BETTER than the gulmite system with the bolt, washer cap, rubber washer. The hex head are 1/2 drive on your socket set and with an extension on, are super easy to get on/off. Once you swap those out, you won't hesitate to remove the tub any time. Phil's got them and you buy them by the set ... 2 long bolts and 4 short bolts. You will need 2 additional bolts for securing the center plate to the transmission.

Phil also has the gasket sets you need and the lubrication. I buy a few things at a time ... basic clean-up of transmission "might" need: replacement of gulmite bolts with hex heads; gasket set for transmission/center plate; gasket set for right angle-drive and wringer post; correct lubrication to refill transmission; correct lubrication (grease) to refill wringer post. While you're at it, I'd replace that center seal on the center plate; it's easy and comes as a kit. Don't forget to replace the stop ring on the agitator shaft; it will keep your agitator held in place for a long time! Also, don't forget to purchase the tub to center plate rubber gasket; it's a narrow rubber gasket that goes in the groove of the center plate ... you'll see it when you remove the tub (if it's still there).

Make a list and just start with the transmission and tub.

Good luck and let us know how you're doing.


Post# 626164 , Reply# 98   9/19/2012 at 18:35 (4,234 days old) by e2l-arry (LAKEWOOD COLORADO)        
Well today

after work I plugged in the washer and the motor went along fine. Fine enough that I decided to roll it over to the laundry room and do a load. She behaved like a perfect lady. So on one good note, at least, for now anyway, I can still use it until I start operating. And that just depends on when I can get the tub and the rest of the stuff I need. Even though some days it runs fine, I don't like the uncertainty that it will work, or even walk away for a bit. Plus something obviously needs attention "under the hood" I'm curious now as to what's in there? I'm betting on some real funky oil, or no oil practically at all. But I can use it as is for, hopefully as long as it takes to get all the parts.

So Stan, this is Colorado and I don't live near a river. The best I could do here is I'd have to push it off a mountain. And I can't say I didn't think about that!


Post# 626216 , Reply# 99   9/20/2012 at 00:24 (4,234 days old) by stan (Napa CA)        
Larry

stan's profile picture
I was just so disappointed for you, guess I got too emotional! LOL
I'm near a river... so ... my first thought was...

I'll be curious to know what you find too! Maybe only needs oil??
What kinds of sounds did you hear coming from the P.U before this happened?

Think Jim may be on to something with the dremel idea! You have the gulmite wrench don't you?


Post# 626299 , Reply# 100   9/20/2012 at 09:06 (4,233 days old) by e2l-arry (LAKEWOOD COLORADO)        
The gulmite wrench

I have but now wonder if I'll get the chance to use it. I heard back from Phil and he said he has no tubs. I'm checking with Dave, another old Maytag guy from Penn. If that's a bust I was thinking of checking with the guy in Early Iowa to see if he ever parts things out. It's 600 miles from here but I could drive out and pick one up. Probably be less expensive that shipping and would only take 2 days.

On the other hand, at least for now the machine still works. Yesterday there were NO problems. Plus Mike said his Norge did the same thing after sitting unused for a long time but with a few instances of crawling under to loosen the pulley his is running fine now.

So for now, if I can't get a tub, and this continues to run, There will be no transmission removal and repair.

I guess things COULD be worse!


Post# 626313 , Reply# 101   9/20/2012 at 10:41 (4,233 days old) by wringer (x)        
Hi Larry,

If you decide you do need a tub I can find out if the Amish would ship you one reasonable if they have one. They are not heavy but just big. Let me know if you may have a need for a new tub and I will find out. Hopefully all is on the mend and you won't have to go further. Best of Luck !!! Also, there is a fiberglass gray tub available that the Amish use sometimes for replacement. I have no idea of the cost but have watched them install one in an E. Just another aftermarket part.

Jim


Post# 626321 , Reply# 102   9/20/2012 at 11:43 (4,233 days old) by geoffdelp (SAUK RAPIDS)        

Don't forget about Lehman's Hardware in Kidron, Ohio! Ask for the Service Department; they sell lots of parts for reconditioning Model E's.


CLICK HERE TO GO TO geoffdelp's LINK


Post# 626331 , Reply# 103   9/20/2012 at 12:17 (4,233 days old) by wringer (x)        
I just

ran across this on ebay. Not sure if your interested but just a thought. I have been to Lehman's many times. They do sell rebuilt Maytag E's for 800 bucks. They employ Amish men to do their rebuilding so none is done at the store. I do know they sell parts as Geoff stated but not sure of their inventory. You could always call them and talk to the service manager who seems to be quite knowledgeable. His name is Mr. Kerby. If you want to call them they have a toll free number on their website Lehman's.com. They are supposedly rebuilt but don't look so hot LOL. They also sell that new Home Queen wringer made in Arabia a copy of the old Speed Queen wringers.
221127795180 Item number:
Seller assumes all responsibility for this listing.
Item specifics
Condition:
Used: An item that has been used previously. The item may have some signs of cosmetic wear, but is fully ... Read more

Jim


Post# 626343 , Reply# 104   9/20/2012 at 13:14 (4,233 days old) by mickeyd (Hamburg NY)        
Agreed, projects are fun,

mickeyd's profile picture

but sometimes it's nice just to be done for a while and to enjoy the washer and the sheer pleasure of washing.


"Doan worry. Be hah-ppy." ~ Steve Marley


Good Luck with your pretty girl, Larry.


Post# 626344 , Reply# 105   9/20/2012 at 13:14 (4,233 days old) by e2l-arry (LAKEWOOD COLORADO)        
Mr. Kirby says,

No, they don't carry tubs. He said he's heard of the fiberglass replacements but he doesn't carry them. Phil said they made a fiberglass repair patch but they're not made anymore. Also of interest, Mr. Kirby says they're getting out of the refurbishing of Maytag business so if anybody wants something from them they better order fast.

There's another guy, Dave from Albany Penn. I've used for some parts and questions. He told me he has 2 salvage E2L's in storage and will check to see the tub condition on those. I'm waiting to hear back from him.
I do need a tub. Maybe not urgently but one of these days,
1. My transmission will total quit or
2. My patch job will eventually start leaking again

So on with the hunt!
Thanks!

Larry


Post# 626568 , Reply# 106   9/21/2012 at 13:09 (4,232 days old) by e2l-arry (LAKEWOOD COLORADO)        
Never say "die"!

I got a tub! Dave out of Albany Penn. came through. He has a few old E2's in his barn as parts machines and he has a tub with no corrosion. He did say they'd need some clean up and polishing but I know how to do that. Had a little tub practice recently. So now I just need to order the replacement bolts, gaskets and what ever else, wait for the tub to ship and arrive then start taking the old one apart. I figure I can just use 90 wt. gear oil from the Auto Parts Store. Right? Then the grease for the horizontal and vertical drive? Is that some standard issue easily available grease or does that have to be a Maytag specific grease? I figure I should do them too since I'll have easy access. Then like Geoff says, I'll have a machine that will run and run for years!

Post# 626612 , Reply# 107   9/21/2012 at 17:02 (4,232 days old) by qsd-dan (West)        
I figure I can just use 90 wt. gear oil from the Auto Parts

qsd-dan's profile picture
Best to get and use the real deal. 6-0560800. Use 12 ounces from the 34 ounce bottle.

Shop around and find the best deal.


CLICK HERE TO GO TO qsd-dan's LINK


Post# 626627 , Reply# 108   9/21/2012 at 17:29 (4,232 days old) by e2l-arry (LAKEWOOD COLORADO)        
AMAZON!

Who'd have thunk it! I ordered it on my account.
Thanks Dan! I ordered my stuff from Phil today too. Soon it will all come together and I can finish out this project. Than, as the 3 Stooges say, "There will be nothing to do but live off the fat of the land . . . And eat and sleep!"


Post# 626675 , Reply# 109   9/21/2012 at 21:19 (4,232 days old) by e2l-arry (LAKEWOOD COLORADO)        
Now this is interesting

So I'm washing tonight, trying to get everything caught up before the . . .shhhhh, she doesn't know, . . . the transplant. It did lock up once but here's another first. I heard a weird sound, a new one like an old lady fart sound, as sure enough, beneath the vent hole, a nice little puddle of what looked like BOSCO. Thick chocolate syrup. So who knows what that means. It's no big deal since I'll be rebuilding the entire thing when I get the new tub. I'd appreciate any tips on what the sudden Bosco leak means. What should I be looking for once I opener up?

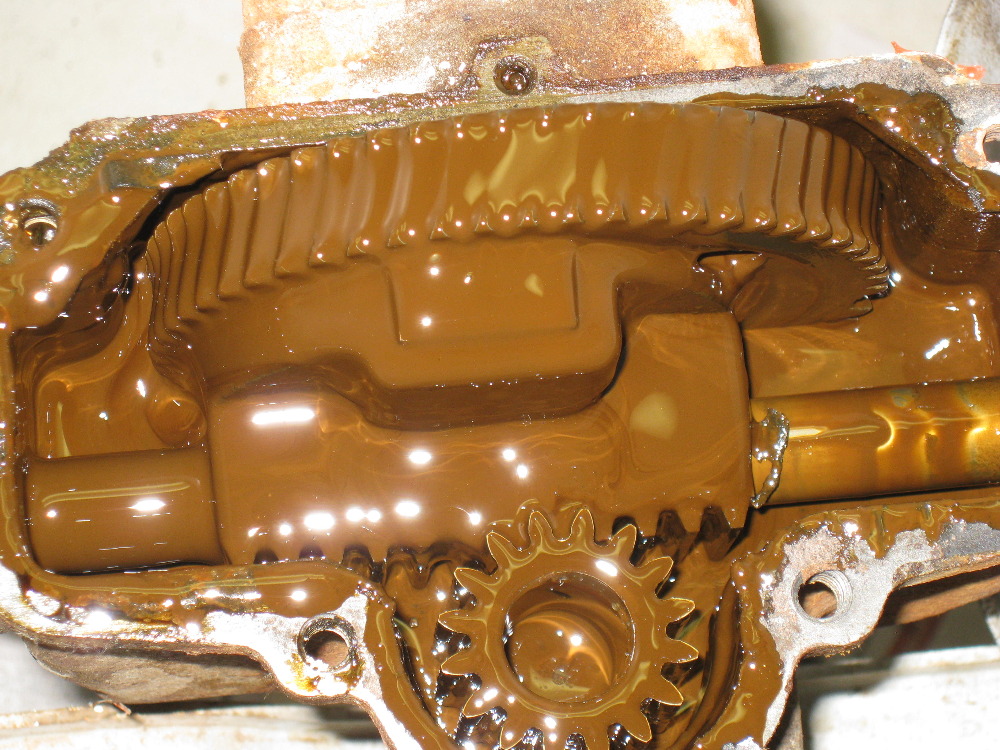
Post# 626677 , Reply# 110   9/21/2012 at 21:44 (4,232 days old) by e2l-arry (LAKEWOOD COLORADO)        
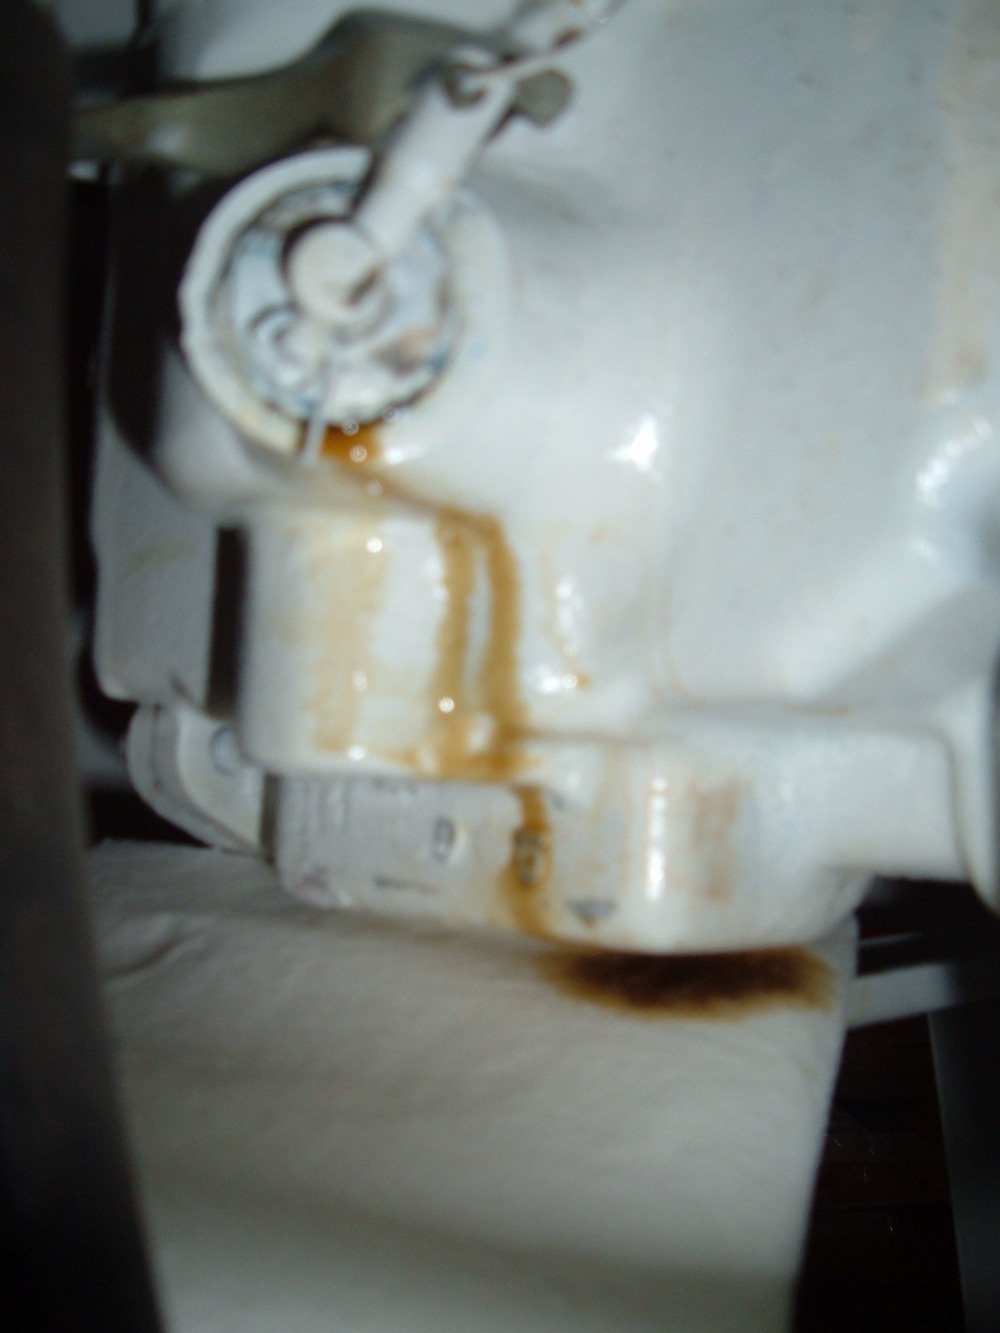
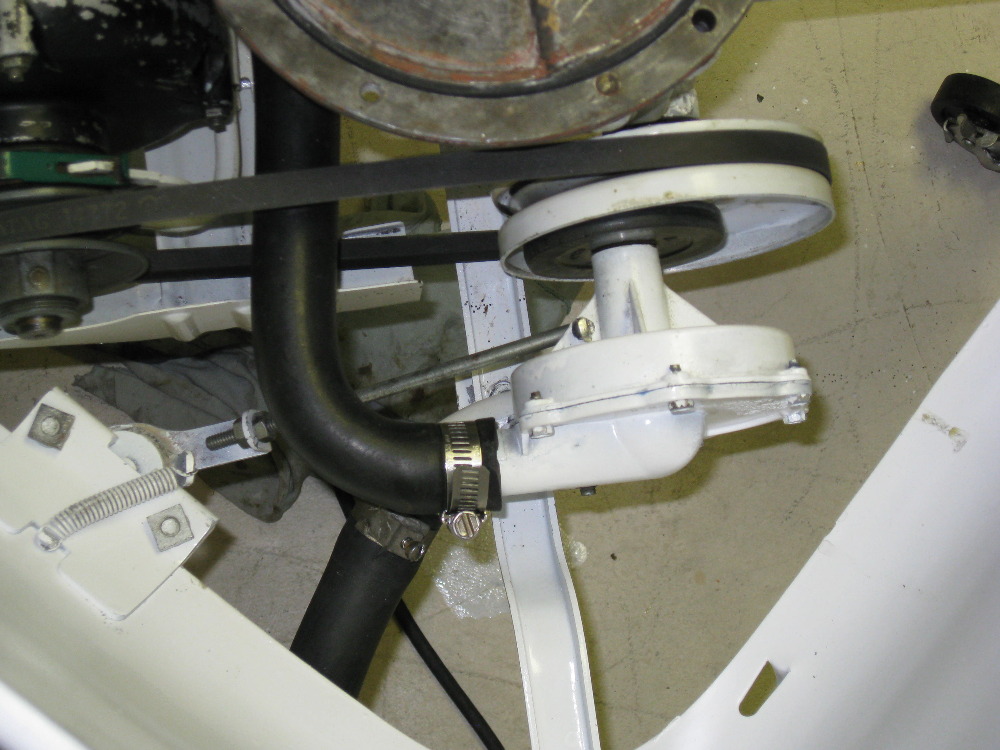
ANOTHER CLUE

Serious oil down the wringer leg.

Post# 626681 , Reply# 111   9/21/2012 at 22:05 (4,232 days old) by stan (Napa CA)        
where in the hell

stan's profile picture
did it come from! Can you tell?
Maybe she just needed to get that out and she'll be O.K now!

Where is Geoff!


Post# 626682 , Reply# 112   9/21/2012 at 22:15 (4,232 days old) by e2l-arry (LAKEWOOD COLORADO)        
From what I've read

The color and consistency of oil, means water getting into the transmission. Can't say I'm shocked but I did think I had it sealed tight. Anyway, kind of lucky the way it all worked out. No matter what, I was going to have to go under the hood. Something I thought about when I brought her home 5 weeks ago. I got off to a rocky start that night. New tub, new seals and gaskets, probably the only thing wrong with this PU is water. An easy fix. Clean/soak the unit . . .. .

I do think that I won't use it anymore until the refurbishing is done. That water and oil leaking can't be helping anything. So tomorrow I can start on operation, TUB REMOVAL.


Post# 626683 , Reply# 113   9/21/2012 at 22:19 (4,232 days old) by qsd-dan (West)        
Son-of-a....

qsd-dan's profile picture

Good Lord, this E2L is being beyond difficult!


Yup, it must be of female gender coupled with a serious attitude problem, lol


Post# 626685 , Reply# 114   9/21/2012 at 22:25 (4,232 days old) by e2l-arry (LAKEWOOD COLORADO)        
The vent

is where it came from. I suspect that from the top of the shaft by the vent, some oil runs to the end and runs down the wringer leg. So a few days ago I thought my problem was it was OUT of oil, the real problem didn't reveal itself until enough water had worked it's way into the system to become obvious. That is actually GREAT timing! Now I have enough history to tell me this machine has to be rebuilt. And now! And luckily today I found a tub. And soon I'll have everything I need to complete the job.

VERY COOL!


Post# 626686 , Reply# 115   9/21/2012 at 22:30 (4,232 days old) by e2l-arry (LAKEWOOD COLORADO)        
Beyond difficult, is an understatement!

Luckily, after I get the new tub and open up the PU, there's really nothing else to go bad. Then Like Geoff says, it will run for years and years.

Post# 626691 , Reply# 116   9/21/2012 at 23:16 (4,232 days old) by qsd-dan (West)        

qsd-dan's profile picture

If it isn't too much trouble, would you please take plenty of pics along with some commentary?


I have yet to tear into an E/J/N (have torn into a Model 80 and somewhat into a Model A).


I have a parts breakdown and a service manual for this model, just in case you get stuck.


Post# 626695 , Reply# 117   9/22/2012 at 00:12 (4,232 days old) by stan (Napa CA)        
Larry

stan's profile picture
are you able to tell if this oil leak actually has water in it?

My E has done something similar once (not that bad) after I had added gear lube down the wringer post.
I had had the machine on its belly replacing the belt, and " thought" after that I should add a little for good measure. But she didn't like it and spit it out later! (what I put in came down that leg)

A couple of times thru the years, I have had some very thick grease, about the size of a nickel (grey brown) ooze out of the weep hole, but never noticed water in it. If I remember right, think it was on some hot days, that this happened ?

A few here have said that it's not uncommon for these old girls to leak a little.
Maybe it WAS a old lady fart (air) or something ??

I'll be interested in what Geoff has to say about this.


Post# 626750 , Reply# 118   9/22/2012 at 08:41 (4,231 days old) by geoffdelp (SAUK RAPIDS)        

Hi everyone ... well ... there you have it. I believe it's a combination of things. My guess is that when Larry got this machine, it hadn't been used for quite some time. I remember seeing the agitator with that big old hole on the top; surely, water got down there and was over the shaft/center. If those seals in the center shaft weren't good, water went into the transmission and into the right angle drive; hence the oil/water mixture coming out of the breather hole on the drive. Just like it was supposed to do.

Also, oil dripping down the legs means that where the right angle drive connects to the wringer post, the gasket is shot AND probably transmission oil/water traveled through the right angle drive and into the bottom of the wringer post.

I'd stop using it until you get her fixed, Larry. She's telling you that she needs a complete DNC (dusting 'n cleaning)!! :-)

You will be learning a lot about these machines and you will find how simple they can be to work on ... except for the oil ... that stuff gets all over the place but is extremely necessary.

Start reading your manual!!! :-)


Post# 626764 , Reply# 119   9/22/2012 at 09:59 (4,231 days old) by e2l-arry (LAKEWOOD COLORADO)        
Just as I suspected

What Geoff said. I was wondering how it got water in it because when I was replacing the agitator and got the spline off and cleaned the shaft, I replaced the water seal between the shaft and the center plate. The old one looked pretty worn but I never filled it while that one was in there. So I'm thinking it most likely had water in the trans when I brought it home. Funny but that was the only thing on this washer that COULD hold water at the time! Just took a couple of hours use for it to work it's way out the breather. This also could explain the pulley seizing up.

On one hand, after 5 weeks, it would be nice to be done for awhile but on the other hand I'm chomping at the bit to get in there, figure this thing out and really finish off the restoration. I have to finish my list of parts from Phil. Maybe by next weekend I'll have everything I need. In the meantime, I can get all the old stuff out and paint all the behind the scenes stuff. Make it look pretty on the inside too! I'll take lots of pictures to add to my pictoral history of this Mr. Haney (Green Acres) washing machine!


Post# 626768 , Reply# 120   9/22/2012 at 10:22 (4,231 days old) by wringer (x)        
Larry,

You certainly have made a commitment to this ole gal. I don't know if I even had the room to work on her to the degree you have that I would have done so. Please keep us posted on your progress. We are all awaiting your completion and the first load of wash coming from her with millions to follow that one. Best of luck !! The pic here is of my N that developed a leak in the clutch mechanism for some reason. I guess they can leak lots of places. Now that I have fixed it with new parts she is dry as a bone. When I spoke to the Myron my Amish restorer, he told me he had never seen a leak like this? Sorry for the pic quality. It was kinda hard to get my arms and all situated beneath Lela May to get a pic LOL. Keep up the faith !!

Jim


Post# 626774 , Reply# 121   9/22/2012 at 11:08 (4,231 days old) by e2l-arry (LAKEWOOD COLORADO)        
They can leak

In a million different places. Well, maybe not a million, but anywhere there is any connection from the inside, there is a potential for a leak path to develop. That's why I'm not going to tear down every last part. Only that parts that need attention and anything I disconnect that has a gasket. You gotta replace all of those.

You know, I never expected this to develop into a project of this magnitude. I thought I found this "bargain" of a classic Maytag on CL for only $25.00! I thought I'd clean her up, touch up a few rough spots and be on my way. But then you get to a point that if you quit now, all your previous work and expense was for nothing and I just can't see doing that. Lord knows this isn't the first thing I ever did that didn't work out like I planned. But the end result will be worth it. So what if my $25.00 washer is now up to $400.00? The way I look at it, if Lehmans' sells reconditioned Maytags, for $800.00, I'm still $400 ahead! Plus, I bet theirs aren't as good lookin' as mine!

Larry


Post# 626776 , Reply# 122   9/22/2012 at 11:17 (4,231 days old) by wringer (x)        
Nope,

As I said, I have seen their redo's and they are not well done. They are made to be functional with a new sloppy paint job and that is it. I have not talked to Mr. Kerby for some time. The last time I was there we had a long chat. He really is a marvelous man. He and his wife have adopted 6 abused children of all races and have a beautiful family. He is English but most of the help there are Mennonite. Anyhow, please don't quit now. I know you won't. And yes, for the price you will have in your Tag you could buy 2 from Lehman's if they have any !!

Keep trudging away buddy !!

Jim


Post# 626794 , Reply# 123   9/22/2012 at 12:46 (4,231 days old) by mickeyd (Hamburg NY)        
"... this Mr. Haney (Green Acres) washing machine! "

mickeyd's profile picture

Look out for Mr. Haney coming over with another one of his famous, unbreakable, never-before-seen, lifetime " GAR UUNNN TEED" E2L's . LOL


You gave me a nice chucke. All along I've wanted to say, there have been so many of these in better condition offered for sale......., but ya never know till you get it home, anyway, so who knows? And you seem to have found a great hobby. Hey, maybe when you retire, you could be the E2L --L for Larry's --Restoration Company.


Post# 626800 , Reply# 124   9/22/2012 at 13:10 (4,231 days old) by e2l-arry (LAKEWOOD COLORADO)        
Buyer Beware!

That's what they say anyway. I've learned a few things about buying used stuff on CL.
I'm sure there have been better machines offered on CL or Ebay. I figure most of them HAD to be better. They don't come much worse!! LOL! But seriously, like I said all along, for 25 bucks you can't expect too much. There were others but looked too rough for what they were asking. Or priced high, like $150.00 for one that didn't work OR have a motor. Hmmm, maybe that's why it didn't work. A little troubleshooting. Hindsight's 20/20.


Post# 626830 , Reply# 125   9/22/2012 at 14:33 (4,231 days old) by geoffdelp (SAUK RAPIDS)        

Larry ... still ... for $25; not bad. I've done enough of these that I know that after so many years of HARD use (you can tell by the condition they were kept in) there was bound to be problems. It's mostly gaskets and seals. If I buy one, the first thing I do is try to remove the agitator and look underneath for the oil drips. If the agitator comes out normally, the woman who owned the machine took good care of it and probably HAD to rely on it for her family's wash. If it's stuck on the shaft, chances are the machine wasn't used and/or cared for properly.

The biggest problem with these machines was people who terribly overloaded them. They were so doggoned dependable that they just kept right on washing. Those gears are tough; you'll see. A lot of women got an automatic washer to replace their wringers and kept the wringers "just in case" or to wash rugs. UGGH. Washing rugs is fine, but just be careful.

Also, a lot of people inherited them and either didn't know how to use them properly or just stuck them in the corner of the basement or garage; untouched for years. You just can't expect machines that were used heavily and then sat for a long time to be up to par.

I don't know how many "YouTube" videos I've seen of these machines being misused. One of the biggest culprits was not enough water in them. The instruction manual clearly states that water needs to be up to the water line on the top of the agitator fins for ANY sized load. Overloading and washing with small amounts of water put a big strain on the transmission/belt/motor. Also, those agitators need to be removed after every wash day and left off the tub until thoroughly dry or until the next wash day.

I think once you get her running up to speed again, you will not only enjoy using her, but will have a great deal of respect for the quality of the machine. You probably already do!!!


Post# 626836 , Reply# 126   9/22/2012 at 14:50 (4,231 days old) by geoffdelp (SAUK RAPIDS)        
Forgot to mention ...

Larry ... forgot to say in the above post but you can tell that water (and probably washing chemicals ... who knows what) sat in that tub for a long, long time. That is one of the reasons why it was corroded through. You can tell by your first picture of the tub that the agitator had not been removed and I'll bet that's when they busted the top off to try to get it out of there. A sure sign that water had seeped underneath the agitator onto the spline and rested on the center plate seal.

The other people before you gave that machine poor, poor care. Unfortunately, you find that a lot with these machines. They were subject to a lot of abuse.

Just trying to help you see that you are rescuing a great piece of Americana! You should be proud!! :-)


Post# 626856 , Reply# 127   9/22/2012 at 16:10 (4,231 days old) by e2l-arry (LAKEWOOD COLORADO)        
No regrets here

Geoff, I AM proud of the work I've done and don't regret buying it. I'm also glad like most of the folks here to have been able to save one of these great machines from the scrap yard. It's just that next time, if there is one, I'd know a lot more of what to look for beforehand. They plugged it in and I saw the agitator move and the wringer roll. But didn't see what would happen with a bucket of water in it or try to pull off the agitator. And again, I figured for 25 beans whatever problems I encountered I'd be able to solve. Boy! Was THAT an understatement! She told me she used it in the early 80's for kids diapers so I suspect it just sat for a long time. I too noticed a water line stained in the tub and thought the same thing. That someone had left it sitting full of water for a LONG time. Probably trying to raise mosquitos or something but that did tell me this wasn't taken care of. Because, how hard is it to lower a hose and empty the darn thing? I mean, do these people flush the toilet afterwards, or is that too much hassle? LOL

I just started taking things apart. Like the lid, hose, and motor. When I was down there I did see that all the leak was from the vent hole. It ran down a support beam on the bottom to the wringer leg so that gasket wasn't leaking. I ordered a new gasket anyway. And BOY! that stuff is THICK! It was a bit of a job wiping it off the floor. It may have looked like chocolate syrup but this was about 5 times as thick.

Did you ever get a chance to look at the picture of the pulley I posted a few days ago? Mine has a 1/2" lip that I thought was in case it had a pump. Will the current pulley work or do I still need a wider one for the pump? I've decided that I'm going this far, now's the time to add one.

Thanks,


Post# 626888 , Reply# 128   9/22/2012 at 19:14 (4,231 days old) by e2l-arry (LAKEWOOD COLORADO)        
TUBS OUT!

I made good progress this afternoon. I took everything off the washer I could, lid, drain hose and motor. The I attacked the tub! I never used the J-B Weld over the bolts but did seal around them with the 3M 800. Either that stuff stays somewhat pliable or it hadn't 100% cured yet. So I was able to peel around all 6 bolts then use my gulmite wrench and get all the bolts off. Next, since I'll never reuse the tub anyway, I drilled a few starter holes the sawed around the circumference to get the tub out.

Post# 626889 , Reply# 129   9/22/2012 at 19:17 (4,231 days old) by e2l-arry (LAKEWOOD COLORADO)        
NEXT

I was able to remove the tub. Just like Geoff said, kind of moved from side to side and rotated around until it was out. Not too bad at all!

Post# 626893 , Reply# 130   9/22/2012 at 19:23 (4,231 days old) by e2l-arry (LAKEWOOD COLORADO)        
Finally

I was able to peel away the J-B Welded left over piece and I'm down to the power unit.

Tomorrow that goes on the bench to be opened up. The inside of the skirt gets all that dirt and oil residue removed and will be painted white. All I can do is maybe drain and clean the transmission. My 90wt. Whirlpool brand fluid from Amazon and gaskets and stuff from Phil won't arrive until mid-week at best.

If the rest of this goes this easily, I'll be a happy man!


Post# 626934 , Reply# 131   9/22/2012 at 21:38 (4,231 days old) by geoffdelp (SAUK RAPIDS)        

WOW, Larry ... WAY TO GO!!! That baby has been leaking for a long time; look at the oil build up ... true sludge. Lacquer thinner will work great on that oil/dirt removal.

Try to remove the center plate before you take the transmission out; it will be easier for you if you can get the gulmite wrench to get those last 2 bolts out. Those can be buggers. Did you get the little lead screw out on the center plate? I don't see that there ... hmmm ... are my eyes playing tricks? You can double-check your maintenance manual to see what I'm talking about.

When you get that done, you can tap that center plate out by placing a large flat edged screwdriver underneath it and give it a tap, tap, tap with a rubber mallet. Those two pins on the sides stay with the center plate.

Then remove the 3 bolts that hold the right angle drive to the transmission first, then remove the bolt on the bottom of the power unit holding it to the frame. Take a rubber mallet and strike the transmission near where it connects to the right angle drive and you should be able to pull it out. Keep it upright as much as possible; there's a breather hole there and you'll get fluid everywhere if it tips (if there's any fluid left ... LOL).

I see the old rubber tub to power unit gasket laying underneath. Pretty hard and cruddy, huh? Best to just put in a new one.

Oh, the flywheel; I forgot. That looks like a pump flywheel; what the heck?? The regular flywheels were flat. That sure does look like one; that's where the rubber wheel of the pump grabs when you push the handle forward.

Don't forget to recycle that aluminum tub at your nearest aluminum recycler! The last time I did it, I got $30 for one; that was a long time ago, too!! That's pure aluminum!! You could at least get the price of the machine back. :-)

The people who sold it to you like that ought to be spanked and yes, I wonder, too, if they flush their toilet!! :-)


Post# 627041 , Reply# 132   9/23/2012 at 09:51 (4,230 days old) by wringer (x)        
WOW !!

You have done a remarkable job Larry. It appears that you have succeeded at every task that has popped up. I agree with Geoff about people over loading and miss using these work horses. Not having enough water in the tub is as bad on the unit as putting to many clothes in them. Seeing the condition of yours and knowing how many loving hours you have put into it makes me really appreciate my 3 girls. Geoff, I had no idea you had done all of this work yourself. I admire the pics of your girls and am very envious of both you and Ted for having NEW units. I know that all of us here appreciate how you have helped Larry.

Keep going Larry and please continue to keep us up to date on your progress. Best !

Jim


Post# 627137 , Reply# 133   9/23/2012 at 18:43 (4,230 days old) by e2l-arry (LAKEWOOD COLORADO)        
The transmission / power unit is out

and as I expected, it was a mess. There was a little scrap of metal stuck between the shaft for the rack. I was able to remove it easy enough but have no idea of where it came from. So not sure how much further I need to break this down. The pinion gear looks OK, a few rough spots. I sanded between the teeth and I think it's OK. Also there's some pitting on the center shaft support bearing but that doesn't concern me too much. If it should let me know. Now, this does concern me. On the worm wheel there a small piece of one of the teeth missing. The rest of the gear looks fine but this one . . . Here's a picture.Let me know your thoughts. Is this too small a chunk to worry about or should I replace it when I have the chance?

Post# 627138 , Reply# 134   9/23/2012 at 18:54 (4,230 days old) by e2l-arry (LAKEWOOD COLORADO)        
Here's what it looked like

When I first opened it up. You can see on the right side of the shaft a piece of metal. I have no idea where it came from but I took a set of needle nose pliers and it came right out. It soaking in cleaner right now. Probably leave it soak overnight. Then flush it good to get any other loose debris or metal flakes out.

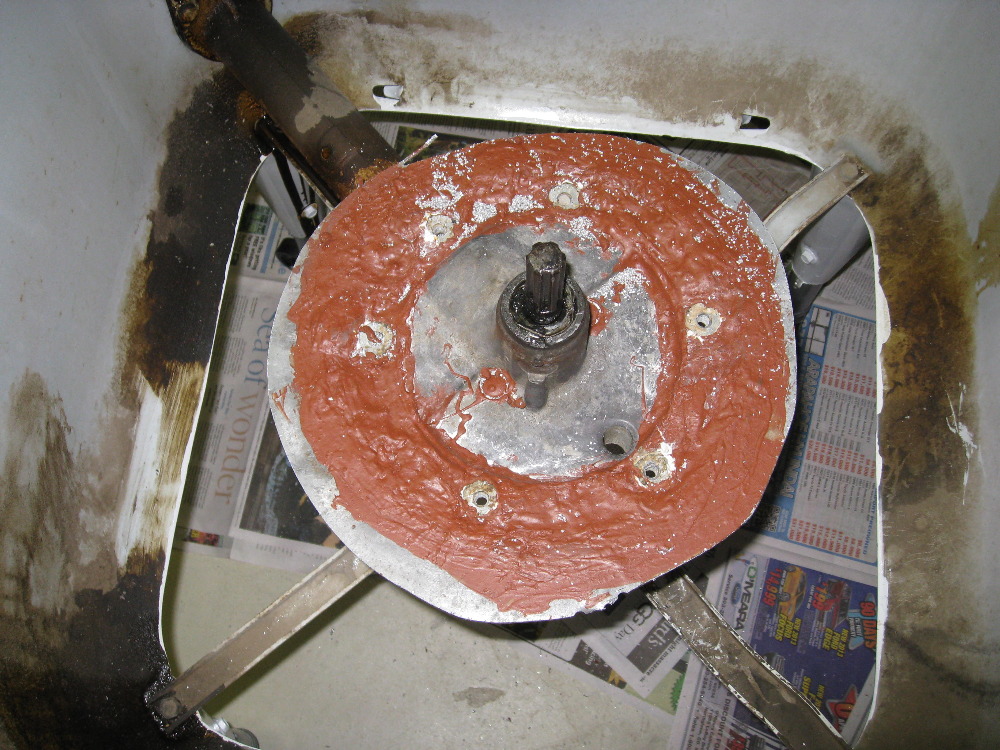
Post# 627141 , Reply# 135   9/23/2012 at 19:03 (4,230 days old) by e2l-arry (LAKEWOOD COLORADO)        
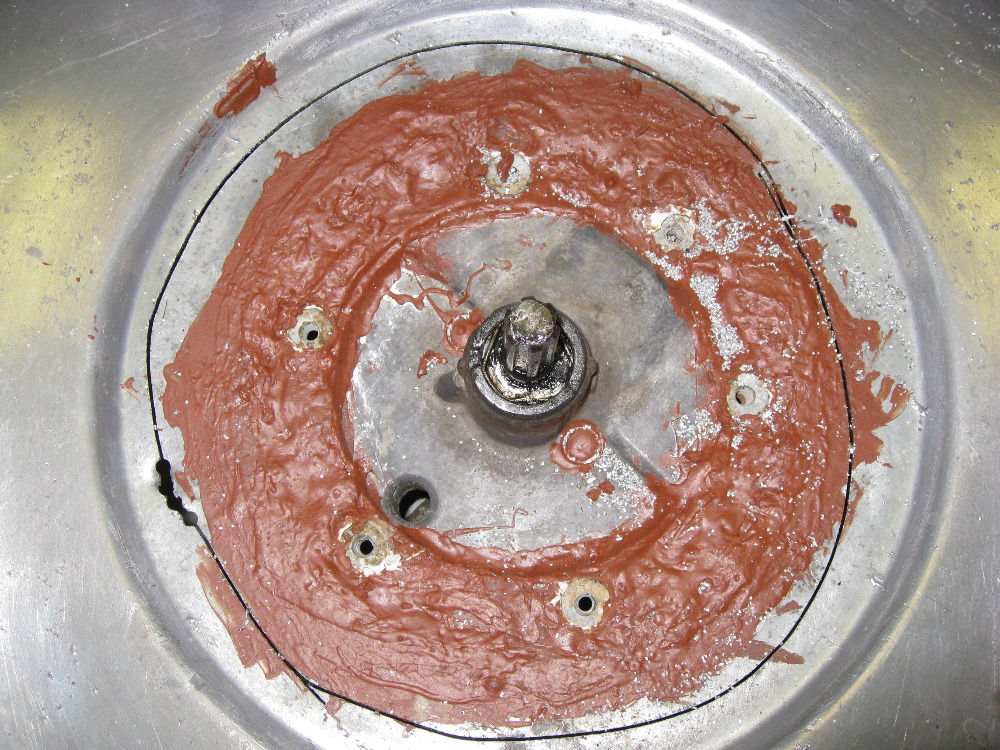
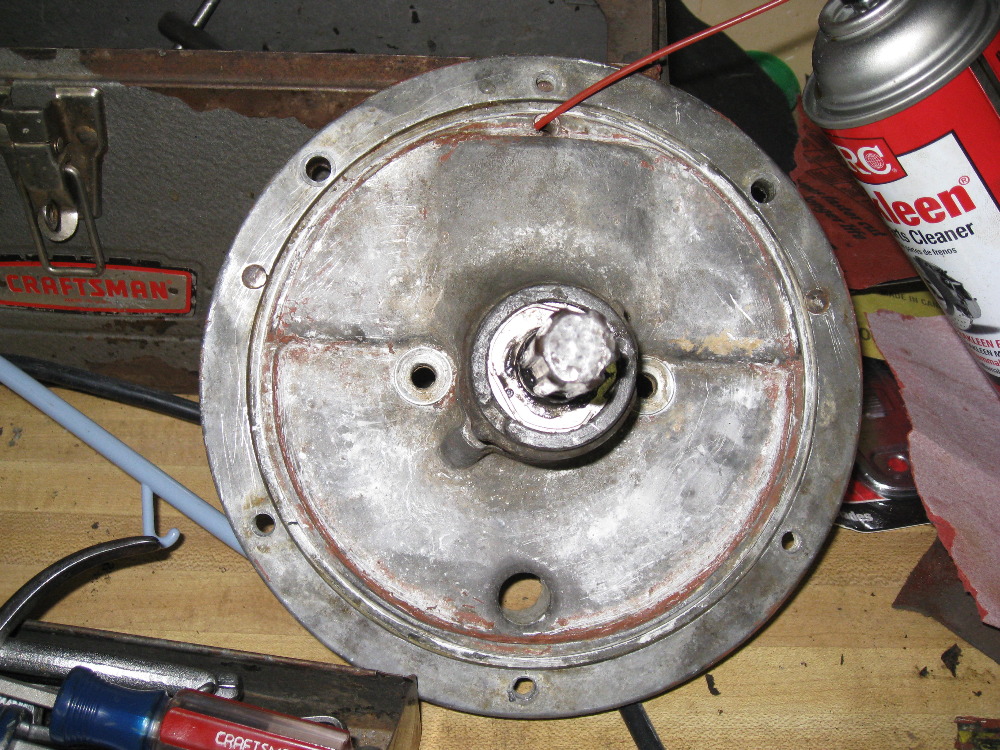
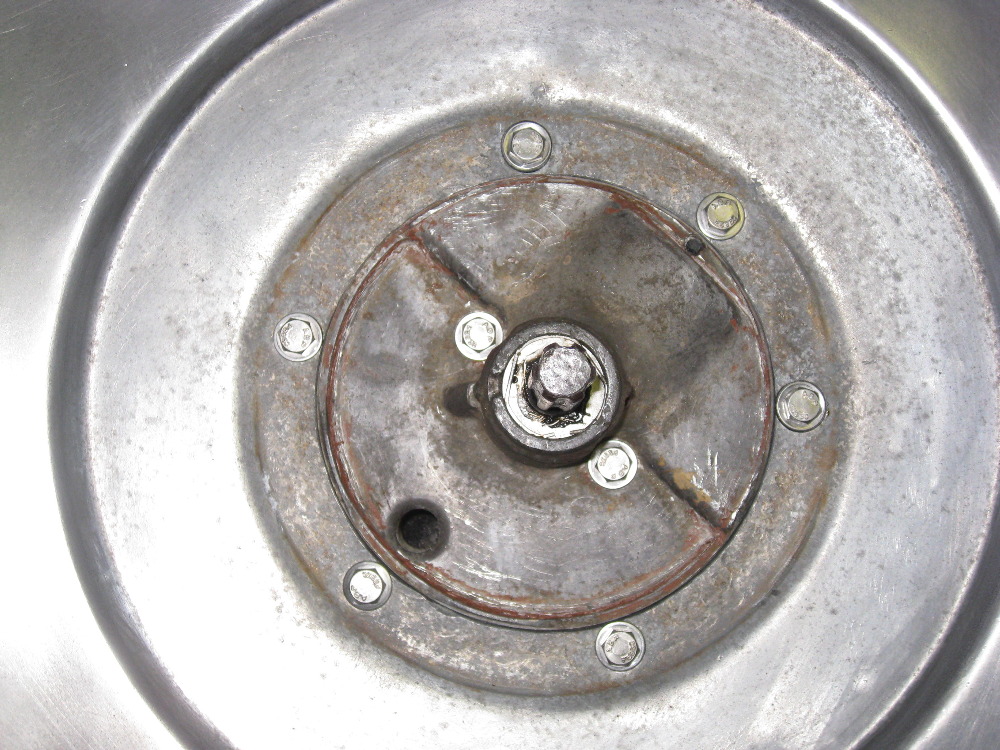
This is the underside

of the center plate. I little corrosion on the collar. I wet sanded it with some WD-40. I don't think it will affect performance but I've been wrong before. It's true!

Post# 627143 , Reply# 136   9/23/2012 at 19:09 (4,230 days old) by geoffdelp (SAUK RAPIDS)        

Larry ... I can't see where one of the teeth is missing; is it on the wheel or the worm gear? If it's on the worm gear, you will want to replace it for sure. You will have to pound out the bar it rides on; nasty job. You will be breaking factory seals.

That piece of scrap metal is unique; wonder if it is over-run from casting or is it the missing tooth?


Post# 627144 , Reply# 137   9/23/2012 at 19:11 (4,230 days old) by geoffdelp (SAUK RAPIDS)        

No ... that won't affect performance; just a sure sign of moisture getting where it wasn't supposed to be. Wet sanding is fine; don't think you will need to do more than that.

You already replaced the center plate seal, right? The shaft turns free, right?

Also, by removing the transmission, are you able to spin the flywheel OK and watch the worm gear move?


Post# 627148 , Reply# 138   9/23/2012 at 19:24 (4,230 days old) by e2l-arry (LAKEWOOD COLORADO)        
Hey Geoff!

Yes, the seal was replaced and I saw no reason to remove it for what I'm doing here. So that should still be good. Everything moves freely in the transmission, back and forth when I manually crank it. Everything came apart relatively easy today except the pulley. Boy was that thing ever wedged on! Even the set screw was a pain. I got it though! The missing tooth is on the worm wheel. If you look at the first picture it's just right of top dead center. A small piece facing the inside of the unit is missing. Let me know what you think and thanks for the help! I really appreciate it!

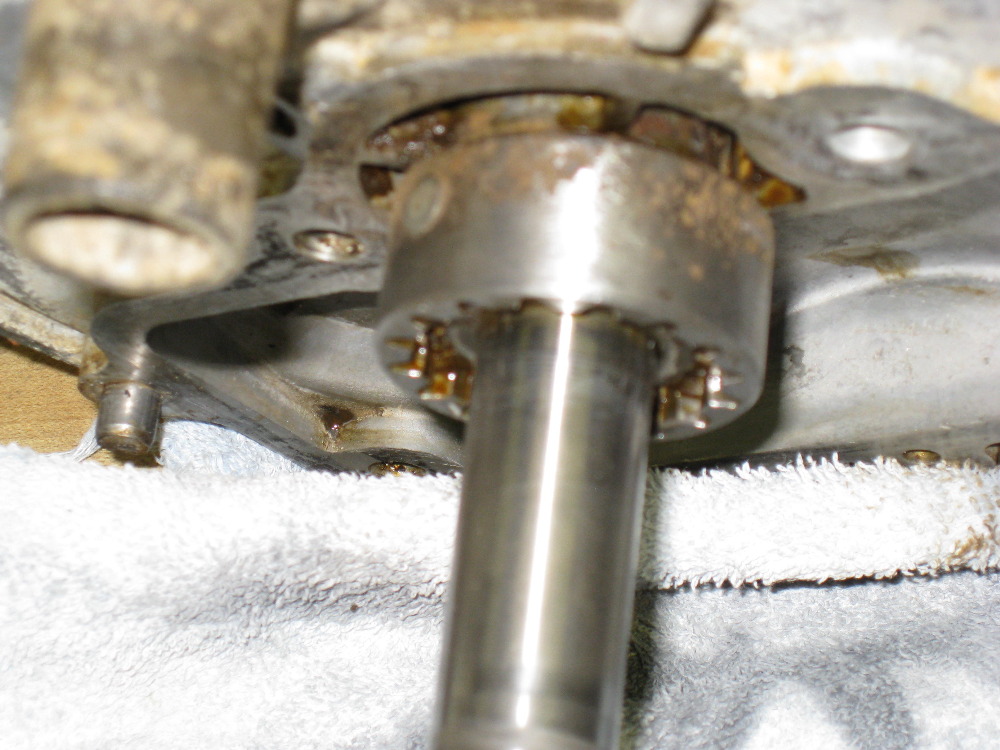
Post# 627149 , Reply# 139   9/23/2012 at 19:33 (4,230 days old) by stan (Napa CA)        
I see it!

stan's profile picture
You have to look at it JUST right ! Like Art!
The piece of metal dose not look like the chuck missing, but maybe it is, and has just been smashed around for 20 years? seems a little big though??

I have the same question... about the spin?


Post# 627155 , Reply# 140   9/23/2012 at 19:47 (4,230 days old) by e2l-arry (LAKEWOOD COLORADO)        
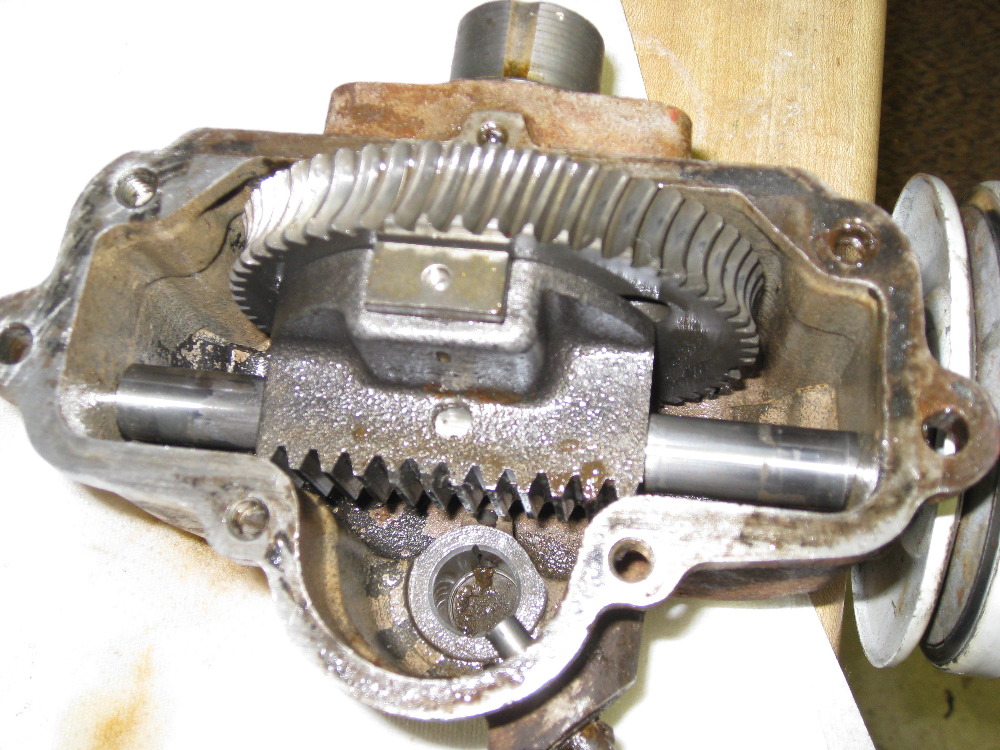
EVERYTHING MOVES

freely. I'm just wondering about the worm wheel. It' not missing the complete tooth. Just a bit of one is broken off on the end facing the inside of the P.U. I don't think that what was on the shaft though. Completely different size and shape.

Post# 627167 , Reply# 141   9/23/2012 at 20:24 (4,230 days old) by stan (Napa CA)        
Humm

stan's profile picture
I guess we'll wait for Geoff to come along.
Think getting that big loose piece out should make a big difference, but lets see what he has to say about the gears!


Post# 627173 , Reply# 142   9/23/2012 at 20:38 (4,230 days old) by mickeyd (Hamburg NY)        
And about the mysterious fly wheel

mickeyd's profile picture

How did a non-pump model end up with the larger one? Assembly error? Replacement? It once was a pumper?


AH ! a Maytag Mystery


Post# 627175 , Reply# 143   9/23/2012 at 20:58 (4,230 days old) by e2l-arry (LAKEWOOD COLORADO)        
My suspicion is that

By 1964 there was a consolidations parts to save money and reducing BOM's. (Bills Of Materials) That way they only maintained inventory of 1 parts vs. 2. Since this pulley worked for either pump or non-pump, it didn't matter.

But another theory is that the machine did originally have a pump that broke and was simply removed vs. fixing the pump. The original drain hose was threaded? Who knows. I've learned to expect the unexpected with this thing. I'm wondering if it's even really a Maytag. Might be a knock off Hoyt-Clagwell. Leave it to that Mr. Haney! He's a slippery old cuss!


Post# 627176 , Reply# 144   9/23/2012 at 20:59 (4,230 days old) by stan (Napa CA)        
Good question!

stan's profile picture
looks like there are two factory holes to accommodate a pump ?? Did Maytag do this with E machines so that one could add later??

Post# 627192 , Reply# 145   9/23/2012 at 22:17 (4,230 days old) by geoffdelp (SAUK RAPIDS)        

I see the missing piece; not sure how that would break off. Larry ... when you turn the flywheel, does the gear turn a full 360 degrees? Do you feel anything grabbing at the bottom? One of the purposes of that wheel was to bring transmission fluid up and over the worm gear; keeping it well lubricated during operation. We should research that a little more. It may be OK just the way it is; I'm worried about something at the bottom of that wheel, however.

Also ... all Maytag models (E, J, N) had those two holes added to the frames for possible future pump additions ... BUT ... my 1968 Model J does not have the larger-lipped flywheel; it is a non-pump model. If that model was originally a pump model, you would have seen a gray-primed space on the right hand side (where the hose is) of the bottom of the skirt ... in the middle ... the pump handles were placed on the machine prior to painting.

A mystery if that is a pump wheel. Do you have the parts manual Larry? Can you look up the pump feature and check the wheel? There could have been a repair to this machine earlier; who knows.


Post# 627197 , Reply# 146   9/23/2012 at 22:22 (4,230 days old) by e2l-arry (LAKEWOOD COLORADO)        
I think,

Maytag just made one set that would accommodate either model by the 60's. I mean, why have 2 sets of parts when 1 set can be used for either? I think maybe back in the 40's and 50's maybe the extra $10.00 for a pump was considered a luxury and a lot of people wouldn't pay the extra. But by the 1960's? Yea, some cheep-os might not want a pump but from a manufacturing point of view it would make sense to have one set of tooling that made one part that could be configured either way. Just speculating. It would take a true Maytag historian to confirm any of this.

So there's my 2 cents on the subject.


Post# 627210 , Reply# 147   9/23/2012 at 23:34 (4,230 days old) by stan (Napa CA)        
so...

stan's profile picture
how to proceed ?

Can that P.U be turned upside down, and flushed out in case there is something (broken piece) laying on the bottom that might be brought up by it's turning?
Kind of looks like maybe you've done that already?

Curious to know what you used to clean it with?


Post# 627278 , Reply# 148   9/24/2012 at 10:44 (4,229 days old) by geoffdelp (SAUK RAPIDS)        

Larry ... Not sure if that is so true. A lot of homemakers did not have the plumbing to accommodate the pump model; my cousin's mother-in-law was one (where I inherited the 1968 Model J). She washed clothes in the cellar of their farm home in Central MN until the day she died in the early 1990's. She had no formal plumbing; hot and cold water had been dropped from the kitchen up above via regular garden hoses. Rinsing was done with standard, non-plumbed, double galvanized tubs. She let water out through a small drain in the floor that ran underneath the ground into the farm yard.

In all the Maytag historical data that I have, I don't find a mention of the flywheel being made as one specific version but I would guess that towards the end of production in 1983, that could be possible. The final parts list still showed both flywheels.

I would also guess that your machine had been repaired at some point. One of the easiest ways to repair these machines was to have a power unit "ready to go". The service shop would determine if the power unit was the problem and take the machine back to the shop and "swap" out units. Hence, the possibility of getting a unit with a pump flywheel AND ... possibly ... the other things you noticed (missing tooth on worm wheel, scrap of metal). Without knowing the history of the machine, it's pure speculation!! It doesn't really matter, either, as long as it functions OK!!

Sure wish I could have heard the sounds it made when it blurped its Bosco all over the floor!!!! :-)

You're doing an excellent job, BTW. Did you remove the right angle drive yet and clean it out? Kind of messy, huh?


Post# 627303 , Reply# 149   9/24/2012 at 13:03 (4,229 days old) by e2l-arry (LAKEWOOD COLORADO)        
I THINK IT CAME WITH A PUMP

That had been removed somewhere along the line. I thought I saw a space on the skirt where the "ON OFF" sticker was. I just went to look but it has been painted over.

So you're not worried about the chipped tooth? I'm wondering if that had anything to do with it locking up. Or is it more likely that wayward loose metal fragment was the culprit? Later today I'm going to dump out the cleaning fluid after soaking and see if there's anything else loose in there. It does turn freely 360 degrees but it also would do that before or after it would lock up. But whenever it did seize, the cure was to back it up, then turn it forward so maybe that freed up whatever was jamming it from the inside? How knows? I can go crazy trying to figure this thing out!

That sound it made when it leaked was something else It DID sound like a long fart followed by the sound of something dripping. For a minute there I thought I had a "personal problem"! I was somewhat relieved to see it was only the washer. LOL

The right angle drive is still in the machine. I unbolted it from the skirt AND transmission but it held tight to the skirt. It was oozing Bosco yesterday so I just put a bucket under it. I may attack that tonight. I saw what you meant about messy! Even with your warning I made a mess. Some oil dripped that I didn't notice. Then I stepped in it and tracked it all over the basement!

The parts manual does show 2 different pulley part numbers. A4367 is the standard pulley and A4368 is the pump/pulley


Post# 627306 , Reply# 150   9/24/2012 at 13:25 (4,229 days old) by mickeyd (Hamburg NY)        
Laughing pretty hard right now about the farts, etc.

mickeyd's profile picture


Laughing

Thanks, Larry!


Post# 627309 , Reply# 151   9/24/2012 at 13:43 (4,229 days old) by geoffdelp (SAUK RAPIDS)        

I'm chuckling about the "farts", too! I have never heard one do that before. It must have had some air/water/oil bubble in the right angle drive and just sort of belched Bosco right out of there. Good grief.

There has got to be something then, that made that tooth break off. I am wondering what might have gotten beneath that wheel. Just see if anything flushes out of it when you take it out of the parts cleaner. I'm going to "try" to look at the documentation I have about that wheel so we clearly understand its purpose. I know it moves the worm feeder bar and also moves the oil back up over the top so it can keep the worm drive fully lubricated during operation.

You wanna talk about an oil mess ... my first time working on a machine, I decided it would be cool to see the transmission in action ... with the center plate off. Good gravy ... I had Bosco all over the place. What a mess to clean up.

Also, since this was a pump model before, I bet that the pump jammed up and that's why it is no longer on there. That also explains why you have the strainer plate; those only went with pump models.

Ah ha ... we're solving the pump issue!! :-)


Post# 627341 , Reply# 152   9/24/2012 at 17:13 (4,229 days old) by e2l-arry (LAKEWOOD COLORADO)        
From what I can tell,

I'm the third owner. The woman I bought it from said she used it for her kids diapers in the early 80's but did mention that she bought it second hand. So probably 2 sets of bad owners before me. How oafish to just yank something off when it breaks instead of just fixing it correctly. Good thing they didn't do that with everything wrong with it or there'd have been nothing left for me to buy. Well, I'm off to empty and flush the trans. See what I can see. Dare I even look? . . morbid curiosity forces me!

Post# 627373 , Reply# 153   9/24/2012 at 19:47 (4,229 days old) by stan (Napa CA)        
Farts

stan's profile picture
"it must have had some air/water/oil bubble in the right angle drive"

like I said up thread "these are old ladies, they just do that" can't be helped !

waiting to see if what you find Larry, if nothing, than it had to be that loose piece of metal that hung up in there!
I'm curious to see what the new gaskets/seals are going to look like when you get them!

Also curious about the right angle drive re packing.


Post# 627381 , Reply# 154   9/24/2012 at 20:13 (4,229 days old) by e2l-arry (LAKEWOOD COLORADO)        
I got it all cleaned up

Didn't find anything else loose although I could have missed something when I was flushing it with water. I can turn it by hand and watch it go through it's cycle. Back and forth. Nothing under the worm shaft and I didn't see any chips or obvious damage to it either. I did seem a little stiff but I gave it a light coating of WD 40 because I did use hot water on it and don't want any rust. From the pictures in the Service Manual I always assumed this worm wheel drove something related to the wringer but now since Geoff said it's only function is to lubricate when in use, I can't see how one little piece of a tooth missing can screw anything up. The thing does somehow move a shaft to the rt. angle drive but the teeth have nothing to do with that. So here's a picture of the newly cleaned part. Can't think of anything else to do to it at this point. I see a few spots of gunk I can go after but after that???? Maybe I'll go have another shot at getting that right angle drive out.

Post# 627389 , Reply# 155   9/24/2012 at 21:11 (4,229 days old) by geoffdelp (SAUK RAPIDS)        

BEAUTIFUL, LARRY!! :-) You cleaned that right up! Now you can see how that transmission functions; not so scary ... solid mechanical workings. That wheel does more than oils ... it also drives the connection to the right angle drive; you'll see it when you take it out. It's pretty powerful because the right angle drive turns the pinion in the wringer post feeding up to the wringer head. "The foot bone's connected to the ankle bone, the ankle bone's connected to the leg bone ... " :-)

Those casted parts are heavy, aren't they? They had to be for a "lifetime of dependability." Just think ... Maytag had the ability to cast all of their parts; they did their own quality control and it shows.

Also ... think about washing clothes AND wringing all at once; that power unit is the heart of the machine. It sure does a lot and should be cared for.

You were gutsy to use hot water ... I've never done that; only parts cleaner. I suppose as long as it dries well. No ... you don't want anything rusting or seizing.

Way to go; hard part's done!! :-) Get the worst over with first.


Post# 627391 , Reply# 156   9/24/2012 at 21:19 (4,229 days old) by geoffdelp (SAUK RAPIDS)        

Stan you're funny. Poor old lady ... she just had to get that stuff out of her! Larry to the rescue!! :-)

Post# 627402 , Reply# 157   9/24/2012 at 21:47 (4,229 days old) by e2l-arry (LAKEWOOD COLORADO)        
I used water

because it was plentiful enough to really force it's way through the unit and jog any loose pieces of debris loose I used the hose in the basement sink I use to fill the washer. On those rare occasions where it's working! I just checked it again and there's no rusting. That light coating of WD-40. And I'll wipe that out best I can before I re-fill it with the 90 wt.

I did get the right angle drive AND vertical drive out. They're still oozing Bosco out in the garage. Do you actually dis-assemble them or just pack fresh grease as well as you can? I cleaned the gear that goes to the vertical drive and scraped off the old gasket. I tried pulling it out. It comes mostly out but just before it comes to the end, it stops. So do you just grease it up as good as you can or do I need to get it all the way out?

I did see there the worm wheel works the wringer shaft but I doubt anything in there was hanging up. It's funny but I never knew the power unit ran the wringer until I got this washer. When I used to use the old Speed Queen I always assumed some electric motor made the wringer go. Never would have though a series of gears and shafts from under the washer did that. It's been an education. No one can deny that!


Post# 627408 , Reply# 158   9/24/2012 at 22:13 (4,229 days old) by stan (Napa CA)        
Larry

stan's profile picture
if you can, show us a pic of the inside of that shaft (sounds kinda sexy) after the oil drains out.

Unless you do find a way to disassemble ! And of course we want to see that too LOL

Would assume that it's packed with wheel bearing grease? Or something like.


Post# 627409 , Reply# 159   9/24/2012 at 22:14 (4,229 days old) by mickeyd (Hamburg NY)        
" think about washing clothes AND wringing all at once;

mickeyd's profile picture

not to mention....Pumping. It's really fun to have all three functions going simultaneously. The low percussive rumble always reminds me of a hydroelectric damn which is kind of funny since I've never been up close and personal to one. Must be a movie memory.


Love seeing the wringer deconstructed and that oozy worm gear looks almost alive.


Post# 627464 , Reply# 160   9/25/2012 at 09:53 (4,228 days old) by geoffdelp (SAUK RAPIDS)        

Larry ... let them finish oozing Bosco and then clean them with parts cleaner. No need to disassemble; you don't have any broken pinion gears. You would have to drive the gears off first and then pull the rods. But like I said, no need to do that because they aren't broken.

I wouldn't put water in these parts ... only parts cleaner. Do the best you can to clean them up. Believe it or not, the only part your going to pack with grease is the wringer post! Check the service manual for quantity and weight; it should tell you. They used "like" an axel grease but greasier (if that's possible). It was sold in 1 lb. containers. The wringer head takes a whole pound while the wringer post takes maybe a half a pound???

The right angle drive gets no packing of lubrication. It gets lubricated through usage. The pinion gear on the right angle drive lines up with the pinion gear in the wringer post.


Post# 627575 , Reply# 161   9/25/2012 at 21:29 (4,228 days old) by geoffdelp (SAUK RAPIDS)        

Mickey ... how could I forget the pumping!! That's your favorite part of these machines; they sure are powerful. My 1963 pink E2LP had the pump abused; there was gunk in it when I got it and wouldn't work. I took it apart and had to replace the impeller with an extra one I had but the wheel is lop-sided a bit. If I push the handle all the way on, it has such force that the gooseneck comes right up out of the tub; unbelievable. It took a few times of water all over the floor before I figured out not to push it all the way on. I need to put a new wheel on it and then it should straighten out.

Larry probably has everything cleaned up and is now waiting for gaskets and a tub.

This has been a fun thread!! :-)


Post# 627576 , Reply# 162   9/25/2012 at 21:33 (4,228 days old) by e2l-arry (LAKEWOOD COLORADO)        
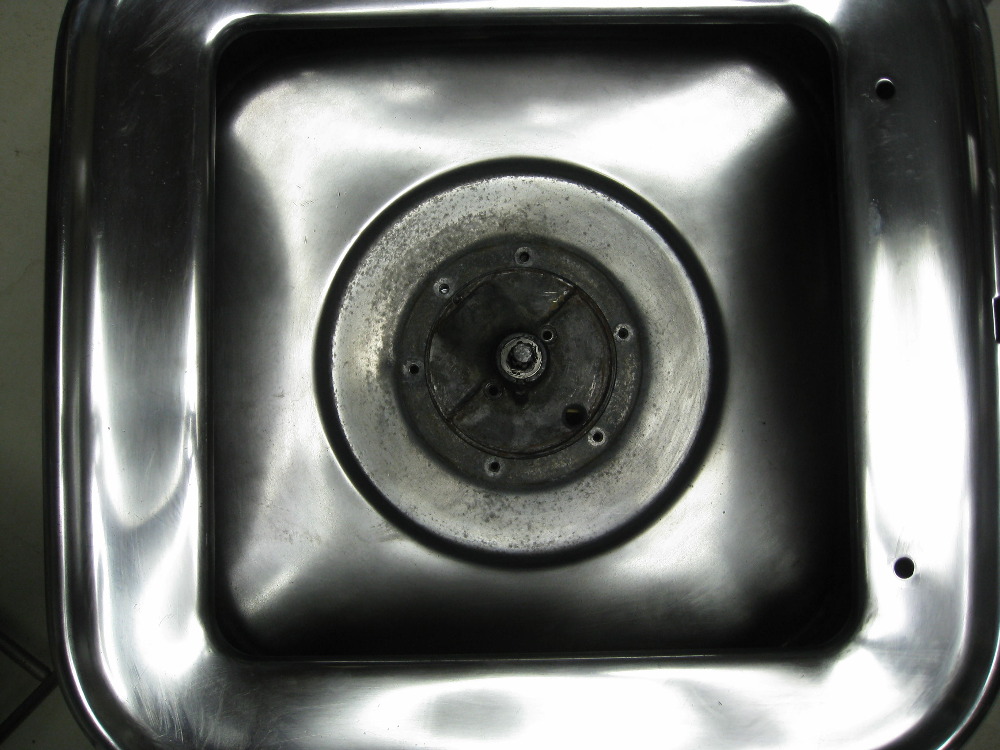
Today I cleaned

and prepped for painting the inside of the tub (do I see where the pump "on off" lever went?) It took a bit of elbow grease to remove all that transmission grease. Tomorrow night I paint the inside of the tub.

Post# 627577 , Reply# 163   9/25/2012 at 21:48 (4,228 days old) by e2l-arry (LAKEWOOD COLORADO)        
And here's

the right angle drive. All cleaned and sanded and ready for priming.There was quite a bit of "Bosco residue" to flush out but it's all out now. There's not much to it. A housing and 1 shaft that connects the power unit to the wringer shaft. After I paint this and the inside of the tub,the vertical shaft is next. Phil says he doesn't sell the grease used to pack it out but said to just get synthetic grease at the Auto Parts store. Simple enough!

Post# 627578 , Reply# 164   9/25/2012 at 21:49 (4,228 days old) by geoffdelp (SAUK RAPIDS)        

Larry ... BEAUTIFUL! You DO see where the pump handle went; HOORAY!! Pump mystery solved. I can't believe they wouldn't have fixed that?? Just yanked it off and put on a regular hose; go figure. You'll like having a pump; they are nice and Maytag always said it would empty the tub in 2 minutes or less; it's true.

Are you going to use gloss or flat? I don't think Maytag lacquered the interior.

Superb detailing job. This is great to watch someone else get into this. Great!!


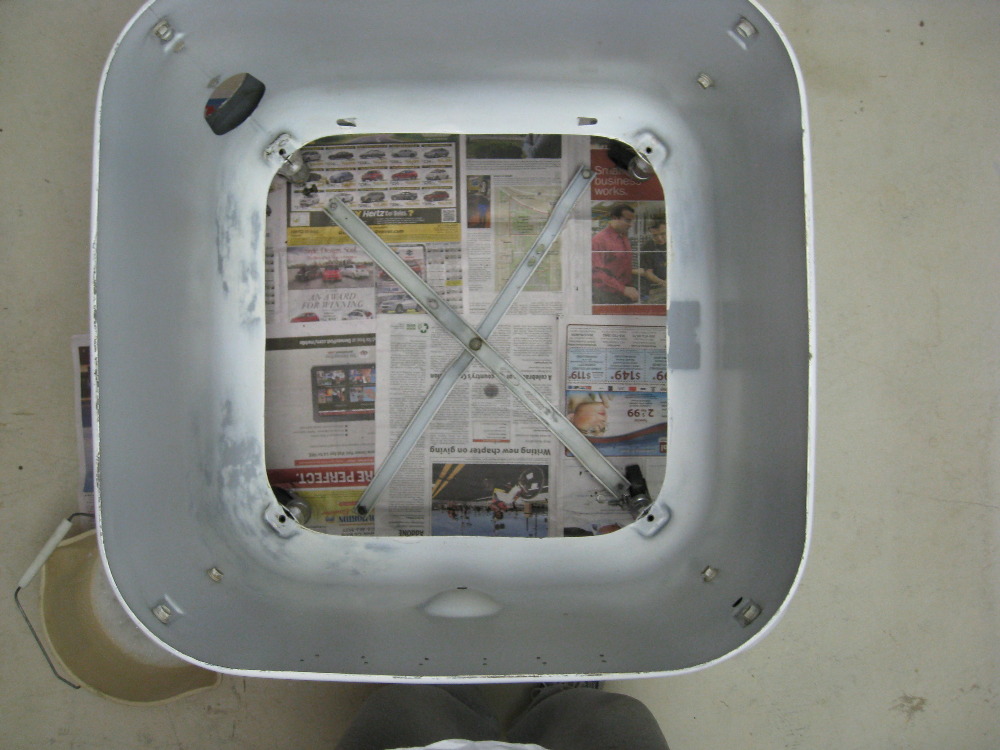
Post# 627579 , Reply# 165   9/25/2012 at 21:50 (4,228 days old) by geoffdelp (SAUK RAPIDS)        

Rustoleum (or something like it) on that right angle drive; you'll like the results.

Let us know what kind of grease you get for packing that wringer post.


Post# 627589 , Reply# 166   9/25/2012 at 22:58 (4,228 days old) by stan (Napa CA)        
synthetic grease?

stan's profile picture
Dose Phil mean the wheel bearing grease? And did he say how much to put in?

The weep hole looks bigger than I expected. Have never really got a good look at mine (just felt it)

Larry what dose that right angle drive look like from the other end, looking inside?
(the end that bolts to the P.U)

We talked about the letters on the front, now that the tub is out how did Maytag fasten them (speed nut ?) Or do they just fit in tight (small hole) push in pull out?

Don't you boys think that when Larryss done, that his pics need to go into "restorations"
Have email Robert to ask how one qualifies, but haven't heard back yet.
Anyone know?


Post# 627591 , Reply# 167   9/25/2012 at 23:09 (4,228 days old) by e2l-arry (LAKEWOOD COLORADO)        
I actually looked on-line

for "synthetic" grease and most of what I read had it as "superior" to the old petroleum based grease. I saw a 3 lb. container of "Tri-Flow Synthetic grease at Amazon for $11.95 so I went ahead and ordered one.

I have some left over Rust-Oleum oil based paint I used on the skirt, Stan't formulation, that I'll use on the inside. The original does look more flat but, it's the INSIDE after all so might as well use it instead of buying more white paint. For the horizontal shaft I'll use some of the Rust-Oleum White Epoxy Appliance spray paint I have leftover as well. Also on the PU before I put it back in. I used it on the wringer and it works fine. Plus again, this is under the unit so it won't matter to anyone but me. I've seen some units for sale, mostly on EBay and the washers look new. Until they show a picture from the bottom! Then it's like "Wah happened" here?

Then you're right, I'll be waiting on my ordered stuff before I can do much else. I know my stuff from Phil shipped already but I haven't heard back from Dave on the tub yet. Last Friday he said he'd be looking for a box to ship it in and let me know the shipping cost ASAP, but I haven't heard anything back so that makes me a little nervous. I don't want to come across as a pest but I'm thinking if I don't hear anything by tomorrow I'll send a friendly email and try to see what up with that. Then of course, more painting and priming tomorrow after work. More pictures too!


Post# 627592 , Reply# 168   9/25/2012 at 23:16 (4,228 days old) by e2l-arry (LAKEWOOD COLORADO)        
Stan,

I'll send a picture tomorrow but the side that bolts to the P.U. is just the other end of the shaft I have pulled out. It doesn't have a gear but like a peg that goes through it that connects to and is turned by the worm wheel of the transmission.

The M A Y T A G letters appear to be rivets. They either are pushed through small holes and flattened to hold them in place or are just very tightly forced into place. No nuts holding them in place. I'm not going to mess with those. No need to really.


Post# 627595 , Reply# 169   9/25/2012 at 23:29 (4,228 days old) by stan (Napa CA)        
You know

stan's profile picture
when you really start looking at the parts and pieces, insides, and outs, these machine were built like brick shit houses! They meant for them to do a haul, didn't they! Amazing.

Post# 627715 , Reply# 170   9/26/2012 at 14:54 (4,227 days old) by wringer (x)        
Larry,

Continued amazement here at your work !!!! You are good and I am glad you have had Geoff and Phil to help you out. You have done to her exactly what the Amish did to my girls before I bought them. They totally tore them down and repainted everything. New grease/oil also. You can be very proud !!!! You have me convinced you can tackle anything. Best!!

Jim


Post# 627748 , Reply# 171   9/26/2012 at 17:59 (4,227 days old) by e2l-arry (LAKEWOOD COLORADO)        
Thanks Jim!

My only concern now is I've had no response from Dave about the replacement tub. Last Friday he said all he needed was a box and then he'd let me know the shipping costs ASAP. That was last Friday. I sent an email today but got no reply. Without a new tub I'm hosed. I may need you to ask your Amish friends if they have a salvage E2L that still has a usable tub as a back up plan. One thing this project has taught me, and that's ALWAYS have a back up plan!

Stan, here's a view of the drive from the side that bolts to the P.U. You can see how the connect and the P.U. drives the shaft. Simple huh?

Larry


Post# 627769 , Reply# 172   9/26/2012 at 19:27 (4,227 days old) by stan (Napa CA)        
Well I'll be

stan's profile picture

can't get much better than that!! was there a seal between those two connections as well?

Did you find out how much grease to put in?


Post# 627779 , Reply# 173   9/26/2012 at 20:03 (4,227 days old) by e2l-arry (LAKEWOOD COLORADO)        
You don't put any grease in this one.

There's a gasket that I have for this connection. I have all the gaskets I'll need as of today. I read that you do add 3 oz. of the 90 wt. oil at the bottom of the vertical shaft where this gear meets the bottom of the wringer gear. I guess that keeps everything in the horizontal shaft lubricated. The I read that you pack the wringer post with 1/2 lb. of grease. That's tricky because that would be from scratch. Brand new or totally empty so not sure what I should put in that one. If anything? Dan said 12 oz. of the 90 wt. in the transmission.

So I got my stuff from Phil today. Including the pump but I don't know how I'll use it. When you order a pump, you get a PUMP. But none of the hardware to connect it, the on off lever, and the pump hinge bracket. I've been looking on line and Ebay but can't find any and they're not included on Phil's part list so right now I have a $45 pump that is absolutely useless. At least I have the correct fly wheel for it because I wouldn't know where to get one of those either. Maybe I'll ask Dave if any salvage machines have the pump linkage. But he's gone missing right now too.


Post# 627785 , Reply# 174   9/26/2012 at 20:36 (4,227 days old) by wringer (x)        
No

problem Larry. Just let me know if you are in need of a tub and I will call them. They have a phone OUTSIDE but can't have it inside LOL. So, I call and leave a message and they call me back !!!!!! They may or may not have one. Do you have a manufacture date for your girl? That would tell which tub it had in it, the cast or a spun one. Let me know !

Jim


Post# 627797 , Reply# 175   9/26/2012 at 20:56 (4,227 days old) by wringer (x)        
Larry,

I have been meaning to write this but keep forgetting. When the Amish restore an E with the letters across the front they no longer remove them because of damage it causes to the skirt and letters. He just paints them and then takes a razor blade and removes the paint from the top side of the letters. The sides are white naturally but it really doesn't show if you don't know what you are looking for. He used to try to remove them but ruined to many and those skirts are not as plentiful as the logo/label ones are. Just a thought !

Jim


Post# 627801 , Reply# 176   9/26/2012 at 21:02 (4,227 days old) by e2l-arry (LAKEWOOD COLORADO)        
June 1964

So it's the lighter spun Aluminum used in the later models. Like you said earlier, when I got it out it's not heavy, just large. If I'm not mistaken, the heavy cast tubs were the ones used earlier models like on Brad's Model 30. Thanks for checking for me. It'll be 6 days tomorrow since I've heard anything and that's making me nervous.

Post# 627802 , Reply# 177   9/26/2012 at 21:05 (4,227 days old) by e2l-arry (LAKEWOOD COLORADO)        
I painted around the letters

A trick I learned. I cover the letters with Vaseline. Then carefully paint around them. Then if I get any paint on the letters it wipes off with the Vaseline. Works Great!

Post# 627887 , Reply# 178   9/27/2012 at 10:06 (4,226 days old) by wringer (x)        
What a

trick !!!! I will have to tell the Amish about this if it is OK with you. I will call them today about the tub. Will let you know when I hear from them.

Jim


Post# 627906 , Reply# 179   9/27/2012 at 13:33 (4,226 days old) by e2l-arry (LAKEWOOD COLORADO)        
Sure!

Always happy to share a tip. If they spray, they can completely spray over the lettering after the Vaseline coating. Then just wipe off the lettering when the paint is dry. Easy as pie! I heard back from Dave and it looks like the tub with him is still a go. I'd be curious to see if the Amish could supply a replacement anyway. I won't be completely at ease until it's delivered, undamaged! Dave is also going to supply me with the rest of the hardware to complete the pump installation. Have other people used him? I've had very good luck with him being to supply vintage parts for my E2L soon to add the P.

Thanks Jim


Post# 627953 , Reply# 180   9/27/2012 at 18:08 (4,226 days old) by e2l-arry (LAKEWOOD COLORADO)        
OK

Got the horizontal drive painted. And got the lower part of the vertical 100% Bosco Free!

Post# 627954 , Reply# 181   9/27/2012 at 18:12 (4,226 days old) by e2l-arry (LAKEWOOD COLORADO)        
PAINTED THE INSIDE

Of the skirt last night. Could use a second coat maybe but guess what? AIN'T gonna happen! It's the INSIDE for cryin' out load! Where over 1/2 is covered with the tub. Still as good or better that the day it came off the line.

Post# 627955 , Reply# 182   9/27/2012 at 18:18 (4,226 days old) by e2l-arry (LAKEWOOD COLORADO)        
Here's a close up

of the vertical wringer shaft. It was pretty thick with the Bosco. I used engine cleaner and de-greaser from Auto Zone. Sprayed some in and let it soak for a bit. Then, I put in some fresh and got the nook and crannies with a toothbrush. Here's a hint. If you use your toothbrush be sure you open a fresh one for you to use in the morning. Otherwise you'll be wondering, "What IS that weird taste in my mouth?" All day!

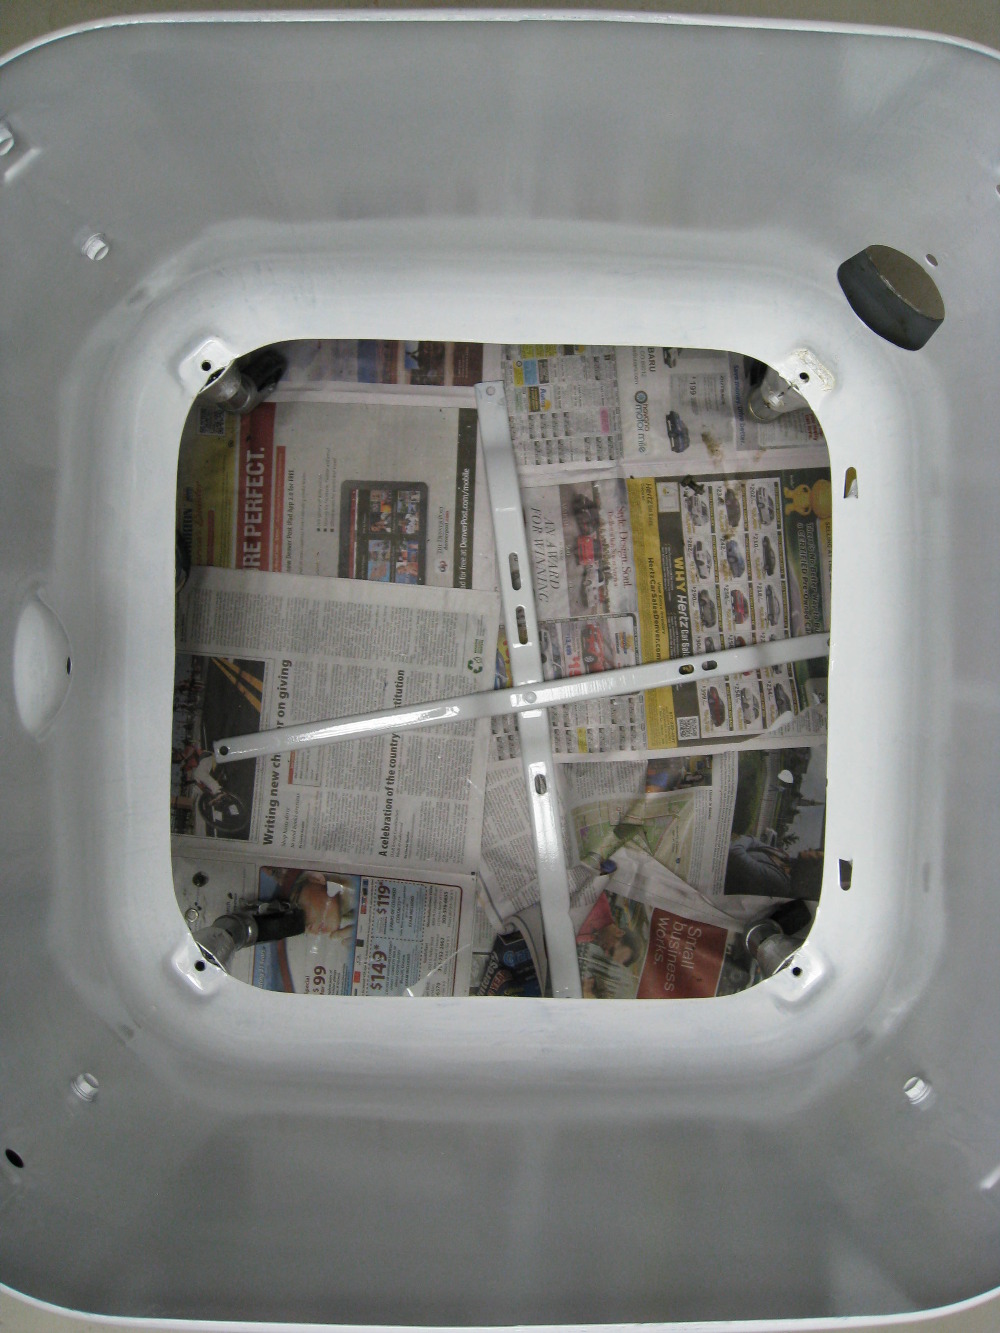
Post# 627969 , Reply# 183   9/27/2012 at 18:57 (4,226 days old) by stan (Napa CA)        
Yah

stan's profile picture
thats what I"m talking about!

She's going to be a pretty girl! again

This thread is going to be so helpful to anyone who decides to do a overhall on a Maytag conventional !


Post# 627989 , Reply# 184   9/27/2012 at 20:03 (4,226 days old) by e2l-arry (LAKEWOOD COLORADO)        
AND!

I think this is where I'm supposed to add 3 oz of the 90 wt. before I close it up. And it stays there and doesn't intermix with the thicker grease of the upstairs neighbor. And to me that makes sense because that area, when I opened it up, had the same power unit Bosco as opposed to a thicker grease. So, unless Geoff or someone else tells me otherwise, that's the plan.

Post# 628001 , Reply# 185   9/27/2012 at 21:36 (4,226 days old) by geoffdelp (SAUK RAPIDS)        

Hi Larry ... B-E-A-U-T-I-F-U-L!! Nicely done. That wringer post looks brand new. The right angle drive looks brand new, too! You're right; don't think you have to make the inside of the machine look like the outside ... Maytag didn't.

Maytag really did use a thicker grease to pack that wringer post. It was part number 056078 - Wringer Head Lube. I just wonder if your local Maytag dealer "might" have a jar left. It came in a plastic jar; not a bottle; that's how thick it was ... you spooned it out of the jar. The reason why you had Bosco in the wringer post was because the wringer head lube broke down over time and probably was exposed to moisture.

When I put the wringer head lube in the wringer post, I do it first and then I put the gasket on after cleaning the area where the gasket goes with lacquer thinner or parts cleaner to make it absolutely grease free. Then I attach the right angle drive and secure the bolts and then put the post and right angle drive back on the machine and secure to skirt but leave the bolts a little loose where it secures to the skirt. That will help you manipulate it while installing the power unit. The right angle drive will maneuver its way through the hole for the post. Having the wringer post and right angle drive on the machine before you place the power unit back on is easier. The power unit will have to be matched with the right angle drive before you secure it.

Also, before you put the right angle drive back on, put some lubrication on the shaft; it will give it some protection.

Those really are amazing machines and were so well AMERICAN built!! :-)

You're doing a fantastic job and THANK YOU SO MUCH for documenting all of this with photos. I've always wanted to do that but haven't had the chance.


Post# 628059 , Reply# 186   9/28/2012 at 10:06 (4,225 days old) by wringer (x)        
What

a pleasurable thread to read with my morning coffee Larry. I agree with Geoff about the job you have done and are doing. You will be soooooooooo proud when she purrs as you use her. Glad you got the tub situation all straightenend out. Thanks from me also for doing such a great job of keeping us up on your progress with before and after pics. This thread should never go away. Looking forward to run day as I know you are too !!

Jim


Post# 628142 , Reply# 187   9/28/2012 at 17:59 (4,225 days old) by e2l-arry (LAKEWOOD COLORADO)        
Here's my picture for the day,

All my refurbished parts resting comfortably.

I received my Amazon shipments today. One good, one not so good. The first was the transmission fluid. It says right on the container HEAVY DUTY TRANSMISSION LUBRICANT. For E J N Transmissions use 12 FL. OZ. The container has 32 FL. OZ. so a lifetime supply!

The synthetic grease is another story. The Amazon description clearly says 3 pounds. What I got was 3 ounces! They even crossed out "pounds" on the packing list and wrote in "ounces" the Oafs! Well! I got on line with the good folks at Amazon and that one's going back. So off to the Auto Parts store tomorrow to scope out some grease!
I have a gasket question. When installing new gaskets, do you just use the new gaskets of any additional sealant like "FORM A GASKET"? I thought I saw one on line thing where they said to use gasket cement? I've never done that on cars but you never know. How do the washer pros do it?


Post# 628195 , Reply# 188   9/28/2012 at 21:33 (4,225 days old) by stan (Napa CA)        
Good question!

stan's profile picture
Lets see what Geoff says, or maybe Phil.

Speaking of a gasket, reminds me ... the tub nuts... did you order new, or are you reusing the gulmite bolts, with new rubber washers?


Post# 628196 , Reply# 189   9/28/2012 at 21:34 (4,225 days old) by geoffdelp (SAUK RAPIDS)        

Nice job! Well ... I use gasket cement to secure the gasket to the part. It's like rubber cement.

Also, what is that gasket on the top of the center plate, Larry? Where did you get that one? Did you get the black rubber gasket that goes in the groove of the center plate? That should be the only gasket you use on the center plate and it doesn't get glued in; it just lays in the groove.


Post# 628198 , Reply# 190   9/28/2012 at 21:38 (4,225 days old) by e2l-arry (LAKEWOOD COLORADO)        
OH! I almost forgot!

Checking out all my gaskets today. The big cork one. There was NO evidence of any cork gasket or even remnants of one when I removed that tub last week. There WAS however, evidence of a LOT of cork gasket material under the agitator when I got that off on day 2. More evidence of just how messed up this washer was when I got it.

On the upside, you couldn't ASK for a better machine to learn on.


Post# 628204 , Reply# 191   9/28/2012 at 22:27 (4,225 days old) by wringer (x)        
The

gasket you need that Geoff mentions looks like a huge o ring Larry. I think, but am not sure that the old cast heavy tubs used the cork gasket. Geoff may have to correct me on that one.

Jim


Post# 628208 , Reply# 192   9/28/2012 at 22:49 (4,225 days old) by e2l-arry (LAKEWOOD COLORADO)        
I thought I needed the cork one too

But then wondered. On the parts list they have "old" and "new" Is "old" the cork and the "new" the rubber seal? I bought both! If I only need 1, I'll only use 1. That would explain why I didn't find evidence of one. It wouldn't explain the cork I found under the muck under the agitator. Like pins, razor blades, bits of cork???

Post# 628277 , Reply# 193   9/29/2012 at 08:47 (4,224 days old) by wringer (x)        
When

I was in your position I ask the Amish about the seals. They told me that the old cast tubs took the cork and the new spun tubs took the o ring type. I have no idea why there would have been a cork one used anywhere. But, like Geoff says, who knows what someone did to this poor beauty. I don't think you need a cork gasket at all but I am not certain. Good Luck !!!

Jim


Post# 628283 , Reply# 194   9/29/2012 at 09:37 (4,224 days old) by e2l-arry (LAKEWOOD COLORADO)        
Never fear!

I do have the big O-ring gasket too. I can see how the cork one would work though.

Stan! The bolts, I did order a new set from Phil. They appear to be a standard size 1/2" bolt you'd be able to get at any Hardware Store. What's different on these though is what appears to be the washer. They seem to be attached to the bolt. I got "the set of 6", 2 long and 4 short, that fasten the tub but that doesn't include the 2 used in the center of the plate. So for those I may look at ACE and see if they have any that look like these. Or, pick out the best 2 washers from the gulmite set and re-use then. Better yet, re-use them on part of the tub not connected to the power unit and use 2 of my new one for those. That way if I have a faulty seal it's just a leak. Where as if one of the washers over the Power Unit leak I get water in the transmission.

Been there!, Done that!


Post# 628407 , Reply# 195   9/29/2012 at 22:30 (4,224 days old) by stan (Napa CA)        
Smart move

stan's profile picture
Larry. we don't want any leaks anywhere, anytime. LOL

We'l being waiting to see what happens next when you get the tub!


Post# 628646 , Reply# 196   9/30/2012 at 21:58 (4,223 days old) by geoffdelp (SAUK RAPIDS)        

Larry ... Stan is correct; the cork gasket on the center plate was used on the cast aluminum tubs AND on the previous models ... the A, 30, etc. When Maytag created the spun aluminum tub they created the "O" ring type gasket; don't use both ... you won't get the right fit. Your machine will take the "O" ring type gasket.


Post# 628673 , Reply# 197   9/30/2012 at 23:23 (4,223 days old) by e2l-arry (LAKEWOOD COLORADO)        
O ring

it is. I guess I'll just hang on to the cork one in case anyone ever needs one. Hopefully my new tub will ship the week. There's not much else I can do at this point until it shows up. I did do some paint touch up and buffing with the Fine Cut this weekend. Everything looks real nice! Just waiting to all go back together.

So Geoff, when you use the gasket cement, do you just use it it spots to tack the gasket on or do you cover the entire gasket with it? If covered do you cover 1 side or both? I bought some today at Ace. Not sure it's the right stuff so it'll depend on how it's used.


Post# 628812 , Reply# 198   10/1/2012 at 18:02 (4,222 days old) by e2l-arry (LAKEWOOD COLORADO)        
DIS-ASSEMBLED

E2LP - I wanted 1 picture before I start re-assembling the washer. The replacement tub and pump hardware will ship tomorrow. The tub is the picture is the old one, just a prop. There was a time a few weeks ago I even had the wringer cap completely taken apart. But I wasn't going to do that again just to get a picture! The only thing left is to sand, clean and paint the power unit. But I'm waiting for my EBay $35.00 spare to arrive first. Then I'll evaluate them against each other and decide which one I should use. The winner gets a paint job! I even have all the old hardware on top of the speaker. I used to be notorious for loosing small parts like hardware so I was very careful this time.

Post# 628814 , Reply# 199   10/1/2012 at 18:28 (4,222 days old) by mickeyd (Hamburg NY)        
Looks like a Maytag Conventional parts manual~ Wonderful !!!

mickeyd's profile picture

So when can we start sending you our E2L's for restoration?


Larry, you'll be so, so happy with the pump. Mr Haney says: " I guar unnn TEEEE"


Post# 628816 , Reply# 200   10/1/2012 at 18:53 (4,222 days old) by wringer (x)        
Larry,

Did you get the PU that I alerted you to on ebay or was there another one available there? Glad you got it at that price. Looks like a factory parts department with a shipment ready for production !!!!!

Looking good !!

Jim


Post# 628820 , Reply# 201   10/1/2012 at 19:20 (4,222 days old) by e2l-arry (LAKEWOOD COLORADO)        
Yea Jim

I did go ahead and bid. I wouldn't go over the $35.00 but it didn't matter. I got it for 35. I want to check it out and if it's better than mine I'll swap them out. And if mine is in better shape, I have a spare either way. Mine did make some weird clunking sounds and other than 1 piece of loose metal I never found what the root cause was. It could have been that 1 piece but I don't know for sure. A little insurance after all my set backs sounded like a good idea.

Post# 628837 , Reply# 202   10/1/2012 at 20:19 (4,222 days old) by wringer (x)        
Yep,

I agree on spares. Glad you got it at the right price also. It will be interesting to hear what shape it is in when you get it. You can really be proud and when you begin to use her and hear her hum you will really be proud.

Jim


Post# 628838 , Reply# 203   10/1/2012 at 20:27 (4,222 days old) by e2l-arry (LAKEWOOD COLORADO)        
Spares!

Jim! You're the spares champ. Not a few extra parts laying around, but a few extra machines in perfect order. Now that's what I call a spare! Did you notice the M A Y T A G letters on the front? On that section I used Vaseline over the letters then sprayed that part as it would be too hard to paint between with a brush or roller, then just wiped it off after the paint dried. Works every time.

Post# 628860 , Reply# 204   10/1/2012 at 21:48 (4,222 days old) by geoffdelp (SAUK RAPIDS)        

Larry ... it sure looks like you are ready to GO! :-) Looks wonderful; let her rip!!

Did you find the right lubrication for the wringer post?

Just put gasket cement on only side of the gasket; no need to do both. You want it to adhere well to one of the parts and still be able to move the part around. If you seal both sides; you won't be able to separate the parts without destroying the gasket.


Post# 628882 , Reply# 205   10/1/2012 at 23:19 (4,222 days old) by e2l-arry (LAKEWOOD COLORADO)        
OK

The gasket cement on only 1 side makes sense. I should have thought of that myself! The wringer lubricant/grease I think I got. Phil just said synthetic grease. That stuff I got from Amazon was 3 ounces for $11.95. Then I saw a 1 lb. container of the same stuff at ACE yesterday for $10.00. Sometime ya win, sometime ya loose. So anyway, I think that's what I'm going to use. So Geoff, let me see if I got this right because I can't really make head nor tail out of the vertical drive. You say to pack about 4 oz. in the lower part of the vertical? That would be where the 2 gears, 1 from the vertical the other from the horizontal, meet? Easy enough. But do I pack anything in the rest of the vertical? I removed the insert for the wringer post at the top. But that wouldn't come completely out because of the shaft and the gear attached. It didn't look to me like I should pack any grease in there anyway as that appears to just hold the shaft in the proper orientation to line up with the wringer head. Lower down the opening narrows to an opening just the size of the shaft. So would I pack any grease around there or just grease up the shaft best I can and with the 4oz. packed in the bottom, everything's fine? The Service Manual just shows how it comes apart but doesn't really say to put how much grease where? It looks to me like that should do the trick. Maybe pack some around the top where the wringer head would push it downwards. I don't want too much that will be oozing out in a month though. I want this baby to be clean for a long time.

I did see an EBay ad today for a Maytag, I think it was a J2L today where the description said something like "Runs Good! A little grease leaking underneath but they ALL do that" And I'm thinking, well maybe they ALL used to, but, . . . . . . I'm looking at 1 that doesn't . . .anymore . . . if there's a God in heaven!


Post# 628885 , Reply# 206   10/1/2012 at 23:32 (4,222 days old) by qsd-dan (West)        
Synth Grease

qsd-dan's profile picture
A problem I have had using high quality synthetic greases is that it doesn't stick very well to gears. I learned this early on when re-packing gear boxes in antique fans. It does work well in roller and sleeve type bearings, not so great in gears, especially those exposed to high heat (grease can sometimes turn into a liquid) or just plain exposed to the elements. My 2 Cents.

This is what I use to repack gears and have had great success in using it. Not sure if it's the best application for wringer washers (perhaps Geoff can chime in), but it's something to keep in mind.


CLICK HERE TO GO TO qsd-dan's LINK


Post# 628980 , Reply# 207   10/2/2012 at 13:25 (4,221 days old) by geoffdelp (SAUK RAPIDS)        

Hi guys ... I'd be careful with the "sticky" grease; that has white Lithium in it. Lithium grease is fine to use with parts that could have contact to water (wringer roll bearing hangers, spring loaded tension reset, etc.) but can be too sticky when used in sealed gears. It's better to stick with a lubrication that is more "oily" in nature.

The wringer post (or vertical drive) gets the lubrication packed into the bottom; where you cleaned it out. It self lubricates up the shaft; no need to put lubrication down the shaft. Don't clean it out, either, Larry. Just put the insert back on.

The right angle drive (or horizontal drive) works the same way. It's fed through the power unit and only slightly. If it's pouring in there and pouring out the breather hole, you've got a problem ... you already know about that!!

As far as quantity goes, I was always taught a half jar (half of a pound) of the Maytag grease. We all know that 8 ounces is half a pound but that sure seems like a lot! Start with 4-6 ounces and don't overfill it. Use your best guess; the gears need to be fully lubricated at all times. You'll be able to tell.

You could also lubricate the bottom of the wringer head post that slides into the insert with the same grease as you do the wringer (vertical) drive. You should be doing that once a month. Some women used to put Crisco on there; what a sticky, smelly mess that was to fix those machines; GROSS. Don't use Crisco; save it for pie crusts!! :-)


Post# 629259 , Reply# 208   10/3/2012 at 19:16 (4,220 days old) by e2l-arry (LAKEWOOD COLORADO)        
It's really is simple,

to replace those dated 2 prong power cords with the 3 prong grounded ones. I did this a few weeks ago but wanted to post some pictures before I put it back in the machine. I though my cord was just fine but when I removed to cover on the motor it was a MESS. So for $6.95 at ACE Hardware I bought a new 6' black grounded cord. If your motor doesn't have a nut connection for the green ground wire, just screw it onto one of the cover screw connections. Then if your outlet is grounded, so is your motor/washer. It's just smart considering the age of some cords and the fact that you can't use these machines without coming in contact with water.

Post# 629260 , Reply# 209   10/3/2012 at 19:19 (4,220 days old) by e2l-arry (LAKEWOOD COLORADO)        
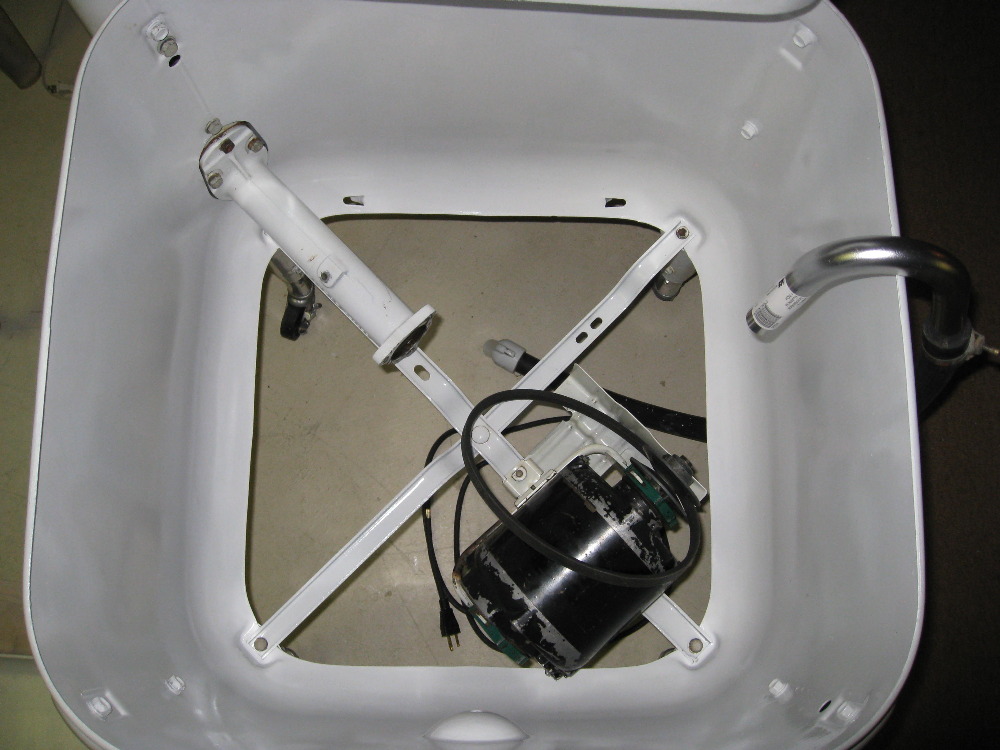
And after you replace

the cover, it's unnoticeable! I was surprised to see mine has a Westinghouse motor. I'd only heard about GE and Delco motors in these Maytags.

And now, back into the washer it goes!


Post# 629263 , Reply# 210   10/3/2012 at 19:46 (4,220 days old) by e2l-arry (LAKEWOOD COLORADO)        
RE-ASSEMBLY

Started this afternoon. The leg extensions and casters went back on first. Really easy when you can position the washer in any position without worry of an oil spill! Then I re-attached the horizontal and vertical drive. I added about 4 oz. of grease. That looked to be just about the right amount for the space available. Then you re-attach it in the machine, the same way the Service Manual suggests to remove it. And it DID!

The E Bay power unit is at a UPS facility about 20 miles from here so I expect that tomorrow. And the stuff from Dave, pump hardware, 8' drain hose and tub will be here by Friday! I think the hose is just a hose so check out the cool goose neck that I found at the Hardware store at lunch today. It fits the current drain just right! I'll just attach to the hose with a clamp.


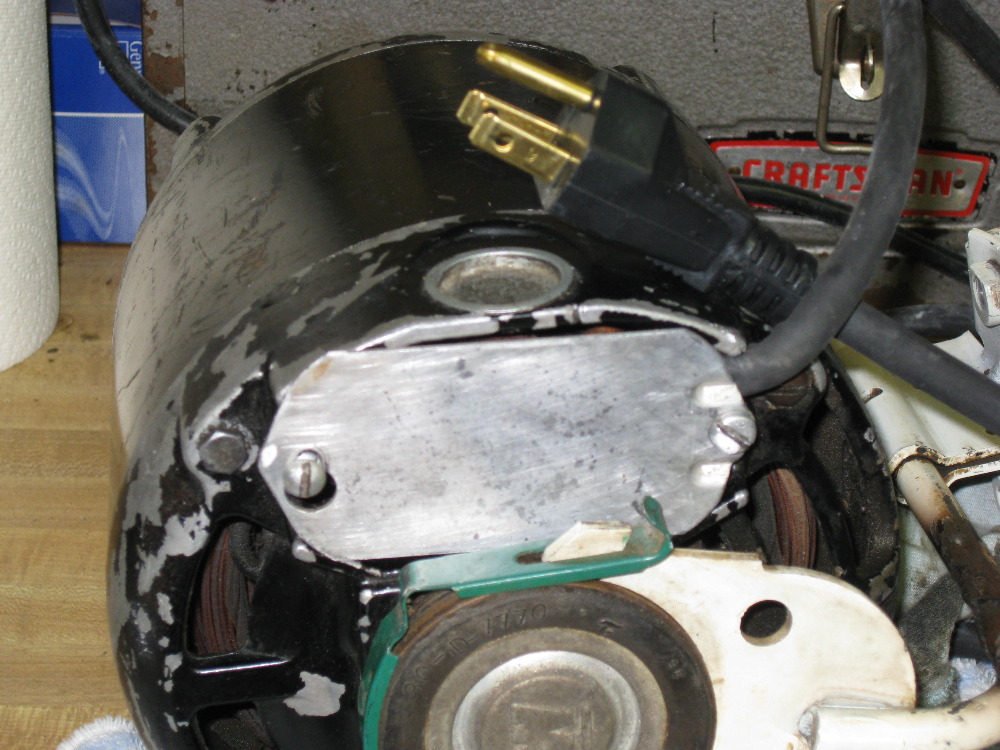
Post# 629265 , Reply# 211   10/3/2012 at 19:54 (4,220 days old) by e2l-arry (LAKEWOOD COLORADO)        
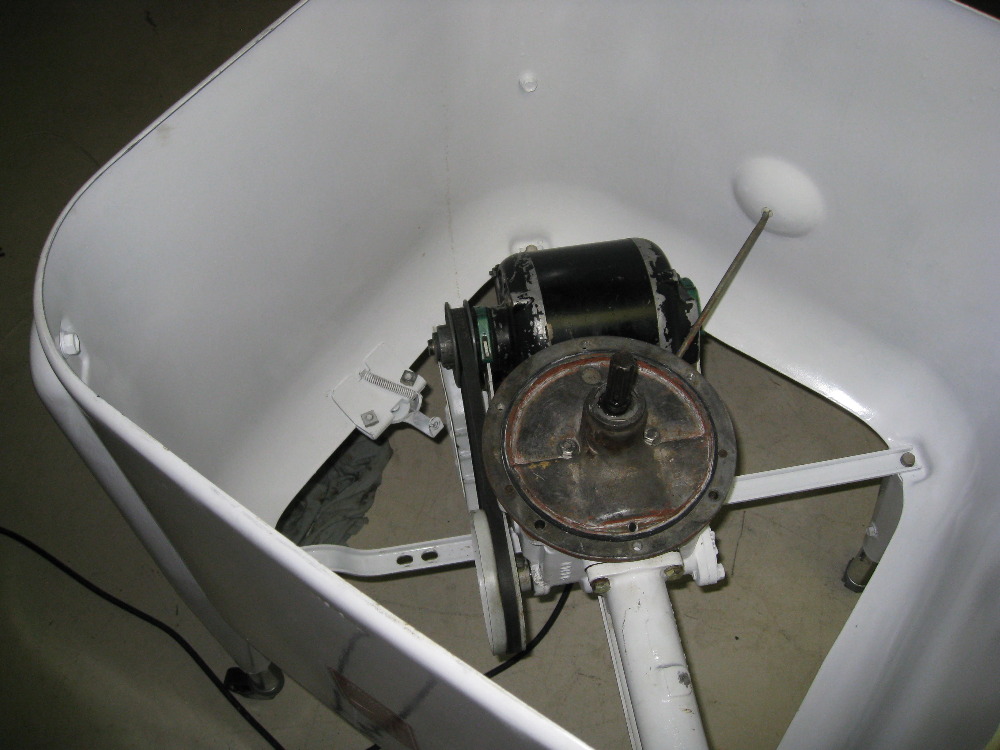
One more

picture of the washer in re-assembly mode. I know it's too soon to put the wringer back on but I wanted to make sure everything would fit correctly after the both drives were re-worked. And it DID!

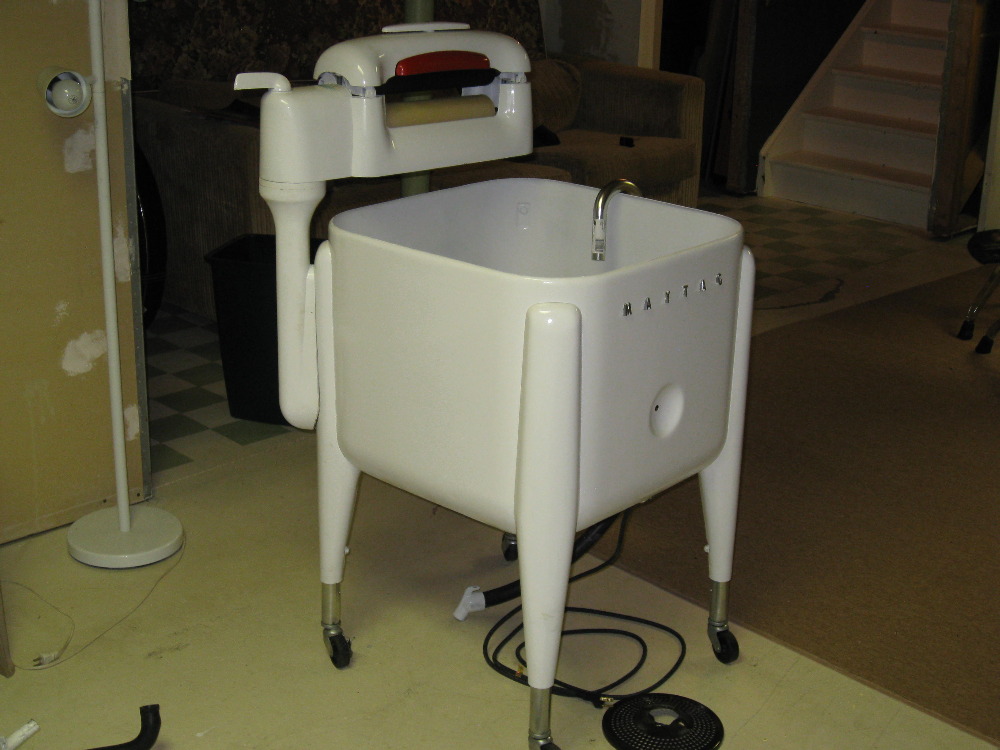
Post# 629270 , Reply# 212   10/3/2012 at 20:03 (4,220 days old) by mickeyd (Hamburg NY)        
Close enough to win the cigar

mickeyd's profile picture

In fact, the goose you have is nicer and longer than the original.


Post# 629271 , Reply# 213   10/3/2012 at 20:10 (4,220 days old) by e2l-arry (LAKEWOOD COLORADO)        
AND!

It's 100% Guar-uuu-teed and gen-U-wine imitation 110% imported from Mexico from Haney International Enterprises Inc! And as I always said, better to have a goose neck that a turkey neck.

Post# 629299 , Reply# 214   10/4/2012 at 00:41 (4,220 days old) by stan (Napa CA)        
Larry

stan's profile picture
That looks like the same goose neck I got for mine at a local appliance store. From what I can see you've done the same as I did and used the old style hose clamp.

Not sure I understand the new electric cord? I can see the two wires from the cord (one green) but don't see the third? Am I having a blonde moment?

The 4 ounce of grease...what kind of grease did you decide to use use in the "space available"

Had mine over on it front today checking things out ( preparing my thoughts for replacing the seals) and noticed that the bolt that holds the power unit in place, is not tightened down firmly to the frame.
When I did tighten it down snug, and turned the machine on, it didn't sound right! Had to loosen it back to where it was, while it was running, to get her quiet again.

Just a observation I thought I'd pass on in case you find the same.


Post# 629310 , Reply# 215   10/4/2012 at 02:51 (4,220 days old) by stan (Napa CA)        
Oh I see

stan's profile picture
what you mean (new cord) I was looking at the wrong pic !

Post# 629332 , Reply# 216   10/4/2012 at 08:21 (4,219 days old) by e2l-arry (LAKEWOOD COLORADO)        
That bolt on the P.U.

Isn't supposed to be tightened all the way. There's a lock nut you use for raising or lowering the unit. It's supposed to keep it level with the drive. I think one of the manuals said something like a 1/4" gap. Might have been 1/2" I'll have to check. But that's why she made noise when you tightened it down. Messed up the rt' angle drive alignment.

Post# 629338 , Reply# 217   10/4/2012 at 08:40 (4,219 days old) by wringer (x)        
Gosh,

I wonder how many members are like me and wait daily for a progress report. She sure is lookin good !!!!! Can't wait to see her all done and doing laundry !! I know you can't either LOL. Great going Larry !!!

Jim


Post# 629340 , Reply# 218   10/4/2012 at 08:45 (4,219 days old) by geoffdelp (SAUK RAPIDS)        

Larry ... you're learning; good job! :-) Yes ... the bolt that keeps the power unit tightened to the frame is a tricky little devil but oh so necessary. You will see when you get the tub back in place. That bolt will help bring the power unit closer to the tub and then when you fasten the tub to the power unit, you will make a water-tight fit. You can then use the other nut to lock the bolt into place.

4 ounces of grease worked well? Good to know!!

Like the gooseneck; the water will really come out of that hose.


Post# 629386 , Reply# 219   10/4/2012 at 13:38 (4,219 days old) by e2l-arry (LAKEWOOD COLORADO)        
Stan

1/4 inch between the bottom of the power unit and the X frame. That's what the Service Manual says. At that gap it should align up with both the horizontal drive and the tub. Anything else and it would be out of sync. That's BAD!

Jim, I saw on Whitelightening's post. My mother's first washer was that blue trimmed Speed Queen in 1947. In 1952 she wanted an automatic and it was sold to my Grandmother who used it until 1964. The last time it was used was June 1968 by yours truly and it's been out in the barn since. I can't imagine what the gaskets and seals on that thing must be like after 44 years but I know they'd be willing to sell it. Last time I was there they also still have the 1956 Kenmore electric dryer and an electric 1951 Westinghouse stove. Heck, the old wood cook stove that THAT replaced is still there! I don't know how easy it would be to get replacement parts a Speed Queen would be. You see quite a few vintage Speed Queens but nowhere near as many as you see Maytag's. I suspect Speed Queens & Kenmore's were a bit cheaper.

I'm hoping the last of my shipments get here today. Then by Saturday or Sunday I should be ready for wash! I have a 2 week supply. I haven't done laundry since the Friday Night Fart episode of 2 weeks ago tomorrow. That's when I decided I either needed to throw a Depend on the old girl or correct the condition. As you all know, I took the more dignified approach


Post# 629392 , Reply# 220   10/4/2012 at 14:12 (4,219 days old) by wringer (x)        
Larry,

If I were closer to you I would definately be interested in the old Speed Queen. But, being in Ohio it is just not possible. One thing bad about Speed Queens is that the parts are not available close to me or anyplace else I know of. Lehman's in Kidron, Ohio no longer carry Speed Queen parts. I think they are getting out of the wringer business. That place is only an hour from me. My Amish connection will not touch a Speed Queen :-(.

Jim


Post# 629485 , Reply# 221   10/4/2012 at 21:05 (4,219 days old) by e2l-arry (LAKEWOOD COLORADO)        
READY FOR ROUND 2!

Everything showed up today, Here's the new tub. A little elbow grease, a little SOS, a little wet sanding, a little Mother's Mag & Aluminum polish. . . I know the drill.

Also my E-Bay power unit assembly showed up too. It was a bit rough, like the picture. But what I couldn't tell in the picture was that it is green? Makes me think it's from a REALLY old Maytag. But it's the exact same as mine so I went ahead working on it. It too still had a thick Bosco fluid still in it even though it had been drained prior to shipment.

Then I sprayed it out with cleaner and checked it out. I decided I would use it. Reason being, I never found root cause of mine locking up and this one had no metal in it and no chipped teeth on the worm wheel. I proceeded to clean it up. Used the engine de-greaser. Then I wiped it down with lacquer thinner, let dry and went t it with my mouse sander. I am SO glad I bought that at the start of this project. Highly recommended!

Next I took all the pump hardware, sanded it down too. Finally, I wiped everything down with lacquer thinner a second time and sprayed with primer. They'll be ready to paint with the Rust-Oleum tomorrow after work.

Here's a picture of the new tub "BEFORE" You KNOW there'll be an "AFTER" LOL


Post# 629496 , Reply# 222   10/4/2012 at 22:53 (4,219 days old) by e2l-arry (LAKEWOOD COLORADO)        
Today's parts primed for paint

Here's the new stuff that arrived today. Got them all prepped, sanded and painted with primer. In the picture is my mouse sander. If anyone does any sanding on wood or metal, in small areas, I can't say how much this little contraption has saved time and tedious labor. Gotta love Black & Decker. Any company who's motto is "If you don't look good, We look like a bucket of shit!" is all right with me.

In the background you can see the green rt. angle drive and pulley I took off the EBay purchase. Note: the pulley is NOT pump compatible. I'll swap that out with mine.


Post# 629615 , Reply# 223   10/5/2012 at 09:33 (4,218 days old) by wringer (x)        
Hi Larry,

That power unit looks like all 3 of mine. That tub is in great condition. As you say, a little TLC will have it shining new in no time. I never saw anything green on a Maytag before. But, I have not seen all of them. Just curious if it had been repainted at one point? Good Luck !!

Jim


Post# 629742 , Reply# 224   10/5/2012 at 23:39 (4,218 days old) by e2l-arry (LAKEWOOD COLORADO)        
We're coming to,

the home stretch here. I painted the P.U. this afternoon so won't install until tomorrow. If the paint's not 100% cured, who cares? It's on the BOTTOM.
Also painted the pump hardware today.

I'm planning my re-assembly. I'm thinking I'll install the power unit first. BUT!, without the center plate. Get this set up with no oil spills, then add the 12 oz. of the 90 wt., install the center plate, make sure it runs, then install the tub.

If that's the wrong sequence for any reason, let me know.

Got the crown of the new tub almost to where it should be. And I have the new 8 ft. drain hose from Dave. On one hand, it's long with the goose neck at the end, but on the other, I like the black industrial washer hose with the spiffy goose neck. Looks more "stock" I have a great idea for a hook to tub too.


Post# 629756 , Reply# 225   10/6/2012 at 01:50 (4,218 days old) by stan (Napa CA)        
Larry

stan's profile picture
Don't know how much of a departure from the service manuals instructions for "re assembly" that is, but sounds O.K to me!
You would also hook up the right angle drive and wringer post, prior to the installation of the tub though, right?

Without looking (at the manual) I would think filling the P.U and closing it up with the center plate (two bolts) right away, is where my mind go's first, but you have interesting idea! That might make it easier!
Do you think the P.U, and center plate, would be stable enough with out it being bolted to the tub, to "run" without ?

Geoff where are you!


Post# 629796 , Reply# 226   10/6/2012 at 08:44 (4,217 days old) by geoffdelp (SAUK RAPIDS)        

WOW ... ready to go!! I'm right here, Stan. :-)

That's the right sequence Larry. Install the power unit first without oil and after installed, THEN add the oil and put the center plate on. You DO NOT WANT to turn on the machine with the power unit full of oil and no center plate!!! That's nasty when that happens ... been there, done that!! :-)

You will want to keep the tub off while installing the pump, also. Make sure the pump wheel is making correct contact with the flywheel before you put the tub on. You can make final adjustments after tub is on and ready to go.

About the hose(s). I would suggest you stay as close to the stock one as you can. see the one from Dave and the only problem is that if the hose is ever laid down while you have a tub full of water, water will come pouring out. The pump doesn't stop the water from draining; it only aids in the quick removal of it. It's up to you, but just remember that you want that hose out of the way and up when you are washing.


Post# 629799 , Reply# 227   10/6/2012 at 09:18 (4,217 days old) by wringer (x)        
G'morning Larry,

I always have to come to this thread first with my morning coffee to check on your progress. That tub shine is beautiful. I know nothing about the reassembly but it sounds like you, Stan and Geoff have it all under control. Jeff, I am wondering how many gals you have rebuilt? Anyhow, I will be here again to check on your progress Larry. GREAT JOB !!!!

Jim


Post# 629806 , Reply# 228   10/6/2012 at 10:28 (4,217 days old) by geoffdelp (SAUK RAPIDS)        

Jim ... a lot. Not sure how many; I have 9 in my collection right now. That includes the Model A. Two E's need to have done what Larry is doing.

I used to help re-build them for the Maytag Shop in St. Cloud, MN a number of years ago. They would sell them as fast as I could get them done; I would go in to the shop in the evenings after work and over the weekends to restore them. We would sell a nicely restored E for $400. The wringer heads were always tricky, if there was a problem. The Maytag Shop still had a gentleman who used to work on them and get them running properly again; I never mastered the gearing within the wringer head. I could do most everything else but that! I still am going to try to do it some day; I've got a junked one in the garage that I could rip apart and not worry that I need to have it for one of my machines.

These machines were really built well and we would do what Larry is doing; have an extra power unit and a center plate ready to go in case the one we were working on was shot. The cost of the gears made it almost cost prohibitive to completely rebuild a power unit; it was better to find one in decent condition and junk the old one. Maybe nowadays a guy could pick up parts off and on and then rebuild one for a lot less money. You have to pound out the gear bars and break the factory seals. I no longer have access to the tool that was used for the thrust and it is almost necessary to have that in order to adjust the movement of a rebuilt power unit.


Post# 629816 , Reply# 229   10/6/2012 at 11:33 (4,217 days old) by e2l-arry (LAKEWOOD COLORADO)        
I have a plan!

For the drain hose. I'm not going to use the 8 footer from Dave. It looks like a hose for a modern washer. Plus I don't need 8 feet of hose. I'm not draining this into the neighbors basement tub! I have the tub to pump hose connection from Phil. Then I have the new gravity drain hose I bought when I first bought this washer. I discovered yesterday that I was able to remove the white metal cap at the drain end of the hose. You know the part. Pump models are threaded, gravity drain are not. So that white cap is glued on with a rubber cement type adhesive. I was able to pry it off by wedging a screwdriver in between and prying it off. Now I'll connect one end to the pump and my new goose neck on the other. I should have some extra length since the gravity hose connects to the center plate and the pump hose connects to the pump, I figure I'll have en extra 12 inches or so. To hook it to the washer I'm going to cut the hook off a clothes hanger. A plastic light blue one. Then with a hose clamp fix that onto the hose and use the hanger hook to hook it onto the tub. Only use plastic hanger ends. NO WIRE HANGERS!!!! We don't want to upset Joan Crawford!

Post# 629818 , Reply# 230   10/6/2012 at 11:39 (4,217 days old) by stan (Napa CA)        
Geoff

stan's profile picture
what about Larry's idea of "running" or testing before tub installation? I'm concerned that without the tub in place, it wont be stable enough for him to spin up the motor?
Bet Larry's on it right now, and already has it figured out! And done two loads of laundry LOL


Post# 629820 , Reply# 231   10/6/2012 at 11:55 (4,217 days old) by geoffdelp (SAUK RAPIDS)        

Stan ... As long as he has the bolt in for securing the power unit to the cross frame AND has the center plate on, he'll be fine; that's how you used to work on them. It doesn't need the tub for security. It's important, however, to have that bolt securing the power unit to the cross frame, however.

Larry ... Oh my ... not sure how that will work but you're the expert now!! Didn't the Maytag version of the hose has a brass/metal piece that went into the hose and then the hose cap was placed on? I have a couple of the hoses with the rubber cement; one of them came completely off (while I had water in the tub ... glad I was right there). BE SURE.


Post# 629823 , Reply# 232   10/6/2012 at 12:17 (4,217 days old) by e2l-arry (LAKEWOOD COLORADO)        
Geoff

Maybe the original Maytag hoses were like that. I can't say as I threw mine away. I bought this off EBay, might have been from Phil. But this "aftermarket" hose looks to me to be nothing more that the standard, black, washer drain hose, cut to a certain length, with the cap glued on the end. So what I have now is just a length of black hose, no inserts, nothing else. I already did a practice run to see if I could connect it to the pump and the goose neck. Success!

Before I install the tub I just want to plug it in for a minute to make sure I don't have a problem that would make me have to remove the tub later. Make sure the agitator shaft moves when activated. Make sure I have the clutch pinion installed correctly and nothing weird going on with the horizontal or vertical drives. No uncouth farting noises! Not likely but just want to be 100% sure before the tub goes back in.

I do expect I'll be done later this afternoon. I'll keep you posted!

Larry


Post# 629839 , Reply# 233   10/6/2012 at 15:27 (4,217 days old) by geoffdelp (SAUK RAPIDS)        
Larry

Absolutely! Plug it in and make sure everything works; that's the way to do it!! You'll also hear how quiet it is without the aluminum tub to make an echo.

Can't wait ... I'll check back later this weekend. Good luck but I'm sure you've got it!!

:-)


Post# 629853 , Reply# 234   10/6/2012 at 16:22 (4,217 days old) by e2l-arry (LAKEWOOD COLORADO)        
Almost Done!

But I'm having a problem with the pump hook up. There's a shaft that connects to the on/off lever. But where does it connect to the pump? There's just this hook like bend on the other end but I don't see where it goes?

Post# 629855 , Reply# 235   10/6/2012 at 16:48 (4,217 days old) by stan (Napa CA)        
The hook

stan's profile picture
end go's threw a pre made hold on the pump U side down.
The rest of the linkage where it connects to the lever, is a little tricky to get it to have the right amount of tension with the spring, and so forth.
The two bolts that hold the end of that to the lever, are the tricky spot. Depending on how deep the first one is threaded, will determine the distance the fly wheel travels on the pump before engagement takes place.

You'll see! And after a adjustment, you'll get it!


Post# 629857 , Reply# 236   10/6/2012 at 16:58 (4,217 days old) by e2l-arry (LAKEWOOD COLORADO)        
This?

Is this it? Because that end of the shaft is too big for the hole in the pump. Won't fit through it.

Post# 629860 , Reply# 237   10/6/2012 at 17:09 (4,217 days old) by stan (Napa CA)        
Sure looks like it to me!

stan's profile picture
it's the only hole you have to work with! Somehow thats got to fit! So if installing from the top... the hook end would point up towards you. PUT SOME LUB ON IT!

Post# 629862 , Reply# 238   10/6/2012 at 17:20 (4,217 days old) by e2l-arry (LAKEWOOD COLORADO)        
I figured it out!

No where does it show you but you take the threaded end and route it through the hole first. Then you navigate the threaded end to the lever and make your adjustments. I had it backward. I started by connecting the rod to the lever first. Then trying to line up the hooked end into the pump hole and of course, it can't be done that way. But it's hooked up now!

Now I just have to put the tub back in and I should be ready to wash!

Thanks for the help Stan!


Post# 629863 , Reply# 239   10/6/2012 at 17:27 (4,217 days old) by stan (Napa CA)        
The other end that

stan's profile picture
attaches to the pump lever is straight, and should be threaded. Hooked end attaches to the pump. One bolt go's on so deep, then thru the hole of the pump lever, then (hard part) the other bolt. Tighten both, at the same time. There should also be a spring that came with your pump package?

Post# 629866 , Reply# 240   10/6/2012 at 17:43 (4,217 days old) by e2l-arry (LAKEWOOD COLORADO)        
Yea!

The pump's in and working. Noe for the tub. After dinner it will be wash time!

Post# 629870 , Reply# 241   10/6/2012 at 18:58 (4,217 days old) by e2l-arry (LAKEWOOD COLORADO)        
7 WEEKS AGO TODAY!

I brought this little beauty home. AND I'VE HAD NOTHING BUT HEARTACHES EVER SINCE!!!!

HA! Just kidding. Got the whole thing reassembled in about 4 hours. I had to overcome a few obsticals. Like not knowing what I'm doing! I bet next time I can do it in half the time.


I'll do a few test loads tonight! She's all back together and as pretty as a picture, so here is one!


Post# 629872 , Reply# 242   10/6/2012 at 19:01 (4,217 days old) by e2l-arry (LAKEWOOD COLORADO)        
The underside

Hasn't looked this clean since she came off the assembly line in June 1964. It may not last but here's what it looks like today.

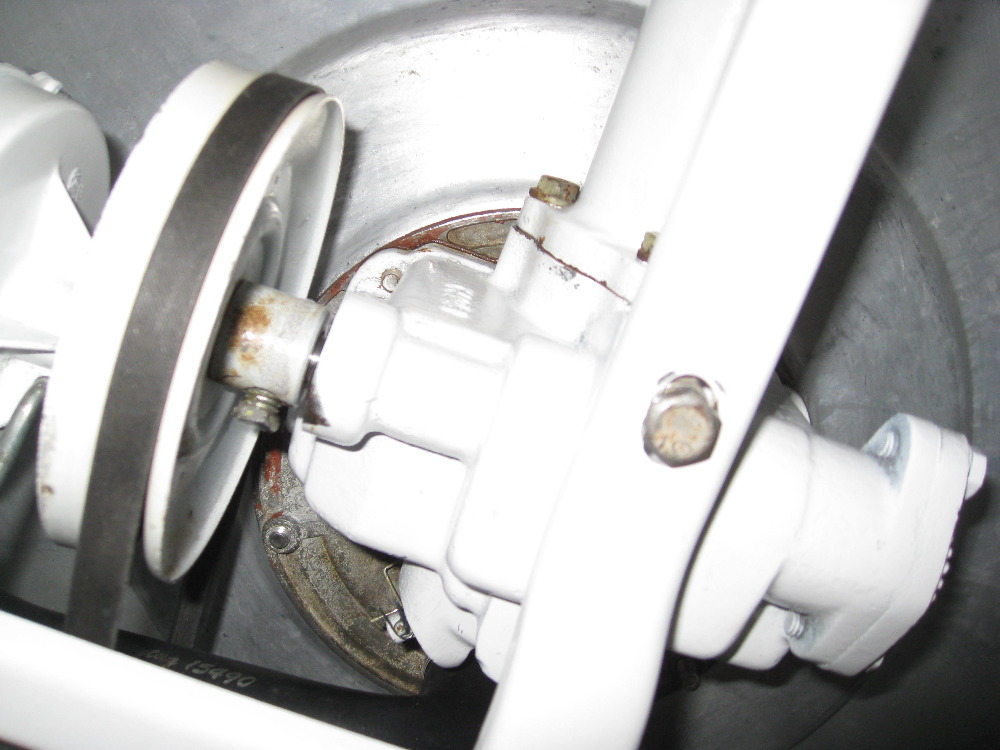
Post# 629883 , Reply# 243   10/6/2012 at 20:02 (4,217 days old) by stan (Napa CA)        
Beautiful

stan's profile picture
Umm what "next time" the hell you've been through, can't imagine you'd even consider a next time LOL!

A couple of thing I"ll give you an heads up on, now that she's ready to wash, and pump... If the pump lever linkage is adjusted a little to tight, the lever may pop back over to the OFF position by itself, its no big deal (mine dose this and haven't bothered to re adjust)

As Mike said up thread, the pumps are mighty, and will empty that tub right quick!
While its pumping out, don't be surprised if you lid rattle's !LOL (mine dose, and never been able to stop) Also no big deal.

After what you been through this little things, will seem like heaven!

Beautiful job Larry


Post# 629898 , Reply# 244   10/6/2012 at 21:07 (4,217 days old) by geoffdelp (SAUK RAPIDS)        

She shore is purty!! :-) WONDERFUL, AMAZING, FANTASTIC! You did it!

When you tested it without the tub, was it quiet? Agitator gear connected well?

You'll have to let us know how you like that pump. Have you tried it out yet before washing? Maytag's literature said it would empty the tub in 2 minutes or less. Once the wheel connects to the flywheel, the impeller in the pump really shoots out the water.

Enjoy, Larry; you've done great!!


Post# 629900 , Reply# 245   10/6/2012 at 21:20 (4,217 days old) by e2l-arry (LAKEWOOD COLORADO)        
Well,

I must have done something backwards because now you push in to start the agitator and pull out to stop. But I can live with that.

There's more bad news. I used it tonight and first I saw 1 spot of Bosco on the floor. I traced it back to the pulley shaft from my EBay replacement transmission. It was old because it looked nothing like the fresh oil I put in today. So I wonder if that will stop or I'll put my other PU back in and hope for no more locking up. I put a bucket under and by the end of washing there was quite a bit.


Next, I go to empty the machine with me new pump and NADA! It ran when I hooked it up but must need some final adjustment. At least with the longer hose and goose neck it was easier getting it to the floor drain.

And now the REALLY sad part. Lots of drainage out of the vent. Nice puddle of the new oil I put in today with a lot of water mixed in. So there is a BIG leak but damned if I can spot it. I kind of suspect that 1 lone screw. All the bolts are tight.

So . . . maybe not for a while, but I need to pull the tub again, and get another set of gaskets and bolts from Phil. Maybe when I pull the center plate I'll get a clue of where the leak is. Try my original transmission that I know wasn't leaking from the pulley shaft.
.
DAMN!

Not the results I was hoping for but I won't let this haunted machine beat me!


Post# 629908 , Reply# 246   10/6/2012 at 22:09 (4,217 days old) by alr2903 (TN)        

Oh no, Larry i have followed your posts and great photo's.  I had a moment of worry, when you mentioned using the that alternate PU.  Maybe the old girl, just wants her original heart back, so to speak.  You have reworked all of it maybe just too much "new" at one time.  alr


Post# 629909 , Reply# 247   10/6/2012 at 22:13 (4,217 days old) by stan (Napa CA)        
I'm dying here

stan's profile picture
My God this old girl is being difficult!

Where could the Bosco come from? You had all that cleaned out?

Leaks! ...You had new tub bolts and new rubber washers?? Could it be the center plate seal? I know you put a new one on, before the tare down, but ... ??

Think we all know you well enough now, that we know this wont get the better of you, but I'll tell you, it sure causes me to pause at the idea of doing mine!
I know that I'll have to do this sooner or later, but after reading this... Umm, think that will be a later LOL


Post# 629915 , Reply# 248   10/6/2012 at 22:40 (4,217 days old) by e2l-arry (LAKEWOOD COLORADO)        
I have no idea

I will remove the tub again. I'll have to! Piece of cake for an old pro like me. I have to drain the PU again now that I know it has water in it. But you're right Stan, new bolts, new seal, I don't know where I went wrong.

So here's what I'm thinking of doing next. Pull the tub. Then figure out the adjustment on the pump. That'll either run against the pulley when "ON" or not. An easy enough adjustment. Unless it's already making contact and I got a bum pump. I'll have to remove the center plate again and get another new gasket. Switch out the P.U. to the one it came with. That one didn't leak at the pulley seal.

Now, If I put the original back on and it goes back to locking up again, which is why I didn't put it back in the first place, then I have an operation between units. Make one working unit out of 2.

I'm tempted to use my cork gasket this time. It just covers for much more real estate than that rubber gasket. I'll try ANYTHING at this point. If it doesn't work I'm no stranger to failure here.

Another advantage I have here is I know there are no holes in the new tub. So the only possible leaks have to come from the bolts and/or the center plate seal. Next time I put it back together I'm going to give them all a coat of Goop.

But right now, I'm drying tonight's wash and I'll be going back to using my front loader for a couple of weeks. Some advise I got from Stan at the start of this. He said "I can just walk away" for awhile. And after 7 weeks of this I think I'll be taking a break.

I'm not giving up but I really think I need a break after today.

I appreciate everyone's support. I'll be back!

Larry


Post# 629918 , Reply# 249   10/6/2012 at 23:09 (4,217 days old) by stan (Napa CA)        
Think the

stan's profile picture
cork gasket is certainly worth a try at this point, so is the "Goop" (good stuff) Don't know what P.U is better? my guess is that the one that it came with, locked up because of that piece of metal.

Did you hear the pump when it was engaged? They make quite a roar when the fly wheel and pump wheel meet. It may be just a little short, (adjustment) where it's not quite touching.

Sure can't blame you for taking a rest from it, you certainly deserve one!

We're here to help, when you you try again!


Post# 629934 , Reply# 250   10/7/2012 at 00:20 (4,217 days old) by e2l-arry (LAKEWOOD COLORADO)        
There's icing on the cake I forgot

That red label on the back with the patent numbers? I bought one from that guy in Ohio. So today I figure I'll put that on. Find out, it's not some peel back and stick label. This is some ancient thing from some print shop in Newton Iowa. How this Ohio guy got them is beyond me, But alas, they're not only old, they're VERY brittle! Directions say to lay momentarily in water. When's the last time you read that for an instruction for a sticker? Well anyway, I put it in that water then when I tried to peel it off the backing, it disintegrates into just a pile of mush.

I find that only fitting. But watch out when ordering decals and labels. That sometimes aren't what you'd call, strictly fresh.


Post# 629968 , Reply# 251   10/7/2012 at 08:46 (4,216 days old) by geoffdelp (SAUK RAPIDS)        

Larry ... you are too close to give up!! Now listen ... you were in a hurry to get it done; mistakes can happen and especially for it being your first time. Slow down and go through it thoroughly.

You're right about the pump; you can adjust that later. That's the least of your worries. It's probably just a matter of moving the pump closer to the flywheel.

Start with the tub to center plate connection. Does the tub rest on the top of the center plate or is there more than a 1/8" gap? If there's more of a gap, that means you do not have the power unit adjusted right and it's not close enough to the tub. You've got to use the bolt that's holding it to the cross frame to move it closer. The rubber gasket on the center plate is MORE than enough. Do not use the cork gasket; it's not right for those center plates. Also, when tightening those 1/2" hex-head bolts, don't over-tighten; make sure you have a secure connection of the rubber gasket to the tub.

You've got the agitator connection wrong. Look at the drawings in the service manual. The "toggle" for the agitator needs to be pushed all the way forward towards the power unit before you put the agitator control arm, pin, and spring back on.

If you truly have water running out the right angle drive breather hole, you DO have a major leak! Again, double-check your work for placing the water seal in the center plate; make sure you did that correctly. Also, that little screw could be problematic. Phil stopped using those screws and is using a piece of solid rubber. You pull the rubber through the hole and then cut it off flush to the center plate. When placing the center plate back on the machine, you have to use a rubber mallet to tap it down so it makes complete connection; VERY important to have that hole blocked.

I'm unclear as to why you would have so much lubrication coming out of the breather hole unless water is mixing in and making the lubrication too thin. There must be a lot of water getting into that transmission to do that; especially after only one use. You've got to go through and make sure those connections are water-tight.

Once you do all of this, Larry. You should run the machine without the pump for a good 10-15 minutes with the agitator on so you can see if it develops oil leaks. If no leaks and you're ready to put the tub back on, make sure the tub lines up well and you have a solid connection to the center plate; don't use GOOP ... address the connection instead. Water test the machine with a bucket of hot water in it and let it sit there and then turn the machine on and let it agitate.

I know it's frustrating but you really are close; I think it's just the connections you've made.


Post# 629971 , Reply# 252   10/7/2012 at 08:53 (4,216 days old) by wringer (x)        
Lordie, Lordie !!

It took me 2 cups of coffee to get this far in the thread today Larry. I agree that you need a bit of a rest from good ole Bessie May. She sure is cantankerous. I could not have done all you have done my friend. I say friend because you have become a great friend to all of us here following your journey with Bessie May. Geoff, I would have given my eye teeth to have had the opportunity you had when you were young working on these babies. I love to go to the Amish shop just to watch Myron working and doing a meticulous job of restoring. He is only 20 and just got married the 3rd but acts and works like someone who has been doing it for many more years than he has. He learned from his father who has done this his entire life. He used to rebuild them for Lehman's in Kidron, Oh but quit there and started his own business because they didn't want him to do the good job he was doing. They wanted them in the back door and out the side door in a very short period of time. Sloppy as I said when I saw one of them.

Another thing I have noticed and heard from others Larry is that the E's make more noise than the J's and N's because of the space between the tub and skirt. I have found that to be the case with mine.

The greatest of luck to you Larry. Please keep us updated on your progress and what you do. You will make it through this and Bessie May will be your friend the rest of your life. You have a lot of your life in here now !!!!

Best !!

Jim


Post# 629996 , Reply# 253   10/7/2012 at 10:39 (4,216 days old) by e2l-arry (LAKEWOOD COLORADO)        
Geoff made some good points

I wondered if over tightening could be an issue. I tightened the hell out of those bolts. I do think water got through that 1 screw hole. If I can't find a rubber piece to fit maybe I'd just fill it in with something else.If I ever get that far.

I still have the issue of oil leaking out the pulley shaft. I did file a complaint with Pay Pal that this part does NOT work correctly as advertised. Probably nothing will come of that though.

The gap between the tub and the center plate did seem large to me and I thought about raising the power unit with the adjustment bolt on the bottom but the service manual says 1/4 inch and I didn't want to second guess the pros. But some of the "instruction" on that manual leaves a lot to be desired. Some instruction is very "step by step" while some of it is very vague. Especially to a novice.

I will say that after sleeping on it, this morning I wanted to rip it apart, sell whatever I bought, agitator, pump, hardware even that tub if there was a buyer. Then list anything salvageable like the motor, leg extensions and casters and wringer rollers. Finally take the skirt frame, legs and wringer post and housing to the metal scrap yard in Golden and recoup at least some of my financial loss. I still might. Everyone has their limit!

But for now, a cooling off period. I moved it into a storage room in the basement and threw an old blanket over it and shut the door. Out of sight, out of mind. Then spent the next 1/2 hour cleaning up the mess the Exon Valdez left on the floor!


Post# 630046 , Reply# 254   10/7/2012 at 15:24 (4,216 days old) by stan (Napa CA)        
Geoff

stan's profile picture
"Also, that little screw cant be problematic "

You lost me! what little screw are we talking about ?


Post# 630059 , Reply# 255   10/7/2012 at 18:26 (4,216 days old) by e2l-arry (LAKEWOOD COLORADO)        
Well, that passed

my foul mood and I'm back on the case. I took it apart again. That goes faster every time. It looked to me like the pump wheel was making contact with the pulley so I'll check that out from below next time I have water in it? I might have gotten a bum pump or it is just an adjustment.

I had to disconnect the agitator activation shaft so during the re-install I'll do it correctly. But having them opposite really I could have lived with.

Took of the center plate and the trans was FULL of water. So not just some leak, we're talking BIG HONKIN' LEAK(S)! The thing looked like it was left over from Hurricane Katrina! The bottom side of the rubber gasket for the center plate was all wet so that tells me something. Next time I will raise it with the bottom bolt to level with the tub. Whether that's a 1/4" or more from the support frame to the bottom of the unit. I'll definitely need new gaskets. They both tore. So here's my list of questions.

1.Do I need to use another new set of new bolts? I used 2 of the set from Phil to connect the Center Plate to the Power Unit. I cranked those on pretty tightly and when I removed them that washer/rubber seal part stayed on. Then since I used those 2 there, I was 2 short for the tub installation. So for those 2 I used the same 1/2" bolt from Ace with a rubber washer, then a lock and regular washer. I used those where the center plate connects to the tub but NOT the power unit. Was that OK? I mean, for $7.50 I can get another set if it will help.

2. That damned little screw. I had a hell of a time getting that back in yesterday. I think it compromised the gasket because today when I opened it up, the gasket had broken at that location and looked to me like that was at least one of the leak paths. So since Phil fills those in with rubber, could I fill those in, the hole in the Center Plate and the mating hole in the Power Unit, with sealant? So long as it's flush with the surface? It sounds like Phil uses the rubber thing as a plug and a plug is a plug? Rubber piece or sealant.

3. Since there was so much water in the rt.angle drive, should I redo my grease job where that meets the vertical drive?

4. The EBay transmission seemed to work fine but it was leaking oil from the pulley side of the worm gear. Should I attempt to repair that? The Service Manual shows washer, seal, washer, spring washer, washer, snap ring. Or is that asking for trouble? Do you think I'm safer just switching back to the original transmission? I have a little paranoia about getting that back in and then a recurrence of the mysterious locking up episodes.

I'd like to avoid a 3rd tear down if at all possible.Maybe one of these days I'll have a working washer. I think I'll go downstairs now and see if the Valdez has stopped dripping.

Thanks Guys!


Post# 630080 , Reply# 256   10/7/2012 at 19:48 (4,216 days old) by stan (Napa CA)        
Your hilarious dude

stan's profile picture
I knew it would'nt get you down for too long LOL

Think we need Geoff for those questions, but one thing for sure is you have to get the water out of the right angle drive.
My vote is that you use to the P.U she was came with, but lets wait for Geoff to stop by!

What little screw are you all talking about?Do you have pics so we can see? (your probably sick of pics by now, but we enjoy them!)


Post# 630085 , Reply# 257   10/7/2012 at 20:07 (4,216 days old) by e2l-arry (LAKEWOOD COLORADO)        
Yea, I'm hilarious all right!

I could hardly keep a lid on the hilarity last night! Gotta laugh to keep from crying!

Here's a pic of the infamous screw hole. Where the red nozzle is pointing. There are 2 bolts near the shaft that connect directly to the Power Unit, nothing to do with the tub. Then this goofy screw at the top that is nothing but trouble. And from what I'm hearing now, isn't even really necessary.


Post# 630087 , Reply# 258   10/7/2012 at 20:13 (4,216 days old) by stan (Napa CA)        
Oh I see

stan's profile picture
WTH is it for? plug that thing up!
You got a pic of that rubber seal that went around the center plate?
Want to see why Geoff says not to use the cork!

How long did it take you to get it all apart!


Post# 630096 , Reply# 259   10/7/2012 at 20:34 (4,216 days old) by wringer (x)        
Darn,

I am of no help to you but certainly am standing by you watching your every move. I knew you would not give up. However, it is always good to get away from things for a bit. I just looked at my 3 gals and the E has a black rubber plug in that hole and the other two have screws in them. I have no idea what they are for but the hole is filled as stated above. Geoff will be here soon to give you some help I am sure. He will know about this situation. I am wondering if the cork gasket rather than the rubber O ring type may have been the problem? I am told that the cork one was only used on the older models with the cast aluminum tub. Anyhow, you have a lot of support here but no help in person LOL. Good Luck Larry !!! Keep us informed as we all care !

Jim


Post# 630118 , Reply# 260   10/7/2012 at 21:19 (4,216 days old) by e2l-arry (LAKEWOOD COLORADO)        
Jim, I didn't use

the cork gasket. I bought that by mistake after looking at the parts manual. I didn't notice one gasket was labeled "old" and the other rubber one "new". Apparently the "new' one is designed for the spun aluminum tubs, which I have. And, here's the catch, if installed CORRECTLY does the job!

It only took me about 30 minutes to get the thing apart. After 4 hours yesterday putting it back together.

When I order another set of gaskets I'll ask Phil if he sells the rubber plugs. If not I'll plug it myself. I am convinced that was a big part of the problem. The other, incorrect alignment of the power unit / center plate. NOW I figure it out!

Stan, if you go upstream to the picture where I took out the first tub, on one of those pictures you'll see the rubber gasket laying on the floor under the skirt. I'ts just a big O-ring basically


Post# 630149 , Reply# 261   10/7/2012 at 22:32 (4,216 days old) by geoffdelp (SAUK RAPIDS)        

OK ... lots 'o questions; which is a good thing.

Phil does sell the rubber used to plug that screw hole; I learned it the hard way in reusing a screw without the lead washer; bad mistake. I caught mine, however, with oil shooting out everywhere; before I put the tub back on. Live and learn. Don't forget to tap the center plate securely in that area after placing the plug in; that center plate needs to sit flush to the power unit. That's where that little screw is very important; it also pulled the center plate down to the power unit making a good seal and without it, you will have to make sure that plate is all the way down to the power unit.

You are probably OK with the alignment of your tub to the center plate, Larry. Keep it at a quarter of inch if that's what the book says. It is apparent that the water got in from the center plate not being sufficiently water tight. Those bolts with the rubber washers are very, very important.

You can probably reuse what you have but order a couple more from Phil ... the short ones ... for the middle of the center plate. You tighten it down but don't over-tighten. Just take it to the point on the socket wrench where it's getting harder to tighten; don't crank on it.

Did you get the water out of the right angle drive? Probably going to be OK.

Could the leak from the seal by the flywheel have been caused by the water mixing with the oil? Those transmissions were not designed to hold water; only thick lubrication. Was it just a few drops or LOTS of oil dripping out? I've noticed that on my pink E, it has had water in the transmission, and that area leaked drops of black lubrication out; not a lot but enough to PO me! When the transmission fluid got changed, the leak stopped.

If you're uncomfortable with your original power unit, keep using this one. Clean it up (don't use hot water this time ... OK? ... only parts cleaner), re-gasket and try again.

I hope I'm helping you with my advice, Larry. I don't want you to have the Valdez in your basement shooting out Bosco!! :-)

Wish I had a video tape or something to show you how to do this but I think you're going to get it. Just don't get PO'd; go slow ... you're very mechanically inclined.


Post# 630153 , Reply# 262   10/7/2012 at 22:40 (4,216 days old) by stan (Napa CA)        
just looked at mine

stan's profile picture
and my E appears to have some kind of rubber plug in it like Jim's E! Never noticed it before had to poke around on it to see and feel!
I probably poked a hole in it trying to find out LOL
Also noticed that all the gulmite bolts have a rubber washer with the exception of the two that hold the P.U ??

So either they were not used there, or the edges of mine have disintegrated ?
Dose anyone know why the gulmite bolts should not be re used (with new rubbers) ?

Larry have you checked that agitator shaft seal (just to make sure)

Just brainstorming here, but what about wrapping the threads of each bolt with a little teflon tape (again just to make sure)


Post# 630159 , Reply# 263   10/7/2012 at 23:11 (4,216 days old) by e2l-arry (LAKEWOOD COLORADO)        
Hi Geoff

This power unit is the # 2 power unit, what I call the Ebay unit. This one was only cleaned with parts cleaner. I never used water to flush this one. I noticed something yesterday that there was an oil spot on the floor after I had run it without the tub. I was working on the washer in another part of the basement away from the laundry area. Better lighting. That spot was the dark color Bosco. Like the black oil you describe. Not at all the same color as the fresh oil I had just added. At first I wondered if it was a spot I missed cleaning from last week. So I wipe it up and run it again. Later another drop in the same spot. Dark like before. When I had the machine running wash, I did see a spot of the dark stuff under the pulley. Then later also with a lot of water. Then much clearer oil with lots of water in it was on the floor under the vent. So I don't know if the water flushed out the last of the old oil or if it will continue to leak from that shaft if I use it the #2 power unit again. I may gamble and use the original. Then run it for about an hour a couple of times without the tub to see if it locks up at all. Once I'm convinced it's good, put the tub back on. Of course I could do that with the #2 power unit to check for any more oil leaks by the pulley shaft. All these decisions!

When I order the new gaskets I'll ask about 4 more bolts and a rubber plug. I'm also thinking maybe I should change my sequence of putting it back together. Maybe I should fill it with oil and put the center plate back when it's still on the bench? Then I really have a better view of how evenly the plate covers the power unit.


Post# 630160 , Reply# 264   10/7/2012 at 23:16 (4,216 days old) by e2l-arry (LAKEWOOD COLORADO)        
Stan,

I did remove and reinspect and clean the agitator seal last week. It appeared to make a good seal when I put it back in.

Post# 630167 , Reply# 265   10/8/2012 at 01:03 (4,216 days old) by stan (Napa CA)        
Geoff

stan's profile picture
I'm confused! (wouldn't be the first time)
is the rubber over the screw, or rubber under the screw? I don't see a screw in mine just see rubber?
And dose this screw (if present in the E model) actually serve a purpose, like helping to hold the center plate to the P.U (or P.U to center plate)

Can only imagine it's there to help with alignment, configuration, or something?

Also, is there a reason NOT to re use the same bolts, (in my case the gulmite) and what are your thoughts about using a little teflon tape on the threads of the bolts, prior to installation?

(sorry for all the questions Geoff) LOL


Post# 630185 , Reply# 266   10/8/2012 at 07:38 (4,215 days old) by wringer (x)        
G'morning all,

Coffee time again with you all. Stan, I have the same question about the rubber plug in my E and not in my J and N. So Geoff, should I buy a plug to put on top of my screws in the N and J or was this something added in later models? I am presuming that there is a screw in the E with a rubber plug on top of it?

I misunderstood you Larry about which gasket you used. Sorry !! I for one have learned a lot from you during this rebuild. And yes, you are very mechanically inclined. Can I borrow some of it from you? LOL

Keep plugging away and writing such detailed information here for all of us.

Good Luck !!!

Jim


Post# 630231 , Reply# 267   10/8/2012 at 13:12 (4,215 days old) by e2l-arry (LAKEWOOD COLORADO)        
If I got this right

You either have the plug OR the screw but you wouldn't have both. It sounds to me like some of the repair guys, or Maytag guys themselves figured out you really didn't need the screw to have a good seal. It was so much trouble that someone got creative and came up with a plug to keep water out and just said "screw the screw!"

Another idea came to me last night on where I might have messed up the P.U. to tub height adjustment. Prior to putting the P.U. back in, I had tightened down the vertical wringer assembly. Maybe I should have left that loose? That way when I adjust the height of the P.U. the entire assembly would float up or down since they're all tied together by the horizontal drive shaft. With the vertical drive held fast into place, it can't move but forcing the transmission to move it would only move at an angle. It did seem the gap was uneven when I put the tub in and, at the time couldn't figure out why. I mean, it's not like I had the washer parked on a hill. LOL! Am I onto something here or has this whole project sent me over the bend?


Post# 630237 , Reply# 268   10/8/2012 at 13:51 (4,215 days old) by geoffdelp (SAUK RAPIDS)        

Hi Larry ... you're thinking is just fine; you haven't gone over the bend. You should leave the bolts loose for the wringer post; it will help you adjust the power unit/center plate. Once you have it where you think it needs to be, you tighten it down.

As far as putting the center plate on the power unit on the work bench; matter of preference, I suppose. I like to have the power unit on the machine because of the potential for oil spillage. It can happen quite easily if it's tilted the wrong way.

Larry's right, guys ... either the rubber plug or the screw; not both.


Post# 630338 , Reply# 269   10/8/2012 at 21:31 (4,215 days old) by e2l-arry (LAKEWOOD COLORADO)        
Placed my order

with Phil today. I'm getting 6 more 1/2" bolts with the washer things attached, new gaskets and the rubber plug. He even sent a picture telling me what end to thread through, pull as tight as I can then cut it off flush to the surface on both ends.

I also heard back from Kevin the label guy from Ohio. He explained that with these old time labels you don't try and peel them off like I did. You place in water momentarily, then you SLIDE the label off the paper and apply. Everything modern is crack and peel so I messed it up. He said he'd split the cost of a new one with me and I thought that was very fair of him. I took him up on his offer.

I've been thinking I still want to use my same EBay power unit again. That one has no chipped teeth and the pinion gear is in better shape, although those are easily changed out. I think it ran better than the one it came with but to be fair, I haven't run that one since it was cleaned and had the loose metal bit removed. It really ran well except for the leak at the pulley shaft. But like Geoff said, once the new oil works through sometimes the leak stops. But that stuff that came out Saturday was pretty darn thick! I could fill it and run for an hour or so and evaluate? But, now here's an idea I got today. I might take that worm gear oil seal apart for cleaning and reassembly. It's just washer, seal, washer, spring washer, washer and snap ring. How hard can that be? If I hose it up, I still have another power unit. Nice to have a spare. Any thoughts?

Larry


Post# 630340 , Reply# 270   10/8/2012 at 21:36 (4,215 days old) by stan (Napa CA)        
Your scarrin me !

stan's profile picture
LOL

Post# 630553 , Reply# 271   10/9/2012 at 21:28 (4,214 days old) by e2l-arry (LAKEWOOD COLORADO)        
Today's adventure!

I do like my EBay power unit better than the original. It just ran and sounded a lot smoother than the one it came with. Granted, I haven't run the original since it was cleaned and the loose metal removed but, the devil you know . . .Except for those drips of the old dark oil it (the Ebay PU) was leaking at the pulley shaft. So tonight I did what I'd been thinking about. I removed and cleaned the washers and seal that are assembled around the pulley shaft.

I pulled all 6 layers out and kept them in order. Then used cleaner and cleaned the seal and washers and got all the old gunk out of the shaft housing. The seal appeared to be in good shape. I could even still read the numbers on it. So when re-assembling, the seal had a nice snug fit. Put it all back together in the right order, put the snap ring back on a PRESTO!

Like I said, it's just washer, seal, washer, spring washer, washer, snap ring. Piece of cake!

Between the cleaning and the new oil I hope there will be no more dripping out of that shaft. I'll run it for a good bit before I put the tub back in. So if I made it worse somehow, I don't see how THAT'S possible, but if I did, I'll swap it out the the one it came with.


Post# 630570 , Reply# 272   10/9/2012 at 23:30 (4,214 days old) by stan (Napa CA)        
Good job.

stan's profile picture
hate to ask you, but can you snap another pic of that from a different angle.
I'd like to get a better look at the spot where the pulley is attached. Trying to see if part of the shaft is flat?

(once in a while, mine drips a tiny bit from there too)


Post# 630607 , Reply# 273   10/10/2012 at 08:43 (4,213 days old) by geoffdelp (SAUK RAPIDS)        

Nice, Larry. It is pretty simple, isn't it? Kind of reminds you of the center plate seal, doesn't it?

Fun to watch; isn't it Stan?


Post# 630610 , Reply# 274   10/10/2012 at 09:00 (4,213 days old) by e2l-arry (LAKEWOOD COLORADO)        
Stan,

It's already re-assembled so I can't take another picture. But looking at it I can tell that the shaft is round until it's through the unit. Then about maybe the last 2 inched has a flat side to secure the bolt from the pulley.

Post# 630681 , Reply# 275   10/10/2012 at 16:12 (4,213 days old) by stan (Napa CA)        
O.K thats

stan's profile picture
what I thought!

Yes it is fun to watch, wish I could be there in person to see, that would be more fun.
For now we'll just have to rely on Larry's pics!

Out of curiosity...is it just the die hards hanging on here? I know Jim, Geoff, myself, and of course Larry, are tuning in on this? Any of the rest of you out there peeking in? LOL


Post# 630690 , Reply# 276   10/10/2012 at 16:38 (4,213 days old) by d-jones (Western Pennsylvania (Pittsburgh Area))        
Stan

d-jones's profile picture
I don't have a wringer washer or any experience with them, so I haven't had anything worthwhile to add to this thread. But it's still very interesting, so I've been following it closely since it morphed from moving a wringer to essentially overhauling one. And even though I'm not commenting on his progress, I'll keep checking in until Larry finishes this project or throws in the towel. So yes, others are following this thread. ; - )

Post# 630706 , Reply# 277   10/10/2012 at 17:44 (4,213 days old) by e2l-arry (LAKEWOOD COLORADO)        
Mikeyd

still checks in from time to time. alr2903 Also made comment after last weekends disasterous adventures. Hopefully, the only towel throwing I'll be doing will be a dirty one into a WORKING and water tight, non-oil leaking, refurbished E2LP Maytag Conventional Washer! I think I'm due!

Post# 630769 , Reply# 278   10/10/2012 at 22:51 (4,213 days old) by stan (Napa CA)        
whats

stan's profile picture
alr2903 ?

Post# 630969 , Reply# 279   10/11/2012 at 21:37 (4,212 days old) by e2l-arry (LAKEWOOD COLORADO)        
Ain't it purdy?

Really finished off the tub today. Scrubbed it down in the back yard with a hose and bucket of suds today. I found that steel wool or S.O.S. works better than wet sanding. When it feels rough, you're still removing tarnish or corrosion or whatever that build up is. Once it feels smooth, you've got it and move on to another section. Then I brought it in the house and gave it the Mother's Mag & Aluminum polish treatment on the crown and the inside.

Mike! If you read this I WAY miscalculated how much time I spent on the other tub. I think I told you an hour. I spent a good 4 or 5 on this one. My fingers are raw! But she sure is PURDY!

Stan, alr2903 replied on post 246.


Post# 630970 , Reply# 280   10/11/2012 at 21:40 (4,212 days old) by e2l-arry (LAKEWOOD COLORADO)        
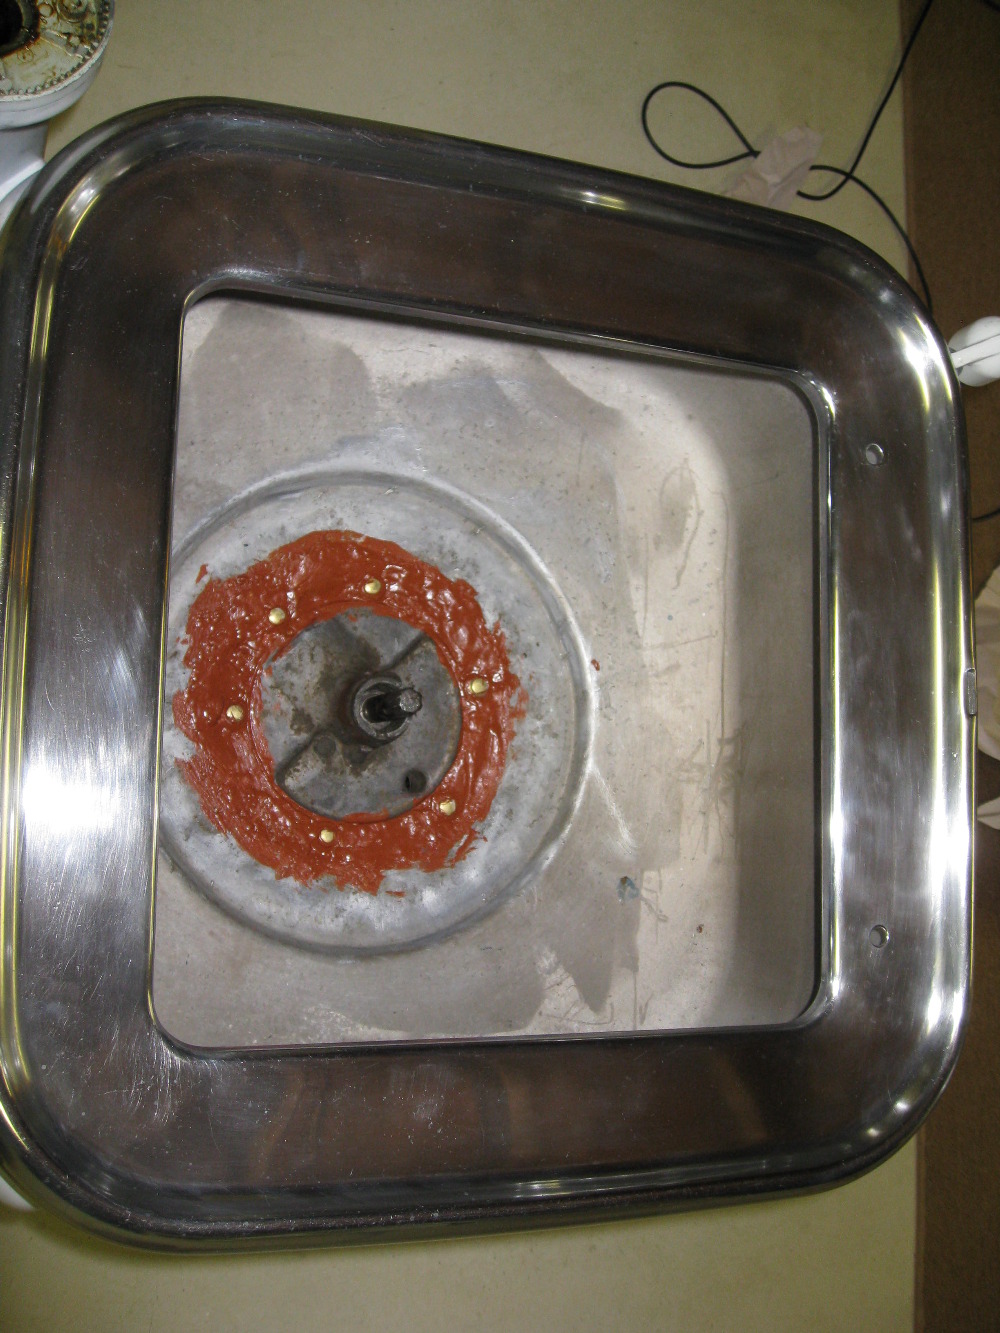
Here's the center plate

before the plug is inserted. This is what becomes the plug. You pull it through and get it as tight as you can. Then trim off the ends with a razor blade. The gasket, O-ring is in the picture but not inserted.

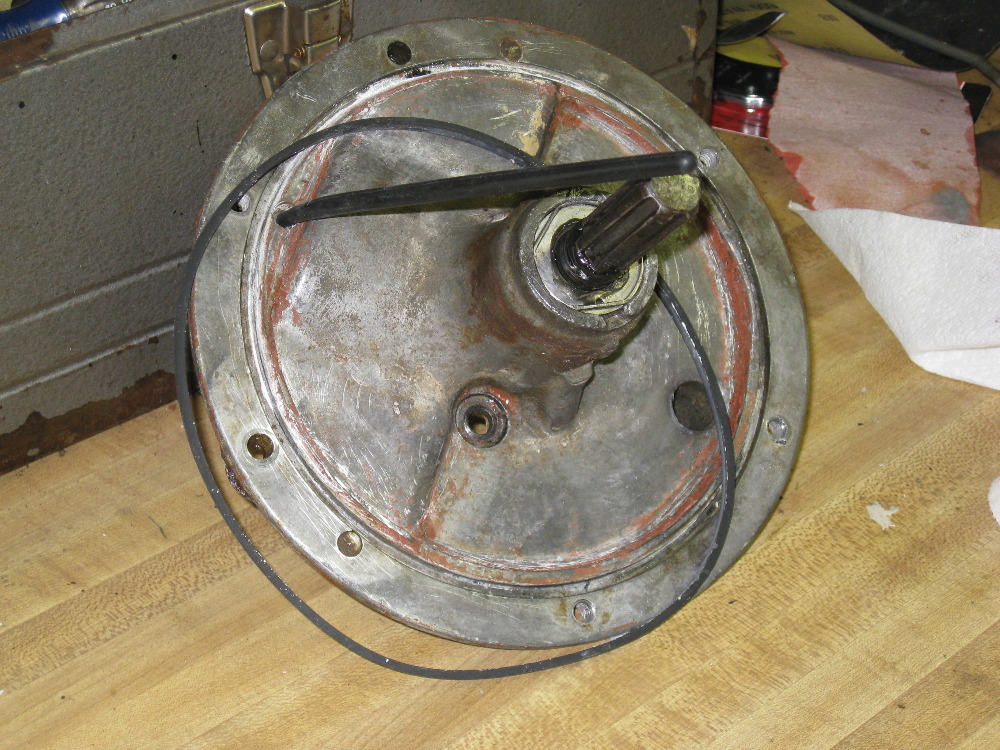
Post# 630971 , Reply# 281   10/11/2012 at 21:42 (4,212 days old) by e2l-arry (LAKEWOOD COLORADO)        
Here's

After the plug operation is completed. The gasket is inserted where it goes for the tub installation.

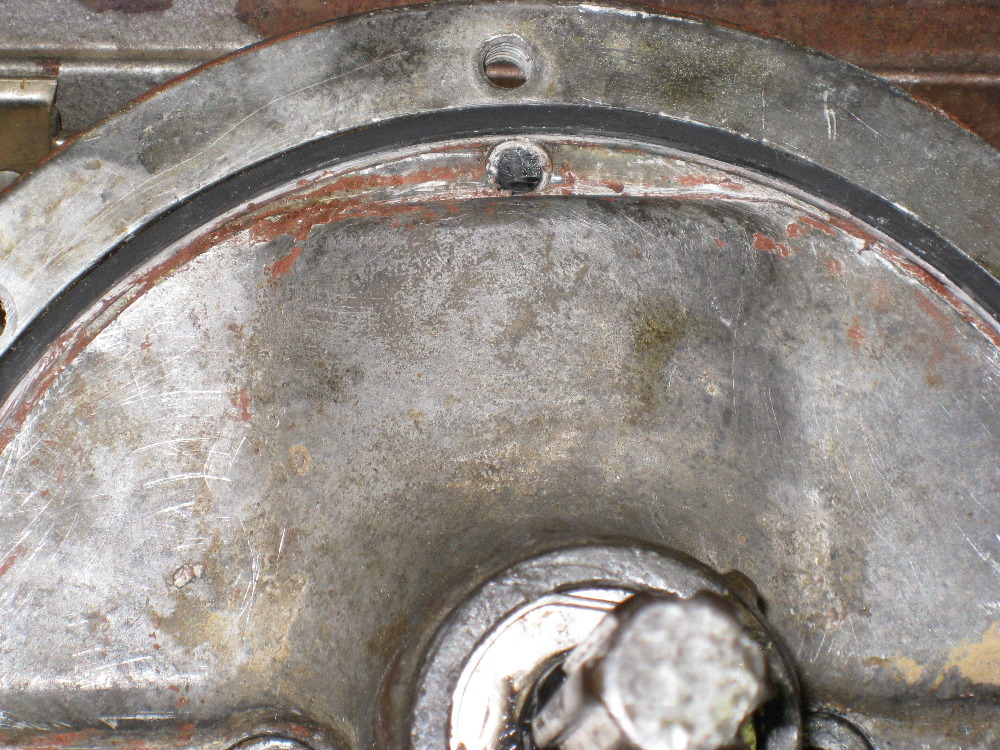
Post# 630975 , Reply# 282   10/11/2012 at 21:46 (4,212 days old) by geoffdelp (SAUK RAPIDS)        

Oh boy ... nicely done, Larry! That tub is beautiful!! I use Brillo pads with "oxygen cleaner" in them; they work well, too.

That plug material really makes a tight seal, doesn't it?


Post# 630976 , Reply# 283   10/11/2012 at 21:50 (4,212 days old) by e2l-arry (LAKEWOOD COLORADO)        
And finally!

I did a mock up of the tub going over the center plate. This is how I have to make sure it's positioned before I tighten things down after installation back into the machine. There's a lip on the plate that edges up to the tub. Directly under the edge of the tub is the O-Ring/gasket that makes the water seal. The trick will be having the power unit/center plate adjusted just right. I think that, and the leak from the now gone screw socket are what messed me up last Saturday.

Post# 630996 , Reply# 284   10/12/2012 at 00:01 (4,212 days old) by stan (Napa CA)        
Beautiful

stan's profile picture
looks like a labor of love to me!

Sounds like your feeling a lot better about this second go around, and have things well thought through!

Thanks for the detailed pics


Post# 630998 , Reply# 285   10/12/2012 at 00:23 (4,212 days old) by stan (Napa CA)        
Just happened to

stan's profile picture
think! (after looking at the pics)

Did we ever determine what the little screw ( now plug) was intended for by the manufacture?
Dose it have a purpose? is there a receiving hole on the power unit for it?
Was it intended to be a possible way of adding lube to the power unit, just by removing the screw, adding lube, and then replacing the screw?

Talk among yourselves LOL


Post# 631053 , Reply# 286   10/12/2012 at 10:52 (4,211 days old) by wringer (x)        
WOWWWWWWWWWWW

How would you like to trade tubs with me? You did a beautiful job on polishing the tub!!!!! I had mine looking like that when I first got it but made the mistake of using Tide with bleach powder in it the first wash and the oxygen bleach tarnished it pretty badly. Now I use just Tide powder and need to get busy and use Brillo pads and Mothers again. I am sure I am speaking for all of when I say we can't wait for its completion and your using her. GREAT JOB LARRY ALL THE WAY ROUND !!!

Jim


Post# 631071 , Reply# 287   10/12/2012 at 12:34 (4,211 days old) by mickeyd (Hamburg NY)        
Talk about washer art.......

mickeyd's profile picture

You could almost shave in that shine.


On another topic, make sure you give the hose an upward pull when engaging the pump to get everything kosher.


Post# 631079 , Reply# 288   10/12/2012 at 13:42 (4,211 days old) by e2l-arry (LAKEWOOD COLORADO)        
As for the pump . . .

Mike, what do you mean about the upward pull? Last week when washing the pump didn't work. I assumed it needed more adjustment. But when I was taking things apart, I'd flip the pump lever to ON and the pump roller was engaged and rotating against the pulley rim. So I thought maybe that was because there was no water in it and the day before when there was water, it causes resistance on the pump and again, thought I needed an adjustment for tighter contact? So if you have any pump tricks, I'd sure like to learn them!

I'm hoping to have this up and running in the next week. It would be so great if everything works and nothing leaked!!

Larry


Post# 631095 , Reply# 289   10/12/2012 at 15:21 (4,211 days old) by mickeyd (Hamburg NY)        
HI Larry,

mickeyd's profile picture

The original hose is thick, stiff, and hard. To get it off the holding couple, the operating instructions say to grasp the hose with both hands and pull upward to release the hose from its post. That always stuck in my head: all those rituals to begin the drain sequence. I often wondered if the upward pull had anything to do with aligning the parts below. Maybe so, maybe not.


Then one rosy washday afternoon, I engaged the pump, but nothing happened. So I gave a yank on the longer, more pliable replacement hose, and thar' she blows.....


Thereafter, she always blew just fine. Just a fluke perhaps, and I do whatever works, especially if it's easy. It's worth a try, and please believe Larry, that's I have nowhere near the skill of many here, so don't expect mechanical miralces from me. "Ah gar un teeeeee." ; 'D


Post# 631159 , Reply# 290   10/12/2012 at 21:25 (4,211 days old) by geoffdelp (SAUK RAPIDS)        

Larry ... Mickey is right about the instructions ... here they are and I quote right from the instruction manual:

"To lower the drain hose on non-pump models, place your left hand on the lower third of the hose, move the hose to the left and push in. With your right hand, lift the nozzle of the hose out of the bracket.

On pump models, push the lower portion of the hose in toward the tub with your left hand while lifting the nozzle of the hose out of the bracket with the right hand. Hook curved end into sink, tub, or drainpipe and move pump control lever (located at the lower edge of the cabinet) to "ON". Washer must be plugged in to operate pump. If water flow stops with pump "ON" before the tub is emptied, move the pump lever off and on once or twice until the flow is resumed."

With that being said, what I would suggest, Larry, is that you make sure the pump is aligned and connects with the flywheel while the hose is in the bracket; not laying down. When you lay the hose down on the floor, it loosens its connection with the flywheel. It's better to adjust the pump while the hose in hooked in the bracket.

Make sense?


Post# 631165 , Reply# 291   10/12/2012 at 21:40 (4,211 days old) by e2l-arry (LAKEWOOD COLORADO)        
No,

But I'll try it!

When I thought I had a gravity drain, I did find the instructions made sense. By pushing in on the hose it took pressure/resistance off the top of the hose making it easy to get out of the hook. If you didn't follow the directions, you had to wrestle the hose off it's post. I now have longer hose and didn't have to follow those directives to get the hook over the sink. Next time I'll try it the book way.

I really couldn't figure what could be wrong with the pump anyway. It's 100% mechanical. If the pump wheel is turning, the pump must be working.

That's the beauty of these. No circuit cards, no solenoid valves, no timers, just 1 electric motor that runs the works.


Post# 631174 , Reply# 292   10/12/2012 at 22:25 (4,211 days old) by geoffdelp (SAUK RAPIDS)        

True, Larry. But I have to wonder if you have "too much" hose creating too much slack on the pump. The original hoses were installed flush to the side of the washer cabinet and had some resistance while in the hanger; it would stay put.

Something to mull over ...


Post# 631190 , Reply# 293   10/13/2012 at 00:00 (4,211 days old) by stan (Napa CA)        
Humm

stan's profile picture
I don't think I get it either!
However
I've already done, what Larry's done, I made my own hose, and goose neck, I leave mine hooked to the sink. The only time I unhook it from the sink is when I'm finished with all the wash, and I'm draining the left over into a bucket!
I don't push or pull on anything, just move the lever to ON or OFF. No problem. Pump dose what I want, when ON... empties the tub right quick! LOL


Post# 631286 , Reply# 294   10/13/2012 at 12:58 (4,210 days old) by e2l-arry (LAKEWOOD COLORADO)        
We'll see soon enough

Once I get it back together and do the water test as described by Geoff, that'll also give me a chance to try out the pump. I'm sure the last time I adjusted it I had it laying on the floor, out of the way. Next time I'll have it in the "parked" position. This still has the rigid black washer drain hose on it. It's just a little longer because I converted the gravity drain hose that I bought earlier. I'm thinking of cutting it down to fit normally on the hook on the tub. Mine sits right in from of the laundry tub when I use it so I don't need the additional foot or whatever it is. But looking at the set up, I can see where giving it a tag could be just the thing to get a good connection between the pump wheel and the drive pulley. Couldn't hurt! Unless I pull the hose off and dump 18 gallons of wash water on the floor. With my luck . . . . I'll make SURE that clamp it tight! HA!

I got an email from the guy that sold me the EBay transmission this morning. He said he mailed me a new drive pinion seal. I'm not sure what that is?? It had the oil drip from the pulley shaft. I took that apart and cleaned it out and thought the seal looked good. So I think I'll wait until that shows up before I put it, the power unit, back in the machine. That'll give me a weekend off! If it's a spankin' NEW seal I'll put it on. If it's something else, I'll just proceed.


Post# 631967 , Reply# 295   10/15/2012 at 23:03 (4,208 days old) by e2l-arry (LAKEWOOD COLORADO)        
I started the re-re-assembly tonight.

That drive pulley seal from the EBay guy was in today's mail. It didn't look much different from the one I took out and cleaned last week but the new one was a tiny bit thicker. So I went ahead and changed them out. That extra thickness was just enough to make a real project out getting the snap ring back on. Last week that was the hardest part but I only spent about 5 minutes on it. Today's was about 45 minutes getting that sucker back on but I finally got it!

Next part was putting the power unit back in the machine. Another new oil fill and the new gaskets then re-attached the center plate and tightening down the 2 bolts. Very careful not to over or under tighten this time and I think I got it right. I did play around with the raising and lowering of the unit using the adjustment bolt from below. Seems to work fine but I set it at the recommended 1/4". When the tub goes in if I need to adjust up OR down, I will.

Here's a trick I learned when I went to remove the pulley and used it again tonight to tighten the pulley bolt onto the shaft. That locking bolt has a funky square bolt. I couldn't find anything that would fit to remove it. So I took a socket extension. The side that attaches to the ratchet is square also and fit that bolt. So I use the socket extension then tighten or loosed by using a pair of vice grips on the other end. Works like a charm!

Then I got the belt on the motor and pulley and took it for a spin. Even though it's a conventional washer that doesn't spin. Ironic huh? The first test to pass was the agitator activation. It's back to pull for agitation and push to stop. Then I let it run for 30 minutes. Stopped and checked for any oil leaks. There were none. Let it rest and checked again. No leaks. Then let it run another 25 minutes. No leaks from the pulley shaft or anywhere else.

Tomorrow night's project is the re-installation of the pump. So much easier without the tub. I want to make sure I get it lined up so it makes contact and spins when the lever is set to "ON" and stops when moved to "OFF". Then if there's time, the tub!

Speaking of the tub, I noticed over the weekend that the bottom wasn't completely flat. One small area was dented/bowed slightly down. The could have also been a leak path. So I held it to the concrete floor and flattened it with a hammer. It's 100% flat now. I just didn't notice that before. Maybe I had done that by over tightening a bolt? Maybe I got it that way? I do remember it didn't seem to fit flatly on the center plate the first time so I may have discovered why.

So a couple of steps successfully completed, a couple of more to go!


Post# 631980 , Reply# 296   10/16/2012 at 00:05 (4,208 days old) by stan (Napa CA)        
Hi Larry

stan's profile picture
so, at this point I see you have the right angle bolted to the P.U.

Do you have it slightly loose at the wringer post ? (to help with any adjustment later) Or is it all bolted together, and the adjustment will be with just the one bolt under the P.U?


Post# 632088 , Reply# 297   10/16/2012 at 10:55 (4,207 days old) by wringer (x)        
G'morning Larry,

Coffee and information reading time. Sounds like you are right on track with what you have done so far. I for one am anxious to hear that she is all assembled and washing. I am now wondering how long this thread will be available in the club on line? I hope it will be forever for others to learn from as we have. A lot of information is held in this thread. I told Myron my Amish friend about the vaseline trick on the lettering on the front Larry and he tried it and KaBoom it worked. Looks much better than just the tops of the letters being shiny. Good luck as you continue.

Best !

Jim


Post# 632106 , Reply# 298   10/16/2012 at 12:42 (4,207 days old) by mickeyd (Hamburg NY)        
"Anticipation" ~ the song.

mickeyd's profile picture

She's tapping her foot waiting for the pump, and then it'll be all quiet on the western front, and you can move on. I really can't wait to see what machine you find for your next project. Hmmmmm, I wonder what it will be?


PS: The tug on the hose may be the secret move..... shhhhhh, but the flooding is funny, pulling too hard, indeed!


Post# 632154 , Reply# 299   10/16/2012 at 17:51 (4,207 days old) by e2l-arry (LAKEWOOD COLORADO)        
Anticipation -

Now I won't get anything done Mike. I got that Carly Simon song stuck in my head with a real hankerin' for some Gen-U-Wine, Heinz Ketchup! MMmmmmmmmm Heinz. The slowest ketchup in the west!


Post# 632193 , Reply# 300   10/16/2012 at 21:42 (4,207 days old) by e2l-arry (LAKEWOOD COLORADO)        
REPLY THREE HUNDRED!

WOW! This is the 300th post to this thread. It looks like there's good news! I got the pump in and working. It connects to the flywheel in the "ON" position and cuts off in the "OFF" I haven't actually discharge water, but it does connect and I can feel air flow from the impeller when ON so I'm confident it's a good pump.

After the pump I re-installed the tub. It did seem a little tricky getting it lined up just right and I was very cautious before tightening it down. But it looked like a did get a good even fit to the gasket.

Here's a picture of the now working pump. To the pump, to the pump, to the pump, pump, pump!


Post# 632194 , Reply# 301   10/16/2012 at 22:01 (4,207 days old) by e2l-arry (LAKEWOOD COLORADO)        
And now the tub!

After a couple of tries, I was satisfied with the positioning of the tub and tightened it down. Next step? Add water and PRAY! It looked pretty good but after 20 minutes I spotted about 3 drops of water. I went under the washer with a flashlight determined to find the source. The seal all the way around the tub was completely dry so I did get a good seal around the rubber gasket. I was able to spot the sole drip from one of the 2 bolts that connects the center plate to the power unit. So,with water still in the tub I got my socket wrench and gave it a feel. It could have used a little more torque so I gave it a twist. I was very cautious of over tightening so this was a bolt I misjudged. The good new there was that after I tweaked it down a little more there hasn't been another drop and it's been over an hour.

Also of interest is that since the refurb, the transmission hasn't seized up at all.

So, after 8 and 1/2 weeks and 301 posts, I may, just may, have finally gotten this old machine in working condition.

The next test will be wash day on Saturday


Post# 632210 , Reply# 302   10/16/2012 at 22:37 (4,207 days old) by stan (Napa CA)        
"refurb of the transmission, hasn't seized up at all

stan's profile picture
Just keeping track,

Did you use the ebay trans ,or your original?

Great job Larry!


Post# 632216 , Reply# 303   10/16/2012 at 23:21 (4,207 days old) by e2l-arry (LAKEWOOD COLORADO)        
I used the Ebay one

Because that one was in better shape. No loose metal floating around in it and no chipped tooth on the worm wheel or anywhere else. I don't know if that chipped tooth is what would occasionally get it hung up, or if that's even possible but I didn't want to chance it. I've had this one on a lot the last 2 night and it runs quietly, smoothly and it doesn't freeze up. I can actually leave the room without worrying about burning up a belt.

I spent so much time underneath it checking for leaks, I took a picture. It's bottom view hasn't looked this good in YEARS! No water, no oil or grease, I'm not sure this is mine!


Post# 632221 , Reply# 304   10/16/2012 at 23:45 (4,207 days old) by qsd-dan (West)        

qsd-dan's profile picture

The light at the end of the tunnel is visibly apparent! Sending good wishes that it completely behaves itself from now on.


Post# 632306 , Reply# 305   10/17/2012 at 09:53 (4,206 days old) by wringer (x)        
Coffee and education time again Larry,

I am so very envious of you at both your ability to take on this task and your perseverance. You did a job that would put the Amish to shame maybe. So glad you joined the club and shared your rebuild with us. With some help from Geoff and the others and your staying with the project have been very interesting reading for all of us Wringer fans. Waiting to hear about how you did on washday. Best !!!!

Jim


Post# 632341 , Reply# 306   10/17/2012 at 13:08 (4,206 days old) by mickeyd (Hamburg NY)        
In full agreement with Jim.

mickeyd's profile picture

Those pics are Newton, Iowa-perfect! I'm sure we'd love to see pics of her in operation, especially the minty pump, in your signature close-ups.


Admiring your patient wait till Saturday. I would not be able to wait that long, unless you must, for sealing and drying purposes.


Post# 632423 , Reply# 307   10/17/2012 at 21:36 (4,206 days old) by e2l-arry (LAKEWOOD COLORADO)        
I have to wait Mike,

I'm not done yet. I'm still working on some cosmetiticals, as Lisa Douglas would say. Tonight I wet sanded the skirt and buffed it with the Meguiar's fine cut. It's like a liquid rubbing compound, a little less abrasive. I used my electric car buffer and it really polished it up! So I did the same to the lid and put it back on. Of course, the legs and corners had to be done by hand. Tomorrow night I have a work related dinner and won't have a chance to do much of anything.

I'm having a terrible time with the decals. I got the second replacement red patent decal for the back. This time I slid it off as instructed and it was still brittle and broke into pieces on me. I kind of pieced it on the back like a puzzle but it's far from perfect. But it's an old machine so the decal gives it an aged look. Some corner chunks missing. I had the same problem with the ON OFF for the pump lever. The 2 F's in OFF are a little offset because that's where that one slit. If I had a "do over", I'd skip the decals.

Maybe Friday night I'll put the wringer back on and roll it back to it's home in the laundry room. Put some water in it, test the agitator and pump. Make sure these's no water leaks, oil leaks or old lady fart sounds. There shouldn't be any issues, there weren't last night but I didn't plug it in either, THEN!!! it's GO TIME! Probably Saturday maybe Friday night, depending on the timing.

I think I got it this time but if anything goes wrong, you KNOW I'll be posting here.


The moment of truth! How exciting! Nine week it took me. Who'd a thunk it?

Larry


Larry


Post# 632538 , Reply# 308   10/18/2012 at 08:56 (4,205 days old) by wringer (x)        
OHHHHHHHHHHHHHHHHHHHHHHHHHHHH

the suspense is killing me !!!!!!!!!!!!!! Waiting here with baited breath Larry.

I would have never "thunk" it at all. But the end result is worth thunking about !!!

Best

Jim


Post# 632733 , Reply# 309   10/18/2012 at 21:16 (4,205 days old) by e2l-arry (LAKEWOOD COLORADO)        
I got home as early

As I could tonight. I waxed the washer and wringer AFTER last night's buffing. It looks good. AND if I'm reading the label on the wax bottle correctly, I can take my washer through the car wash 40 times and the finish will still bead up!

I tried to re-stage the original picture form 2 months ago today. My lap top is in the background for that reason.

I also cut about 14" from the drain hose. From where it is situated from the laundry tub, I didn't need the slack. So away with it!


Post# 632737 , Reply# 310   10/18/2012 at 21:23 (4,205 days old) by e2l-arry (LAKEWOOD COLORADO)        
Next,

I moved it over to the laundry room, which is to be it's home. I plugged it in for another "dry" run and noticed that like last time, When I hit the pump, it didn't click ON. So there must be something to the adjustment with the hose in the hooked position. I got my open end wrench and tightened down the pull rod in the OFF position, tightening it up. The I tried again and when I hit the ON lever, it connected tightly to the pulley and the pump wheel was a spinnin'! Better to find this out before the first wash load. That must be why I had no pump last time. Live and Learn!

I HAVE PUMP! YEA!


Post# 632740 , Reply# 311   10/18/2012 at 21:35 (4,205 days old) by e2l-arry (LAKEWOOD COLORADO)        
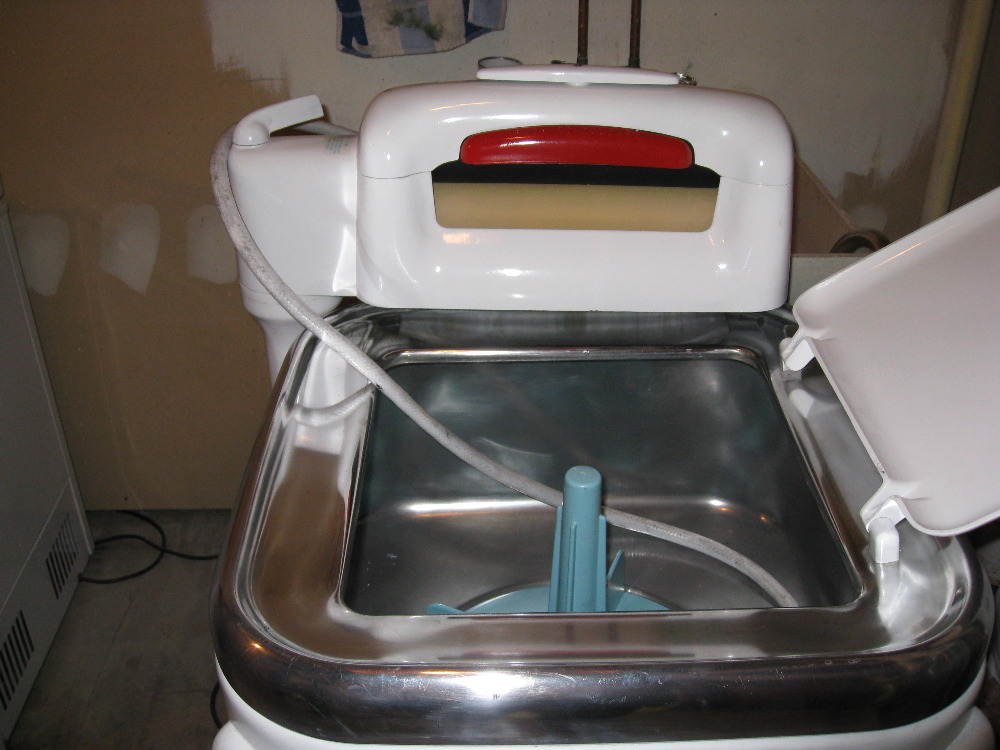
Saturday's Wash Day!

And it will be 9 weeks to the day I brought Bessie Mae, as Jim calls her, home. Never thought it would take so long. But never thought I'd learn so much either. This isn't some touch up machine. This is a refurbished E2LP machine from 1964
that looks DAMN good!


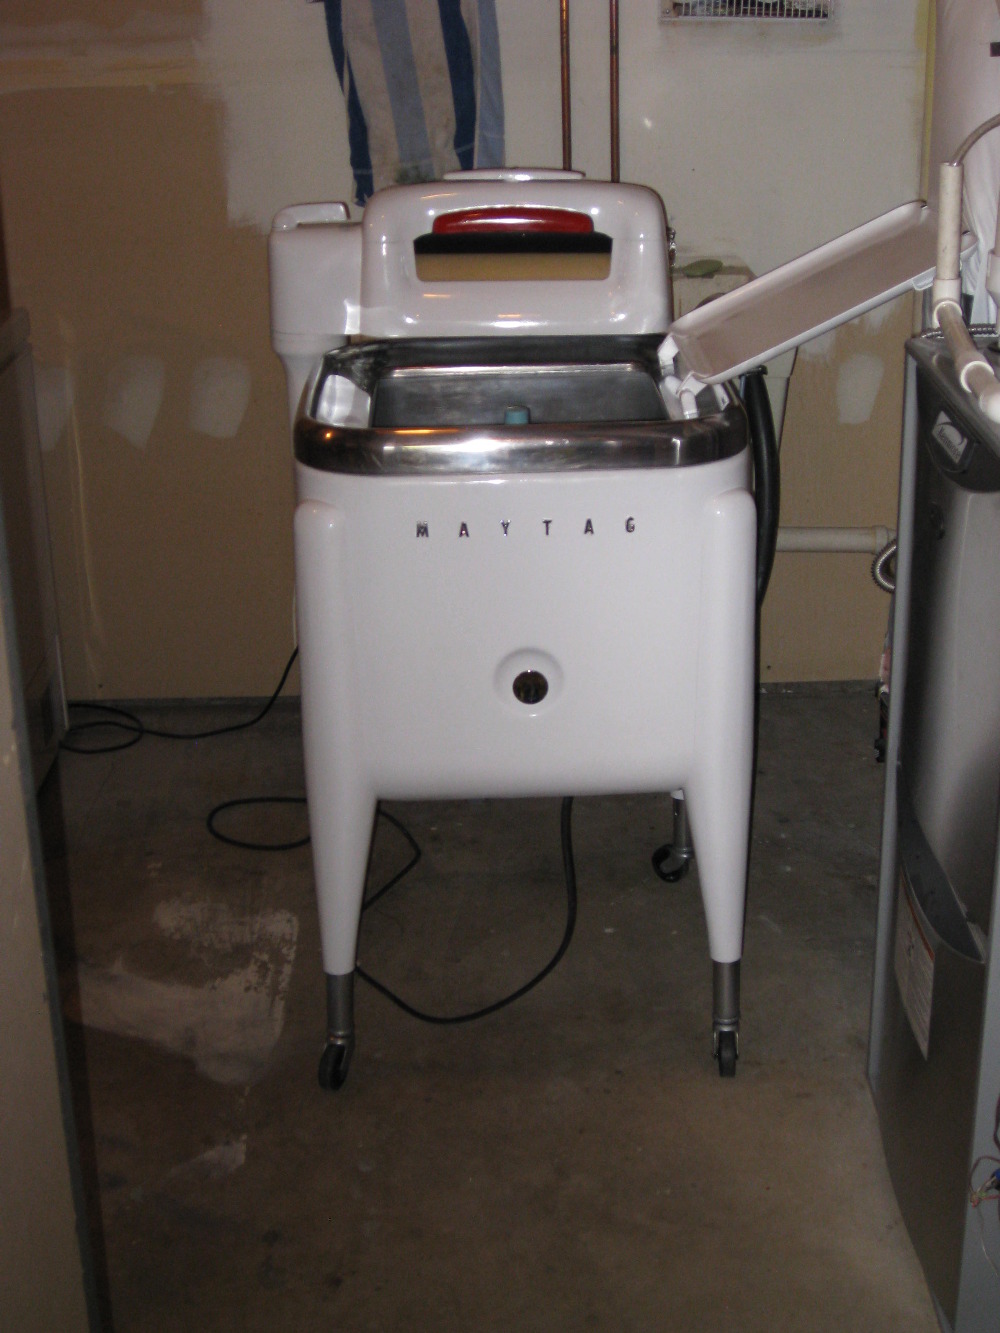
Post# 632741 , Reply# 312   10/18/2012 at 21:39 (4,205 days old) by e2l-arry (LAKEWOOD COLORADO)        
Here's a shot

from the side with the "new" pump lever. Not exactly level . .. I haven't had the best of luck with decals . . but . . . .Beats a poke in the eye with a sharp stick!

Post# 632771 , Reply# 313   10/19/2012 at 00:22 (4,205 days old) by stan (Napa CA)        
Looks Great Larry

stan's profile picture
Think we need a shot of you posing with it LOL

Post# 632812 , Reply# 314   10/19/2012 at 08:32 (4,204 days old) by geoffdelp (SAUK RAPIDS)        

Looks great, Larry!! Can't wait to see it in action. Sounds like you have mastered the pump now, too.

Ready to go!!!


Post# 632816 , Reply# 315   10/19/2012 at 08:46 (4,204 days old) by wringer (x)        
This

is the day I have been waiting for. Bessie May looks beautiful setting there ready to do laundry. You did an outstanding job Larry !!!!!!! You can be very proud of what all you have gone through. Congrats and let us see her full of laundry doing her job :-).

Best !

Jim


Post# 632864 , Reply# 316   10/19/2012 at 15:40 (4,204 days old) by mickeyd (Hamburg NY)        
Shimmering

mickeyd's profile picture

Just look at the back wall of the tub! Waves of shimmer. And then the hook, hose, and control shot. Sacrilege, I know, but the hose and pump look better than the originals. "Anticipaaayyyytion..........


It will be interesting to see how you conduct the rinse operation: right in "Bessie May," in another machine, or in laundry sinks. It will all be a grand surprise to see you actually washing, and your method. Again, wait till you see how fast the Maytag pump moves water. As far as I've seen, it has no equal in any other conventional machine. I've had races with the Tag, the Norge, the Easy and the Kenmore.


Post# 632985 , Reply# 317   10/20/2012 at 08:29 (4,203 days old) by wringer (x)        
Well,

it is Saturday AM and washday for you Larry. Hope to see some pics of Bessie May in action. I know you are more than ready to use her as she was built and rebuilt to use. Happy Maytagging today !!

Best, Jim


Post# 632996 , Reply# 318   10/20/2012 at 09:42 (4,203 days old) by e2l-arry (LAKEWOOD COLORADO)        
WASH DAY IT IS!

And all is well! Nine weeks to the day that I brought Bessie Mae A.K.A. The Valdez, home. Here's a picture of it in action! It's running smoothly and quietly with no water or oil dripping from it's underside!


AND everyone was right about the pump. I'm LOVING the pump! It CRANKS!!!

I have a variety of rinse methods. My tub is a single so it's not as easy as it would be with an old time double laundry sink. So with the first load, usually a set of sheets I can get by with 1 rinse. Then I re-use that rinse water as a 1st rinse for the second load. I take those clothes and wring then back onto the top of the washer or into a basket. Drain the tub and refill with new rinse water and dump the clothes back into the tub for a 2nd rinse and repeat that process for subsequent loads. When I come to a load of towels, I usually just wring them through them after the wash then rinse and spin in the Automatic. It's just easier. Towels absorb a lot of detergent and are hard to rinse manually. Plus I found that wringing doesn't take nearly as much water out as a high spin. Out of the Automatic, they dry in about 45 minutes. Through just the wringer and that dryer cycle extends by about 30 more minutes. Whenever I come to the last load, I wring out the clothes, PUMP that dirty wash water out and refill with clear water. Then I rinse the last load in the machine, wring them out and PUMP the used rinse water away.

What could be simpler? It's as much fun as it was when I was a kid. Only now no adults are yelling at me to "Get out of the way" or "Get your hands out of there!" Or the ever popular "You're getting water EVERYWHERE!" Being the adult does have it's advantages!


Happy Washing Everyone!

Larry


Post# 633040 , Reply# 319   10/20/2012 at 13:42 (4,203 days old) by bradross (New Westminster, BC., Canada)        
Wow! Mission accomplished!

bradross's profile picture
Larry, this has been an amazing success with a very involved - and apparently frustrating - restoration project. As I think Geoff or Jim said earlier on, with good care, this machine could easily last for several future generations! Just think - my model 30 is from 1935 and still working with original parts and motor! These things were built like tractors!

Don't ya just love a wringer washer??? I love the fact that I'm actually "doing" the laundry - there's something engaging about it, rather than just throwing it in the machine and walking away. Not to mention the memory recall from childhood!

Congrats on a job beautifully done!


Post# 633054 , Reply# 320   10/20/2012 at 14:50 (4,203 days old) by d-jones (Western Pennsylvania (Pittsburgh Area))        
Great Job Larry!

d-jones's profile picture
Because of the way you documented your progress so thoroughly with photos and commentary, this has been one of the more interesting rebuilds I've seen here on the blog, and as I said earlier, I don't even have a wringer washer. Thanks for taking the time to share it with all of us, and congratulations for a job well done! There is something very satisfying about seeing a vintage machine brought back to life after years of neglect. In this case, something old is new again.

Post# 633104 , Reply# 321   10/20/2012 at 18:07 (4,203 days old) by wringer (x)        
Gosh !!

What a job you did !!!!! You had a round trip ticket to Hell on this one buddy !!! I also spin my clothes out in the auto. It takes much less time to dry and especially synthetic materials don't wring dry in a wringer. Glad you had a day that brought back great old times !! I have been using my E as a daily driver since Aug of 11 and love it. I rinse in mine also. Much easier than in a tub. Don't have rinse tub anyhow and no room in the apartment.

GREAT JOB !!!

Jim


Post# 633725 , Reply# 322   10/23/2012 at 14:14 (4,200 days old) by rp2813 (Sannazay)        

rp2813's profile picture

After seeing this thread hanging near the top of the list for over two months and noticing it had more than 300 replies, curiosity got the best of me and once I started reading, I couldn't stop.


That having been said, let me also say this:  Congratulations!


Larry, you have shown everyone here that with a combination of dedication, determination and perseverance, there is virtually no such thing as a lost cause when it comes to a Maytag washer.   I nominate you for "Outstanding Achievement in Clothes Washer Restoration, Non-automatic" as well as "Outstanding Achievement in a Documentary Presentation."


This has been one of the most interesting threads I've seen here.  Thanks so much for sharing.  You really hit the ground running when you joined AWO, that's for sure!


Ralph


Post# 633785 , Reply# 323   10/23/2012 at 18:33 (4,200 days old) by e2l-arry (LAKEWOOD COLORADO)        
Thanks Ralph!

I used the washer for the 2nd time today since the second go-round. It's SO GREAT because I can be using it without saying to myself. "Hurry up and finish this! Before something ELSE happens!" Now it's much more relaxing.

I'm new at this I still take lots of pictures. Here's a cool one. It didn't appear like this in the lens. But the motor was a hummin'. And the water was going along with the good vibe.


Just waiting for the agitator to switch on!


Post# 633787 , Reply# 324   10/23/2012 at 18:34 (4,200 days old) by e2l-arry (LAKEWOOD COLORADO)        
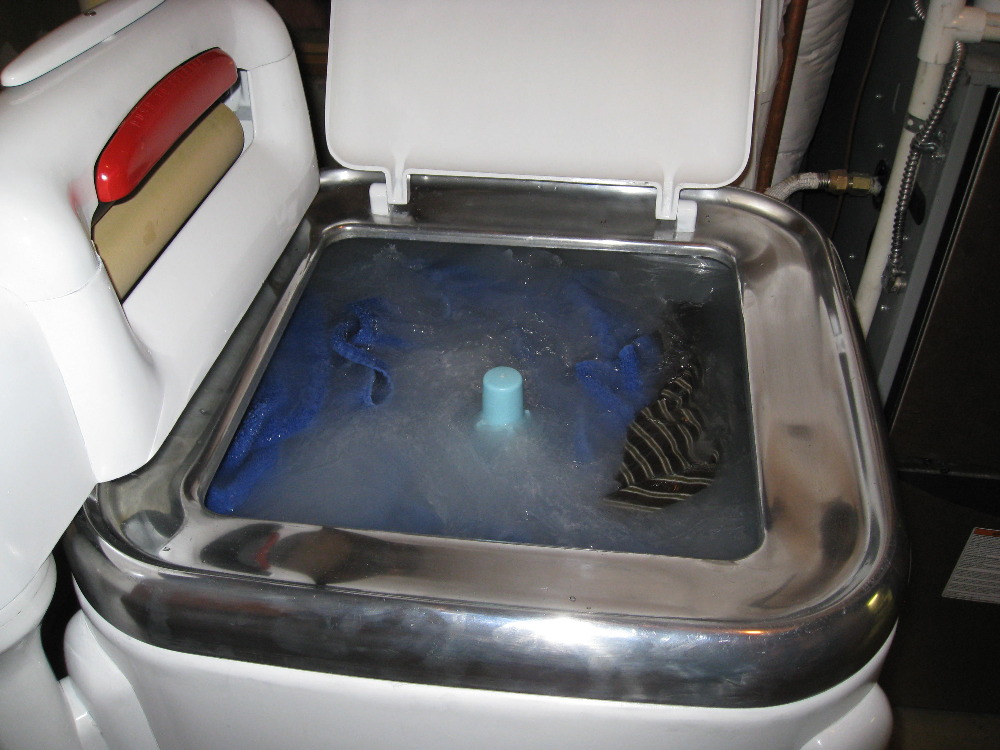
And the PUMP

I'm lovin' the pump!

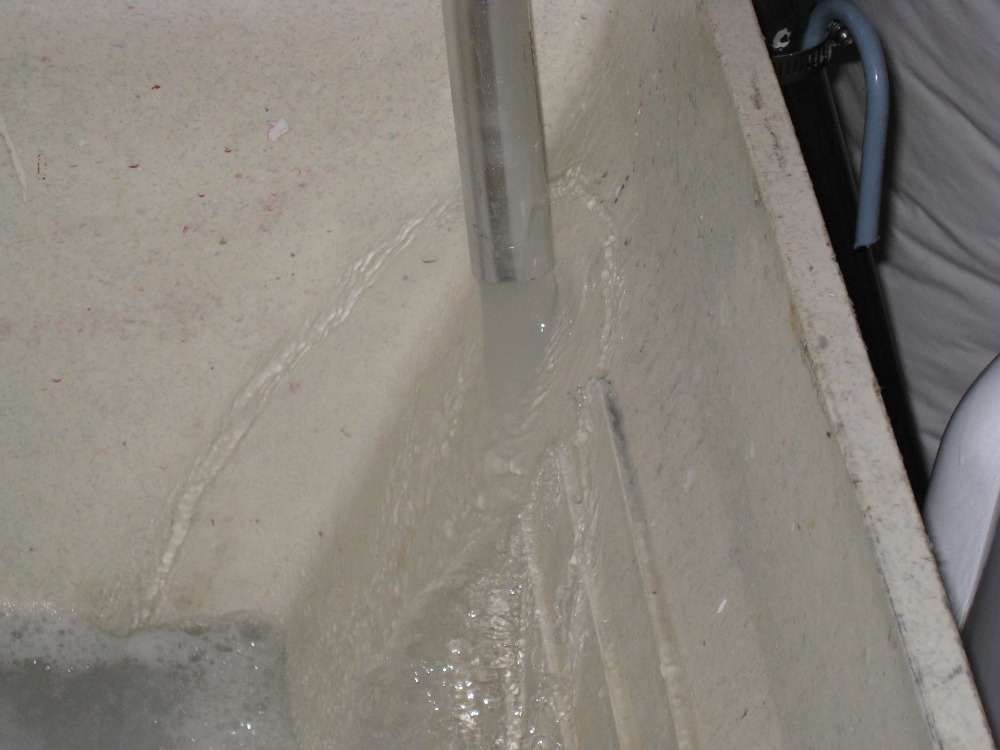
Post# 633791 , Reply# 325   10/23/2012 at 18:42 (4,200 days old) by e2l-arry (LAKEWOOD COLORADO)        
And here's my favorite!

A picture of the floor under the washer when I was finished. Isn't that something? No water, no oil. I waited a long time for that!

Post# 633832 , Reply# 326   10/23/2012 at 21:45 (4,200 days old) by wringer (x)        
You

are a proud Papa Larry and deservedly so !! She is a beauty.

Jim


Post# 633839 , Reply# 327   10/23/2012 at 22:36 (4,200 days old) by stan (Napa CA)        
It's a beautiful site

stan's profile picture
the pic of the standing water, is almost hypnotic! like you kind of what to dive in LOL

Ralph's right, this one needs to be in the hall of fame!


Post# 633942 , Reply# 328   10/24/2012 at 10:56 (4,199 days old) by shankstr (St. Louis, Missouri)        
Awesome Job

You sure went through the "wringer" on this project but she sure looks beautiful!! I want to thank you for all the photos and documentation you provided as I am brand spanking new to this forum and just purchased my first E2L to restore. I learned alot. My eventual plan is to add a pump too but need to address the transmission leaking first. Sound familiar??

Thanks again for your post!
Steve


Post# 633971 , Reply# 329   10/24/2012 at 13:23 (4,199 days old) by wringer (x)        
Hypnotising

water !! I don't think any of my gals does this. However, I don't remember ever looking at them running but no soap or agitation. I will have to look next washday. Again, AMAZING AND BEAUTIFUL JOB !!!

Jim


Post# 634017 , Reply# 330   10/24/2012 at 18:08 (4,199 days old) by stan (Napa CA)        
Steve

stan's profile picture
your lucky!
you stumbled on to the perfect thread didn't you LOL


Post# 634031 , Reply# 331   10/24/2012 at 19:16 (4,199 days old) by e2l-arry (LAKEWOOD COLORADO)        
A leaking transmission Steve?

Why that's practically unheard of in the Maytag E2L restoration world! What a coincidence that we got the only 2 this ever happened to. LOL

Like Stan said, you came to the right place. I had so much fun with the transmission that I ended up doing it twice. Hopefully, you can save some time by not repeating some of my mistakes.

You'll also find a lot of help here if and when you need it. I have to honestly say I couldn't have done what I did without this site and the members of it. Here I got everything from advise to actual "How To" steps. Not to mention contact information and much need items like parts, Service and Parts Manuals. There are just a lot of friendly and helpful folks here that helped me no end.

Good luck with your restoration! Post pictures of you progress. I joined this site when I first bought Bessie Mae and hadn't even brought her home yet. When I go back to the very first thread and read what I wrote originally, I laugh. Boy! Did I ever have a lot to learn! I thought I'd bring this little gem home and be in business that afternoon. I just wanted to know how to move it and I ended up restoring it on the same thread.

Have fun and let's see some pictures of your progress!!


Larry


Post# 634058 , Reply# 332   10/24/2012 at 21:25 (4,199 days old) by rp2813 (Sannazay)        
Speaking of your first post --

rp2813's profile picture

It occurs to me that your initial inquiry was moot.  You could have loaded that thing any way you wanted!


Post# 634075 , Reply# 333   10/24/2012 at 22:20 (4,199 days old) by e2l-arry (LAKEWOOD COLORADO)        
That's very true.

But it didn't know that back then. Sideways, upside down, let it drip. It was all going to have to come apart anyway!

Post# 634339 , Reply# 334   10/25/2012 at 23:00 (4,198 days old) by bradross (New Westminster, BC., Canada)        
Great shot of the water ripples!

bradross's profile picture
Larry, it's a work of art! Great shot! And what a relief it must be - to see no drips of ANYTHING under that machine when it's running. Wish I had the space (or facility) to completely dismantle my Model 30 and replace all the gaskets. Being 70+ years old, not surprising that there's a bit of oil seepage around the joints of the transmission casing, etc. But amazingly, it's nothing major. So I'll just keep using it - it's not like it's actually dripping or anything. But I'd still like it perfectly sealed!

Thanks again for posting all the pics of your restoration project!


Post# 634365 , Reply# 335   10/25/2012 at 23:30 (4,198 days old) by mickeyd (Hamburg NY)        
Spooky water ghosts for Halloween

mickeyd's profile picture

John combo took a pic of the famous Maytag Halo of Heat, removed from the dryer and suspended in space--first thing that came to mind when I saw your ripples. The "pattern" is almost the same. I'll try to find it for its eerie similarity.


And I want to tell you about double wringing, tomorrow, which came to mind just a few minutes ago after imitating your method of draining the tub while wringing and returning the load right back to the E2L for rinsing.


Post# 634545 , Reply# 336   10/26/2012 at 16:44 (4,197 days old) by e2l-arry (LAKEWOOD COLORADO)        
CORRECTION:

"while wringing and returning the load right back to the E2L - P, for rinsing."

Post# 634551 , Reply# 337   10/26/2012 at 18:16 (4,197 days old) by mickeyd (Hamburg NY)        
pee pee

mickeyd's profile picture

Only thru implant surgery.


Mine came with a pump and the label reads E2LS. Hmmmmm...... Maybe it's what we call a "SUDS." I'll have to see. All jokes.


So I was doing a big load of darks, that had been soaking out salad dressing on a few long sleeve cotton jerseys. Next, I started the pump and I wrung, not wanting to re-use the old cold water. You already know how quick these gals wring, so the tub was empty and I though of you.


Then instead of rinsing else where, I started the water in through my inlet mod, and rather than lift the load from the movable cart behind the wringer, I put the load thru the wringer from the cart back into the washer. A ton of water came out ! Since the drain board had automatically reversed, I forgot to provide for the run-off, and the second wring actually flooded the linoleum, so I mopped the floor which needed it anyway.


Had heard of this ancient ritual of double--even, tripple--wringing. This was my first attempt, and YOU are the efficient cause, so Thank You, Lawrence. It was pretty cool. Try it on those towels and let us know.


Post# 634617 , Reply# 338   10/26/2012 at 23:58 (4,197 days old) by e2l-arry (LAKEWOOD COLORADO)        
I never tried that but. . .

You may be onto something. I usually just put salad dressing on, of all things, salads! I KNOW! D_U_L_L! Next time I'll try a little Wish Bone on some long sleeve cotton jerseys and give that a try! What goes good with cotton sleeves, Italian? Thousand Island? Chunky Blue Cheese?

Shouldn't yours read E2LPS if it came with a pump? I know now that originally mine was a E2LP. But some negligent oafs removed the P when it broke. I only put one back on. It's criminal! You can go to jail for child neglect but NOT washing machine neglect? What's wrong with THAT? Children, plenty more where those came from. But some of these washers are a finite supply!

I thought the drain pan automatically adjusted to the right angle by the direction of the wringer rolls. I tried running towels through twice but the amount of water extracted the second time doesn't amount to much. I doubt it would shave much off the dryer time.

Tomorrow I have 2 loads. One has 2 towels in it and I'll try the double wring again and see how much water, and/or salad dressing come out the second time through.


Maybe discover a new way to make Maytag Mayonnaise. Or it's bastard cousin. Miracle Whip.


Post# 634667 , Reply# 339   10/27/2012 at 10:00 (4,196 days old) by wringer (x)        
Joking aside :-)

I always spin my clothes in the auto after rinsing in my gals. I decided to measure how much water came out by putting the hoses (my auto is a GE portable)into a 5 gal bucket and catch the water. I was totally surprised by the amount of water the wringers do leave in. I get different amounts of water in the bucket depending upon which gal I do the final rinse in. Saves a lot of dryer time especially since my dryer is 110 and portable also. At least the water in the pale is clean when I dump it in the terlit. Washday is an interesting and fun filled day here LOL.

Jim


Post# 634671 , Reply# 340   10/27/2012 at 10:41 (4,196 days old) by e2l-arry (LAKEWOOD COLORADO)        
Hi Jim

I don't run everything through the spin. Just the heavy stuff like towels. But my dryer is a 220 and they have a lot more ummph than the 110's.

I had a portable set of Whirlpools in the early 80's. My first set! Small neutral drain washer that really worked well if you didn't overload it. The 110 dryer worked well too. It just took about an hour to dry a load.

How do you vent yours? My first apartment was a converted 2nd floor of a house and was vented to the outside. Then I bought a condo and there was no venting in the kitchen. Some people would use an old stocking over the exhaust to catch the lint. But I could see those clogging up to easily. Then I found this contraption at the Hardware Store. It's a small bucket you put water into. Then, the flexible dryer duct attached to the top part that has holes in it and you snapped that onto the bottom part with the water in it. The water caught the lint and the dryer air escaped through the holes in the top cover. It caught most of the lint. It was nice in the winter but you didn't want to use the dryer on a hot humid day, I was still in the Chicago area at the time, or with the A/C on. It just worked counter to the A/C.

Here's a rinse pic from the other day. I put the washed and wrung out clothes back in the washer and fill it with water with the clothes already in it. Once the water hits the line, on comes the agitator for 3 or 4 minutes and it's ready from the second wring and pump. Somewhat like a manual- automatic. Only better!

I think next summer I'll put a clothes line up in the back yard. Then it won't matter how much water is left in the towels. They can take all day to dry for all I care. Plus, with the low humidity in Colorado, most stuff dries as fast outside as it does in the dryer. Not that I'm going all "GREEN" or anything. I just like the old school ways.

Take Care,

Larry


Post# 634680 , Reply# 341   10/27/2012 at 11:43 (4,196 days old) by wringer (x)        
Hello Larry,

Well, I did a bit of "venting for dummies" with my dryer. Since it is only 110 it takes a long time to dry some things as you stated. My dryer is on a stand (which you can partially see in my pic that the auto is supposed to wheel beneath. The E wheels in there now tho) and is close to my stove vent. I removed the motor and fan blade from the stove vent, took out the filter, cut a piece of plexiglass the size of the filter, slid it into the slot. I cut a round hole in the plexiglas to allow a piece of vent pipe to fit through and then bent it around the top at 1 inch intervals and then sealed it with epoxy. So, now my dryer is totally vented to the outside and I don't have to worry about lint or humidity. Since I live in a condo with restrictions I can't have an outside clothes line, even an umbrella one :-(. I hope this makes sense to anyone who may want to vent a dryer out a stove vent in the kitchen. Works for me and has for 10 years. I do however take it all apart and clean it often to have free flowing air. I doubt that my dryer would ever get hot enough to start a fire in the vent system but one never knows. My dryer doesn't take an hour to dry towels but does of course take longer than a 220.

Jim


Post# 634683 , Reply# 342   10/27/2012 at 12:06 (4,196 days old) by stan (Napa CA)        
Clotheslines

stan's profile picture
Drying racks, ect, I use whenever wherever possible, when I use my E.

For tee shirts or anything that get too wrinkled from the wringer, I found if you put in the dryer for about 10 min, the hang up outside or on a drying rack wont be wrinkled,

I'm lucky here, I can hang out most of the year!


Post# 636172 , Reply# 343   11/3/2012 at 16:18 (4,189 days old) by e2l-arry (LAKEWOOD COLORADO)        
EIPLOGUE

Remember those TV shows from the 60's that were "QM Productions" "In Color!" Like The FBI and The Fugitive? They had act I II and III, then the Epilogue to tie up the ending.

So here we go and it's grim news. Two weeks into this and yet another repeat of the oil/water coming out the vent mess. At this writing the unit is again disassembled waiting for a few parts (gaskets) to arrive. I should just order them by the case!

Although the water wasn't evident as soon as the last reassemble, when it did appear there was plenty. At first I thought maybe I would replace the water seal again around the agitator shaft and maybe run it empty to try and get the vent to stop leaking. But then I realized that the oil will float on top of the water and there'd only be one way to remove the water. And we ALL know what that means! The good news is that I had the whole thing disassembled and open on the garage work bench in 20 minutes flat. A couple more times and I'll be able to do it in my sleep.

So where does this water come from? Well, I was able to rule out the screw hole since I had that plugged. Also, I was able to rule out the bolts that connect to power unit to the tub/center plate as I sealed them on the tub side as a precaution. There were no leaks between the plate and the tub this time either so water could not have seeped in that way. That my friends leaves only the shaft as a leak path. Hence my decision to replace again that water seal. A funny thing though, once I got that off I noticed that the shaft had a LOT of play in it. Never noticed that before and didn't know if that was a good or bad thing. Up and down and side to side it moved. Consulting with our in house expert, Geoff, he told me it should have NO play.

Ah HA! A bad center plate? No doubt something in there is hosed. It either came that way or I did it by beating the hell out of it trying to get that spline off way back when. Either way, I'm 99% sure that's my problem. Well, my number 1 problem anyway.

So you all remember the EBay power unit I bought for $35.00 as a spare? Well that came with a center plate and horizontal drive with it. I almost threw them away but am now glad I didn't. So I went to work on that plate. It was very tight and dirty. A little spray out with cleaner and then WD-40 and it's all clean and loose again. AND no play in the shaft so that's the one going back in. I also have NO complaints on that EBay power unit either. That thing worked 100% fine. No leaking at the pulley shaft either. In the few weeks it was in there anyway.

So in a few days I'll have it back together and try again. But I have a good feeling this time that I've finally figured out the problem. I'm ready for the Maytag E2LP Olympics! If I get another Exxon Valdez thing going on my basement floor, the only thing to do will be to stock up on ammo and start climbing up the watch tower!

KIDDING!!!!

It's a good thing one of my other hobbies is drumming. I have that big over sized 70's style kit I bought years ago from Nigel Olsson. Playing on something where you're supposed to hit, strike, beat, crash, smash and bash, does wonders for getting rid of one's hostilities!

And so on . . . .

Larry


Post# 636174 , Reply# 344   11/3/2012 at 16:26 (4,189 days old) by wringer (x)        
Holy Crap !!!

I was not wanting to read this news Larry. I tell you my friend, you have to put out a shingle for trouble shooting Maytag Wringer Washer problems. I am happy you have all of this in you because I have none of it !!!! Please keep us posted on this latest problem. We are all here pulling for this to be the last tear down. Best !!

Jim


Post# 636181 , Reply# 345   11/3/2012 at 17:01 (4,189 days old) by qsd-dan (West)        

qsd-dan's profile picture

Phil has new shaft bushings for reasonable prices, if you need to go that route. The lower shaft bushing for the E J N wringers is the same ones used on all pitman transmissions from 1948-1988.


If wringers behave in the same manner as the automatics, it'll be the upper bushing that's toast.


Post# 636203 , Reply# 346   11/3/2012 at 19:04 (4,189 days old) by e2l-arry (LAKEWOOD COLORADO)        
YEP,

I saw Phil's center plates on Ebay for $115.20. BUT! if I have a good one from my EBay power unit purchase in the garage all set to go. I'll try that first. If I get yet ANOTHER Valdez I'll order the new one from Phil. I figure it HAS to be getting water through that shaft.

Geoff said that one of the signs of a damaged/cracked shaft was a knock, knock, knock, noise they make while agitating. And mine did that.

None of my stuff came in the mail today. N.Y. I figure, probably Super Sandy related. Why does everything happen to me?

Oh well, it'll give me something to do Tuesday night. I couldn't watch election returns!


Post# 636245 , Reply# 347   11/3/2012 at 23:16 (4,189 days old) by shankstr (St. Louis, Missouri)        
You are the Phoenix!

Larry I think you have raised the dead! At least when it comes to E2's. I think the only thing left for you to do is forge your own parts. I'm really bummed for ya but I think you are the right track as far as the shaft leaking. I happen to notice on mine that I had about a 1/16th" side to side play. Don't ask me how i noticed it but I did. Phil said the same as Geoff that there should be NO play so I bought a new center plate rather than install new bushings. I figured the factor could do a better job than I. I pray I don't have any water / oil leaks but we will see. Still working on the cosmetics at this time.

Steve


Post# 636258 , Reply# 348   11/4/2012 at 00:29 (4,189 days old) by stan (Napa CA)        
OMG!

stan's profile picture
It's name is not Bessie Mae, It LINDA BLAIR!
The SOB is going to spit spit pea soup next! I'ts EVIL!

After all this ...
if mine shits on the foor, I'm just gona let it! LOL


Post# 636368 , Reply# 349   11/4/2012 at 08:50 (4,188 days old) by e2l-arry (LAKEWOOD COLORADO)        
It's evil all right!

I think it needs an Exorcism. I'd have to get the Maytag Repairman to perform it. It's doesn't spew pea soup but it spews Bosco. And farts at me! And one night I thought I heard it say "Your Mother sews socks that smell!"

Steve, mine has about 1/16" of play top to bottom. And some side to side. This washer hadn't been used in at least 25 years. I don't know if the shaft was cracked when I got it or if I did it beating on it trying to get the spline off. How I finally got that off, after 4 days, was I took a saber saw to it. Cut a nice line in it from top to bottom, not quite all the way through. Then took a hammer and chisel and tapped it open. Real nice. But that was after 4 days of random beatings. It's still paying me back for that! So like Dan says, it's usually the top bushing that's toast so I think that's where my water leak is. My parts will be here tomorrow so one night this week I'll put her all back together ans see what I have.

Also Steve, did your new center plate have the hole for the screw or is that all filled in? From the picture on EBay, it didn't look like there even was a screw hole? That's one of my parts I'm waiting on. Another rubber plug for my replacement center plate. I'm leaving nothing to chance!

Larry


Post# 636369 , Reply# 350   11/4/2012 at 09:02 (4,188 days old) by shankstr (St. Louis, Missouri)        
The New Centerplate

Still has the screw hole. I did buy the rubber plug for it though..

Post# 636373 , Reply# 351   11/4/2012 at 09:19 (4,188 days old) by scoots (Chattanooga TN)        
"Your Mother sews socks that smell!"

scoots's profile picture
How I laughed at this. Thanks.

Post# 636376 , Reply# 352   11/4/2012 at 09:26 (4,188 days old) by wringer (x)        
Larry,

I bought a new after market "agibitator" from Phil for my E. The old one needed a new spline and I didn't know anyone who could put it in for me since I didn't know the Amish back then. Anyhow, the new one has a bad habit of knock knocking when it reverses since it has a plastic spline in it. I don't like that so don't use it. I took the original down and had a new metal spline put in it and it is as quiet as a mouse when reversing now. I don't know if all the white plastic spline ones make the noise or just the one I have. Just thought I would throw that in. Good Luck on your next moves with Bessie May. :-)

Jim


Post# 636467 , Reply# 353   11/4/2012 at 12:54 (4,188 days old) by stan (Napa CA)        
Jim

stan's profile picture
Glade you mentioned this!
I'll keep my metal one then !


Post# 636809 , Reply# 354   11/5/2012 at 17:11 (4,187 days old) by shankstr (St. Louis, Missouri)        
So larry

What kind of grease did you put into the lower verticle wringer shaft? I was re-reading your post but you didn't say for sure. I saw the part where Phil said to use synthetic grease but Geoff recommended the original Maytag grease because it was oiler. So what did you do?

Steve


Post# 636832 , Reply# 355   11/5/2012 at 18:06 (4,187 days old) by e2l-arry (LAKEWOOD COLORADO)        
You don't put anything

In the horizontal shaft. It appears to be self lubricating. I coated the shaft with grease but you don't pack it out with anything. The one UNDER the washer that is.

The lower section of the vertical shaft, where the gears from the horizontal shaft and vertical shaft meet up, that is where you put the 1/4 pound of grease. I didn't even look for the old Maytag grease. I just went with what Phil said and put about 1/4 of a pound of what appeared to be all-purpose synthetic grease I got at Ace Hardware for about $10.00 and used that. So far that's worked just fine.

I wouldn't even know where to begin looking for the Maytag grease. I'm sure back in the day, synthetic grease didn't even exist. But Phil said synthetic so that was good enough for me.

Larry


Post# 636849 , Reply# 356   11/5/2012 at 19:05 (4,187 days old) by shankstr (St. Louis, Missouri)        
I'm thinking I'll do the same

OK cool. I bought the synthetic so I guess I'll go with it too. I checked around the net and couldn't find any original Maytag grease anyway. I also bought the Maytag transmission oil online..34oz worth...just in-case I have to pull it apart again :)

Steve


Post# 636858 , Reply# 357   11/5/2012 at 19:34 (4,187 days old) by e2l-arry (LAKEWOOD COLORADO)        
I bought the trans oil on line too.

I used the link Dan sent for Amazon at something like $17.99. 34 oz. The unit is supposed to be filled with 12 oz. Since I've filled mine twice already I only have 10 oz. left. So to make up the 2 oz. difference I'll use some 90 wt. gear oil I bought at the auto parts store. It was about 1/2 the price of the "official" stuff. And all I need is 2 oz. . . . I hope!

Larry


Post# 636862 , Reply# 358   11/5/2012 at 19:41 (4,187 days old) by stan (Napa CA)        
Larry

stan's profile picture
Looking back on this from where you are now... Is there any reason that the 90 weight gear oil couldn't have been used in the first place?
(for the P.U)


Post# 636870 , Reply# 359   11/5/2012 at 19:47 (4,187 days old) by e2l-arry (LAKEWOOD COLORADO)        
None

None that I can see anyway. Is there any difference if you use Penzoil 40 wt. or 40 wt.Quaker State? Not much anyway. I think 40 wt. is 40 wt. and 90 wt. is 90 wt.

Plus, at the rate I go through it, it's just more economically sound to use the cheap stuff!


Post# 636878 , Reply# 360   11/5/2012 at 20:15 (4,187 days old) by stan (Napa CA)        
So

stan's profile picture
tomorrow's your night?

Post# 636901 , Reply# 361   11/5/2012 at 22:01 (4,187 days old) by e2l-arry (LAKEWOOD COLORADO)        
I'm hoping tomorrow night Stan

But I somehow messed up my thumb. It feels like a pulled a tendon. I can't even pick up a glass or write with my right hand and I'm right handed! I've been putting ice on it trying to work it out. But if it's not better tomorrow there's no way I'll be able to re-assemble a washer.

Post# 636918 , Reply# 362   11/6/2012 at 00:56 (4,187 days old) by stan (Napa CA)        
Damm

stan's profile picture
that's too bad!

Somehow I think you'll do it anyway...call it a hunch LOL


Post# 636948 , Reply# 363   11/6/2012 at 07:15 (4,186 days old) by wringer (x)        
Good Grief !!!

Now Bessie May's "diffugalties" have moved to you !!! Hope your thumb is better soon. As you know, I am a fanatic about my 3 gals. Today is washday in all 3 of them. It takes longer but they each get used and then cleaned up weekly. One washes and the other two rinse. Anyhow, I wish you the best not only with Bessie May now but the thumb also.

Jim


Post# 637339 , Reply# 364   11/7/2012 at 13:00 (4,185 days old) by e2l-arry (LAKEWOOD COLORADO)        
I did get it back together last night

Everything went back into place just fine. Although not as quickly as it went when I tore it apart. But I expected that.

I was real careful with re connecting the "new" center plate back to it's original mating power unit. Made sure the gasket was properly in place to prevent any leak paths to keep the oil IN and water OUT.

I did this on the bench just to make extra sure when I tapped down the locating pins I had every even and had a good connection. The downside was it was a little messier than replacing the center plate with the power unit already back in the machine. A couple of times during the re-install I'd tilt it just right and it would spill some oil from the breather holes. Not too bad it at least it was fresh, clean oil and easier to wipe up than the Bosco.

Now I'm just waiting on the new shaft water seal. The vendor said it was delayed because of Hurricane Sandy. I probably didn't need one but I'm leaving NOTHING to chance this time! I also sealed around the 2 bolts the connect the CP to the PU and the other 2 bolts that attach the tub, CP and PU. Like I said, I'm taking every precaution this time as I really hope that by changing out the center plate this will be the LAST time. The motor, agitator and pump worked just fine when I plugged it in.

Once the new seal is in place I'll give it the preliminary water test. Hopefully tomorrow or Friday after work. Wish me luck!

Larry


Post# 637395 , Reply# 365   11/7/2012 at 17:35 (4,185 days old) by shankstr (St. Louis, Missouri)        
I've got

my fingers crossed!!

Post# 637682 , Reply# 366   11/8/2012 at 22:58 (4,184 days old) by e2l-arry (LAKEWOOD COLORADO)        
We passed the water test!

I only put about 3 inches in because I don't have the shaft water seal in yet. In a couple of minutes I saw a water drops. I looked underneath and it was from the hose to center plate connection. The clamp wasn't tight enough. So a little tightening with a socket wrench and that solved the problem. Three hours later NOT A DROP! I got a good seal around the tub.

Here's something I found out about the center plate that I didn't know. There's a hole in the bottom of the center plate, between drain hole and one of the bolts that connect to the power unit, that goes directly to the lower part of the shaft. With a good seal you wouldn't have a leak, with a bad one you would. A direct hole, at an angle, from the bottom of the water seal to an opening at the bottom of the plate. Water directly to the floor. I have to assume that was designed to prevent standing water from seeping into the power unit. Better to have it leak onto the floor. So I guess if you have a leaking water seal, you'd know it.


Post# 638117 , Reply# 367   11/10/2012 at 18:34 (4,182 days old) by e2l-arry (LAKEWOOD COLORADO)        
I think I got it!

Well everyone, I think the center plate was my problem all along. I used the replacement plate and tested it out over the weekend. So far, so good!

I did the water test a few nights ago with only about 3" of water and it passed. Last night I did another test with a full tub of hot water, after I installed the new shaft water seal, and all passed. So, I pulled out my winter flannel sheets and gave them a wash along with some other stuff. Ended up being 3 loads. Everything was fine. That louder knock, knock, knock, beat that kept time to the agitator is gone. Geoff said a bad bearing, and it will make that sound. Now it just has the lighter tick tock to it which I understand is more common with the newer plastic agitator splanes.

So today I did the rest of my 2 week's worth of laundry, another 5 loads, and I'm happy to report everything is just fine! I really think that center plate did the trick. Took me a while and some trial and mostly, error, but I think I got it.

Going over the history of my usage of this washer, I don't think I've ever made it to 8 loads of laundry without "incident" It was Possessed you know.The night before I pulled off the evil center plate I thought I heard if fart and say "Your Mama eats kitty litter!"

This is SOOOOOOOO much better . Finally!


Larry


Post# 638195 , Reply# 368   11/11/2012 at 08:15 (4,181 days old) by wringer (x)        
Well,

no one can say you don't deserve her to operate as a NEW gal with all of the work you have put into her. I am glad/happy that you have been successful. I know it was very trying to you and we all here were pulling for you. Many happy wash days ahead await you Larry !

Jim


Post# 793016 , Reply# 369   11/9/2014 at 23:21 (3,453 days old) by Patrick ()        

Last reply was a year ago, but asking anyway.

What are you using to clean the inside of the tubs so well?


Post# 793128 , Reply# 370   11/10/2014 at 17:56 (3,452 days old) by e2l-arry (LAKEWOOD COLORADO)        
Many options but

The easiest is Mother's Mag and Aluminum Polish. They sell it at Auto Parts stores. You just rub it on and buff it off. You'll go through a lot of rags as the oxidation comes off but it's easier than scrubbing with SOS pads or fine steel wool. But those are options too. But from my experience, the best was the Mother's Mag

Post# 897194 , Reply# 371   9/4/2016 at 22:38 (2,788 days old) by joeslawn (MYOB)        
Thank you!!!

Thank you for such a good write up on a really impressive washing machine. I have acquired one and I now feel confident that I can restore it to operating condition. Not sure how long it's been since it was used, but it came with two wooden sticks! Don't think it's been out of service all that long.


Forum Index:       Other Forums:                      


Comes to the Rescue!

The Discuss-o-Mat has stopped, buzzer is sounding!!!
If you would like to reply to this thread please log-in...

Discuss-O-MAT Log-In


New Members
Click Here To Sign Up.


automaticwasher.org home
Discuss-o-Mat Forums
Vintage Brochures, Service and Owners Manuals
Fun Vintage Washer Ephemera
See It Wash!
Video Downloads
Audio Downloads
Picture of the Day
Patent of the Day
Photos of our Collections
The Old Aberdeen Farm
Vintage Service Manuals
Vintage washer/dryer/dishwasher to sell?
Technical/service questions?
Looking for Parts?
Website related questions?
Digital Millennium Copyright Act Policy
Our Privacy Policy