|
Thread Number: 44466
/ Tag: Small Appliances
KitchenAid Burr Coffee Mill KCG200 (aka A-9) |
[Down to Last] |
Post# 653166 1/13/2013 at 19:08 (4,120 days old) by rp2813  (Sannazay) (Sannazay) |
||
 I just picked up one of these at Goodwill today for $14.99. It's in working order but needs a thorough cleaning. The previous owner may never have cleaned it. The exit chute was packed solid and other parts are still caked with oily bean dust that, judging from the feel and smell was probably a regular diet of dark roasted Peets.
I've found a non-printable owner's manual and parts list on line but I'm having trouble removing the jar support/grind selector ring in order to clean it and the burr grinder below it. There's an acorn nut that I'm unable to loosen and remove in order to disassemble those components from the base. The entire burr assembly rotates and there's no way to hold it in place to remove the nut.
Is the spindle the nut screws onto supposed to lift out along with the jar support? It's stuck and so am I.
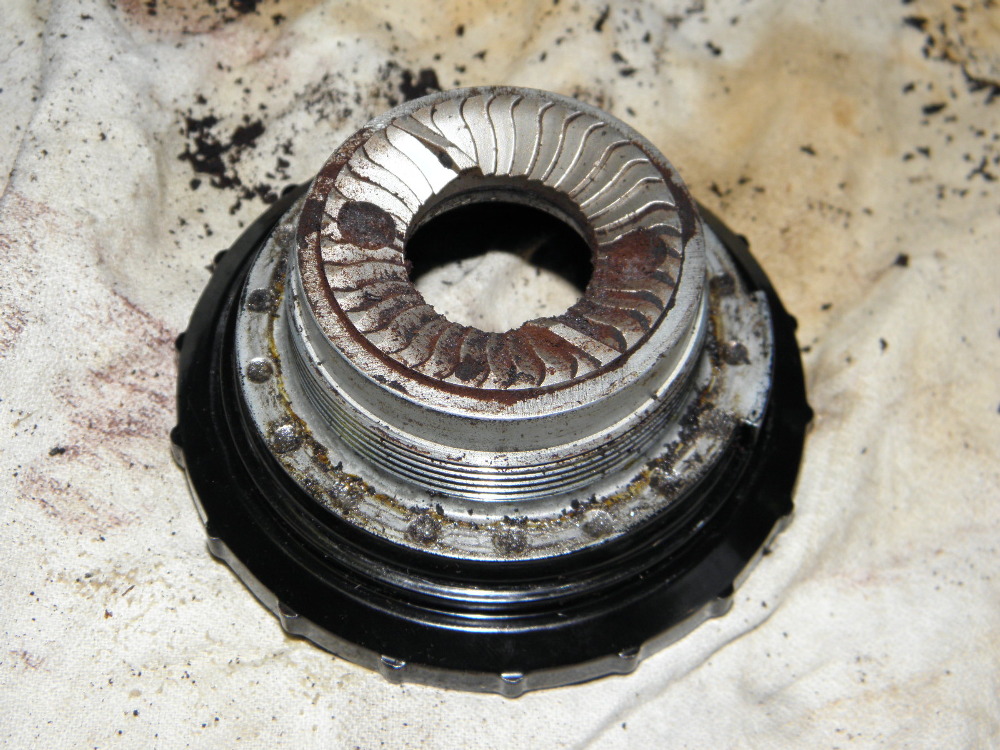
Here's a picture of the nut and the caked-up jar support that needs to be removed in order to thoroughly clean it. The owner's manual has a drawing of this assembly but the nut looks more like a nub, and it shows the spindle being lifted out with just two fingers gripping the nub. It doesn't seem inclined to lift out for me in any remotely similar manner.
Any guidance would be greatly appreciated. 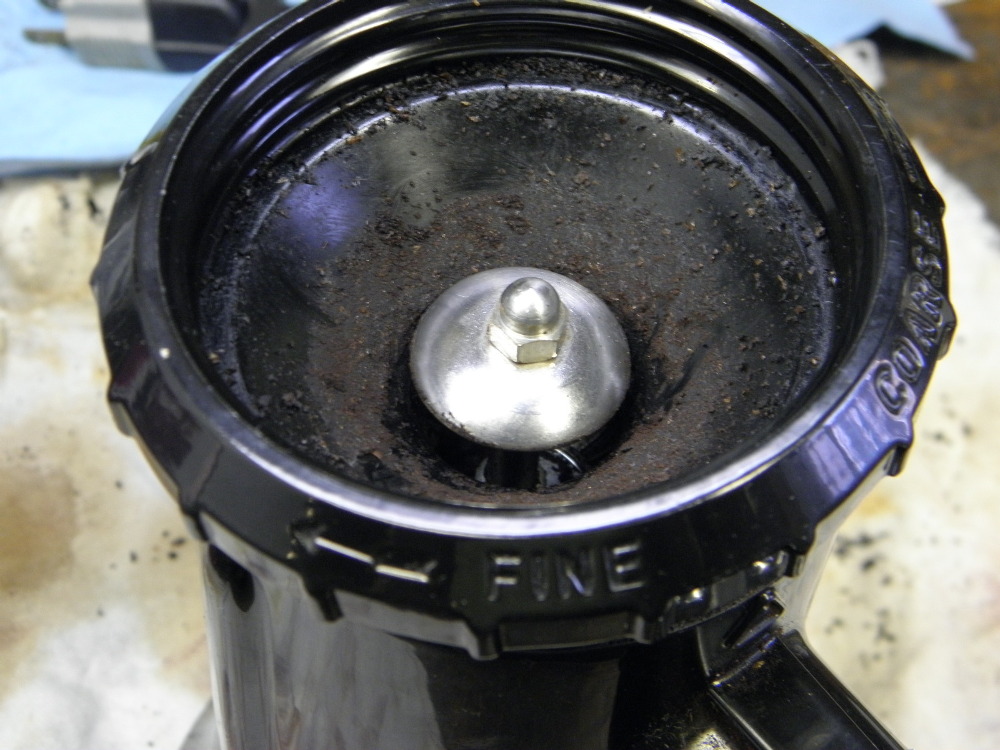
| ||

|
| Post# 653182 , Reply# 1 1/13/2013 at 20:50 (4,120 days old) by perc-o-prince (Southboro, Mass) | ||
|
Try this before you take it apart... Grind a bag of rice through it. The rice will come out very dirty then will be totaly white at the end. Then run a hand-full of coffe beans through before you grind for drinking. This works every time I do it. Good luck, Rich | ||
|
Post# 653183 , Reply# 2 1/13/2013 at 20:56 (4,120 days old) by sudsmaster (SF Bay Area, California) |
||
 | ||
|
Post# 653189 , Reply# 3 1/13/2013 at 21:45 (4,120 days old) by gansky1 (Omaha, The Home of the TV Dinner!) |
||
If its like the A-9
There should be a set screw for the grind selector ring 180 degrees from the outlet (on the back).
Remove that screw and twist the grind ring off. You will then be able to clean out the oily bean curd and start over. These "heritage" models had a tendency to clog when oily, flavored coffees were milled frequently. Once cleaned up, it should be fine. | ||
|
Post# 653190 , Reply# 4 1/13/2013 at 21:46 (4,120 days old) by rp2813 (Sannazay) |
||
|
I did try to wedge a screwdriver in there to keep the burr assembly from moving, but the acorn nut wouldn't budge.
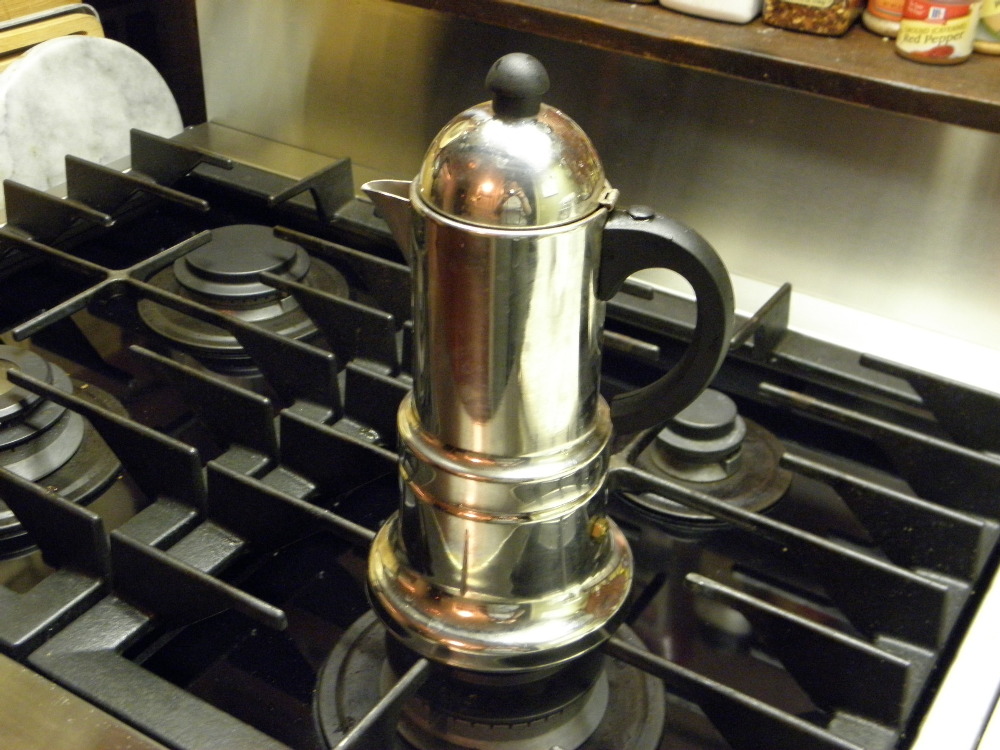
Here's a picture of my model. It's a revival of the original 1937 vintage A-9 that was manufactured by Hobart.
From what I've seen on line, I got a pretty good deal on it.
Chuck, thanks for the rice suggestion. I'll definitely use that cleaning method if I can't get the grinding mechanism disassembled.
| ||
|
Post# 653191 , Reply# 5 1/13/2013 at 21:49 (4,120 days old) by rp2813 (Sannazay) |
||
|
| ||
|
Post# 653192 , Reply# 6 1/13/2013 at 22:30 (4,120 days old) by Kenmore71 (Minneapolis, MN) |
||
 | ||
|
Post# 653196 , Reply# 7 1/13/2013 at 23:12 (4,120 days old) by rp2813 (Sannazay) |
||
|
Yes, I removed the screw #20 which allowed me to turn the hopper (grind adjustment ring) and separate it from the lower body, but there's still not enough room to get anything like pliers, channel locks or vice grips in there. I don't know how they expect you to remove the acorn nut, which is why I suspect that whole assembly should lift out along with the hopper, but I can't get it to budge.
I've attached a link to the owner's manual that I'm unable to print. If you scroll down to the Care and Maintenance section on page 11 of the guide, you'll see the instructions for removing the burr shaft assembly from the motor housing, which advise simply to "lift" it out. The images of the grind adjustment ring don't show an acorn nut, which serves to make the whole process even less clear. Perhaps the vice grips need to be used on the acorn nut vertically to pull the burr shaft assembly out. Once cleaned, it might lift out more readily, although I could probably use Chuck's rice routine going forward if I could clean up the residue thoroughly this first time.
By the way, whether you search for the model A-9 manual or model KCG200, this same document is what comes up. CLICK HERE TO GO TO rp2813's LINK | ||
|
Post# 653198 , Reply# 8 1/13/2013 at 23:23 (4,120 days old) by gansky1 (Omaha, The Home of the TV Dinner!) |
||
|
| ||
|
Post# 653199 , Reply# 9 1/13/2013 at 23:25 (4,120 days old) by rp2813 (Sannazay) |
||
|
| ||
|
Post# 653200 , Reply# 10 1/13/2013 at 23:31 (4,120 days old) by gansky1 (Omaha, The Home of the TV Dinner!) |
||
|
| ||
|
Post# 653201 , Reply# 11 1/13/2013 at 23:33 (4,120 days old) by gansky1 (Omaha, The Home of the TV Dinner!) |
||
|
| ||
|
Post# 653203 , Reply# 12 1/13/2013 at 23:54 (4,120 days old) by rp2813 (Sannazay) |
||
|
| ||
|
Post# 653205 , Reply# 13 1/14/2013 at 00:43 (4,120 days old) by sudsmaster (SF Bay Area, California) |
||
|
It sounds like the motor shaft is keyed to accept the lower burr assembly, and that it's a slip fit. It's probably got debris and/or corrosion on the shaft that has resulted in the lower burr assembly getting locked onto the shaft. I'd try lifting the lower burr assembly out with the aid of two flat screwdrivers gently prying it up. You might be able to rock it loose.
This is just my impression from looking at the drawing, the manual, and the other comments. As usual, be careful not to overdo the prying. I'm guessing that the acorn nut does not screw onto the drive shaft, but rather onto the lower burr mounting plate. After you remove the lower burr assembly it might be possible to remove the nut. It's also possible it's a left hand thread, which could explain the difficulty in removing it now. All the above is just educated guesswork. Looks like a cool grinder, although the Pro models are even more intriguing (they look like miniature KA mixers and cost almost as much!). PS-I was able to print the manual you linked to just fine. In fact I made a pamphlet copy. I can snail that to you if you like. | ||
|
Post# 653206 , Reply# 14 1/14/2013 at 00:50 (4,120 days old) by sudsmaster (SF Bay Area, California) |
||
|
| ||
|
Post# 653207 , Reply# 15 1/14/2013 at 01:05 (4,120 days old) by rp2813 (Sannazay) |
||
|
Thanks Rich. I agree that there's likely built up debris cementing the upper assembly into the lower one. All the more reason to take it apart and clean it. Good call on the possible left hand thread.
I'm betting this thing was a gift or that the previous owner was somehow unaware of just how much these grinders cost new, otherwise they'd not have been so quick to toss it out. They clearly didn't appreciate it enough to take proper care of it.
I don't know why the manual won't print for me. I click file/print and nothing happens. It doesn't even bring up the printer's menu. I'm suspecting an automatic update from Firefox yesterday that isn't yet compatible/communicating with my printer. I'll give it a few days and see what happens. | ||
|
Post# 653209 , Reply# 16 1/14/2013 at 01:34 (4,120 days old) by sudsmaster (SF Bay Area, California) |
||
|
Ralph, it's an Adobe Acrobat document, so all you need to do is to click on the little printer icon on the Adobe portion of the document header, and that should work pretty good, giving more options than just a browser File/print would. You can also download the pdf to your local computer and bring it up in Windows Explorer, which should bring it up in PDF/Adobe native mode.
| ||
|
Post# 653210 , Reply# 17 1/14/2013 at 01:37 (4,120 days old) by sudsmaster (SF Bay Area, California) |
||
|
Ralph, it sounds like you only need to unscrew the adjustment ring a few turns and it should lift off easily. When you turn it counter-clockwise, does it turn freely? Or does it feel like the threads are still engaged? Once you get the upper burr/adj ring off, then you should be able to see the lower burr/motor shaft assembly and that should lift off also. It looks to me that the acorn nut and chrome dome is there simply to direct the beans into the space between the upper and lower burrs. It's probably attached to the lower burr/plate, not to the motor shaft.
| ||
| Post# 653228 , Reply# 18 1/14/2013 at 06:28 (4,120 days old) by Maytagbear (N.E. Ohio) | ||
|
I'll bet that the previous owner ignored the warning about NOT grinding preflavored beans, and that it's all gunked up with sugar, etc. Nice catch, anyway. This revival version was on the market for only a little while. Lawrence/Maytagbear | ||
|
Post# 653280 , Reply# 19 1/14/2013 at 12:45 (4,119 days old) by rp2813 (Sannazay) |
||
|
The picture doesn't capture it, but yes, the ring is loosened and separated from the lower housing but the finger guard is just barely larger than the opening in the bottom of the ring, so it can't be lifted past it. If the ring could get past the finger guard, I'd have been on my way and this whole thread would have been a before & after documentary. I think the image of the adjustment ring in the owners manual document may show the type that was used on the original A-9 model. That one probably did just lift off since it appears to be a one-piece ring/finger guard item.
It occurred to me while trying to fall to sleep last night that I could download and save the PDF file, then print it. I was originally only wanting to print the pages with the cleaning instructions to have handy out in the shop, so that's why I didn't download the whole thing.
I haven't bothered with the grinder again today. It's too damned cold in the shop right now, but I'm hoping to get at it later. | ||
|
Post# 653286 , Reply# 20 1/14/2013 at 13:37 (4,119 days old) by rp2813 (Sannazay) |
||
|
Rich Nails It Again! The acorn nut is a left-hand thread. It came off like buttah!
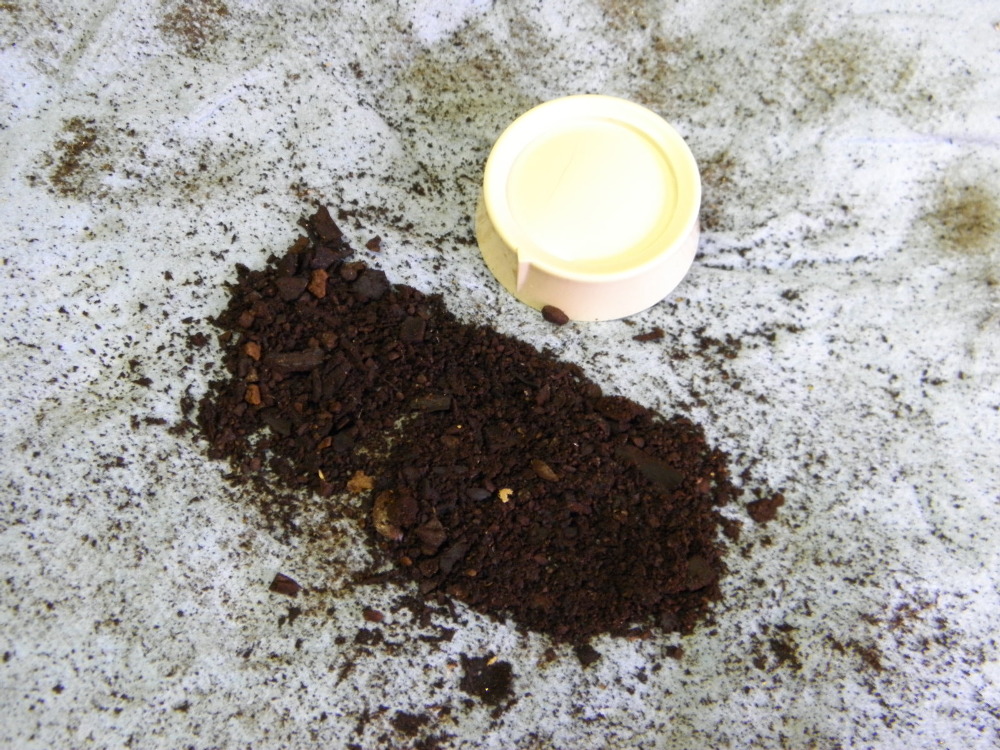
I have the whole burr and hopper disassembled now. Even the threads in the housing for the adjustment ring are caked with powdered coffee. I took the coarse brush that came with my Cuisinart Grind & Brew to the burr and it worked well, but it's a tedious process. I decided I should stop and grab the camera to take some "before" pictures, so will be uploading later.
Also, there was no download option offered when I tried to save the owner's manual document. I instead right-clicked on it once it was open, it offered the print option and the printer window opened. I'm printing it right now. | ||
| Post# 653289 , Reply# 21 1/14/2013 at 14:12 (4,119 days old) by Westie2 () | ||
|
Yeah!!! The help from members on here is the best. Why I love AW.
Now waiting on the before and after pictures. | ||
|
Post# 653345 , Reply# 22 1/14/2013 at 17:25 (4,119 days old) by rp2813 (Sannazay) |
||
|
Before I take the last of the pictures for posting here, there's one issue.
The reassembly instructions say to tighten the adjuster ring until the grind mechanism "offers complete resistance." The ring on my mill tightens all the way down, but the burrs still spin freely. As a result, the settings on the ring are off, with the finest possible grind corresponding to the ring's "medium" mark.
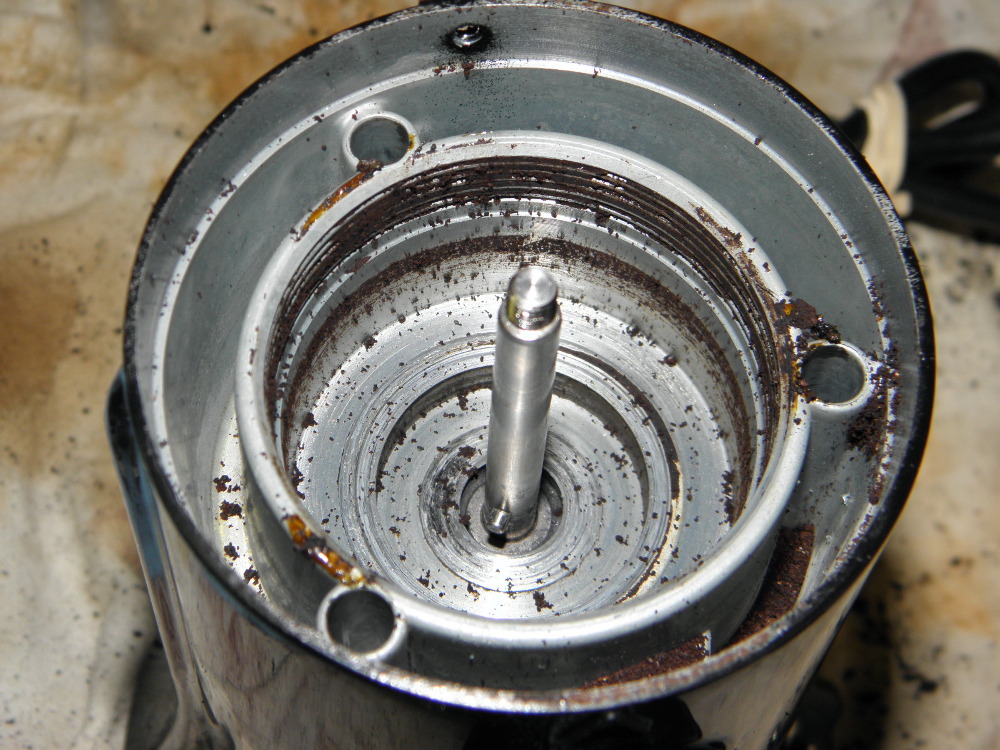
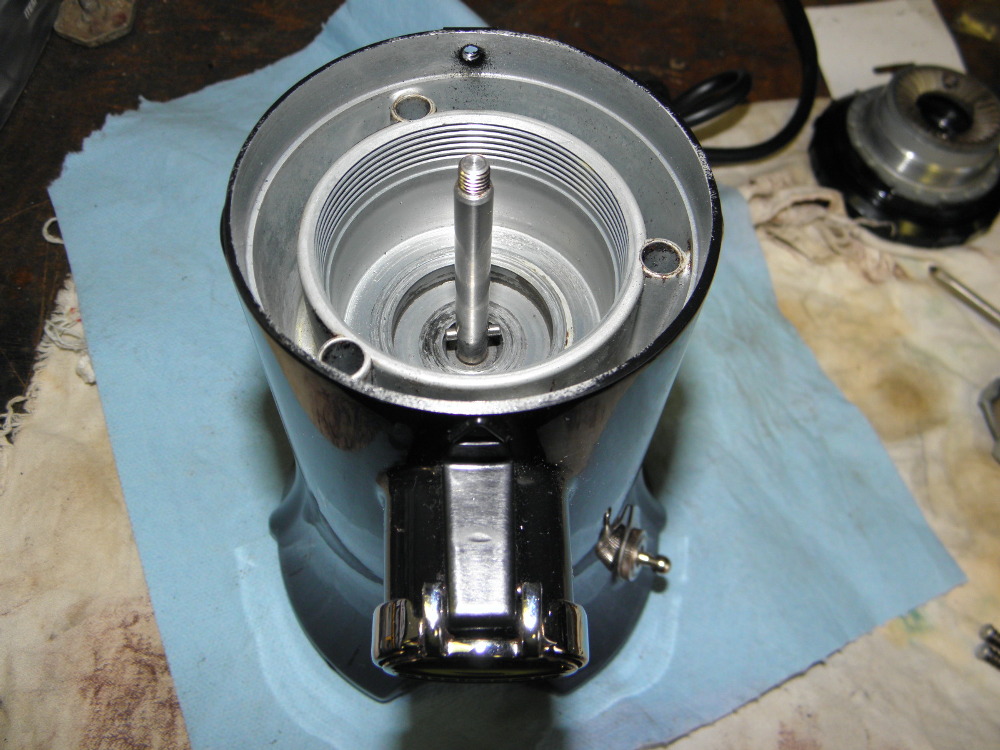
When I removed the bottom plate to have a look at the motor, I noticed the bottom of the motor shaft has a slot in it for a screwdriver. I'm wondering if this is the way to adjust the bottom burr higher so that it makes contact with the top burr and offers "complete resistance" when the adjuster ring is in the proper position to reflect the correct grind.
If anyone can confirm this and provide advice on how to proceed, a post would be appreciated. | ||
|
Post# 653371 , Reply# 23 1/14/2013 at 18:41 (4,119 days old) by rp2813 (Sannazay) |
||
|
Pictures | ||
|
Post# 653373 , Reply# 24 1/14/2013 at 18:44 (4,119 days old) by rp2813 (Sannazay) |
||
|
| ||
|
Post# 653375 , Reply# 25 1/14/2013 at 18:46 (4,119 days old) by rp2813 (Sannazay) |
||
|
| ||
|
Post# 653377 , Reply# 26 1/14/2013 at 18:48 (4,119 days old) by rp2813 (Sannazay) |
||
|
| ||
|
Post# 653379 , Reply# 27 1/14/2013 at 18:53 (4,119 days old) by rp2813 (Sannazay) |
||
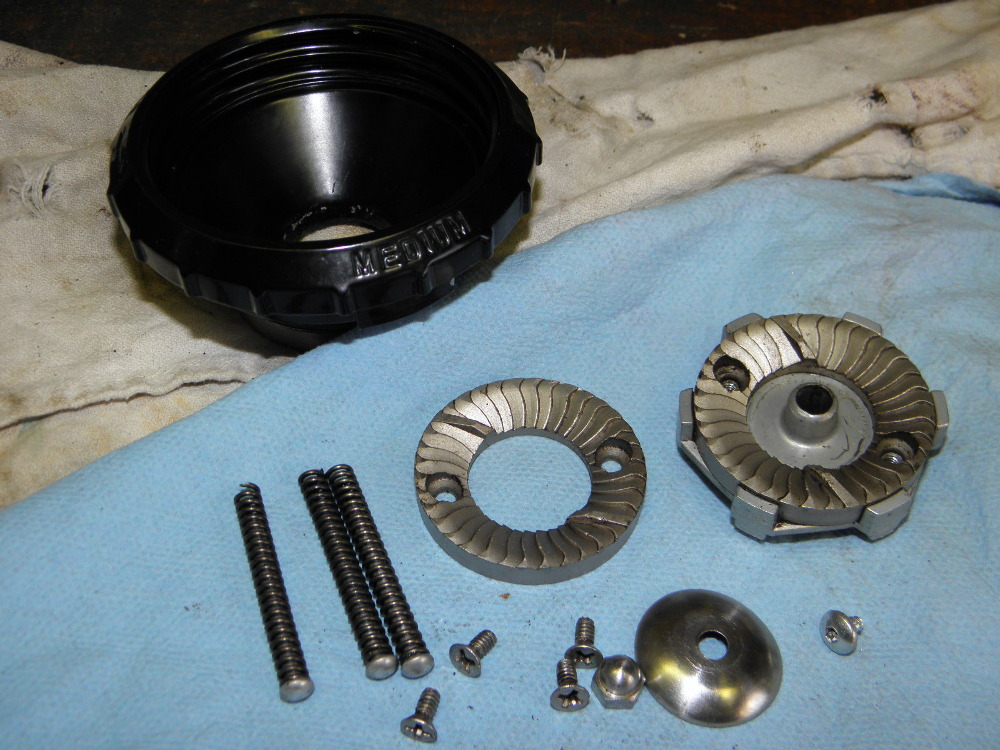
|
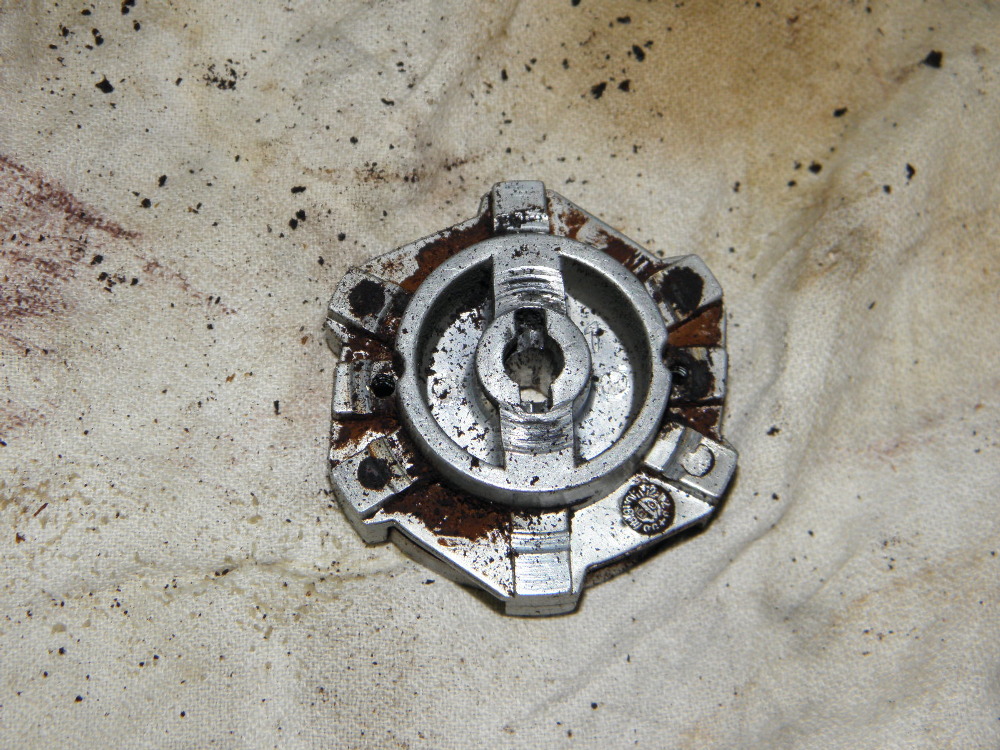
The other side (after I had used a brush on it).
I later realized that this is a two-piece assembly (duh, I had removed the pair of screws earlier) and that the top and bottom burrs are identical and interchangeable. It was filthy in between these two components, and the most oily residue of all was on the lower portion inside the tabs that surround the burr. 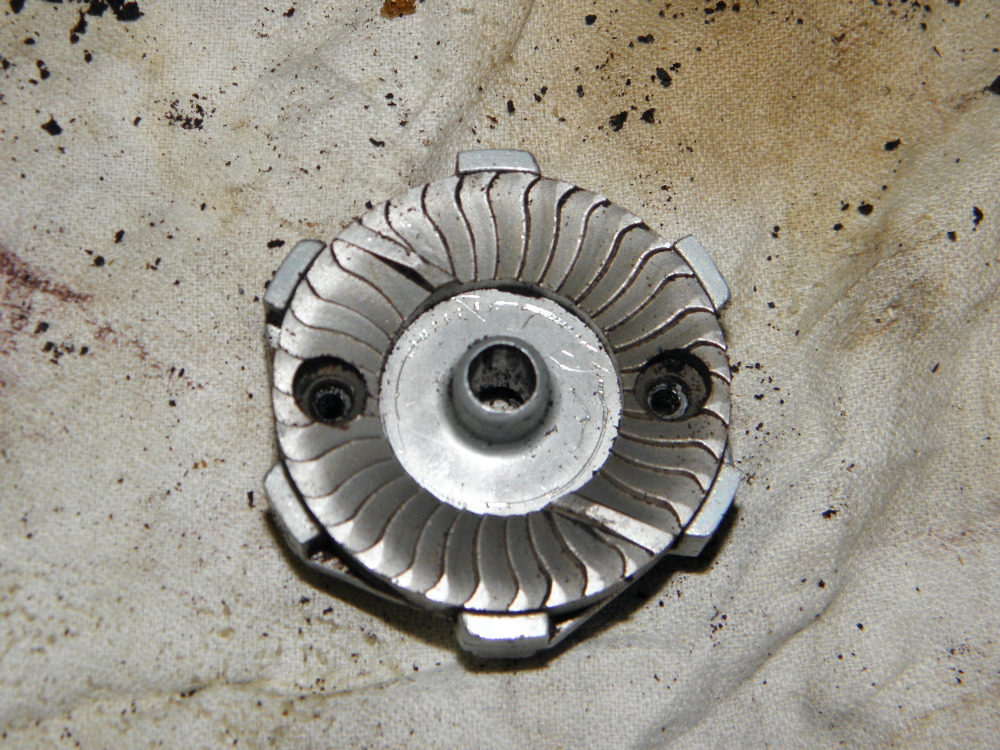
| ||
|
Post# 653381 , Reply# 28 1/14/2013 at 18:56 (4,119 days old) by rp2813 (Sannazay) |
||
|
| ||
|
Post# 653383 , Reply# 29 1/14/2013 at 19:01 (4,119 days old) by rp2813 (Sannazay) |
||
|
After: | ||
|
Post# 653384 , Reply# 30 1/14/2013 at 19:02 (4,119 days old) by rp2813 (Sannazay) |
||
|
| ||
|
Post# 653385 , Reply# 31 1/14/2013 at 19:06 (4,119 days old) by rp2813 (Sannazay) |
||
|
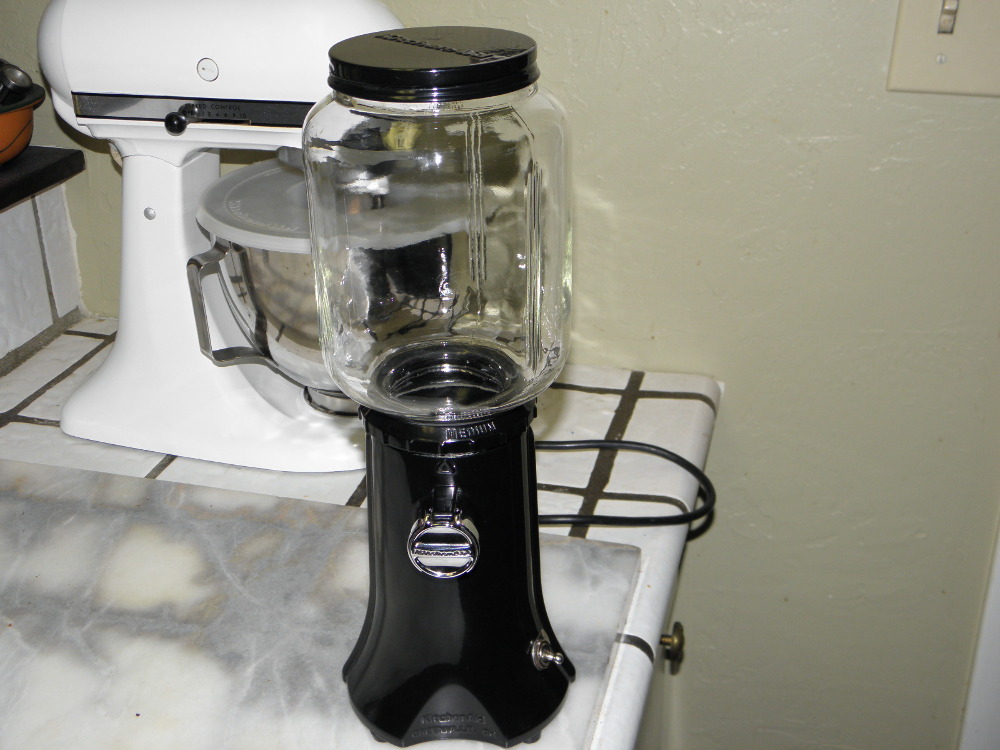
Back Together | ||
|
Post# 653387 , Reply# 32 1/14/2013 at 19:10 (4,119 days old) by rp2813 (Sannazay) |
||
|
| ||
|
Post# 653395 , Reply# 33 1/14/2013 at 19:50 (4,119 days old) by sudsmaster (SF Bay Area, California) |
||
|
Congrats again on reviving another find. I'm wondering where you do your shopping, though. Up here the Goodwill and other charity shops generally have only the cheapest dreck for sale. If it was ever a quality item, it's highly unlikely to appear in the charity used shops up here. There are probably exceptions, of course, such as Goodwill in tonier suburbs or neighborhoods, I just haven't found them yet... LOL... Not that I've looked very hard. Sometimes the aroma of the women's shoe section sends me right back out the door before even checking out the small appliances...
| ||
|
Post# 653422 , Reply# 34 1/14/2013 at 22:09 (4,119 days old) by rp2813 (Sannazay) |
||
|
This was a true Goodwill fluke. I usually walk out of there empty-handed, particularly the store where I found this mill. At a different one I've scored some deals on Corningware items and more McCoy Canyonware to add to the place settings I found some time ago at Salvation Army, but Savers seems to have less insider skimming going on than the other thrifts.
I'm not declaring this latest process a success just yet. Based on how the adjusting ring is behaving, I don't think it will render a very fine grind. I have a question in to KA's support staff and will wait to hear if they can offer any advice. I'm not getting my hopes up, but you never know. It seems to me that the bottom burr assembly is too low and needs to be raised somehow, or perhaps spacers/washers placed under the top burr. I don't know of any other way to achieve the "complete resistance" described in the owner's manual and thus get the markings on the ring to correspond to the desired grind. | ||
|
Post# 653433 , Reply# 35 1/15/2013 at 01:22 (4,119 days old) by sudsmaster (SF Bay Area, California) |
||
|
Well, Ralph, I'm not sure the gears are ever supposed to contact each other - that could be disastrous if the machine was turned on, with one gear trashing the other.
If it were me, I'd tighten the upper ring until it won't go any more, don't worry about the burrs being able to be turned, then turn the ring back to the "M" setting and finish reassembling the machine. Then try a test grind at "M". I gather that should be the correct setting for a drip coffee maker. Try grinding some beans at that setting and see if the coffee comes out ok. That's my thought for the night. Meanwhile this is spurring me to do a more thorough cleaning of the Cuisinart Thermal Burr Grind 'N Brew machine I've started using again (got tired of the finicky Keurig machine). I've been cleaning the coffee chute every weekend but haven't cleaned out the hopper and the upper burr plate for a while. Which also reminds me - the KA you're working on has conical burrs. These are supposed to be superior to the flat burrs that most cheaper burr grinders have (like on the Grind 'N Brew). So it should give a superior result. | ||
|
Post# 653510 , Reply# 36 1/15/2013 at 13:04 (4,118 days old) by rp2813 (Sannazay) |
||
|
I think the burrs making contact might have been residual old-school instruction from back in 1937 when people actually read their owner's manual, but I agree it could have disastrous consequences even if the screw that locks in the ring's range of rotation hasn't been tightened.
Still, with markings provided on the ring and an indicator arrow on the base that they should line up with, it seems to me that if you want a fine grind, the word "fine" should be rotated into position above the arrow. This isn't currently possible on my machine.
I'm doubtful that this machine could grind beans fine enough for a batch of Turkish, and that seems like an indication that something's not right.
I'm still waiting to hear from KA customer support.
Regarding the Cuisinart, I don't recall ever seeing instructions about cleaning the hopper and burr plate. Maybe I should check my literature again, or slap the DVD into my laptop? So far, the maintenance I've been doing with the chute has been enough to keep the grinder functional for over three years, which is far, far longer than my first two machines lasted. | ||
|
Post# 653833 , Reply# 37 1/16/2013 at 21:19 (4,117 days old) by sudsmaster (SF Bay Area, California) |
||
|
Well, I took a closer look at the hopper, and it does not hold either burr plate. The burrs are basically inaccessible unless one wants to start disassembling the machine past the mfg's recommendations.
However the owner's manual does recommend cleaning the hopper bin ever couple of weeks. I took a look at mine and it did have a build up of fine coffee powder in certain spots, so it was worth the effort, which was minimal anyway. I generally use a vacuum cleaner to clean out the beans left in the depression above the grinder mechanism when I pull the hopper plate. Back to the KA-9. Are you sure the upper and lower burrs are identical? Perhaps they are not, and this is why the clearance may be off. Even if a difference isn't readily observable, you might try swapping them and seeing if that changes anything important. I'm thinking maybe they have different depth counterbores or other precision surfaces that could affect grind height depending on which part of the grind mechanism they are mounted upon. Just guessing, mind you. | ||
|
Post# 653837 , Reply# 38 1/16/2013 at 22:12 (4,117 days old) by rp2813 (Sannazay) |
||
|
Well Rich, you're batting 1.000 thus far, so it's worth switching the burrs around. It had occurred to me that they might be different and that they had been improperly installed, but when I had them side by side they looked identical. That doesn't mean they are, but I decided not to switch them around. It's worth a try. If I could find a parts list that would answer the question, but information on these machines is very limited.
I read reviews on Amazon and there are a lot of unhappy owners who returned their mills. I know people who have had a bad experience are more likely to write about it than those who didn't, but the reviews are disproportionately negative. I think these mills were designed with light roasted, non oily beans in mind, as they were likely the most prevalent type back in 1937 America.
Meanwhile, I'll check the hopper bin on my Cuisinart. The hopper is nearly empty, so I'll be performing maintenance fairly soon. | ||
|
Post# 653839 , Reply# 39 1/16/2013 at 22:25 (4,117 days old) by petek (Ontari ari ari O ) |
||

I was just thinking the same.. People weren't fine grinding coffee for espresso and latte's back in the 30's 40' 50' 60's . Well some Italian families were but they may have been using hand crank grinders.
I can't quite tell from the pics or anything. but I have a Braun mill and it did sort of the same thing.. the dial was not matching the grind.. it turned out that you had to sort of get it in the right "starting" position to screw it on or it would get to its tight point threading it on (finest grind) before the fine grind markings on the base. | ||
|
Post# 653848 , Reply# 40 1/16/2013 at 23:01 (4,117 days old) by Launderess (Quiet Please, There�s a Lady on Stage) |
||
From What One Understands 
Via various "coffee geek" sites one frequented when was very into vacuum pot coffee making, these Hobart/KitchenAid domestic grinders did not and could not produce a fine grind on their own. Espresso coffee must not have been a big thing back then cause the finest you can get from these is best for drip or maybe vacuum pots.
Being as this many seem to recall some members of various coffee geek sites claiming they "tweaked" this or other grinders to get a finer grind. Me I'd just as soon scour fleaPay or thrifts for a modern grinder such as the one's coffee places use. Or, another option would be a "vintage" type grinder as what was often seen at supermarkets. Growing up used to love going with my Grandmother to her local (A&P) because they had those huge red grinders at the front of the store. You took your Eight O'Clock coffee beans there and an employee would custom grind to whatever degree one wished. | ||
|
Post# 653849 , Reply# 41 1/16/2013 at 23:07 (4,117 days old) by rp2813 (Sannazay) |
||
|
Thanks for the suggestion Pete. The manual does advise that the ring is easier to adjust with the motor running, so that could easily apply to the initial installation.
Looks like I have a couple of things to try tomorrow.
Regarding the Cuisinart Grind & Brew burrs not being accessible for maintenance, I think the difference may be that the Cuisinart burrs aren't flat like the ones on the KA, and therefore not as vulnerable to oil and residue accumulation. | ||
|
Post# 653850 , Reply# 42 1/16/2013 at 23:32 (4,117 days old) by petek (Ontari ari ari O ) |
||
|
| ||
|
Post# 653936 , Reply# 43 1/17/2013 at 14:02 (4,116 days old) by rp2813 (Sannazay) |
||
|
I figured it out Pete, that's an interesting Cory grinder. It doesn't seem to take up too much counter space either.
I pulled the KA apart again and the burrs are indeed identical. I fooled with adjusting the ring for a while and finally decided to ignore the instructions from the owner's manual and apply common sense. I noticed that with the ring tightened almost all the way, the burrs would make slight contact (and a faint ringing noise) after power was cut and they spun to a stop. I knew this wasn't right.
I decided to back off the ring and tighten its set screw so burr contact wouldn't be possible. My first attempt at this prevented the ring from moving beyond one click in the "fine" direction. The ring has a stop on the bottom that hits the set screw, preventing it from traveling more than 360 degrees in either direction. I loosened the set screw and rotated the ring just enough to allow the stop to get past the screw, and tightened it down again.
In doing this, I noticed something else that points to yet another error in the owner's manual. The "M" in "medium" now was positioned above the set screw at the rear of the housing. The instructions advise to position it above the grind indicator arrow on the front. With the "M" above the screw, the ring now rotates clockwise until the word "fine" is above the arrow, and counter-clockwise until the word "coarse" is above the arrow, with "medium" in between. This is exactly how it's supposed to behave.
By following the instructions in the manual, I was setting the ring into an adjustment range that would have resulted in no grinding action at all when turned fully in the "fine" direction because the burrs were making almost complete contact, which would have ruined them. By aligning the "M" with the set screw, there's now room on the finest setting for beans to fit in between the burrs.
Wow. I can't believe how sloppy Whirlpool was with the instructions for this thing.
Next: Grinding some beans for espresso later this evening. | ||
|
Post# 653949 , Reply# 44 1/17/2013 at 15:33 (4,116 days old) by kb0nes (Burnsville, MN) |
||
Consistent Grind?
I have one of these new "reissue" KitchenAid coffee grinders. I have had the burrs out of mine twice trying to get them adjusted correctly. It seems with mine that no matter where I adjust it I get a very inconsistent grind. Even when I move the burrs apart to yield a coarser grind I get a lot of fine powder. It often causes the vacuum pot to fail due to a plugged filter. I get a far more consistent grind from my Braun chopper!
I'm not sure if this is a symptom of the design or if something is amiss with mine. It seems to me that the burrs are spun WAY to fast in this design. This likely adds to the fact that these grinders make a mess, I have grounds all over the counter when I'm done Due to these issues mine has likely ground less then a couple pounds of coffee and it mostly just sits next to my mixer and looking pretty. The KitchenAid Pro series seems to grind a slower speed. From what I have seen of them they addressed all the problems I have with my earlier design model. I'm in the market for one of those. | ||
|
Post# 653953 , Reply# 45 1/17/2013 at 15:48 (4,116 days old) by rp2813 (Sannazay) |
||
|
I just tested this one out.
Findings: Even on the finest setting, there are large chunks mixed in. It sounds like the reverse is true when set for a coarse grind.
I'm impressed with the speed that this thing will render ground beans though. Just a few seconds produces enough to make a pot of espresso.
I had no problem with grounds flying everywhere. They dropped neatly from the spout downward into the glass. It all struck me as a very professional system, and it's not any more noisy than others I've used.
This thing can't even come close to turning out a fine enough grind for Turkish/Greek coffee though, which is what I'd really like. Now that it's in proper working order I may end up giving it to my sister, who grinds her own beans every morning for use in her Chemex Automated. It would be a very convenient set-up for her.
| ||
|
Post# 654516 , Reply# 46 1/19/2013 at 15:34 (4,114 days old) by polkanut (Wausau, WI ) |
||
Ralph, | ||
|
Post# 808995 , Reply# 48 2/12/2015 at 23:28 (3,360 days old) by rp2813 (Sannazay) |
||
|
Jerri,
It's been a couple of years, but I think the bottom burr assembly may have just fallen out by itself. One of those situations where it seemed impossible to budge or get a grip on, and then it just dropped out on its own.
I'm glad the information shared here got your grinder going again.
Ralph | ||
| Post# 1089578 , Reply# 49 9/15/2020 at 21:54 (1,318 days old) by dawley2570 (Novato, California) | ||
|
KitchenAid Vintage A-9 Coffee Grinder Does anyone know where to purchase the electric motor brushes for a KitchenAid Vintage A-9 Coffee Grinder? | ||
|
Post# 1089591 , Reply# 50 9/16/2020 at 01:39 (1,318 days old) by RP2813 (Sannazay) |
||
|
| ||
|
Post# 1089619 , Reply# 51 9/16/2020 at 11:03 (1,317 days old) by jeff_adelphi (Adelphi, Maryland, USA) |
||
 | ||
|
Post# 1120053 , Reply# 53 6/12/2021 at 12:19 (1,048 days old) by RP2813 (Sannazay) |
||
|
Here We Go Again It's been 8+ years, and this past weekend when my sister was up from L.A. for a visit, she brought this grinder with her per my request. She never used it much, and after her cheap plastic grinder failed a while back, I gave her a new one for Xmas that had received good reviews on line.
I tried out the KitchenAid this morning. The first thing I noticed was that I couldn't get the adjustment ring to move all the way to the "FINE" setting. It would only move as far as "MEDIUM" and even that required quite a bit of force. I ran some rice through it. That didn't change anything, but it sure did make a mess. I held the chute cover closed until I felt pressure, then released it and the ground rice dropped obediently into the cup. I added more rice just for good measure and figured I didn't need to hold the cover again. It spewed un-ground rice (why wasn't it ground?) all over the counter and floor, including out the doorway into the hall. Grrrrr.
After that, I decided to give the "MEDIUM" setting a go anyway. I held the chute cover closed initially the same as I did with the rice, and the grounds went mostly into the cup. But the grind was way too coarse and uneven, and the brew it made in my Bonavita auto-drip machine outfitted with Chemex carafe and paper cone filter was weak. The pattern of the grounds in the filter was weird and it was obvious that a significant portion of the grounds didn't receive proper saturation.
Considering this grinder didn't see much use at all over the past eight years, I can't imagine that I need to disassemble it again, but I at least want to be able to set it to the finest grind. I'm going to adjust the ring per instructions and see if that's all it needs, but it seems odd that with such little use, it would be so out of adjustment.
I'm starting to see why these things got so many negative reviews, and I agree that the RPM of the burrs is way too fast. It's like it needs an in-line rheostat or something, but it's built solid and makes my KCM model seem like an ear-splitting slowpoke in comparison, so I'm hoping I can figure out a way to dispense (pardon the pun) with its annoying characteristics.
| ||
|
Post# 1120118 , Reply# 54 6/13/2021 at 01:51 (1,048 days old) by SudsMaster (SF Bay Area, California) |
||
|
| ||
|
Post# 1120122 , Reply# 55 6/13/2021 at 03:03 (1,048 days old) by foraloysius (Leeuwarden, Friesland, the Netherlands) |
||

Braun grinders are not the best choice for coffee grinders. They used to be something in the past, but Braun isn't anymore what it used to be. A lot of coffee afficionados advise a Baratza Encore, it's an affordable grinder and gives great grinding results as long as you don't need the coffee as fine as required for an espresso pot. For all other methods it's great.
View Full Size
| ||
|
Post# 1120123 , Reply# 56 6/13/2021 at 03:08 (1,048 days old) by RP2813 (Sannazay) |
||
|
I took it apart, brushed both sets of threads for the adjusting ring, the upper and lower burrs, and the rest of the hopper. Now the ring easily turns to the "FINE" setting.
The grind it renders for coffee in the morning will determine its fate. It already has two strikes against it for having to be taken apart and cleaned so frequently. And the ring set screw, as mentioned further up, is a weird torx screw with a pin-like thing in the middle so the only way I could remove and replace it was very carefully with pliers. I don't remember that from last time, but it's been a while.
I'm going to take a wild guess that burr RPM is also the reason why grounds end up in places they shouldn't inside the hopper. | ||
|
Post# 1120126 , Reply# 57 6/13/2021 at 04:37 (1,048 days old) by foraloysius (Leeuwarden, Friesland, the Netherlands) |
||
|
| ||
|
Post# 1120127 , Reply# 58 6/13/2021 at 05:38 (1,048 days old) by Launderess (Quiet Please, There�s a Lady on Stage) |
||
|
Will have to see if still in bookmarks somewhere
Years go when got into vacuum pot coffee brewing phase (many glass Silex and Pyrex pots long since broken) read up on grinders. IIRC someone had worked out a hack to get a finer grind out of certain vintage grinders; KA, Bodum, and a few others.
This was for the espresso people because as you know that coffee needs a fine grind. Vac pots OTOH depending upon what sort of filter being used do fine with coarser grinds. | ||
|
Post# 1120146 , Reply# 59 6/13/2021 at 13:05 (1,047 days old) by RP2813 (Sannazay) |
||
|
I would love to learn about the finer grind hack! I thought I could simply tighten the set screw with the ring adjusted in a different position than instructed in order to get a finer grind, but there is a stop inside the ring that prevents any setting for tightening the screw other than the first "M" in "MEDIUM," so it is what it is.
This morning's grind was much improved, but I still had some of the more coarsely ground beans left from yesterday's episode that I used, so tomorrow morning's brew will be with 100% finest grind possible. If it's fine enough to render the same level of flavor as its model KCM counterpart, I may keep this one on the counter. It's fast and quiet, which is one thing I do really like about it. | ||
|
Post# 1120159 , Reply# 60 6/13/2021 at 14:40 (1,047 days old) by SudsMaster (SF Bay Area, California) |
||
|
Ralph,
You could probably pick up a hex bit set at HD or Harbor Freight that would perfectly fit those "weird Torx screws with the post in the middle". It's called a Torx Security Bit, and I do have a Torx bit set with bits that fit that exact configuration. They are not too difficult to find. See below link: CLICK HERE TO GO TO SudsMaster's LINK
View Full Size
This post was last edited 06/13/2021 at 15:05 | ||
|
Post# 1120169 , Reply# 61 6/13/2021 at 16:34 (1,047 days old) by RP2813 (Sannazay) |
||
|
| ||
|
Post# 1120178 , Reply# 62 6/13/2021 at 18:51 (1,047 days old) by SudsMaster (SF Bay Area, California) |
||
|
Yes, Ralph. Often one can find a full set of hex bits with all sorts of configurations at places like Harbor Freight or HD. Complete with driver. No shop should be without them.
That said, I'm mystified now as to who thought up the security Torx bit design: did they really think it would prevent a determined mechanic from taking things apart? I suppose for a year or two it dissuaded some, but the bit sets are so readily available now the point is lost. And it just makes maintaining things more difficult. Although I suppose the presence of a security Torx fastener might make some hesitate to remove it. There is that. | ||
|
Post# 1120180 , Reply# 63 6/13/2021 at 19:05 (1,047 days old) by RP2813 (Sannazay) |
||
|
Rich, it makes even less sense when one considers that KA includes removal of that screw as part of the routine cleaning process. That is just one of the disconnects between the realities of the manufacturing process and the erroneous verbiage contained in the owner's manual. I had to make my own hand-written corrections to it. | ||
|
Post# 1120220 , Reply# 64 6/14/2021 at 04:38 (1,047 days old) by SudsMaster (SF Bay Area, California) |
||
|
Ralph, yes, that makes no sense whatsoever (for KA to make a screw that needs to be removed for routine cleaning a security piece).
I used to grind my own, and sometimes still do, but when I did it was almost always for drip grind. Nowadays I just use a Keurig style machine. Much less fuss. But I do have a grinder collection... somewhere... ;-). Mostly the burr type, although I have a spinner type, which for a while I used to grind up kitty kibble for use as fish food. I know, too much detail there. Now I just toss the kibble in the pond(s) and let the fish nibble away. Probably good exercise for their little fish lips. | ||
| Post# 1120227 , Reply# 65 6/14/2021 at 07:05 (1,047 days old) by vacerator (Macomb, Michigan) | ||
|
My Krupps is from the 80's and still works perfectly. | ||
|
Post# 1120592 , Reply# 66 6/17/2021 at 16:17 (1,043 days old) by RP2813 (Sannazay) |
||
|
I've been using the A-9 all week. My theory about not clearing out the chute after grinding proved correct, and there is no spewing now. However, the grind it produces on the FINE setting still has some larger chunks in it. The brew hasn't been as flavorful as that from the KCM grinder and I've been playing around with the amount of ground beans. I've been getting my beans from the same independent coffee roaster for over 35 years and they aren't cheap, but my morning coffee is important enough to me that I'm willing to pay a premium for it. I only make two mugs' worth each morning. That said, I don't want to waste beans on a grinder that can't render the fine grind required for a cone filter.
This morning I decided to try the blooming/wetting method that the '70s era Chemex Automated machines use, which is to start the brewing for long enough to saturate the grinds, then shut down for a minute or two. Doing this helps to extract the most flavor from the grind. With my Bonavita machine, this requires a manual process, so I stop the brewing process after about 30 seconds, shut down the machine, wait a minute or so, then start it up again. It made a big improvement and I just might be able to continue using the A-9.
When I used this same blooming method on the fine grind from the KCM mill, it seemed to overbrew so I stopped doing it. It's no big deal for me to start using this process again.
In addition to the look of the A-9, I really like that it's quiet, and that it's fast. Right away the cat learned the sound of the much louder KCM grinder and could hear it from her sleeping spot in the back yard, even with the windows closed. She'd be at the back door demanding breakfast before I could start brewing my own coffee. So this quieter grinder will let me get away with enjoying my coffee, newspaper and breakfast totally under her radar. We'll see how it goes. I'm not ready to give up on the A-9 just yet. | ||
|
Post# 1161359 , Reply# 70 10/8/2022 at 14:57 (565 days old) by RP2813 (Sannazay) |
||
|
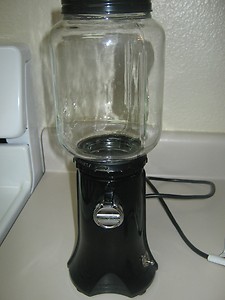
If anyone has found a solution to the spewing problem, please post here. I've been using my '60s KA burr grinder since finding the subject grinder in 2013 because the re-issued A9s make such a mess. I like the speed and relatively quiet operation of the A9, but the redesigned models with plastic hoppers are much better behaved. | ||
| Forum Index: | 
| Other Forums: |

|

|

|

|

|

 Comes to the Rescue!