|
Thread Number: 77619
/ Tag: Vintage Automatic Washers
A Second Chance for a Rusty Maytag A408 |
[Down to Last] |
| Post# 1016214 11/29/2018 at 11:07 (2,066 days old) by lowefficiency (Iowa) | ||

So I was browsing the regional classifieds, when a pair of center-dial Maytags popped up:
- A harvest gold A806, non-working (wouldn't drain), rough shape, make offer. - A white A408, non-working (unknown reasons), OK shape from the picture, FREE. Bingo! There's everything I needed to make a white A806 to match my DE806! I follow up on both, but the A806 had already been sold. Can't beat the low low price of free, so we decided to go pick up the a408 anyway. :) Didn't know what was wrong, but we would figure that out once we got it.
View Full Size
| ||

|
| Post# 1016215 , Reply# 1 11/29/2018 at 11:12 (2,066 days old) by lowefficiency (Iowa) | ||
|
Met with the seller yesterday, a nice young fellow who listed it for his grandma, who had bought it new. We decided to use our Subaru this time instead of the truck... which meant that we would need to pull the front panel and pad the tub before tipping it onto its side. That's where we started figuring out what we were getting into... It left a pile of rust flakes on their driveway, in the car, and on every step of the stairs leading down to our basement. :D
| ||
| Post# 1016216 , Reply# 2 11/29/2018 at 11:18 (2,066 days old) by lowefficiency (Iowa) | ||
|
Back at home, and tucked into place.
It needs a good cleaning, but actually looks relatively good inside, no hard water stains or anything on the white tub, just really gunky on the inaccessible top tub edge. The lint filter was clean, so that's a good sign. The tag doesn't have any printing left, but the stamped model and serial number are visible, with an "AR" code indicating a September 1978 production date. | ||
| Post# 1016218 , Reply# 3 11/29/2018 at 11:26 (2,066 days old) by lowefficiency (Iowa) | ||
|
The inside is where things get interesting. So apparently Grandma said it actually still works fine(!), it just leaks a lot of water, and has for a long time. That would explain the interior rust. She was probably just going to use it until it died, and... it never did. :D
My parents came over last night to take a look, and Dad commented that the rust and corrosion inside was very uniformly distributed, so it didn't quite look like a pump, hose, or outer tub leak... His theory is that possibly it has been overfilling and splashing out the top of the tub for a long time? My first step of course is to hit it with the shop vac and a brush to clean up the piles of rust inside... After that, I suppose I'll hook it up and look for clues, but if you have any thoughts on what else to check, I'm all ears. (Thanks in advance!) | ||
| Post# 1016222 , Reply# 4 11/29/2018 at 12:11 (2,066 days old) by potatochips ( ) | ||
|
Im willing to bet the tub seal went on this. I have an 806 that was just like this when I went to restore it and it was the tub seal, or some part of it anyways. | ||
| Post# 1016226 , Reply# 5 11/29/2018 at 13:06 (2,066 days old) by eurekastar (Amarillo, Texas) | ||
|
| ||
| Post# 1016230 , Reply# 6 11/29/2018 at 14:09 (2,066 days old) by Kafooty06 (washington ) | ||
Mine does that same thing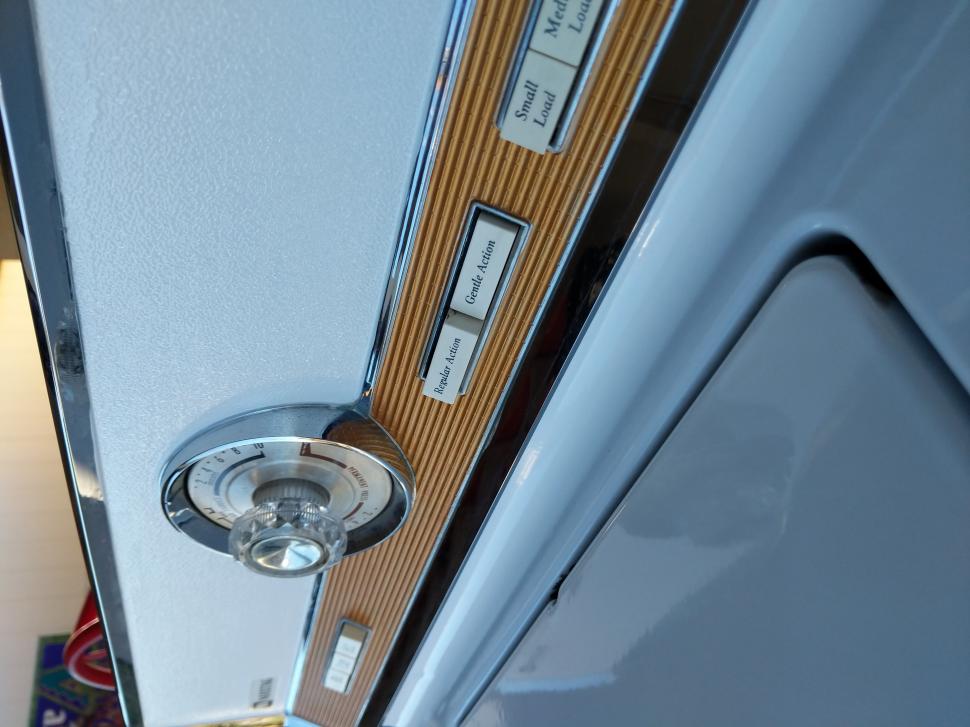
I have a Maytag like yours and got it free owner said it broke .I got it to work great but mine leaks too . Your dad may be right in a way. I had a member that told me if there is too much water in the tub but not enough clothing it will spill out from the sides and top of the tub when it goes into spin . Good luck , these are nicer Maytags !
| ||
| Post# 1016238 , Reply# 7 11/29/2018 at 16:04 (2,066 days old) by lowefficiency (Iowa) | ||
|
Thanks for the encouragement!
I gave the inside a pass with the shop vac, using the crevice tool to scrape anything that looked loose. A lot of big flakes and debris came free, especially that rear corner (probably where it collected when tipped on its side), and I clogged the vacuum hose several times in the process. It's obviously damaged, but looks more manageable now... I was vacuuming up pen caps, bandaids, and other stuff like that, so I think at least some of it must be tub overflow... or this thing has a *serious* tub seal issue! :D The inner tub I just gave a quick wipe with wet paper towels. There's a few small stains, but not bad at all as you can see. I think before I hook this up to the water line to test, I'll have to pick up one of those washer drip pans with the drain. We have a floor drain quite close, but I'm realizing now that even if the water finds its way safely, it's still going to leave a massive rust water stain on the floor if I run it as-is. | ||
| Post# 1016240 , Reply# 8 11/29/2018 at 16:17 (2,066 days old) by eurekastar (Amarillo, Texas) | ||
|
| ||
| Post# 1016247 , Reply# 9 11/29/2018 at 18:04 (2,066 days old) by lowefficiency (Iowa) | ||
|
>> Was it sitting on someone's back porch?
Not that I'm aware of. The grandson had told us about how he had helped lug it out of the basement, so I'm sure it spent most of its life down there. The schematic sticker on the back is also in good shape, so I don't think it has been outside in the elements much aside from just moving it in/out and to/from their garage... | ||
Post# 1016260 , Reply# 10 11/29/2018 at 20:25 (2,065 days old) by combo52  (50 Year Repair Tech Beltsville,Md) (50 Year Repair Tech Beltsville,Md) |
||
Very Sad A408 The rust damage you see is a combination of a very damp basement and very frequent OVERSUDSING, suds have spilled over the tub cover many, many times.
This machine at best is a parts donor, The tubs and transmission may be good, as well as the controls. Often when the base-plates are this rusted on Maytag's they will just crack and break, but for free you at least got some parts and more experience with an older washer.
John L. | ||
| Post# 1016606 , Reply# 11 12/2/2018 at 23:05 (2,062 days old) by lowefficiency (Iowa) | ||
|
Thanks John, that would explain it. No worries if this one doesn't last, I only expected it to be for parts anyway. But after picking it up and being given the surprise information that the "broken" washer actually still functions, it *is* sort of interesting to follow through and see about fixing it... at least to use until I find the right A806.
If I were to look for a replacement base plate from a donor washer, how new of a machine could I get? Is it just the similar Ax06/07/08 models, or would the Ax10/12 models (and others?) also be compatible? Thanks as always for the help. | ||
| Post# 1016967 , Reply# 12 12/5/2018 at 17:36 (2,060 days old) by lowefficiency (Iowa) | ||
|
... and we're washing!! :D
The source of the leak appears to be the injector / air gap component. We pulled some plastic sheeting under the machine to avoid rust staining the freshly painted floor, and I hooked the cold supply up to our utility sink faucet as we don't have proper hookups yet after the basement remodel. Running the washer with the front panel off, I quickly found that water would spray out the air gap if the faucet tap was any past about 1/3 of the way open. By reducing the flow on the supply side, the washer operates 100% as expected. All four fill levels work (Extra Large filling up to the 2nd row of holes in the inner tub), and I ran it through five wash cycles of different settings without a problem. No drips from the outer tub, no dampness underneath, no moisture on the top of the transmission, nothing. But as soon as you turn the water up, it comes out the side of the injector. This is both great and sad news at the same time. Great news in that the tub seal appears to be fine, and everything else on the machine functions. Sad news that someone used this a long time with a very inexpensively repairable fault, causing more damage in the process... | ||
| Post# 1016970 , Reply# 13 12/5/2018 at 17:46 (2,060 days old) by lowefficiency (Iowa) | ||
|
Additional photos - the injector/air-gap assembly from above, and from below with water dripping from it while running.
The top of the outer tub was caked in soapy filth, proving John's theory on the oversudsing and likely also Steve's theory on using too much water for the load. So in the end there were two issues at hand, one with the machine, and one with the way in which it was used. I won't post the "before" picture of the outer tub, but you can see that it cleaned up reasonably well. there is quite a bit of rust on the metal tab that trips the unbalance switch, so this top area was wet quite often. It won't ever be seen, so I'll live with that for now. I'm just happy that the leak(s) are understood. | ||
| Post# 1016973 , Reply# 14 12/5/2018 at 17:54 (2,060 days old) by lowefficiency (Iowa) | ||
|
The only other thing I thought was interesting was the fill valve assembly. As I mentioned, I only hooked up the cold side to the sink faucet with a single hose. However, if the tap was opened up too much, water would begin flowing out from the hot water inlet connection on the washer. For now, I just hooked up a second hose and let it drain back into the utility sink while I was testing the other functions of the washer.
Is this indicative of a faulty valve assembly, or is this expected? I know there are some internal check valves and the like to assist the mixing when "warm" water is selected, but I'm not familiar enough to know if, for example, the inlet valves rely on some amount of constant water pressure from the outside to stay seated/closed when the solenoids are not energized. Perhaps the non-normal situation of having full pressure on the cold side with zero pressure on hot was enough to force the hot valve open against its spring? | ||
|
Post# 1016981 , Reply# 15 12/5/2018 at 18:40 (2,060 days old) by Yogitunes (New Jersey) |
||

each valve is a little different, if one side is hooked up, you can get a varying degree of situations from the other side.....nothing, a dribble, or a full flow...
most likely you hooked it up to the cold side, and selected cold.....sometimes by selecting warm, it will cut off the dribble...other times, not.... but yeah, mains pressure is what keeps the valve closed when not in use, or unplugged... | ||
| Post# 1017996 , Reply# 16 12/14/2018 at 11:22 (2,051 days old) by lowefficiency (Iowa) | ||
|
My parts came in, and with the injector repaired, the washer is now leak-free even with the water supply fully opened!
Part numbers for future reference: "Sleeve Injector" - 22213057 "Valve" - 12001677 I likely would have been fine with just the rubber part of the valve, which would have made it an extremely cheap fix (less than $6). But I knew I would have to replace one of the clamps (too rusty to loosen), and wanted to update to the revised vent tube with the splash guard while I had it apart, so I splurged and spent about $13 total. :D With them side-by-side, you can see how stretched the old rubber tube was, but also how much shorter it was (or became) than the new replacement. It's easy to see now how the water, once deflected off of the flared tip of the plastic part, could spray backwards and out the vents. Simple and quick fix, the only "gotcha" is that you have to be careful that the flange on the new rubber piece doesn't bunch up when inserted into the water supply hose. | ||
| Post# 1018000 , Reply# 17 12/14/2018 at 11:40 (2,051 days old) by eurekastar (Amarillo, Texas) | ||
|
| ||
|
Post# 1018026 , Reply# 18 12/14/2018 at 17:15 (2,051 days old) by turquoisedude (.) |
||
 | ||
|
Post# 1018031 , Reply# 19 12/14/2018 at 17:36 (2,051 days old) by RP2813 (Sannazay) |
||
 | ||
| Post# 1018055 , Reply# 20 12/14/2018 at 20:33 (2,050 days old) by ken (NYS) | ||
Ralph | ||
|
Post# 1018062 , Reply# 21 12/14/2018 at 21:12 (2,050 days old) by RP2813 (Sannazay) |
||
|
| ||
| Post# 1018063 , Reply# 22 12/14/2018 at 21:26 (2,050 days old) by ken (NYS) | ||
|
| ||
|
Post# 1018064 , Reply# 23 12/14/2018 at 21:30 (2,050 days old) by RP2813 (Sannazay) |
||
|
| ||
| Post# 1019337 , Reply# 24 12/28/2018 at 21:00 (2,036 days old) by LowEfficiency (Iowa) | ||
|
It's been a long couple of weeks, but I've been making good progress on getting our "new" laundry area set up.
Our house originally had basement laundry (based on the presence of a drain standpipe by the utility sink), however the water lines had been cut, electrical removed, and there was no evidence of a dryer vent ever being run to the outside. There were also typical clueless DIY issues like the laundry drain running UPHILL, the sink being too low, the standpipe being too short, cracked and patched PVC fittings, etc. All of the supply plumbing that was there just hung from the ceiling. So in order to actually use these now functional machines, I've had to fix all of those issues. So now we have all new drain plumbing, proper water line routing and shutoff valves, and all of the other plumbing issues are sorted. I also made an insert to replace the window, which provides an outlet for the dryer vent (and a blank space for a second), and ran a solid vent pipe to the DE806. Our plan then is to bring the two newer machines from the 2nd floor back down to the basement, placing them to the right of the utility sink, and to reclaim the upstairs "laundry room" to use as a nursery. It will be a little snug, but should all fit. Next up is electrical...
View Full Size
| ||
| Post# 1019338 , Reply# 25 12/28/2018 at 21:02 (2,036 days old) by LowEfficiency (Iowa) | ||
|
Half way there... :D
View Full Size
| ||
|
Post# 1019362 , Reply# 26 12/29/2018 at 09:08 (2,036 days old) by Yogitunes (New Jersey) |
||
|
| ||
| Post# 1019777 , Reply# 27 1/1/2019 at 22:56 (2,032 days old) by LowEfficiency (Iowa) | ||
|
Thanks Martin. I can't take full credit for the idea, as it's the same concept as one of Maytag's recommendations in the Halo of Heat service manual (photo below). Maytag's intention was that you would remove a pane of glass from an existing window, and replace it with a pre-cut plate in which to mount the vent. (Maytag part number 59133 for a 12x18 plate, and 59134 for a 15x20 plate.)
In my case, I didn't want to remove glass panes from my nearly 100-year-old windows, as I know how long the glazing putty takes to cure, and didn't want to go that route in our below-freezing weather. I'm also considering the window exhaust to be somewhat temporary while we figure out the laundry layout, then hopefully cutting the "real" holes and replacing the original window sometime next spring or summer when the weather is better for it. I did take steps to ensure that my new insert retained the expected "window" functionality though - it's still on hinges, and latches securely from inside instead of being permanently fastened. So in an emergency, it would still be a suitable egress window.
View Full Size
| ||
|
Post# 1019877 , Reply# 28 1/2/2019 at 20:36 (2,031 days old) by swestoyz (Cedar Falls, IA) |
||
 | ||
| Post# 1153349 , Reply# 29 7/4/2022 at 18:17 (753 days old) by LowEfficiency (Iowa) | ||
|
Looks like I haven't updated this thread in a while!
The rusty A408 has been our daily-use machine this entire time, only briefly giving up a few loads here and there to the A209. We did have one issue, two years ago already, where we would occasionally come back expecting the load to be done, only for the machine to be making humming and clicking sounds... hum, click, hum, click, repeatedly. After a little detective work, I discovered that the motor was incredibly stiff to turn. Not seized, but quite close. So if the load was great enough (such as starting the spin drain), the stalled or nearly-stalled motor would overheat and trip the thermal cutout. With nothing to lose, we sprayed the motor bearings liberally with a penetrating cleaner, turning it by hand for several applications. This freed the motor up quite well, so after letting it thoroughly dry and re-lubricating it, we put the motor back into service and it's been working great ever since. I replaced the motor glides while it was out, opting for old-stock rollers over the newer square sliding blocks, logic being that while functionally comparable for good-condition machines, the rollers would better tolerate the rough surface of the rusty tracks on the machine base of this one. | ||
| Post# 1153352 , Reply# 30 7/4/2022 at 18:24 (753 days old) by LowEfficiency (Iowa) | ||
|
A few weeks ago however, the A408 developed a squealing sound from the water valve, which was fairly benign until it worsened into a flutter that caused a water hammer oscillation this past week.
I took the valve assembly apart, cleaned it, ensured it was free of debris in the screens and ports in the diaphragms, and re-assembled. I also cleaned the electrical contacts. This unfortunately wasn't enough to resolve the issue, and it appears that Maytag declared these valves "non-serviceable", so replacement diaphragms are not available. I'll have to replace the entire valve. (See my other thread here: www.automaticwasher.org/c...) In the meantime, I've swapped the wiring and hoses, so that the "bad" valve is on the hot side instead of the cold, so the machine can continue being used for cold/cold washes. The injector hose leaked on reassembly, but it seems fine now after cutting off a half-inch (so it's fresh hose over the barb). | ||
| Post# 1153354 , Reply# 31 7/4/2022 at 18:39 (753 days old) by Maytag85 (Sean A806) | ||
LowEfficiency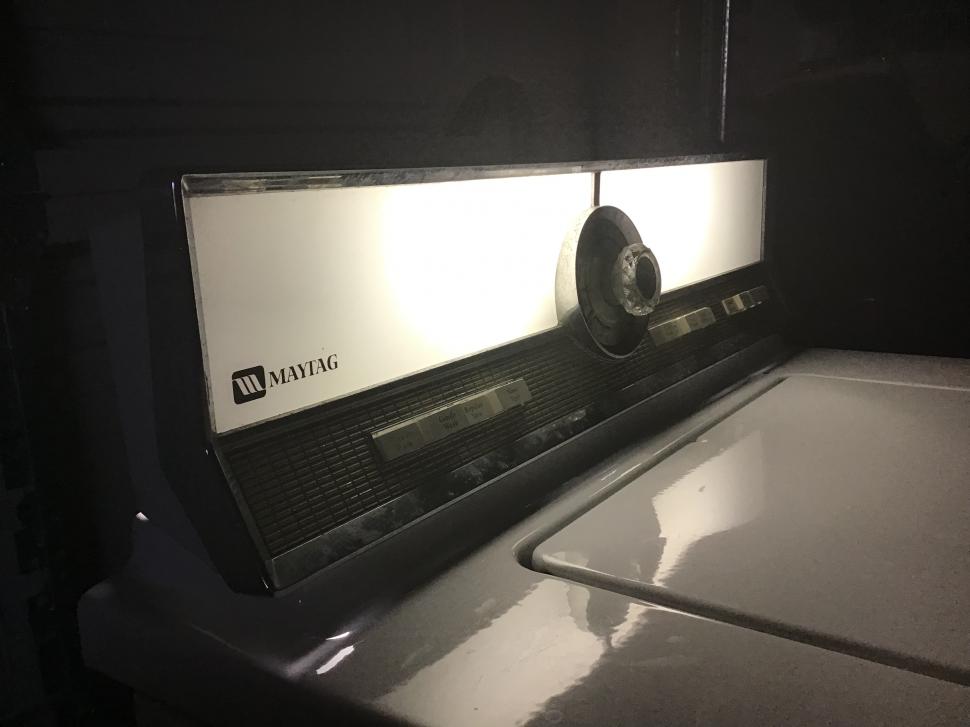 | ||
| Post# 1153360 , Reply# 32 7/4/2022 at 18:58 (753 days old) by LowEfficiency (Iowa) | ||
|
| ||
| Post# 1153366 , Reply# 33 7/4/2022 at 19:49 (753 days old) by Maytag85 (Sean A806) | ||
|
Reply #32
You probably saw the thread of the Maytag A806 I acquired about 2 weeks ago, but I am going to try to put a customized Maytag Halo Of Heat dryer together with low and regular temperature selections and a auto dry timer (once I obtain a 408 auto dry timer). Low is going to be 120F and regular/high is going to be 155F which will give me some flexibility since a majority of Maytag HOH dryers made from 1966 to 1975 only came with one temperature. Probably will dry fairly quick with a 155F thermostat when on the regular drying temperature.
| ||
|
Post# 1153404 , Reply# 34 7/5/2022 at 06:20 (752 days old) by goatfarmer (South Bend, home of Champions) |
||
 | ||
| Post# 1153412 , Reply# 35 7/5/2022 at 10:22 (752 days old) by Maytag85 (Sean A806) | ||
|
Goatfarmer | ||
| Post# 1153414 , Reply# 36 7/5/2022 at 10:33 (752 days old) by LowEfficiency (Iowa) | ||
|
| ||
|
Post# 1153423 , Reply# 37 7/5/2022 at 13:27 (752 days old) by goatfarmer (South Bend, home of Champions) |
||
|
| ||
| Post# 1153425 , Reply# 38 7/5/2022 at 14:18 (752 days old) by Maytag85 (Sean A806) | ||
|
Reply #37 | ||
|
Post# 1153450 , Reply# 39 7/5/2022 at 18:30 (752 days old) by goatfarmer (South Bend, home of Champions) |
||
|
No dryer consoles. Here is the A806 I have. Chrome has some pitting, missing a bank of switches. And the timer.
View Full Size
| ||
| Post# 1154871 , Reply# 40 7/20/2022 at 23:50 (736 days old) by LowEfficiency (Iowa) | ||
|
The A806 panel from Kenny has arrived! It looks great - just the right amount of patina, and the glass and lamp holders are intact. He was nice enough to include all of the machine wiring too, which gives me a huge head start on my project. Thanks Kenny!! Now I just have to decide which path to take - Do I swap the A408 timer and switches over, wire in the lamp, and have the worlds fanciest rusty A408/A806 hybrid? Hunt for more original parts to make a "real" A806? Or springboard from this to something completely unique- the "hotrod" approach? hmmm....
View Full Size
| ||
|
Post# 1154941 , Reply# 41 7/22/2022 at 11:10 (735 days old) by Adam-aussie-vac (Canberra ACT) |
||
 | ||
| Post# 1154951 , Reply# 42 7/22/2022 at 13:25 (735 days old) by Maytag85 (Sean A806) | ||
|
| ||
| Post# 1154953 , Reply# 43 7/22/2022 at 13:49 (735 days old) by qsd-dan (West) | ||
|
All you need is the motor speed switch bank and one button for the water level switch. Here's the switch bank.
https://www.ebay.com/itm/384966750368QUE... | ||
| Post# 1154954 , Reply# 44 7/22/2022 at 13:51 (735 days old) by qsd-dan (West) | ||
|
| ||
| Forum Index: | 
| Other Forums: |

|

|

|

|

|

 Comes to the Rescue!


;)
;)
;)
;)
;)
;)
;)
;)
;)
;)
;)
;)
;)
;)