Thread Number: 81040  /  Tag: Refrigerators
GE Combination Wall-Mount Fridge repairs...
[Down to Last]

automaticwasher.org's exclusive eBay Watch:
scroll >>> for more items --- [As an eBay Partner, eBay may compensate automaticwasher.org if you make a purchase using any link to eBay on this page]
Post# 1050393   11/9/2019 at 09:28 (1,641 days old) by turbokinetic (Northport, Alabama USA)        

So, our fellow member Sarah Purdue has bought her Mid Century Modern wall mounted GE Combination fridge here to get some much-needed repairs done.


These things are very interesting, and very awkward to handle.  I built a repair stand to support and provide mobility to the machine during repairs. It is a little too high for accessing some angles on the unit; however it is high enough to allow for access to the bottom of the cabinet. The stand was built to be a repair / test / painting stand; so there are some compromises.


I have been videoing the process, as much as I can, with two videos up at this time.


The fridge was acquired in non-working condition. It was apparent that previous repairs had been done, by looking at the unit. The compressor had a support bar welded on top of it. Looked like it was done with a farmyard class AC-only stick welder. That was to support the fan shroud. The manual showed a tube-and-fin condenser mounted vertically in a shroud in front of the fan. This one had a coiled, non-finned copper tube condenser in front of the fan, with a "piece of" another GE condenser mounted to the side of the compressor.


At first I assumed the condenser setup was factory, but after finding the welded-on support, and looking closely at the manual pictures - I don't think it was. Another local friend looked at it as well, and said he's seen that coiled condenser before but it was not a GE and was a much smaller HP unit.


We powered on the fridge and the compressor started right up. Unfortunately, it drew very little power and didn't cool. I don't have the special clamp-on style GE service tool, so I was forced to use a line puncturing tap. When this was installed, the low side pressure was in the low 20's. Thinking it was low on charge, I tried adding refrigerant in the interest of having more pressure and searching for a leak with the Freon Sniffer tool.


The compressor would not start again. We tried capacitors, Supco relays, and other tricks - but she would not go. Thinking the system could have a blockage, I cracked open the high-side port. Liquid refrigerant sprayed out. All the pressure was trapped in the high side of the unit.


Even hours later, the compressor would still not start, and the pressure was still present at the high side. In looking at the unit, there seemed to be a splice in the capillary tube with extra tube added. This looked crude and poorly done. Expecting this to be where the blockage is, I removed the condensing unit and made further checks.


The heat exchanger assemble was sort of mangled. It appeared that people had damaged it trying to replace the thermostat in years past.

While the compressor was on the bench, I replaced the GE clamp-on service ports with modern 1/4" SAE ports.


Video:


(Continued)


  Photos...       <              >      Photo 1 of 9         View Full Size


Post# 1050396 , Reply# 1   11/9/2019 at 09:46 (1,641 days old) by turbokinetic (Northport, Alabama USA)        
Repairs begin...

It was about this time that the possibly undersized condenser became apparent. In digging around my shop, I went through old Frigidaire parts and other random stuff but was unable to find anything suitable. Then I found a parallel-flow cooler which was for another project that never was used. It seemed to be about right. Has fins in it and should have more than enough heat transfer area for the 1/4 HP compressor.


I soldered copper tube stubs into it for ease of connection, then checked it in a sink of water at 250 PSI. The fridge has a 235 PSI test pressure so if it took the 250 it would be safer than safe LOL!


To use this efficiently, the fan needs to draw through it with shrouding around the sides of the condenser. To make that happen, I repurposed some old filing cabinet dividers, hospital bed frame steel, and the shell of a deceased microwave oven. Once it was all painted black, it looks the part. :)


The General Electric PC36 compressor has an oil cooler "loop" which is a large-diameter pipe U-bend coming from the base of the compressor. This needs air circulation around it from the fan. The bottom of the new condenser shroud has two slots which accommodate the oil cooler pipe. There is a gap beside the pipe, so a lot of forced draft from the condenser fan will rush in across the oil cooler.


The next issue was the plugged capillary tube in the heat exchanger. I think the thermostat shorted out on it possibly, or the tube got crimped during repairs. Either way it was bad. So I built a new heat exchanger. The return line is 5/16" tube, so I used that line to pre-form the shape of the heat exchanger how I wanted it to lay in the cabinet. Once the shape was done, I then soldered cap tube to the return line, creating the heat exchange portion of the device. That was then wrapped over with cork tar-tape insulation; which was further wrapped with rubber splicing tape. that seals it and gives it a cleaner look.


The capillary tube is sold by Supco. They have a chart inside the package which gives a guideline to the length of the tube, and the size of the tube - based on compressor horsepower and refrigerant gas in use. I would have preferred to measure the original tube inner diameter but couldn't locate a suitable tool to do that.


Once that was installed, another shot of nitrogen and bubble check revealed no leaks, so the vacuum pump has been in operation overnight. Today I hope to make a function test!


 Here is part 2 of the video:


Thanks for your interest!

Sincerely,

David


  Photos...       <              >      Photo 1 of 20         View Full Size
Post# 1050397 , Reply# 2   11/9/2019 at 10:47 (1,641 days old) by combo52 (50 Year Repair Tech Beltsville,Md)        
GE Wall Refrigerator Sealed System Repairs

combo52's profile picture
Wow David it looks like you will have this refrigerator running soon.

Some thoughts

The condenser set up is original, GE used a coiled condenser near the fan and the smaller tube and wire condenser behind the compressor.

Do you think the compressor has ever been changed to the newer improved design ?

To test the compressor GE suggests seeing how much vacuum it can pull, it should be very close to 30" other wise it is worn out.

If you have to change the compressor I would adapt a modern compressor as the originals ran pretty hot and used a lot of power.

If anyone needs it I have a NIB compressor and complete evaporator and heat exchanger for one of these wall refs that I would sell.

John L.


Post# 1050402 , Reply# 3   11/9/2019 at 11:29 (1,641 days old) by Repairguy (Danbury, Texas)        

repairguy's profile picture
You sir have a great talent and you must have some amazing patience as well. For myself, I would love to have the time that I know it takes for these projects because I have too many vintage washers and dryers that need rebuilding. Keep up the awesome work I enjoy reading your posts.

Post# 1050409 , Reply# 4   11/9/2019 at 12:16 (1,640 days old) by pulltostart (Mobile, AL)        
David,

pulltostart's profile picture

Your talent, skills and patience are just awesome!  I don't know beans about what you're doing, but your videos are so interesting I can't help but watch and listen.  Sarah is soooo fortunate to have access to you and your shop to bring her refrigerator back to life.  Makes me really wish that I could have used you about 10 years ago when my 1958 GE Combination bit the dust.


lawrence


  View Full Size
Post# 1050425 , Reply# 5   11/9/2019 at 16:56 (1,640 days old) by combo52 (50 Year Repair Tech Beltsville,Md)        
GE Wall Refrigerator Sealed System Repairs

combo52's profile picture
Good news David the compressor and condenser assembly in the ref is the official GE replacement Hi-Side, the condensers are correct and hopefully the compressor is still good. It looks a little crude the way a bracket was welded to the top of the compressor because this was a low production replacement part from GE.

Attached pictures of a complete Hi-Side replacement compressor that I have NIB.

John L.


  Photos...       <              >      Photo 1 of 3         View Full Size
Post# 1050444 , Reply# 6   11/9/2019 at 18:17 (1,640 days old) by sarahperdue (Alabama)        
Thanks, John

sarahperdue's profile picture
I always love it when my two favorite appliance geeks agree on something. Especially when that something is going to end up in my kitchen. Thank you both.

Post# 1050471 , Reply# 7   11/9/2019 at 22:57 (1,640 days old) by turbokinetic (Northport, Alabama USA)        
Thanks!

Thanks to all of you for the positive comments!  I really appreciate it.


John, that is amazing that they used this small coiled condenser for a replacement unit design.  I'm sure the one in Sarah's fridge was one of the units as in your picture; however a subsequent compressor failure happened and yet another new GE compressor was installed. The second time, they modified the replacement high side and adapted a compressor from some other GE high side.  I say this because of how the lines were fabricated, spliced, and oddly bent. Furthermore, the compressor is a newer one without the embossed areas on top as your picture shows. Finally, the coiled condenser mounting points were a hackjob. The top point did fit into the welded-on top bracket. On yours, the lower points have a bracket clamped over the oil cooler tubes to give it a point for grommet supports. On this one, the bottom of the condenser coil was riding directly against the oil cooler, with cable ties.  The two bottom pins which would have ridden in the grommets were just hanging freely. So it obviously started out as an original GE wall-mount replacement high-side, that was further adapted with a more generic GE replacement compressor.

The new parallel-flow condenser seems to be very efficient. The unit was using less than 250 watts when at temperature and had seemingly plenty of cooling power.


Today I got the wiring done; including a new junction box at the condensing unit and 3-wire grounded power cord.


In the video I go over more info. There were complications with a bad charging hose, but I didn't 'waste' as much refrigerant as I thought...  because it ended up being overcharged in spite of the messup. Once the charge was adjusted, it easily got sub-zero in the freezer and a hard frost across the refrigerator compartment evaporatir coil.


At the first test, the control wouldn't cycle off. I took it out and opened it up, finding nothing obviously wrong. A little Lucan Chain and Cable Lubricant (tacky oil that doesn't run off) was used on the mechanism in the control. After that, it cycles as it should!


I added some extra insulation to replace what may have been lost; and re-sealed the top cover with new cork-tar-tape. Things are looking pretty good for this one. :)  


I also repaired the under-cabinet countertop light and storage shelf. It got a new GFCI outlet, protecting the 2-wire outlet and the fluorescent light circuit. The original ballasts were good, but the lamps and starters were not, so they got renewed.


Today's video:


  Photos...       <              >      Photo 1 of 13         View Full Size
Post# 1050486 , Reply# 8   11/10/2019 at 05:52 (1,640 days old) by combo52 (50 Year Repair Tech Beltsville,Md)        
Another Great Sealed System Restoration

combo52's profile picture

Impressive David enjoyed your video as usual,


We need to turn you loose on some of these new Samsung dual evaporator Refrigerators etc that are a PITA to diagnose and repair, LOL


John L.


Post# 1050505 , Reply# 9   11/10/2019 at 09:43 (1,640 days old) by pulltostart (Mobile, AL)        
David,

pulltostart's profile picture

Those "cabinettes" were designed to be installed under standard, 12" deep wall cabinets.  However, they could also be installed under this wall-mount refrigerator.  In the case of the later, the cabinettes would be installed against the wall, flush with the rear of the refrigerator.  I don't know if they were anchored to the wall (behind) or the refrigerator (above).  If to the refrigerator, the mounting holes would be located in the rear half of the underside of the refrigerator, not the front half.


lawrence


Post# 1050509 , Reply# 10   11/10/2019 at 10:26 (1,640 days old) by turbokinetic (Northport, Alabama USA)        

Thanks John!  Happy you're enjoying the videos and I appreciate your feedback on my projects.


As for the Samsung fridges. I would expect they fight the same issues GE did with the Combination design; in that it can't keep the freezer at a low enough temperature without over-cooling the fresh food compartment. There's a lot of info in the GE manual devoted to the control and the system's limitations due to the dual evaporator design. I expect that Samsung has probably used some very cheaply manufactured parts to try to overcome this limitation. 


Whenever I want a laugh I walk through the appliance section of Lowe's and look at the high-end fridges. The insanely complicated double-door design always makes me laugh. Can you say, junk after 5 years? None of that door sealing mechanism will be sustainable.  Also they have knockoff of the GE Combination roll-out bottom freezer design. The difference is, the freezer carriage (not sure the correct term) feels HORRIBLY cheap and flimsy. It seems like just opening it normally is flexing things and it's about to come off the track.


Thanks again for posting the pictures of the NOS high-side for these.  I got a NOS high-side for a different model fridge, with a multi-layer serpentine condenser. Originally, I was going to adapt that to Sarah's fridge but the compressor in hers looked to be relatively new, and it sounds perfectly un-worn. 


Seeing how these are now out of production and once they are gone they are gone - I wanted to save the new one for a future repair if needed. 


Post# 1050510 , Reply# 11   11/10/2019 at 10:28 (1,640 days old) by turbokinetic (Northport, Alabama USA)        

Reply#9 

Thank you Lawrence. I appreciate this!  I've been working to get the fridge and cabinet ready for painting before I go back out of town for work, and have focused on technical repairs. Need to investigate how it mounts so that if any fabrication is necessary it can be done before painting.


Post# 1050513 , Reply# 12   11/10/2019 at 11:45 (1,640 days old) by kenwashesmonday (Carlstadt, NJ)        

Dave, the quality and neatness of your work is outstanding.  I'm thinking you may have actually improved on the original design here.  


By the time I worked for GE as an appliance tech, the wall mounted refrigerators were not generally repaired by factory service techs anymore, but my Dad worked on them when they were new.  After watching your excellent videos, I now have a better understanding of why my Dad hated those refrigerators so much, and If anyone wanted one repaired he would run away as fast as he could.


Post# 1050533 , Reply# 13   11/10/2019 at 15:03 (1,639 days old) by sarahperdue (Alabama)        
Very exciting!

sarahperdue's profile picture
David, thank you for working on this fridge. I'm enjoying your pictures, videos and explanations.

Yes, the cabinettes have sliding glass doors. All four are intact. I have them here and have been polishing the handles which were very corroded. I believe they are chrome plated steel, but even with very conservative abrasives--600 then 1000 and 1200 grit sandpapers--it looks like I'm removing the chrome because the corrosion was so bad. I'm going to polish all four down to the steel and wax them.

Lawrence, the cabinettes will have to go under my fridge. It's a small kitchen, and the fridge is the only continuous run of upper cabinets that they will fit under. If they don't work well under the fridge, I'm not sure what I will do with them. Over the kitchen sink?

I've got most of the interior parts except for the doors to vegetable compartments in the fresh food section. It looks like it needs four--similar to the butter conditioner doors in design but bigger.

Sarah


  Photos...       <              >      Photo 1 of 3         View Full Size
Post# 1050539 , Reply# 14   11/10/2019 at 15:28 (1,639 days old) by sarahperdue (Alabama)        
Picture of a cabinette

sarahperdue's profile picture
I just found a picture of a cabinette in good condition with glass doors.

Sarah


  View Full Size
Post# 1050553 , Reply# 15   11/10/2019 at 16:33 (1,639 days old) by pulltostart (Mobile, AL)        
Sarah,

pulltostart's profile picture

Another period photograph showing a kitchen with cabinettes in place.


lawrence


  View Full Size
Post# 1050554 , Reply# 16   11/10/2019 at 16:34 (1,639 days old) by spacepig (Floridas Emerald Coast)        

spacepig's profile picture
I have 6 of these in pink. They are all either 24" or 21" inches long. All have the original glass except one. Here's a picture of some of them from the kitchen they came out of in Biloxi. I ended up buying most of these cabinets.

  View Full Size
Post# 1050560 , Reply# 17   11/10/2019 at 17:16 (1,639 days old) by sarahperdue (Alabama)        
Thanks for the pictures

sarahperdue's profile picture
Lawrence and Jeannine

I don't have a long enough run of upper cabinets to put them anywhere but under the fridge.

Lawrence, I am planning a peninsula and like the way they look in the left side of your picture, but I don't think my peninsula is long enough. Also, it's going to be standard cabinet depth with a cooktop on it. It looks like the footprint of the cabinettes is too wide to permit installation of both the cooktop and cabinettes on the same counter.

Do either of you know what the bottom width of the cabinettes is? Mine is at David's. If I know the bottom measurement, I might be able to play around a bit with my plan. Thanks.

Sarah


Post# 1050564 , Reply# 18   11/10/2019 at 18:03 (1,639 days old) by pulltostart (Mobile, AL)        
Sarah,

pulltostart's profile picture

Checking my 1957 catalog and finding - 


Standard Cabinettes were 11-7/8" tall, 10-1/2" deep at the top, and 7" deep at the base.  They were available in lengths of 21", 24", 30" and 36".


GE offered a special cabinette designed for installation under the wall refrigerator.  It was 8" tall, 15-3/16" deep at the top, 13-3/8" deep at the base, and 64" long; so deeper front-to-back and shorter than the standard ones


lawrence


Post# 1050568 , Reply# 19   11/10/2019 at 18:33 (1,639 days old) by ken (NYS)        
Sarah

ken's profile picture
You could consider having the handles re-chromed.

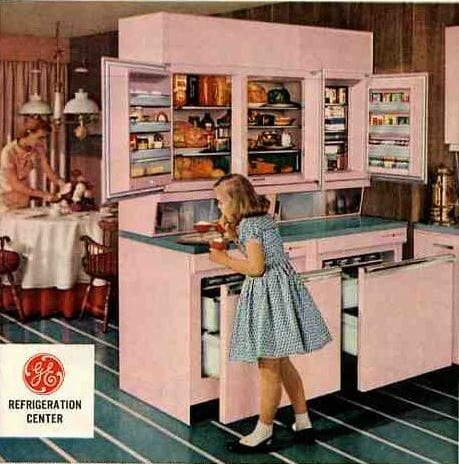
Post# 1050609 , Reply# 20   11/10/2019 at 22:26 (1,639 days old) by sarahperdue (Alabama)        
Cabinettes and chrome

sarahperdue's profile picture
Thanks, Lawrence, mine was probably made for the fridge then. If it's not exactly as long as the fridge, it's very close and significantly longer than any of the others.

Re-chroming? I never think of that. I wonder if there's a shop in my area that does it.

These have plastic grab thingies. I don't know if they'd be good candidates for chrome plating or not.

Thanks,
Sarah


Post# 1050614 , Reply# 21   11/10/2019 at 22:54 (1,639 days old) by turbokinetic (Northport, Alabama USA)        
Cabinette installed....

Figured it out. They had used sheet metal screws. I replaced them with studs for easier installation.


There is one small filler-piece missing on the left end of the cabinette, as you can see.


By the way, the fridge has been in operation since yesterday and all seems very well! My workshop is cool and the fridge hardly ever runs. The cabinet temp is around 35 and the freezer is hard frozen.


Sincerely,

David


  Photos...       <              >      Photo 1 of 6         View Full Size
Post# 1050618 , Reply# 22   11/10/2019 at 23:17 (1,639 days old) by sarahperdue (Alabama)        

sarahperdue's profile picture
That's looking great, David.

I'm looking at the pictures I took of the cabinette before I left it with you. It looks like two cabinettes joined in the middle and faced with a single light unit.

Here are pictures for the rest of you who haven't seen all of it. Alas, I had already removed the glass by the time I took the pictures.

Sarah


  Photos...       <              >      Photo 1 of 4         View Full Size
Post# 1050623 , Reply# 23   11/11/2019 at 00:27 (1,639 days old) by RP2813 (Sannazay)        

rp2813's profile picture

Sarah, I think any auto body shop could refer you to a chrome plating business, or David likely knows of one.  


Post# 1050645 , Reply# 24   11/11/2019 at 07:57 (1,639 days old) by turbokinetic (Northport, Alabama USA)        

Sadly, I don't know of a re-chrome shop. I've been considering getting the hardware for my 1926 Frigidaire M52 replated as well; so hope to learn together!


Post# 1050717 , Reply# 25   11/11/2019 at 16:45 (1,638 days old) by sfh074 ( )        
I mentioned this before .....

Just had 23 pieces rechromed for my '55 Philco two door fridge. "Hanlon Plating" does the best job and is the most inexpensive chrome shop I've found. Have used several shops over the years and this one is great. Go to their website and find the contact email address. Then send Tom (owner) an email with pictures and include a ruler beside pieces you want replated. He will send you a reply with prices for the job. Located in Richmond,VA.

www.hanlonplating.com/...

Bud - Atlanta


Post# 1052882 , Reply# 26   12/1/2019 at 19:28 (1,618 days old) by turbokinetic (Northport, Alabama USA)        
Door gaskets!

So after a week out of country, I got home and had a package waiting. It was the door gaskets for the GE Combination Wall Mount. These came from Case Parts Co. of Saint Louis. www.caseparts.com/...


If anyone is interested, these are style P2896 gasket. The dimensions ordered were as follows, with two of the larger ones ordered for the fridge side and one of the smaller for the freezer.

21"x25-3/8"

17-1/2"x25-3/8"


They should work with the original gasket retainer strips and hardware. The reason I haven't put them on yet is because the cabinet and doors will get painted first. The new gaskets are magnetic unlike the originals. They stick to the cabinet even without a door LOL!


One think I can say about this fridge is that it is very complicated how the doors are manufactured. It makes sense that this would have been a costly model to produce. The door has a whole lot of parts which I doubt could be machine assembled.


  Photos...       <              >      Photo 1 of 6         View Full Size
Post# 1052973 , Reply# 27   12/2/2019 at 21:58 (1,617 days old) by turbokinetic (Northport, Alabama USA)        
Off to the painter!

Today I took the doors off, condensing unit out, and dismantled the doors. This is at the paint shop now!


I got quite a few looks on the highway with this.  LOL


  View Full Size
Post# 1053004 , Reply# 28   12/3/2019 at 08:29 (1,617 days old) by ozzie908 (Lincoln UK)        
WOW David you really are a talented man.

ozzie908's profile picture
I dunno about anyone else but I can't wait to see the finished fridge I bet its going to look amazing..

Sarah I think it will last you many a year now its had David repairing it !!

I have to watch his videos as they are mesmerising and I have learnt so much from watching this very talented man.

Austin


Post# 1058326 , Reply# 29   1/21/2020 at 21:28 (1,567 days old) by turbokinetic (Northport, Alabama USA)        
It's back!

So; the General Electric wall-mount refrigerator is back! The paint job is very nice! I got the condensing unit back in the cabinet today after bringing the parts home from the paint shop.


I wanted to coat the interior of the compressor compartment with an undercoating, to deaden the sound. The original fiberglass insulation had fallen down and clogged the condenser fins. The coating won't be as quiet but it will be a lot safer.


I papered off the new paint to protect it from overspray of the undercoating; then gave it two coats. The heater is hanging on the hoist to warm the area so that the coating will gel and stay put and not run off. 


Look at that gloss... it looks like there are TWO Frigidaire W-8's in my shop now!


I had to replace the already replaced once cord since the painter sprayed it with overspray. It will be fine for other uses but this project needs an unbastardized cord.


the vacuum pump is running tonight so tomorrow it should be ready for charging!


Now the doors have to go on, but not before Sarah does some magic on the door liners. 


Sincerely,

David 


  Photos...       <              >      Photo 1 of 14         View Full Size
Post# 1058338 , Reply# 30   1/21/2020 at 23:19 (1,567 days old) by Repairguy (Danbury, Texas)        

repairguy's profile picture
AWESOME!!!

Post# 1058362 , Reply# 31   1/22/2020 at 08:03 (1,567 days old) by ken (NYS)        

ken's profile picture
Looking great. Looking forward to pictures of the reassembly and video of it running.

Post# 1058374 , Reply# 32   1/22/2020 at 10:12 (1,567 days old) by turbokinetic (Northport, Alabama USA)        

Thanks for the compliments on the paintjob!  I had my friends at Bama Auto Painting do this job. They have done 3 fridges for me so far and each has looked as close to a porcelain cabinet as you'll ever get with paint.


I'll have run videos for sure, after it's all together. I did get it fully working and running before painting, and then took the condensing unit out for painting. I want to be sure everything will be "easy bolt together" to minimize chances for scratching the paint after it is looking so nice.

The lines had to be replaced because of a blocked capillary tube, so I used flare fittings for quick connection of the unit after painting.


Post# 1058384 , Reply# 33   1/22/2020 at 12:58 (1,566 days old) by sarahperdue (Alabama)        
So excited!

sarahperdue's profile picture
Thanks, David!

Post# 1058450 , Reply# 34   1/22/2020 at 21:35 (1,566 days old) by turbokinetic (Northport, Alabama USA)        

Sarah, it was fun visiting with a fellow vintage appliance enthusiast today! Good to see the door liner repairs moving along; and happy to have the Cabinette back on for a test fit. 


  Photos...       <              >      Photo 1 of 3         View Full Size
Post# 1059272 , Reply# 35   1/31/2020 at 08:26 (1,558 days old) by ozzie908 (Lincoln UK)        
One word David....

ozzie908's profile picture
WOW !!!!

Post# 1059290 , Reply# 36   1/31/2020 at 13:59 (1,557 days old) by pulltostart (Mobile, AL)        
Sarah,

pulltostart's profile picture

I remember earlier that you were still trying to find a successful kitchen layout so all of your pretties could be in there.  But after seeing the incredible restoration of this wall refrigerator, should you reconsider and place this in the living room?????


A beautiful job, David.


lawrence


Post# 1059299 , Reply# 37   1/31/2020 at 16:26 (1,557 days old) by sfh074 ( )        
LOLOLOL ....

Yes, the living room, or a room all to itself!

Post# 1059320 , Reply# 38   1/31/2020 at 20:29 (1,557 days old) by turbokinetic (Northport, Alabama USA)        
Little more progress!

Thanks for all the positive feedback on the fridge reassembly! It does look pretty amazing. laughing


So, all doors are on!  The butter conditioner required some rewiring, which was done with a 3-wire twisted harness. That was due to the foil heat transfer mechanism being electrically conductive, and having continuity to the lower shelf in the door liner. I wanted to be sure all metal parts which could conceivably  become electrically live were bonded and grounded. 


The new door gaskets from Case Parts Co. fit and work like new. they are magnetic, as well as the doors have magnetic latches already on them - so it's a double-magnetic door seal now.


And; with a little evac and charge activity - it cools again! smile


It's down to the trim and odds & ends now!


  Photos...       <              >      Photo 1 of 11         View Full Size
Post# 1059328 , Reply# 39   1/31/2020 at 21:46 (1,557 days old) by sarahperdue (Alabama)        
Fantastic!

sarahperdue's profile picture
Now, if Sarah would just get her act together and finish polishing the aluminum trim. It's going to be fantastic. And tomorrow, I'm back to reclaiming pine flooring for the kitchen. We're working on plumbing, wiring and sheetrock...

Thanks all,
Sarah


Post# 1059344 , Reply# 40   2/1/2020 at 05:42 (1,557 days old) by sfh074 ( )        
Love ....

the new door gaskets! Awesome finishing touch.

Post# 1059462 , Reply# 41   2/2/2020 at 17:39 (1,555 days old) by sfh074 ( )        
Saw this pic .....

had to post to this thread since it had the wall fridge and in same color.

  View Full Size
Post# 1059475 , Reply# 42   2/2/2020 at 21:20 (1,555 days old) by turbokinetic (Northport, Alabama USA)        

Very cool picture! I love the GE appliances of course; but also the large windows, high ceiling, and openness. This is such a nice layout.


Post# 1059718 , Reply# 43   2/6/2020 at 03:24 (1,552 days old) by askolover (South of Nash Vegas, TN)        

askolover's profile picture

I love the turquoise color.  I'd use it in my own kitchen but DH hates it, so black is in.


Post# 1059732 , Reply# 44   2/6/2020 at 06:56 (1,552 days old) by turquoisedude (.)        

turquoisedude's profile picture

I've been following this thread closely and I'm really impressed with how this restoration is progressing.  You do good work, Dave and I know Sarah is going to love having a wall-mount fridge in her vintage kitchen.   Thank you for documenting this whole process!  


Forum Index:       Other Forums:                      


Comes to the Rescue!

The Discuss-o-Mat has stopped, buzzer is sounding!!!
If you would like to reply to this thread please log-in...

Discuss-O-MAT Log-In


New Members
Click Here To Sign Up.


automaticwasher.org home
Discuss-o-Mat Forums
Vintage Brochures, Service and Owners Manuals
Fun Vintage Washer Ephemera
See It Wash!
Video Downloads
Audio Downloads
Picture of the Day
Patent of the Day
Photos of our Collections
The Old Aberdeen Farm
Vintage Service Manuals
Vintage washer/dryer/dishwasher to sell?
Technical/service questions?
Looking for Parts?
Website related questions?
Digital Millennium Copyright Act Policy
Our Privacy Policy