|
Thread Number: 84262
/ Tag: Vintage Automatic Washers
Westinghouse washer woes - the never-ending rebuild of the 57 L110 Laundromat |
[Down to Last] |
Post# 1086322 8/24/2020 at 13:12 (1,340 days old) by turquoisedude  (.) (.) |
||
 I had the chance to get this 57 Westinghouse Laundromat and almost-perfect-matched 58 Canadian Westinghouse dryer set twice already, so when a third chance came up this spring I jumped on it.
I've posted a bit about the washer - I knew it needed a bearing job and it seemed to take me forever to get the damned wash basket out of the rear tub. However, I got it out, got the new bearings installed, and even better, managed to fabricate a decent tub gasket as the one on this machine was the textbook definition of 'shot to hell'...
The tub didn't leak so I started to put it all back together - I just seemed to run into one snag or another at every step. Now here's where I am at and what's snagging me this time around...
I got the motor pulleys back on; first test in wash mode was fine, but the first spin was a disaster. It was immediately obvious (even to me...) that the high-speed sheave was not sitting on the tub shaft correctly. It seems as if the tub shaft doesn't extend out far enough for the rectangular slot to seat properly.
As always, I've tried to figure out what went wrong here... First thought is that because of all the heating and pounding I did on the tub shaft I managed to squash that rectangular end of the wash tub shaft. The reason why I am thinking this is because when I tried to slide the clutch spring hub onto the rectangular part of the shaft, it wouldn't go. I had to file down the edges of the rectangular post to get it to fit. I don't know if I could somehow extend that rectagular shaft...and would it be solid enough to propel the tub.
Second thought is that I haven't fully seated the wash tub into the new seal and bearings in the rear of the tub. I admit it took some persuasion, but it 'looked' right. I don't relish the idea of taking the machine apart again - would it be possible to push the tub in while still installed? I'd need to call on my local handyman, who can crush cars with his bare hands, to help with that 'cause I'm such a weakling now...
Is there something else I may be overlooking here?
And while I'm kvetching about it... The pump shaft seems to be binding since I reinstalled it. Could that just be because the spring drive shaft has slipped? If worst comes to worst, I do have a spare aftermarket replacement pump. | ||

|
|
Post# 1086324 , Reply# 1 8/24/2020 at 13:14 (1,340 days old) by turquoisedude (.) |
||
|
Wash tub shaft BEFORE Here's what the wash tub shaft looked like before the weeks of pounding...
View Full Size
| ||
|
Post# 1086370 , Reply# 2 8/24/2020 at 18:48 (1,340 days old) by Unimatic1140 (Minneapolis) |
||
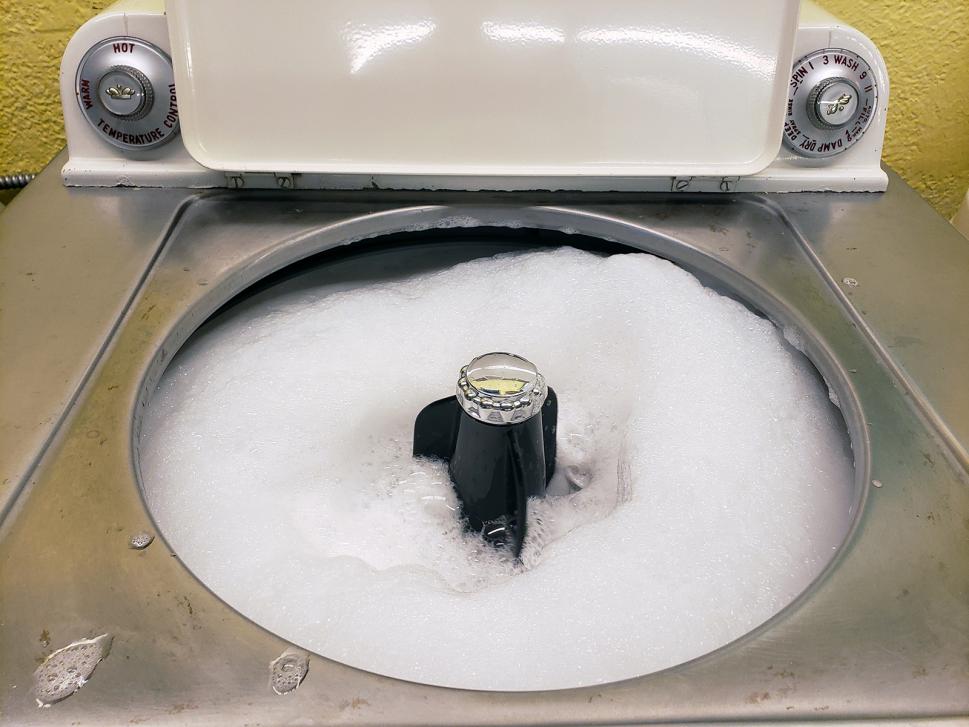
Hi Paul, there shouldn't be much clearance between the wash cylinder and the tub front so I would think if the spinning cylinder wasn't pushed all the way in it would scrape on the front of the tub, but that's just a guess.
So in picture #5, it looks like that clutch spring isn't seated all the way down towards the tub back. It's hard to tell from the picture but that would be my first guess.
View Full Size
| ||
|
Post# 1086385 , Reply# 3 8/24/2020 at 19:44 (1,340 days old) by moparwash (Pittsburgh,PA ) |
||
clutch spring.. | ||
|
Post# 1086389 , Reply# 4 8/24/2020 at 20:10 (1,340 days old) by turquoisedude (.) |
||
|
| ||
| Post# 1086391 , Reply# 5 8/24/2020 at 20:15 (1,340 days old) by sfh074 ( ) | ||
|
Any news when ...... the border will be reopened Paul? | ||
|
Post# 1086397 , Reply# 6 8/24/2020 at 21:17 (1,340 days old) by turquoisedude (.) |
||
|
| ||
|
Post# 1086410 , Reply# 7 8/24/2020 at 22:52 (1,340 days old) by hoover28 (Oneida NY) |
||
|
good luck hope you get it working soon. I am also having trouble with my Westinghouse L 100 mine is still leaking oil and I need a new speed change unit or transmission. any one know were i can find a good used one. Chris | ||
|
Post# 1086441 , Reply# 8 8/25/2020 at 04:12 (1,339 days old) by vacbear58 (Sutton In Ashfield, East Midlands, UK) |
||
"managed to fabricate a decent tub gasket" | ||
|
Post# 1086451 , Reply# 9 8/25/2020 at 07:17 (1,339 days old) by turquoisedude (.) |
||
|
Turquoisedude's Guide to Gaskets Greetings Al!! I had planned on doing a full story about this latest disaster...er, restoration of mine LOL But the gasket merits being mentioned here.
The original gasket had been used and re-used several times over the years... this tub had been taken apart several times by the look of things. The gasket had been "reinforced" with silicone, glue, and (ugh) bathtub caulking to stem the flow of leaks. In sum, it was a mess and pretty much unusable when I cracked the tub...
Here's what it looked like: | ||
|
Post# 1086453 , Reply# 10 8/25/2020 at 07:21 (1,339 days old) by turquoisedude (.) |
||
|
I had to sand off the accumulated goo and glue; I took the time to straighten out the tub rims as much as possible. The inner tub rim had rusted, bubbled and separated in a few spots, so they got a coat (ok, 2 coats) of JB Weld to seal it up. I gave both halves a coat of POR15 to hopefully preserve the tub for another 60-odd years! | ||
|
Post# 1086458 , Reply# 11 8/25/2020 at 07:41 (1,339 days old) by turquoisedude (.) |
||
|
New gasket I did try to find a NOS replacement gasket - you never know, sometimes these things turn up!
This time wasn't one of them....
I measured the old gasket carefully and tried to search for alternate materials. Upon discussion with Jon Charles, the name McMaster-Carr came up. I had bought materials from them in the past and adapted them sucessfully. I found pretty much exactly what I needed - a flat neoprene material that I figured I could adapt by glueing to the tub surface. The gasket I found was 1/8 inch thick by 1/2 of an inch wide (there is a picture of the item number I used - 10 feet is what I ordered; I needed about 7 feet). Almost perfect! 'cept I couldn't buy it....
McMaster-Carr do not ship to Canada under any circumstances (I don't get that at all...) and due to the border closure I was unable to get to my PO Box in Vermont, a mere 10 minutes away from the house in Ogden. Did I give up? Nope.
I begged Jon to order the gasket on my behalf, have it shipped to him, and then have him forward it to me in Canada. A bit of a pony express solution, but it worked and Jon (bless him) was happy to help me out.
When I did get the gasket, I simply glued it to the outer tub half using an automotive weatherstripping adhesive. When I reassembled the tub, I gave the gasket a coat of 'blue goo' - RTV silicone.
I put the two halves back together... and... it worked! No leaks!! | ||
|
Post# 1086460 , Reply# 12 8/25/2020 at 07:49 (1,339 days old) by Unimatic1140 (Minneapolis) |
||
|
Hey Paul, there is a chance that the drive pulley clutch spring is still good. It may just need to be properly seated. With that spring when you manually turn it in one direction (either clockwise or counterclockwise) it tightens and in the other direction it should loosen. To do this you have to turn the spring in the direction that loosens it and simultaneously push it down on the shaft towards the tub back as you turn. Make sure the shaft and tub don't turn as you do this, the trick is just to turn and push the spring inwards.
| ||
|
Post# 1086637 , Reply# 13 8/26/2020 at 08:15 (1,338 days old) by turquoisedude (.) |
||
|
| ||
| Forum Index: | 
| Other Forums: |

|

|

|

|

|

 Comes to the Rescue!


;)
;)
;)
;)
;)
;)
;)
;)