|
Thread Number: 55332
Pre-Test Advice Needed KDS18 |
[Down to Last] |

|
Post# 777369 , Reply# 1 8/14/2014 at 18:37 (3,542 days old) by kakidd  (Texas) (Texas) |
||
|
Sorry, Wrong Forum Not sure how to move to Imperial. | ||
| Post# 777372 , Reply# 2 8/14/2014 at 19:19 (3,542 days old) by washdaddy (Baltimore) | ||
|
Green is your ground In the first pic you posted there appears to be a green wire that's attached by a screw to the frame of the dishwasher. It's partially blocked from view by that bundle of wires. That would be where you would attach your ground wire. | ||
|
Post# 777373 , Reply# 3 8/14/2014 at 19:26 (3,542 days old) by kakidd (Texas) |
||
|
Thank you Washdaddy! | ||
|
Post# 777446 , Reply# 4 8/15/2014 at 10:05 (3,541 days old) by kakidd (Texas) |
||
|
Racks Are racks from kds 19 & 20 series able to be used in the 18? | ||
| Post# 777457 , Reply# 5 8/15/2014 at 14:07 (3,541 days old) by stevet (West Melbourne, FL) | ||
|
Racks... I believe the rack question was already answered in your other post or one recently posted by another member. Totally interchangeable. You should not have a problem swapping them out. | ||
|
Post# 777463 , Reply# 7 8/15/2014 at 14:36 (3,541 days old) by chachp (North Little Rock, AR) |
||
Stainless Panels. | ||
| Post# 777466 , Reply# 8 8/15/2014 at 14:46 (3,541 days old) by danemodsandy (The Bramford, Apt. 7-E) | ||
|
Not Needy! | ||
|
Post# 777473 , Reply# 9 8/15/2014 at 15:11 (3,541 days old) by chachp (North Little Rock, AR) |
||
|
Me either. I learned everything I know from the folks here. I bought my first vintage machine a few years ago which was a KDS-17A that I got on eBay for $25. I cost me more to rent the truck and drive 4 hours to get it but I would do it again. I didn't know anything about this stuff when I bought this machine. I learned as I went along.
The folks here are a wealth of knowledge and always eager to help. That looks like a really nice machine and I'm sure you'll have it in your kitchen in no time at all. | ||
|
Post# 777495 , Reply# 10 8/15/2014 at 17:18 (3,541 days old) by kakidd (Texas) |
||
|
drain hose I am going to have to get some drain host for testing and hopefully installation, what do I ask for at the home improvement store?? | ||
| Post# 777499 , Reply# 11 8/15/2014 at 17:44 (3,541 days old) by beekeyknee (Columbia, MO) | ||
 Do you have an Ace Hardware near by? You can find everything you need there and usually get much more help. They have d/w hose in bulk and you can get a fitting to go on the d/w water valve, a double female adaptor to go between the fitting for the d/w valve and a garden hose. You'll need some thread tape for the fitting that goes on the d/w and then tighten the double female adaptor to the fitting and the hose until there are no leaks. You have to have a garden hose that doesn't leak around the metal ends or cut off the ends and put some new ones on. Hook it up to a hot water faucet in the house - and not on to the water heater. You'll get crud out of the w/h that will clog the screen on you d/w valve. | ||
| Post# 777501 , Reply# 12 8/15/2014 at 17:48 (3,541 days old) by beekeyknee (Columbia, MO) | ||
|
I see the "L" fitting is already on your d/w. Take it off and take it to the hardware store and tell them what you want to do. They should be able to get the fittings you need to make everything work.
Actually, now that I think about it, you won't use the "L" fitting for the test. They will give you a piece that threads onto the w/v and points straight out. Then you put on the double female adaptor, the garden hose and check for leaks. Take the "L" shape with you so they will know the thread size for the w/v to garden hose adaptor.
Oh, you didn't say anything about testing it outside. Sorry, must have this thread mixed up with another one. This post was last edited 08/15/2014 at 20:00 | ||
| Post# 777878 , Reply# 14 8/17/2014 at 21:43 (3,539 days old) by barcoboy (Canada) | ||

For the detergent dispenser, take off the cardboard covers on top of the bi-metals and watch them while the cycle is running. When it is time to open each door, the timer routes power to the motor through one of the bi-metals, thus causing the bi-metal to heat and flex, which releases the door catch and a spring snaps the door open. It is possible that the main wash bi-metal isn't flexing enough to release the catch, and it can be bent slightly to adjust it. If the bi-metal is releasing the catch, then the problem might be a broken or weak spring, or something binding the door preventing it from opening. With regards to the dispenser dripping, do you know if it is the outside seal of the detergent dispenser that is leaking, or one/both of the detergent dispenser door shafts where they come through the dispenser? (Removing the cardboard covers will also help you determine this if you're not sure.) If it is the shafts that are dripping, this can easily be fixed by changing a couple of o-rings on the shafts. Have a look at the thread I wrote up about this for my KDS-58C (the Canadian portable version of the KDS-18.)
I'll let someone else answer regarding the other dripping, but it sounds like it could be the door seal. CLICK HERE TO GO TO barcoboy's LINK | ||
|
Post# 777927 , Reply# 17 8/18/2014 at 08:50 (3,538 days old) by kakidd (Texas) |
||
|
Thank You. The machine was run all three times with racks in. just had a skillet and casserole in the third cycle which is when it started leaking. | ||
|
Post# 777954 , Reply# 18 8/18/2014 at 12:05 (3,538 days old) by kakidd (Texas) |
||
|
lower wash arm support How do I know if it is intact and in good shape? | ||
|
Post# 778029 , Reply# 19 8/18/2014 at 17:04 (3,538 days old) by chachp (North Little Rock, AR) |
||
|
Pictures speak a thousand words.. Can you send a picture of your bottom rack? I had this very problem with my first KDS-20 years ago. Turns out the installers left the packing tabs on the back of the rack. When they removed those the leak went away. Seems it was putting just enough pressure on the door to cause the leak. After that no more leak. The leak was exactly like yours. It would have to get into the 3rd of 4th fill before it started to leak. They thought I was nuts but I made the guy sit there and watch and sure enough. He opened the door and said "Here's your problem, you didn't remove all the packing materials." I reminded him his company did the install so he should probably talk to his guys about it.
These are the tabs Steve is talking about. Do you have these on your lower rack in both front corners?
View Full Size
| ||
|
Post# 778036 , Reply# 20 8/18/2014 at 17:56 (3,538 days old) by kakidd (Texas) |
||
|
Yes, I do have those, they are shaped a little differently, more triangular but there. I ordered a new door seal and lower rack today so we'll see what happens. Thank you for the info! | ||
| Post# 778127 , Reply# 21 8/19/2014 at 03:27 (3,538 days old) by beekeyknee (Columbia, MO) | ||
|
All great advise above. Determine if the main wash door on your dispenser isn't working because of mechanical or electrical problem. With the machine unplugged, and the door latched, take a small pointed tool and pull the bi-metal away from the white plastic catch. The door should snap open. If it doesn't it's mechanical. A little drop of light weight oil on the pivot point of that latch where the spring is might get it working again.
If it does snap open when you pull the bi-metal away it's electrical. Like mentioned above, check for corroded connectors. Sometimes they can be cleaned up if they're not too bad and sometimes they have to be replaced. If it's the latter, clip the connector off with a little pair of wire nippers and take it with you to the hardware store to get a matching size. Strip off the right amount of insulation off the wire and install the new connector. Try that and if it's no go let us know. A good thing to always check is the tightness of the screws around the perimeter of the detergent dispenser. Make sure each screw is snug. Don't get carried away, just snug. You'll strip out the plastic. | ||
|
Post# 778151 , Reply# 22 8/19/2014 at 06:39 (3,537 days old) by neptunebob (Pittsburgh, PA) |
||

Another source of a leak could just be a lot of crud at the bottom of the edge of the tub that the bottom of the door closes over. Take out the rack, open the door fully and look from the inside, I should warn you there is probably enough there to make you gag. Clean it all up, and a leak should stop and the machine may smell better too.
| ||
|
Post# 778241 , Reply# 26 8/19/2014 at 18:39 (3,537 days old) by kakidd (Texas) |
||
|
Metal Piece that seals the door innards?? Not quite sure what that is. Is it the strip at the bottom of the door in the middle? It feels like plastic?? | ||
| Post# 778263 , Reply# 27 8/19/2014 at 20:29 (3,537 days old) by barcoboy (Canada) | ||
|
| ||
|
Post# 778289 , Reply# 28 8/20/2014 at 03:37 (3,537 days old) by kakidd (Texas) |
||
|
I don't know, I was told that if the door springs open when the cardboard lever is pressed, which it does, then it was electrical, not mechanical. The motor on the machine does not stop or pause during the main wash portion where it should open. | ||
| Post# 778415 , Reply# 29 8/20/2014 at 22:34 (3,536 days old) by beekeyknee (Columbia, MO) | ||
|
The motor keeps running while the current is diverted through the bi-metal to heat it up which causes it to bend and release the latch. If the connections are good, you could put a clamp-on amp meter around one of the wires leading to the main wash bi-metal and see if you get a reading. If there's no reading the bi-metal may be bad. 6.2 Check for low fill or oversudsing. 7. Drain valve open-foreign object. 7.1 Unclog drain valve or replace.
From what you've said it sounds like # 5 could be your problem. The clamp-on amp meter will tell if current is passing through. Don't know the value off hand. Keep your fingers crossed that it's not # 3. My suggestion of the drop of oil on the shaft is an alternative to # 1. It usually works and is easier than disassembling, but that doesn't sound like your problem. If there's water in the tank # 7's not your problem and for # 6 to be your problem, the filter would have to be extremely dirty. I'm guessing # 5 without seeing the machine.
The cardboard has nothing to do with it. It's just a protective cover. See the two little phillips head screws on the black bakelite on each side underneath the blue plastic detergent dispenser? I think if you take those out it will release the bimetal assembly and the cardboard will come off. Then there's two other tiny screws on each side of the bimetal piece that holds the bimetal to the bakelite with a little divider that sticks up between the two sides of the bimetal to keep the bimetal from touching so the current will go all the way through the bimetal to heat it up. If it touched at the bottom it would be a short and wouldn't work.
If I recall correctly, the screws that hold the bimetals to the bakelite are tiny phillips head screws. You will need a very small phillips s/d to work on these.
This post was last edited 08/20/2014 at 23:21 | ||
|
Post# 778428 , Reply# 30 8/21/2014 at 05:05 (3,535 days old) by chachp (North Little Rock, AR) |
||
|
I am learning alot reading this post. It does make me wonder though why KitchenAid made this so complex. Seems there are so many dependencies just to get the detergent door to pop open. In the previous models (like my 15 series) is seems so much less complex. It was pretty much self contained and all it needed was some current from the timer to get it to pop open. Although in the 15 only one door has to open vs. two doors in the later models. I wonder if it had something to do with that. | ||
|
Post# 778437 , Reply# 31 8/21/2014 at 08:01 (3,535 days old) by kakidd (Texas) |
||
|
Thanks All Took the old door seal off last night and will install the new one today or tomorrow and re-test . Fingers crossed for no leaks😊😀 | ||
| Post# 778862 , Reply# 33 8/23/2014 at 07:10 (3,533 days old) by danemodsandy (The Bramford, Apt. 7-E) | ||
|
Mark:
The stainless panels you found were intended for a KA model that has the "trim kit," which is a set of aluminum extrusions that form a frame around the door and the service panel. The extrusions are screwed to the edges of the panels; the stainless panels slip into the frame they form. This feature was called the "Vari-Front."
There are two ways to get a stainless look for your DW. One is to find a trim kit, either as NOS parts or by salvaging it off a parts machine. You'll have to drill holes in the edges of your existing panels for the screws yourself, or just swap panels. The other way is to find the true stainless panels, which were available for some models. This is the entire outer panel, not just a flat piece, in stainless. I know the 15 series had these available - I'm looking for them. But I don't know about the 18 series. Perhaps others here will know. Here's a page from the 15-series sales brochure, originally posted by Ben swestoyz. You can see that one model (the wood-fronted one) has the frame around the front panels, and others don't: 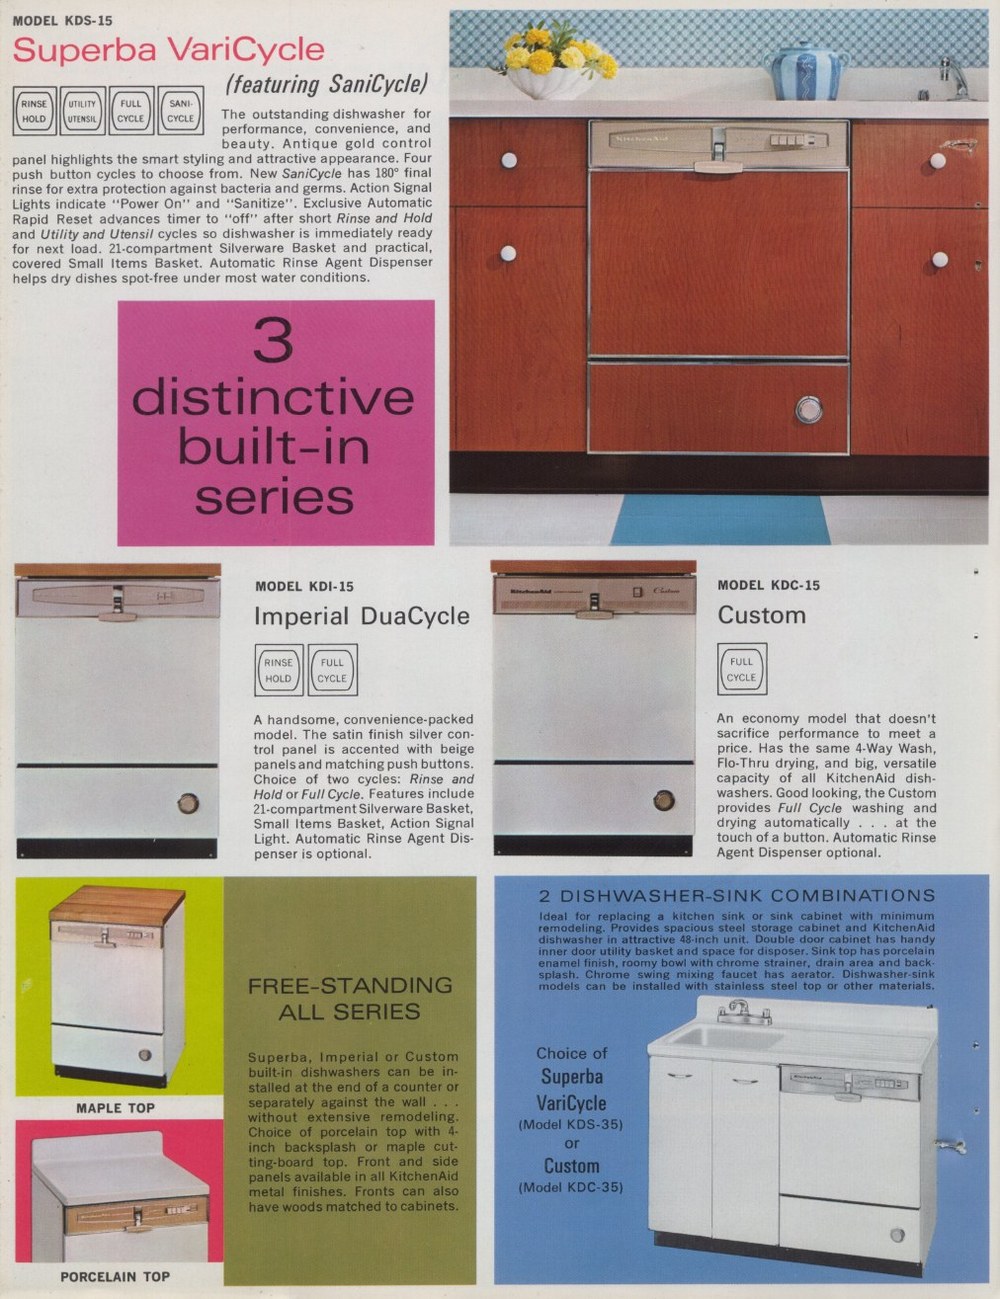
| ||
| Post# 778979 , Reply# 34 8/24/2014 at 05:08 (3,532 days old) by beekeyknee (Columbia, MO) | ||
|
Mark,
Here is a link to a post that was made years ago. At first I was reluctant to post this as there is a bit of a tiff between Sandy and I in the link but we're long since over it and helping you is the most important issue. It appears that I over reacted to Sandy's posts but the past is inviolate. Click on the link and scroll down to the last reply - #20. If you continue to have problems with you're dispenser cups leaking this might help. B. CLICK HERE TO GO TO beekeyknee's LINK | ||
|
Post# 779003 , Reply# 36 8/24/2014 at 08:16 (3,532 days old) by DADoES (TX,�U.S. of A.) |
||
|
�
There's apparently an obstruction somewhere in the outlet path.� Should not take 3 Cancel/Drain cycles to fully drain the water whether or not an overfill is involved. The inlet valve has a flow washer that should allow the proper fill level on a wide range of supply pressures. Seems that a leak occurred, something got wet and the GFI came into play. | ||
|
Post# 779011 , Reply# 37 8/24/2014 at 08:50 (3,532 days old) by kakidd (Texas) |
||
|
What should I check next? Where should I check for the obstruction? The drain hose is clear but is there somewhere else I should check? | ||
| Post# 779015 , Reply# 38 8/24/2014 at 09:17 (3,532 days old) by beekeyknee (Columbia, MO) | ||
|
| ||
| Post# 779025 , Reply# 40 8/24/2014 at 10:01 (3,532 days old) by beekeyknee (Columbia, MO) | ||
|
Stupid iPad is acting up. I've only worked on a KDS-20 and newer. I don't think the cycle increments are much different but it's possible. The 20 does a brief fill (a few seconds) and pump out, called a purge at the end of some of the washes or rinses. I don't remember exactly. I'll have to pull up the service manual to give you exact cycle intervals. I'm not sure if they're the same from the 18 to the 20.
| ||
| Post# 779028 , Reply# 43 8/24/2014 at 10:13 (3,532 days old) by beekeyknee (Columbia, MO) | ||
|
| ||
| Post# 779029 , Reply# 44 8/24/2014 at 10:14 (3,532 days old) by beekeyknee (Columbia, MO) | ||
|
| ||
| Post# 779030 , Reply# 45 8/24/2014 at 10:16 (3,532 days old) by beekeyknee (Columbia, MO) | ||
|
Do you have a PayPal account and can you open a pdf document? If you do and you can, go up to the top of the page. See the square with the picture in it to the right of "Dirty Laundry and the left of the User Name and Password fields? Click on it, click on the arrow to the right of the "Show All Publishers", scroll down to KitchenAid, click on it, scroll down to "Service Manuals and Parts Lists". Click on the KitchenAid KD-18 Series Dishwasher Service Manual, pay for the manual through PayPal, make a file for the manual to go into, download the manual after you've payed for it and save it in the file folder you made. You'll have 24 hours to download and save the manual. Then you'll have something to work with. People will still be able to answer your questions but you'll have a guide for now and in the future. Make a back-up on a portable drive or a USB stick in case your computer crashes. Then you'll always have it.
This post was last edited 08/24/2014 at 10:38 | ||
|
Post# 779033 , Reply# 47 8/24/2014 at 10:23 (3,532 days old) by kakidd (Texas) |
||
|
On a Laptop Don't have a paypal acct but can get one and can open a PDF | ||
| Post# 779036 , Reply# 48 8/24/2014 at 10:41 (3,532 days old) by beekeyknee (Columbia, MO) | ||
|
| ||
|
Post# 779042 , Reply# 49 8/24/2014 at 10:57 (3,532 days old) by kakidd (Texas) |
||
|
Thank You I do have the user manual, service manual and parts list, I will review and troubleshoot from there, Thanks again! | ||
| Post# 779072 , Reply# 50 8/24/2014 at 13:20 (3,532 days old) by beekeyknee (Columbia, MO) | ||
|
| ||
|
Post# 779080 , Reply# 51 8/24/2014 at 14:36 (3,532 days old) by kakidd (Texas) |
||
|
No apology necessary I appreciate the guidance! I will see if there is anything regarding the current issues I am having. Thanks Again! | ||
| Post# 779116 , Reply# 52 8/24/2014 at 17:11 (3,532 days old) by barcoboy (Canada) | ||
|
With regards to the dripping detergent dispenser shafts correcting themselves... they won't. Mine did exactly the same thing, and I think it is because at the beginning of the cycle they are dry, but once moistened and heated, they will expand a bit and stop dripping for the rest of the cycle, until they dry out again and shrink. Take the bit of time to change the o-rings and the dripping will be done for good. (Links above) The good news is that both doors are opening properly, which means the problem isn't electric.
As for the flooding problem, I'm hoping it's not but wondering if it might be a timer issue? The reason I wonder this is because there are two lengths of fills on the 18. If you take a look at the service manual at the chart on page 41, you'll see a column labelled "Low fill" and one labelled "High fill". Notice that the first two fills of the Normal cycle are low, and the 3rd fill is a high. The low fill is accomplished by sending power through a "Sub Interval Switch" which limits the fill to 60 seconds of the normal 90 second timer interval, starting at the 5 second mark and stopping at the 65 second mark of the interval. Notice that all of the drains also use this Sub Interval Switch to limit the drain period to 60 seconds. On page 34 of the service manual, you can see the Sub Interval Switch contact in the "Timer" block about two third of the way down, labelled "S.I.S.". The switch contact in the diagram below that controls whether the S.I.S. switch sends power to the fill valve or drain valve. But the switch below that one is what sends power to the fill valve during a high fill... I'm wondering if this contact is not opening after the 90 second fill and is continuing to allow water to flow through the next timer interval, until the float switch stops it? What you can do is run the machine through a Normal cycle, and as soon as the third fill starts, start timing the fill. After 90 seconds, the fill should stop as the timer advances to the next interval... if it does not, then the timer might need servicing/replacing. For the Sani Cycle, if you have a digital oven thermometer or some other kind, you can use it to measure the water temperature as it heats up. If it gets too far above 180F, then the Sani thermostat is stuck open and will need to be replaced if you want to use that cycle. When working, once the water comes up to temperature, you should hear a slight click, the Sani light will go out and the Rinse light will come back on, and the timer motor will restart to complete the 90 second interval, at which point the Sani heater will shut off and the motor restart. | ||
|
Post# 780090 , Reply# 53 8/29/2014 at 10:59 (3,527 days old) by kakidd (Texas) |
||
|
Hopefully Not timer Will test again this weekend. If it does appear to be a timer issue, I assume they are no longer available new??? How should I search for someone knowledgable to possibly service/repair it?? | ||
|
Post# 780110 , Reply# 54 8/29/2014 at 13:15 (3,527 days old) by chachp (North Little Rock, AR) |
||
|
TImer for your KDS-18 Check out this auction. I bet he has one. I have bought two timers from him and both times, very happy. I don't know the part number but I think you can write to him with your model number and he can tell you or someone else could post it for you.
Both timers were new in the box. One I put on my 15 and the other I have put away just in case. If you are planning to use this as your daily machine you might want to consider getting a timer when you can and have it for when you need it.
I hope he can help you. CLICK HERE TO GO TO chachp's LINK on eBay | ||
|
Post# 780229 , Reply# 55 8/30/2014 at 06:27 (3,526 days old) by kakidd (Texas) |
||
|
Thank You I will check it out! | ||
|
Post# 780380 , Reply# 56 8/31/2014 at 07:27 (3,525 days old) by kakidd (Texas) |
||
|
Part # Does anyone know the part # for the timer. I have the parts list but am not coming up with anything searching with the number listed but not sure if I am looking at the right number. The number I am searching is E115998 listed as Timer-Interval. Thanks | ||
|
Post# 780382 , Reply# 57 8/31/2014 at 08:24 (3,525 days old) by chachp (North Little Rock, AR) |
||
|
You can Email him... If you are looking at that auction I sent you, I think you can E-mail him with the model of your dishwasher and what you think the Part # is and I think he can confirm it's the right part.
I had him confirm the timer for my 15 before I actaully bought it. Someone may respond with the part but I don' thave any kind of cross-reference chart between the old numbers and the new ones. Repairclinic.com lists it as 4162399 and that's usually a pretty good source.
There are two on eBay right now and both over $100 this other guy is your best bet first if he has one. | ||
| Post# 780688 , Reply# 59 9/1/2014 at 14:35 (3,524 days old) by barcoboy (Canada) | ||
|
Here's another easy test to try to see if it is getting too much water. Run a Normal cycle with the sink hot water open half way as you did before, then after the third fill (the high fill), open the door and note how high the water level is in the tank. Close the door, then open your water valve all the way and let the dishwasher continue to the 4th fill, which is another high fill. Again after 90 seconds, open the door and see how high the water level is this time. If during this fill you hear the float switch stopping the water before the 90 seconds is completed, open the door immediately and verify that the high water level is causing the float switch to trigger. If this happens, you are getting too much water with your valve open all the way, and you'll need to find some way to restrict the water flow to prevent this from happening when the dishwasher gets permanently installed.
| ||
|
Post# 780694 , Reply# 60 9/1/2014 at 15:49 (3,524 days old) by DADoES (TX,�U.S. of A.) |
||
|
| ||
| Forum Index: | 
| Other Forums: |

|

|

|

|

|

 Comes to the Rescue!


;)
;)
;)
;)
;)
;)