Thread Number: 37669
New Find: Hoover Electra 540 Dual Spin - Australian F/L
[Down to Last]

automaticwasher.org's exclusive eBay Watch:
scroll >>> for more items --- [As an eBay Partner, eBay may compensate automaticwasher.org if you make a purchase using any link to eBay on this page]
Post# 560353   11/30/2011 at 08:24 (4,502 days old) by mattywashboy (Perth, Western Australia)        

mattywashboy's profile picture
Hi Guys

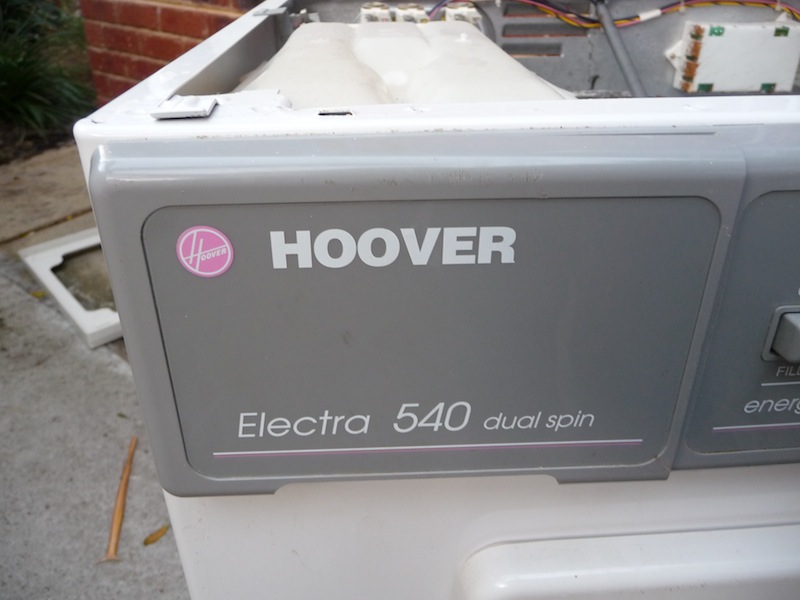
Well just before I was due to leave England for my flights back home this past Sunday, I was searching Perth Gumtree. I found a Hoover Electra 540 Dual Spin front loader made in Australia.

I have always wanted one of these machines so despite the seller not being sure of its condition, i went ahead and organised a pick up when I arrived back home.

Well today I went and grabbed it, despite slight jetlag lol
I never realized how heavy these machines are! Wow, thankgod one of my housemates was casually listening to his Ipod on the front porch and offered to help me, bet he wished he never had! Haha!

Well upon getting the machine to the front of my house I plugged it in and ran a dry tumble/drain/spin to see what I was facing. First thing that I found (and possibly the rest of West Australia) was that the bearings are shot, this thing growls like a starving bear...

Also someone has been very heavy handed with the buttons and when I went to turn the machine off, the entire row of buttons went inside the machine. I remedied this by taking the lid off and clipping the row of buttons back into its spot. Next was the Power button would not stay in, so once again went inside (power unplugged) and secured the spring behind it so it would pop in and out as it should.

Next issue, it leaks. Taking the back off and pouring some water into the drum and watching, I found it to be dripping from the back bottom of the outer tub which appears to be starting to rust and corrode.

So I have a task ahead of me. Since parts appear to be available for this machine from online stores and my local appliance parts dealer, I think I will do my best to refurb this machine with new belts, bearings and door rubber.

Here come some pictures. My question is there anyway to solve the leaking without replacing the outer tub, just in case I cannot source one?

Anyway, heres the pics :-)

Matt


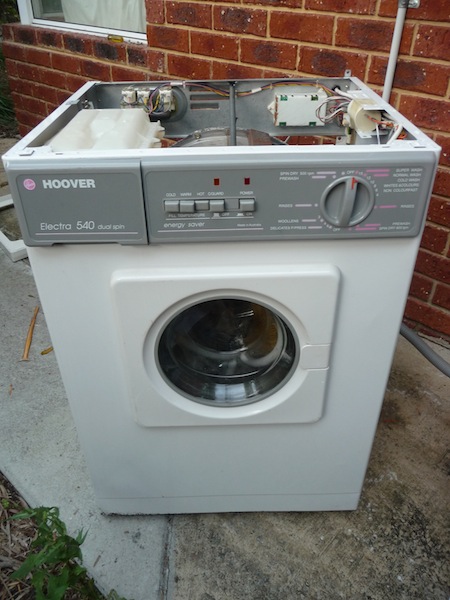
Post# 560356 , Reply# 1   11/30/2011 at 08:32 (4,502 days old) by mattywashboy (Perth, Western Australia)        

mattywashboy's profile picture
Soap Drawer frontage. These machines were unique inside the drawer. Instead of having a Prewash and Main Wash side, you have a side for Cold water washes only on the left and then Hot and Warm washes on the right. Fabric Conditioner dispenser is in the center as on all Hoover automatics that offered one.


Post# 560357 , Reply# 2   11/30/2011 at 08:34 (4,502 days old) by HotpointFan (United Kingdom)        
mattywashboy

hotpointfan's profile picture
Congratulations!

May I ask what are the programmes and can we please see some videos(when fixed)?

Thanks

Jacob


Post# 560358 , Reply# 3   11/30/2011 at 08:37 (4,502 days old) by mattywashboy (Perth, Western Australia)        

mattywashboy's profile picture
Control Buttons

Hot, Warm, Cold. Nice and basic. In later more 'deluxe' models, there was a button in the space between the C/Guard and Power buttons that activated a Heater. This turned on during the wash phases and would heat during the wash time. So if you ran a Cold 15 minute Super Wash you could end up at the end with it reaching 40-50 degrees maybe? If you selected Hot you could almost end up with 90, so i'm told.

The Crease Guard button from memory stopped all action at any point in the washing and rinsing cycles. Just to prevent creasing if you were leaving the machine for a period of time you could hit this button and then recommence whenever you returned home. This is what I remember from a friends machine but not certain, Ronhic you could have a better idea?


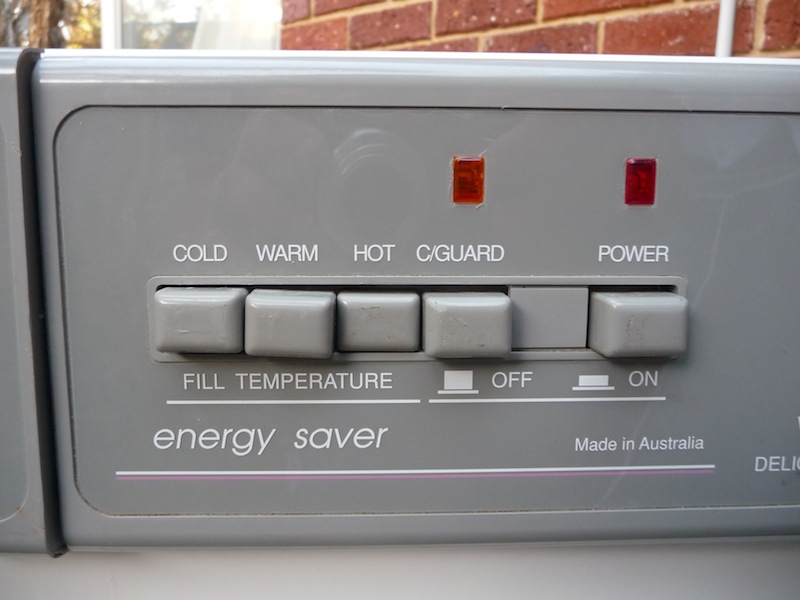
Post# 560360 , Reply# 4   11/30/2011 at 08:44 (4,502 days old) by mattywashboy (Perth, Western Australia)        

mattywashboy's profile picture
Wash programme dial.

Almost identical to the top loaders of the time.

The numbers indicated the number of minutes wash time. The Prewash section is the final rinse. People could use this cycle with a small amount of soap as a Prewash with a final spin then reset with more soap to a wash. Same on the top loaders only on that dial it was labeled as Prewash/Rinse as this was the deep rinse cycle after the top loaders spray rinses.

The Dual Spin is basically the offering of two seperate spin speeds of 800 for cottons/normal cycles and 500 for Gentle cycles. I like the way they labeled this.

Basically this machine is so easy to operate, you select your temperature and then you can select the wash by the fabric/colour or the number of minutes you want to wash for. I remember my friend always using the 4 minute Non Colourfast wash on Cold water as "this is all my clothes and towels and sheets need". Cringeworthy lol


Post# 560361 , Reply# 5   11/30/2011 at 08:45 (4,502 days old) by mattywashboy (Perth, Western Australia)        

mattywashboy's profile picture
The drum

4kg capacity from memory


Post# 560362 , Reply# 6   11/30/2011 at 08:46 (4,502 days old) by mattywashboy (Perth, Western Australia)        

mattywashboy's profile picture
Inside from the top

Post# 560363 , Reply# 7   11/30/2011 at 08:49 (4,502 days old) by mattywashboy (Perth, Western Australia)        

mattywashboy's profile picture
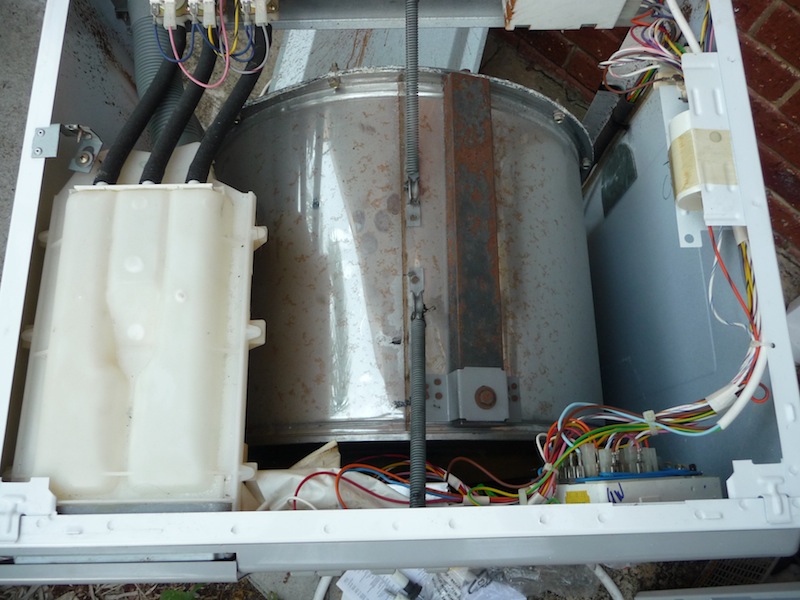
Inside from the back

You can see the corrosion starting to appear on the outer drum.

The leak is coming from one of the nuts on the bottom of the drum, quite a steady drip, glad I tried it outside or I would have been mopping my floors for the second time today lol.

Any advice and or help is welcomed and appreciated. I'm still a novice at the mechanics of washers and repairing one is a little daunting.


Post# 560402 , Reply# 8   11/30/2011 at 13:22 (4,502 days old) by matchboxpaul (U.K)        

Hi Matty.

Glad that you had a good time over here, at your various visiting points and just sorry that I wasnt able to show my face more whilst you were here.

Anyways - lovely find and visually looks in good nick too!

Would I be right in thinking that these machines were the final 'Zodiac' based machine?
Hopefully you should be able to get it sorted.

Seeing that it appears to have a stainless steel outer tub, rust shouldnt be a problem.
Whip off that backplate and give it a clean, to see what you find.

Paul


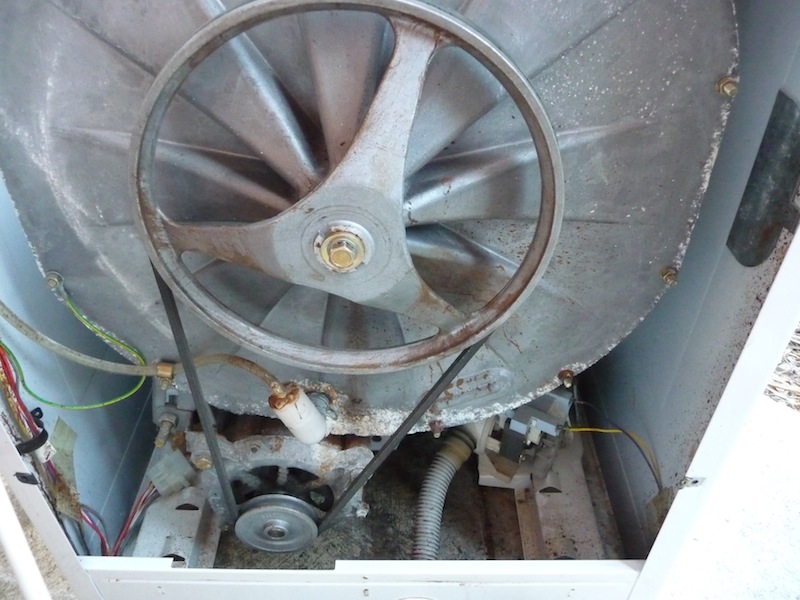
Post# 560424 , Reply# 9   11/30/2011 at 15:00 (4,502 days old) by ronhic (Canberra, Australia)        
Matty

ronhic's profile picture

Ok, first things first...


- These machines have a stainless outer drum - the leak shouldn't be because of rust on the drum....

- That machine would have been made somewhere around 1992/3 - so she's nearly 20 years old


Now, to the programmer Batman....


- All Hoover front loaders made in Australia (to the best of my knowledge) could be had with a heater. It's designated by the last digit in the model number. 540 is without, but a 545 is with.

- On a heater model, you can engage the heater on any cycle and it will bring the temperature up to 40c on Warm and 60c on Hot. What you end up with is determined by which temperature button you select on Electra machines, not which programme. So if you select a 10 "cold wash' but have the warm button engaged, you'll get a hot/cold incoming water mix. Have the heater engaged (if there) and it'll heat as appropriate.

- A lack of an integrated pre-wash programme meant that there was no need to have hot/cold running to both drawer compartments and, when you think about it, the drawer is set up to cater for how the majority of Australians wash - in cold water.


Paul,


These are the final machines that used the Zodiac base or UK machines of a similar overall design - they are smaller than current machines (58cm wide) and they are completely different from a programme, motor point of view. These motors were new in the Electra series and extremely strong....plus they were able to do proper distributions.


Overall, they were simple where they needed to be - timer/programmes and appearance, but more advanced than some others with an up to date motor. I'm not sure if this model or the one after (which I had) went from 5 rinses to 3.


Get her going Matty or find another, preferably a 550, you won't be disappointed and they're still a good machine to use as a daily driver.


Post# 560568 , Reply# 10   12/1/2011 at 07:47 (4,501 days old) by Gizmo (Victoria, Australia)        

Hi Matty

The leaking is NOT caused by corrosion. It is a leaking rubber seal between the backing plate (alloy) and the stainless steel outer drum. The seal is sandwiched between the two components, held tight by the bolts all round the edge. Bolts may not be tight enough, or seal falling to bits.

The white stuff round the edge is detergent residue from the leaking.

There is likely to be leaking from the rubber hose that goes from the detergent drawer to the outer drum, too. This hose connects to the drum without clamps, it pushes into a hole in the side of the drum, with an inside lip and an outside lip. It gets glued into place, over time the glue dries out and loses its grip, leading to leaks. Perfectly normal on these old Hoovers.

If there is evidence of leaking from this drawer-to-drum hose, pull it out from the drum and clean off all dirt, glue residue and detergent residue. When it is all CLEAN, you can re-glue with contact adhesive. Leave to dry 48 hours before use.

To replace the bearings-

DISCONNECT FROM POWER AND WATER.

(sorry to state the obvious.)

1. Slip the belt off - turn the big pulley whilst pulling the belt towards you, so that the belt runs off the groove in the pulley and falls away. No need to remove the motor.

2. Disconnect the pressure switch tube - the clear plastic tube behind the belt in the photo - from the drum.

3. undo the earth wire from the tub - it's the green wire with yellow stripe you can see in the photo. DON'T FORGET TO RE-ATTACH THIS WIRE AT THE END OF THE PROCEEDINGS.

4. Undo all the other bolts around the edge of the drum, they hold the backing plate to the drum.

5. Yank on the pulley to get the backing plate to separate from the drum. You might need to pry them apart with a heavy screwdriver. Once they start to come apart it should happen easily, getting it started is the hard bit.

6. it takes a bit of manoevring to get the backing plate and inner drum assembly out of the machine. It does come out. You need to push the outer drum down to get the backing plate out under the top panel.

7. Once you have the backing plate and drum out together, first job is to see what condition the rubber seal is in. Usually they are OK but need cleaning up. Also the edges of the drum and backing plate will need to be cleaned up, where the seal touches them.

8. Place the drum on the ground (lawn is good, or on an old blanket on the floor) with the drum opening downwards. Look carefully at the bolt head in the centre of the pulley - it might have a locking washer to stop it coming un-done. You need to pry the folded part of the locking washer away from the bolt head before you can undo the bolt. (doesn't look like it in your photo but they normally do).
Then undo the bolt. Put the bolt aside, then lift off the pulley (will need a bit of a wriggle), then (important!) put the bolt back and screw it almost fully in.

9. The backing plate is wider than the inner drum, so a bit of it sticks out all the way round. You can support the backing plate in a saw horse each side of the drum, or otherwise improvise a method of holding the backing plate horizontal, with the drum up off the ground. The aim is to use a hard rubber mallet to whack on the bolt head, which will force the drum shaft down through the bearings and drop free. The bearings have been around this shaft for a few years, so it might need quite a few whacks. If you haven't got a rubber mallet, then place a piece of wood over the bolt head, and whack the wood with a hammer. DON'T hit the bolt head directly with the hammer, the head will get wrecked.

Don't stand with your feet under the drum, or when it drops it will land on your toes.

10. Now you have the drum out, you need to see what type of seal is used. You will have the stainless steel inner drum, with a three-legged alloy "spider" attaching it to the steel shaft. -SEALTYPE A: Some use a spring-loaded carbon face seal which presses into the inner hole of the backing plate. These bulge outwards, and you can press them in and out easily, the rubber bulges out and flexes to allow the shiny inner face, made of hard carbon, to move in and out a bit. Inside the rubber seal you should, along with rusty muck, see a spring, or remnants of a spring. Where the spider meets the steel shaft, there is a matching ceramic counterface - a ring around the shaft which mates to the seal on the backing plate.

OR you have TYPE B: The later, cheaper type of seal - just a standard oilseal, in this case used as a water seal. This is a flat disc of rubber with a hole in the middle the size of the shaft. The seal mounts in the inner hole of the backing plate (same as before) but is simple and flat, not spring loaded. It seals directly around the shaft, there is no ceramic counterface. [actually they aren't just a disc of rubber, they are a steel disc with a rubber coating and rubber inner seal lip, but they look like a black rubber disc with a hole in the centre.]

I like the early type better, these usually clean up OK to be reused.
The simple oilseal type always must be replaced.

11. To remove the bearings - they are still in the backing plate. Place the backing plate down on the ground, resting on two planks of wood with a gap between. Backing plate with the outer face upwards. (sort of volcano shape)
The top of the volcano is the outer bearing. Place a LONG and HEAVY bolt (eg a half inch by ten inch bolt) down through the centre of the top bearing. Place it on an angle so that it passes through the top bearing but is up against the back of the lower bearing. Now you bash on the top of the bolt with a hammer, to press down on the lower bearing and drive it out of the tube. After a few whacks, move the bolt to press down on a different part of the bearing and give a few more whacks. You need to keep changing where you are pressing on the bearing, so it moves down evenly. If you only press down on one side, the bearing will tilt over and grip the tube, becoming harder to get out.
Keep whacking your way around the lower bearing, till it is forced down and out. Don't just tap at it, really belt it or it won't move. But hammer it slowly and carefully, if you rain blows on it madly you won't be able to stop when the bearing suddenly gives way, and you'll bust something - maybe the machine, maybe your hand.

Forcing out the bearing will also drive out the seal.

Once the inner bearing and seal are removed, turn the backing plate over and knock out the outer bearing the same way. It is usually easier.

12. Collect the two bearings, and the seal if it is the simple oil seal type. Take them to a bearing supplier - look up Bearings in the yellow pages, SKF are the best quality brand. These will be MUCH cheaper than getting them from a washing machine spare parts shop, and probably better quality.

There are three types of ball bearing - open (you can see the steel balls inside); shielded (steel round face on each side, keeps dust out but isn't a seal); and sealed (black or red rubber seal each side. The originals are often shielded, but you should use sealed for longer life.

The bearing supplier will find some ID number on the bearings, or they will measure them and give you a match. They will probably also have the seal if it is the basic oil seal type. The better seal, the spring loaded carbon seal and counterface, is a special washing machine part and you will have to get the real thing. (or reuse the original if it survived.)

13. Clean out the bearing mount tube in the centre of the backing plate. It will probably have muck in it. Also the seal seating area, and clean up the spider and, if it has one, the counterface. Closely inspect the spider for cracks and corrosion. White powder is detergent residue and should clean off. If the spider arms are badly pitted, have holes eaten in them or are cracked, you need a new spider, or a good drum/spider assembly. Fitting a new spider is a mongrel job, as they rivet to the drum, the rivets need to be drilled out, and the rivets are stronger than any drill known to mankind. AVOID.

14. When fitting the new bearings, be GENTLE. You can bash out old bearings because they won't be re-used. But new bearings must be treated with care or you will be replacing them again soon. They are a tight fit to get back into the backing plate, the trick is to use a socket (spanner socket) of the same diameter as the OUTER of each bearing. You can then tap on the socket with the hammer, and it will press strictly on the outer steel edge of the bearing. The socket must be the right diameter so that it doesn't press on the rubber seal of each bearing, or the seal will be destroyed.
Once the bearings are in, you can fit the main seal to the inner of the backing plate.

15. From here, just "put it all back together."

16. When putting the drum and backing plate back to the outer drum, don't forget the drum seal. If the seal is in doubtful condition, you can use silicone sealant too.

17. If on reassembly you find an annoying leak weeing at the back, you have probably forgotten to refit the clear plastic pressure switch hose.

18. Don't forget to refit the green wire with the yellow stripe, it is the earth wire for the drum - protects you if there is an electrical fault in the motor.

Good luck.


Post# 560689 , Reply# 11   12/1/2011 at 17:55 (4,501 days old) by paulc (Edinburgh, Scotland)        
Matt

paulc's profile picture
congratulations on the "new" machine. I love the simple programme dial. I used to work with and Australian girl who grew up with a Hoover machine but was a bit baffled by the UK Hoover machine she had in a rental flat here, I had to explain what the cycles did and she did ask where the Hot, Warm and Cold buttons were. Hopefully you will get this machine up and running.

Post# 560877 , Reply# 12   12/2/2011 at 20:32 (4,500 days old) by mattywashboy (Perth, Western Australia)        

mattywashboy's profile picture
Thanks Guys for the advice, big thanks to Gizmo for the detailed step by step instructions, going to print that out and have it hear me when i start to tackle this thing :-)

At the moment my gardens are a priority otherwise my landlord will get angry, i hate gardening lol

Thanks again guys :-)


Post# 715982 , Reply# 13   11/18/2013 at 00:36 (3,784 days old) by tdog ()        
Hoover Electra 540 repairs

Hi MAtty
I also have a Hoover Electra 540 for 10 years - lovely little washer, easy to use and work on. I've replaced various bits on it over the years, all still available. Thanks for the pictures - mine also has the tell tale white detergent residue around the bottom of the tub and does have a small mysterious leak at times.

Did you manage to replace the drum bearings and seal on yours?

One thing that seems to be missing from mine is the nut on the bolt that sets the position of the motor and hence the tension on the belt, (bottom left in your last picture). Consequently the motor is resting all it's weight on the belt, (which still looks fine) and I imagine this would put a bit of stress on the motor bearings over time. Any thoughts on whether this matters? What I really want to know is how much tension should be on the belt?

Anyway I am going to check the tightness of the bolts around the rim of the drum and hope that is enough to stop the leak without replacing the drum seal.

Cheers

Peter


Post# 715988 , Reply# 14   11/18/2013 at 02:31 (3,784 days old) by ronhic (Canberra, Australia)        

ronhic's profile picture
Welcome Peter.

Post# 727512 , Reply# 15   1/13/2014 at 17:30 (3,727 days old) by ishel (Perth)        

Heh heh, this thread seems to still attract attention occasionally even after a couple of years. I came across it (and this amazing forum!) simply by searching for Hoover Electra 540.

We own one of these machines, which we purchased new in 1994. Until I came across this thread, I had been thinking that it was time to ditch it for a new machine, mainly because the buttons are falling off (heh heh!) and also it is leaking a ton of water from somewhere on every use.

Having said that, it still does the job just fine, and if I can stop the leaking (and maybe secure the buttons) I may well just keep it going. It is simple and easy to use, unlike the modern ones which look like you need a pilot's licence even to plug them in!

One thing others may be interested in: I have the owner's manual which came with the machine, and I plan to scan it and post a link to it here forum. Maybe this is already available online someplace, but I thought I could at least contribute that.

I wonder how Matty went with restoring your machine? I saw that Gizmo had posted some detailed instructions on the thread, and I plan to follow these to see if I can work on my machine now (though I am as far from a washing machine mechanic as you can imagine!) Thanks, Gizmo!!

I wonder if there is any place in Perth that scraps old machines like these so that we can maybe pick up parts? Hmmmm... I wonder if Hoover still carries parts for these, might give them a call.

Well, great to find something like this! Cheers! Ian @ Perth, Australia


Post# 727792 , Reply# 16   1/15/2014 at 05:50 (3,725 days old) by ronhic (Canberra, Australia)        
Hello Ian

ronhic's profile picture
...and welcome!

Given the age of the machine there are several things that could be causing the water leakage:

- You may have a split door boot. This need not be a large split to let lots out either.

- one of the inlet hoses to the detergent drawer could be split

- the sump hose between the bottom of the machine and pump could have a split

- the pump may be leaking.

- the drum may be leaking

- the rear seal may be leaking

With the top off the machine, it's easier to check the door seal as it'll let light in through a split. If this doesn't appear to be the issue, whilst the top is off, you could run the machine through a warm fill so both water inlets (wash side) are used. Check the hoses going to the drawer.

Stop the machine and unplug....

Check to see if there is any water leaking onto the floor at this point. See if you can trace it back.

Turn the power back on and have it pump out/spin.

Finally, move the timer to the 'prewash' setting and let it fill again. This will engage the last solenoid and the final inlet into the detergent drawer.


Once you can track it back, others will be able to assist with sorting it, however, there's a link to a chap in Brisbane who's overhauled an earlier Hoover machine here in Oz.


CLICK HERE TO GO TO ronhic's LINK


Forum Index:       Other Forums:                      


Comes to the Rescue!

The Discuss-o-Mat has stopped, buzzer is sounding!!!
If you would like to reply to this thread please log-in...

Discuss-O-MAT Log-In


New Members
Click Here To Sign Up.


automaticwasher.org home
Discuss-o-Mat Forums
Vintage Brochures, Service and Owners Manuals
Fun Vintage Washer Ephemera
See It Wash!
Video Downloads
Audio Downloads
Picture of the Day
Patent of the Day
Photos of our Collections
The Old Aberdeen Farm
Vintage Service Manuals
Vintage washer/dryer/dishwasher to sell?
Technical/service questions?
Looking for Parts?
Website related questions?
Digital Millennium Copyright Act Policy
Our Privacy Policy