|
Thread Number: 38714
Rebuild of Maytag Transmission and Transplant into LAT 9800 AAW. |
[Down to Last] |
| Post# 574194 2/8/2012 at 04:42 (4,552 days old) by beekeyknee (Columbia, MO) | ||
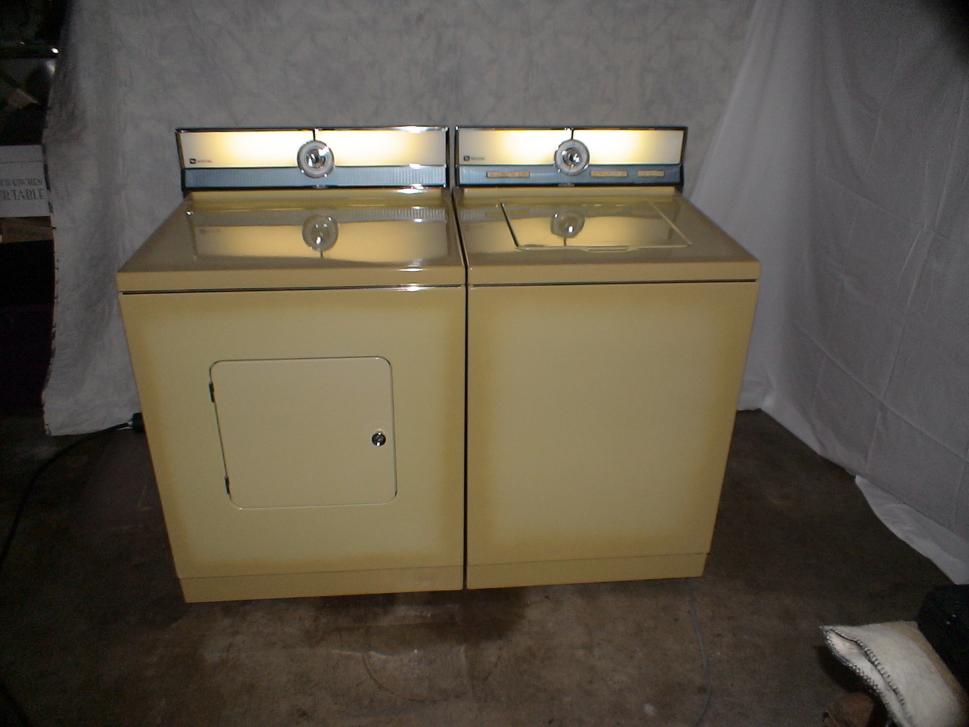
To the best of my recollection this is my step by step rebuild, with photos, from last summer of a Maytag Newton style trans. put into a newer LAT model. I hope this is helpful to someone.
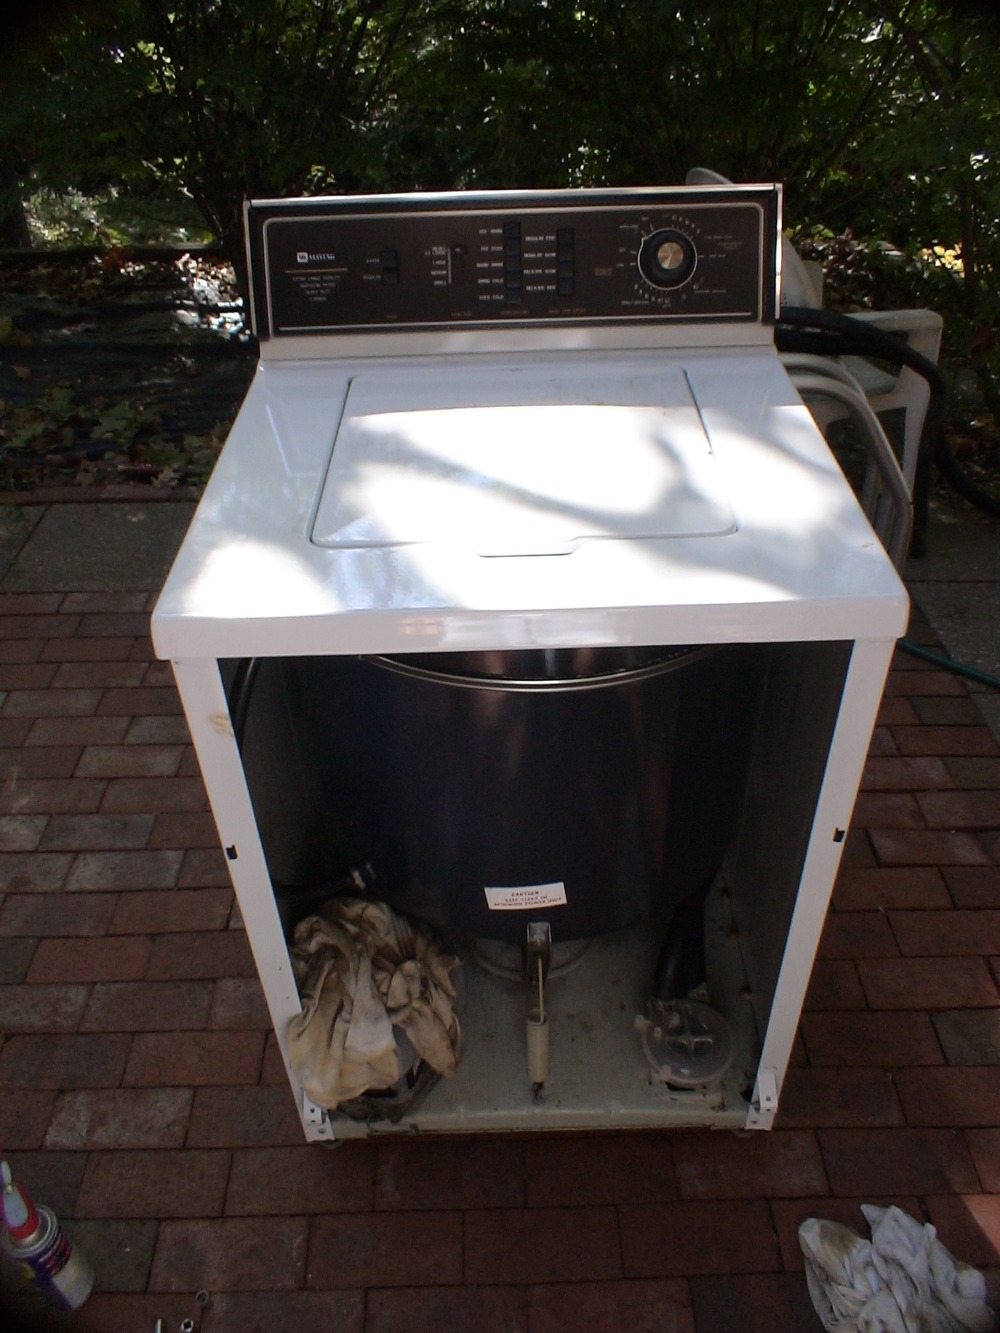
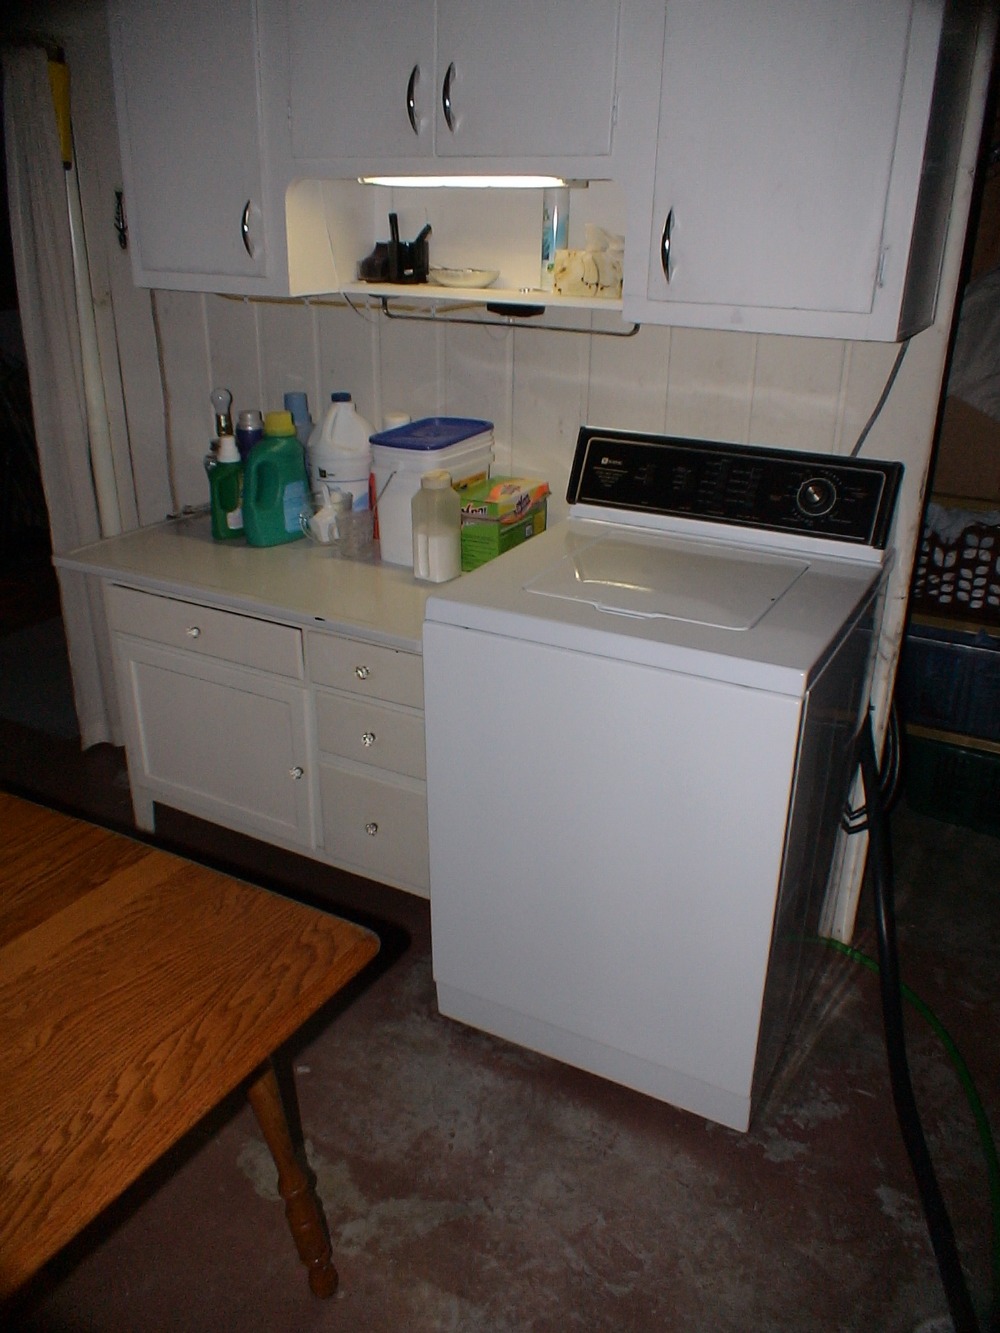
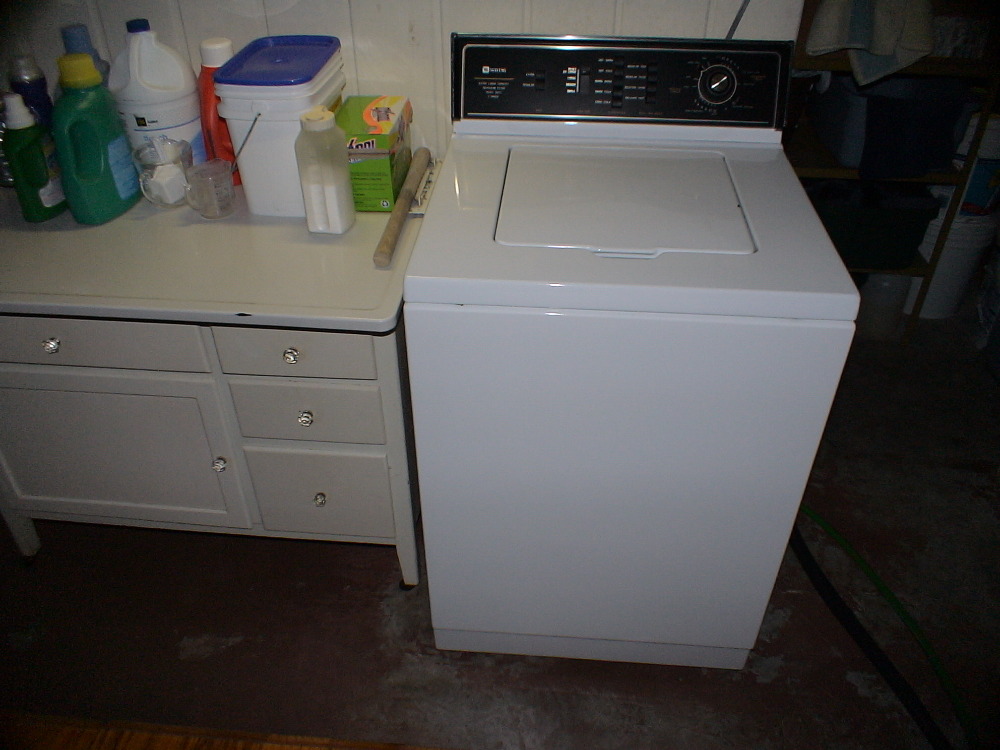
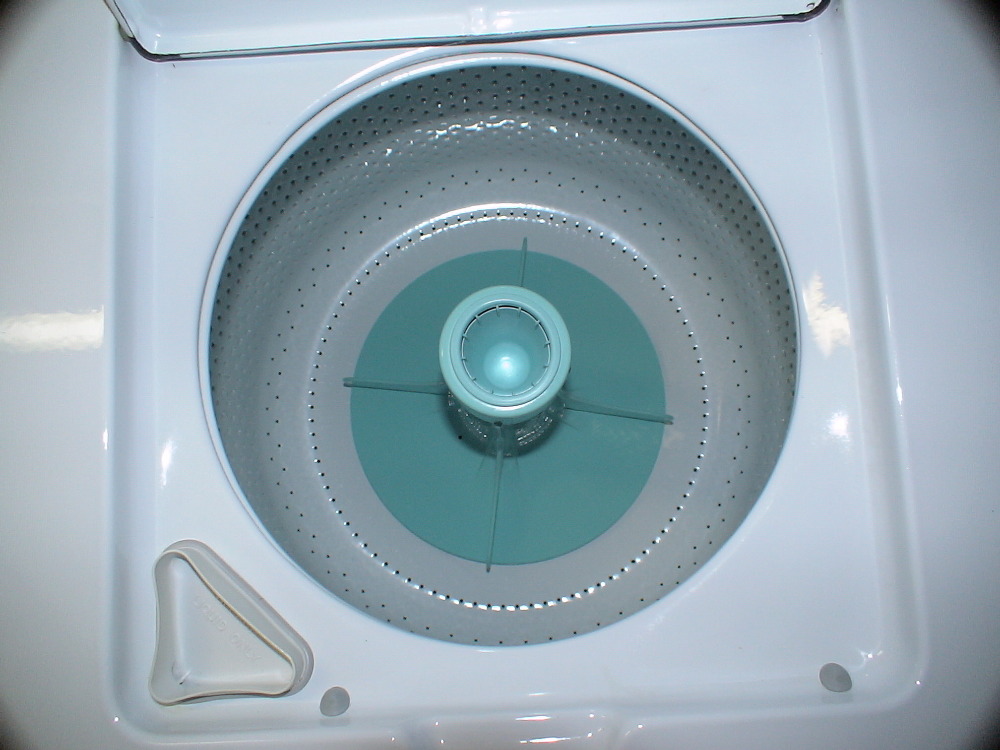
Here�s the HA408 machine�s top. Almost hated to take it apart. It was salvageable. It came with a HDE606. Second down from TOL (excluding 906 of course). Good shape too. 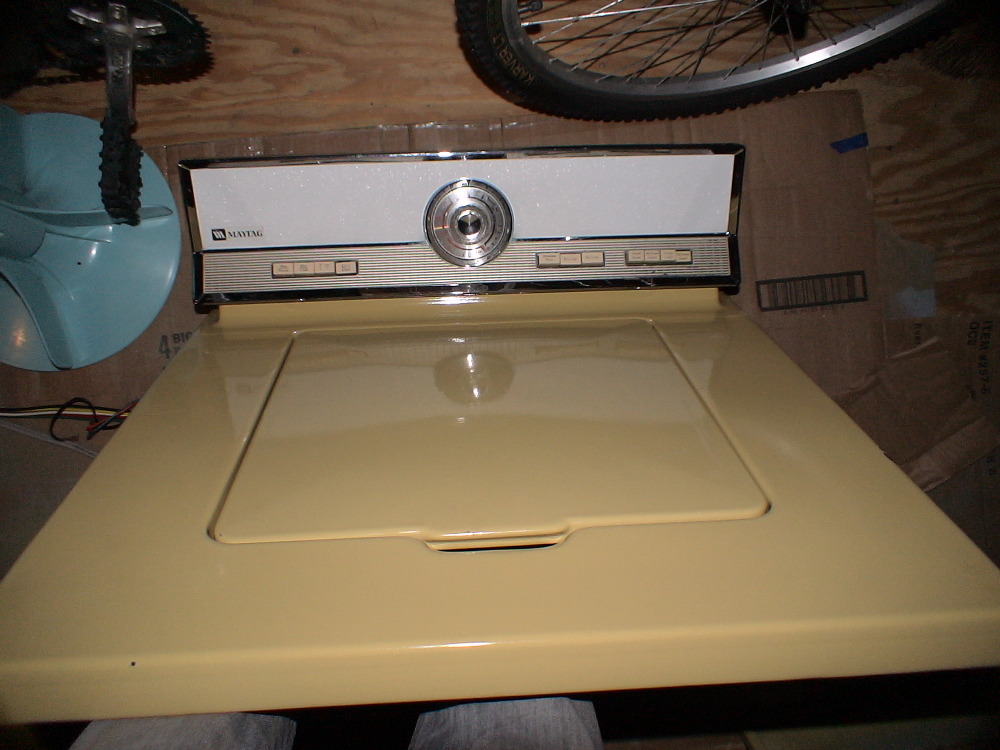
| ||

|
| Post# 574195 , Reply# 1 2/8/2012 at 04:44 (4,552 days old) by beekeyknee (Columbia, MO) | ||
|
| ||
| Post# 574196 , Reply# 2 2/8/2012 at 04:46 (4,552 days old) by beekeyknee (Columbia, MO) | ||
|
| ||
| Post# 574197 , Reply# 3 2/8/2012 at 04:47 (4,552 days old) by beekeyknee (Columbia, MO) | ||
|
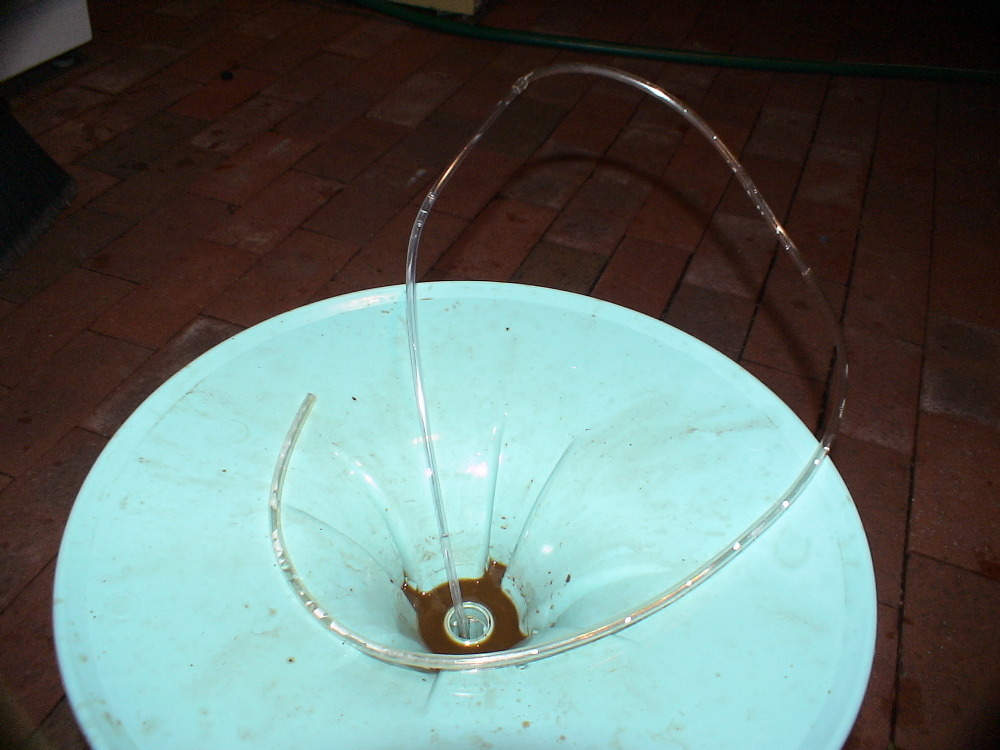
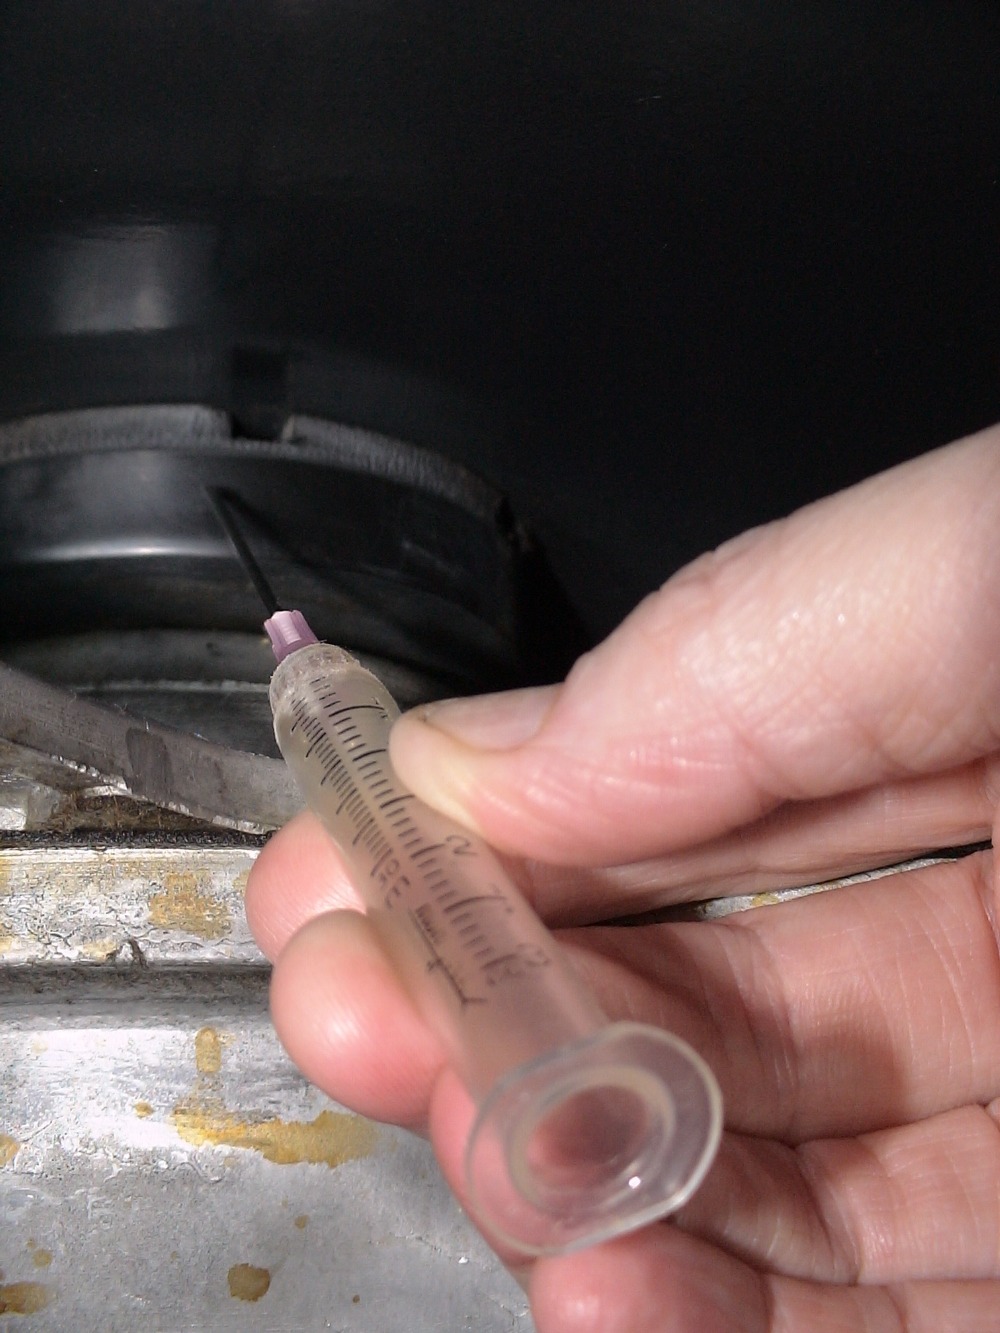
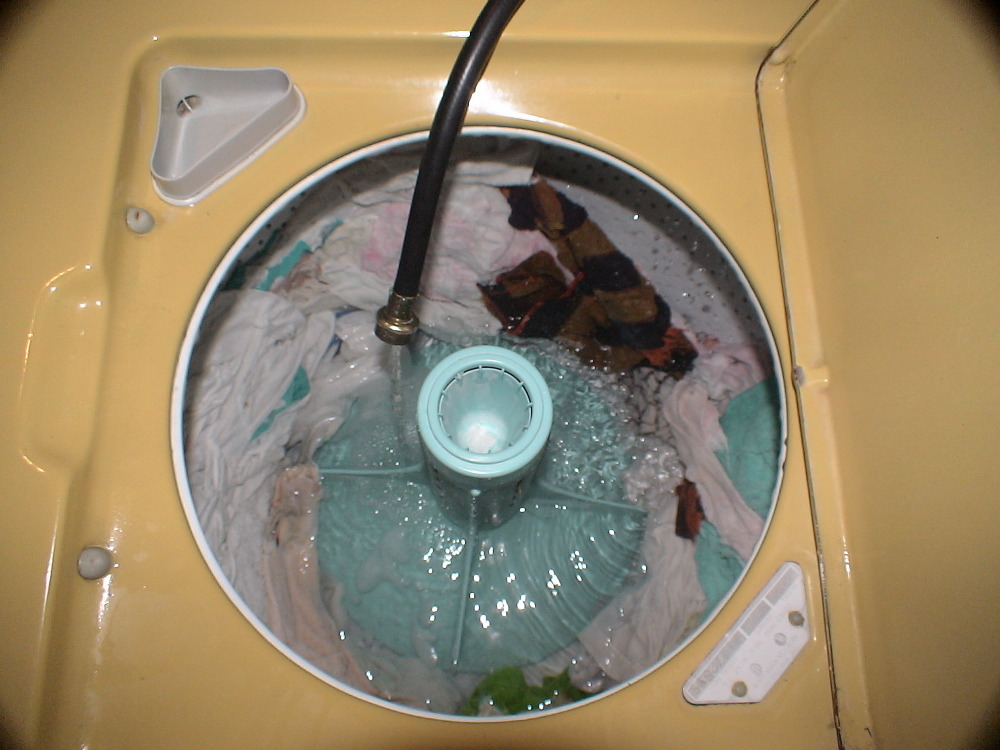
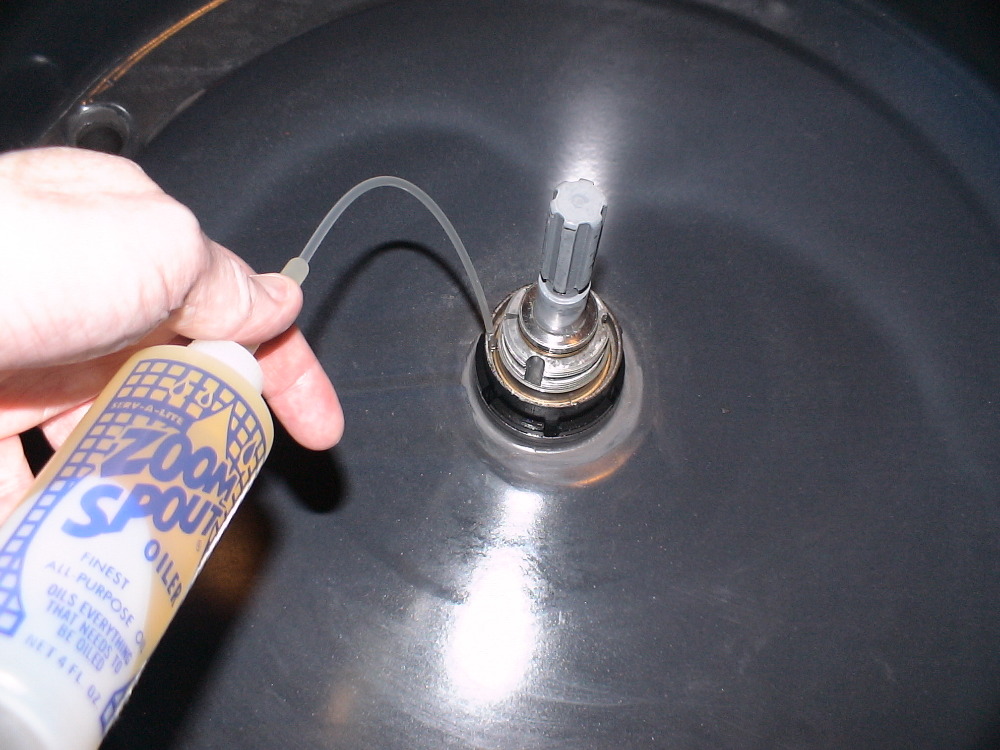
Put a piece of semi-rigid aquarium tubing with soft tubing on the end under the agitator to get at the air bubble underneath the agitator and sucked the air bubble out. Put the machine into agitate for several minutes and then let it set for several more. Reached in with rubber gloves, rocked, pulled and the agitator came off pretty easily. Better than stuffing it with rags and pouring on boiling water, I think.
| ||
| Post# 574198 , Reply# 4 2/8/2012 at 04:49 (4,552 days old) by beekeyknee (Columbia, MO) | ||
|
| ||
| Post# 574199 , Reply# 5 2/8/2012 at 04:51 (4,552 days old) by beekeyknee (Columbia, MO) | ||
|
| ||
| Post# 574200 , Reply# 6 2/8/2012 at 04:52 (4,552 days old) by beekeyknee (Columbia, MO) | ||
|
| ||
| Post# 574201 , Reply# 7 2/8/2012 at 04:54 (4,552 days old) by beekeyknee (Columbia, MO) | ||
|
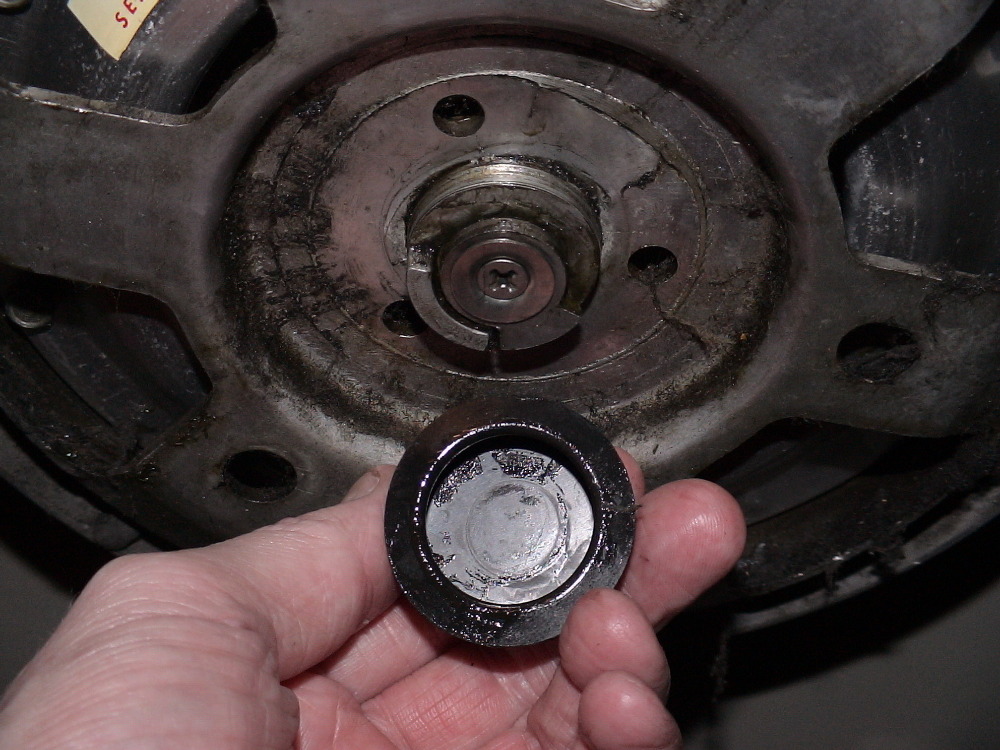
Mounting stem cover removed. Shouldn't have taken out the clip and washer and dug out the agitator drive shaft seal before lifting out the old mounting stem. I think the old ADS seal could possibly be reused underneath the new style mounting stem if you didn't have a NOS drive shaft seal. It seems as if the extra seal just provides a little push under the new style stem mount for an extra guard against leaks. It might be able to be reused in a pinch if it were cleaned and re-greased. I would be willing to try it if I didn't have a new one. Anyway, I'm saving the old seals in the future.
| ||
| Post# 574202 , Reply# 8 2/8/2012 at 04:56 (4,552 days old) by beekeyknee (Columbia, MO) | ||
|
| ||
| Post# 574203 , Reply# 9 2/8/2012 at 04:57 (4,552 days old) by beekeyknee (Columbia, MO) | ||
|
| ||
| Post# 574204 , Reply# 10 2/8/2012 at 04:59 (4,552 days old) by beekeyknee (Columbia, MO) | ||
|
| ||
| Post# 574205 , Reply# 11 2/8/2012 at 05:00 (4,552 days old) by beekeyknee (Columbia, MO) | ||
|
| ||
| Post# 574206 , Reply# 12 2/8/2012 at 05:05 (4,552 days old) by beekeyknee (Columbia, MO) | ||
|
| ||
| Post# 574207 , Reply# 13 2/8/2012 at 05:06 (4,552 days old) by beekeyknee (Columbia, MO) | ||
|
| ||
| Post# 574208 , Reply# 14 2/8/2012 at 05:08 (4,552 days old) by beekeyknee (Columbia, MO) | ||
|
| ||
| Post# 574209 , Reply# 15 2/8/2012 at 05:09 (4,552 days old) by beekeyknee (Columbia, MO) | ||
|
| ||
| Post# 574210 , Reply# 16 2/8/2012 at 05:10 (4,552 days old) by beekeyknee (Columbia, MO) | ||
|
| ||
| Post# 574211 , Reply# 17 2/8/2012 at 05:11 (4,552 days old) by beekeyknee (Columbia, MO) | ||
|
| ||
| Post# 574212 , Reply# 18 2/8/2012 at 05:13 (4,552 days old) by beekeyknee (Columbia, MO) | ||
|
| ||
| Post# 574213 , Reply# 19 2/8/2012 at 05:14 (4,552 days old) by beekeyknee (Columbia, MO) | ||
|
| ||
| Post# 574215 , Reply# 20 2/8/2012 at 05:16 (4,552 days old) by beekeyknee (Columbia, MO) | ||
|
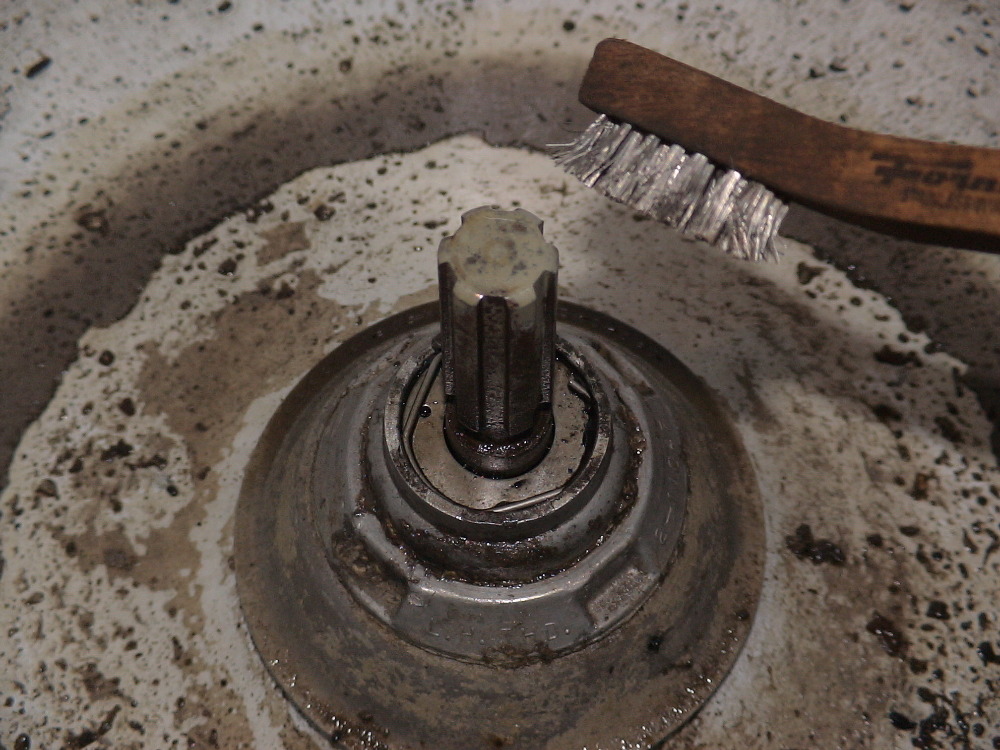
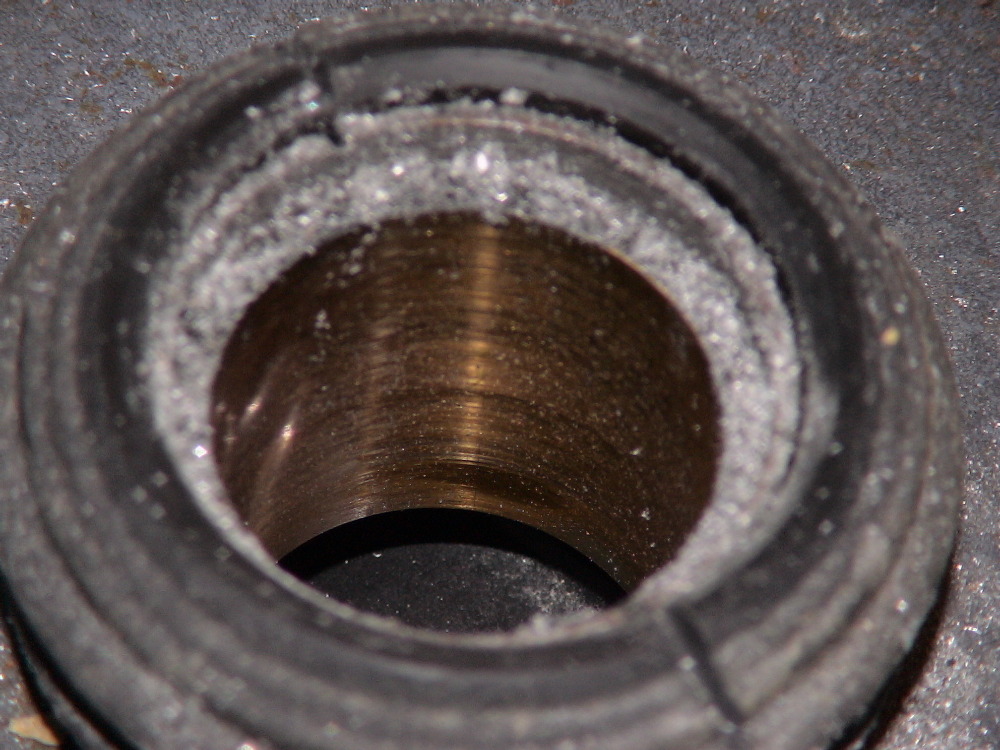
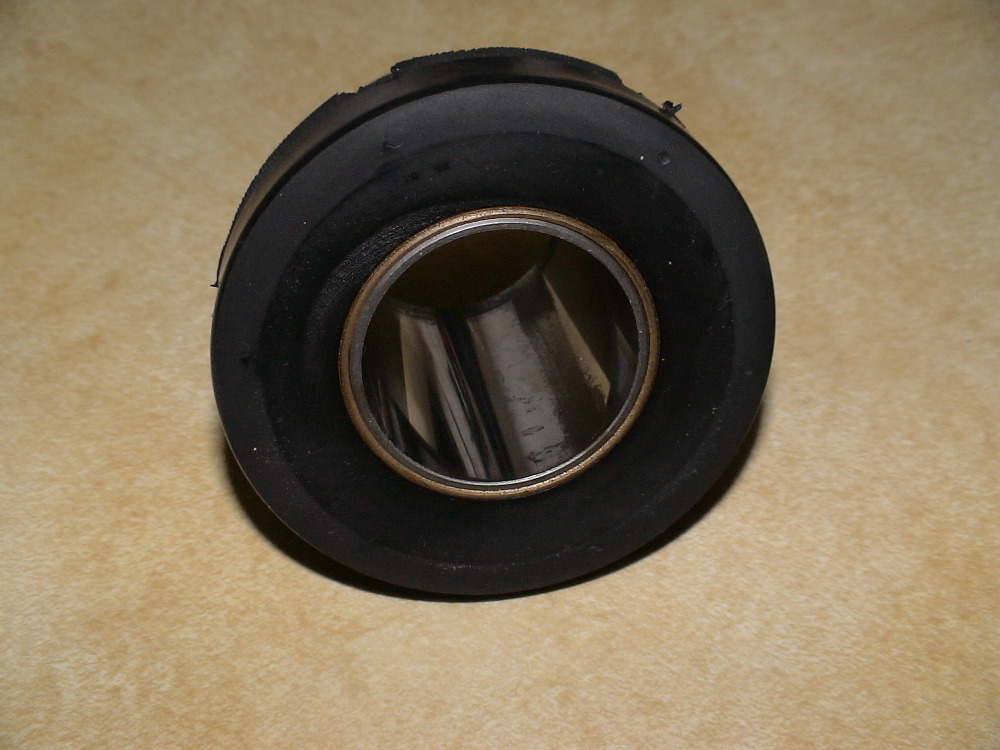
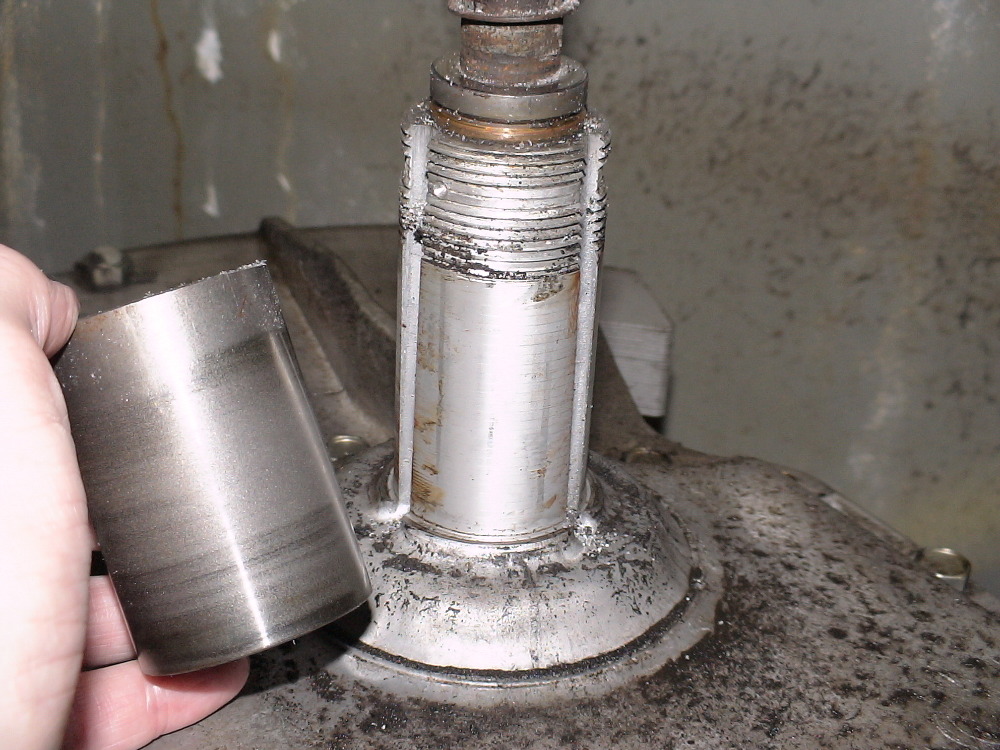
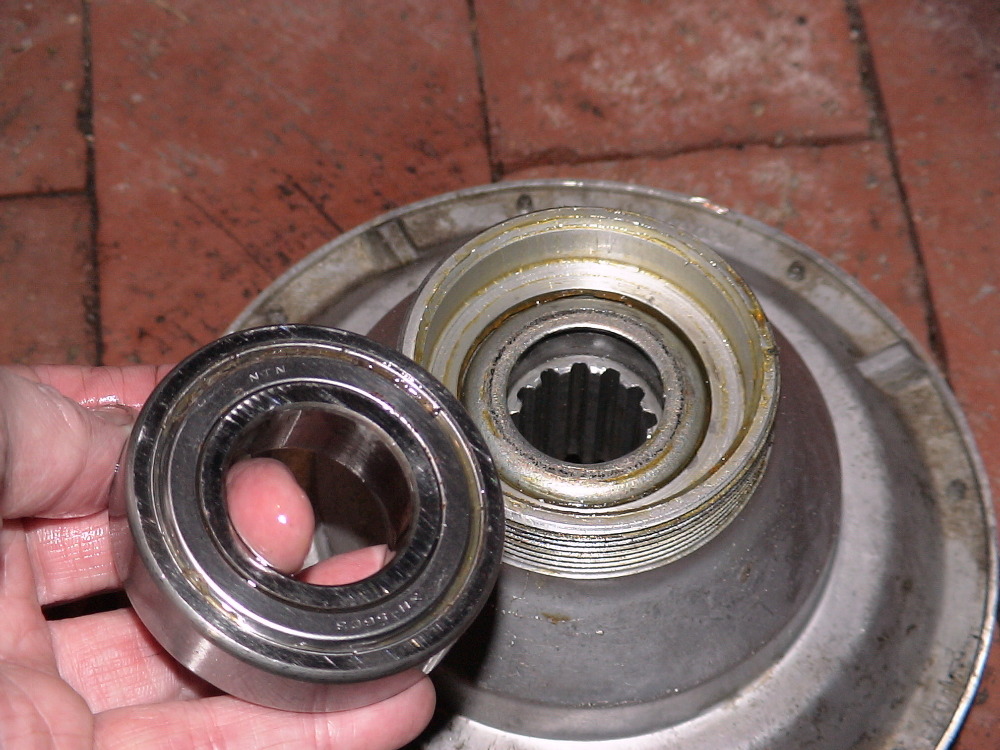
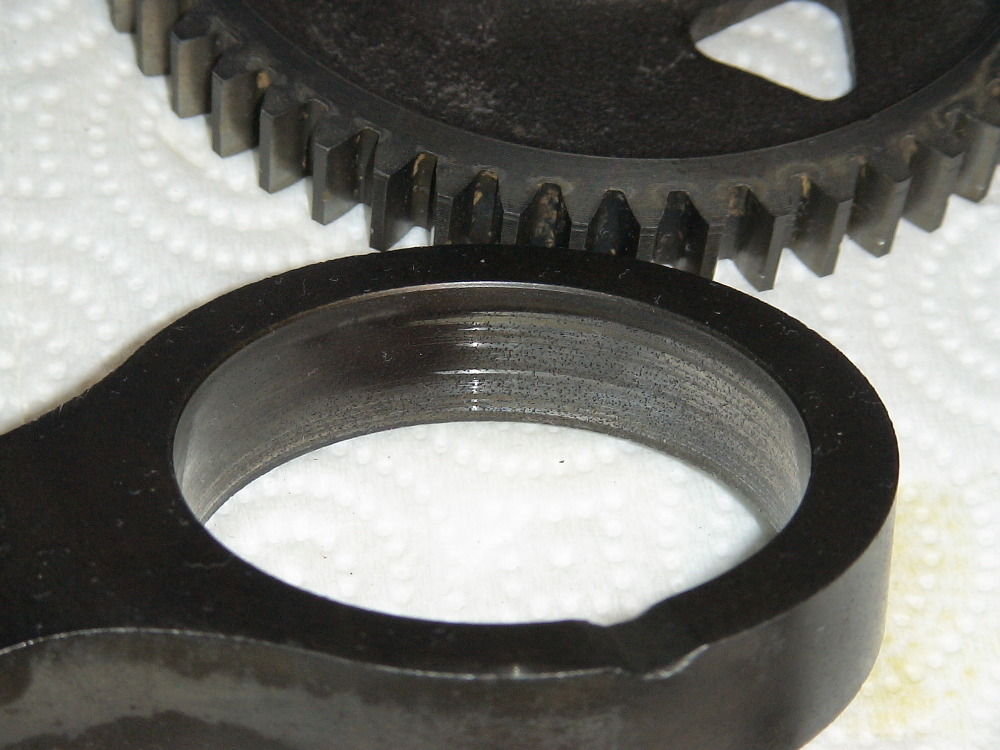
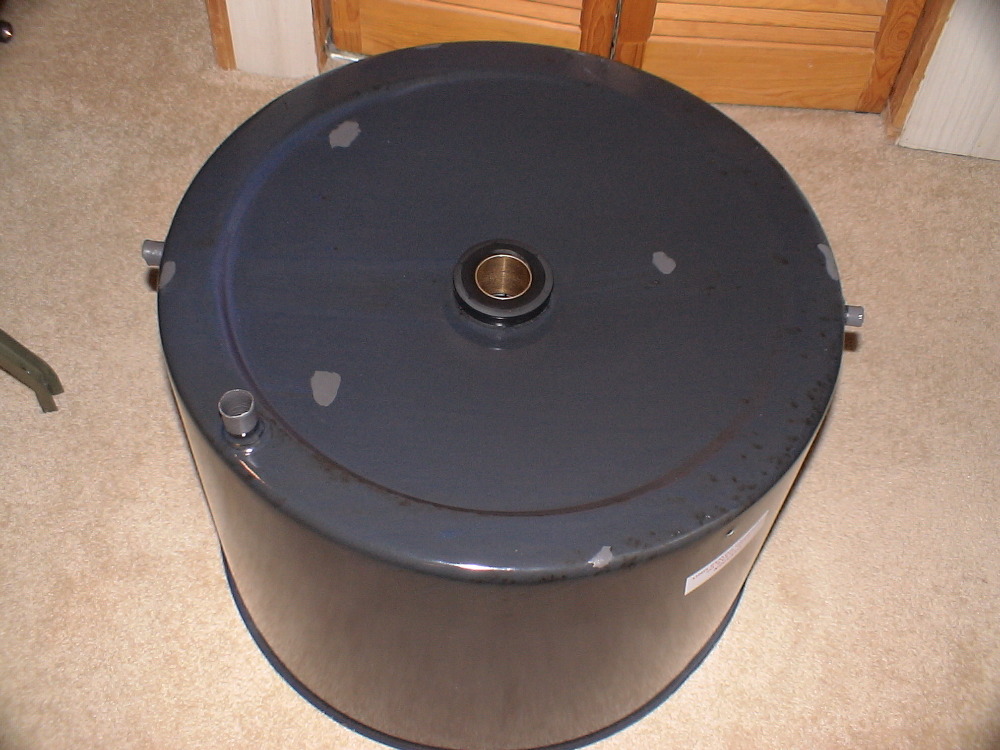
Here's the tub bearing removed from the tub and cleaned. The bearing is removed from the tub by elevating the tub with a couple of 2x4's on each side to protect the porcelain drain tube. Puting some turbine oil around the outside of the bearing where the rubber part contacts the porcelain should help remove it. Put a clean cloth over the bearing, put your foot on it and push down while rocking your foot around in a circular motion with gradually increasing pressure until the bearing is pushed from the bottom of the tub. Be patient and don't push hard all at once to keep from damaging the tub.
I cleaned the bearing by first knocking away all the loose particles of dirt and metal shavings I had made cutting off the mounting stem by using a stiff toothbrush brush. Then I dampened the brush with kerosene or other light solvent that isn't harmful to rubber and cleaned the outside of the bearing, used a lint free cloth and polished up the rubber with Pledge. Rubber protectant (Armor All) could also be used too, I guess. After the outside was clean I very carefully wiped out the bronze inside of the bearing with a microfiber cloth. Be careful not to mar it's surface. 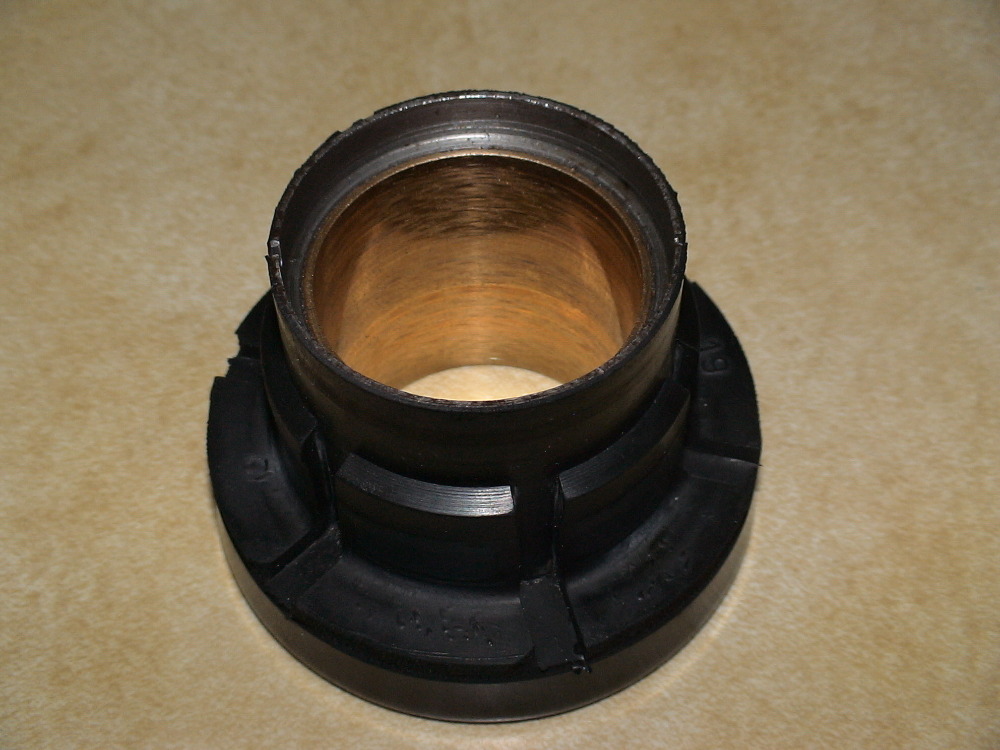
| ||
| Post# 574216 , Reply# 21 2/8/2012 at 05:20 (4,552 days old) by beekeyknee (Columbia, MO) | ||
|
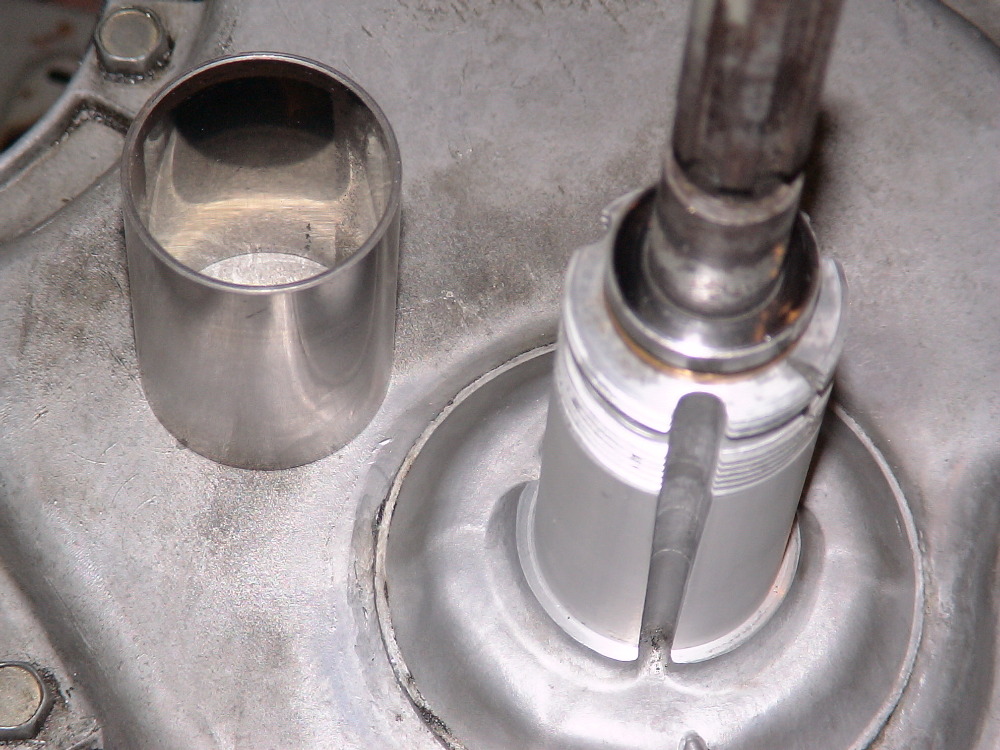
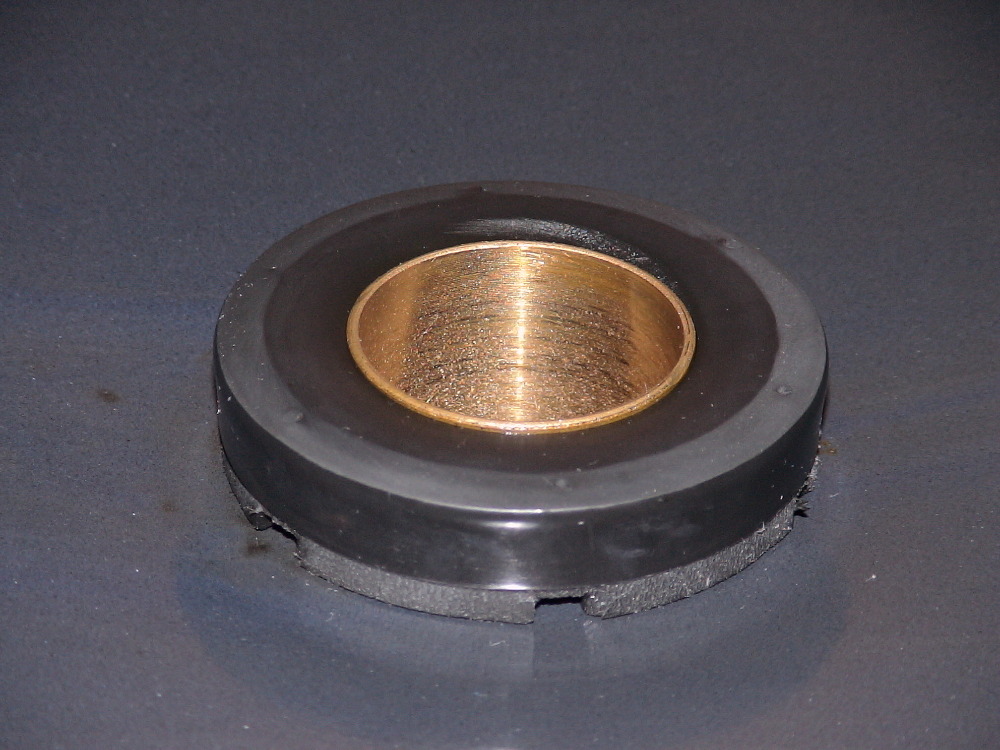
Bottom view. Pull the rubber back away from the bronze bushing on the bottom of the bearing and saturate the wicking with turbine oil. This is for the old style (fat) bearings. Depending on the age of the bearing it may absorb more or less oil. When the absorption slows down the wicking is saturated and no more oil is necessary. Then put a film of the oil on the inside of the bearing and on the outside of the new spin tube and insert. I put in a new spin tube for good measure. Your old one could be reused if it's not very worn and fits smoothly inside the bearing without any slop between the inter bronze piece and the tube. It should spin inside the bearing like wet ice, gliding on the film of oil. Likewise the tube should also slide easily over the trans. neck with no slop or binding at all. The trans. neck should be polished with a very fine emery paper and wiped completely clean with a lint free cloth until it has a bright satin look to it. The neck, tube and inside of the bearing all have very close tolerances and have to be contaminate free to operate properly for a good spin. If you have the new type bearing apply a coat of oil to both the inside bronze surface and the outside spin surface of the tube and slide together.

| ||
| Post# 574217 , Reply# 22 2/8/2012 at 05:21 (4,552 days old) by beekeyknee (Columbia, MO) | ||
|
| ||
| Post# 574218 , Reply# 23 2/8/2012 at 05:23 (4,552 days old) by beekeyknee (Columbia, MO) | ||
|
| ||
| Post# 574219 , Reply# 24 2/8/2012 at 05:25 (4,552 days old) by beekeyknee (Columbia, MO) | ||
|
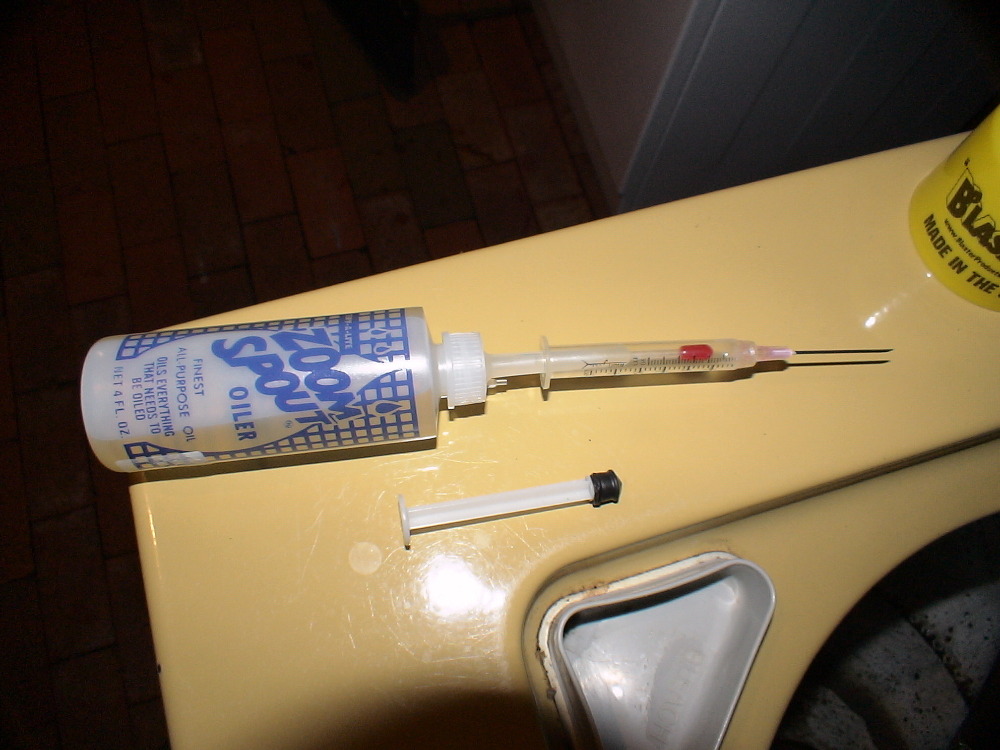
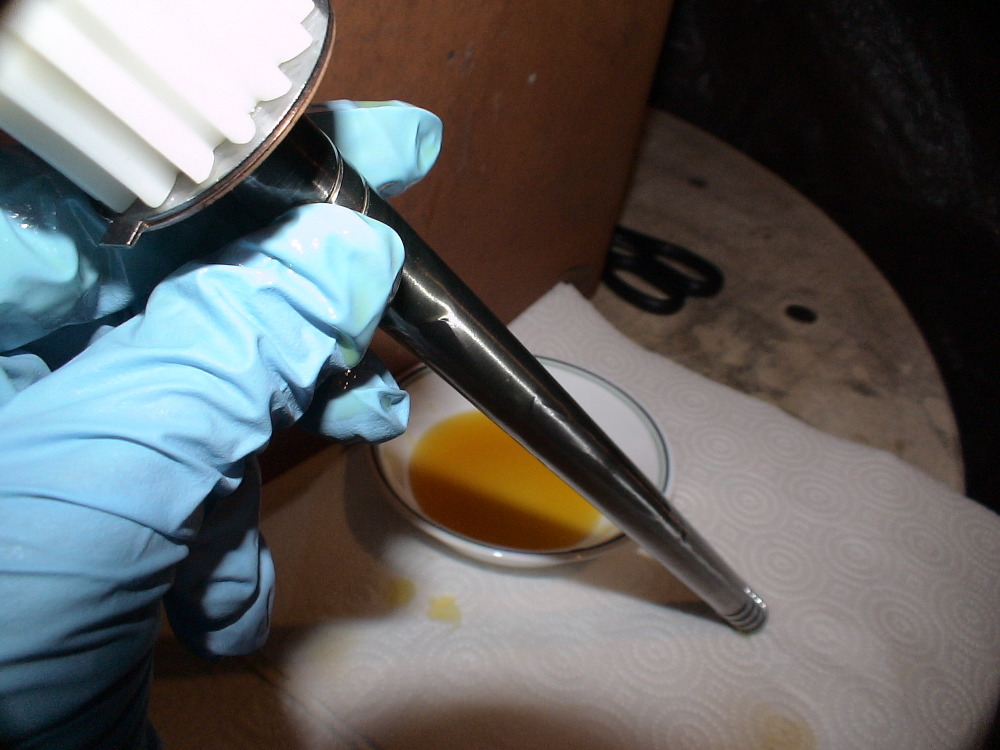
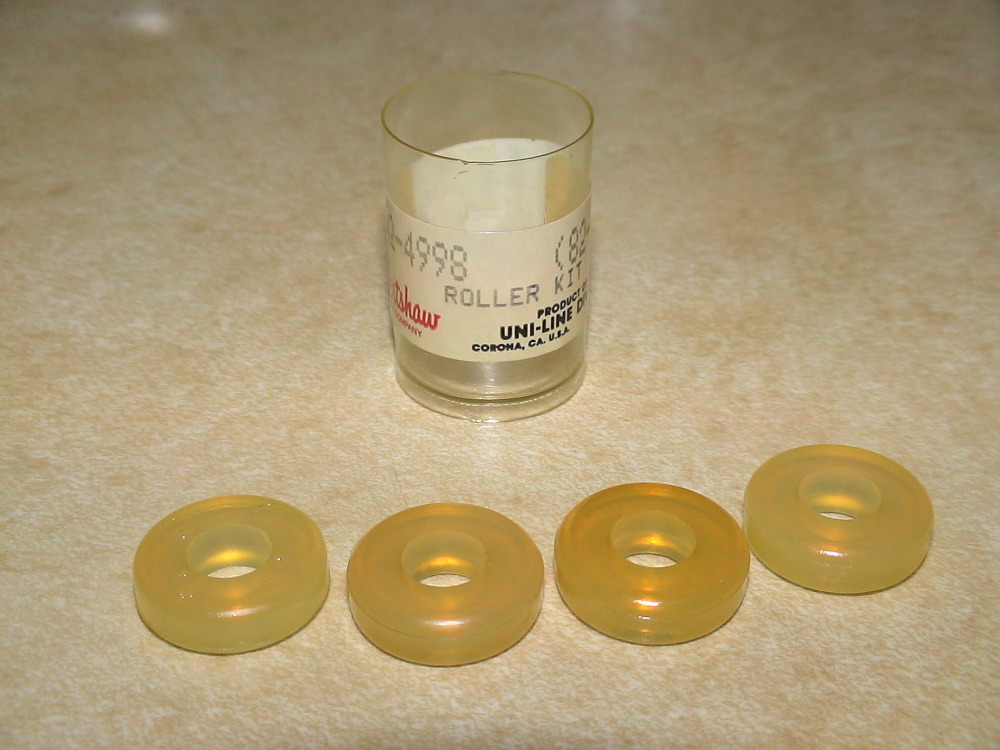
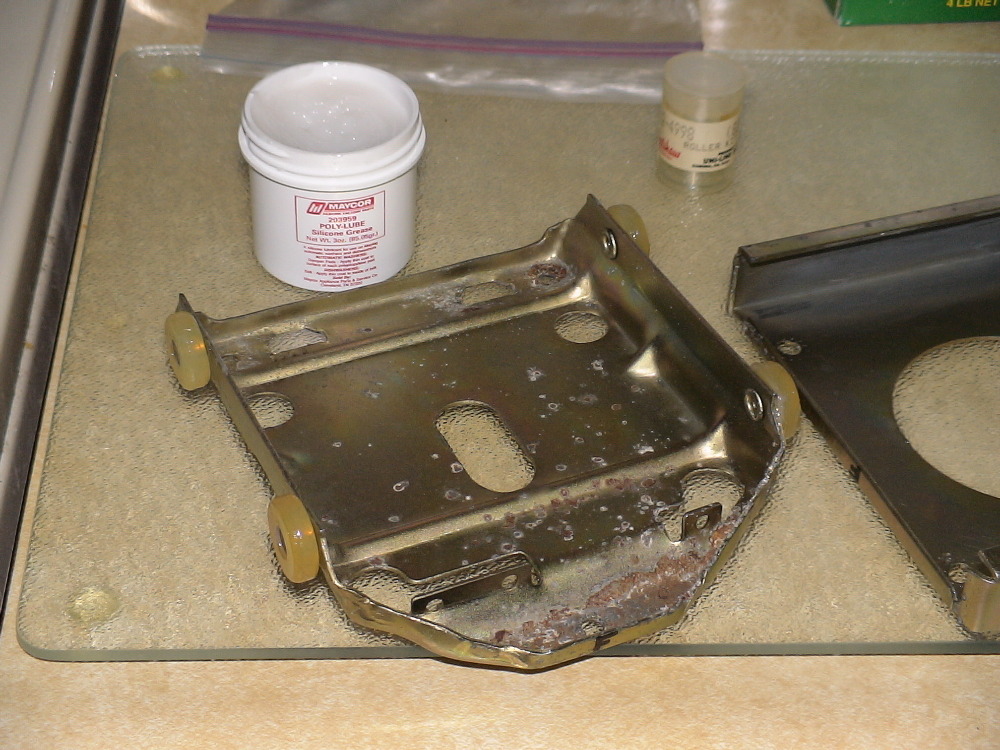
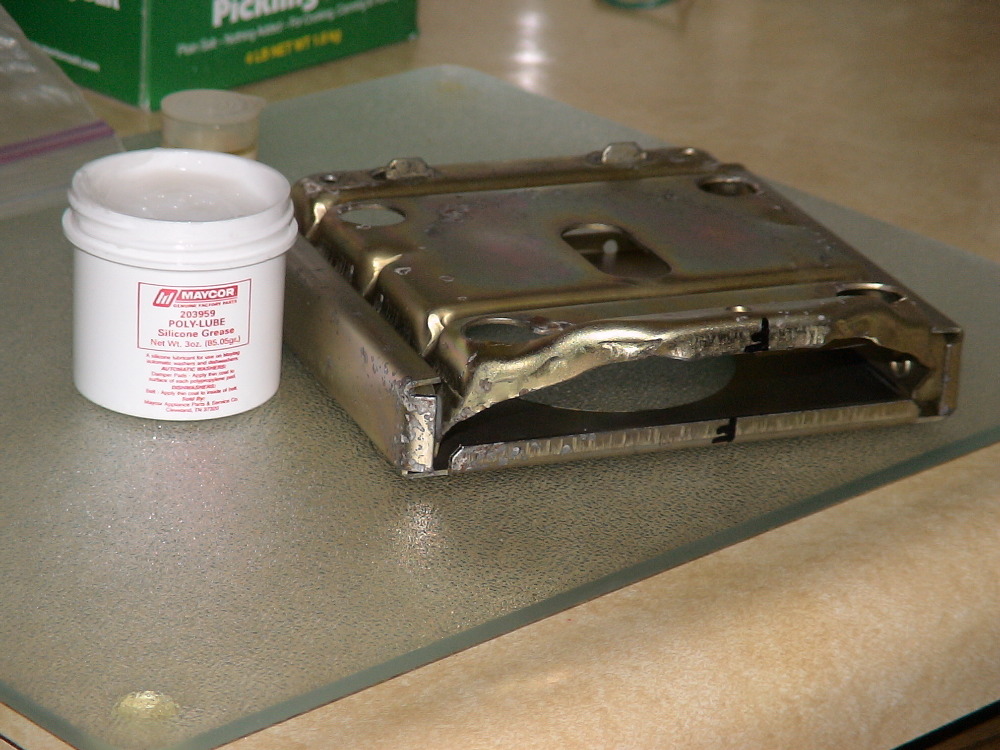
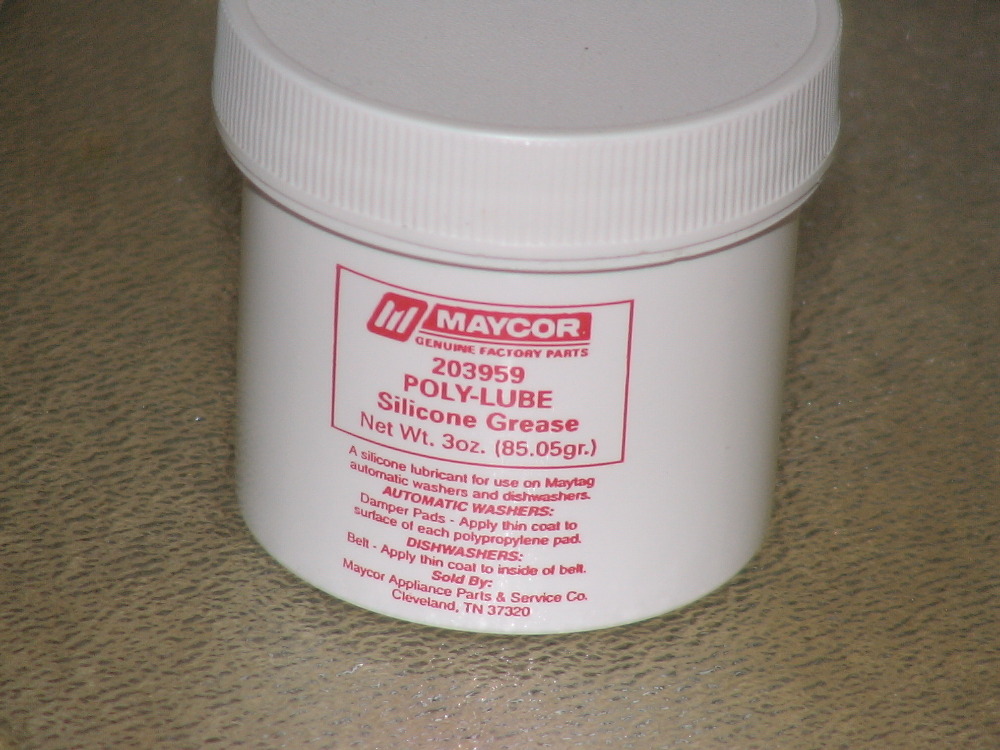
Inject bearing with 6 or 9 CC's (ml) of the oil depending on how old the machine is. Clean pulleys, put in new carriage glides if worn and clean and re-lube carriage and glides with poly-lube. Replace belts if glazed, frayed or cracked. Put washer into spin let it spin until the bearing heats up. This should bring spin speed back up.
| ||
| Post# 574221 , Reply# 25 2/8/2012 at 05:27 (4,552 days old) by beekeyknee (Columbia, MO) | ||
|
| ||
| Post# 574222 , Reply# 26 2/8/2012 at 05:28 (4,552 days old) by beekeyknee (Columbia, MO) | ||
|
| ||
| Post# 574223 , Reply# 27 2/8/2012 at 05:29 (4,552 days old) by beekeyknee (Columbia, MO) | ||
|
| ||
| Post# 574224 , Reply# 28 2/8/2012 at 05:31 (4,552 days old) by beekeyknee (Columbia, MO) | ||
|
| ||
| Post# 574225 , Reply# 29 2/8/2012 at 05:32 (4,552 days old) by beekeyknee (Columbia, MO) | ||
|
| ||
| Post# 574226 , Reply# 30 2/8/2012 at 05:34 (4,552 days old) by beekeyknee (Columbia, MO) | ||
|
| ||
| Post# 574227 , Reply# 31 2/8/2012 at 05:36 (4,552 days old) by beekeyknee (Columbia, MO) | ||
|
| ||
| Post# 574228 , Reply# 32 2/8/2012 at 05:37 (4,552 days old) by beekeyknee (Columbia, MO) | ||
|
| ||
| Post# 574229 , Reply# 33 2/8/2012 at 05:38 (4,552 days old) by beekeyknee (Columbia, MO) | ||
|
| ||
| Post# 574230 , Reply# 34 2/8/2012 at 05:40 (4,552 days old) by beekeyknee (Columbia, MO) | ||
|
| ||
| Post# 574231 , Reply# 35 2/8/2012 at 05:41 (4,552 days old) by beekeyknee (Columbia, MO) | ||
|
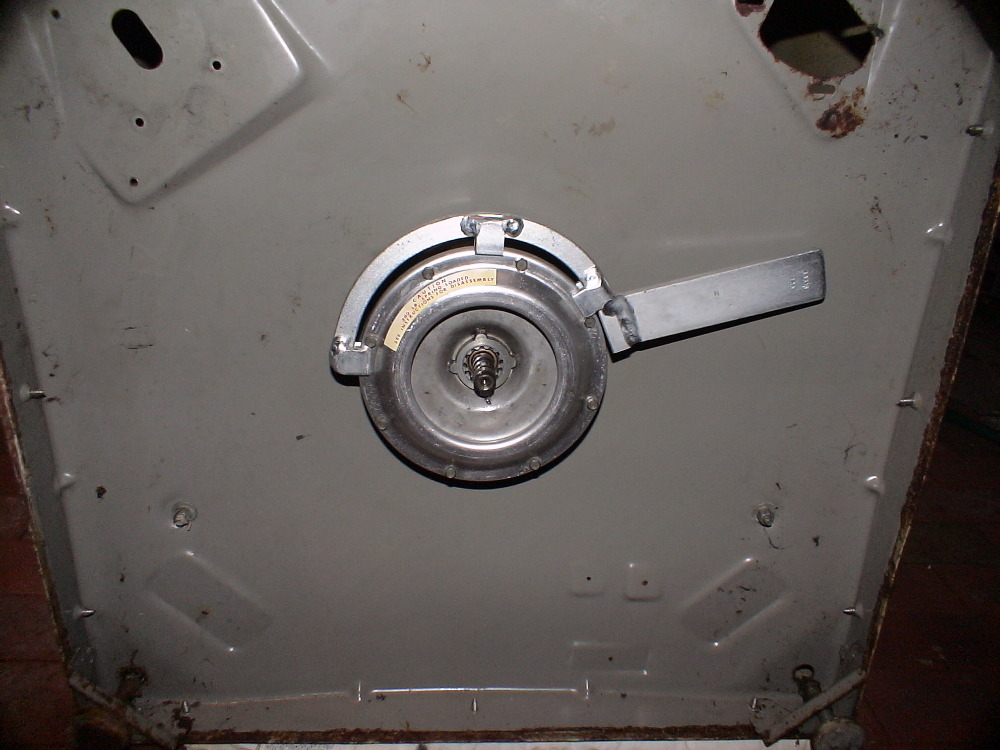
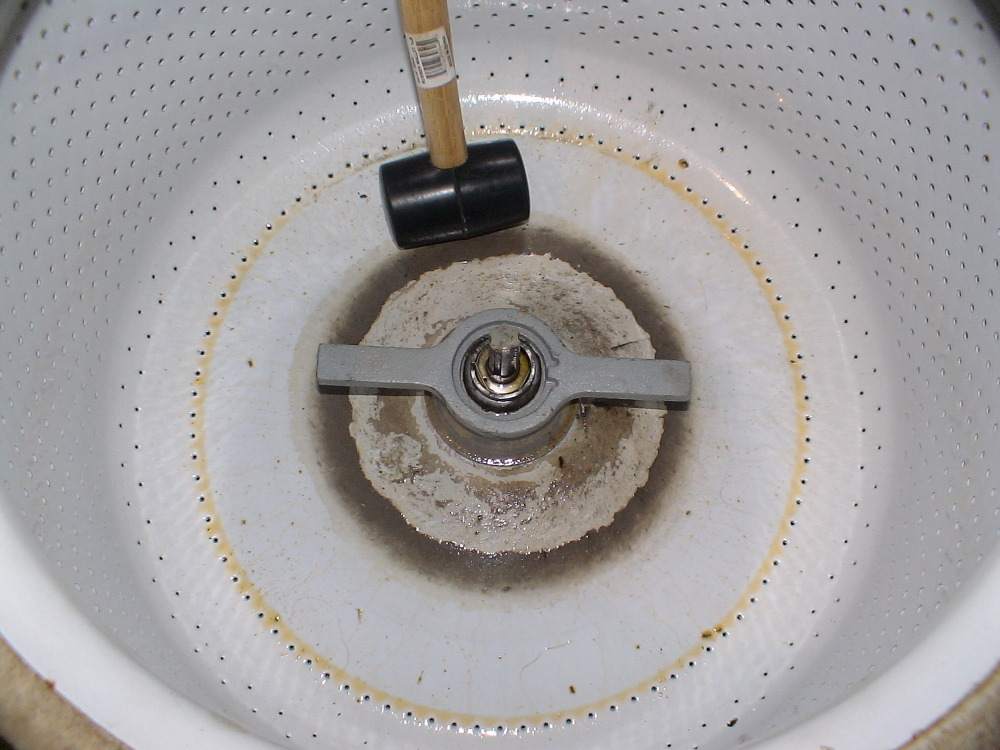
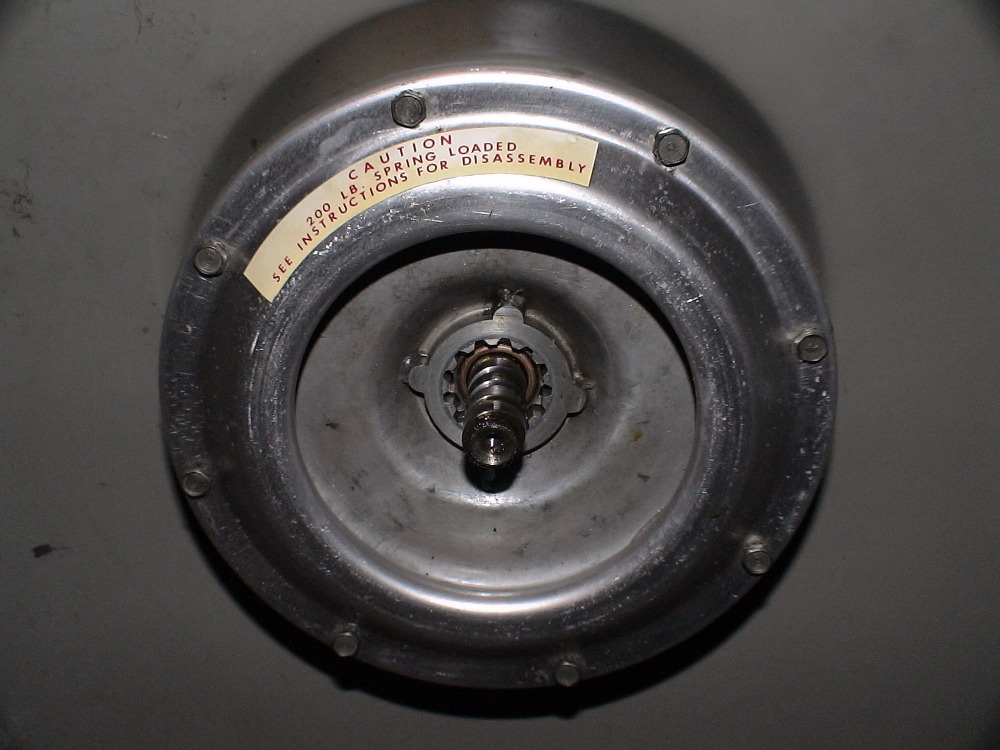
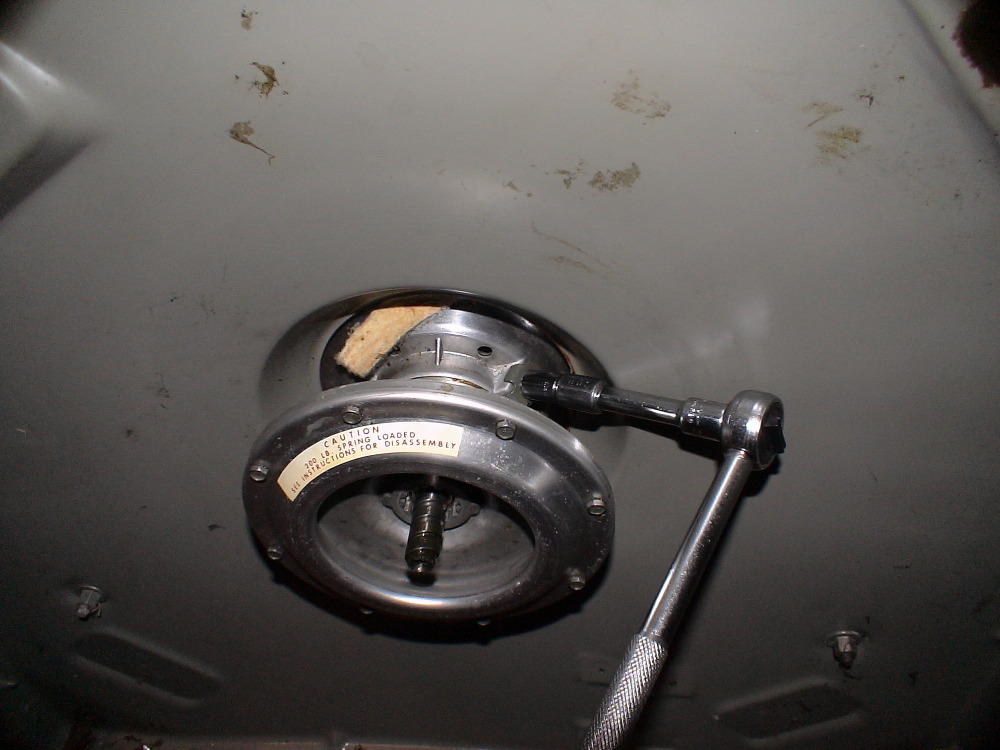
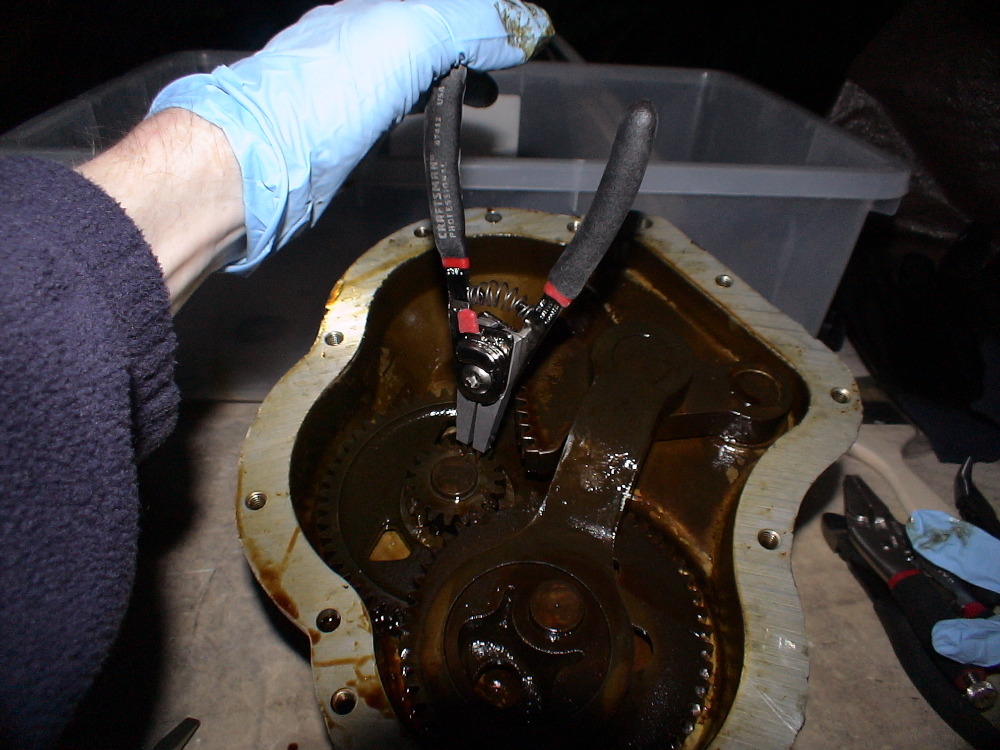
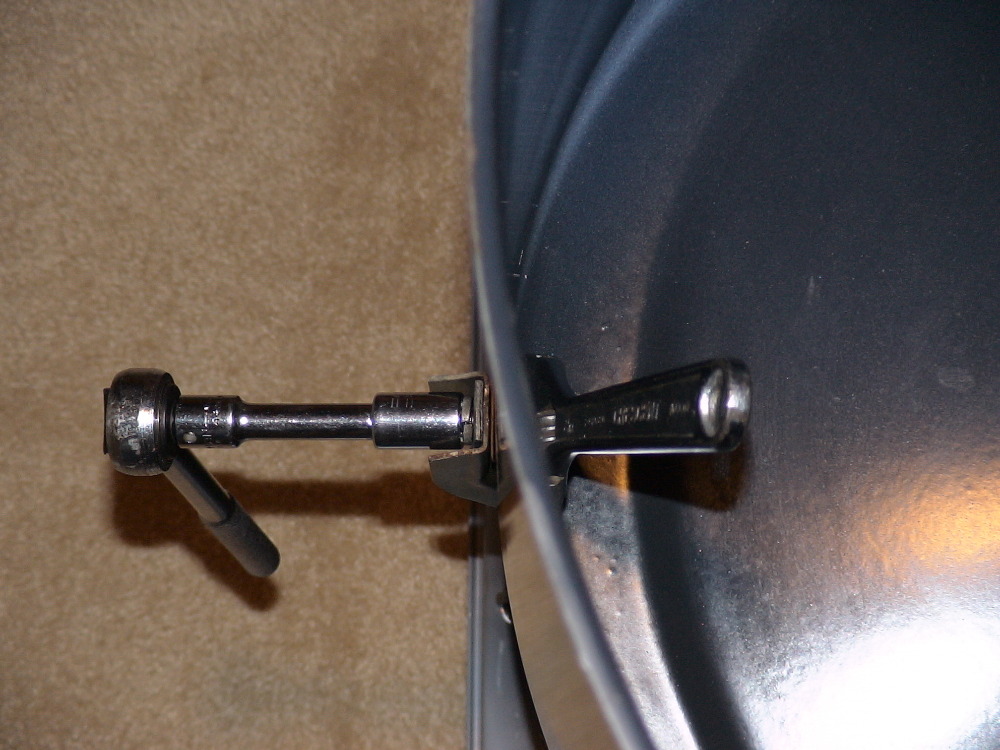
Remove brake. It's nice to have a brake package tool for this, but if you don't have it, it can be done with some vice-grips and a hammer. It kind of bungs up the edge of the brake, but I suspect some layers of rubber rapped around the edge of the brake before hammering might protect it. I'd be willing to try it if I didn't have the tool. I was lucky. I got mine for $10.00. The position of the tool in this pic is for tightening. Reverse tool direction to loosen. The transmission will spin when you're removing the brake
| ||
| Post# 574232 , Reply# 36 2/8/2012 at 05:43 (4,552 days old) by beekeyknee (Columbia, MO) | ||
|
| ||
| Post# 574233 , Reply# 37 2/8/2012 at 05:45 (4,552 days old) by beekeyknee (Columbia, MO) | ||
|
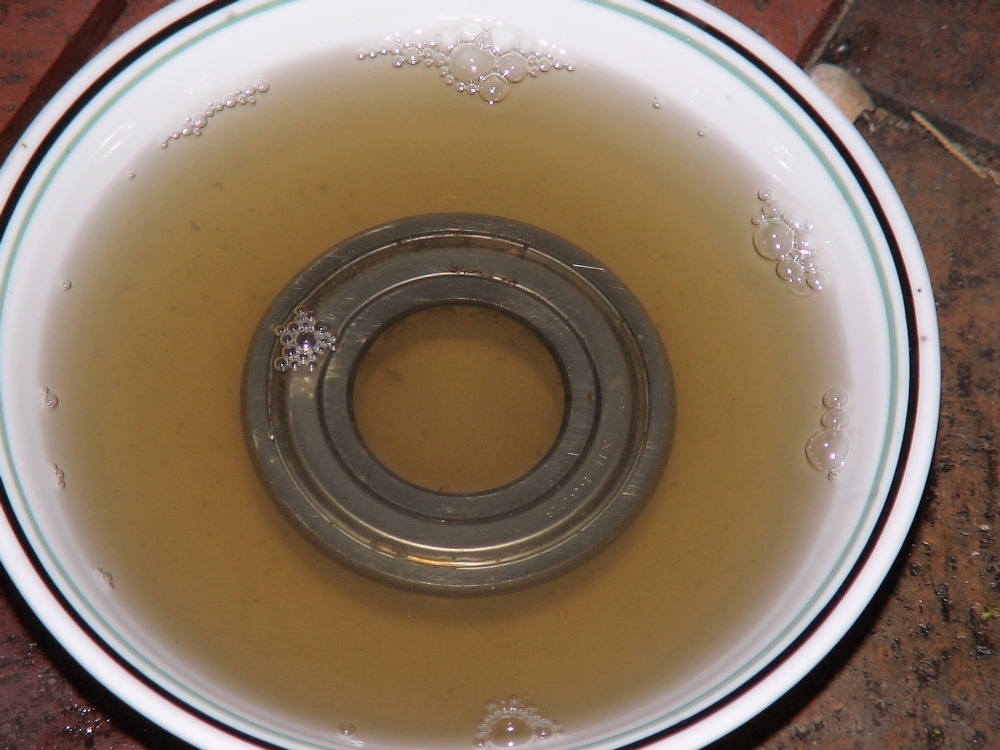
I use some unorthodox ways of doing things sometimes. I've usually never gone wrong. I soaked the radial and brake rotor bearing in kerosene, turning them while submerged to remove the old grease and put them on a paper towel to dry over night. Then I put the bearings in a double boiler with some new grease and just heated the grease to liquify it a bit and turned the bearing while submerged. This re-impregnated the bearing with new grease. The brake rotor bearing can be packed by hand but the radial bearing is too tight. Not completely sealed but too tight to pack by hand, in my opinion anyway. Take the bearings off the heat and let cool over night. Then dig out and store away in a Baggie for reuse later. If a person had a vacuum chamber or Seal-A-Meal I suppose one could place the bearings in it with some grease to suck out the air and displace it with grease. If the bearings are very worn just replace them. The radial bearing has little or no play. The brake rotor bearing isn't as tight but should spin freely before greased. Of course the kerosene procedure should all be done with neoprene gloves on.
| ||
| Post# 574234 , Reply# 38 2/8/2012 at 05:47 (4,552 days old) by beekeyknee (Columbia, MO) | ||
|
| ||
| Post# 574235 , Reply# 39 2/8/2012 at 05:48 (4,552 days old) by beekeyknee (Columbia, MO) | ||
|
| ||
| Post# 574236 , Reply# 40 2/8/2012 at 05:49 (4,552 days old) by beekeyknee (Columbia, MO) | ||
|
| ||
| Post# 574237 , Reply# 41 2/8/2012 at 05:51 (4,552 days old) by beekeyknee (Columbia, MO) | ||
|
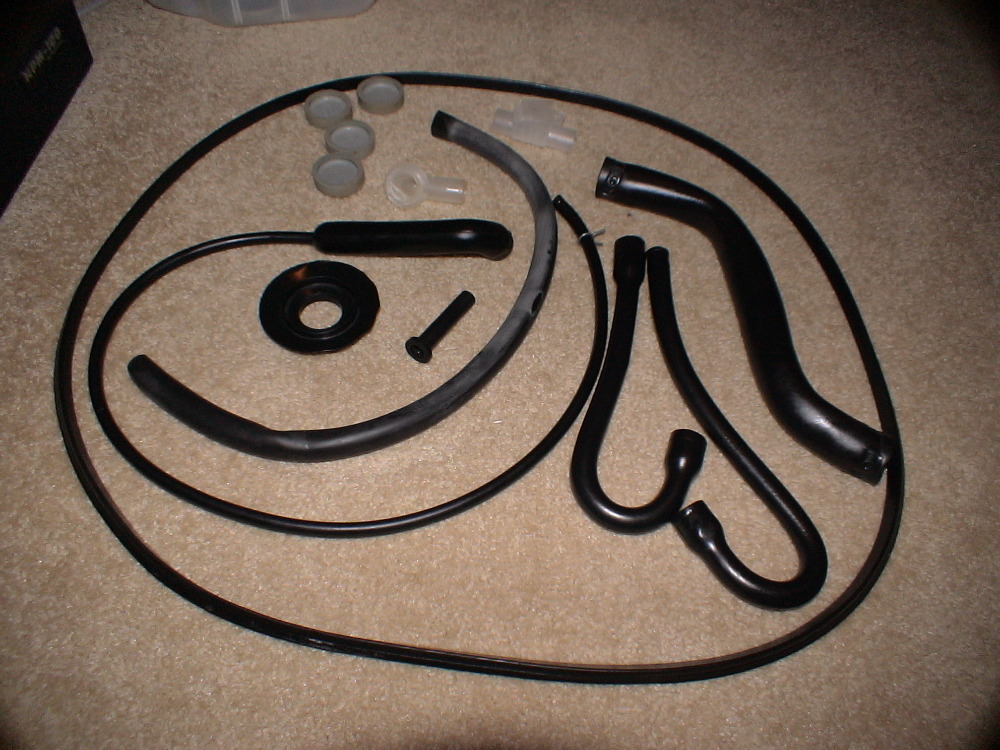
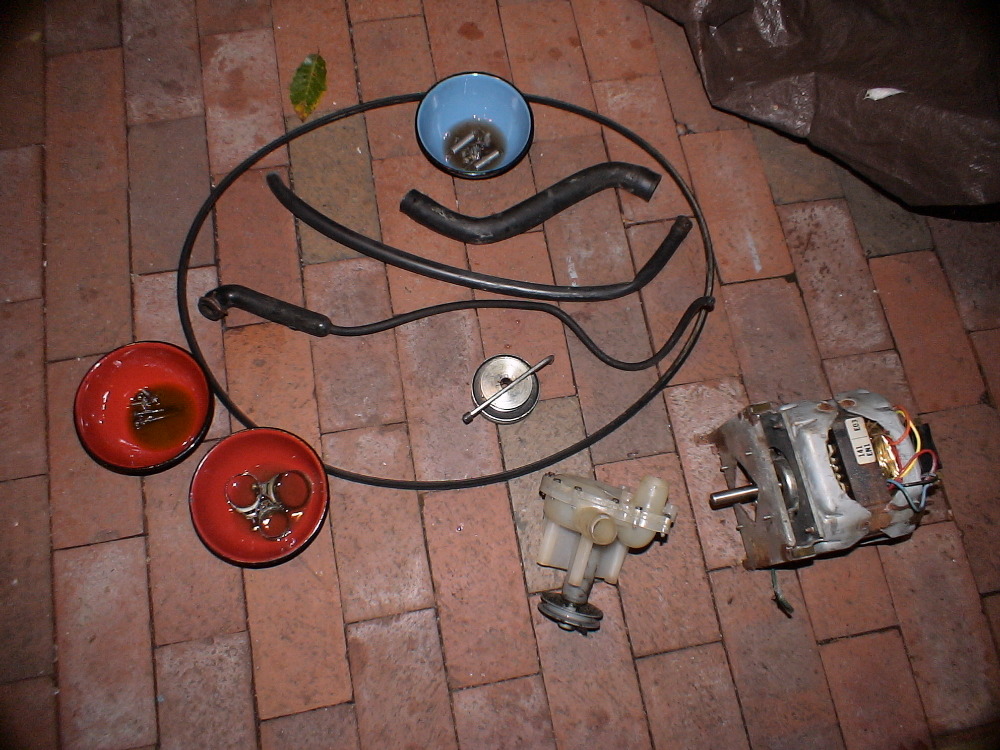
Here's all the rubber parts. I clean these in hot water with lots of soap and a green scratchy pad. Then I take the air dome with hose, fill the dome about half way with baking soda, pour vinegar down the dome, pinch around on the dome, pour in more vinegar until it starts to come out the tube at the other end. I keep repeating this until it's clean. I don't want old muck and hard water deposits to interfere with the water level switch.
| ||
| Post# 574238 , Reply# 42 2/8/2012 at 05:53 (4,552 days old) by beekeyknee (Columbia, MO) | ||
|
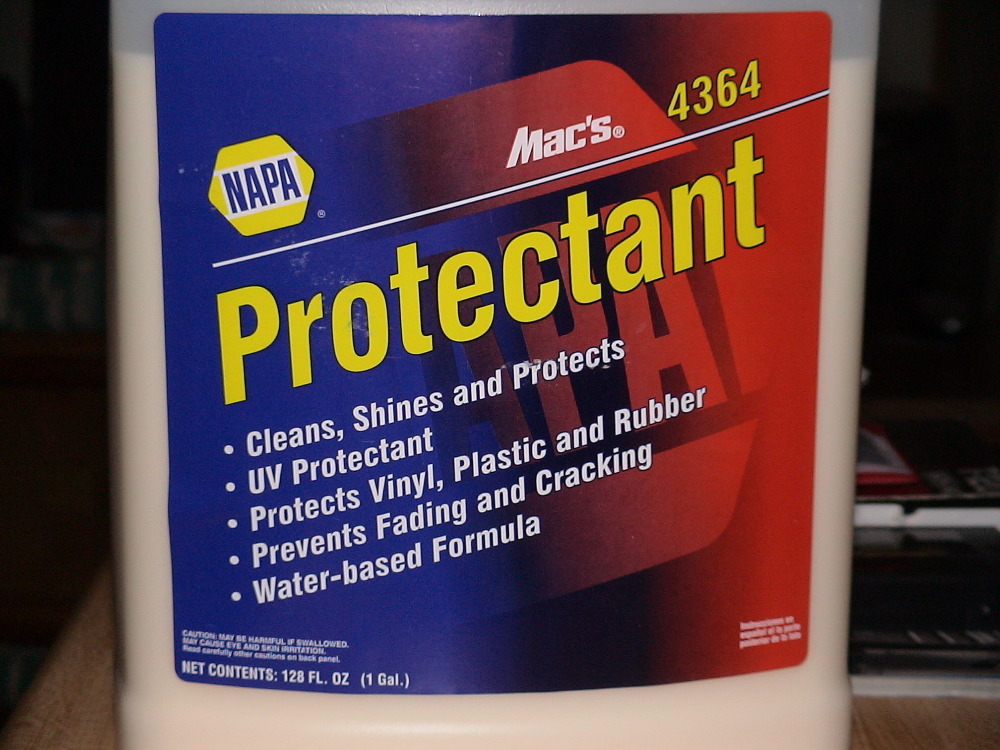
Then I take all the rubber parts in the previous post, arrange them in the bottom of a pot, pour rubber protectant (Armor All type stuff) over them making sure all the air bubbles are out of the tubes, cover the pot and cook it in the oven at around 175-200 degrees for 24 hours. The parts usually come out like brand new. If they're starting to degenerate this may not work. The bleach tube didn't soften up much, but it didn't hurt it.
| ||
| Post# 574239 , Reply# 43 2/8/2012 at 05:55 (4,552 days old) by beekeyknee (Columbia, MO) | ||
|
| ||
| Post# 574240 , Reply# 44 2/8/2012 at 05:56 (4,552 days old) by beekeyknee (Columbia, MO) | ||
|
| ||
| Post# 574241 , Reply# 45 2/8/2012 at 05:58 (4,552 days old) by beekeyknee (Columbia, MO) | ||
|
| ||
| Post# 574242 , Reply# 46 2/8/2012 at 06:00 (4,552 days old) by beekeyknee (Columbia, MO) | ||
|
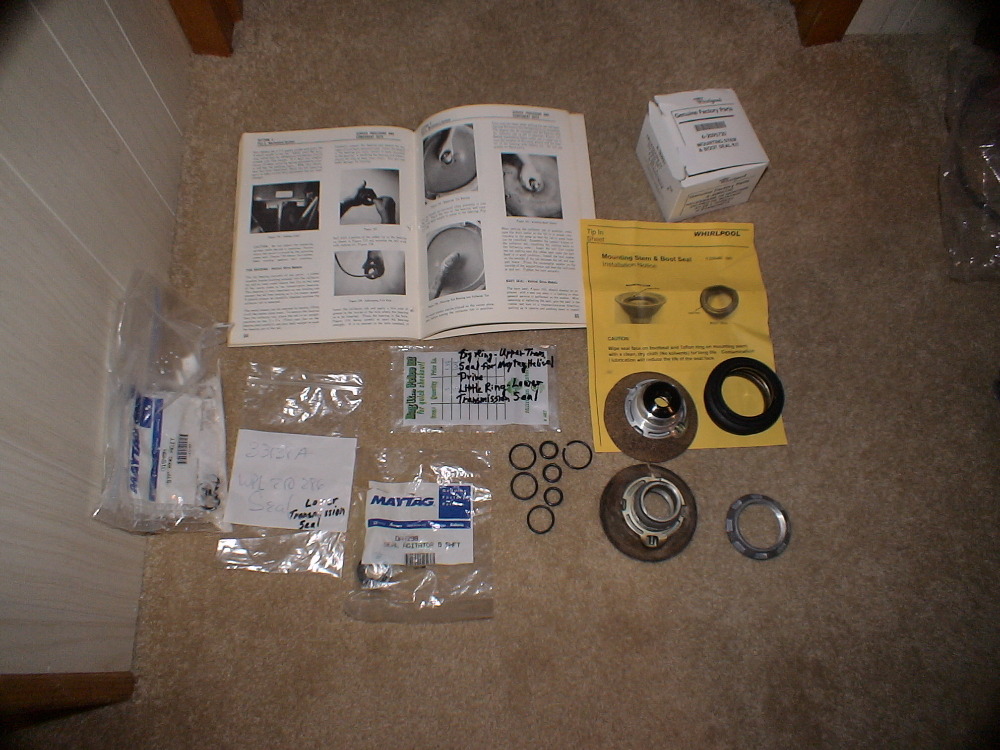
O-ring at the top is the one I ordered from Direct Maytag (Whirlpool) to find the correct size. The three directly below it are from Ace Hardware. The O-ring at the bottom right is the one I cut while removing the mounting stem. The three to the left of it are from Ace. Took the two original rings to Ace Hardware and matched the sizes. The rings are made by Serv-a-lite. The small ring was labeled ORM-206-315. Its measurements are: I.D. 15mm/ O.D. 21mm/ Thickness 3mm. The large ring was labeled ORM-206-325. Its measurements are: I.D. 25 mm/ O.D. 31/ Thickness 3mm. These are the rings to go for. The cost was only about $1.40-$1.50. Much better than the $17.00 Maytag (Whirlpool) wanted for them. Thought you guys might like this info.

This post was last edited 02/08/2012 at 08:32 | ||
| Post# 574243 , Reply# 47 2/8/2012 at 06:01 (4,552 days old) by beekeyknee (Columbia, MO) | ||
|
| ||
| Post# 574244 , Reply# 48 2/8/2012 at 06:03 (4,552 days old) by beekeyknee (Columbia, MO) | ||
|
| ||
| Post# 574245 , Reply# 49 2/8/2012 at 06:04 (4,552 days old) by beekeyknee (Columbia, MO) | ||
|
| ||
| Post# 574246 , Reply# 50 2/8/2012 at 06:05 (4,552 days old) by beekeyknee (Columbia, MO) | ||
|
| ||
| Post# 574247 , Reply# 51 2/8/2012 at 06:06 (4,552 days old) by beekeyknee (Columbia, MO) | ||
|
| ||
| Post# 574248 , Reply# 52 2/8/2012 at 06:07 (4,552 days old) by beekeyknee (Columbia, MO) | ||
|
| ||
| Post# 574249 , Reply# 53 2/8/2012 at 06:08 (4,552 days old) by beekeyknee (Columbia, MO) | ||
|
| ||
| Post# 574250 , Reply# 54 2/8/2012 at 06:09 (4,552 days old) by beekeyknee (Columbia, MO) | ||
|
| ||
| Post# 574251 , Reply# 55 2/8/2012 at 06:10 (4,552 days old) by beekeyknee (Columbia, MO) | ||
|
| ||
| Post# 574252 , Reply# 56 2/8/2012 at 06:12 (4,552 days old) by beekeyknee (Columbia, MO) | ||
|
| ||
| Post# 574254 , Reply# 57 2/8/2012 at 06:13 (4,552 days old) by beekeyknee (Columbia, MO) | ||
|
| ||
| Post# 574255 , Reply# 58 2/8/2012 at 06:14 (4,552 days old) by beekeyknee (Columbia, MO) | ||
|
| ||
| Post# 574256 , Reply# 59 2/8/2012 at 06:15 (4,552 days old) by beekeyknee (Columbia, MO) | ||
|
| ||
| Post# 574257 , Reply# 60 2/8/2012 at 06:17 (4,552 days old) by beekeyknee (Columbia, MO) | ||
|
| ||
| Post# 574258 , Reply# 61 2/8/2012 at 06:18 (4,552 days old) by beekeyknee (Columbia, MO) | ||
|
| ||
| Post# 574259 , Reply# 62 2/8/2012 at 06:19 (4,552 days old) by beekeyknee (Columbia, MO) | ||
|
| ||
| Post# 574260 , Reply# 63 2/8/2012 at 06:20 (4,552 days old) by beekeyknee (Columbia, MO) | ||
|
| ||
| Post# 574261 , Reply# 64 2/8/2012 at 06:21 (4,552 days old) by beekeyknee (Columbia, MO) | ||
|
| ||
| Post# 574262 , Reply# 65 2/8/2012 at 06:22 (4,552 days old) by beekeyknee (Columbia, MO) | ||
|
| ||
| Post# 574263 , Reply# 66 2/8/2012 at 06:23 (4,552 days old) by beekeyknee (Columbia, MO) | ||
|
| ||
| Post# 574264 , Reply# 67 2/8/2012 at 06:24 (4,552 days old) by beekeyknee (Columbia, MO) | ||
|
| ||
| Post# 574265 , Reply# 68 2/8/2012 at 06:26 (4,552 days old) by beekeyknee (Columbia, MO) | ||
|
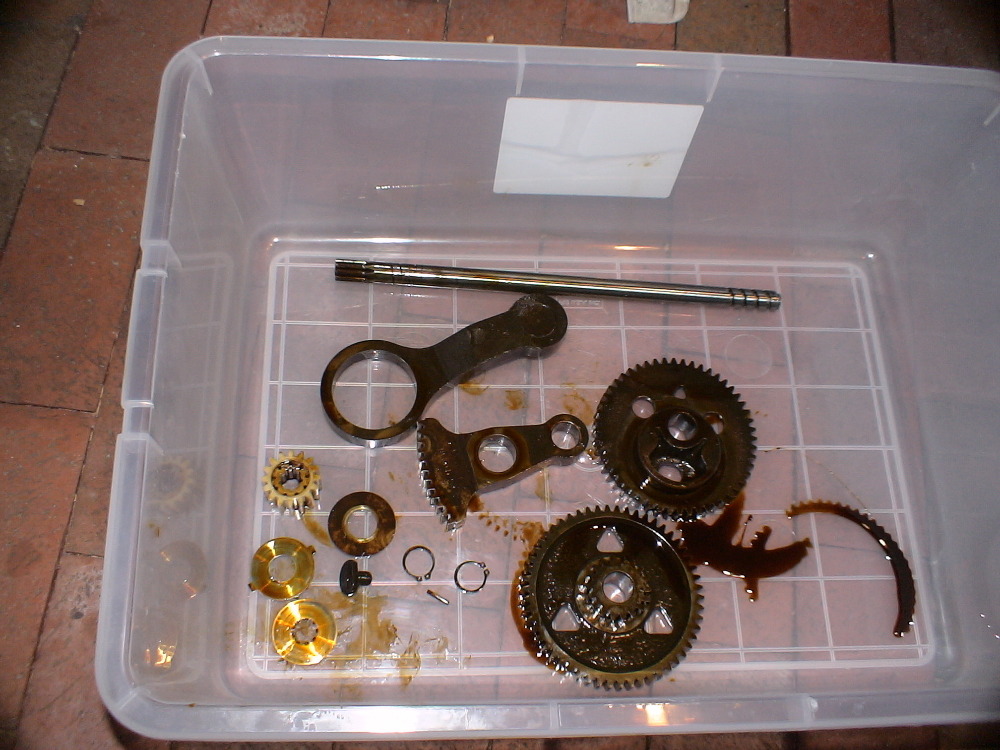
Clean the small parts then remove and clean the transmission housing. Be careful not to drop the transmission halves on the bottom of a plastic tub. I did and it cracked it, so I had to grab up the cracked end to keep the kerosene from running out. When I finished I got a funnel and put the kerosene back in the jug.
| ||
| Post# 574266 , Reply# 69 2/8/2012 at 06:27 (4,552 days old) by beekeyknee (Columbia, MO) | ||
|
| ||
| Post# 574267 , Reply# 70 2/8/2012 at 06:28 (4,552 days old) by beekeyknee (Columbia, MO) | ||
|
| ||
| Post# 574268 , Reply# 71 2/8/2012 at 06:29 (4,552 days old) by beekeyknee (Columbia, MO) | ||
|
| ||
| Post# 574269 , Reply# 72 2/8/2012 at 06:30 (4,552 days old) by beekeyknee (Columbia, MO) | ||
|
| ||
| Post# 574270 , Reply# 73 2/8/2012 at 06:31 (4,552 days old) by beekeyknee (Columbia, MO) | ||
|
| ||
| Post# 574271 , Reply# 74 2/8/2012 at 06:32 (4,552 days old) by beekeyknee (Columbia, MO) | ||
|
| ||
| Post# 574272 , Reply# 75 2/8/2012 at 06:33 (4,552 days old) by beekeyknee (Columbia, MO) | ||
|
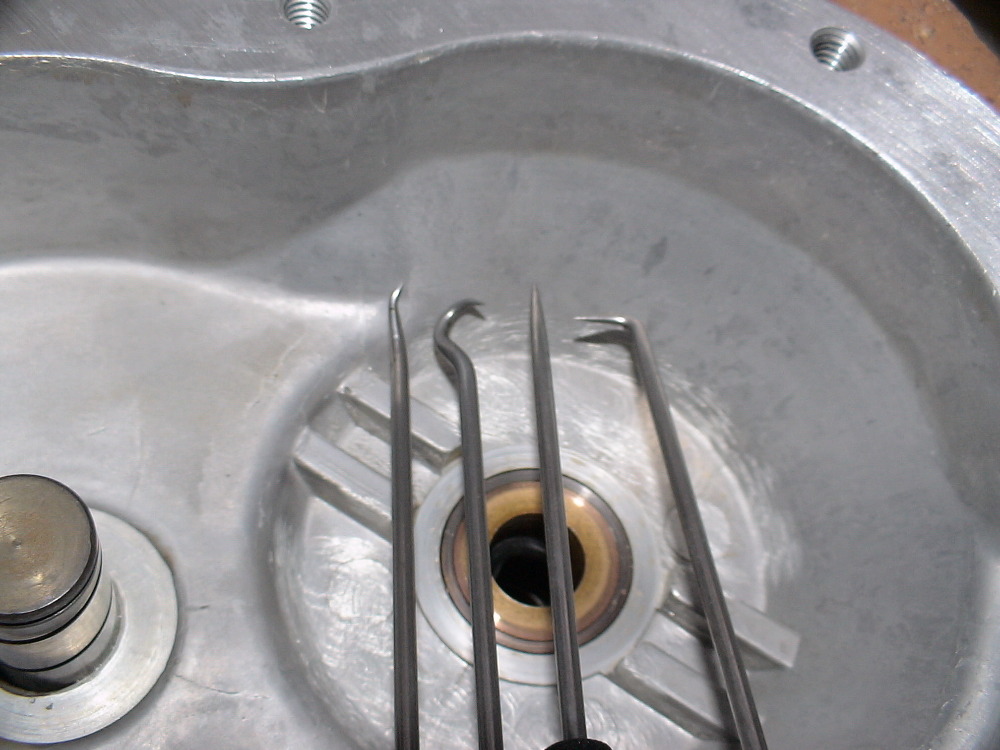
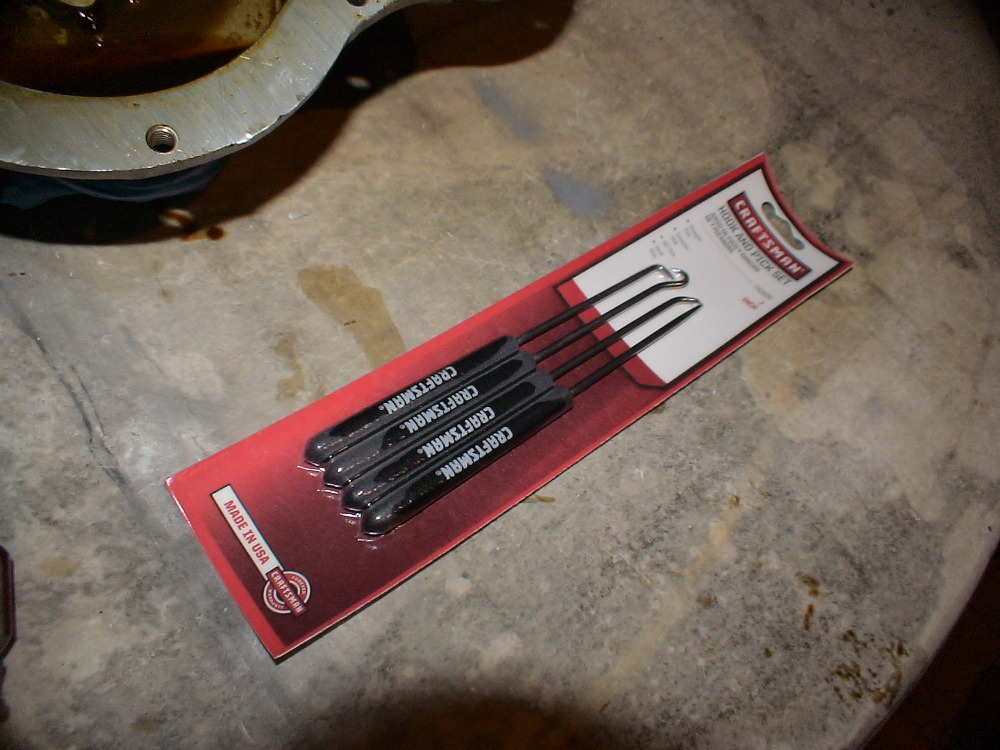
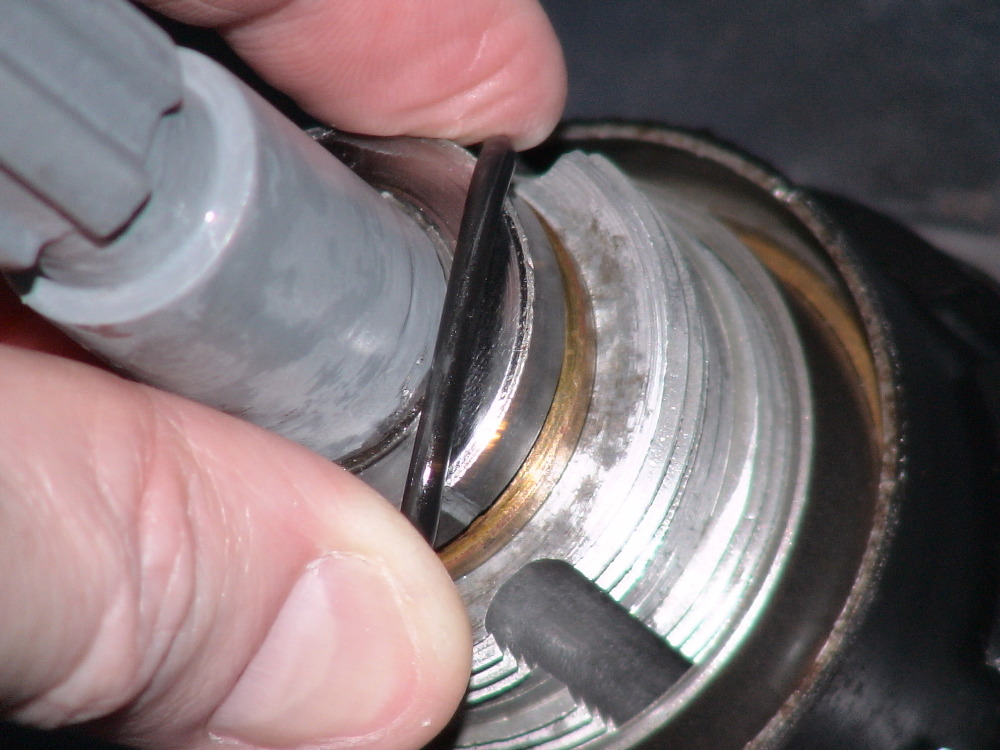
As I recall, I believe I used the 90 degree and straight pick to install the O-ring. I pushed the lower side of the ring down with the 90 degree pick while pushing the upper side of the ring down with the straight pick and then a combination of the two to situate the ring in the groove below the bushing. I think it took me about 10 or 15 minutes to get the ring in place. I may have started over a second time and put a small amount of transmission oil on the ring to help it slide better. When the bottom edge of the ring was even with the groove I put the 90 degree pick below it to keep it from sliding down any further while using the straight pick to push the rest of its circumference into its resting place. The ring tends to pop into place once it reaches its groove because of the rings natural tendency to expand to its original shape. Absolutely make sure the ring is in its proper place before proceeding.
| ||
| Post# 574274 , Reply# 76 2/8/2012 at 06:35 (4,552 days old) by beekeyknee (Columbia, MO) | ||
|
| ||
| Post# 574275 , Reply# 77 2/8/2012 at 06:35 (4,552 days old) by beekeyknee (Columbia, MO) | ||
|
| ||
| Post# 574276 , Reply# 78 2/8/2012 at 06:37 (4,552 days old) by beekeyknee (Columbia, MO) | ||
|
| ||
| Post# 574277 , Reply# 79 2/8/2012 at 06:38 (4,552 days old) by beekeyknee (Columbia, MO) | ||
|
| ||
| Post# 574278 , Reply# 80 2/8/2012 at 06:39 (4,552 days old) by beekeyknee (Columbia, MO) | ||
|
| ||
| Post# 574280 , Reply# 81 2/8/2012 at 06:40 (4,552 days old) by beekeyknee (Columbia, MO) | ||
|
| ||
| Post# 574281 , Reply# 82 2/8/2012 at 06:41 (4,552 days old) by beekeyknee (Columbia, MO) | ||
|
| ||
| Post# 574283 , Reply# 83 2/8/2012 at 06:42 (4,552 days old) by beekeyknee (Columbia, MO) | ||
|
| ||
| Post# 574284 , Reply# 84 2/8/2012 at 06:43 (4,552 days old) by beekeyknee (Columbia, MO) | ||
|
| ||
| Post# 574286 , Reply# 85 2/8/2012 at 06:44 (4,552 days old) by beekeyknee (Columbia, MO) | ||
|
| ||
| Post# 574287 , Reply# 86 2/8/2012 at 06:45 (4,552 days old) by beekeyknee (Columbia, MO) | ||
|
| ||
| Post# 574288 , Reply# 87 2/8/2012 at 06:46 (4,552 days old) by beekeyknee (Columbia, MO) | ||
|
| ||
| Post# 574289 , Reply# 88 2/8/2012 at 06:47 (4,552 days old) by beekeyknee (Columbia, MO) | ||
|
| ||
| Post# 574290 , Reply# 89 2/8/2012 at 06:48 (4,552 days old) by beekeyknee (Columbia, MO) | ||
|
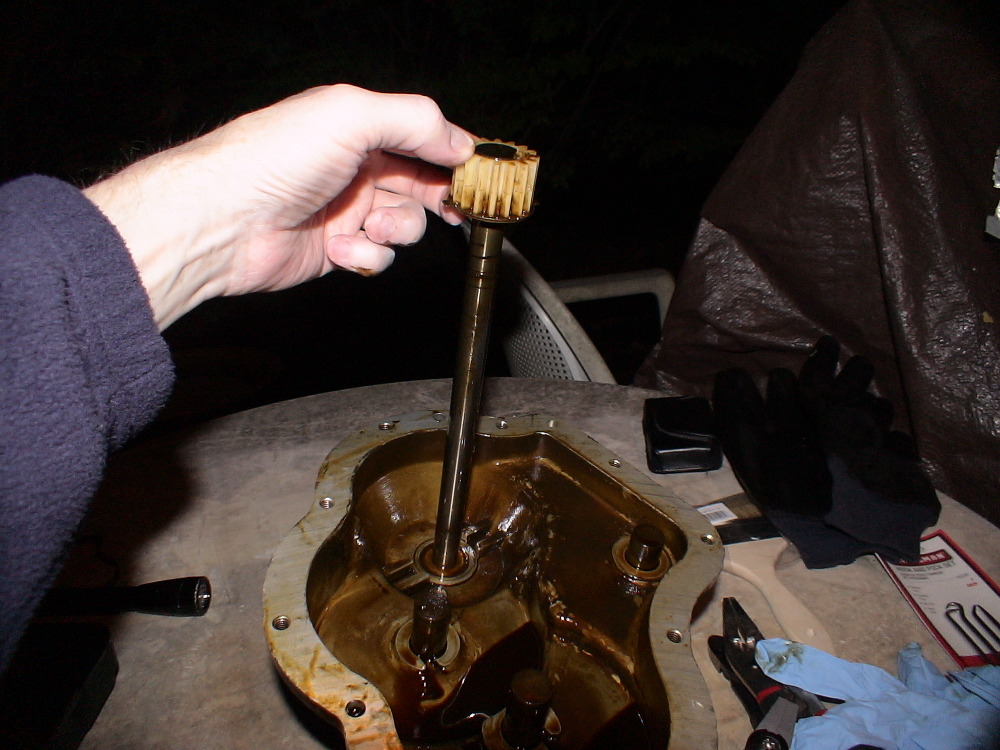
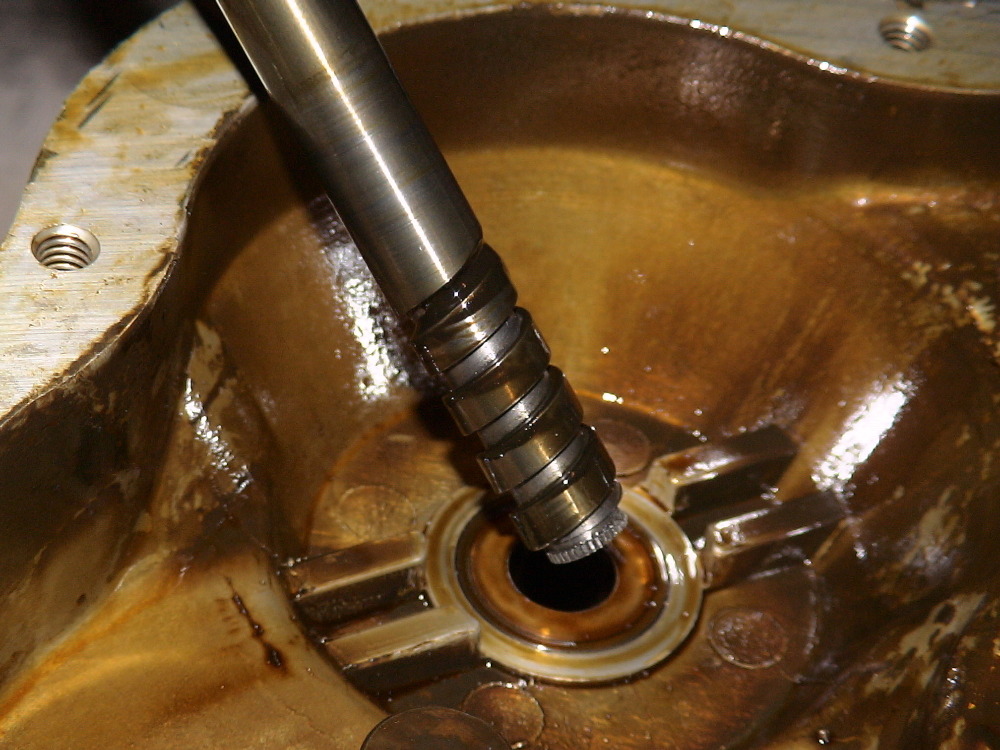
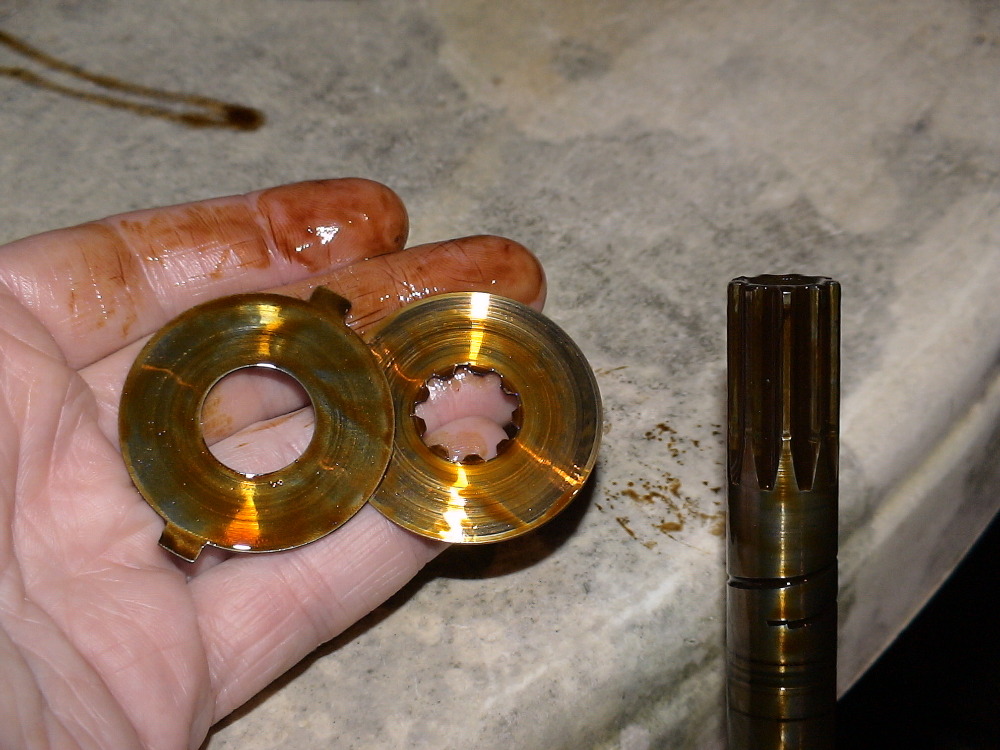
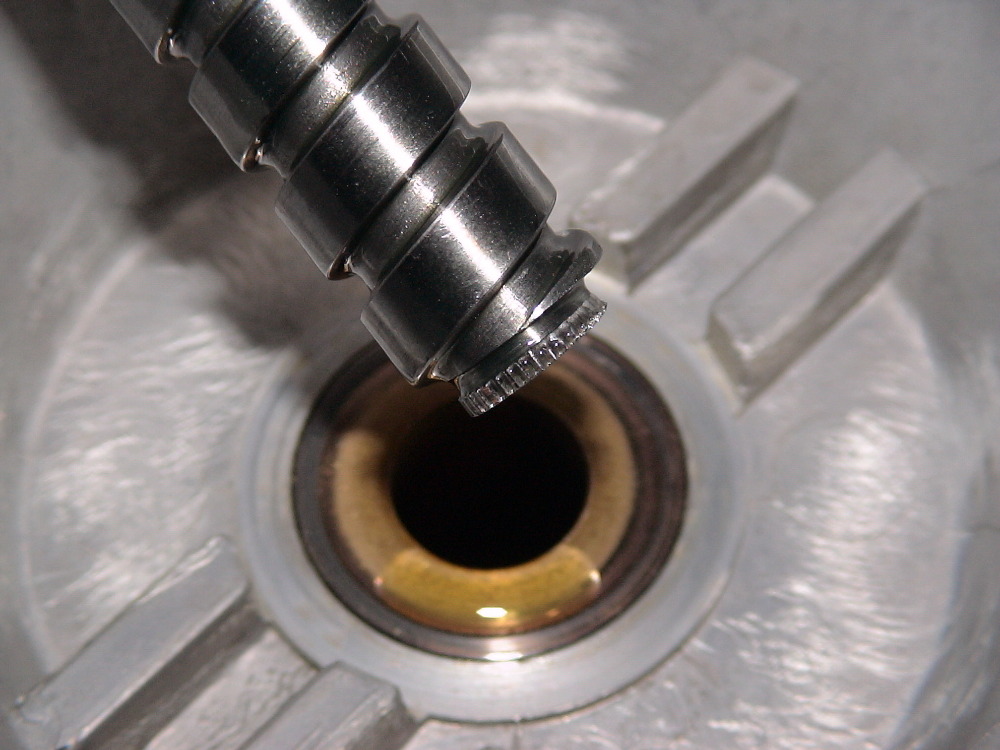
Maytag originally made a guide to place over the end of the drive shaft that had a spiral that threaded up the helix to make the end of the shaft completely smooth so it would pass by the O-ring easily. If you're careful it can be done without it. Start the shaft down the tube while turning slowly clockwise. When the helix reaches the O-ring it should start to thread its self into the helix. Keep turning the shaft and you should see it slowly pulling its self down pasting the O-ring. When it gets to the top of the helix it will stop moving downward. At this point I grabbed the pinion while slowly turning clockwise and applied a steadily increasing downward pressure. If all go�s well the O-ring will give way and compress itself into the groove and create a tight seal between the drive tube and shaft. Then the shaft should push straight down and the lugs on the washer should engage with the slots in the bottom half of the transmission case.
| ||
| Post# 574291 , Reply# 90 2/8/2012 at 06:49 (4,552 days old) by beekeyknee (Columbia, MO) | ||
|
| ||
| Post# 574292 , Reply# 91 2/8/2012 at 06:50 (4,552 days old) by beekeyknee (Columbia, MO) | ||
|
| ||
| Post# 574293 , Reply# 92 2/8/2012 at 06:51 (4,552 days old) by beekeyknee (Columbia, MO) | ||
|
| ||
| Post# 574294 , Reply# 93 2/8/2012 at 06:53 (4,552 days old) by beekeyknee (Columbia, MO) | ||
|
| ||
| Post# 574295 , Reply# 94 2/8/2012 at 06:54 (4,552 days old) by beekeyknee (Columbia, MO) | ||
|
| ||
| Post# 574296 , Reply# 95 2/8/2012 at 06:55 (4,552 days old) by beekeyknee (Columbia, MO) | ||
|
| ||
| Post# 574297 , Reply# 96 2/8/2012 at 06:56 (4,552 days old) by beekeyknee (Columbia, MO) | ||
|
| ||
| Post# 574298 , Reply# 97 2/8/2012 at 06:57 (4,552 days old) by beekeyknee (Columbia, MO) | ||
|
| ||
| Post# 574299 , Reply# 98 2/8/2012 at 06:58 (4,552 days old) by beekeyknee (Columbia, MO) | ||
|
| ||
| Post# 574300 , Reply# 99 2/8/2012 at 06:59 (4,552 days old) by beekeyknee (Columbia, MO) | ||
|
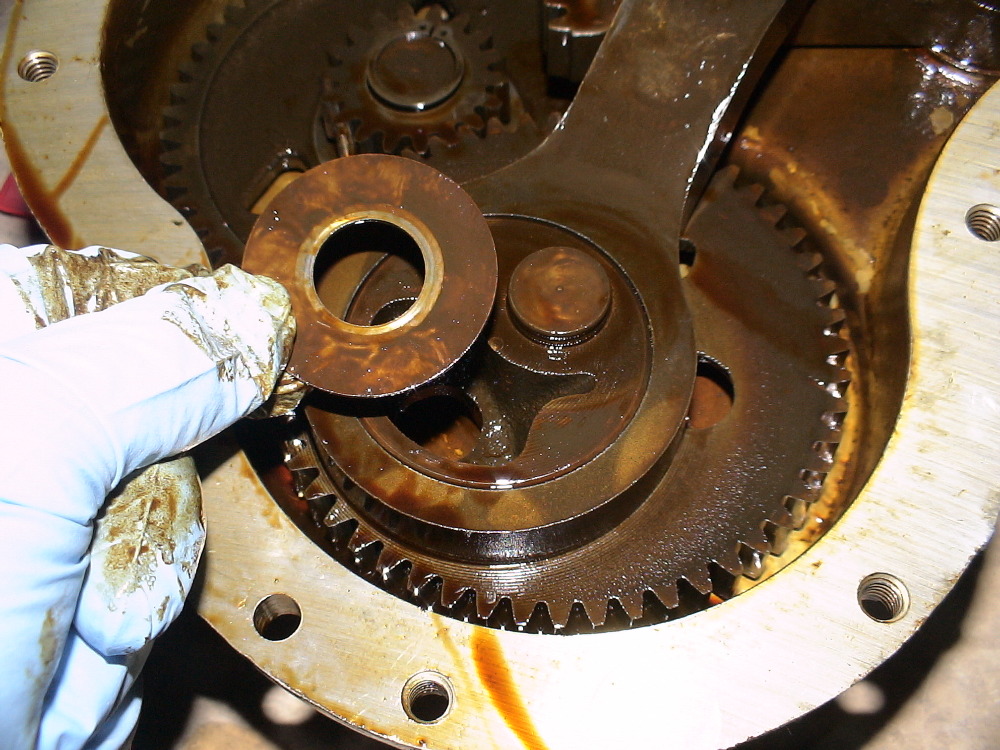
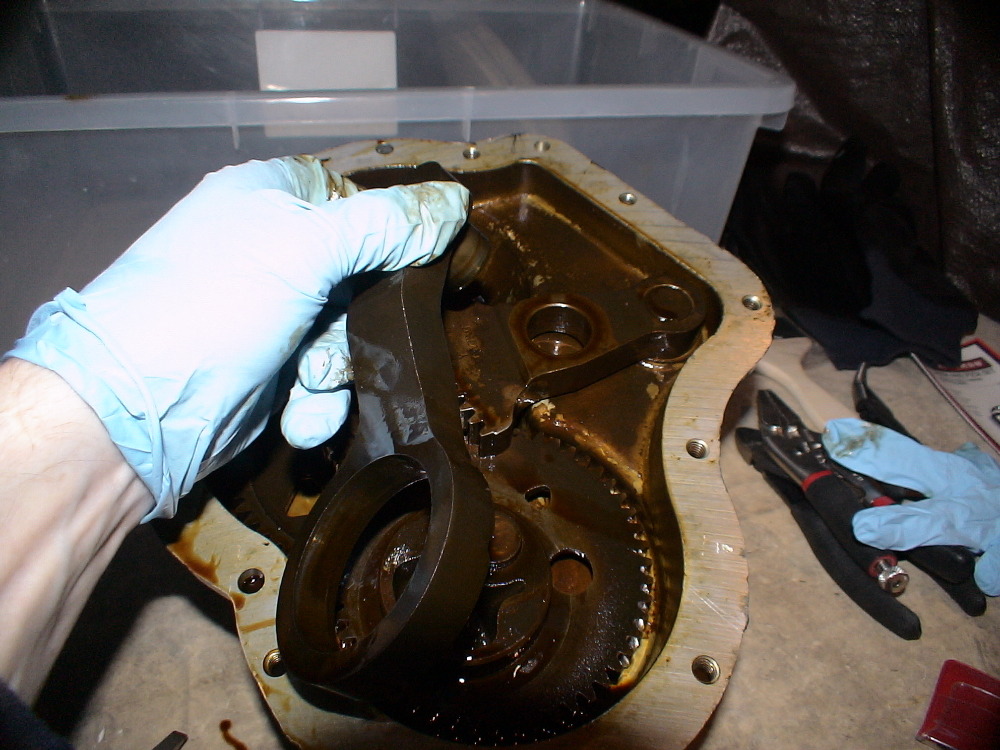
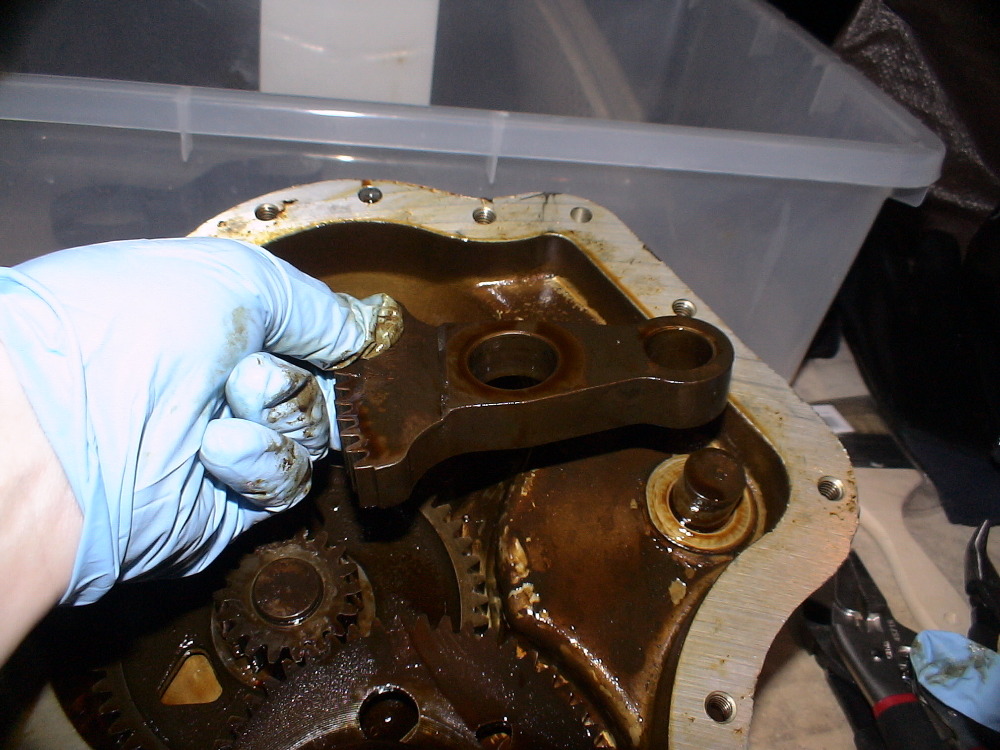
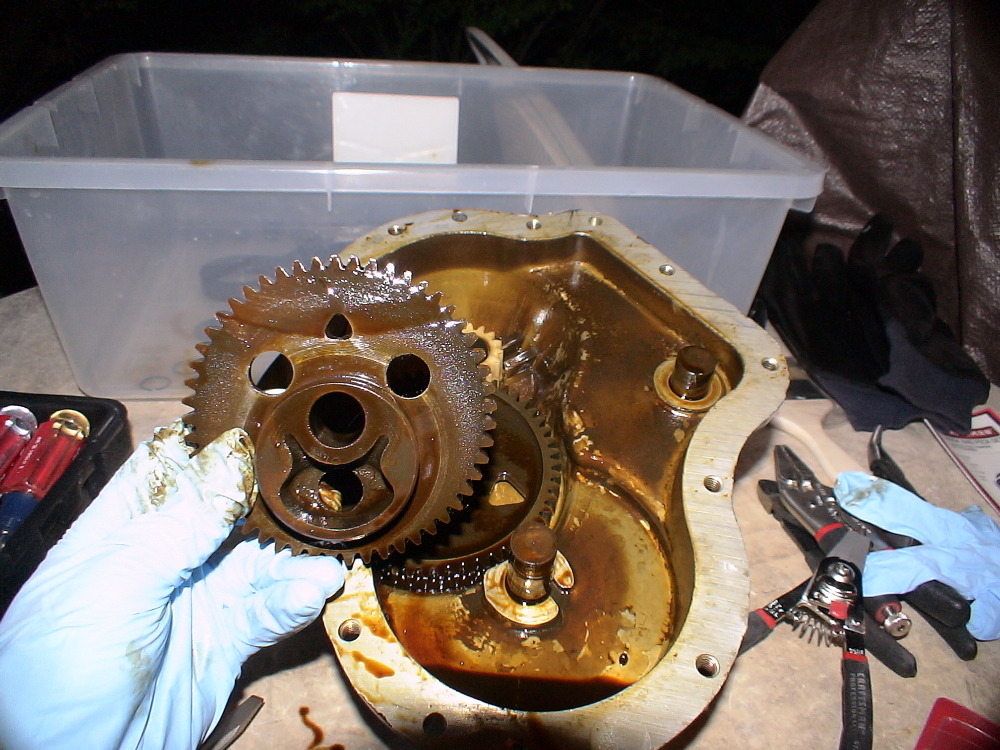
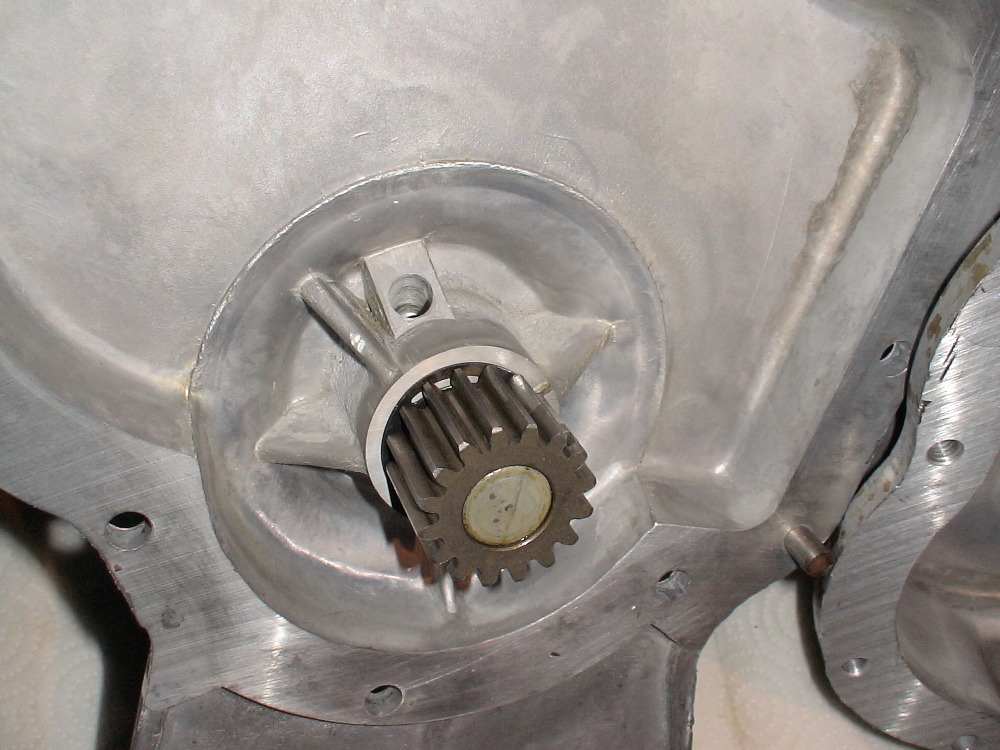
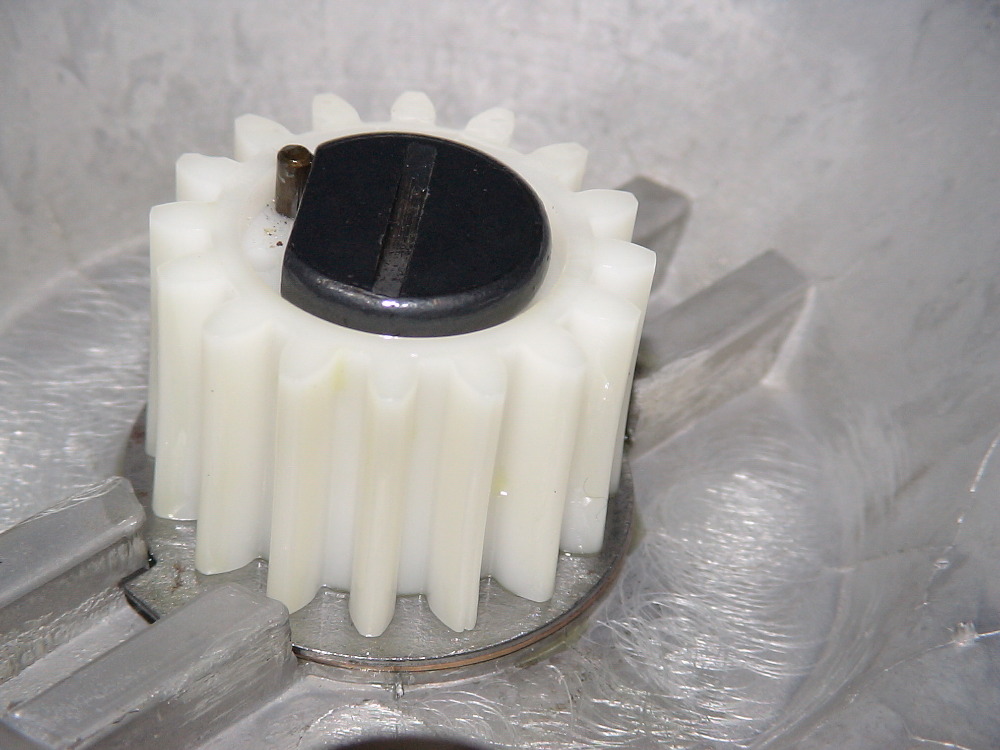
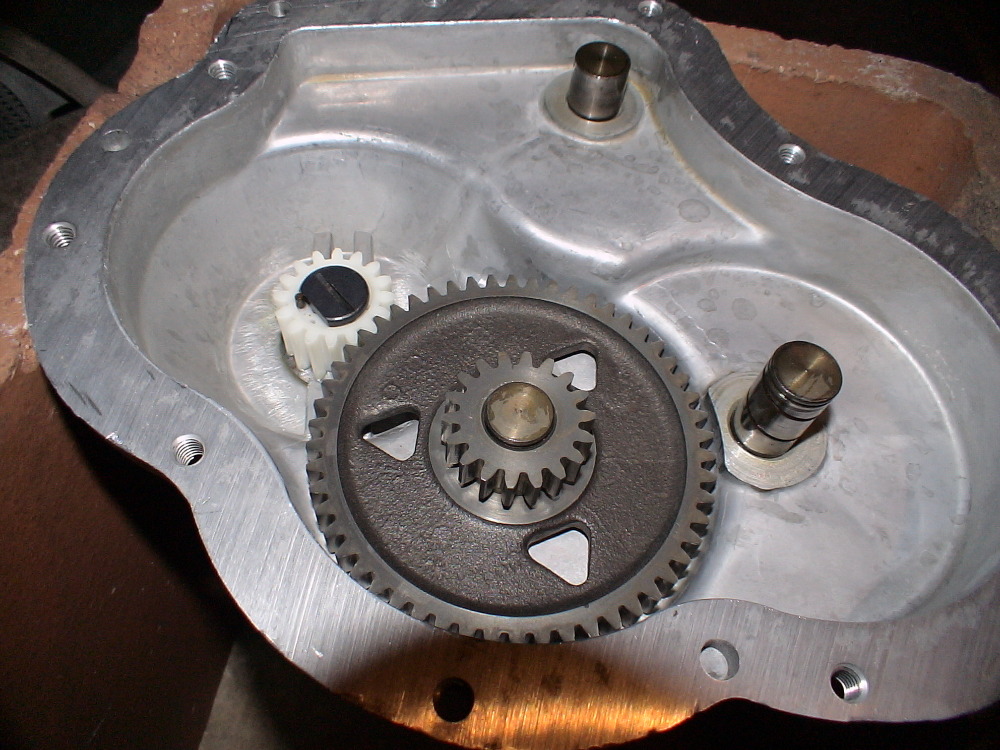
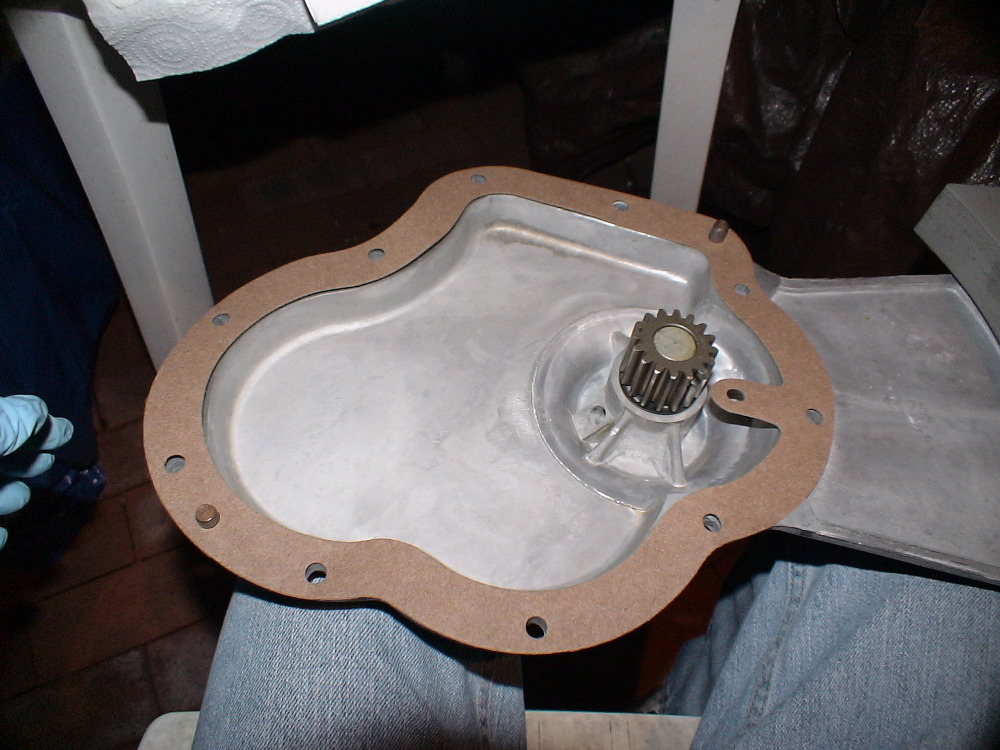
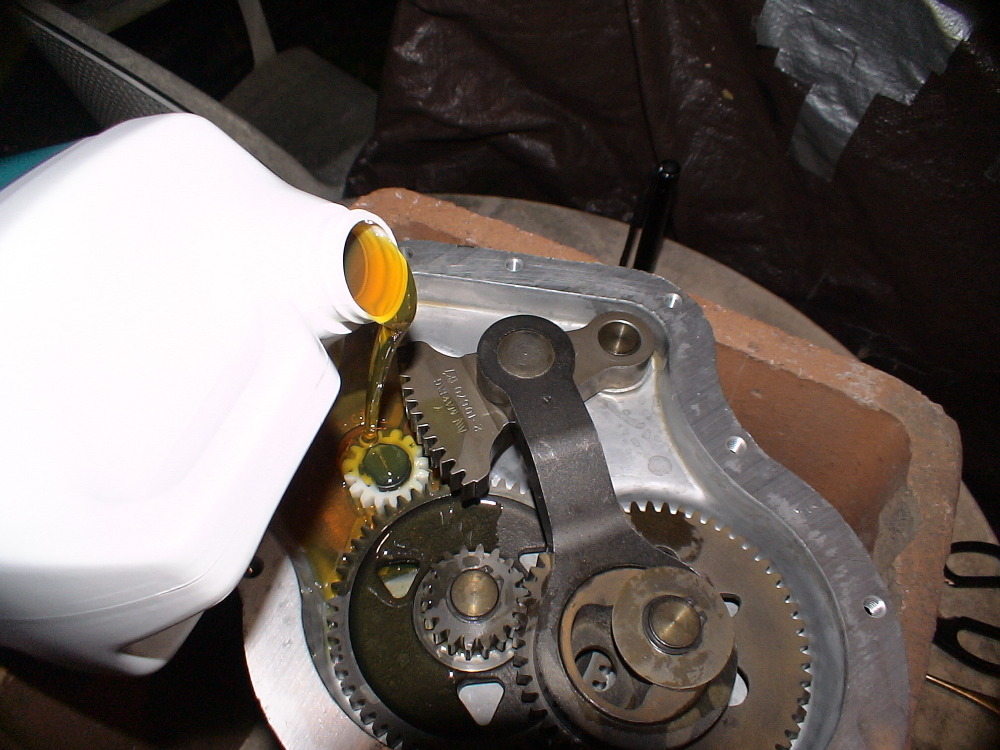
Align the studs on the transmission cover with the holes in the gear housing while keeping the gasket in place and when the two halves start together turn the agitator shaft spline a little bit back and forth to make it engage the segment gear. I found this to be one of the hardest parts of re-assembling the transmission. Everything has to be in perfect alignment for the two halves to go together. You'll notice I ended up using an old chimney tile to support the transmission for reassembly and let the drive tube drop through the umbrella hole in the table. You can't put any pressure on the bottom of the drive shaft as the lugs on the washer have to remain engaged in the casting�s slots of the gear housing. The end of the drive shaft also has to remain protected so the drive lug will mate with the shaft. In my excitement to get this back together I forgot to take a picture of the gear housing after it was filled with oil. The fill is to the top edge of the gear housing.

This post was last edited 02/08/2012 at 08:47 | ||
| Post# 574301 , Reply# 100 2/8/2012 at 07:00 (4,552 days old) by beekeyknee (Columbia, MO) | ||
|
| ||
| Post# 574303 , Reply# 101 2/8/2012 at 07:01 (4,552 days old) by beekeyknee (Columbia, MO) | ||
|
| ||
| Post# 574304 , Reply# 102 2/8/2012 at 07:02 (4,552 days old) by beekeyknee (Columbia, MO) | ||
|
| ||
| Post# 574305 , Reply# 103 2/8/2012 at 07:02 (4,552 days old) by beekeyknee (Columbia, MO) | ||
|
| ||
| Post# 574306 , Reply# 104 2/8/2012 at 07:04 (4,552 days old) by beekeyknee (Columbia, MO) | ||
|
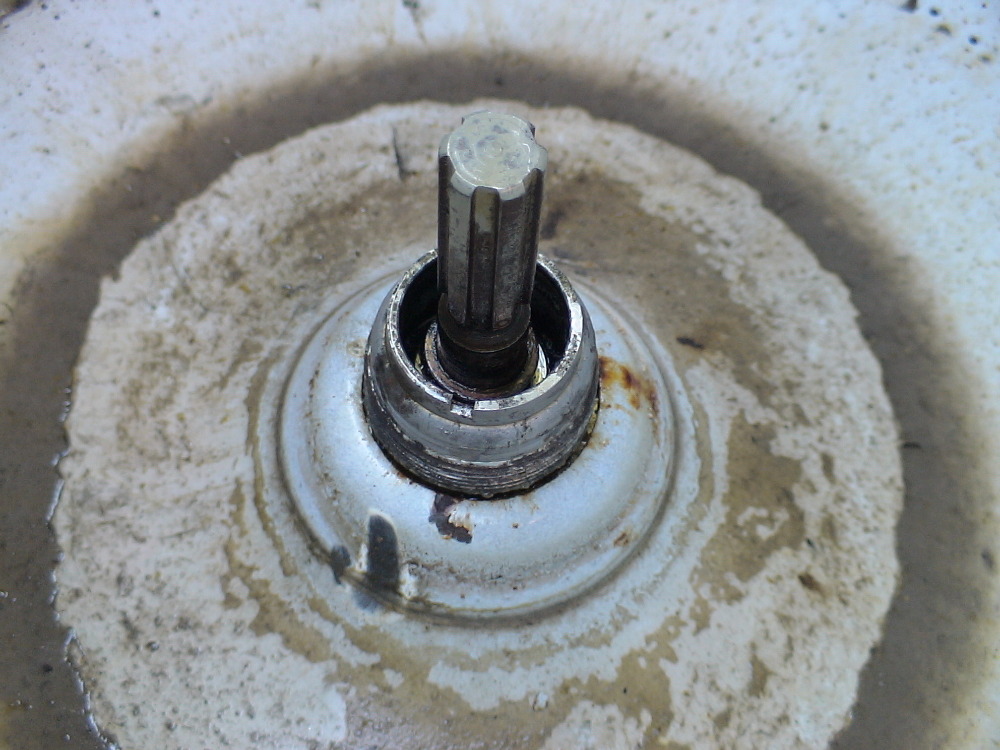
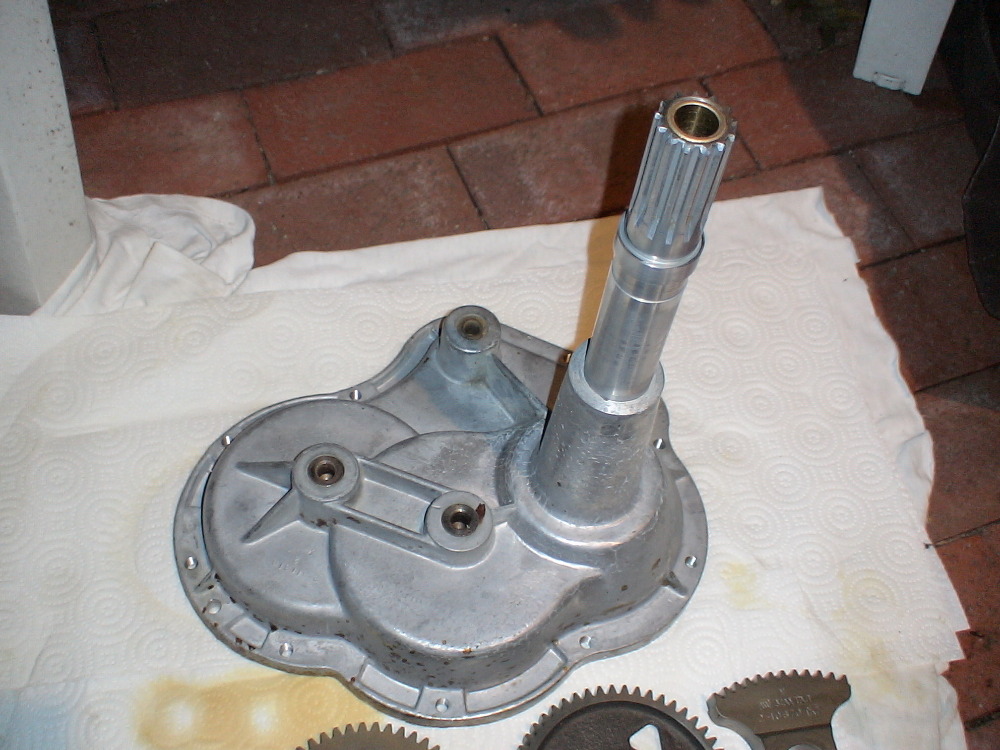
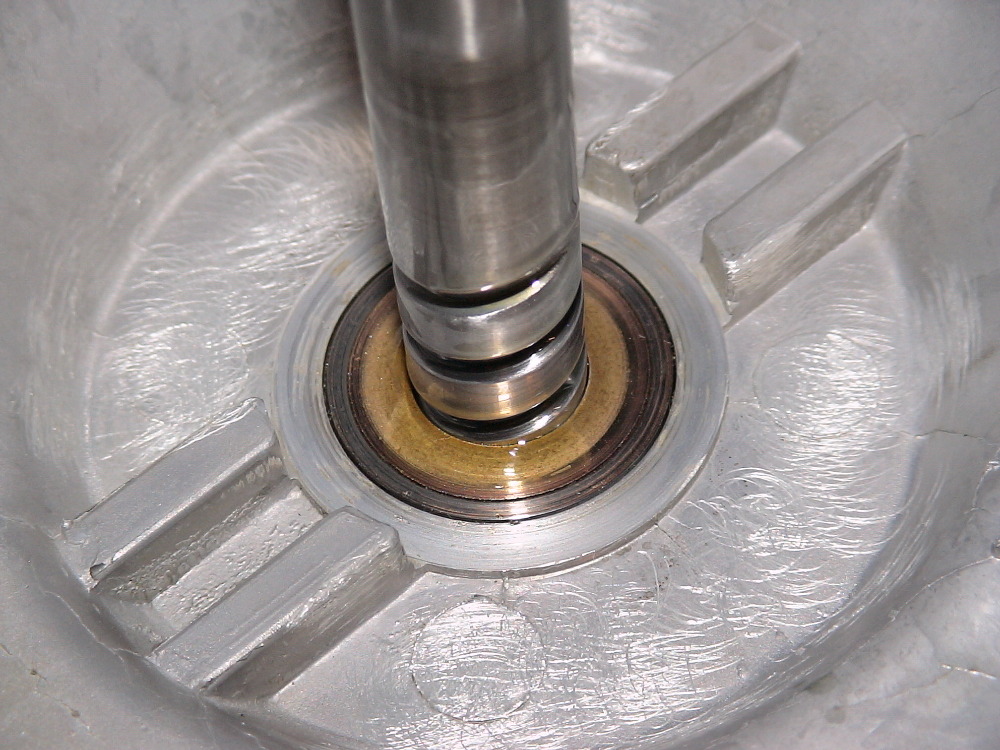
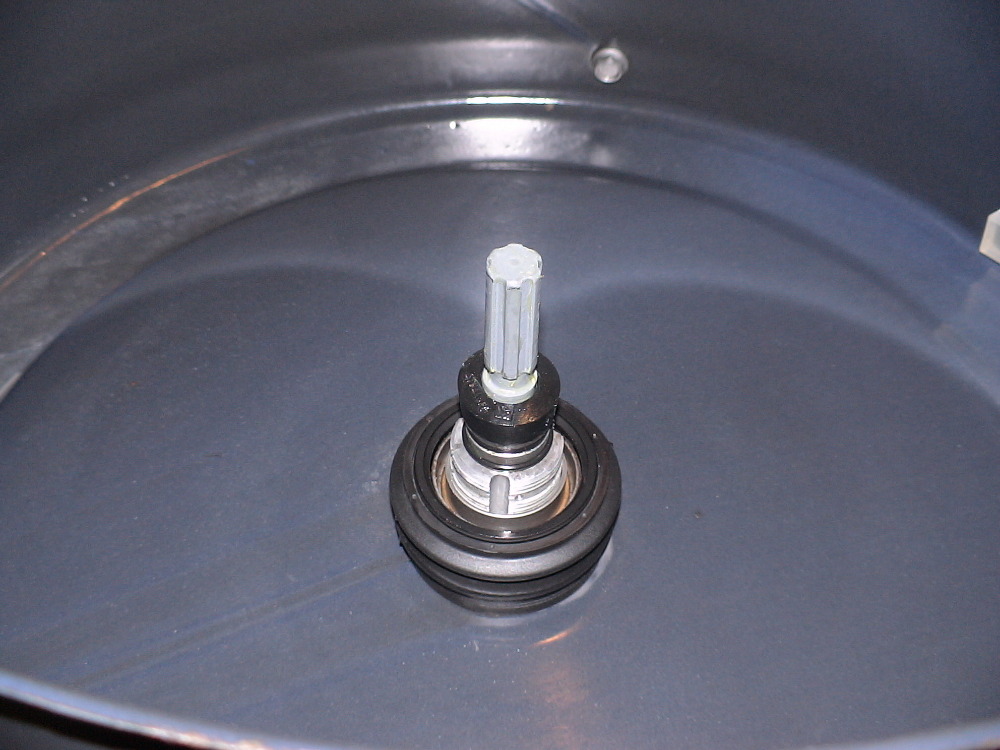
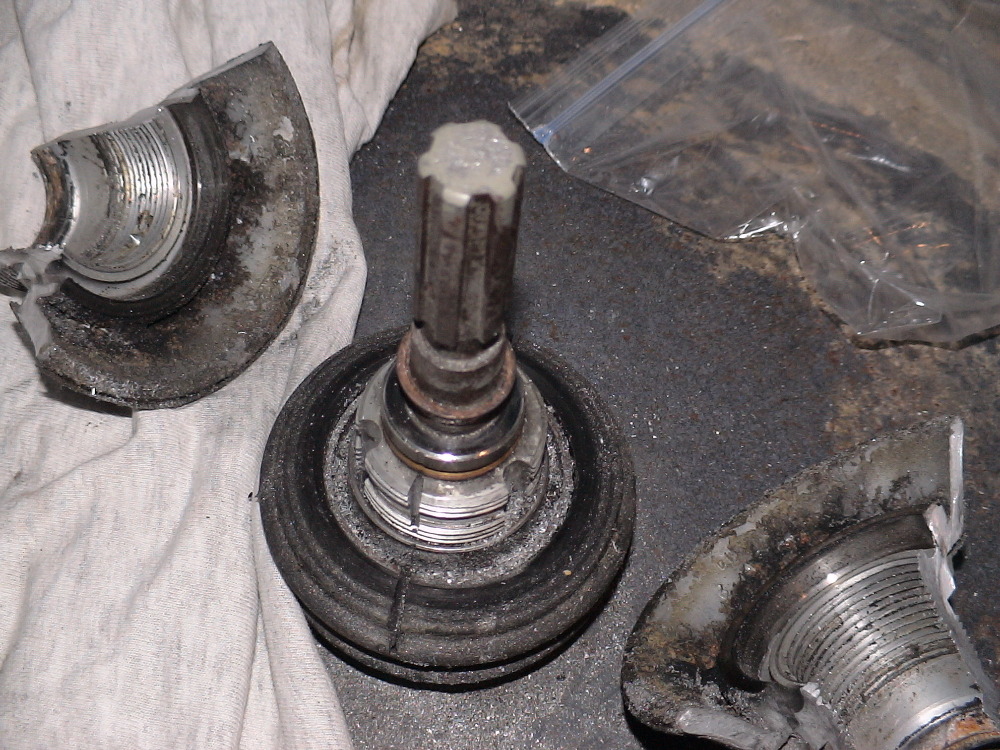
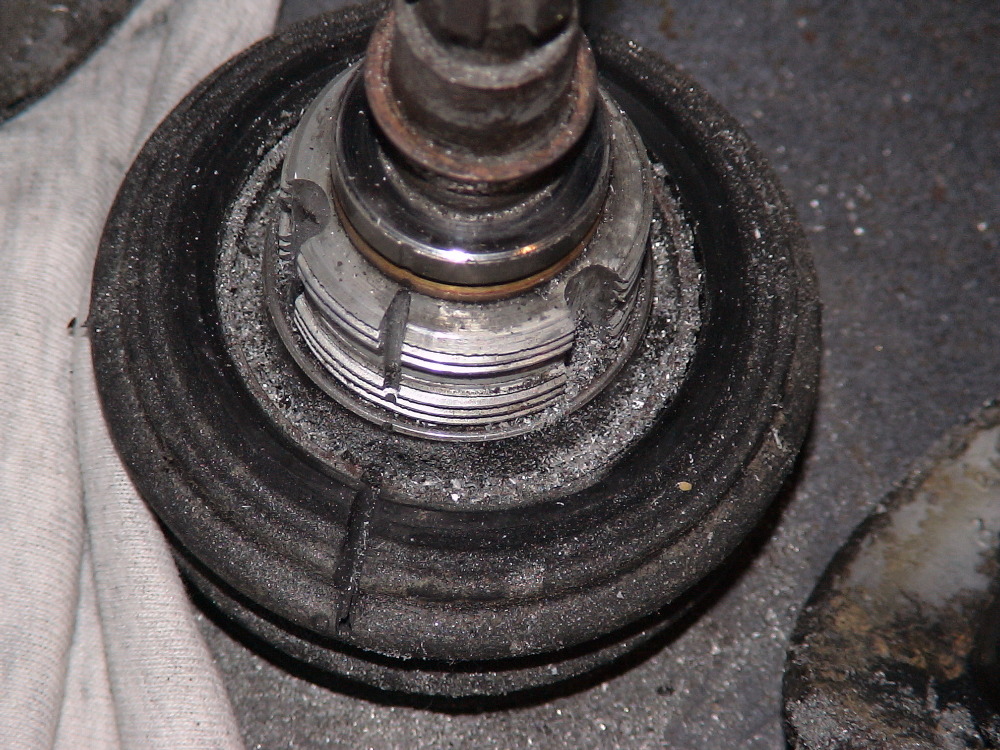
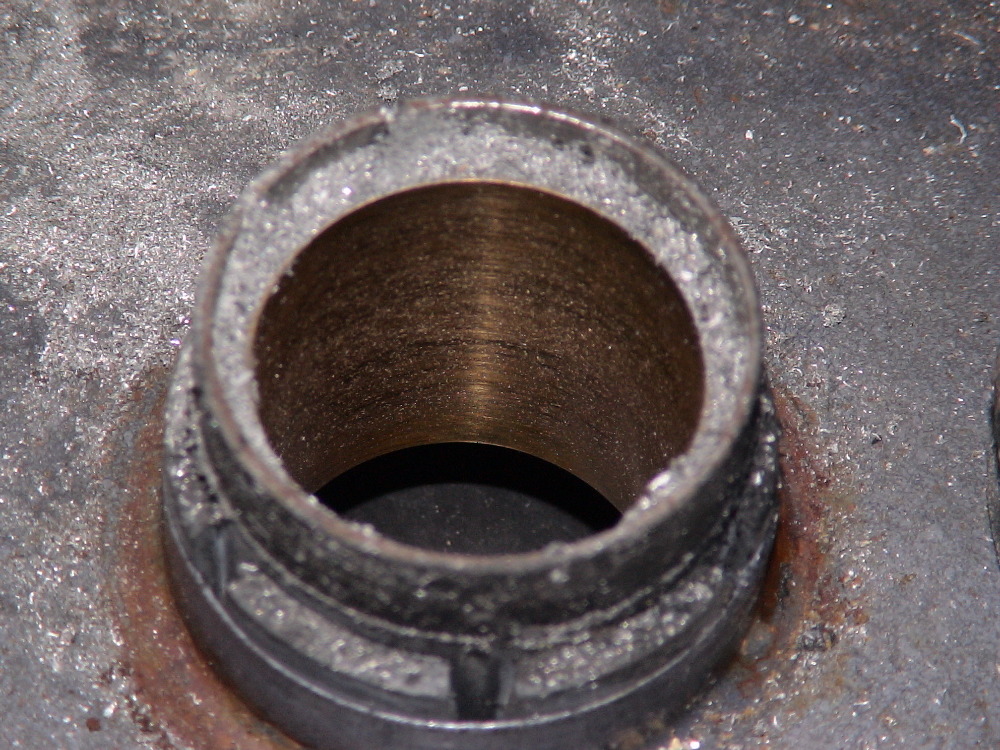
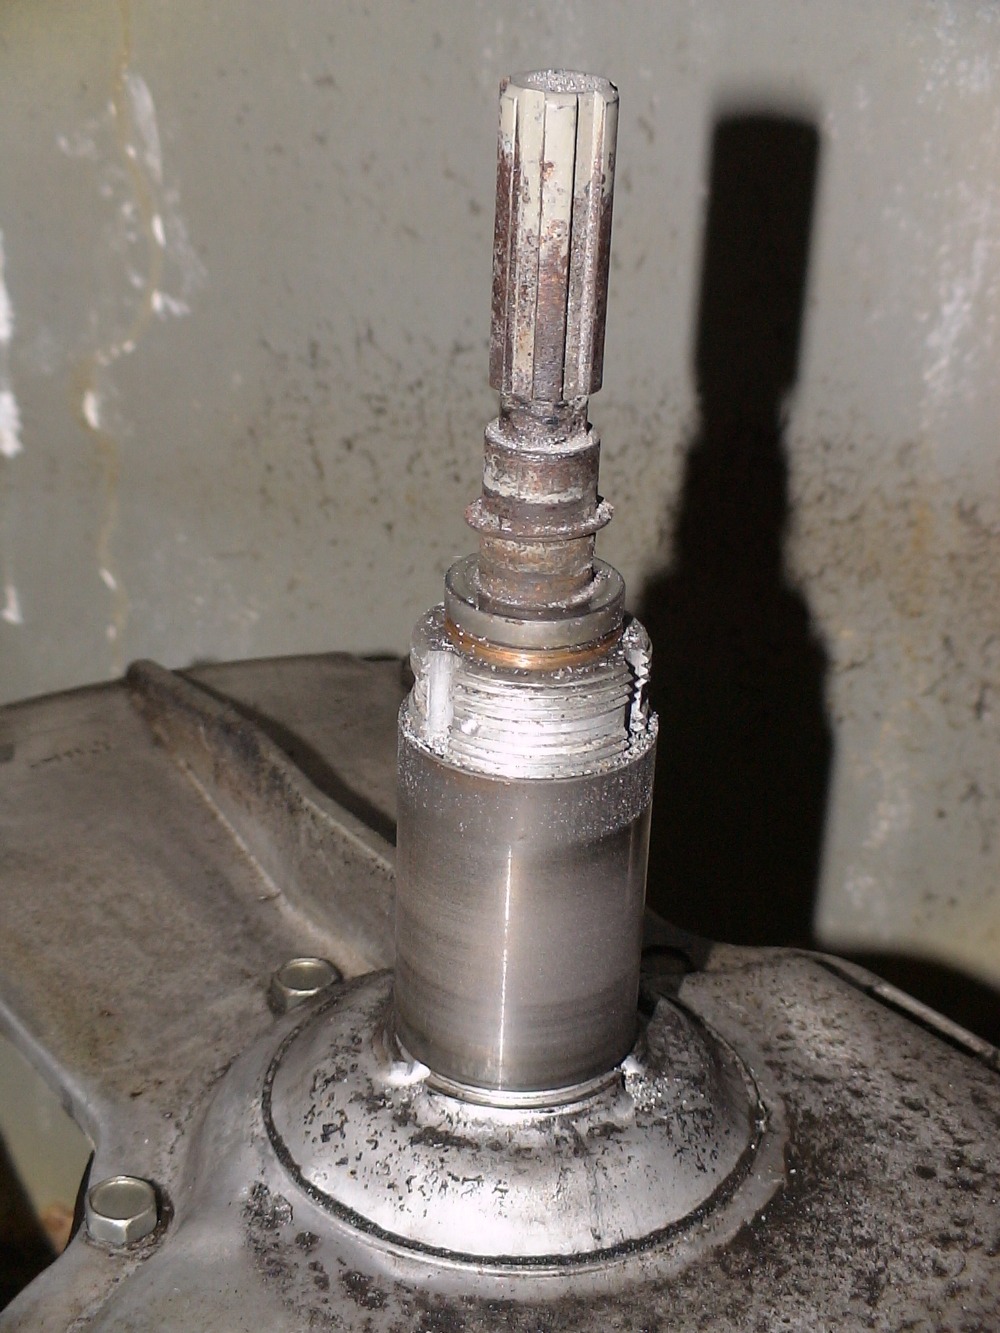
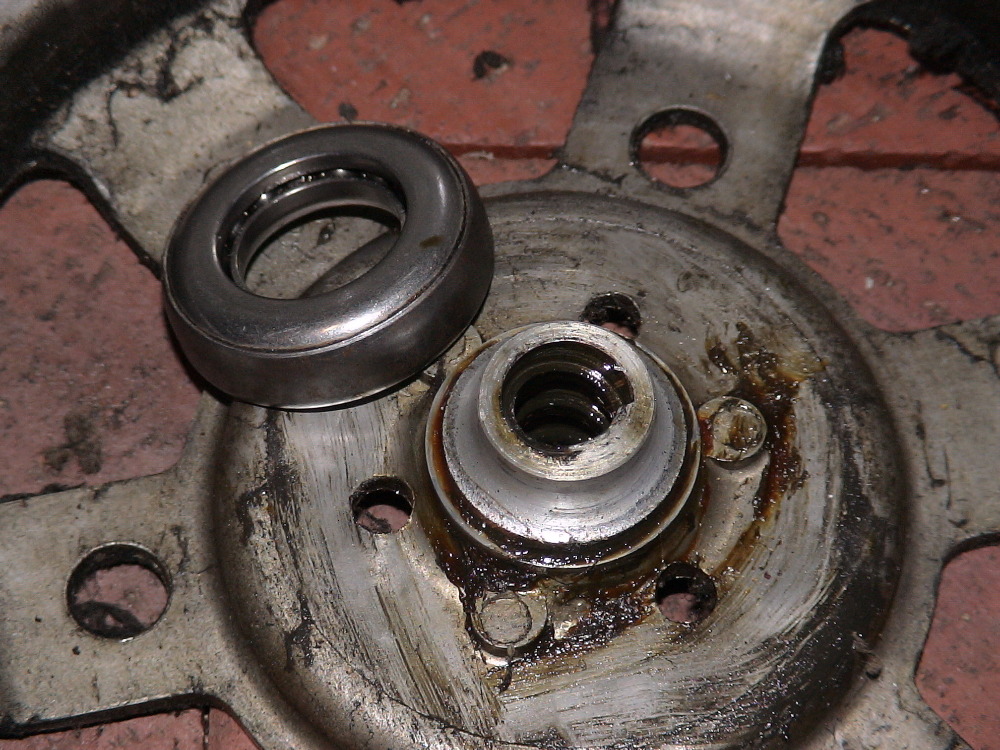
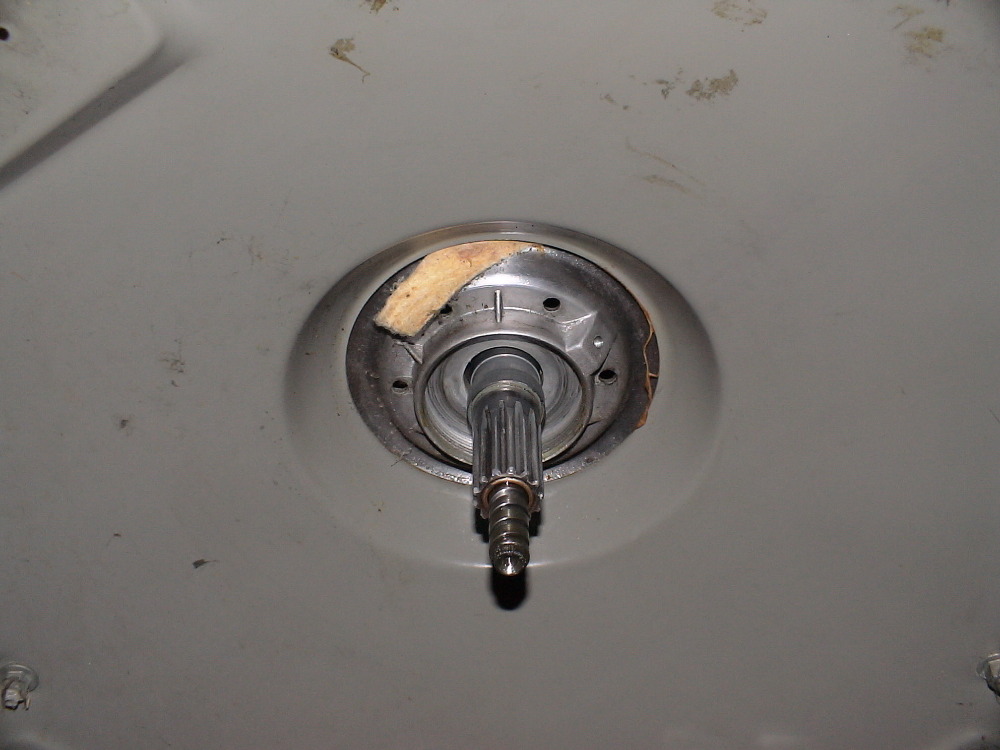
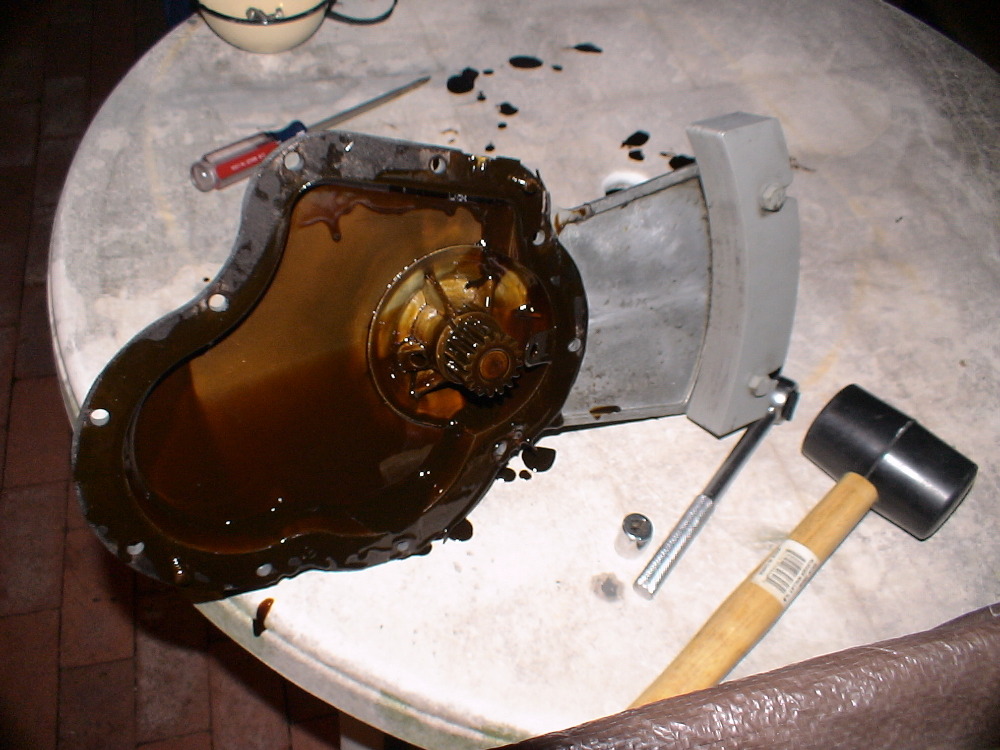
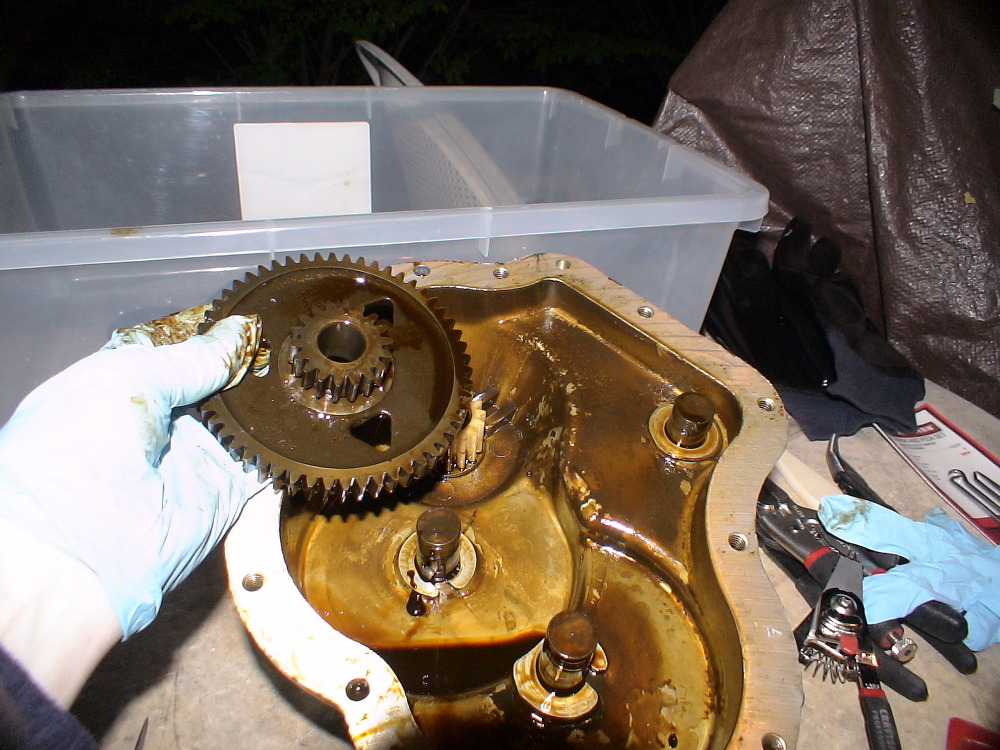
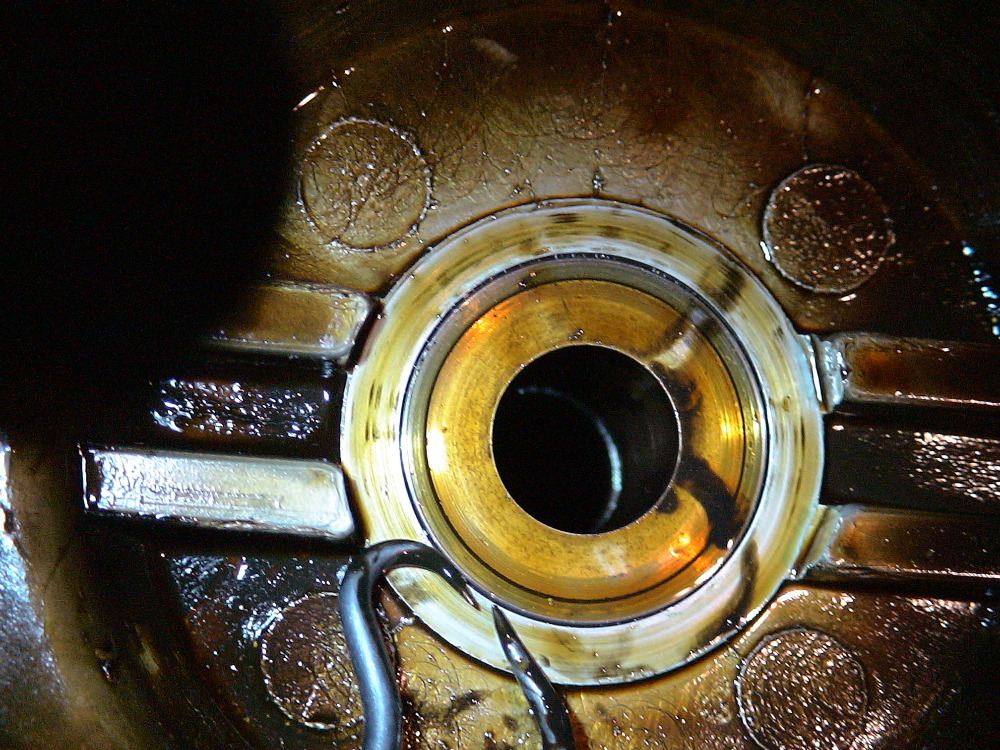
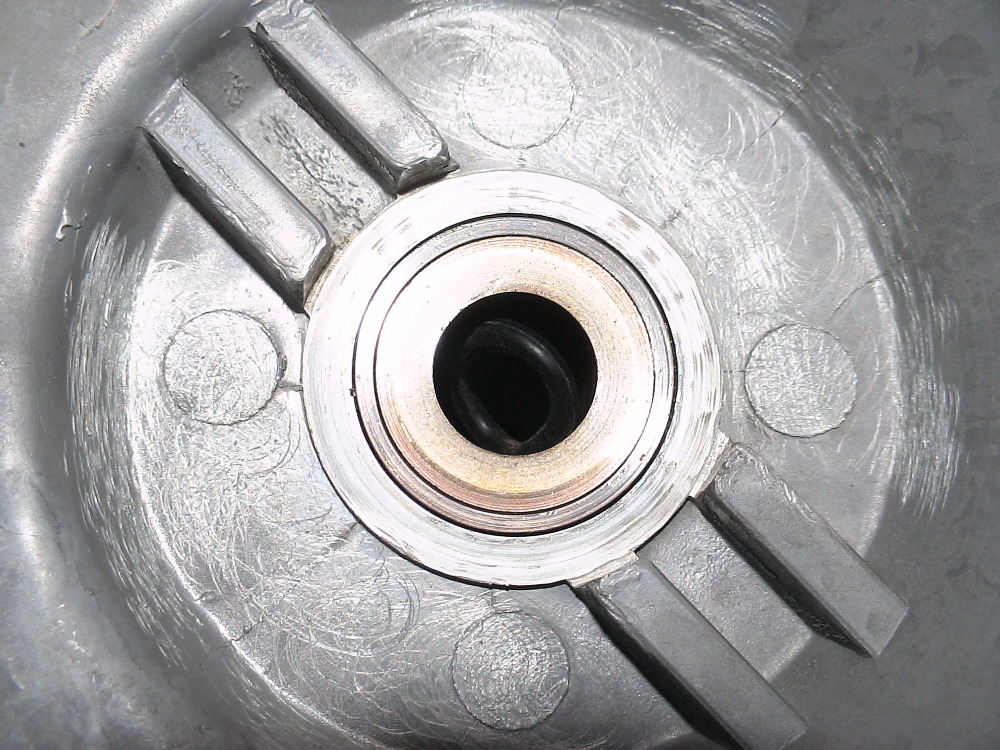
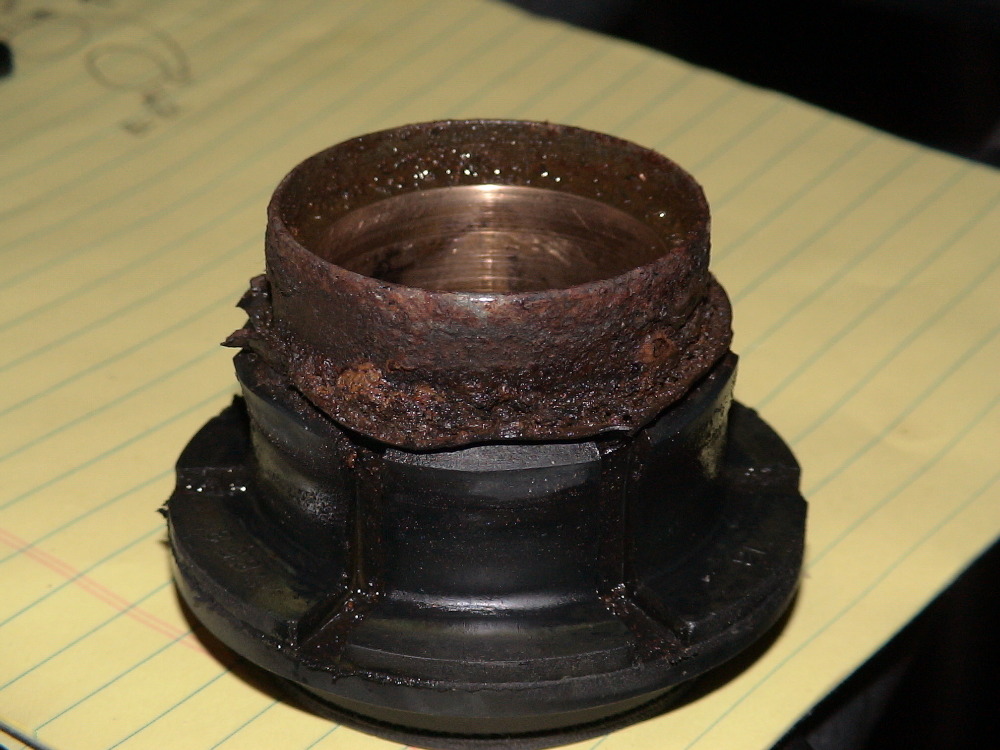
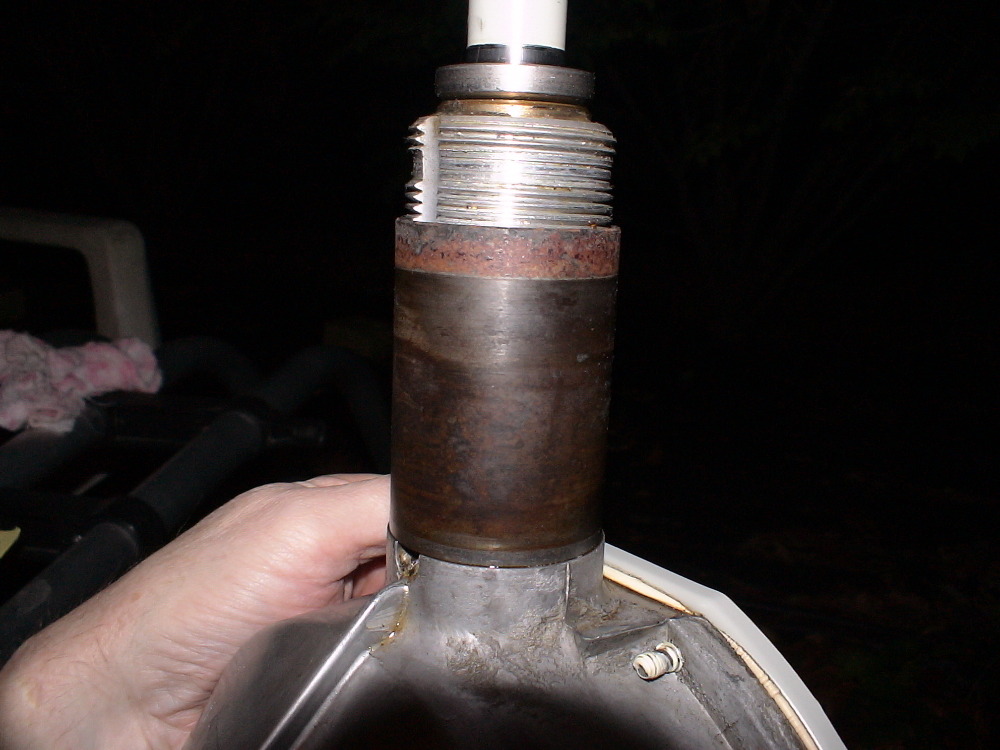
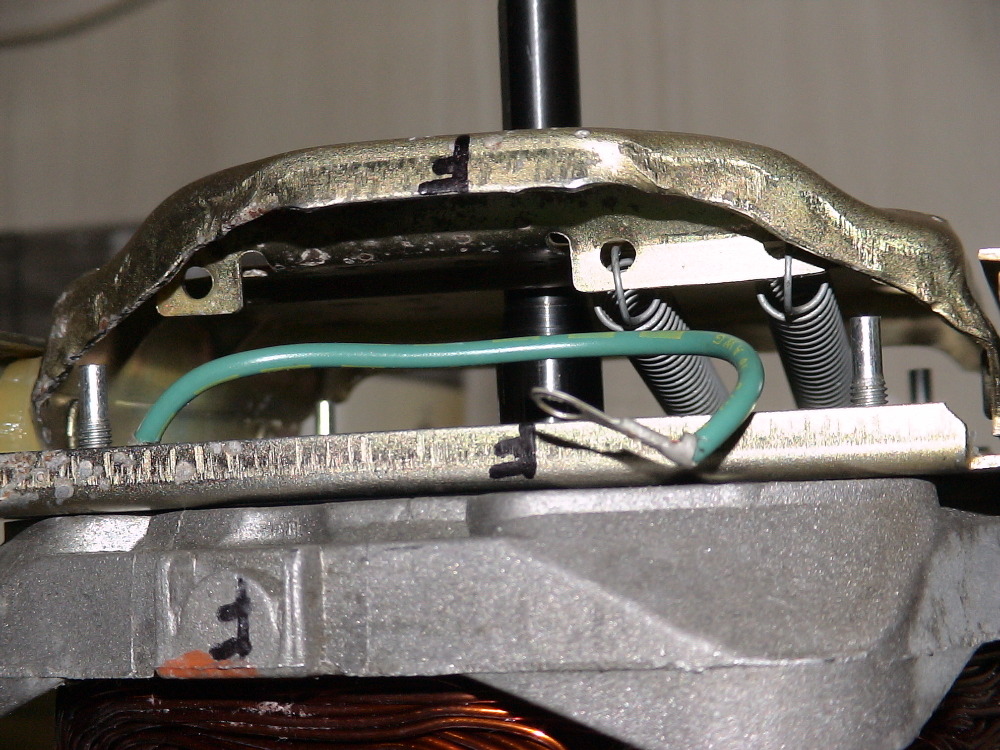
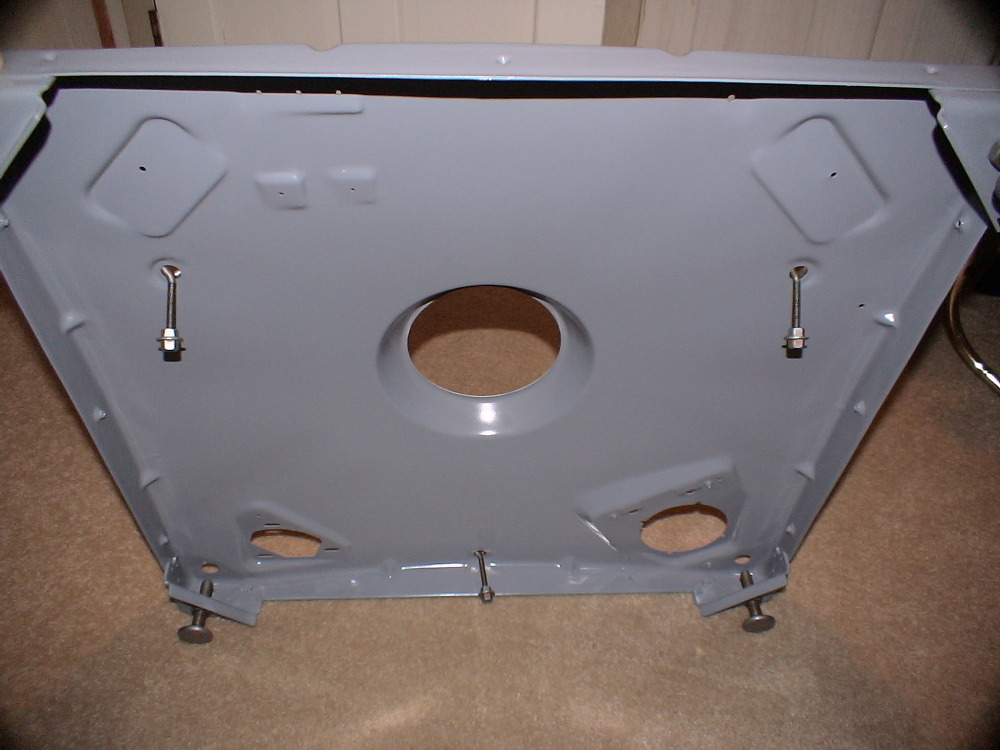
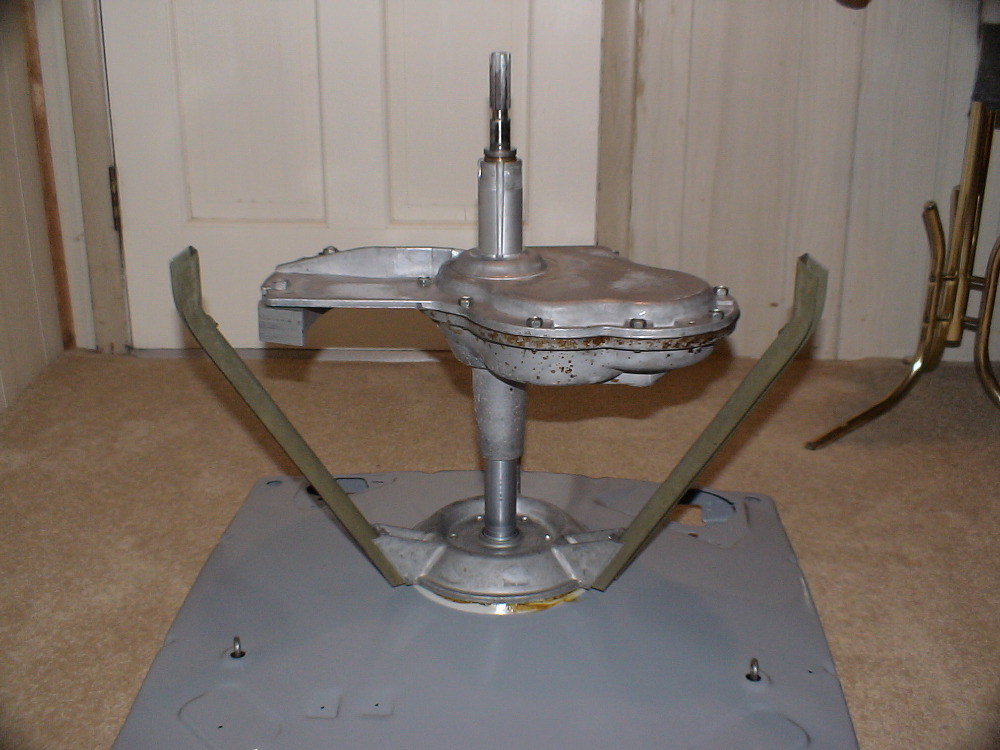
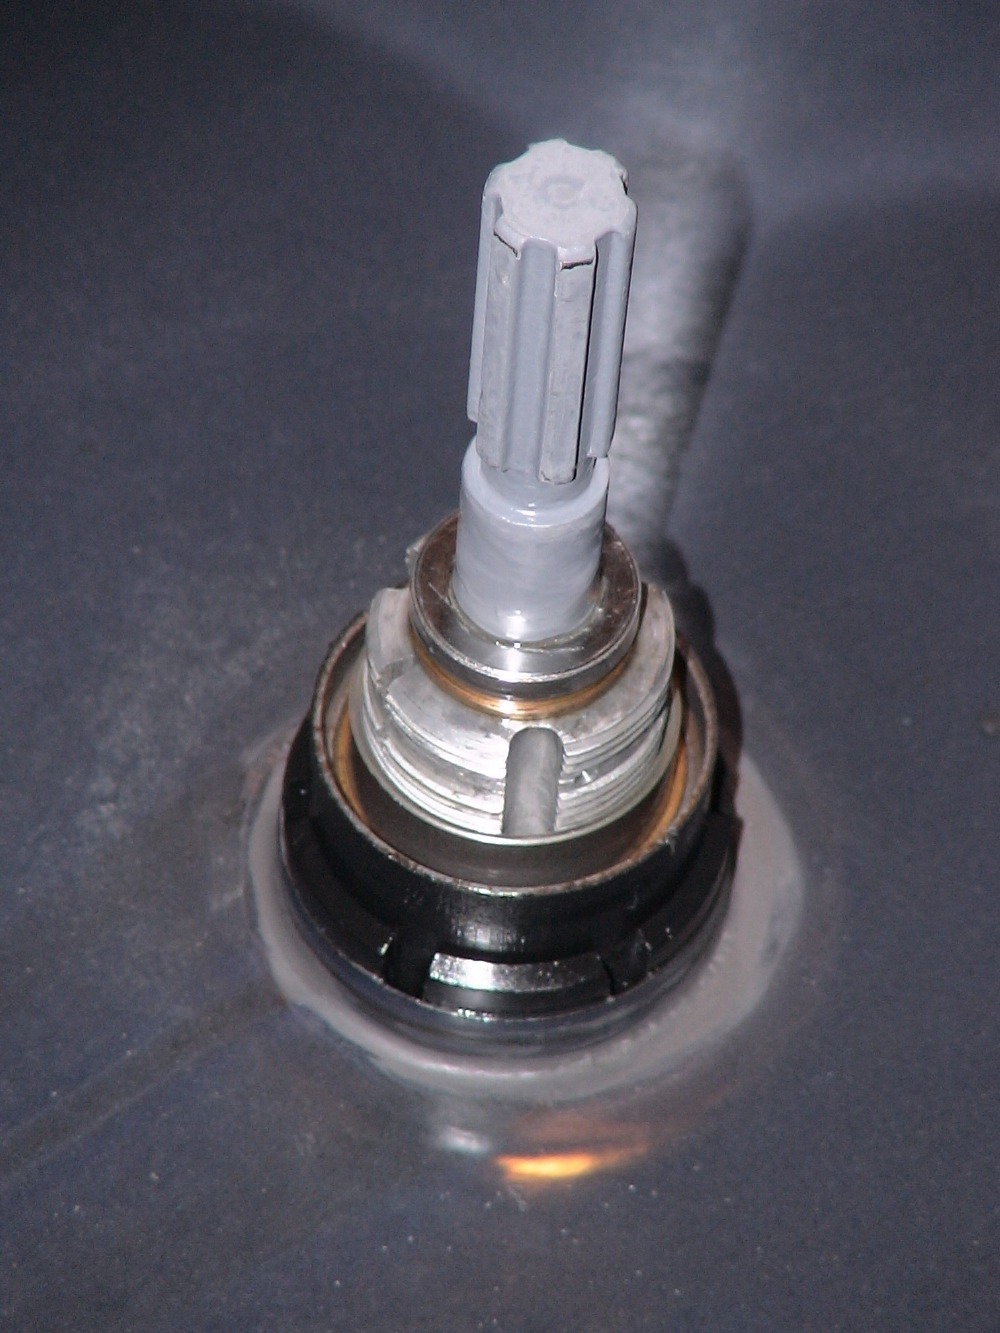
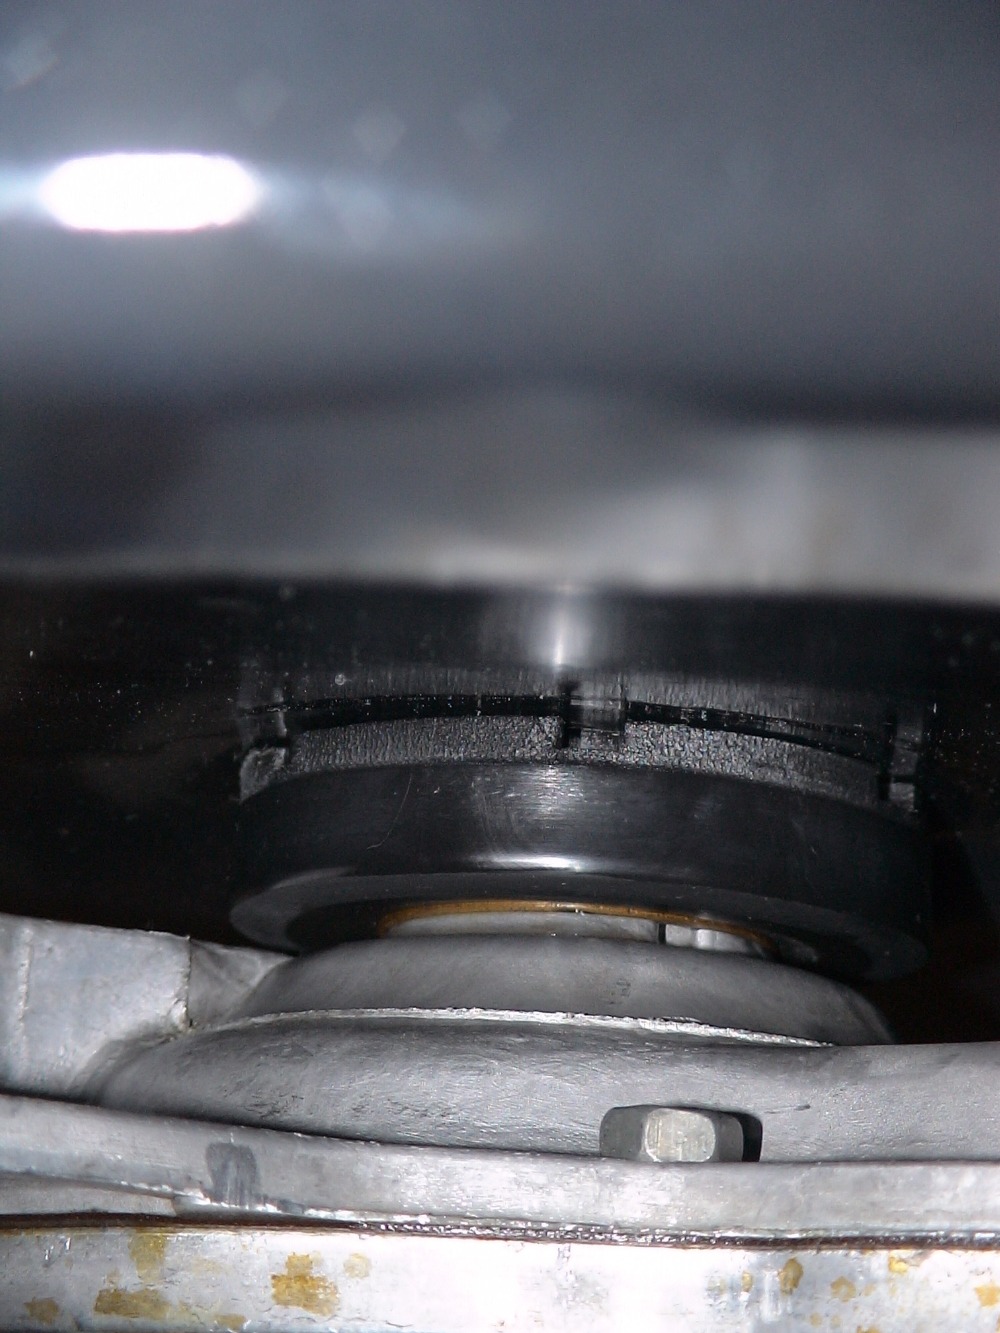
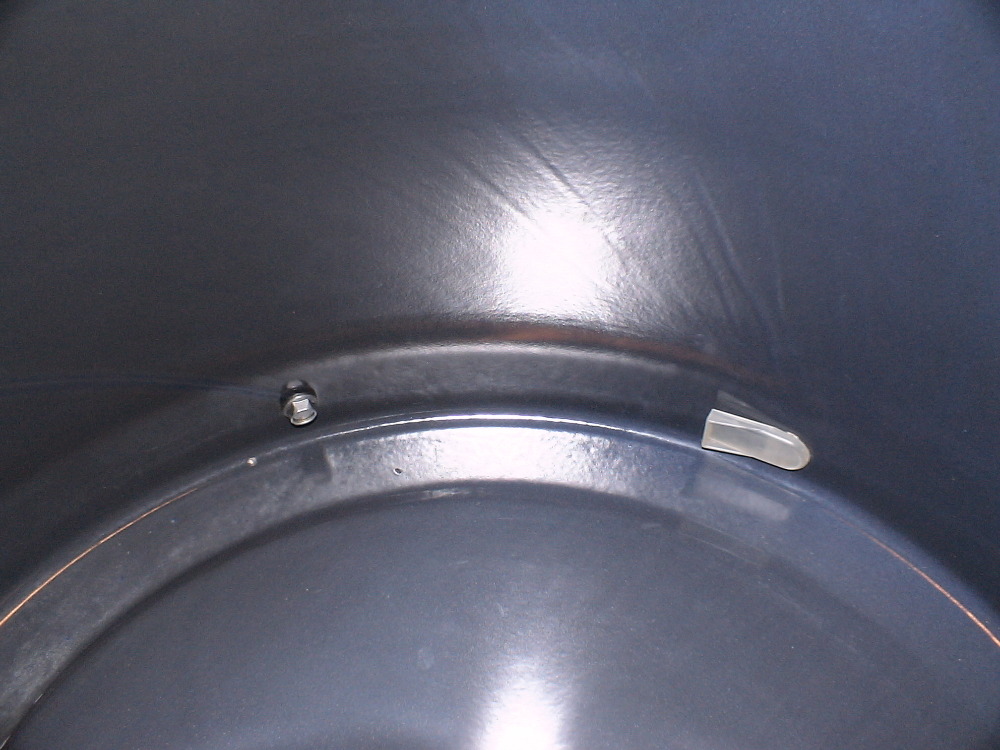
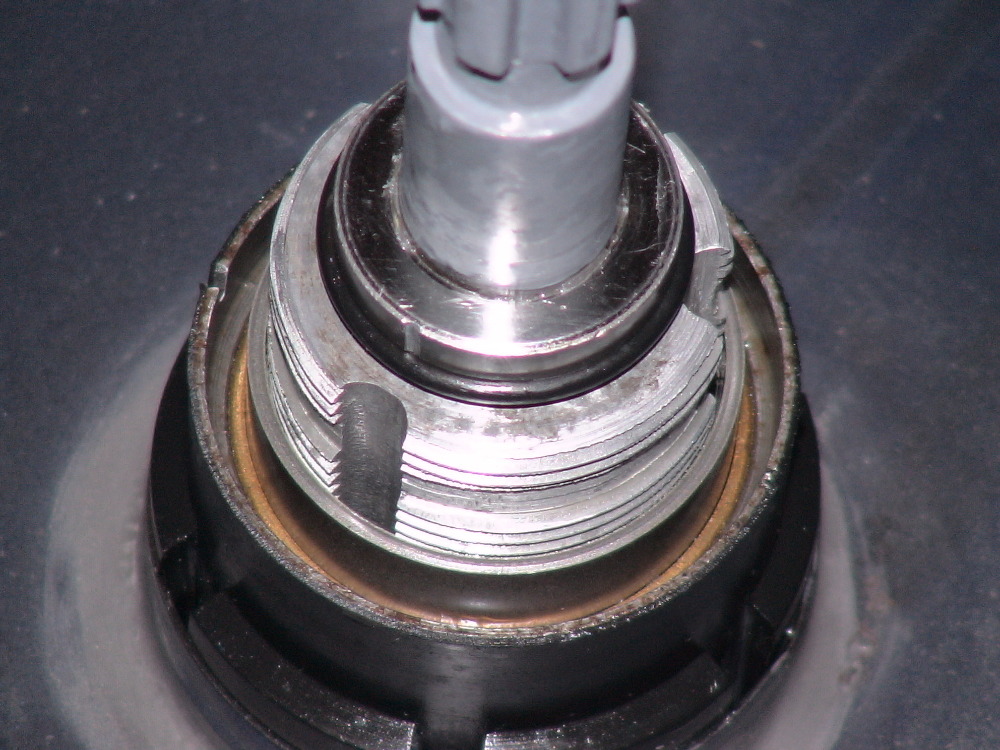
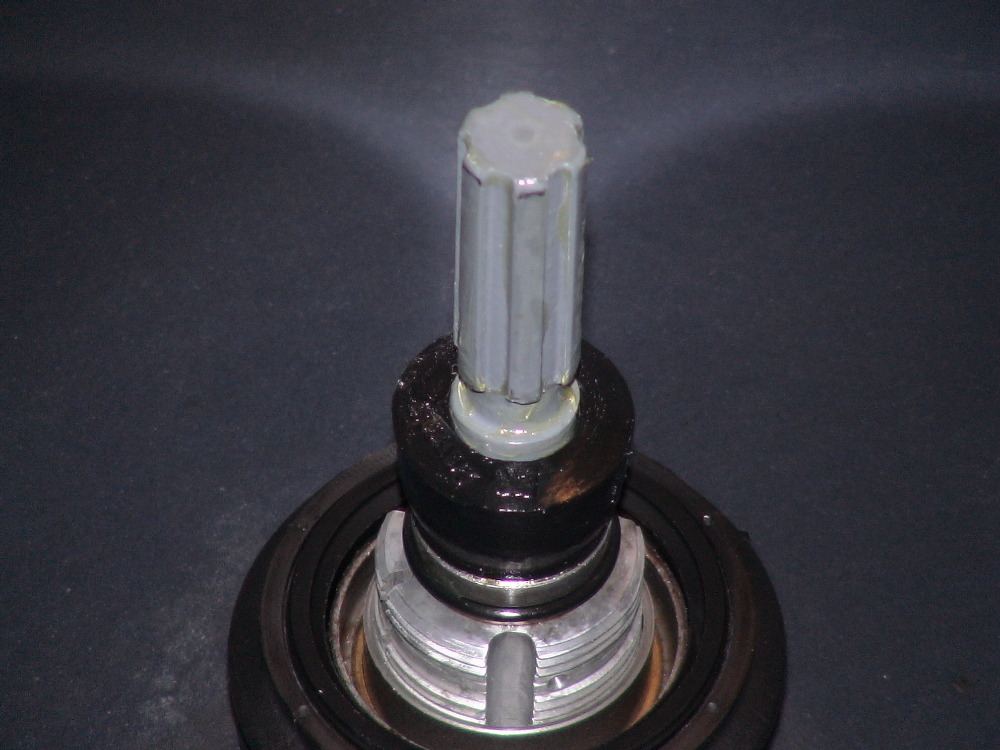
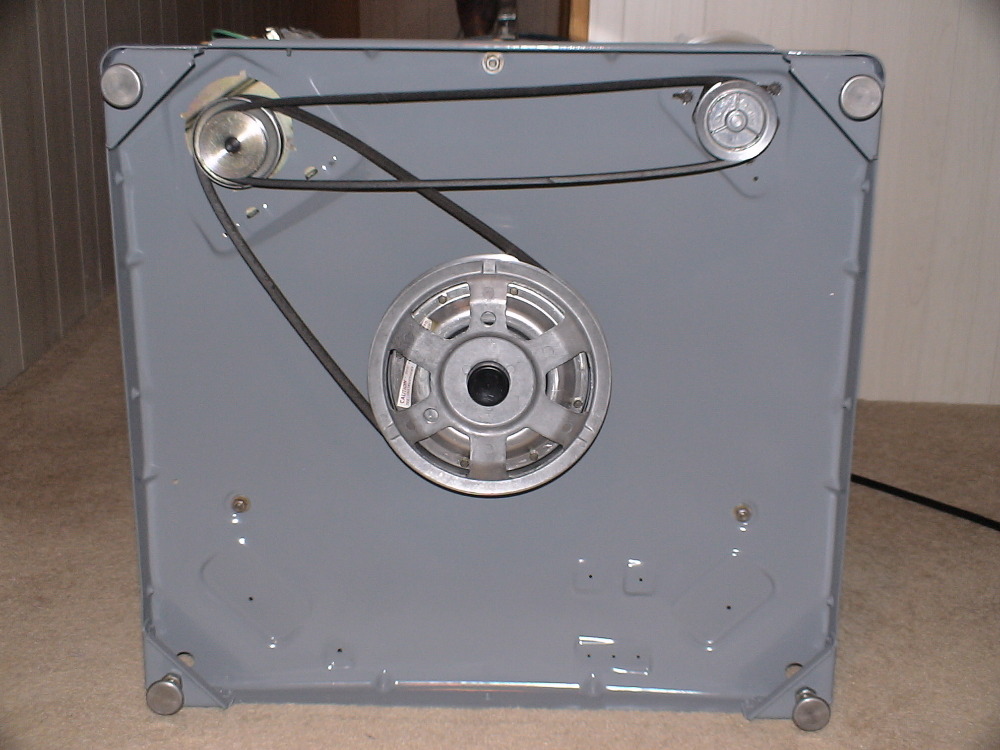
I guess the machine had an agitator shaft seal leak. It had the old style stem mount which uses the old style agitator shaft seal that doesn't go bad as often as the new integrated stem mount and seal, but water was running straight out the tub bearing and down over the transmission, as you can see the streaks on the transmission neck in this picture. By looking at the previous picture you'll notice the severe rusting on the top of the tub bearing. I suppose moisture in the area and movement of the tubs during spin got the top of the tub bearing wet and caused it to rust. During wash the water would run down over the transmission, down the drive tube, over the water deflector, through the holes in the damper and out the bottom of the machine. During spin it would fling water out inside the cabinet off of the spinning transmission. Wash was slow and spin was slow. The drive belt and pulley was glazed. When I pushed against the motor with my foot everything would speed up.

| ||
| Post# 574307 , Reply# 105 2/8/2012 at 07:05 (4,552 days old) by beekeyknee (Columbia, MO) | ||
|
| ||
| Post# 574308 , Reply# 106 2/8/2012 at 07:06 (4,552 days old) by beekeyknee (Columbia, MO) | ||
|
| ||
| Post# 574309 , Reply# 107 2/8/2012 at 07:07 (4,552 days old) by beekeyknee (Columbia, MO) | ||
|
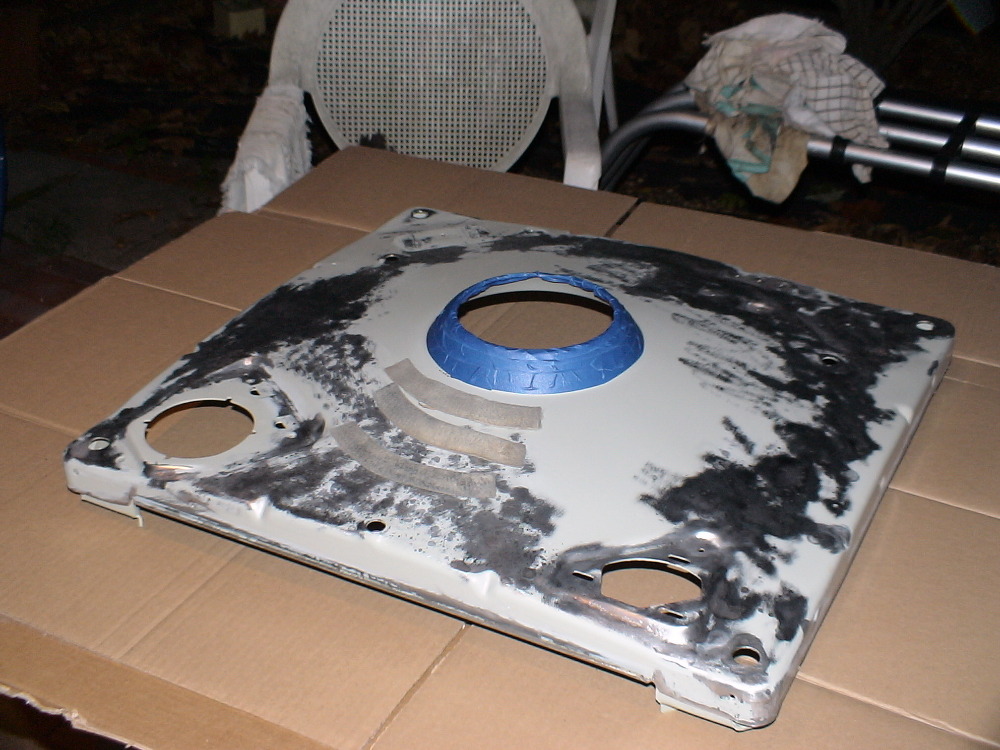
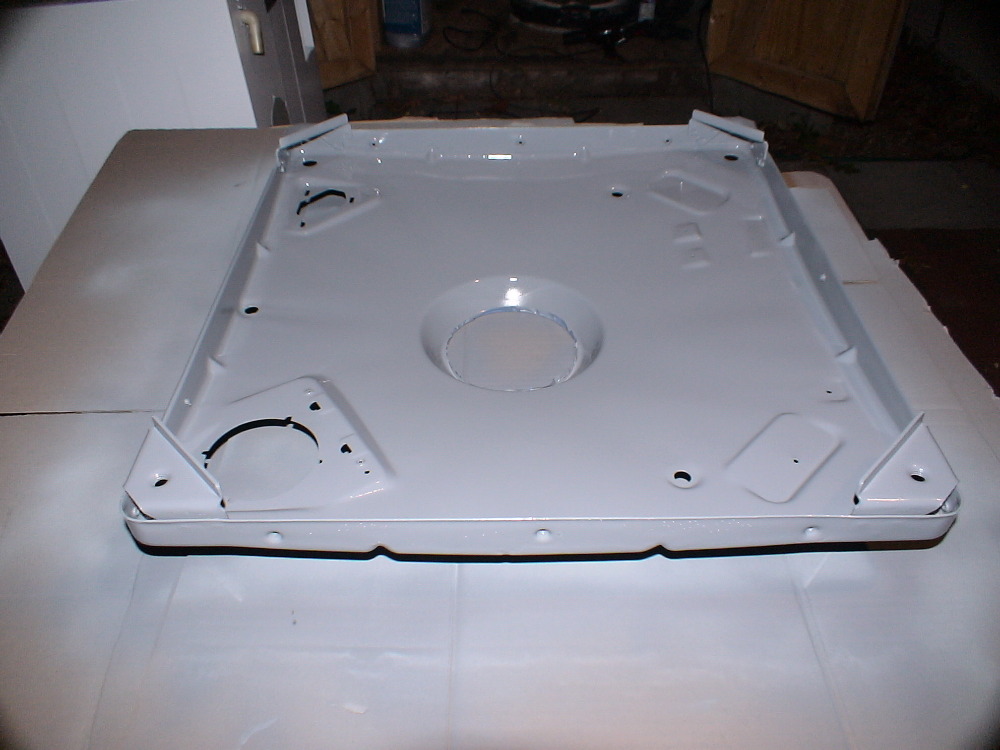
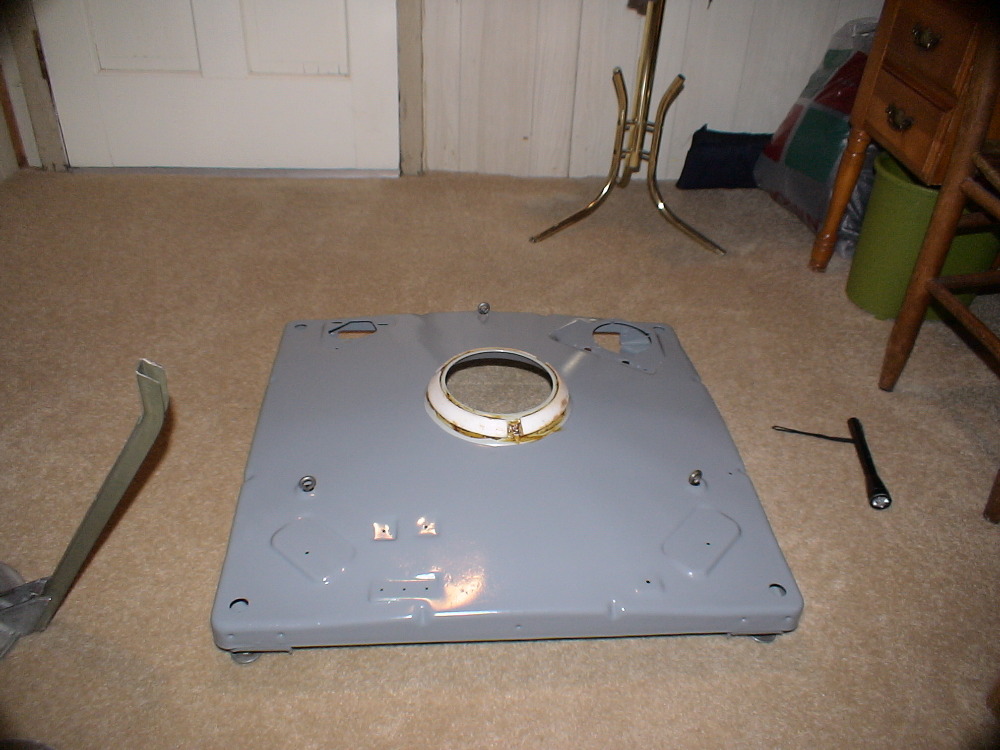
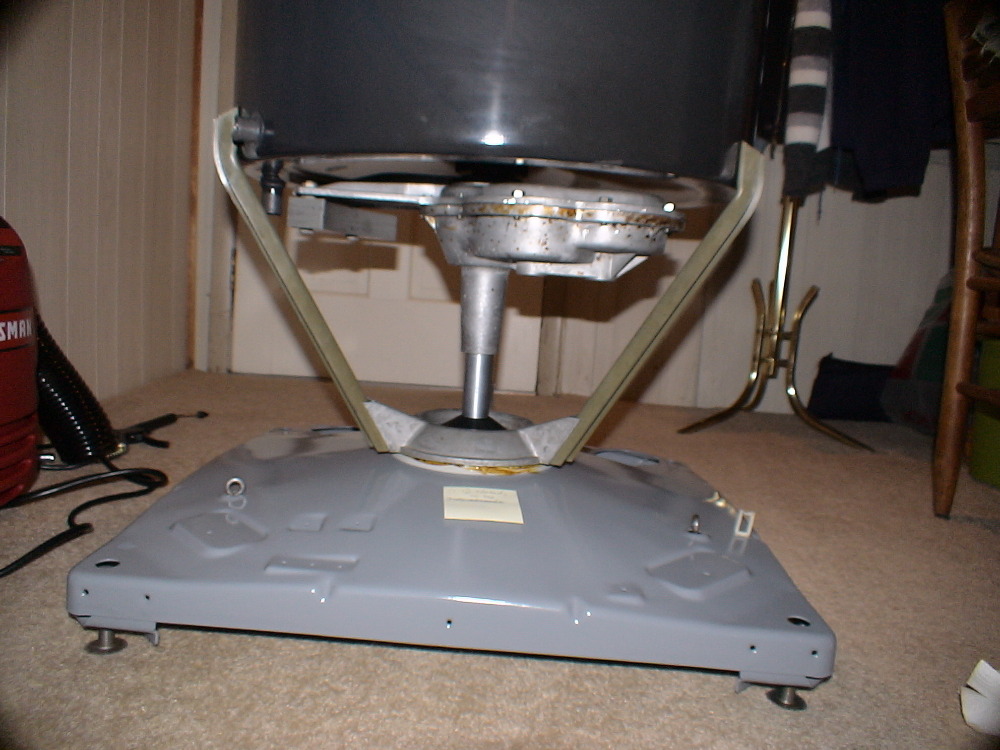
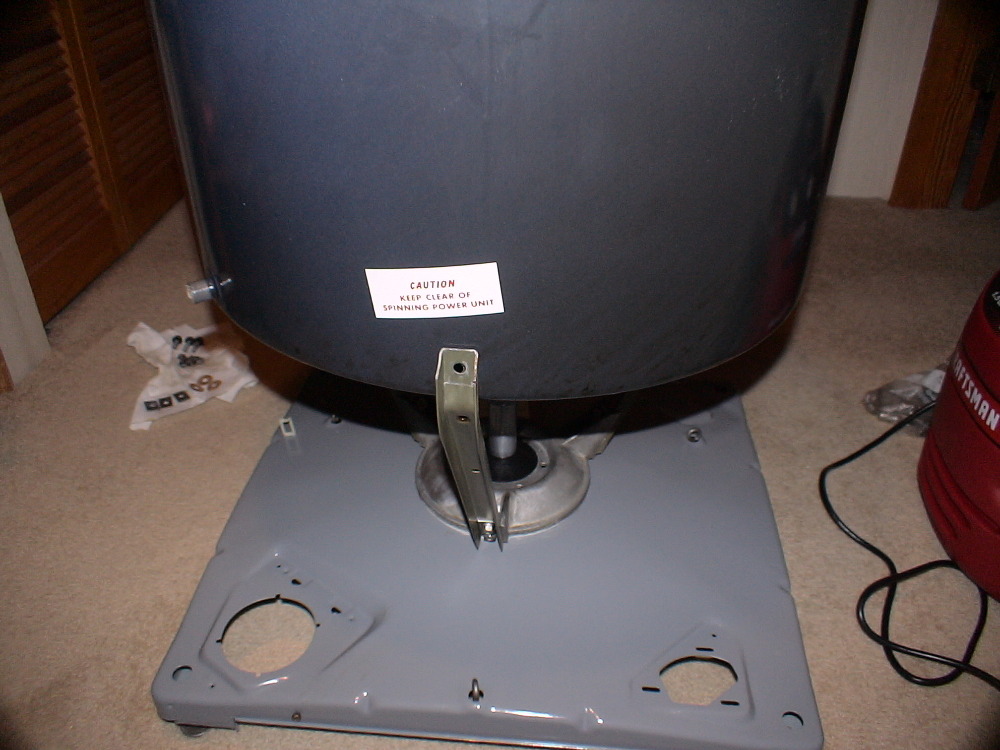
The base prepared for painting. Old damper pads removed and laying on front of base. I used lacquer thinner to remove the old damper adhesive and damper remnants from the base and masked off the area. This paint is much stronger than anything I could put on, so I decided to clean it and mask it before painting. It will provide a stronger gluing surface for the new dampers.
| ||
| Post# 574310 , Reply# 108 2/8/2012 at 07:08 (4,552 days old) by beekeyknee (Columbia, MO) | ||
|
| ||
| Post# 574311 , Reply# 109 2/8/2012 at 07:09 (4,552 days old) by beekeyknee (Columbia, MO) | ||
|
| ||
| Post# 574312 , Reply# 110 2/8/2012 at 07:10 (4,552 days old) by beekeyknee (Columbia, MO) | ||
|
| ||
| Post# 574313 , Reply# 111 2/8/2012 at 07:11 (4,552 days old) by beekeyknee (Columbia, MO) | ||
|
| ||
| Post# 574314 , Reply# 112 2/8/2012 at 07:12 (4,552 days old) by beekeyknee (Columbia, MO) | ||
|
| ||
| Post# 574315 , Reply# 113 2/8/2012 at 07:13 (4,552 days old) by beekeyknee (Columbia, MO) | ||
|
| ||
| Post# 574316 , Reply# 114 2/8/2012 at 07:14 (4,552 days old) by beekeyknee (Columbia, MO) | ||
|
| ||
| Post# 574317 , Reply# 115 2/8/2012 at 07:15 (4,552 days old) by beekeyknee (Columbia, MO) | ||
|
| ||
| Post# 574319 , Reply# 116 2/8/2012 at 07:16 (4,552 days old) by beekeyknee (Columbia, MO) | ||
|
| ||
| Post# 574320 , Reply# 117 2/8/2012 at 07:17 (4,552 days old) by beekeyknee (Columbia, MO) | ||
|
| ||
| Post# 574321 , Reply# 118 2/8/2012 at 07:18 (4,552 days old) by beekeyknee (Columbia, MO) | ||
|
| ||
| Post# 574322 , Reply# 119 2/8/2012 at 07:22 (4,552 days old) by beekeyknee (Columbia, MO) | ||
|
| ||
| Post# 574323 , Reply# 120 2/8/2012 at 07:23 (4,552 days old) by beekeyknee (Columbia, MO) | ||
|
| ||
| Post# 574325 , Reply# 121 2/8/2012 at 07:24 (4,552 days old) by beekeyknee (Columbia, MO) | ||
|
| ||
| Post# 574326 , Reply# 122 2/8/2012 at 07:25 (4,552 days old) by beekeyknee (Columbia, MO) | ||
|
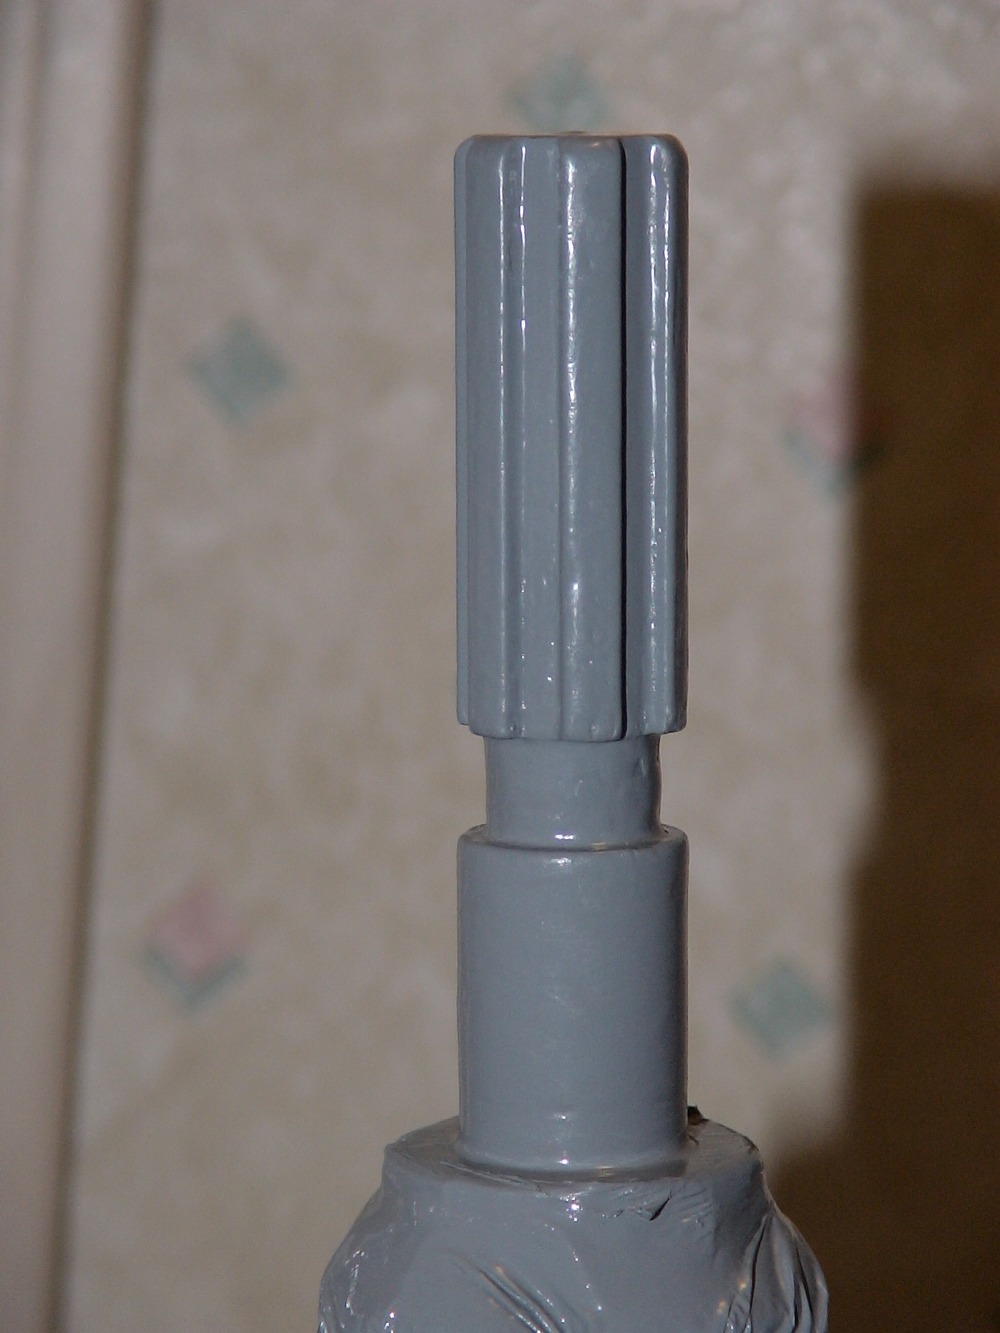
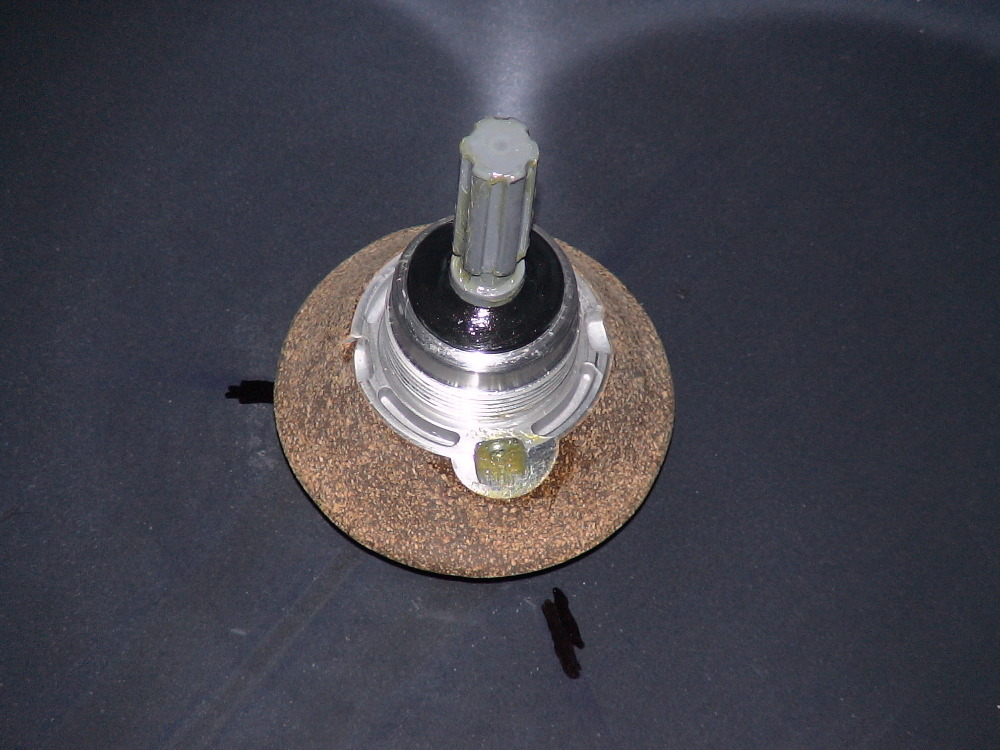
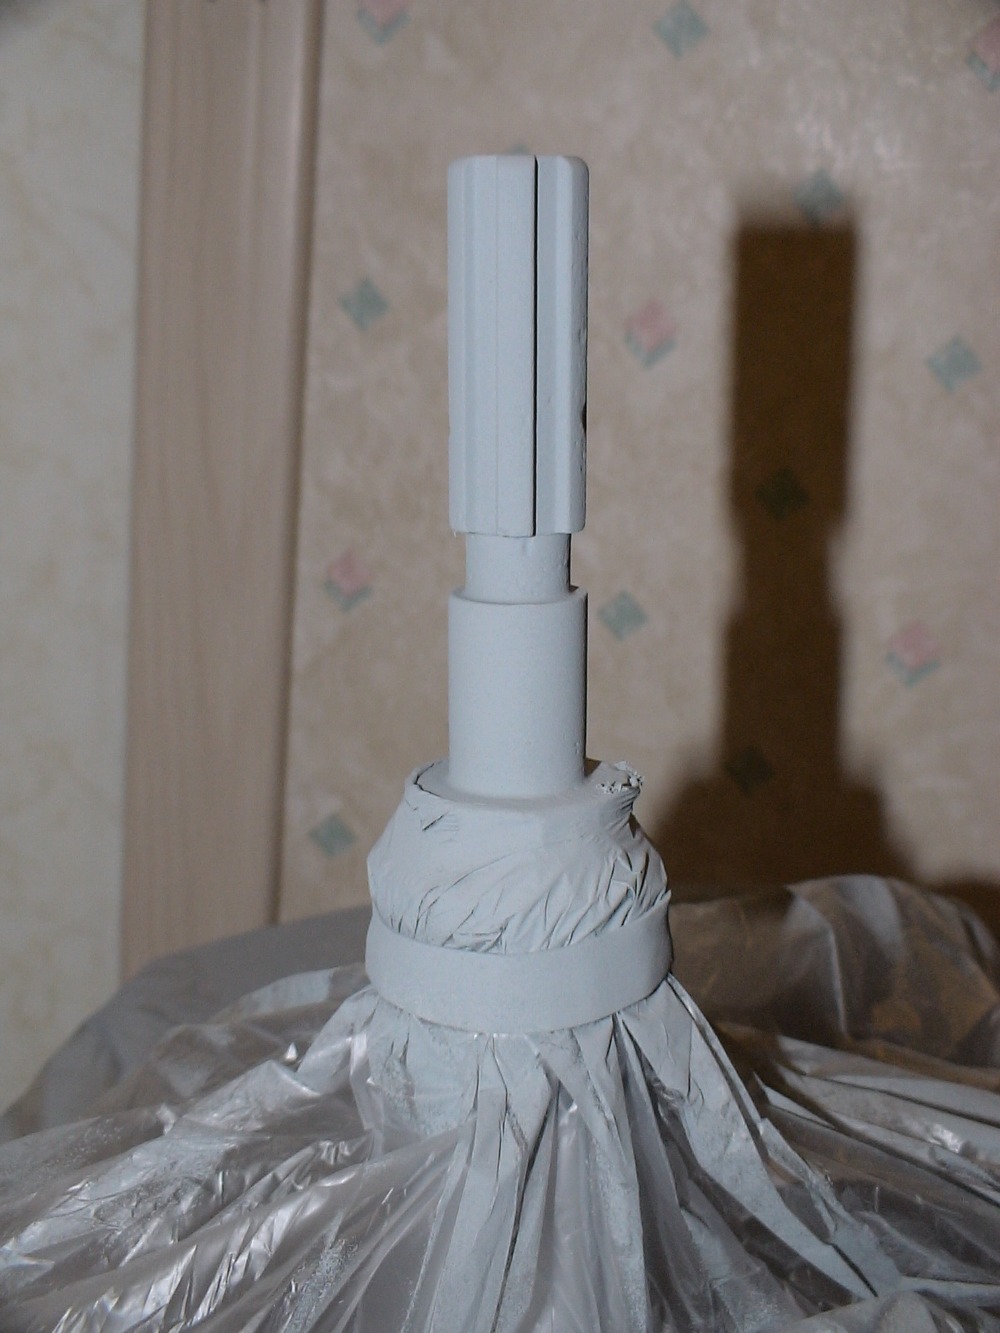
I coated the top of the agitator drive shaft with JB Weld thinned with a little water and applied it with a short bristled 1/2 inch wide synthetic artist brush. Don't get carried away with the JB Weld or the stop ring and agitator won't go back on the shaft. This was the only thing I could think of to seal that raw metal. The rust proof coating was long ago rusted away. It will need to dry as long as possible before re-assembly.
| ||
| Post# 574327 , Reply# 123 2/8/2012 at 07:26 (4,552 days old) by beekeyknee (Columbia, MO) | ||
|
| ||
| Post# 574328 , Reply# 124 2/8/2012 at 07:27 (4,552 days old) by beekeyknee (Columbia, MO) | ||
|
| ||
| Post# 574329 , Reply# 125 2/8/2012 at 07:28 (4,552 days old) by beekeyknee (Columbia, MO) | ||
|
| ||
| Post# 574331 , Reply# 126 2/8/2012 at 07:29 (4,552 days old) by beekeyknee (Columbia, MO) | ||
|
| ||
| Post# 574332 , Reply# 127 2/8/2012 at 07:30 (4,552 days old) by beekeyknee (Columbia, MO) | ||
|
| ||
| Post# 574333 , Reply# 128 2/8/2012 at 07:31 (4,552 days old) by beekeyknee (Columbia, MO) | ||
|
| ||
| Post# 574334 , Reply# 129 2/8/2012 at 07:32 (4,552 days old) by beekeyknee (Columbia, MO) | ||
|
| ||
| Post# 574335 , Reply# 130 2/8/2012 at 07:33 (4,552 days old) by beekeyknee (Columbia, MO) | ||
|
| ||
| Post# 574336 , Reply# 131 2/8/2012 at 07:34 (4,552 days old) by beekeyknee (Columbia, MO) | ||
|
| ||
| Post# 574337 , Reply# 132 2/8/2012 at 07:35 (4,552 days old) by beekeyknee (Columbia, MO) | ||
|
| ||
| Post# 574338 , Reply# 133 2/8/2012 at 07:36 (4,552 days old) by beekeyknee (Columbia, MO) | ||
|
| ||
| Post# 574339 , Reply# 134 2/8/2012 at 07:37 (4,552 days old) by beekeyknee (Columbia, MO) | ||
|
| ||
| Post# 574340 , Reply# 135 2/8/2012 at 07:38 (4,552 days old) by beekeyknee (Columbia, MO) | ||
|
| ||
| Post# 574341 , Reply# 136 2/8/2012 at 07:39 (4,552 days old) by beekeyknee (Columbia, MO) | ||
|
| ||
| Post# 574342 , Reply# 137 2/8/2012 at 07:40 (4,552 days old) by beekeyknee (Columbia, MO) | ||
|
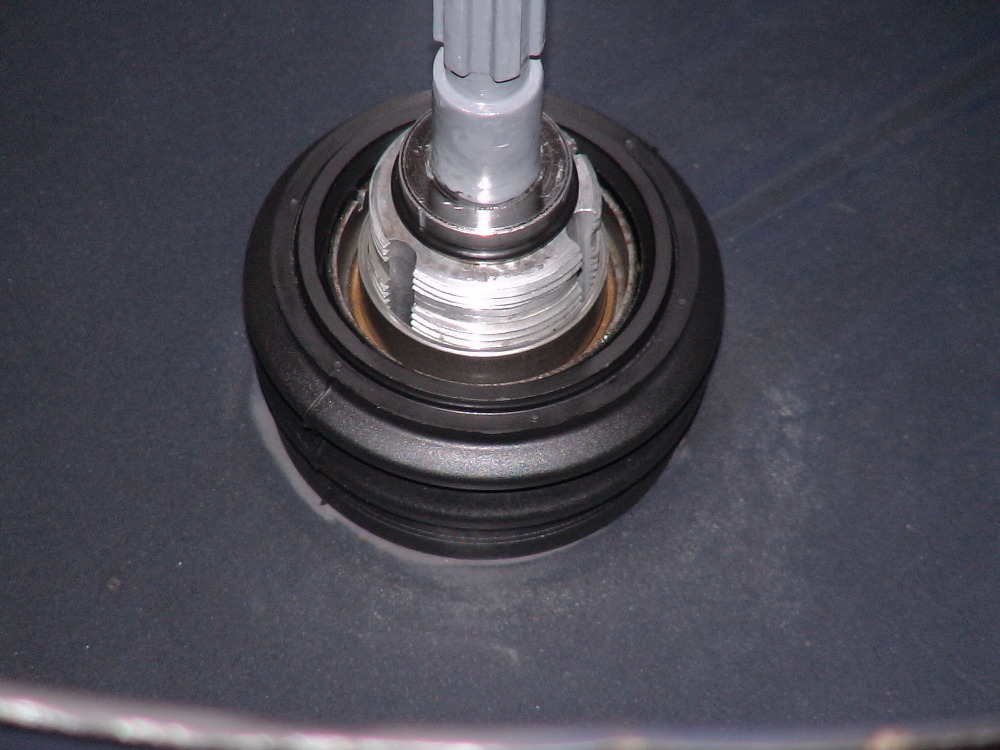
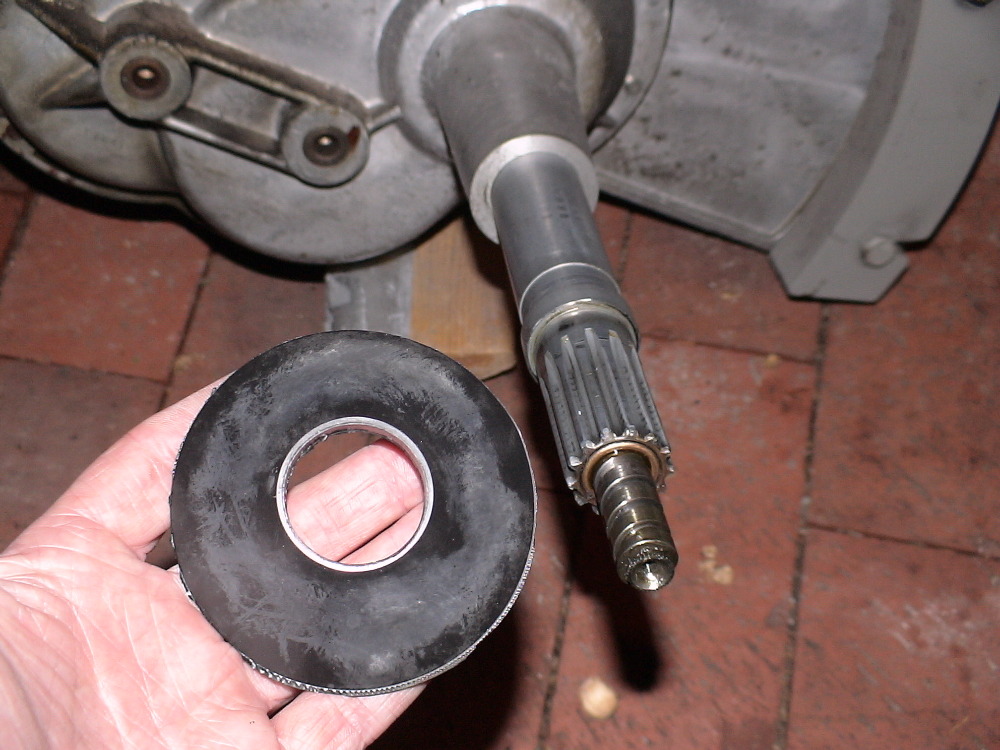
Put a thin film of dish liquid on the bottom inside of the boot seal and the outside of the tub flange. Grasp the boot seal by the bottom and twist the boot clockwise down onto the flange. Don't grab, squeeze or push on the top of the boot where the carbon ring is. If you damage the ring it's ruined. Keep twisting and pushing down until the boot is against the tub bottom. I struggled with this step quite a bit.
| ||
| Post# 574343 , Reply# 138 2/8/2012 at 07:41 (4,552 days old) by beekeyknee (Columbia, MO) | ||
|
If you have an agitator drive shaft seal, grease it and put it on the shaft with the small side down until it contacts the drive shaft collar. The agitator drive shaft seal was a NOS with a different type of grease than was in the stem seal. Since greases with different types of soap bases aren't supposed to be mixed, I washed the old grease out of the seal with hot water, dish liquid and a toothbrush, being careful not to disturb the spring and washer within. Then I blew the water out with compressed air until totally dry and re-greased the seal with the same type of grease that was in the mounting stem. I used NAPA Premium Performance Multi-Purpose Wheel Bearing And Chassis Grease. It's a lithium complex NLGI No. 2 Consistency. It comes in a 16oz. blue and white plastic container. It's the same color (light honey brown), consistency and smell as the grease that comes in the mounting stem. The amount they placed inside the mounting stem was so small I felt it needed some extra. There was no way to use these parts together without the grease mixing.
| ||
| Post# 574344 , Reply# 139 2/8/2012 at 07:43 (4,552 days old) by beekeyknee (Columbia, MO) | ||
|
| ||
| Post# 574346 , Reply# 140 2/8/2012 at 07:46 (4,552 days old) by beekeyknee (Columbia, MO) | ||
|
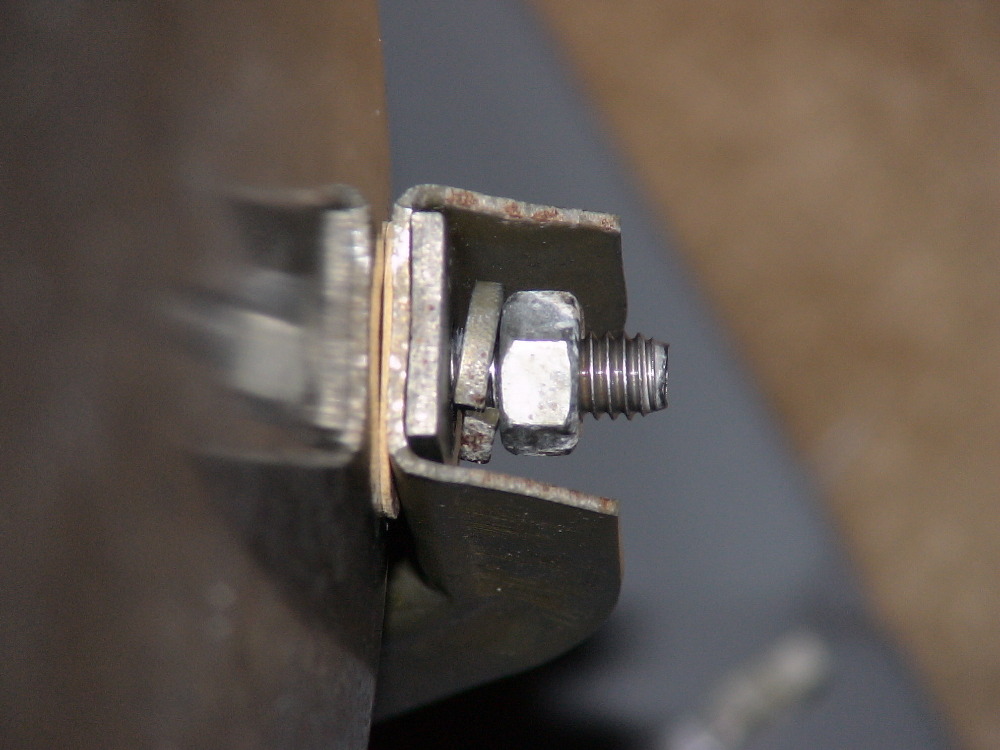
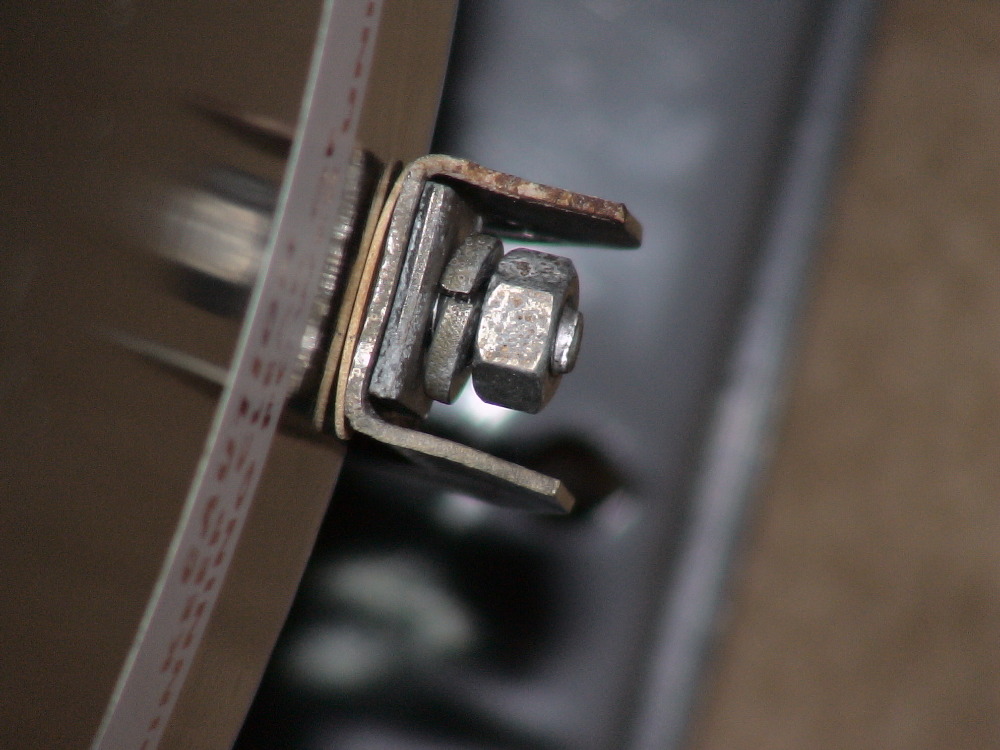
Grease the inside of the mounting stem threads and put it over the drive shaft. Tighten the mounting stem by turning it counterclockwise. It has left-handed threads. After you have tightened it by hand, put the spanner wrench on it and tap it a few times with a rubber mallet till snug. Hopefully after it's tightened the set screw will not be in line with a water relief groove. The set screw cannot be tightened in this position. It has to bite into the threads on the trans. neck for proper operation. If you find the set screw has stopped parallel to one of the water relief grooves, you can try and tap the spanner wrench a few more times so the set screw will pass the groove and will bite the threads in the neck. You can't be to close to the groove when tightening the screw or it may slip off the threads and bust over into the groove. When I tightened the mounting stem on this machine I found the set screw to stop exactly over one of the grooves and the mounting wouldn't tighten any further so I had to loosen the mounting a bit and tighten the set screw on the other side of the groove. It wasn't what I wanted to do, but there was no choice. It worked and the washer is functioning fine. The marks on the bottom of the tub correspond to the grooves on the trans. neck. You have to make sure the trans. doesn't turn when tightening the mounting stem or the marks have no relevance. Put plenty of grease in the set screw hole before tightening. If the set screw disappears into the mounting stem when tightening you most likely have stopped over a groove. The screw should be tightened enough to make a dimple in the neck but not so hard as to cause the bushing to bind the agitator drive shaft. A good mechanic usually has a feel for this type of thing and knows when to quit, unless the tolerances are with in a narrow range. I haven't found the need for any type of torque guage or wrench when working on a Maytag washer. The tolerances just aren't that narrow. The agitator stop ring (not pictured) goes into the groove on the shaft above the mounting stem seal.
This post was last edited 02/08/2012 at 09:06 | ||
| Post# 574347 , Reply# 141 2/8/2012 at 07:49 (4,552 days old) by beekeyknee (Columbia, MO) | ||
|
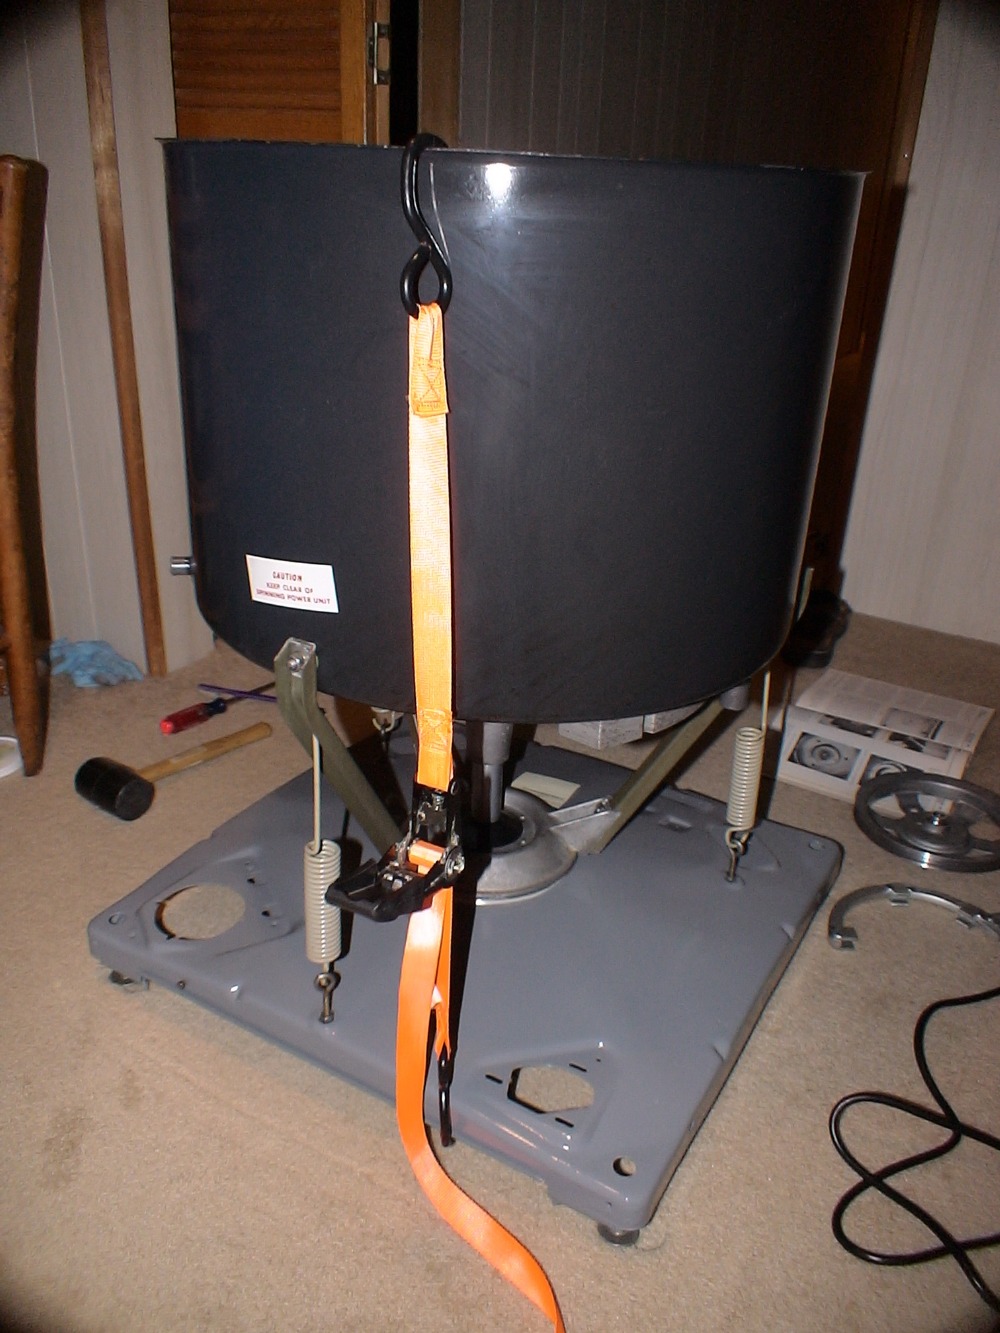
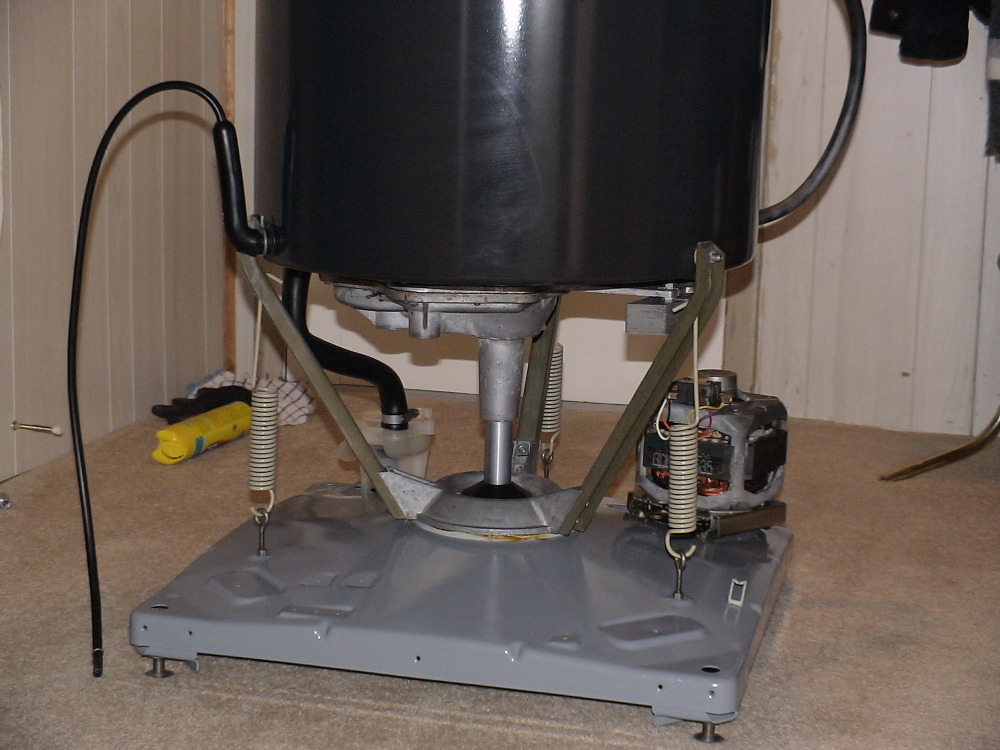
Hang the springs in the tub supports, tip the tub toward the back of the machine and hook the back springs in the eye-bolts. A ratchet strap will work to connect the front spring. Hook one end of a ratchet strap on the front of the tub, the other under the base and tighten the ratchet until the front spring will connect to the eye-bolt. Put a little grease on the springs where they touch the holes on the tub supports and where they go through the eye-bolts to slow down wear. Tighten the eye-bolt nuts so the amount of threads above the nuts are about the same as the number counted before the machine was dissembled. The spring in the front should be tightened slightly more than the ones in the back for proper operation of the out of balance shut-off. That usually translates into three or four less threads above the eye-bolt nut in the front. Remember when tightening the eye-bolts from above the nut must be turned to the left, or counterclockwise. Later you can check the adjustment of these bolts by washing an item that you know tends to cause out of balance conditions. I have a heavy robe that soaks up a lot of water and is very heavy when wet. I use it to adjust the centering springs for proper operation of the out of balance mechanism.
| ||
| Post# 574348 , Reply# 142 2/8/2012 at 07:50 (4,552 days old) by beekeyknee (Columbia, MO) | ||
|
| ||
| Post# 574349 , Reply# 143 2/8/2012 at 07:51 (4,552 days old) by beekeyknee (Columbia, MO) | ||
|
| ||
| Post# 574350 , Reply# 144 2/8/2012 at 07:52 (4,552 days old) by beekeyknee (Columbia, MO) | ||
|
| ||
| Post# 574352 , Reply# 145 2/8/2012 at 07:53 (4,552 days old) by beekeyknee (Columbia, MO) | ||
|
| ||
| Post# 574353 , Reply# 146 2/8/2012 at 07:54 (4,552 days old) by beekeyknee (Columbia, MO) | ||
|
| ||
| Post# 574354 , Reply# 147 2/8/2012 at 07:56 (4,552 days old) by beekeyknee (Columbia, MO) | ||
|
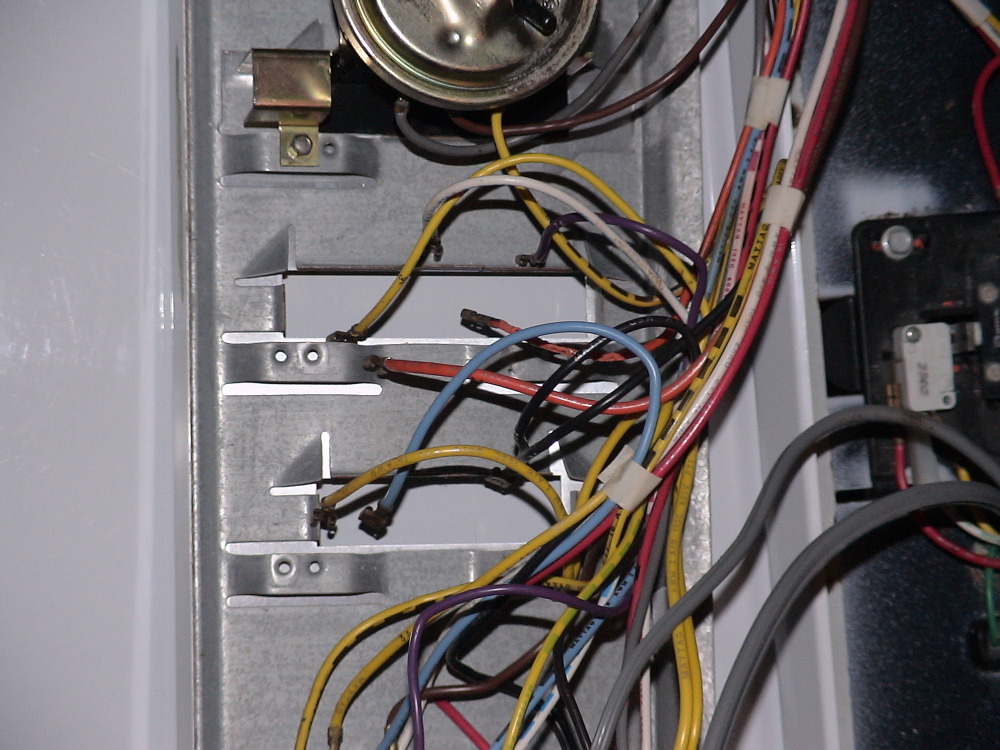
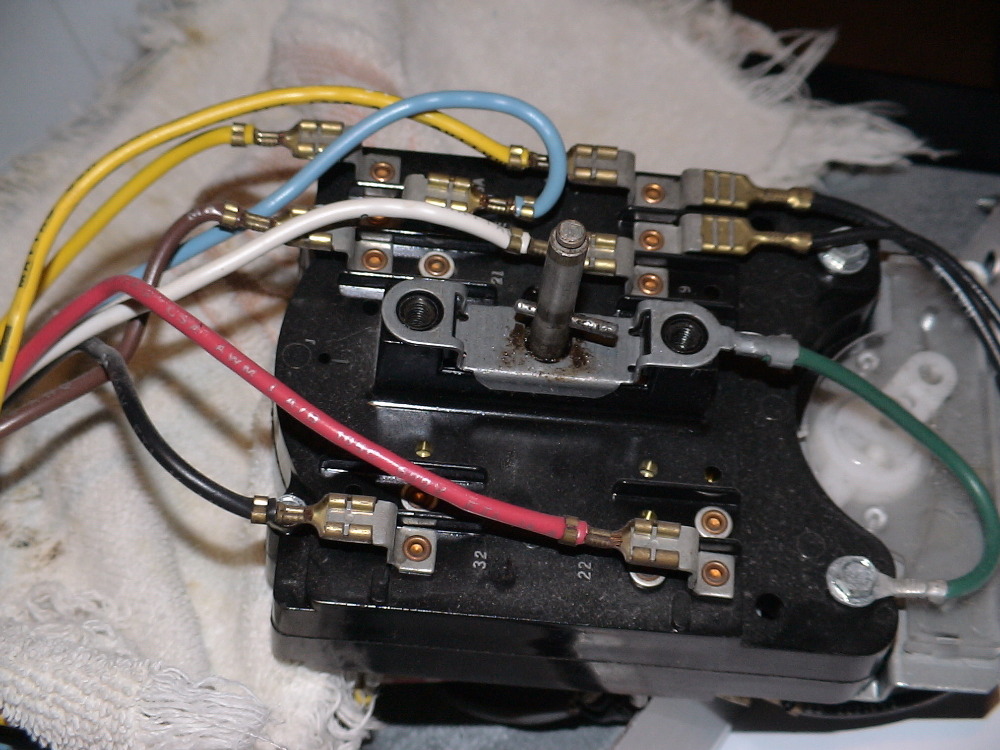
Made a diagram, took out the switches, submerged them in kerosene and operated them while submerged, dried them overnight, sprayed them down with silicone, blew out excess silicone, let them sit again overnight, used a wet vac to suck out silicone from openings and seams in the switches, wiped the switches down and re-installed them.
| ||
| Post# 574355 , Reply# 148 2/8/2012 at 07:57 (4,552 days old) by beekeyknee (Columbia, MO) | ||
|
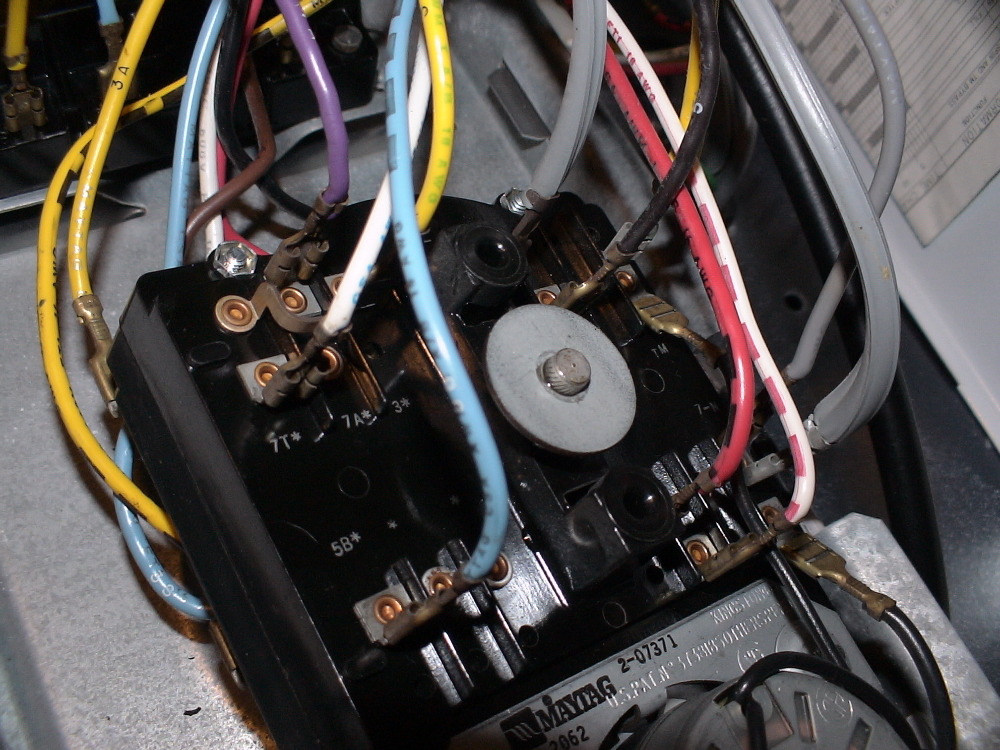
I decided to take the timer out of the control panel for cleaning and lubrication. This machine doesn't have a chrome cap for the timer knob like the older Maytag automatics. The chrome piece is glued to a plastic cap and the cap and chrome piece come off together to expose the clip that holds the knob on the timer shaft. I popped this piece off, took off the clip and knob, took out the hex screws that hold the timer to the control panel, made a diagram of where all the many wires attach to the timer, detached them, took the timer motor off, and gave the timer the same treatment as I did the switches in reply number 147.
This post was last edited 02/08/2012 at 09:12 | ||
| Post# 574356 , Reply# 149 2/8/2012 at 07:58 (4,552 days old) by beekeyknee (Columbia, MO) | ||
|
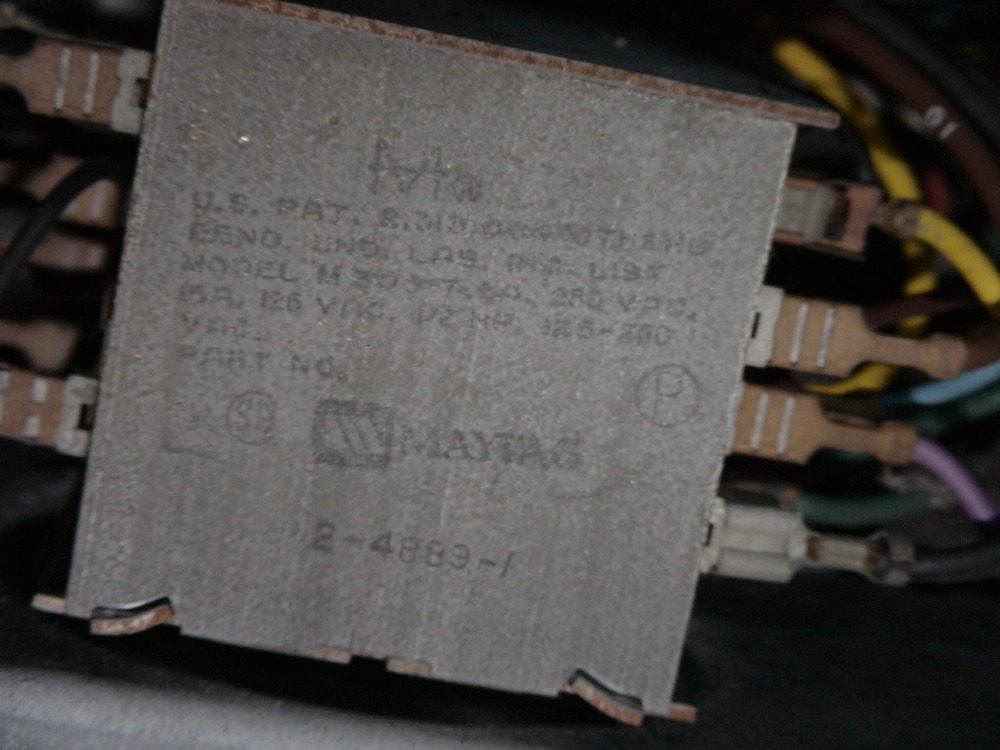
Here's a picture of the timer after the treatment. It's a Kingston timer. You may be able to see its name stamped in the metal just to the left of the Maytag logo and part number. This timer runs very quietly now and turns with ease. I give this treatment to all switches and timers on older machines. I only omit this step if the parts seem very clean and work smoothly and quietly. I believe this greatly extends the life of the part and as these parts are expensive and sometimes hard, if not impossible to find, it's important. Some old timers and switches have wording, markings and designs on them that might be damaged by this process. In that case I would test the areas in question in an inconspicuous or small spot before proceeding. Otherwise I think it's a great way to recondition the parts. It is best to have an air compressor for this step. And a wet vac doesn't hurt. I have experimented on spare parts in the past. I infuse the kerosene with a little oil before I dip it and then let it dry completely. When the kerosene evaporates it leaves a light coating of oil on the part. I wipe the outside down, operate the part, and re-connect it to check it's function in the machine. This is an option if you don't want to spend the money on an air compressor and wet vac.
| ||
| Post# 574358 , Reply# 150 2/8/2012 at 08:00 (4,552 days old) by beekeyknee (Columbia, MO) | ||
|
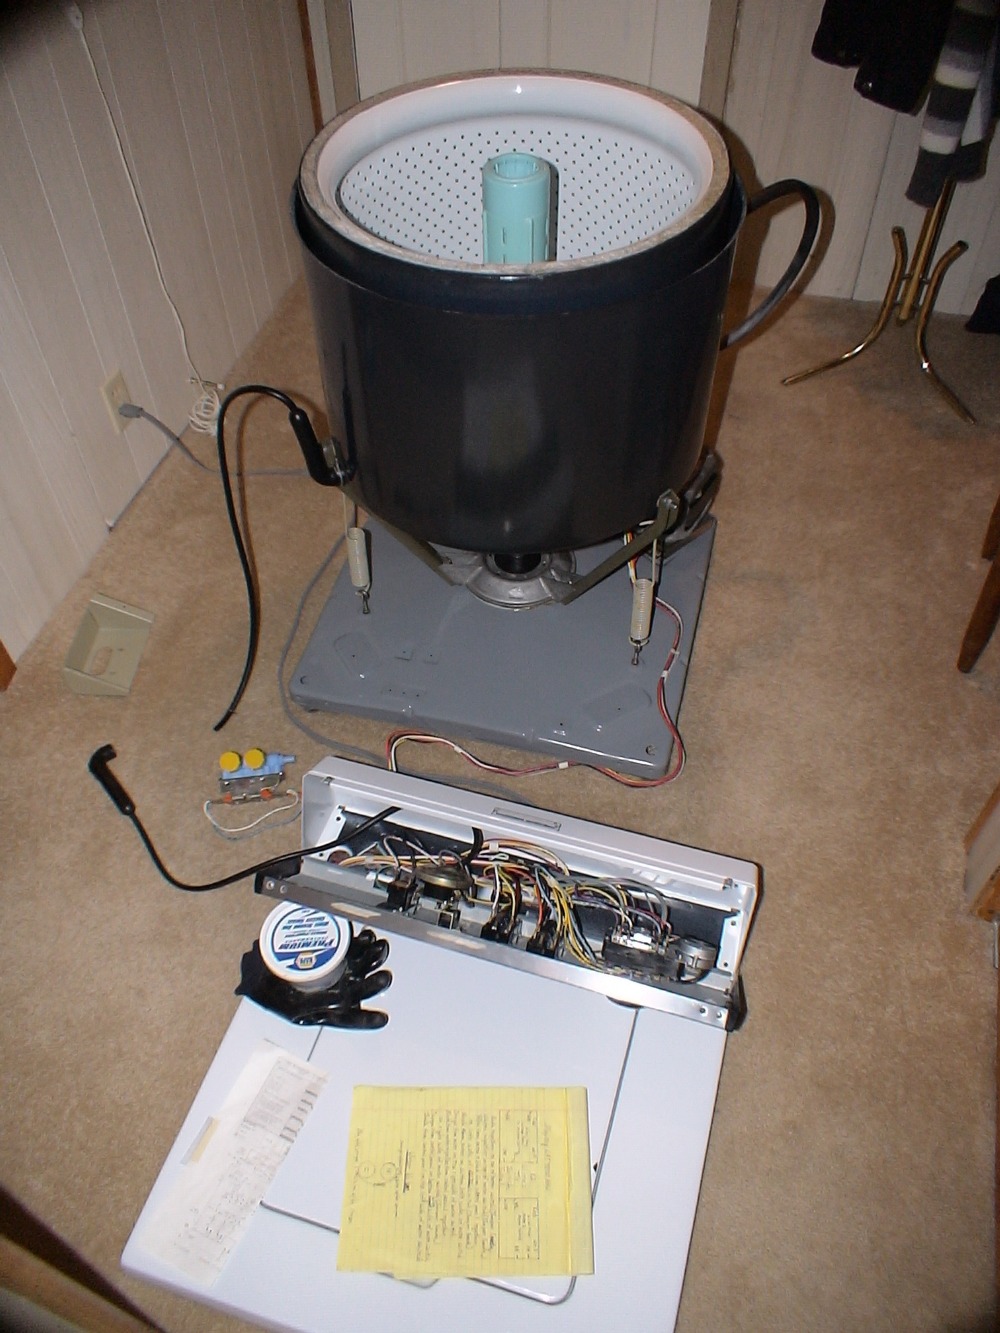
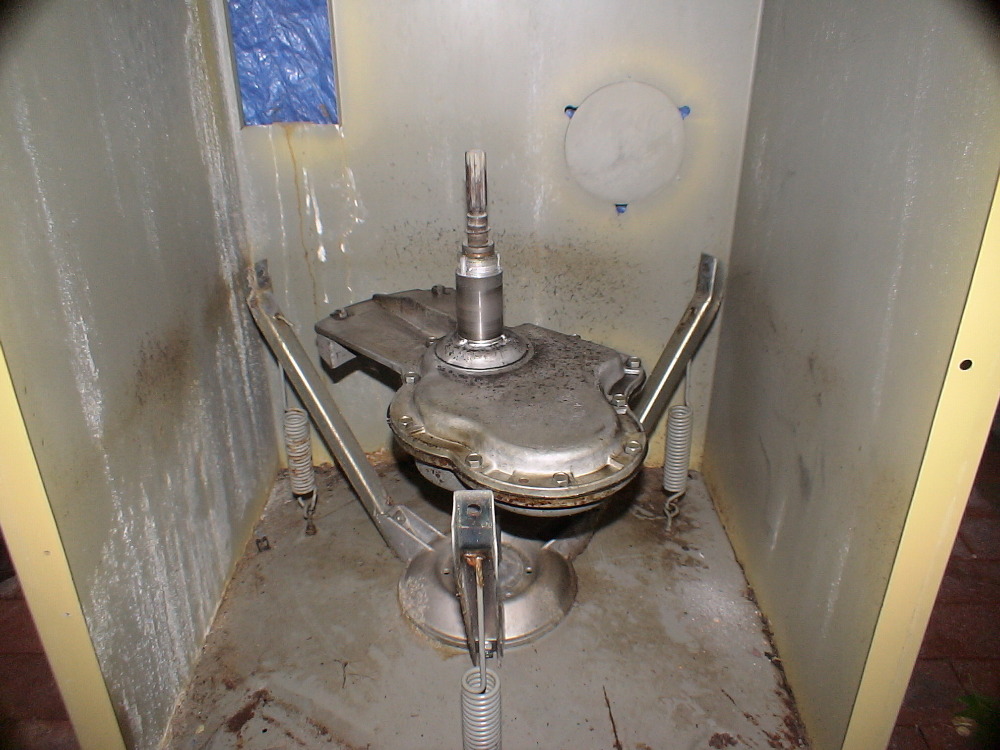
Preparing the washer for its run in. I needed to spin the basket to mate the mounting stem and boot seal. The instructions that came with the mounting stem and boot seal said to install the parts and not put any grease or oil on the carbon face of the boot seal before putting the machine into spin. The service manual said to put a light film of turbine oil on the boot seal face before installing the mounting stem. I opted for the later. I assembled the machine to this point by laying the machine top on the floor, making the connections to the motor per my diagram and instructions I had made at disassembly, blew into the air dome until I heard the water level switch click, clamped the hose with some Vice-grips, turned the timer knob to spin and pulled out the knob. The machine started to spin, the wash basket seemed well centered and the machine was pretty stable even though it was not completely assembled and was on carpet. I let it spin this way for several minutes. If there's any residual oil on the trans., the trans. bolts aren't tight enough or the tub bearing has a bit to much turbine oil in it, the machine will fling oil out from underneath the tub during the spin. Some small specks were coming out during the first couple of minutes. The machine was in a small hallway with paneled walls. I took a cloth and went around the room and wiped the specks off the wall. No harm done. If you're concerned about this you might want to do it outside or in a garage or area that doesn't matter. I took a wrench and went around the trans. and tightened the bolts again. As the new gasket gets saturated with oil it seems to soften a bit and the bolts can be tightened some more. Then I took a rag and wiped the tub, trans., and base down again. Then I turned the knob to wash and let the machine run in the agitate mode for a few minutes. This also worked fine. Then I finished assembling the machine.
| ||
| Post# 574359 , Reply# 151 2/8/2012 at 08:01 (4,552 days old) by beekeyknee (Columbia, MO) | ||
|
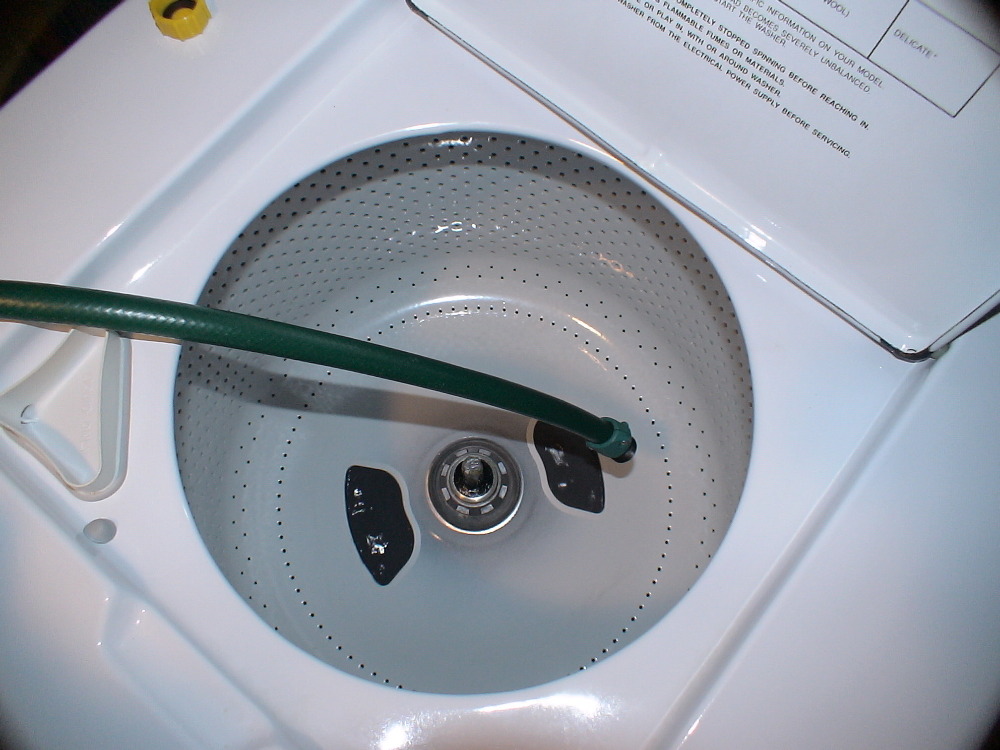
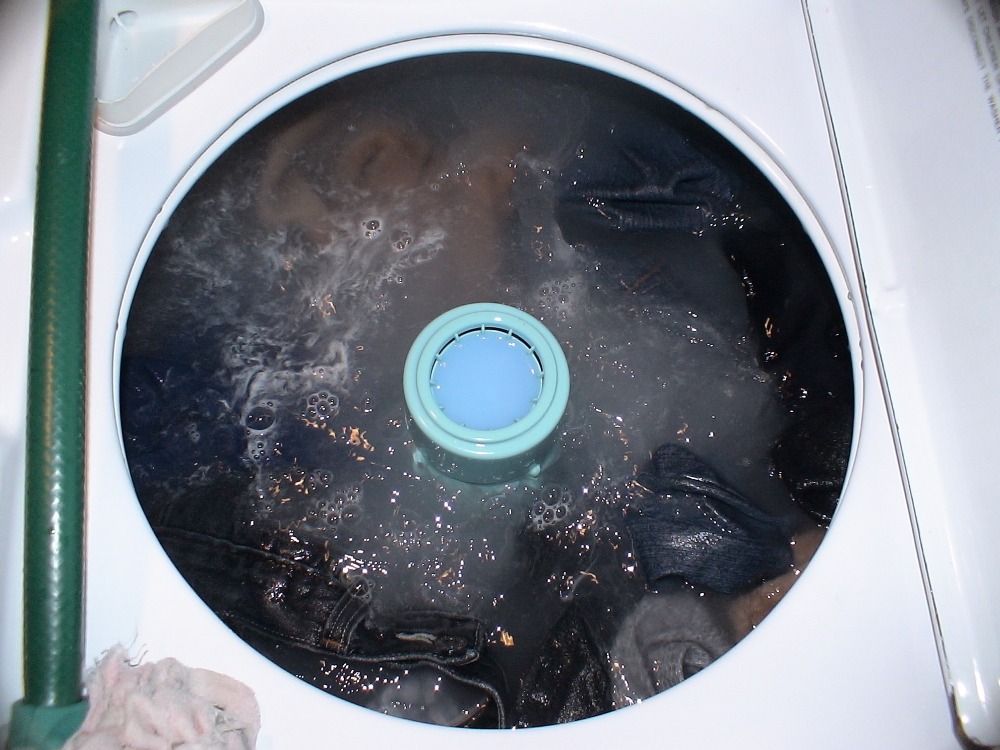
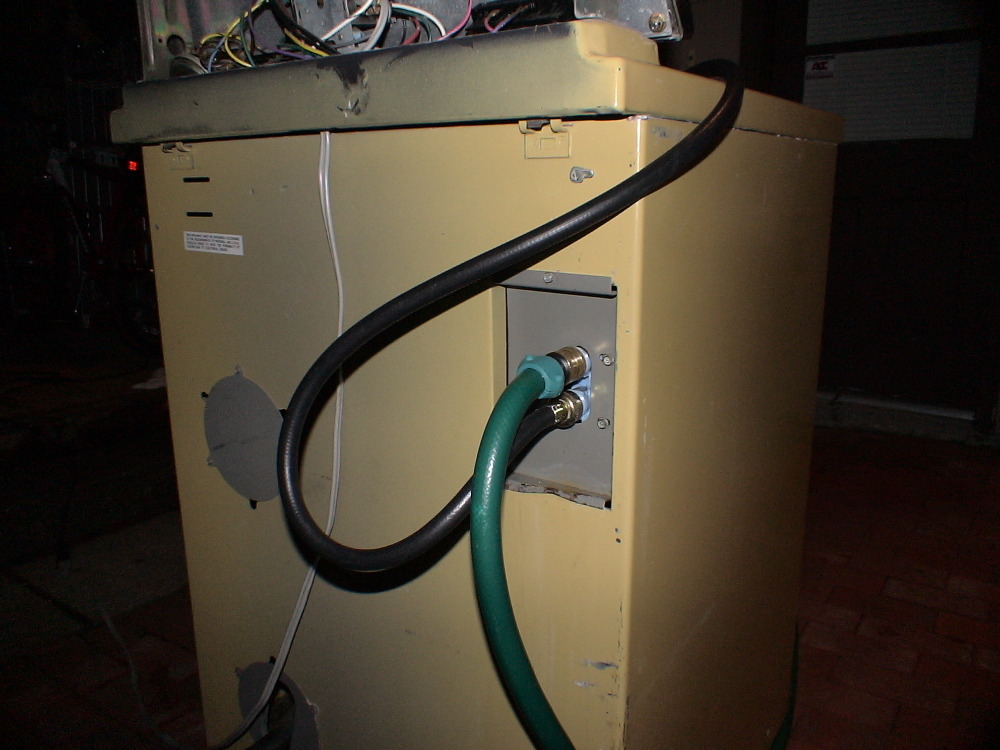
Time for a water test to check for leaks. The cabinet's back on and all the hoses are attached. The tub cover isn't on yet and the agitator isn't in yet, as can be seen. I don't want that air bubble under the agitator. I want the water to get to all possible leak spots. I'm doing a manual fill with a garden hose. That will work for now. I know the water valve works anyway, as I did a test run when I got the machine to check it's functions.
| ||
| Post# 574360 , Reply# 152 2/8/2012 at 08:02 (4,552 days old) by beekeyknee (Columbia, MO) | ||
|
Success. No leaks. Way before this step I made sure the tub, tub cover and tub clamp were clean and mineral free. Polishing the inside edge of the tub, the outside edge of the tub cover and wiping down the tub cover gasket with Pledge makes installing and adjusting the tub cover much easier. Adjust the tub cover to top clearance ( I set mine at around 1/4 inch, close but not touching), slip the tub cover gasket down to the tub edge while holding the tub cover to keep the cover to top clearance from changing, put on the tub cover clamp and tighten (put the tub cover bolts in the 2 and 8 o'clock position, back right and front left corners within the cabinet), connected the water injector, tighten down the machine top, put in the agitator, fill the machine with water, spin out the water and checked for tub cover leaks during spin drain. Then filled the machine with warm water and clothes and did the first wash test. It passed. The out of balance test passed too.
| ||
| Post# 574361 , Reply# 153 2/8/2012 at 08:04 (4,552 days old) by beekeyknee (Columbia, MO) | ||
|
| ||
| Post# 574362 , Reply# 154 2/8/2012 at 08:05 (4,552 days old) by beekeyknee (Columbia, MO) | ||
|
| ||
| Post# 574363 , Reply# 155 2/8/2012 at 08:06 (4,552 days old) by beekeyknee (Columbia, MO) | ||
|
| ||
| Post# 574364 , Reply# 156 2/8/2012 at 08:07 (4,552 days old) by beekeyknee (Columbia, MO) | ||
|
| ||
| Post# 574365 , Reply# 157 2/8/2012 at 08:08 (4,552 days old) by beekeyknee (Columbia, MO) | ||
|
| ||
| Post# 574366 , Reply# 158 2/8/2012 at 08:10 (4,552 days old) by beekeyknee (Columbia, MO) | ||
|
| ||
| Post# 574367 , Reply# 159 2/8/2012 at 08:11 (4,552 days old) by beekeyknee (Columbia, MO) | ||
|
| ||
| Post# 574368 , Reply# 160 2/8/2012 at 08:12 (4,552 days old) by beekeyknee (Columbia, MO) | ||
|
| ||
| Post# 574369 , Reply# 161 2/8/2012 at 08:13 (4,552 days old) by beekeyknee (Columbia, MO) | ||
|
| ||
Post# 574377 , Reply# 162 2/8/2012 at 09:27 (4,552 days old) by Yogitunes  (New Jersey) (New Jersey) |
||
 | ||
| Post# 574397 , Reply# 163 2/8/2012 at 12:39 (4,552 days old) by DirectDriveDave () | ||
|
It takes a LOT of time and patience to do what you did. Absolutely amazing job. | ||
| Post# 574398 , Reply# 164 2/8/2012 at 12:41 (4,552 days old) by lebron (Minnesota) | ||
 | ||
|
Post# 574442 , Reply# 165 2/8/2012 at 14:59 (4,552 days old) by Yogitunes (New Jersey) |
||
|
| ||
| Post# 574450 , Reply# 166 2/8/2012 at 15:22 (4,552 days old) by lorenatx () | ||
|
lorena tx hello!!! Im looking for a maytag washer i have a white one and its a dryer | ||
|
Post# 574469 , Reply# 168 2/8/2012 at 17:54 (4,552 days old) by pdub (Portland, Oregon) |
||
Incredible!!! | ||
| Post# 574496 , Reply# 169 2/8/2012 at 20:16 (4,552 days old) by AutoWasherFreak () | ||
|
Excellent job! I bet she will run for another 50 years. I would love to do this to my Maytag. | ||
|
Post# 574499 , Reply# 170 2/8/2012 at 20:33 (4,552 days old) by peteski50 (New York) |
||
Maytag Rebuild! | ||
| Post# 574511 , Reply# 171 2/8/2012 at 20:57 (4,552 days old) by toploader55 (Massachusetts Sand Bar, Cape Cod) | ||
Wow...
What an incredible detailed job.
Out of three Maytags I have, I may rebuild one of my transmissions using this thread. Thanks so much. The second video is cute. Mom and You watching the Tag disussing the operation. I can't think of many women these days that would be interested in the operation of a machine and what's going on inside. Thanks Again. | ||
| Post# 574563 , Reply# 172 2/8/2012 at 23:57 (4,551 days old) by dnastrau (Lords Valley, PA) | ||
|
Excellent job! I can't add much to what has already been said. Congratulations on a job well done and thanks for the work that you put into documenting the whole procedure! Andrew S. | ||
| Post# 574575 , Reply# 173 2/9/2012 at 01:57 (4,551 days old) by stan (Napa CA) | ||
Can't tell you  | ||
| Post# 574603 , Reply# 174 2/9/2012 at 06:25 (4,551 days old) by kenmore700bill (Lodi NJ) | ||

Brian,
Congratulations on a job well done.. Appreciate the time you took to post all the steps you did with this rebuild. I monitored the thread to check the status of your mission and was glad I did.. You did your homework and did a better job than the Maytag Repair Man..I am sure your Mom will enjoy the Machine. Again GREAT JOB!!! Bill | ||
| Post# 574664 , Reply# 175 2/9/2012 at 11:51 (4,551 days old) by aldspinboy (Philadelphia, Pa) | ||
Brian there are some here that has a genius mechanical and restoration talents,
and your are one of them ! What a beautiful job !!! That was like a symphoney Wow it's nice that all that work you put into it went to your Mom. How nice is that... that's LOVE. She seems she supports you in your craft and that's IMPORTANT. The machine sounds great to me and maybe she will get a little more quit, when it wears in more I'm thinking. Thanks for the time and video's. Best to you. Darren k | ||
| Post# 574951 , Reply# 176 2/10/2012 at 20:09 (4,550 days old) by queeny77 (BERWYN, ILLINOIS) | ||

hope your mom likes it,lots of work went into that. the video reminds me of when me and my mom used to stand over the washer watching it wash.she would prop the lid up with a spray and wash bottle and use a credit card for the lid switch.we sold the maytag to the neighbor when she moved out of state 8 years ago and bought a whirlpool duet cause my dad didnt want to move it,she says she misses her maytag though.
| ||
| Post# 575262 , Reply# 178 2/12/2012 at 00:42 (4,548 days old) by beekeyknee (Columbia, MO) | ||
|
Regarding My Thread
To Martin, Dave, Kevin, Patrick, Jim, Peter, Eddie, Andrew, Stan, Bill, Darren, Keith and Kelly.
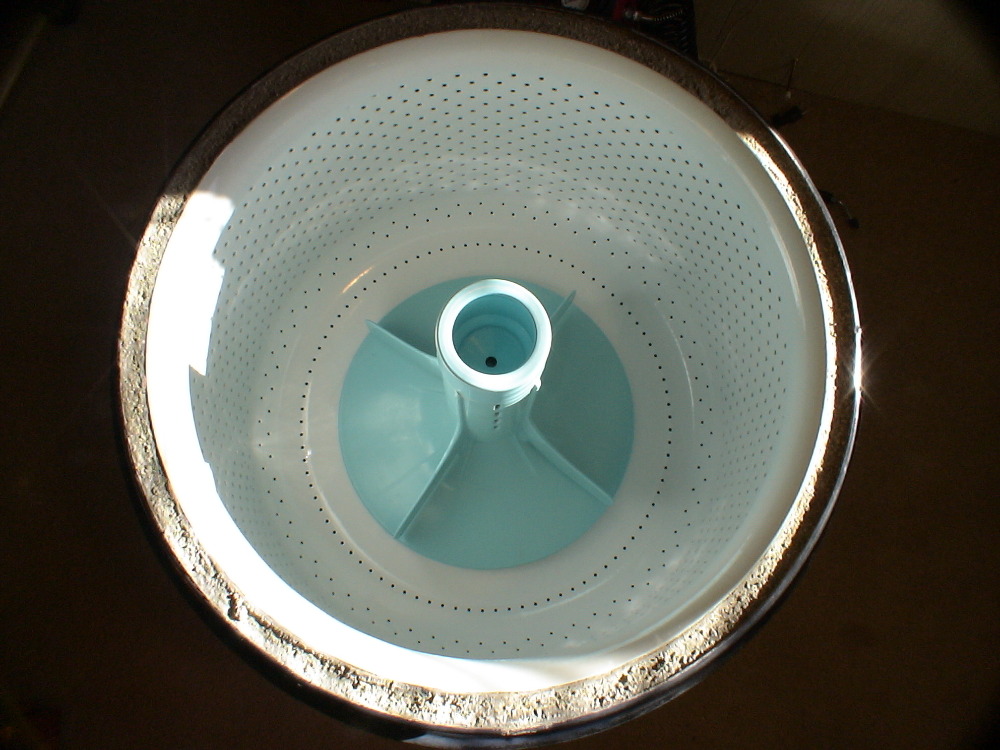
Thank you for all the great compliments. It's nice to be complimented by such knowledgeable people. Martin- I filled in the tub filters because they were added after the orbital transmission was introduced. Its vigorous action caused excessive linting and Maytag thought this would help. I don't think they do much and when I took the machine apart they were mostly covered with this hard, crusty, brown substance. Maytag made blanks for these inner tubs when they were to be used with the Newton transmission (probably during the transition phase), but I couldn't find any so I made my own. It was mentioned on here quite some time ago that instructions for rebuilding a Maytag transmission with a pictorial would be appreciated and since I was doing it I decided to give it a shot. I know the thread was extremely long, but I couldn't show it step by step without the length. Even at that, I condensed it to try and cut down on your fatigue. It was a tremendous amount of work that took 8 to 9 months. The documentation and post was about as much work as the mechanical procedure and I doubt I'll be posting anything like that again. I can't take all the credit for it. It was redcarpetdrew's idea to use the agitator drive shaft seal under the new type mounting stem. I learned a lot of other things by researching posts from different people. I just used their ideas with some of my own, merged them and took pictures. Thanks again and take care. Brian p.s. My Mother is great and she's really smart. She taught me how to do laundry when I was little. She's getting on in years and I wish I could be with her more. Her Mother was remarkable. She lived through two World Wars and the Great Depression. It seemed like there wasn't anything she couldn't do. She had to or do without. She was very artistic. She could sew, knit beautifully and paint. She even painted a picture of the Golden Gate before the bridge was there. | ||
| Post# 669522 , Reply# 180 3/31/2013 at 22:07 (4,135 days old) by beekeyknee (Columbia, MO) | ||
|
Since thread resurrection is here...
I thought I would correct an omission, since this thread seems to be referred to occasionally. It's the stop lug adjustment. I will refer to another enlightening thread for this patch. Thank you.
CLICK HERE TO GO TO beekeyknee's LINK | ||
|
Post# 669533 , Reply# 181 4/1/2013 at 00:31 (4,134 days old) by rinso (Meridian Idaho) |
||
|
Brian, congratulations on your success! I am amazed at your skill and patience. The person(s?)at Maytag who designed this transmission had a genius for keeping things simple, operation-wise, but to disassemble and rebuild a transmission that was more easily snapped together on an assembly line takes real talent. | ||
|
Post# 669869 , Reply# 182 4/2/2013 at 10:01 (4,133 days old) by Jetcone (Schenectady-Home of Calrods,Monitor Tops,Toroid Transformers) |
||
Read the whole thing  | ||
|
Post# 669870 , Reply# 183 4/2/2013 at 10:04 (4,133 days old) by peteski50 (New York) |
||
|
Whirlpool! | ||
| Post# 670154 , Reply# 184 4/3/2013 at 05:52 (4,132 days old) by beekeyknee (Columbia, MO) | ||
|
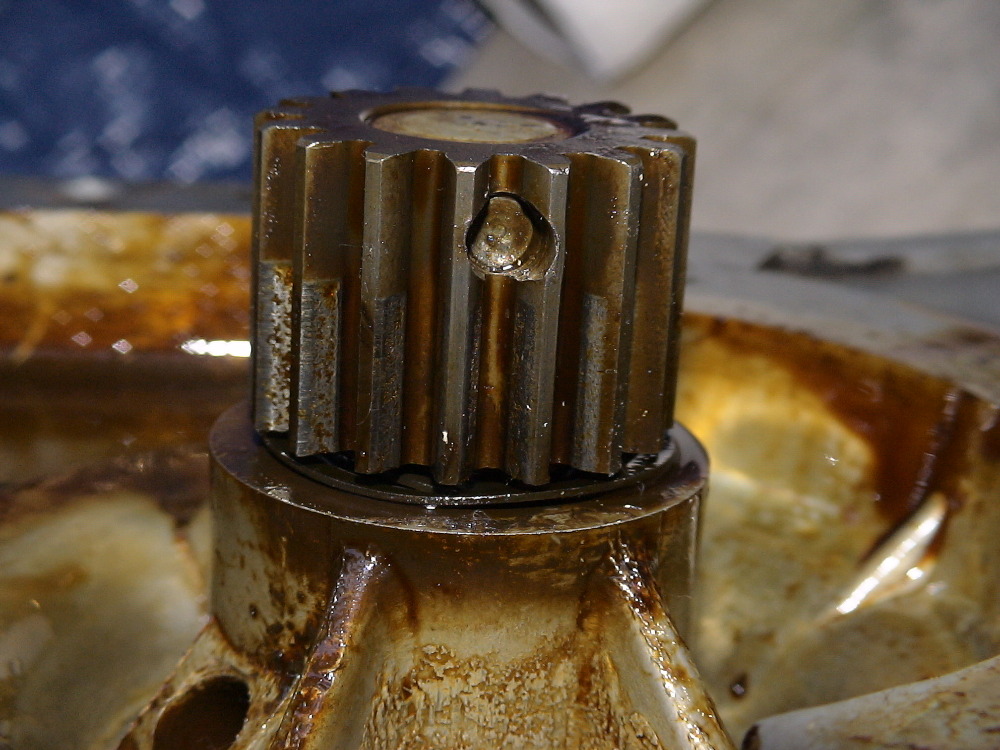
Jon,
That spot you see on the inside threads of the mounting stem is actually the hole where the set screw was. The picture is deceiving. It looks like the set screw but it's really the set screw hole. I tried to remove the mounting stem with a mini-sledge, but it wouldn't budge. I put PB Blaster on it, but no luck. The sledge I have has a rubber coating over it, so that probably reduced the impact. Next time I'll try a non-coated sledge. I was worried about hitting the inside of the basket and busting the porcelain, but I was still hitting hard. I had to wear ear plugs. Hitting that spanner wrench with my head in that tub is deafening. Talk about having your bell rung. Lol. I wish they made a spanner that went on a pneumatic driver. Wouldn't that be neat? Brian | ||
|
Post# 670174 , Reply# 185 4/3/2013 at 08:36 (4,132 days old) by swestoyz (Cedar Falls, IA) |
||
The sledge I have has a rubber coating over it You are correct. Rubber mallets are not intended to drive fasteners or to be used as a hammer. Looking at the photos and the condition of things, I suspect that if you had used a regular hammer or smaller sledge hammer, both the spanner nut and stem seal would have come off with a few good, hard raps.
There's always next time!
Ben | ||
|
Post# 774234 , Reply# 186 7/30/2014 at 21:27 (3,649 days old) by sel8207 (naples, florida 34117) |
||
|
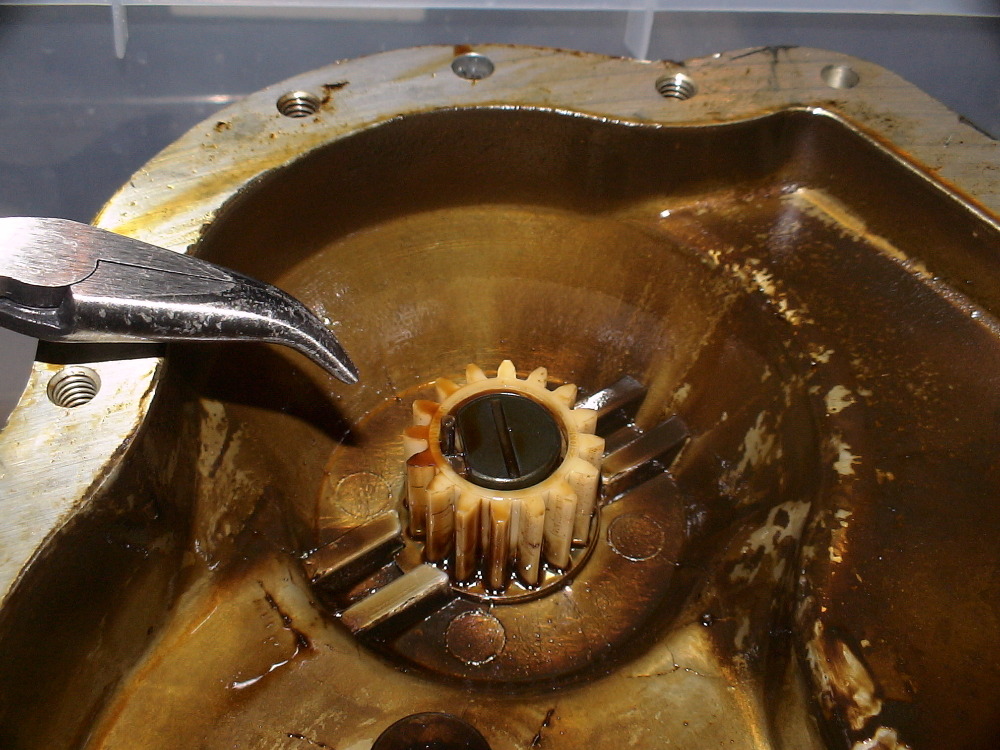
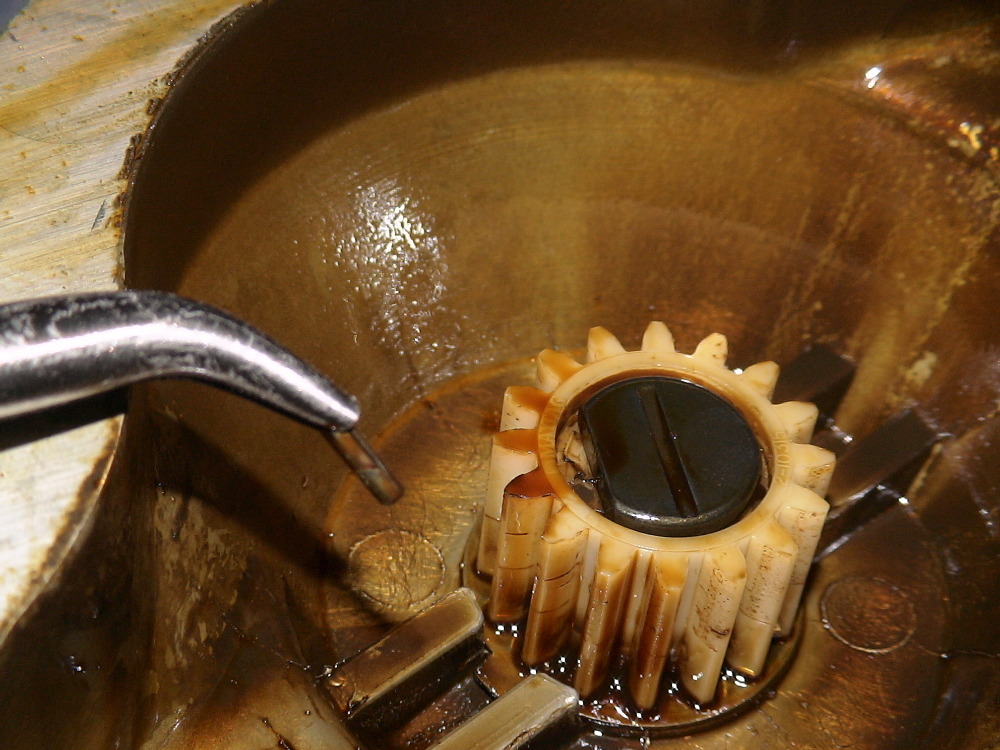
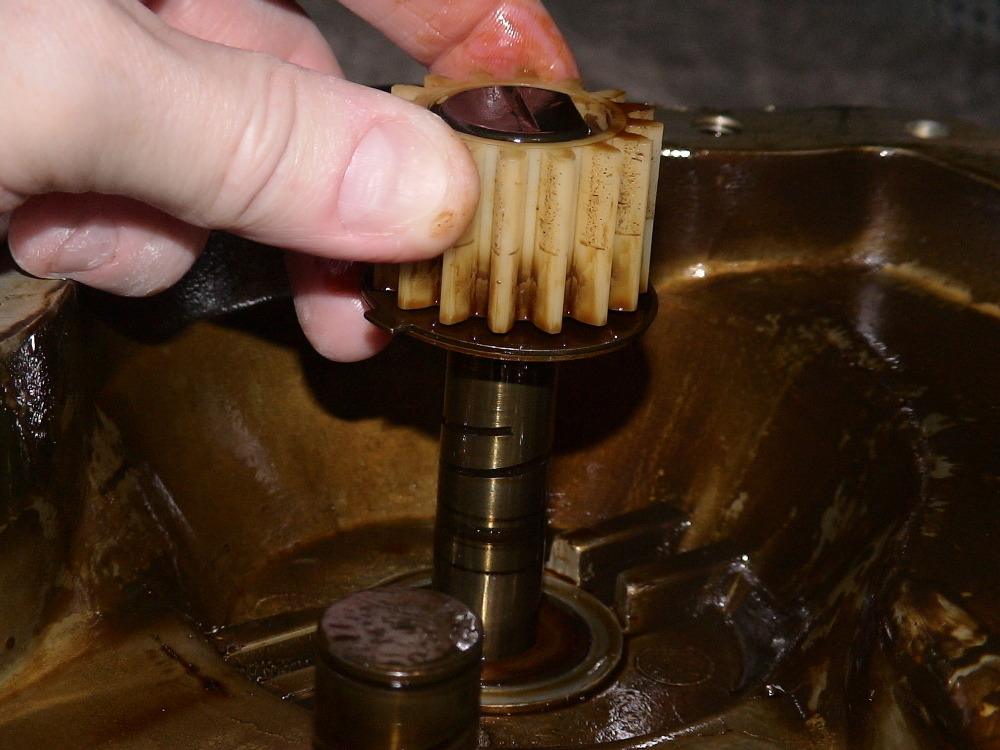
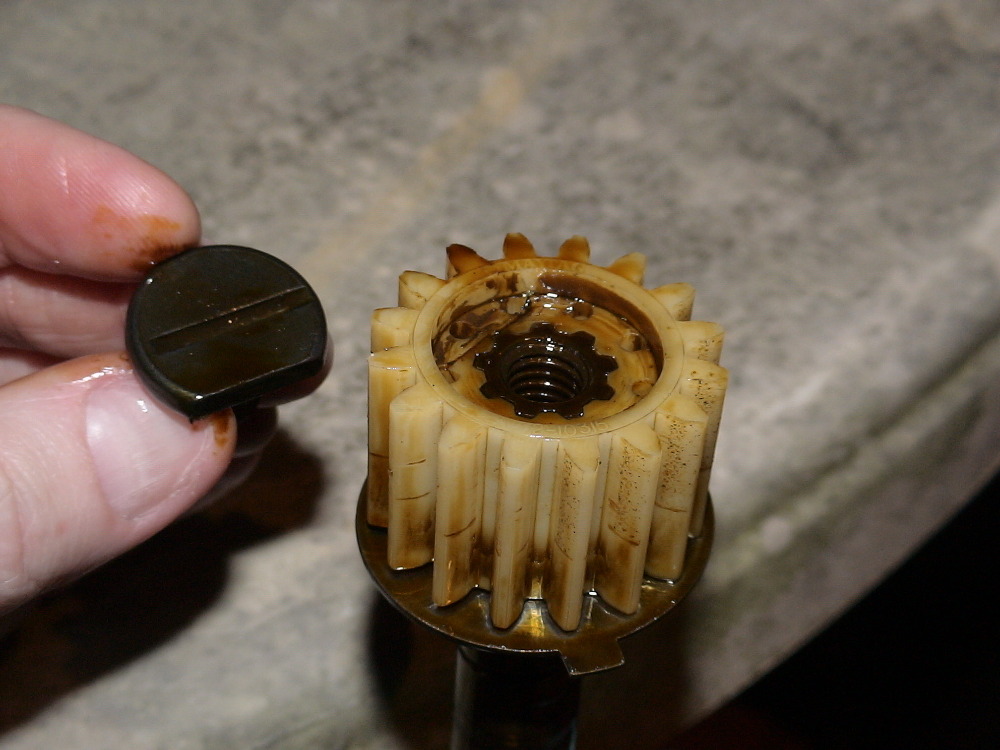
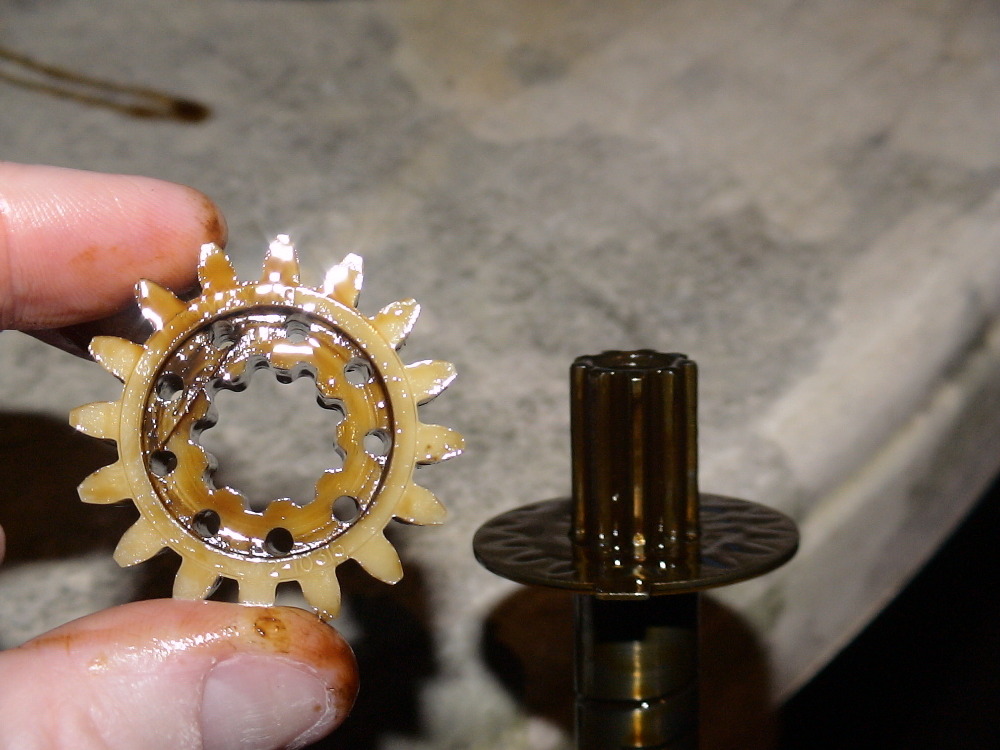
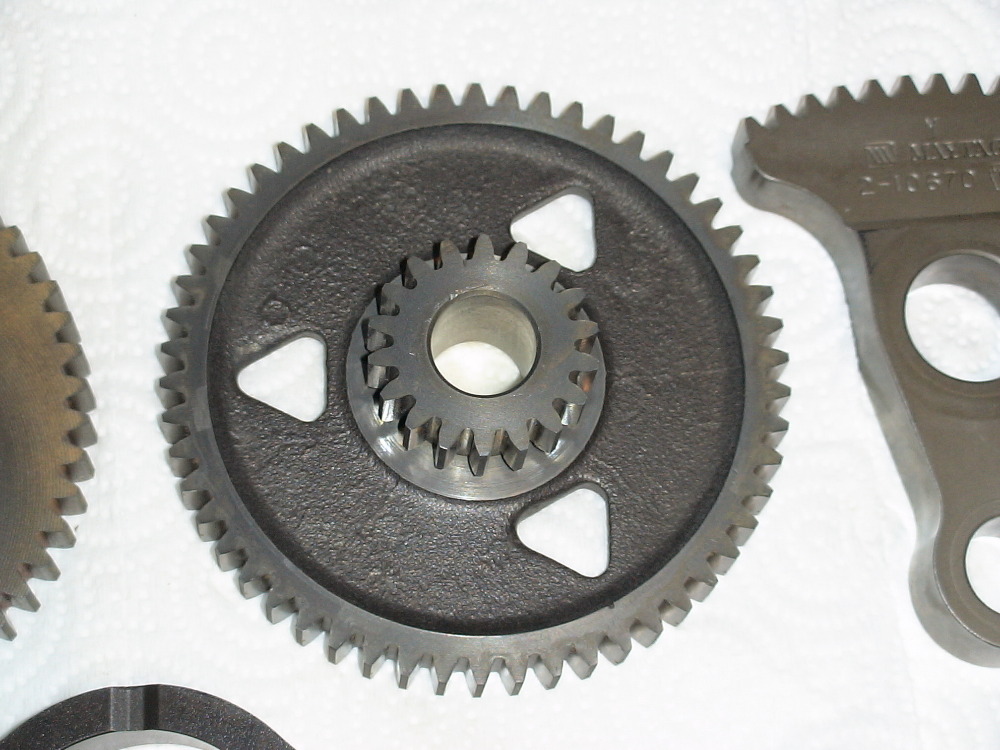
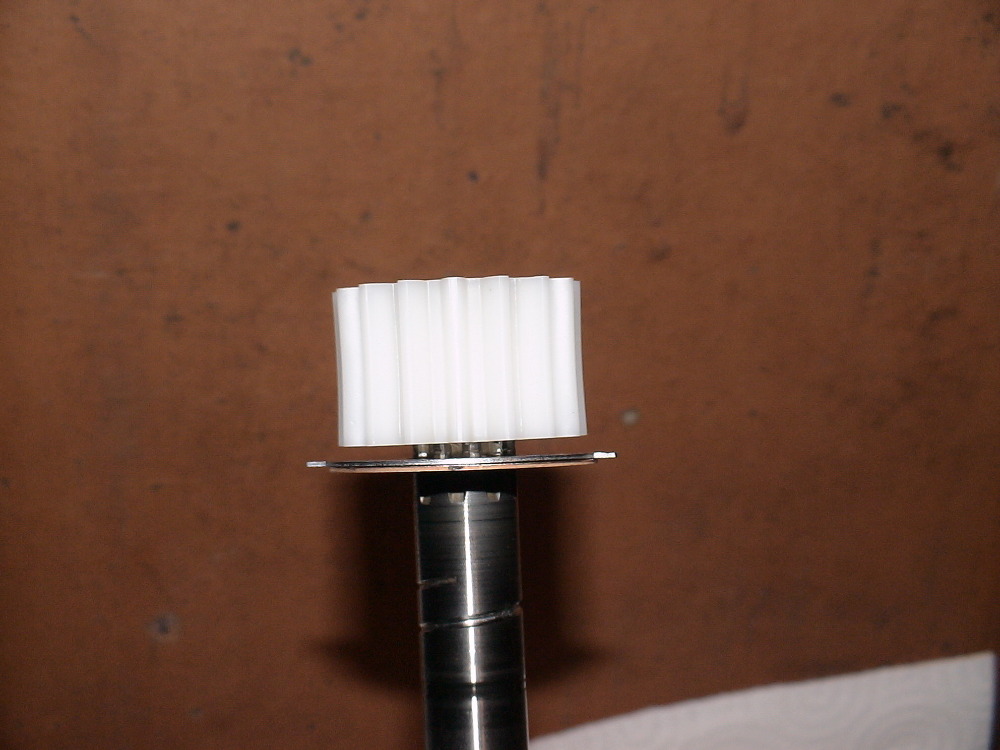
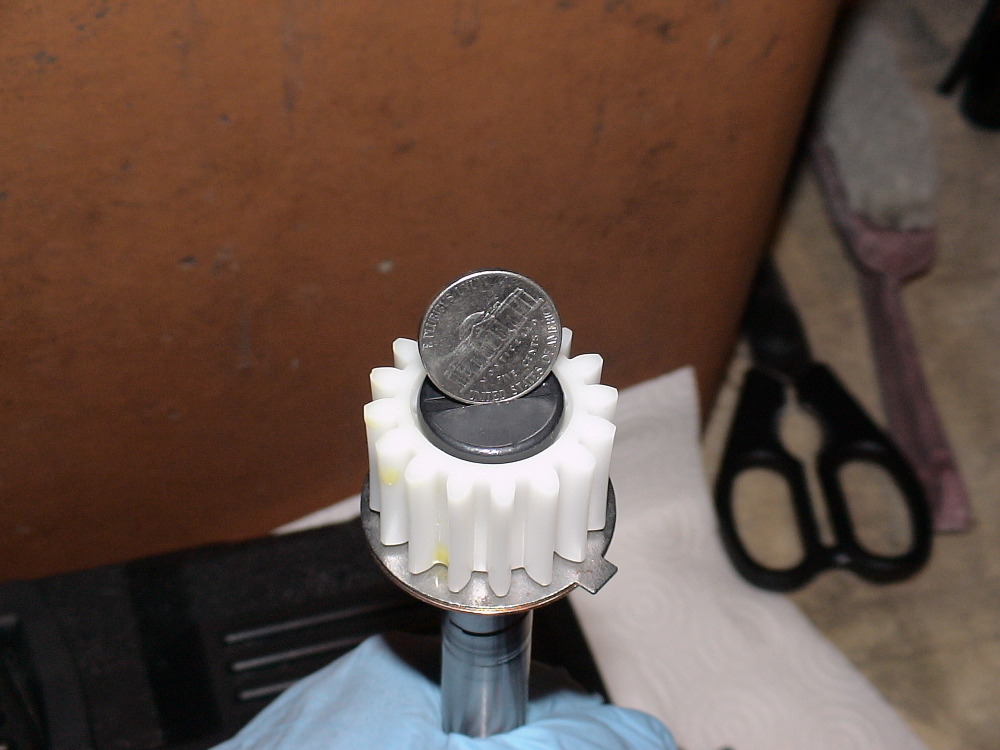
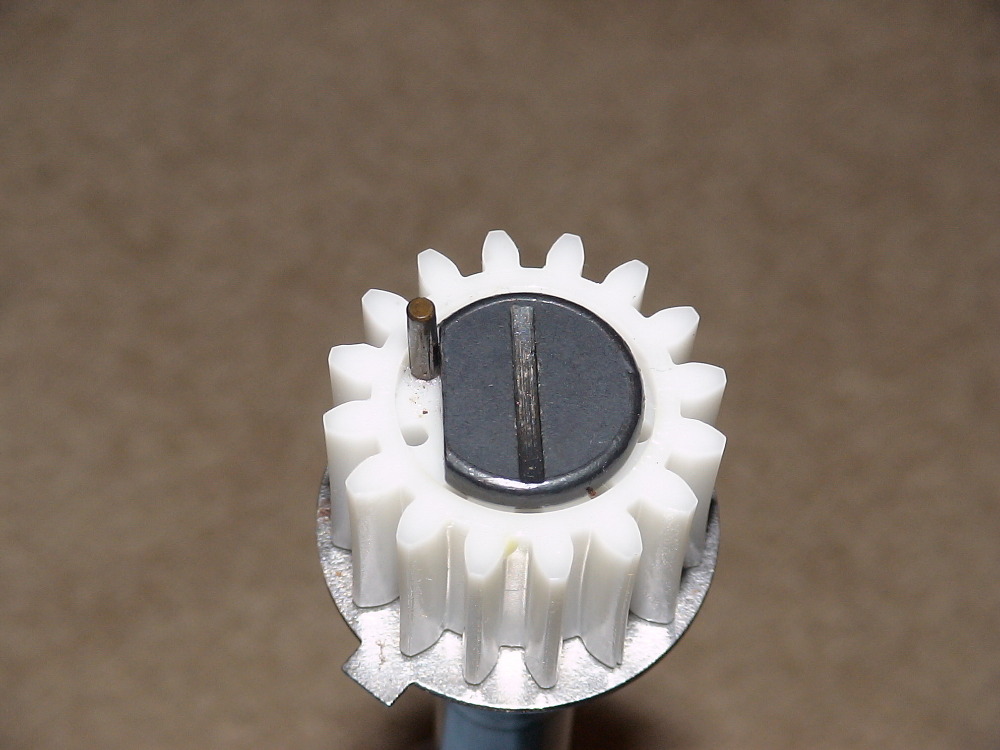
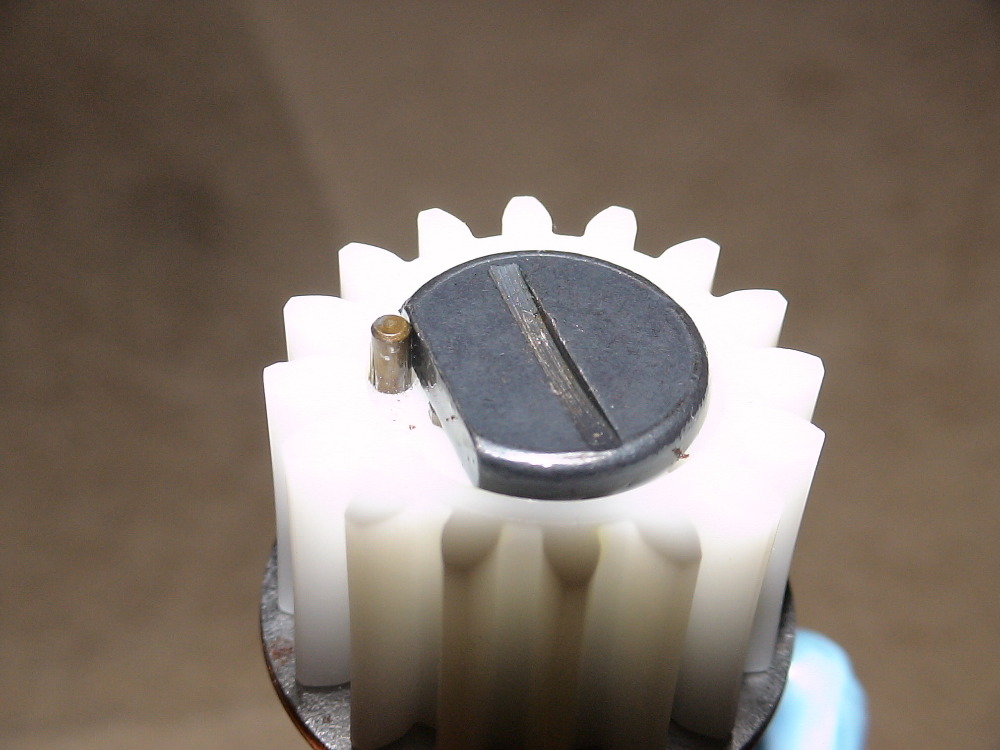
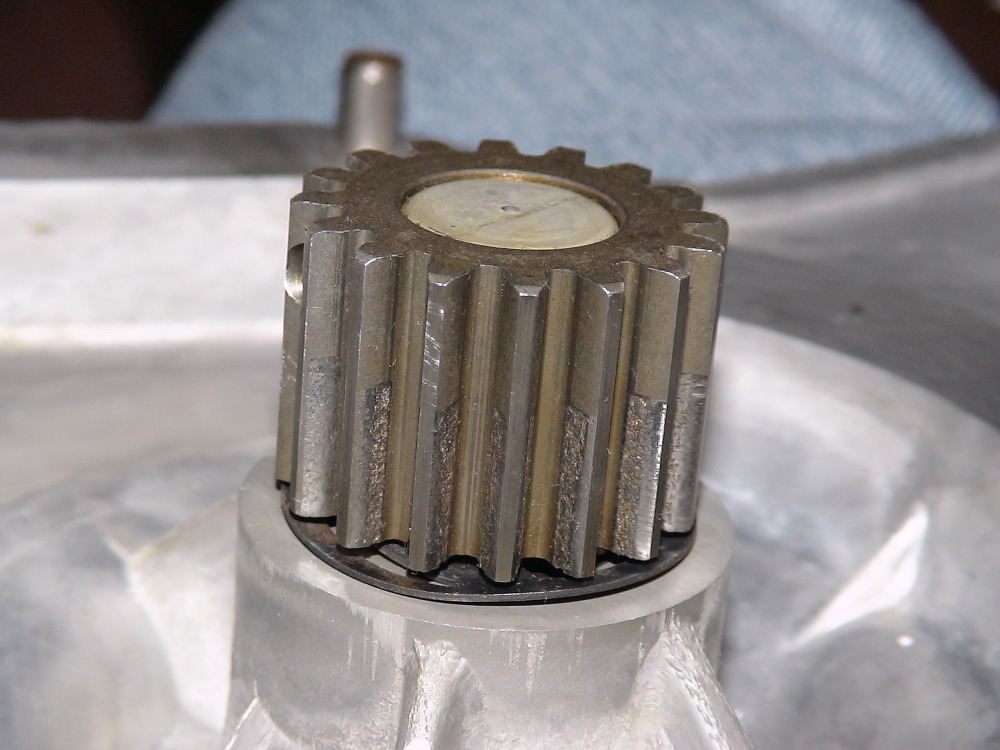
nylon gear question At what point did Maytag decide to have a nylon plastic gear installed in the transmission, when all the other parts are heavy steel? It seems like that gear would be a weak point. Does anybody know what particular year model this nylon gear started, and on what model? Is this gear no longer availabe now? Les. | ||
|
Post# 774239 , Reply# 187 7/30/2014 at 21:51 (3,649 days old) by ovrphil (N.Atlanta / Georgia ) |
||
whoah!  | ||
| Post# 774268 , Reply# 188 7/30/2014 at 23:42 (3,649 days old) by beekeyknee (Columbia, MO) | ||
|
Thank you, Phil. And because of you I found a dream of mine - the KDS-60 (KDS-20). If I ever need to it's easily converted to an under counter model. Many times these portable machines saw little use.
The reply I made to Jon a couple up was in error. I got to thinking about it over a year after I posted it. The reason I cut the mounting stem off was because the set screw wouldn't come out. I didn't have a drill that would fit in the basket and still have room to drill it out. If it happens again I'll get a 90 degree adapter or small drill to do the job. Cutting that stem off wasn't fun. | ||
|
Post# 774271 , Reply# 189 7/30/2014 at 23:56 (3,649 days old) by combo52 (50 Year Repair Tech Beltsville,Md) |
||
Nylon Gear Question | ||
|
Post# 774357 , Reply# 190 7/31/2014 at 09:44 (3,648 days old) by ovrphil (N.Atlanta / Georgia ) |
||
|
".... because of you .."
You're welcome, Brian -thank you for even mentioning it. Beautiful KA - the model is a KDS-20 (not sure of the KDS-60).
If this is a dream appliance, you sorted through alot of DW to decide on this one. How does this become selected as a dream KA over all the other KA models? I mean, there are a few others that are visually(my own judgement tool for now) interesting, as well. :-) | ||
| Post# 774494 , Reply# 191 7/31/2014 at 23:09 (3,648 days old) by beekeyknee (Columbia, MO) | ||
|
A KDS-60 is a KDS-20 disguised in a portables clothing. I wanted an 18 or 20 but the 18 never came along and the 20 isn't bad, so I took it. I don't have room for a built in right now, but hopefully I will in the future.
Anyway all this d/w stuff goes with this thread. CLICK HERE TO GO TO beekeyknee's LINK | ||
|
Post# 774497 , Reply# 192 7/31/2014 at 23:29 (3,648 days old) by ovrphil (N.Atlanta / Georgia ) |
||
|
Now I know! I just read most of the link you provided. I missed reading that, which often happens to me, as the searching consumes my focus. I arrive at the scene of restoration threads, often last. Oh well.
Thanks again, Brian. It's in great shape and you of course brought it up to a finer looking and operating appliance. | ||
| Post# 832366 , Reply# 194 7/15/2015 at 09:47 (3,299 days old) by beekeyknee (Columbia, MO) | ||
|
Squealing Belt Problems Pete,
Pull the machine out away from the wall, find it's center of gravity on it's two back feet with the back of the control panel propped against the wall. Be very careful during this step. If the machine falls it can do tremendous damage to itself, it's surroundings or you! If the machine doesn't want to slide and it sets on a smooth surface such as finished concrete or tile you can clean a few inches of the floor in front of each foot with Pledge and it will slide much easier. I trust you've cleaned the motor carriage, replaced or checked the glides and put new Polylube back on the carriage and glides? I would do this before changing the belts if you haven't. The best thing to do to stop the squealing is to remove the pulleys, clean off all the old glazed rubber with some solvent and coarse steal wool or a bench grinder with a buffing wheel on it. Replace the pulleys checking them for rough spots.
Basically the system has to have smooth, clean pulleys, proper sized cloth covered belts, a clean properly assembled motor carriage with good glides that are Polylubed and Maytag springs holding the top and bottom of the carriage together and a properly adjusted pump. It helps to have two people to do the motor/pump adjustment, one to pull back on the motor while the other sets the pump, but it can be done by one. When the motor's pulled back by hand and the pump is pushed toward the right in the slots on the frame a slight motion can be felt in the motor as it starts to just move back toward the drive pulley. This is where the pump should be held in place and tightened down for proper adjustment. This can vary according to the pump belt. If it's old. The pump may move all the way to the right without moving the motor. If it does that's fine as long as the pump belt isn't cracked or chipped and likely to fail. Most of the time the pump belts will out last the machines and it's only the drive belt you have to worry about.
Be careful to get your stop lug adjustment right on the drive pulley when replacing it. Now replace the belts (or at least the drive belt) with good ones with plenty of cloth on them. Your originals may have had enough cloth on them at the time but they must be contaminated by now, either from the pulleys not being cleaned properly when you worked on it before or from belts of poor quality that were used the last time they were replaced. This happened to me on my first restore. I won't use poor quality FSP belts again. I examine them closely before installation. A side by side comparison will show the difference. Don't forget to get your machine good and level and use the locking nuts. Little things make a lot of difference. Just as a side note. The thread you were referring to where I cannibalized a 408 for my mothers LAT9800AAW - the belts on the 408 were in good condition with plenty of cloth and I reused them on her machine. Just because they aren't new doesn't mean they are bad. I checked them thoroughly before using them and they have been serving her well. I hope it hasn't been too long and you find my response. | ||
| Post# 832370 , Reply# 195 7/15/2015 at 10:23 (3,299 days old) by beekeyknee (Columbia, MO) | ||
|
Pete,
I just reread your post. "A repeating squealing belt sound during the entire spin cycle." That's odd. Are you sure it's coming from the belt? If the machine is getting up to full speed it shouldn't be squealing at that point. Does it squeal more at the beginning of the spin than at the end or is it a steady repeating squeal from beginning to end? Does the frequency of the squeal increase as the machine spins faster? Usually a squealing belt will squeal a lot at the beginning of the spin cycle and then stop as the machine reaches full spin speed.
Brian | ||
| Post# 834056 , Reply# 196 7/27/2015 at 12:11 (3,287 days old) by bvf () | ||
|
academy award wow a wonderful job �thanks for taking the time to help all of us�i need to do this to several machines i have�you make it look so easy ill do two by morning�thanks again�. | ||
| Post# 1008790 , Reply# 198 9/27/2018 at 21:03 (2,129 days old) by eurekastar (Amarillo, Texas) | ||
|
| ||
| Forum Index: | 
| Other Forums: |

|

|

|

|

|

 Comes to the Rescue!


;)
;)