|
Thread Number: 50786
Speed Queen solid tub tune-up |
[Down to Last] |
Post# 730647 1/26/2014 at 11:08 (3,742 days old) by akronman  (Akron/Cleveland Ohio) (Akron/Cleveland Ohio) |
||
My early 70's DA3780 washer runs perfectly, but needs some Rustoleum, etc, so it's apart a bit. For onr thing, here's the cement-weighted balance ring, no wonder she weighs a lot. There's also a cement bucket installed near the rear of the base for more balance. No reason to remove the inner tub, no leaks visible anywhere, so I wont.
| ||

|
|
Post# 730649 , Reply# 1 1/26/2014 at 11:17 (3,742 days old) by akronman (Akron/Cleveland Ohio) |
||
|
motor | ||
|
Post# 730651 , Reply# 2 1/26/2014 at 11:20 (3,742 days old) by akronman (Akron/Cleveland Ohio) |
||
|
Main shaft | ||
|
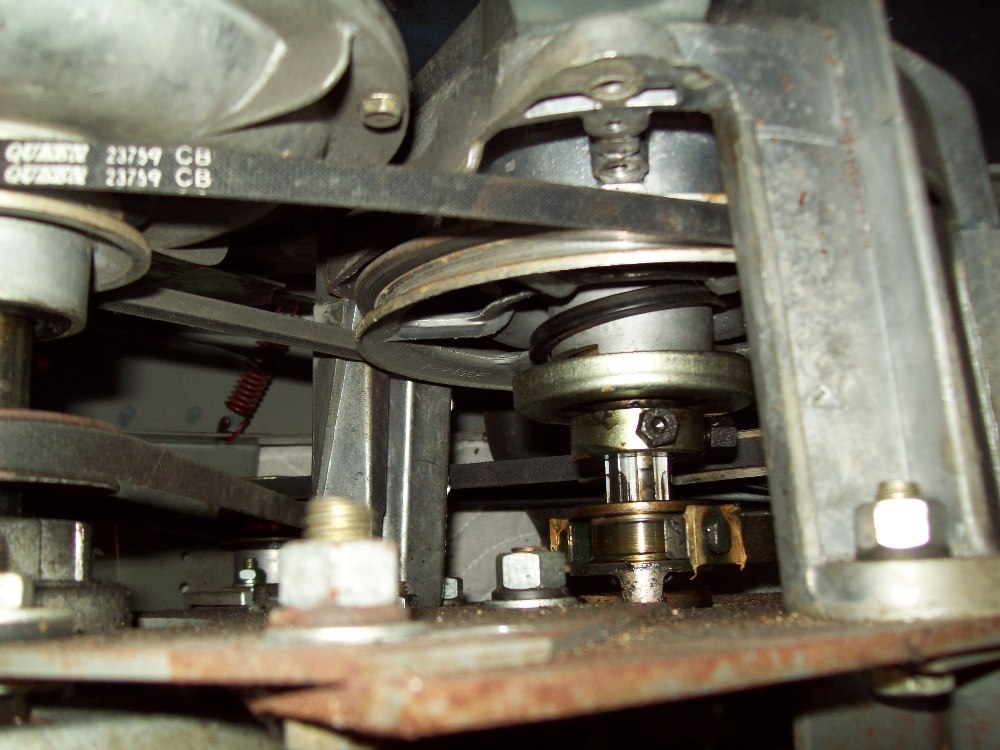
Post# 730654 , Reply# 3 1/26/2014 at 11:27 (3,742 days old) by akronman (Akron/Cleveland Ohio) |
||
|
base
I will likely only remove the motor, then cautiously clean the base for Rustoleum, afte taping up parts that don't need paint. The u-shaped yoke(?) that goes thru the base doesn't spin, it's some balance/snubber/suspension item. What is it, for one thing, and what kind of lubrication?
As always, thanks to anyone/everyone who has Speed Queen experience and advice. This is a well-cared for machine that does a fun fine job, I am just cleaning and doing some preventative maintenance. 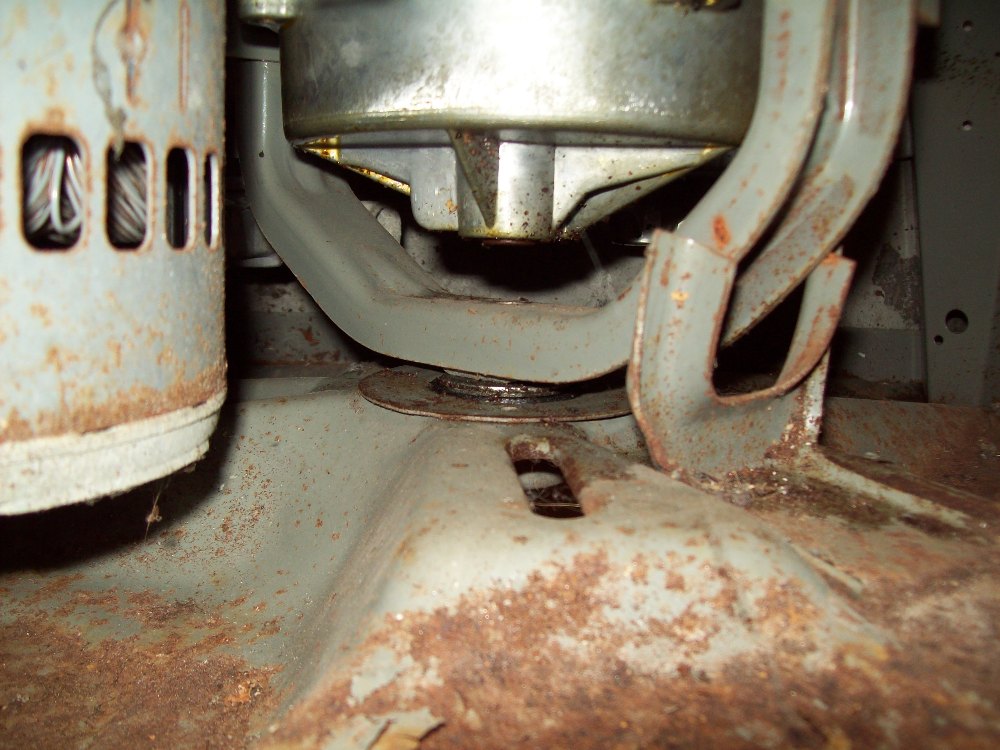
| ||
|
Post# 730655 , Reply# 4 1/26/2014 at 11:28 (3,742 days old) by akronman (Akron/Cleveland Ohio) |
||
|
under | ||
|
Post# 730656 , Reply# 5 1/26/2014 at 11:31 (3,742 days old) by akronman (Akron/Cleveland Ohio) |
||
|
leaks
40 years old, this ain't too bad for the right side of the machine. The gasket looks fine, and I have had great luck on Filter Flo tub/lid gaskets when I lube the tub rim with Vaseline prior to re-assembly, 3 years and no leaks on a FF. Better advice? I will wash it up first so I can follow and find any new leaks, but this is pretty expected at age 40
| ||
|
Post# 730658 , Reply# 6 1/26/2014 at 11:37 (3,742 days old) by akronman (Akron/Cleveland Ohio) |
||
|
center
here's the center shaft seal. Again, to me it looks like incredibly minor wear and water for its age, and I don't want to touch it.
The base has rust, but all hoses and the water inlet valve have been replaced, and the washer was in an ugly 1950's wet basement for 40 years. I read the evidence as "no current leaks" and have watched numerous loads with either the front off or the back, all is good. 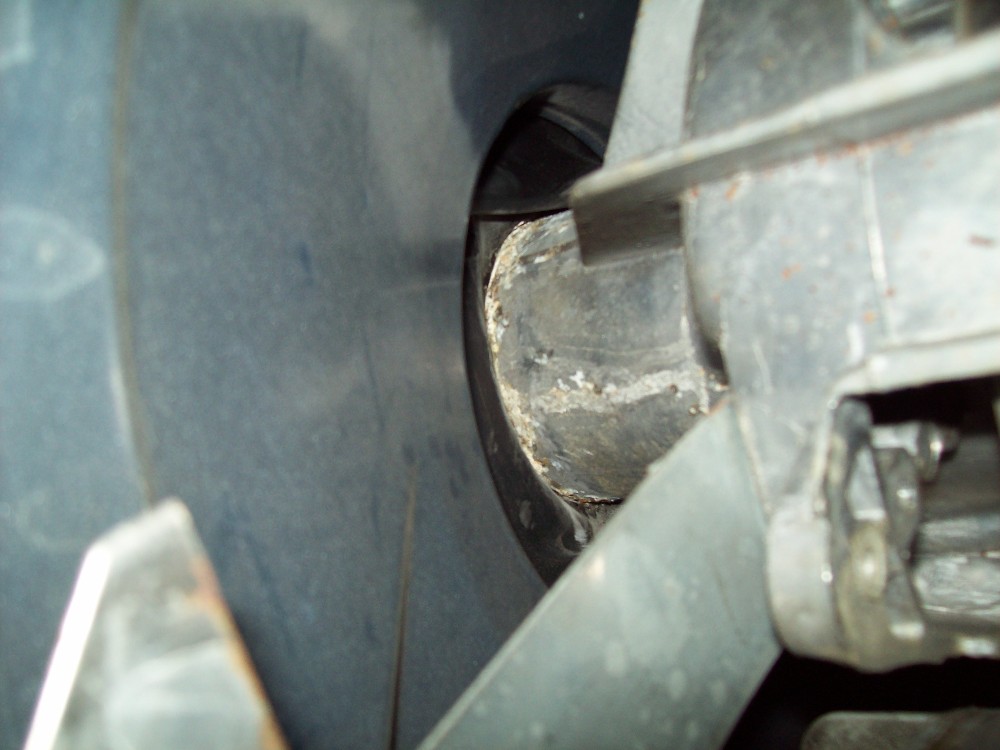
| ||
|
Post# 730661 , Reply# 7 1/26/2014 at 11:42 (3,742 days old) by akronman (Akron/Cleveland Ohio) |
||
|
worst
that interior rust is the worst on any items, I can scrape/clean/prime/paint easily. As for bits of the exterior, screw holes with bits of rust??? New stainless steel sheet metal screws, for one thing. But with a basement installation and the colored cabinet, I won't attempt a paint job, my original posting shows it's in remarkable shape.
But for those exterior screw holes near the floor-----with Rustoleum on the base and on the interior of the side panel, and new stainless screws, is there some clear paint trick for small areas, to prevent additiional rust? Clear epoxy spray? 
| ||
|
Post# 730971 , Reply# 9 1/27/2014 at 13:45 (3,741 days old) by akronman (Akron/Cleveland Ohio) |
||
|
Motor shaf
in reply #1 picture, it ain't a set screw, it's a rod going thru the entire shaft. When I had some dis-assembly done and saw that, I took another good look and just put it all back together as is. Between the 3 belts and pump and the fluid drive just resting atop the motor shaft, it's pretty difficult to remove the motor. Too difficult if it ain't giving me a problem. The motor looks damn clean as is, no dust like on a dryer, and I got some Zoom Spout oil into the top motor bearing, that's gonna be good enough.
Next will be covering up what doens't need cleaned or wet or painted, there's no reason to remove the entire works since it all does work. My poor English in that last sentence is pure Akron OH talk. | ||
| Post# 731065 , Reply# 10 1/27/2014 at 19:44 (3,740 days old) by washman (o) | ||
|
Well do keep us posted and be sure to put up more stuff on youtube. I would be most appreciative if you could film a cycle with the cover off showing off the Arc-Cuate transmission in action. | ||
|
Post# 731183 , Reply# 11 1/28/2014 at 08:02 (3,740 days old) by combo52 (50 Year Repair Tech Beltsville,Md) |
||
Refreshing a 1970s SQ Solid Tub Washer
Good project Mark, there are a few things that you should do to keep this machine working for at least a few more years. The rubber boot in the outer tub looks like it is starting to fail and a leak there will destroy many parts of this washer fast. Bob in Cleveland still has these boots along with the expertise to help you along.
Repainting the base and other parts will sure make it look better [ you can see they did a really bad paint job, but they never intended one of these washers to last more than about 15 years, today paint finishes and coatings are greatly superior. There is no part of these neat older SQs that bears any resemblance to the current SQ TL washers, the inlet valve comes the closest and may be the only interchangeable part. The transmission is completely different, it has no parts wearing into the aluminum housing and no top or bottom oil seals to ever fail. Keep us posted Mark, I will await seeing your finished masterpiece. Ben, I will take you up on your bet on the box of Sears detergent in 40 years [ better save the box of detergent now as Sears will be long gone, LOL ], but neither of us will likely be still living. Everyone said what junk the WP DD washers were 25 years ago and now we see them going strong at 25+ at a rate hundreds of times greater than ST SQs did when they were 25 years old, I have seen nothing with the new WP built BD TLers that makes me thing that they could not last 40 years in some usage situations. John L. | ||
|
Post# 731308 , Reply# 13 1/28/2014 at 17:13 (3,740 days old) by akronman (Akron/Cleveland Ohio) |
||
|
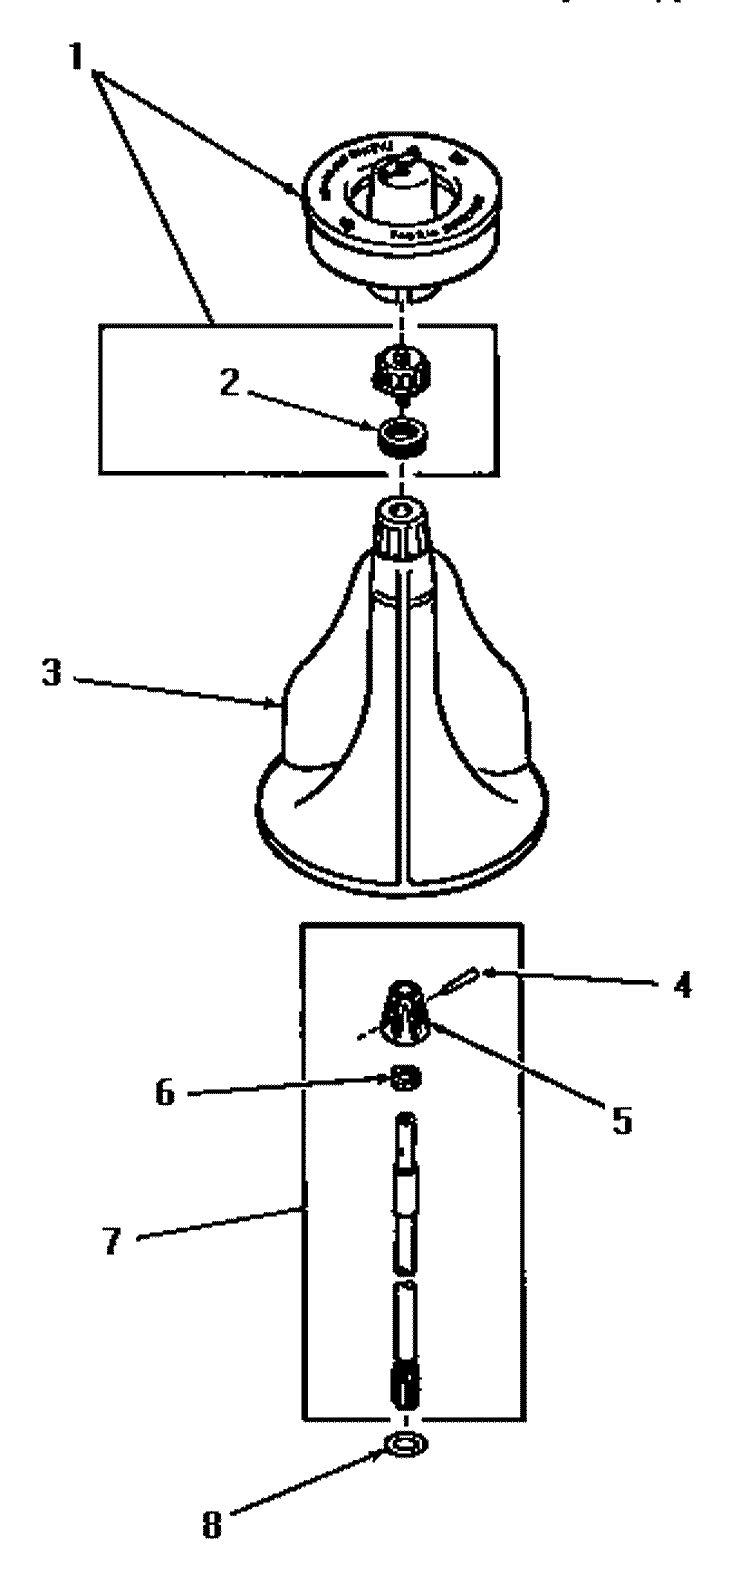
Thanks John
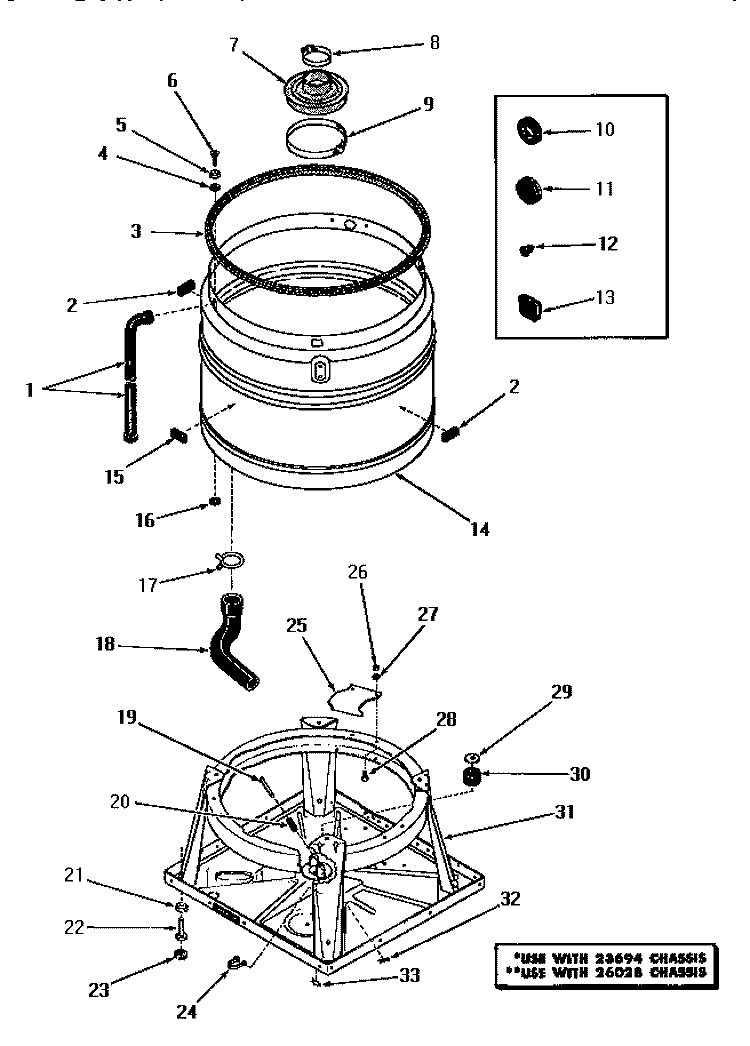
I will gladly take your advice while this is apart. I'll get a new boot before I start major dis-assembly. Is there anything else, sight unseen, I should automatically get before I dig in? I have downloaded entire parts list diagrams, but no service amnual, so I will have some questions. Gaskets under the inner basket or something? Items 13 and 26 in this diagram? Or how much of that inner tub/agi post/sediment tube/assembly can stay together if I just need it out to get to the outer tub boot? I dont' believe any part of that assy is giving me probelms, I just need it removed for an hour.
If this were a routine Kenmore, Tag, or FilterFlo, I'd spruce it up but just keep running as is, those machine are relatively plentiful and easy to find. But this solid tub Queen I put in the catergory of my Norge and 1-18, significantly fewer built back in the day, so restore completely while I can still source parts, and treat gently and rarely for hopeful long-term use. 
| ||
|
Post# 732798 , Reply# 14 2/4/2014 at 09:53 (3,733 days old) by akronman (Akron/Cleveland Ohio) |
||
|
Boot | ||
|
Post# 732807 , Reply# 15 2/4/2014 at 10:47 (3,733 days old) by Yogitunes (New Jersey) |
||

check this place for stuff, they had a few parts in stock that I needed...
www.easyapplianceparts.com... ..... also...follow this thread from Brian....we used a few different model numbers and was able to find parts....especially the softner dispenser CLICK HERE TO GO TO Yogitunes's LINK | ||
|
Post# 733343 , Reply# 16 2/6/2014 at 11:31 (3,731 days old) by akronman (Akron/Cleveland Ohio) |
||
|
stuck | ||
|
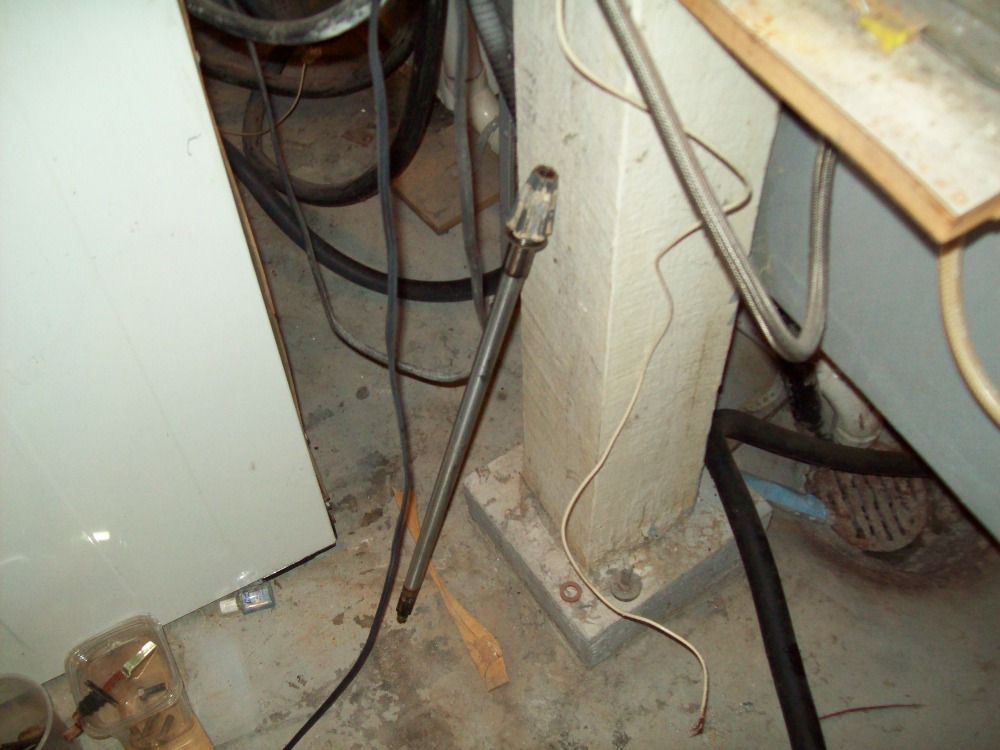
Post# 733344 , Reply# 17 2/6/2014 at 11:34 (3,731 days old) by akronman (Akron/Cleveland Ohio) |
||
|
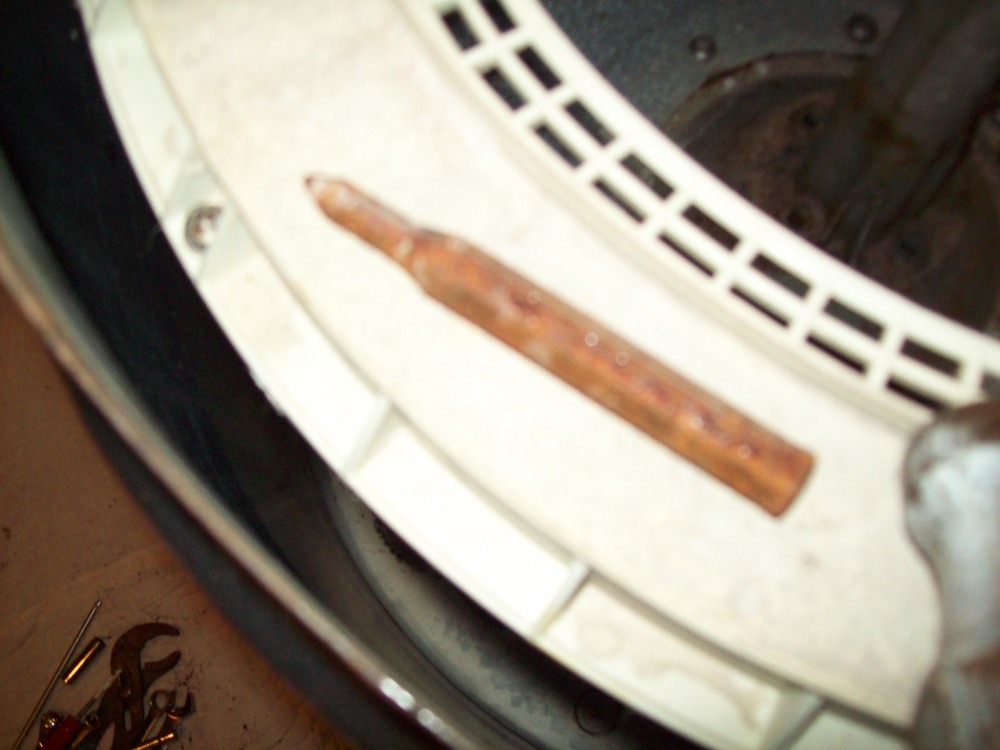
and
here is the drift pin I am using for hammering it out. Of course the suspension of the machine takes some of the hit, and the block turns sometimes, but I have had many damn good hammer blows and no luck yet. The pic shows that the post bolts came out easily. You can't remove the balance ring until the porcelain tub is out of the machine, but it's barely in the way.
| ||
|
Post# 733345 , Reply# 18 2/6/2014 at 11:38 (3,731 days old) by akronman (Akron/Cleveland Ohio) |
||
|
parts diagram | ||
|
Post# 733349 , Reply# 19 2/6/2014 at 12:18 (3,731 days old) by akronman (Akron/Cleveland Ohio) |
||
|
well
I should have SEARCHILATED prior to all these posts--------The entire inner tub and post come out from under the outer tub-------
CLICK HERE TO GO TO akronman's LINK | ||
|
Post# 733350 , Reply# 20 2/6/2014 at 12:32 (3,731 days old) by Yogitunes (New Jersey) |
||
|
| ||
|
Post# 733354 , Reply# 21 2/6/2014 at 12:51 (3,731 days old) by akronman (Akron/Cleveland Ohio) |
||
|
so | ||
|
Post# 733355 , Reply# 22 2/6/2014 at 12:52 (3,731 days old) by akronman (Akron/Cleveland Ohio) |
||
|
and | ||
|
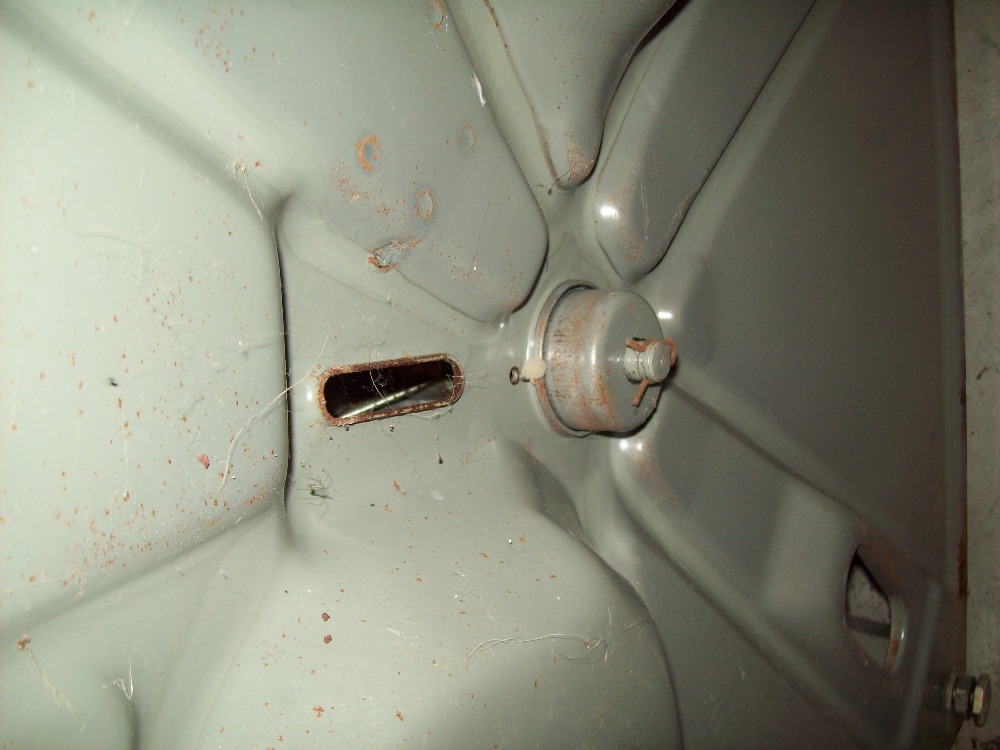
Post# 733357 , Reply# 23 2/6/2014 at 13:01 (3,731 days old) by akronman (Akron/Cleveland Ohio) |
||
|
more
so here's the inside of the outer tub. The two bolts NOT SHOWN, of course, have slight rust but no leaks yet. I will clean them up, leave then in place, and use some red RTV sealant.
Aboth huge hose clamps for the boot came right off, and I've cleaned up crud around the post. But it looks like some difficult maneuver to slide the boot over this big 4 bolt flange. Does it have to come out too? And the gasket for these 4 bolts is in nice shape but also stuck, I fear removing it would ruin it. Just leave it be and add some RTV as I reassemble? It looks like it has VERY successfully kept all water out of the agitator hole. From what I read in the other posts, this agitator/block/removal of entire shaft should apply to decades of SQ solid tubs, not just this reversing motor type. I think. So do I just stretch the boot around that big flange or what? Thanks to anyone who knows---- Mark 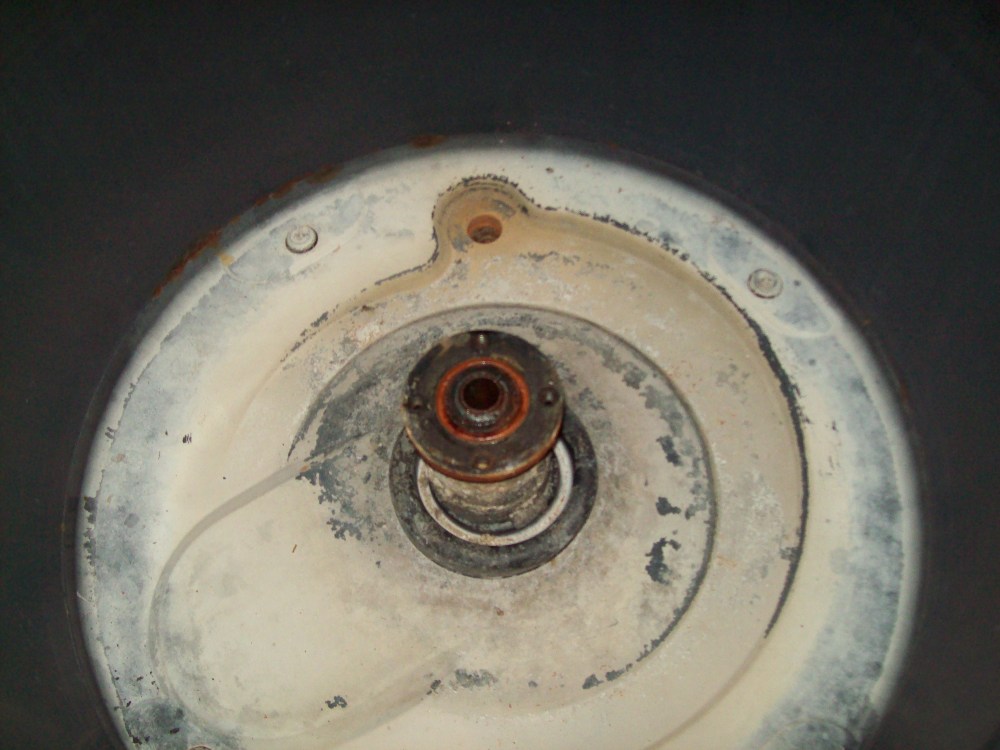
| ||
|
Post# 733358 , Reply# 24 2/6/2014 at 13:11 (3,731 days old) by akronman (Akron/Cleveland Ohio) |
||
|
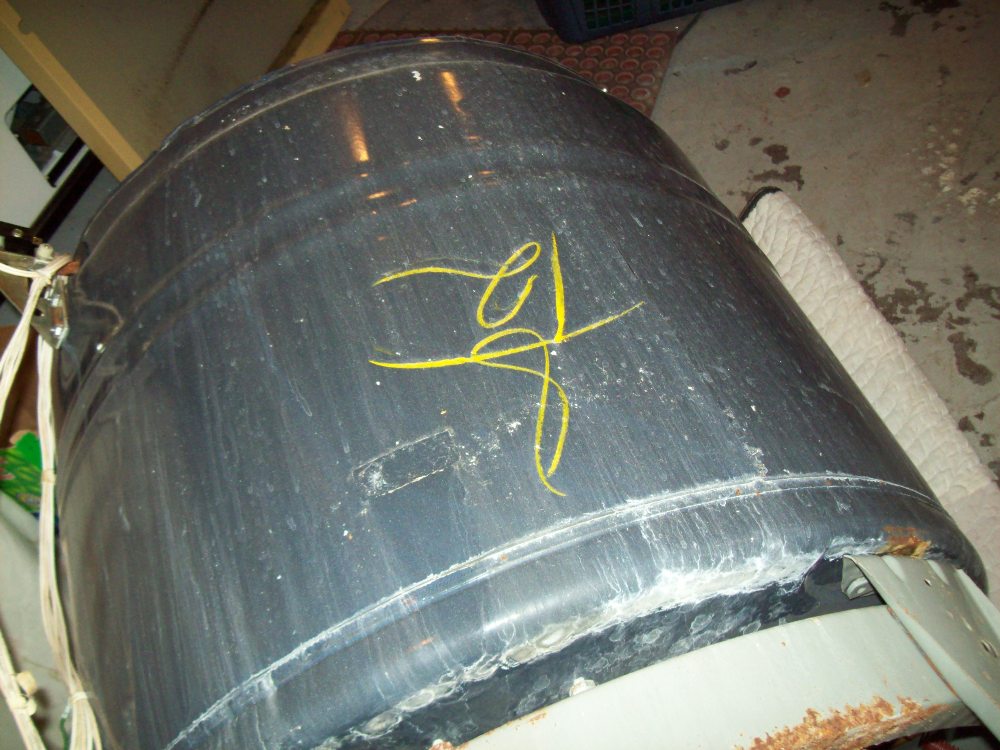
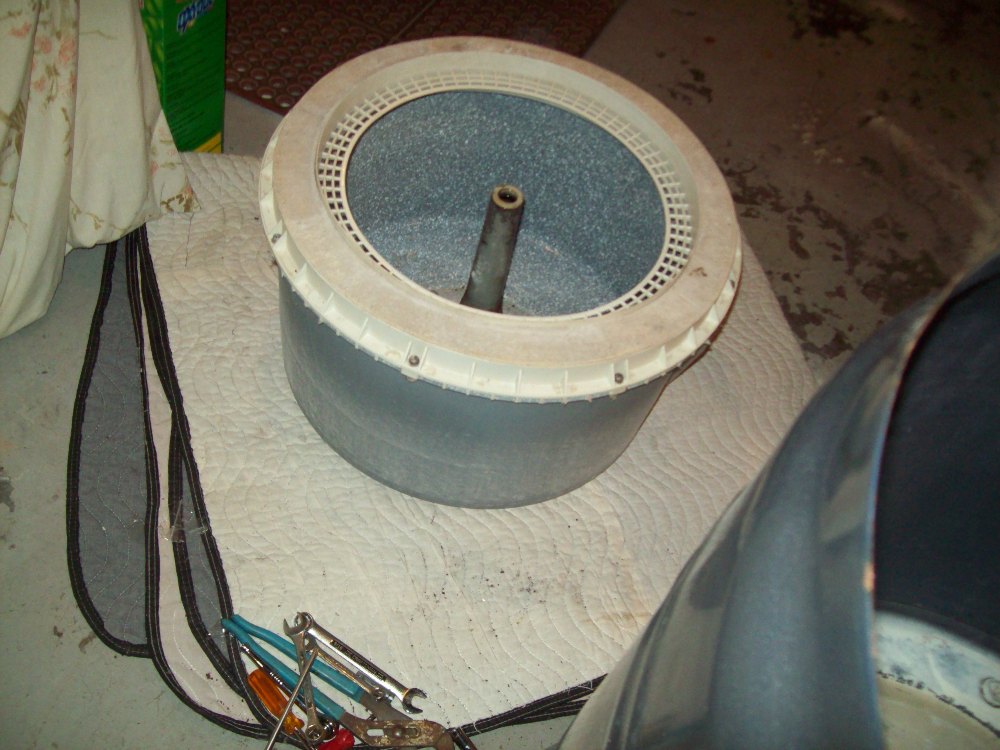
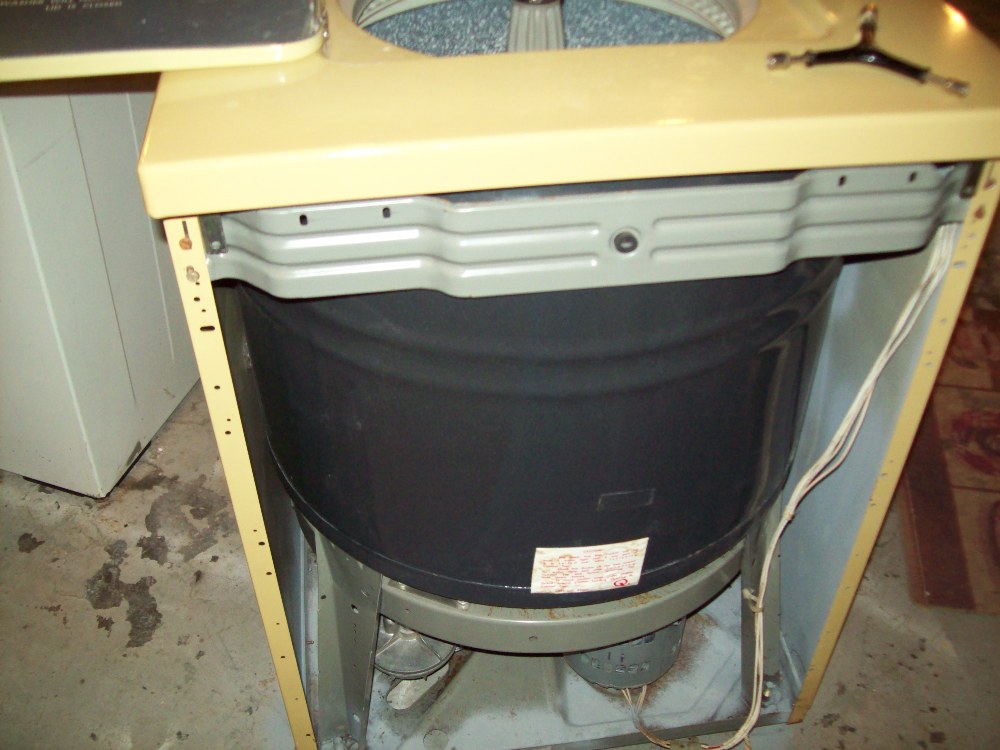
washtub
Here's the full assembly of the inner tub, porcelain model, not stainless steel. From what I can gather from less-than-complete literature, they made a stainless and a porcelain full sized tub, matching size, then also a smaller sized porcelain. I believe all other innards are the same, so why 2 sizes? And I still really don't know if mine is large or small, I know it's the one I got. (laughter expected)
| ||
|
Post# 733359 , Reply# 25 2/6/2014 at 13:12 (3,731 days old) by akronman (Akron/Cleveland Ohio) |
||
|
and........ | ||
|
Post# 733366 , Reply# 26 2/6/2014 at 14:29 (3,731 days old) by gansky1 (Omaha, The Home of the TV Dinner!) |
||
 Just stretch that boot right over the tub flange, won't hurt it if it's still soft and pliable.
You will want to make sure that when you do put the agitate shaft back in that the thrust collar (with the two allen screws) is as tight as possible against the bottom of the spin bearing housing as possible - have someone hold the agitator shaft down (or use a weight on it). If there is any play in it vertically, it will knock in agitation. | ||
|
Post# 733389 , Reply# 27 2/6/2014 at 15:58 (3,731 days old) by Yogitunes (New Jersey) |
||
|
| ||
|
Post# 733394 , Reply# 28 2/6/2014 at 16:10 (3,731 days old) by akronman (Akron/Cleveland Ohio) |
||
|
Martin
Yes I have always heard that, just wasn't sure what it was.
I was working that old boot off in the 52 degree basement, so I stole my boyfriend's hairdryer for some direct heat, got it off pretty easy. Next is cleaning up that post where the top clamp fits, and I think some RTV will be installed along with the new boot. | ||
| Post# 733420 , Reply# 29 2/6/2014 at 19:24 (3,730 days old) by washman (o) | ||
|
When you get it all back together, can I come over a wash a load of stuff? | ||
|
Post# 734290 , Reply# 30 2/10/2014 at 17:38 (3,727 days old) by akronman (Akron/Cleveland Ohio) |
||
|
99% done
My hands were greasy and cold, so I wasn't in a picture taking mood often, but the boot replacement went well. This pic sucks, but I scraped gunk off the shaft, vacuumed up all the crud that fell on the assembly below, screwed the new boot on with the old bands, then used some clear RTV sealant on both the top and bottom of the boot.
On the inside of the cabinet, I scraped and Rustoleum'd the minor rust, and on the back of the cabinet and the worst spots of the base, without major dissasembly. The pump and all 3 belts and inlet hoses and water valve all lookk like they were replaced withing the last six months, so I did nothing to them. I got a few drops of oil into the top of the motor's top bearing, and some on the various sparkling clean agi shaft and various clean and oily assemblies between the tranny and the center shaft. I do not know what the parts are, some fulcrum item that pops the tranny out of agitation? The exterior has minor surface rust near the base, at the screw holes, and I can't imagine finding the right paint cclor, so I sanded lightly then used Rustoleum Clear Epoxy. I bought the wrong size stainless steel screws, but will buy the right ones tomorrow. I think it will look better than the day it came home, and will be proected better than before. I bought Perma-Tex Blue epoxy gasket maker for the tub gasket rim, where the outer tub hits the machine top, but so far I've done 3 loads with the rear and front removed for excellent visual inspection, and no leaks. I never opened the blue epoxy. I'll wait maybe 3 more loads of clothes and constantly inspect with a flashlight, from front and back. You can see an amazing amount of the gasket with all that open area. If everything stays dry, I won't do the extra epoxy and just consider myself lucky. 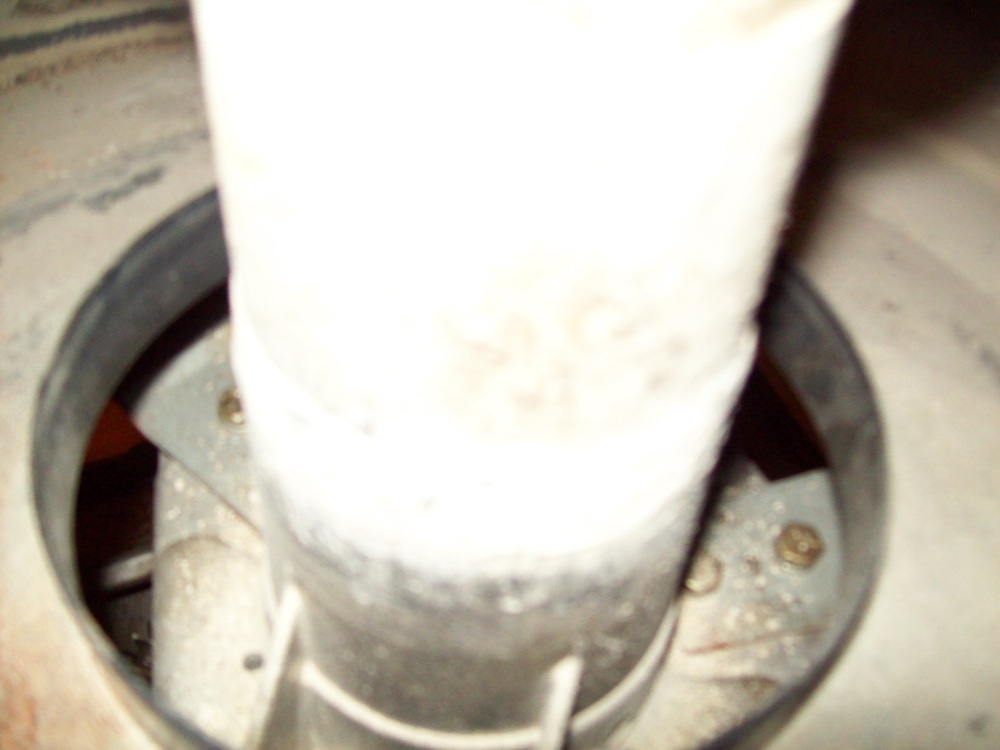
| ||
|
Post# 734291 , Reply# 31 2/10/2014 at 17:41 (3,727 days old) by akronman (Akron/Cleveland Ohio) |
||
|
more
Here's the front open, to inspect for leaks. I haven't found one yet, 3 loasd of clothes. I did not take the entire base apart, so the new paint is only on the edge rusty areas. The way the sides are used to pull the top down on the tub gasket means you can run it damn well with both the back and front removed, to watch.
| ||
|
Post# 734293 , Reply# 32 2/10/2014 at 17:52 (3,727 days old) by akronman (Akron/Cleveland Ohio) |
||
|
last
and the rear removed for watching everything. There's no signs anywhere of recent leaks. I believe the pump and inlet valve caused plenty of problems in the past, but not any more. I cleaned all around the outside of the tub so I can see new soapy crud water stains if anything does go wrong. 3 more loads andno leaks means I put the front and rear back on and just have SQ ST fun. It's BOL, one-speed, small tub, and runs wonderfully and washes well and rinses fantastically. It won't do a rug or comforter or even heavy jeans, they slosh water over the rim and gone, but everything else comes out wonderfully rinsed in a quiet humming machine with lots of overflowing action. Very Cool
Thanks Yogi and John L and Malcolm and Gansky! It's leak-free, 98% rust free, 100% fun! This now fulfills my 2 year search and hope for a Speed Queen solid tub! Next is maybe a long slow search for a slant-front Westinghouse? Or even the flat-front Westy's of the 70's? Mark 
| ||
|
Post# 734296 , Reply# 33 2/10/2014 at 18:00 (3,727 days old) by akronman (Akron/Cleveland Ohio) |
||
|
also
the inside of the outer tub in reply 23 above-------I used clear RTV sealant on all seams(minor rust lines in a few spots) and coated the 4 bolts/washers/gaskets with the same. That should forestall additional rusting for quite a while!
And the 4 hole gasket in the pic, under the wash tub, got some damage from all the boot stretching removal/re-installation, so I coated it with the clear goop and ran some on the mating section of the washtub before I re-installed. IT was just edge damage and the entire gasket did NOT seem to want to come off, so I just gooped away. That's the scientific explanation. | ||
| Post# 734316 , Reply# 34 2/10/2014 at 19:00 (3,726 days old) by rollermatic (cincinnati) | ||
|
enjoyed reading
your thread here very much. I have a speed queen very similar to yours, mine has the stainless solid tub instead of porcelain but everything else looks the same.
never have taken mine apart, it runs fine as is, hopefully it will continue to do so. the pump on mine has some bad corrosion on it so I make sure I completely drain the pump and drain hose after each use to help prevent further corrosion. enjoyed the pic of the inner tub out of yours. didn't know they came in 2 sizes! again, enjoyed reading and looking at your pics! | ||
|
Post# 734320 , Reply# 35 2/10/2014 at 19:11 (3,726 days old) by gansky1 (Omaha, The Home of the TV Dinner!) |
||
|
| ||
| Post# 734323 , Reply# 36 2/10/2014 at 19:16 (3,726 days old) by rollermatic (cincinnati) | ||
|
i do have a question for
you akronman (or combo52)
that boot that you both refer to and show a pic of, I'm not finding it in any of your pics here.is it on the top of the outer tub or bottom? curious what it does? I assume my machine has same boot? when you say many parts will be destroyed if it fails it makes me hesitatnt to use mine anymore. and being in northern ohio did you get that part from modern parts in parma or is there another old parts place in the Cleveland/akron area that may still have old parts for these classic old dishwashers and washers we collect. thanks1 | ||
|
Post# 734327 , Reply# 37 2/10/2014 at 19:27 (3,726 days old) by akronman (Akron/Cleveland Ohio) |
||
|
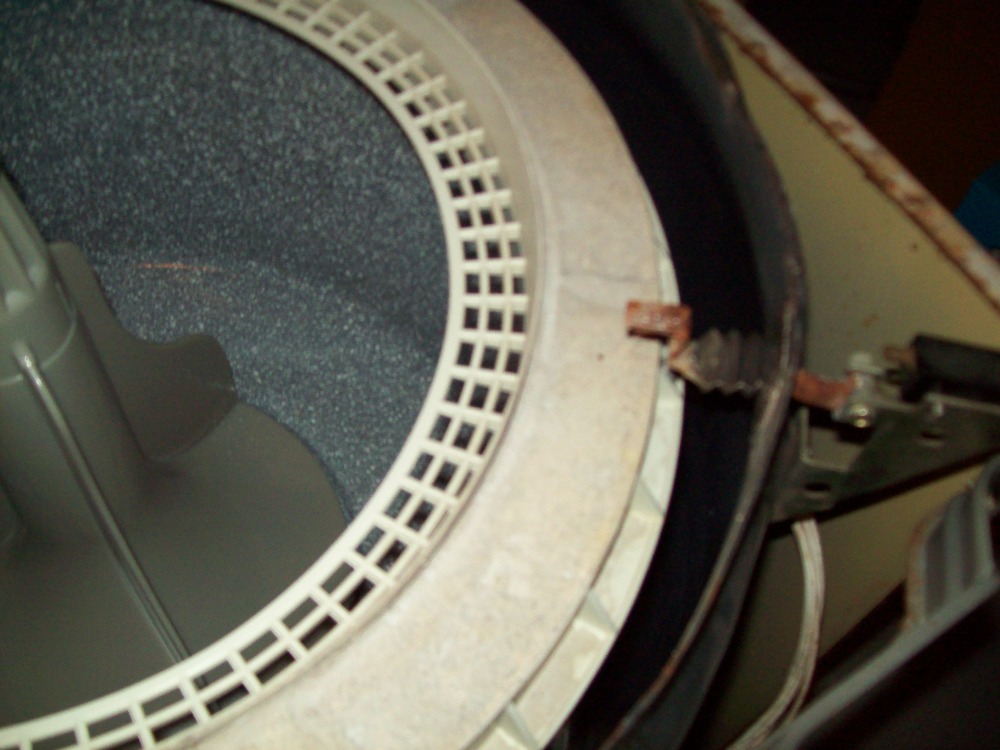
boot
Rollermatic----Thanks for your interest.
This pic shows the original boot in place. It fits inside the outer tub, clamped in place around the outer tub flange and the thick shaft that rises up. It's dirty as hell, and the white ring in this pic is just 40 years of crud/soap scum, etc. Next pic will help too. 
| ||
|
Post# 734330 , Reply# 38 2/10/2014 at 19:33 (3,726 days old) by akronman (Akron/Cleveland Ohio) |
||
|
boot removed
and this pic shows the removed boot just hanging around. Huge hose clamp goes around the bottom attaching it to the outer tub lip. Smaller hose clamp goes around the top, closing it to the shaft, well beneath that 4 hole flange.
Frankly--I may be wrong----but I think I could have removed the clamps, cleaned up all around the mating surfaces with the gasket loosened, then reclamped it and used RTV sealant at the edges where water could get through. The Speed Queen PN is #20129, I believe the same exact boot covered decades of SQ solid tubs. I bought it at a local Akron place, Akron Home Appliance on North Main. While they may not have as extensive an inventory as Modern Parts, they have been in the same old building since the 60's, so I have been lucky. 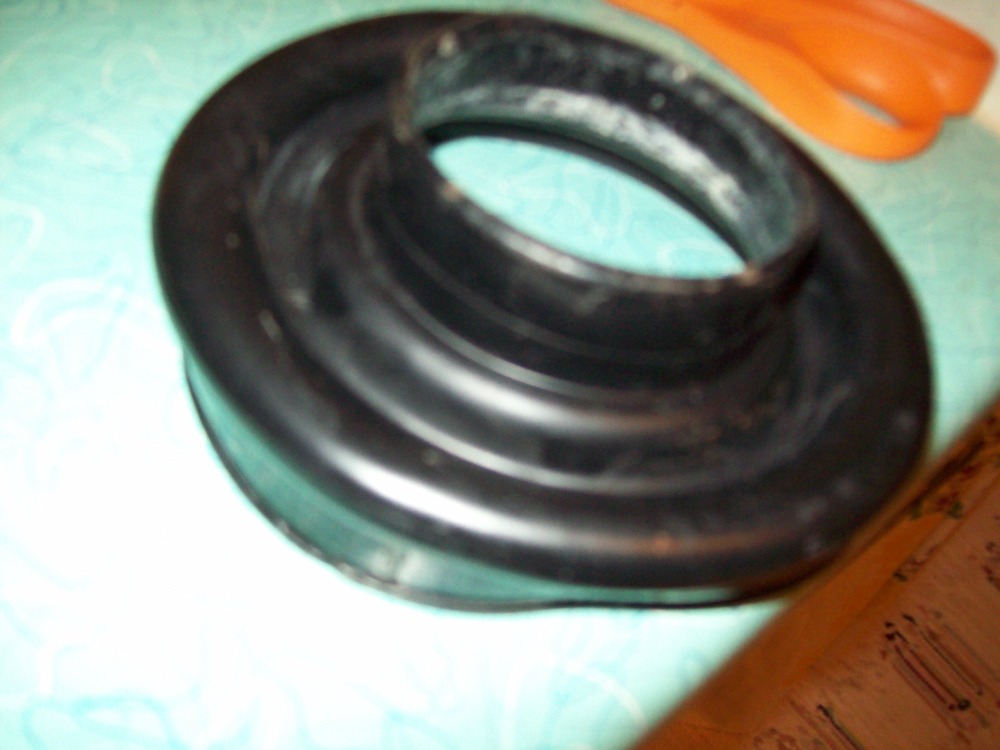
| ||
|
Post# 734331 , Reply# 39 2/10/2014 at 19:36 (3,726 days old) by akronman (Akron/Cleveland Ohio) |
||
|
pump
still available. The bottom thumbscrew lets you move around the ports to fit a variety of machines. I believe, not entirely sure, the same pump with a single pulley was used on SQ Wringers for decades.
CLICK HERE TO GO TO akronman's LINK on eBay 
| ||
|
Post# 734335 , Reply# 40 2/10/2014 at 19:40 (3,726 days old) by akronman (Akron/Cleveland Ohio) |
||
|
boot again | ||
|
Post# 734367 , Reply# 41 2/10/2014 at 21:12 (3,726 days old) by Yogitunes (New Jersey) |
||
|
Mark....your machine spins clockwise, did you get the exact pump for your machine?....
it gets a little tricky because a solid tub with the banging solenoids spins counter-clockwise....and the picture you have up there from ebay is for this type of machine..... no big deal during wash, they both will pump, but during spin, you want the full force of it spinning in the right direction for the port... just make sure you match up any purchase with the one already installed.. | ||
|
Post# 734433 , Reply# 42 2/11/2014 at 06:54 (3,726 days old) by akronman (Akron/Cleveland Ohio) |
||
|
Martin | ||
| Post# 734437 , Reply# 43 2/11/2014 at 07:18 (3,726 days old) by rollermatic (cincinnati) | ||
|
thanks for the info akronman
both on the pump on e bay and the parts store in akron. I did pull up 2 previous threads done by you and me, #41424 and #49864. enjoyed your's and also re-looking at mine.
can't find the model # for my machine handy but do remember i was told here that my machine was a later model solid tub from the 70's. once weather warms up I will pull machine out, remove front and look for it, too cold here in cinti right now, my laundry room is basically unheated. not freezing but cold! yogitunes, thanks for info on pump direction. from looking at new pump on e bay and pics on mine from my thread 41424 it does look like mine pumps in an opposite direction from the one on e bay. | ||
| Forum Index: | 
| Other Forums: |

|

|

|

|

|

 Comes to the Rescue!