|
Thread Number: 92884
/ Tag: Vintage Automatic Washers
A Royal Restoration - Summer of Love Speed Queens! |
[Down to Last] |
Post# 1174557 3/12/2023 at 20:09 (418 days old) by swestoyz  (Cedar Falls, IA) (Cedar Falls, IA) |
||

Evening, fellow AW collectors! I wanted to provide an update on a set that I had posted about back in 2021, shortly after they were delivered. The preliminary check of both looked promising, but after pulling the top off the washer the tales of a blown out balance ring were quickly discovered. I was then on the hunt for a donor tub or balance ring, as well as a base as both front legs had sheered off due to extensive bleach damage.
Original posts: They�re here! 1967 Speed Queen set www.automaticwasher.org/c... Speed Queen Balance Ring Woes: www.automaticwasher.org/c... This is a very long thread so if you�re not digging the extra detail on the restoration feel free to skip down to the end for the glamor shots and video!
View Full Size
| ||

|
|
Post# 1174558 , Reply# 1 3/12/2023 at 20:10 (418 days old) by swestoyz (Cedar Falls, IA) |
||
|
The Dryer
Once it was determined that the washer wasn�t in a great position to begin a full restoration, my attention was switched over to the dryer in early 2022. Thankfully everything on the dryer was in really nice shape. While most of the parts could have been reused the dryer did receive new drum and door seals, a new drum and blower belt, new front rollers, and a good overall cleaning. The original terminal block was disintegrated and was replaced with an over the counter Whirlpool part.
The dryer took a few weeks to go through and was installed roughly a year ago and has been used as a daily driver since. It�s a great performer when compared to other dryers being made in the mid 60�s, although the lint filter is a bit messy and leaves lint deposits on the wire frame that holds the filter. Performance wise it�s between an HOH Maytag and a GE, and built like an absolute tank and QUIET. The auto dry cycle is quite accurate and rarely does anything need additional attention. The pretty stainless drum is really the main reason why I decide to go forward with going through this dryer completely and using it as a daily driver. Here�s a list of the parts that were replaced with new: Outer door seal - 51799 (tough to find) Inner door seal - 51798 (still somewhat available) Front drum seal - 51881 (band and spring were re-used, this seal is tough to find) Back drum seal - 51883A (kit comes with a new band and spring -getting harder to find) Drum belt - 52556 (plentiful w/ generics available) Blower belt - 51994, generic is a 3L460 Drum roller - 56285 x2 (if replacing original style two piece rollers, new hex nuts and split washers will need to be procured from your local hardware store for the 52685 rollers) Terminal block - 50854, subs to FSP WP33001244 | ||
|
Post# 1174559 , Reply# 2 3/12/2023 at 20:11 (418 days old) by swestoyz (Cedar Falls, IA) |
||
|
Full tear down
About 4 years ago I had found a barely used 1972 reversing motor SQ in a defunct appliance store/hoarder building. While many items had been robbed off of it over the years for service calls, it was a totally rust free and mint avocado DA6071. That washer was restored in the summer of 2019 and went to go live with a fellow collector shortly afterwards. Fast forward to January 2023 and the green Queen was brought back to Iowa to be a full donor for the �67, providing the critical tub/balance ring as well as a rust free base frame.
With the �72 disassembled it was time to tear down the �67. Once the tub and outer tub have been removed the full mechanism can be pulled from the frame by removing the snubber suspension system and lifted up out of the rubber isolator in the base. From there on the disassembly of the mechanism was done on the work bench. This task is so much easier to do outside the machine! | ||
|
Post# 1174560 , Reply# 3 3/12/2023 at 20:12 (418 days old) by swestoyz (Cedar Falls, IA) |
||
|
Main Bearing Assembly
During the initial testing of the washer it was evident that something wasn�t quite right with either a bearing in the main bearing assembly or a seal. There was a high pitch squeak that would start once the tub was up to full speed, after things had warmed up a bit. Tearing the assembly apart was also motivated by the need to swap out the factory spin pulley over for the high speed commercial pulley that I just happen to stumble upon shortly after finding the �67 washer.
With the machine torn down the first thing I noticed was excess soap caked around the upper portion of the housing and excessive gunk up by the upper seal. After disassembly it was clear that the seal rubber was starting to break down and wear on the mating sleeve on the drive shaft. If this had been used as it there�s a good chance the seal would have eventually failed. After getting everything cleaned up I coated the upper portion of the housing with that awesome epoxy sealer I used on the interior of the Bendix pump, hopefully preserving it receiving any further damage moving forward. Brand new SKF doubled sealed bearings were installed to replace the single shielded originals, along with a brand new substituted upper lip seal. I�d suggest going this route for anyone restoring a 1960-1980 solid tub over using an NOS 21659 lip seal, as the few NOS seals I�ve found aren�t nearly as nice as the cheap double lip seals you can buy today. Here�s a list of the parts that were replaced with new: Ball bearing - 20012 x2, sub�d for SKF 6206 2RSJEM double sealed bearings (30mm x 62mm x 16mm) Commercial spin pulley - 24625, replacing the original 20130 Upper water seal - 21659, sub�d for a 35mm x 62mm x 10mm double lip seal | ||
|
Post# 1174561 , Reply# 4 3/12/2023 at 20:14 (418 days old) by swestoyz (Cedar Falls, IA) |
||
|
The Transmission, Part 1
With the bearing assembly checked off the list, the next logical item to tackle was the transmission. I was hesitant to even bother as it sounded as quiet as could be during the initial testing. But, knowing that everything else was going to be attended to I decided it wouldn�t hurt to crack it open. The original gear oil was just at the beginning stages of breaking down and turning into sludge. So, everything ended up in a bucket of mineral spirits and cleaned. Lots of date stampings for �67�, even with one indicating May. That is the newest of the many date stamps found throughout the washer, putting this machine right in line for assembly in Ripon, WI during the Summer of Love.
Anyway, before assembling the transmission I had made the decision to use Redline MT-90 to replace the gear oil in the transmission. A few collectors had good luck using this in Maytag transmissions and it is highly rated in the automotive world as a GL-4 synthetic equivalent, for use in manual transmissions where a GL-4 gear oil is required over a GL-5. The problem was SQ never published the type nor quantity of gear oil they considered for the transmission, nor could I find an original bottle of 02528 transmission lubricant to see what the amount was for �one fill�. The decision was to fill it up to where the original oil appeared on the drive gear, which came out really close to about a quart. The original 20199 clutch seal and 20220 pinion seal were replaced with new rubber coated lip seals. I couldn�t find a replacement rubber coated clutch seal that had the same height as the original, 7 mm, but the 9.5 mm height of a double lip seal mates up perfect along the OD of the clutch. The fit of the new clutch seal is tight but it does fit within the cover recess, although oversized on the height side when comparing to the diagram in the service manual. The pinion seal can almost be pressed in by hand but should be carefully installed using a flat block of wood. Both seals are installed with the garter ring facing upwards, per the service manual and how the originals were also installed. With the MT-90 topped off and new lip seals installed on the cover, the original gasket was cleaned and installed without any additional sealer, like RTV or rubber cement. The drive pulley was cleaned received a fresh coat of paint. Here�s a list of the parts that were replaced with new: Clutch seal - 20199, sub�d for a 1.625� x 2.375� x 0.375� (1 5/8� x 2 3/8� x 3/8�) - rubber coated Pinion seal - 20220, sub�d for a 0.625� x 1.125� x 0.250� (5/8� x 1 1/8� x 1/4�) - rubber coated | ||
|
Post# 1174563 , Reply# 5 3/12/2023 at 20:15 (418 days old) by swestoyz (Cedar Falls, IA) |
||
|
Mechanism Assembly
With the transmission and main bearing assembly completed the overall mechanism could be assembled and installed within the donor base frame. General assembly of the mechanism is pretty straight forward. SQ used a TON of threaded fasteners of different lengths so it does take a bit a diligence to keep track of which bolt goes where.
A rebuilt NOS A23669 fluid drive was installed on the motor, with the motor retaining the original motor pulley assembly. After several attempts of trying to drive the tapered pin out I decided to leave pulley alone as the clutch lining was in great shape. The belt groove of the pulley was cleared of old belt and oil deposits and the motor shaft was cleaned and lubricated with a light coating of Maytag SBL oil (sintered bearing oil, used on SOH dryer roller shafts). A clean motor shaft and t-bearing on the fluid drive are critical for correct operation. Gummed up or caked oil on the motor shaft or bearing surface can lead to coasting of the tub without the fluid drive engaged. The original pump was intended to be rebuilt with a new seal and shaft/impeller assembly, but sadly the pump body was not in the great shape. Instead, an NOS A23302 pump was installed, although this pump did NOT have the fiber washer between the impeller and the body! If someone runs across a Beam style pump that has excessive play in the shaft, pull the pump cover off and check that the fiber washer is indeed installed. Another oddity about this replacement pump was the green coating that was applied at some point. I suspect this was done to help ward off mineral deposits building up inside the pump cavity. The original belts were shot, as expected. An executive decision was made to try out some higher quality cogged belts (AX), rather than a standard non cogged belt (A). The belts used were Continental belts purchased from Grainger. The concern of gripping was at play due to the use of the smaller diameter commercial pulley, and the original SQ belt for the commercial pulley was an AX style cogged belt. One small change to consider was the use of the commercial pulley. The original SQ belt, 20895, appears on a few interchanges as being a 25.5 inch belt, which is not common when going with AX style belts. So, I ordered both a 25� and 26� belt to see which of the two would work best with the 26� belt being the one that ended up on the washer. After several tests on the bench (with the max RPM of the spin shaft coming out at 800 RPM!) the mechanism was installed in the donor base. The snubbers from the donor machine were used and the executive decision was made to retain the centering springs that were on the original �67 machine over the counter balance weight from the reversing motor donor. Thankfully the holes required for the centering springs were drilled out on the reversing motor base (it appears that this base was also used on the 70�s solenoid drive commercial machines). All old grease was removed and all springs were installed using synthetic wheel bearing grease (green) from Lucas at each friction point. Here�s a list of the parts that were replaced with new: Fluid Drive - A23669 / 23669 (these are getting harder to find) Pump - A23302 / 23002 (plentiful. When shopping on eBay, make sure the pulley is a large groove pulley vs. the small groove pulley used on reversing motor machines. Both mechanism styles used the small cavity pumps) Drive belt (commercial) - 20895, sub�d using an AX24 cogged belt, or 26� 4L style belt Motor to Pump belt - 20185, AX26 (cogged), or 28� 4L A style belt Pump to transmission - 20186, AX34(cogged), or 36� 4L A style belt | ||
|
Post# 1174564 , Reply# 6 3/12/2023 at 20:17 (418 days old) by swestoyz (Cedar Falls, IA) |
||
|
Mechanism Optimization, i.e. Fluid Drive fiasco
With the wash tub installed, I spent some time trying to dial in everything as close to perfect as possible. Belt tension between the motor and the spin pulley, and tension between the motor and pump, as well as the transmission were dialed in right around 1/2� deflection, as per the service manual.
What I was not expecting was the lack of hitting the advertised RPM of the 24625 commercial pulley, which was rated at 725 RPM, or 100 RPM over the rating on the standard 20130 domestic pulley. With the belts tensioned appropriately, the best the NOS fluid drive could produce was about 645 - 650 RPM, just roughly 20 RPM faster than the stock pulley! At this point the motor was pulled and the fluid drive was drained. ~ 6 oz. of fluid came out of the drive, not the 7.5 oz as advertised on a full charge from the SQ fluid drive bottle. What gives? After a lot of digging through various Beam related service manuals I finally stumbled across one service and parts manual that provided the factory spec - 6.5 oz! This was discovered in the 1949 Hotpoint Service and Parts manual. So, for any of us who have drained a fluid drive and only found about 6 oz in the drive, this was finally evidence that the oil did not �burn up� or leak out. This was the amount they were originally filled with! In the past I�ve drained two other drives and also go 6 oz out of them, and it appears others here on the board have as well. So why would Speed Queen then sell bottles with 7.5 oz? While this is a hunch, I suspect they were aware of the overall efficiency of the fluid coupling within the fluid drive and had done testing later on to discover that these could be filled with a higher amount of fluid and still be able to work properly without stalling the motor and increase the overall torque potential for better spin performance. With this in mind I also did some research on what the optimal hydraulic fluid ISO weight should be within a fluid coupling, and for industrial applications I found recommended anywhere between 10 and 15 ISO. The trouble is, finding a small quantity of hydraulic fluid with that low of an ISO rating is almost impossible, nor are the large gallon + sizes cheap. So, the next best option was to find any oil with the lowest rated ISO that is easy to find and test all options before I put the full machine back together. Three oils were tested: Zoom Spout oil - between 7.5 and 8 oz, 31.8 cSt at 40 deg C, or a 32 ISO rating 3-in-One Multipurpose Oil - between 7.5 and 8 oz, 23.31 cSt at 40 deg C, or a 23 ISO rating Speed Queen Fluid Drive oil - 7.5 oz, unknown ISO rating The first oil tested was Zoom Spout. Bottles can be purchased in 4 oz quantities so two bottles is necessary and can be found at most appliance parts or MRO distributors. This was the first oil tested after pouring out the original charge of 6 oz. from the NOS drive. The best I could get from Zoom Spout was roughly 675 RPM, with the belts pretty loose. The second oil tested was 3-in-One Multipurpose Oil. This oil can be purchased at any local hardware or box store in either 3 or 4 oz bottles. I was surprised immediately with the 3-In-One as the RPM was starting to tip well over 700 RPM with a decent belt tension and close to 710 RPM with the drive belt pretty loose. This was starting to prove the theory that the lower ISO value could potentially produce a higher RPM speed, or was increasing the efficiency of the fluid drive. The third oil tested was an NOS bottle of Speed Queen Fluid Drive oil. I had HIGH hopes for this oil, considering this is what would have been used when these machines were new and would have been used both on the domestic and commercial machines. Sadly, this was the most disappointing test! The best I could get the factory oil up to was roughly 645 RPM, almost identical to the factory change in the rebuilt fluid drive! Knowing that the performance was less than both the 3-In-One and the Zoom Spout, the Speed Queen oil is either an ISO of 32 or higher OR it does not age well. I even tested the original fluid drive that came on the machine and was only able to get about 650 RPM out of it. Besides this being a very unscientific test it was quite evident that belt tension played a huge factor in getting a better RPM result, however the desire to not have belts that are ruined due to being overly loose is also a factor. It is also quite possible that Speed Queen�s advertised rating of 725 RPM was lofty, or the rebuilt NOS fluid drive I was using wasn�t as fresh as it could have been, or a mix of both. I also tried a variety of an NOS 20895 belt (it was a cogged AX style belt), the 25� and 26� belts and got the best performance out of the 26� AX cogged belt. So, the rebuilt NOS drive was drained of the SQ oil and the 3-In-One oil put back in, but sadly with the multiple changes between all of the various oils, the best I could get at the end was about 685 RPM with good belt tension. I figured this was better than than the original factory speed and I didn�t want to tear the fluid drive apart just to clean everything in hopes of getting over 700 RPM again. Long story short - if you�re working on any fluid drive Speed Queen or Beam related washer, a fresh charge of 7.5-8 oz of 3-In-One oil is a safe bet. | ||
|
Post# 1174565 , Reply# 7 3/12/2023 at 20:19 (418 days old) by swestoyz (Cedar Falls, IA) |
||
|
Cabinet and Top assembly
With all the testing and adjustments completed the rest of the machine could be assembled. Here�s a run down on the list of tasks that were completed during this phase:
Outer tub cleaning and POR-15 painted over rusted areas Pump to Drain hose installed with the factory elbow installed on the base Reused the 20129 outer tub boot from the donor washer NOS 22337 bleach pump installed on base Wiring harness cleaned / repaired and installed Outer tub installed / cleaned 21233 outer tub gasket / installed wash tub from donor washer (agitator post assembly had already been cleaned / painted with prior restoration and new stainless button head hex screws where used to secure tub to center post) NOS 25112 drain tub outlet hose to pump installed Lid switch bracket installation - paint / new hardware Cabinet panels cleaned / detailed / installed Top panel disassembled / all parts cleaned / rust damaged patched w/ JB Weld and painted (pro tip - use a piece of blue painters tape on the side that needs to be flat. Once the JB Weld has cured pull the tape and paint) NOS 24597 water valved installed (sub�d in place of a 22454/24596 valve, which I was unable to find, flow washer on 24597 is 0.3 GPM higher than factory) Bleach dispenser parts cleaned and dispenser installed on outer tub. Use a cut piece of sheet rubber to tighten the fit around the bleach dispenser and coated the area around the dispenser w/ The Right Stuff sealant on the inside of the tub NOS 22357 clothes guard installed on panel top Cleaned rust stains from 23366 fill flume / cut replacement gasket from a piece of outlet foam sheet insulation Removed peeling plastisol from panel support bracket and painted it grey Removed old gasket from the agitator cap, cleaned cap, ran a die on the threads and installed NOS 20136 gasket Cleaned hard water deposits and staining from original aluminum agitator All the steps above were completed roughly over a two week period of time. With the machine mostly assembled (minus the front panel), it was time to test the fruits of my labor! | ||
|
Post# 1174566 , Reply# 8 3/12/2023 at 20:21 (418 days old) by swestoyz (Cedar Falls, IA) |
||
|
The Transmission, Part 2 So, after wheeling the washer into the testing spot in laundry room #1 and sorting out a few leaks, I threw a load of towels in the washer with some hot water. Immediately I could tell something was wrong. With each end of the stroke the transmission was emitting a loud clunk that most certainly wasn’t there when the machine was originally tested. While I considered for a moment that it could be the drive clutch or possible misalignment with the transmission to main mounting plate, but in my gut I knew it was the fluid inside the transmission. | ||
|
Post# 1174567 , Reply# 9 3/12/2023 at 20:26 (418 days old) by swestoyz (Cedar Falls, IA) |
||
|
Glamor shots and video!
This has been a long winded thread, so for the last post I�ll let the photos and the video do most of the talking. Enjoy!
This was an incredibly fun and rewarding restoration and I truly hope that both will outlast my lifetime and may bring joy to many. While neither are perfect they fit perfectly in the collection and I couldn�t be happier. There are several members to thank: Robert - when I first saw your �58 Speed Queen in the late Fall of 2004 I knew right there and then that someday I needed find a solenoid drive Speed Queen. It was so unlike anything I had ever seen up to that point Greg - the many SQ washer you�ve found over the years and shared here on AW, PLUS seeing your absolutely gorgeous �55 Speed Queen during the 2005 wash-in, left a lasting impression on me, an so many others who were there that weekend! Don - what can I say? While this isn�t a suds saver it certainly is a sister to your beautiful A78. Thank you for the many opportunities to work on and help provide parts to keep your wonderful childhood memory going, all these years. Ben | ||
|
Post# 1174571 , Reply# 10 3/12/2023 at 20:38 (418 days old) by Mayfan69 (Brisbane Queensland Australia) |
||
Wow Ben! | ||
| Post# 1174573 , Reply# 11 3/12/2023 at 20:48 (418 days old) by Repairguy (Danbury, Texas) | ||
 | ||
| Post# 1174574 , Reply# 12 3/12/2023 at 21:14 (418 days old) by drummerboy928 (Illinois) | ||
 | ||
| Post# 1174575 , Reply# 13 3/12/2023 at 21:20 (418 days old) by eurekastar (Amarillo, Texas) | ||
|
| ||
|
Post# 1174581 , Reply# 14 3/13/2023 at 00:17 (418 days old) by RP2813 (Sannazay) |
||
 | ||
| Post# 1174582 , Reply# 15 3/13/2023 at 00:24 (418 days old) by qsd-dan (West) | ||
|
| ||
|
Post# 1174584 , Reply# 16 3/13/2023 at 02:52 (418 days old) by jons1077 (Vancouver, Washington, USA) |
||
Amazing  | ||
|
Post# 1174588 , Reply# 17 3/13/2023 at 05:02 (418 days old) by peteski50 (New York) |
||
Speed Queen! | ||
|
Post# 1174590 , Reply# 18 3/13/2023 at 07:44 (418 days old) by gansky1 (Omaha, The Home of the TV Dinner!) |
||

Another top-notch restoration. These machines are just stunning, I remember them as a kid at my mom's aunt's house - the lighted panels were breathtaking to a little washer-obsessed boy, surrounded by low-end GE and Maytag Highlanders.
| ||
|
Post# 1174594 , Reply# 19 3/13/2023 at 08:22 (418 days old) by Marky_mark (From Liverpool. Now living in Palm Springs and Dublin) |
||
 | ||
|
Post# 1174596 , Reply# 21 3/13/2023 at 09:14 (418 days old) by pulltostart (Mobile, AL) |
||
Thanks for sharing, Ben! | ||
| Post# 1174601 , Reply# 22 3/13/2023 at 11:54 (417 days old) by mickeyd (Hamburg NY) | ||

What a spectacular way to celebrate Monday Washday, Ben. Actually breath-taking. What a glorious Speed Queen, the big lighted dials reminiscent of Blackstone Royalist's. Didn't know about the exuberant double overflow rinse, such a treat, and the vigorous iconic Speed Queen turnover with those steep fins and high-riding vanes.
I loved the free-spinning tub in the first vid. Haven't seen that before, but mind the little girl, LOL. So much work, not to mention the writing which had to have taken hours alone to accomplish, but knowing your tech genius, there's probably one of those new IA scripting robots doing it for you, (laughs). You have no equal Ben, period! | ||
| Post# 1174607 , Reply# 23 3/13/2023 at 13:57 (417 days old) by Hippiedoll ( arizona ) | ||
WOWZERS...
Those cleaned up amazingly! I love all the options on the washer, wash & rinse temps, agitate & spin speeds. And I have to say, I really enjoyed the added short clip of the agitation with the lint filter accessory attached on the agitator. It made the agitation sound like a different washing machine was chugging away.
Oh man, you did an OUTTA SIGHT restoration on that Speed Queen set. They look brand new! An honorable Salute to 1967! (✌️&❤) 😘 | ||
| Post# 1174631 , Reply# 24 3/13/2023 at 16:56 (417 days old) by panasonicvac (Northern Utah) | ||
 | ||
|
Post# 1174641 , Reply# 25 3/13/2023 at 17:48 (417 days old) by goatfarmer (South Bend, home of Champions) |
||
 | ||
|
Post# 1174645 , Reply# 26 3/13/2023 at 18:03 (417 days old) by Ultramatic (New York City) |
||
 | ||
|
Post# 1174649 , Reply# 27 3/13/2023 at 20:03 (417 days old) by combo52 (50 Year Repair Tech Beltsville,Md) |
||
Amazing, speed, queen, washer and dryer restoration Ben
I have certainly never had a speed queen washer that far apart from that vintage we have a 1968 middle of the line washer in the museum that we put the 800 RPM spin Poleon but never seem to spend that fast but it was a big improvement.
It�s amazing what you found out about oils, my brother, Jeff discovered back in the 70s that when we had a Speed Queen fluid drive washer that wasn�t spinning fast enough he would take half a bottle of zoom spout oil and squirt it into the clutch and it seem to help a lot. It�s also amazing what you found out about transmission oil thickness, he�s older transmissions, needed a pretty heavy oil. They weren�t made for light oil, Maytag�s also needed heavy oil. Maytag did not even use helical cut gears like about every other washer so they would have noise issues. That�s why they use the plastic pinion gear to quiet them down a little bit Yes, getting the transmission out of the Speed Queen was one of the few easy things to do to it, Ge Filter Flow is still the easiest washer to change a transmission in for a vintage machine and of course a newer whirlpool direct drive washer you can change the transmission in 15 or 20 minutes in those . These old Speed Queen dryers were certainly built like a tank I think only this dryer and the old Norge dryer�s. You could actually fill them with rocks and could tumble them without harming the machine. I never felt that the Speed Queen dryers the few that I used were all that fast, but they certainly were built well and they used to be used commercially and they would just go on and on and on When you do these restorations you should check in with me. I have a lot of new parts for the both the washer and dryer that I would�ve been happy to send you. I think I even have new cans of transmission oil for speed queen washers. I will never use this stuff . The other guy that�s really good with these is Bob Salem in Cleveland. He knows more about Speed Queen washers than anybody else that I know still living except for you now as well lol and he has lots of parts for these that he would be happy to send on to others Can�t wait to see you tear into that Kenmore combo. John | ||
|
Post# 1174696 , Reply# 28 3/14/2023 at 07:59 (417 days old) by swestoyz (Cedar Falls, IA) |
||
|
Thank you for the kind comments, everyone! I smiled reading through all the comments knowing that the set has made many of you as happy as they have made me.
The more I learn about what goes on with restoring them makes me appreciate them so much more
Who would have thought that regular 3 in 1 oil would provide superior results?
Dan - certainly not me, or at least not before I figured out what the actual viscosity of the 3-In-One was. There are a few pneumatic tool oils that fall in the 15 to 20 range that I would have liked to have tried but time was starting to run out during the testing phase. Maybe the next collector could give a few a whirl. You should pick up a bottle of GL-1 90w oil. I would love to hear your thoughts.
the writing which had to have taken hours alone to accomplish
Mike - oh goodness, the time! LOL I learned with the Bendix restoration write-up that it is easier and better to write the full thread offline, over the course of several days. It provides the time to make necessary edits, revisions, and additions, however it appears I would still benefit from a true editor. :)
I really enjoyed the added short clip of the agitation with the lint filter accessory attached on the agitator
Christina - I'm so glad you caught that small clip! The filter dramatically changes the sound, especially for partial loads where the turbulence can be drastic.
Can’t wait to see you tear into that Kenmore combo
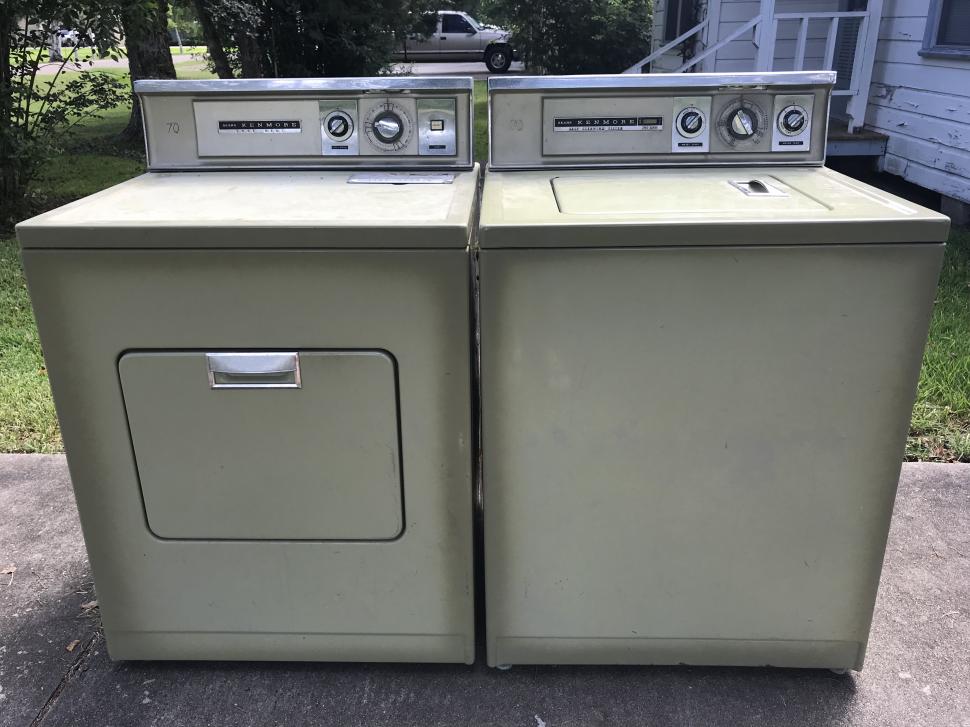
John - me too! There is a basement laundry room restoration and 5 other machines that need small attention before I get into the full teardown of the '71 LK combo. It's the next big one and I'm looking forward to collaborating with you and John E on that one.
Ben | ||
|
Post# 1174707 , Reply# 29 3/14/2023 at 10:45 (416 days old) by Unimatic1140 (Minneapolis) |
||
Hi Ben, as usual great restoration and documenting the restoration as well.
So I was curious after reading what you went through for the spin speed. I just tested my 1952 Speed Queen which also has the commercial spin pulley installed. After about 90 seconds of warm up time (it was the first time it was run in nearly 3 months) it reached full speed of 725.6 rpm. What I remember doing was I simply kept squirting zoom spout oil into the fluid drive until the proper speed was reached. At one point I put too much oil in and it popped the motor protector, so I removed a bit of the oil until the machine worked properly without popping the protector. I have no clue as to the actual amount of oil that in there now. I would like to do a thorough restoration on my SQ as well and your information will certainly help. | ||
|
Post# 1174708 , Reply# 30 3/14/2023 at 11:24 (416 days old) by swestoyz (Cedar Falls, IA) |
||
|
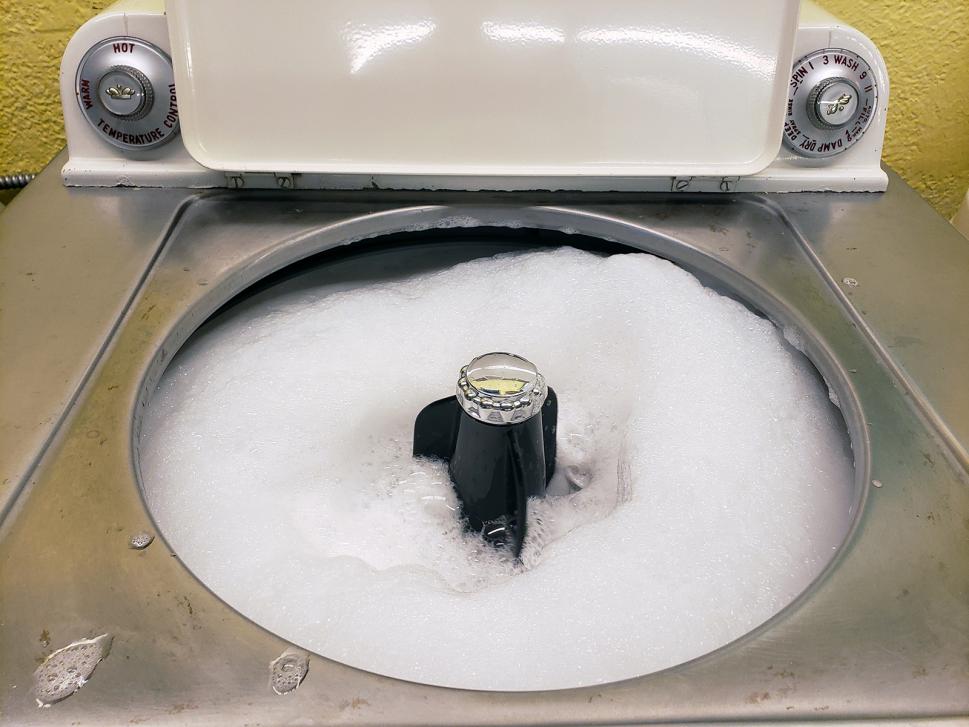
Hi, Robert! Your reply inspired me to run down in the basement and check what the current RPM is, now that I've run about a dozen loads through the washer.
View Full Size
| ||
|
Post# 1174713 , Reply# 31 3/14/2023 at 12:41 (416 days old) by Unimatic1140 (Minneapolis) |
||
|
Very cool Ben, now that's more like it! I will try 3-in-Oil vs zoom spout too when I rebuild my Speed Queen.
Question were the original belts all cogged belts? I noticed that the cogged belts I used are nosier in comparison to standard belts, you can especially hear it during the final spin coast period after the cycle is completed. I've tried belt-dressing but that only works for a few wash loads and the the squeaking belt noise comes back. I was wondering if the transmission and pump drive belts are supposed to be non-cogged? I should look at some service manuals and see what they have installed. | ||
|
Post# 1174718 , Reply# 32 3/14/2023 at 13:39 (416 days old) by swestoyz (Cedar Falls, IA) |
||
|
I've seen both cogged and non cogged OEM Speed Queen/RSPC labeled belts, as well as aftermarket A style belts that are cogged but are not AX belts (AX belts are a bit taller). In fact, the belts that came off the '67 were original and were also cogged.
Here's the clip of the bench test and the belts are no nosier than what I recall hearing on other SQs where I've installed non cogged A style belts. The quality of the belt also may factor into the noise as well. The Continental belts have a finer tooth pattern than the chunkier aftermarket versions and are a closer match to the OEM 20186/20895. These belts are by far the nicest replacement belts I've used on a washer. Picture one - OEM Speed Queen 20186 bottom, after market 20816 top, both cogged but the OEM belt is an AX belt Picture two - OEM Speed Queen 20895 left, Continental AX23 right, both are AX style belts Ben | ||
| Post# 1174749 , Reply# 33 3/14/2023 at 20:09 (416 days old) by seedub (South Texas Hill Country) | ||
|
That's curious... | ||
|
Post# 1174754 , Reply# 34 3/14/2023 at 22:01 (416 days old) by sambootoo (Moody, AL) |
||
|
Ditto what all the others have said. I'm ALWAYS amazed at your expertise and the quality of your restorations | ||
| Post# 1174771 , Reply# 35 3/15/2023 at 00:27 (416 days old) by Hippiedoll ( arizona ) | ||
|
swestoyz/Ben...
�"I'm so glad you caught that small clip!� The filter dramatically changes the sound, especially for partial loads where the turbulence can be drastic."
The way the sound changed with the lint filter on the agitator, it reminded me of how my Maytags sound different when they are chugging away, with the highest water level, and I take out the fabric softener dispenser cup from the top of the agitator. There's a spurt of water that shoots up while the machine is agitating, from the center-hole that drains the fabric softener down into the agitator barrel. It sort of reminds me of an old percolator coffee pot. Can you imagine all the different sounds the machines would make if they were all chugging away in the same room, at the same time? 1. Your Speed Queen with the lint filter in place, 2. My Maytag minus fabric softens dispenser cup, with high water level, 3. A Norge burpolator, 4. A GE Filter-Flo. Of course all the lids would have to be opened during agitation 🤔🤪😄 | ||
| Post# 1174791 , Reply# 36 3/15/2023 at 10:41 (416 days old) by Blackstone (Springfield, Massachusetts) | ||
Great Restoration! | ||
|
Post# 1174795 , Reply# 37 3/15/2023 at 12:00 (415 days old) by pulltostart (Mobile, AL) |
||
|
Ben, You've shared several stories and videos over the years about your restoration projects. All excellent, by the way. And you frequently talk about your machines being daily drivers. My question is - who does laundry for your household? If someone other than yourself, are they instructed on the proper 'use and care' of each machine?
lawrence | ||
|
Post# 1174839 , Reply# 38 3/15/2023 at 16:09 (415 days old) by swestoyz (Cedar Falls, IA) |
||
|
Laundry in the Swestka house
Hi Lawrence, great questions. Overall I own the task of most laundry that isn't related to my wife Savannah's clothes, as she takes care of her stuff on her own. That leaves all bedding, towels, and clothes between myself and my daughter.
As for my use of the term 'daily driver'. Through some self reflection I may use that term a bit more so than is probably the case, however the Speed Queen dryer has been in use now by everyone for the last year or so. The balance of the washer collection does get used by me a few times throughout a month as I do try to rotate through machines so they aren't totally idle. The goal can be tricky to achieve with 15 washers currently hooked up at the ready, and often when a machine has just been restored I'll naturally gravitate towards the novelty of using something new. Savannah uses a 1-18 and A712 and we both use the SQ dryer, DG712, and Neptune 7500 dryers. The Miele Little Giant and Neptune washer are on hand for those days where I don't have the time to watch over the older stuff. Ben | ||
|
Post# 1174976 , Reply# 39 3/17/2023 at 08:02 (414 days old) by JetCone (Schenectady-Home of Calrods,Monitor Tops,Toroid Transformers) |
||
Wow Just wow! | ||
|
Post# 1175927 , Reply# 40 3/25/2023 at 03:55 (406 days old) by chestermikeuk (Rainhill *Home of the RailwayTrials* Merseyside,UK) |
||
Speed Queen Renovation
Hello Ben , another outstanding renovation of the 1967 Speed Queen set, fabulous set now to enjoy them in all their glory.
We picked up a load of spares from a repair shop closing down and have found a fluid drive, motor pump etc which is for a 70`s commercial Speed Queen, looks very similar to yours, now to find the washer . Question: What year was the first Speed Queen Automatic Top loader Produced > and - What year was the first Speed Queen produced with a perforated Spin Tub not solid ? Cheers, Mike | ||
|
Post# 1176106 , Reply# 42 3/26/2023 at 09:46 (405 days old) by swestoyz (Cedar Falls, IA) |
||
|
SQ Questions from across the pond
Mike - thank you for the kind words! And nice save on commercial parts. You never know when a Queen may show up! ;)
To answer your questions, the first year Speed Queen made their first automatic, the A10, was either late 1952 or early 1953. I'm not completely certain on a date. What is fascinating that SQ kept the overall design the exact same, minus the reversing motor and washtub capacity changes in '70 for domestic machines, all the way up until 1980. From there on out the perforated tubs were here to stay and the US lost it's last solid tub maker. Ben | ||
|
Post# 1176126 , Reply# 43 3/26/2023 at 13:47 (404 days old) by foraloysius (Leeuwarden, Friesland, the Netherlands) |
||

That's a Royal restoration indeed! Magnificent. Since I became familiar with American washers I got a soft spot for Speed Queen. This set is lovely with all the separate settings through the four small controls. Thank you for the video, that agitator looks to have decided to get that load really clean!
| ||
| Forum Index: | 
| Other Forums: |

|

|

|

|

|

 Comes to the Rescue!


 This is with ~ 8 oz of 3-In-One oil in the fluid drive.
;)
;)
;)
;)
;)
;)
;)
;)
;)
;)
;)
;)
;)
;)
;)
;)
;)
;)
;)
;)