|
Thread Number: 48305
Hoover 455 (A3072) Washer Overhaul Pt 3 |
[Down to Last] |

|
| Post# 700040 , Reply# 1 8/30/2013 at 19:37 (3,891 days old) by crouzet951 () | ||
|
It begins... 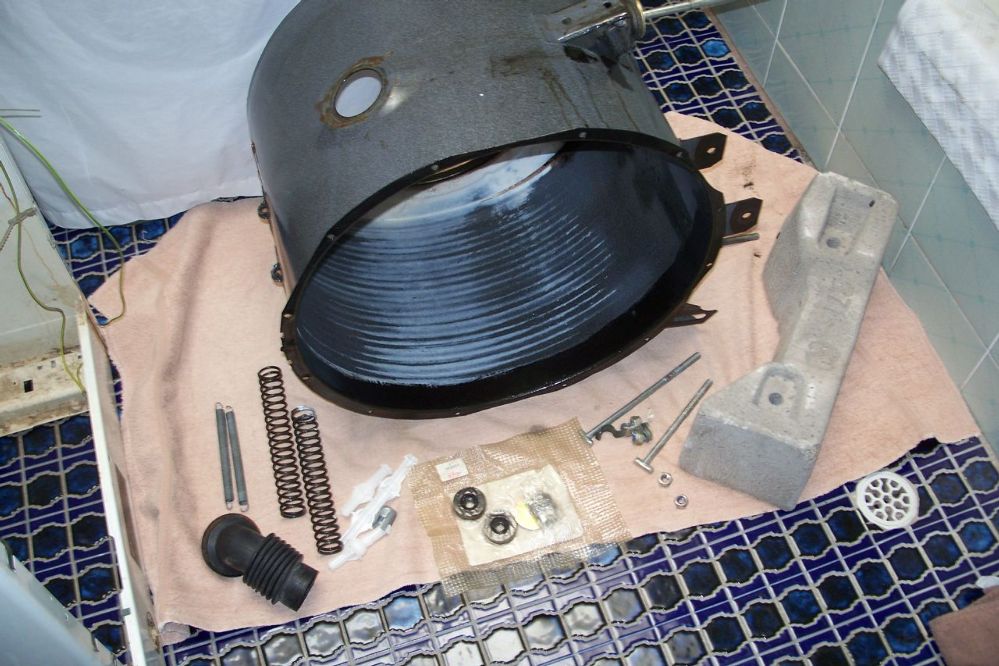
| ||
| Post# 700041 , Reply# 2 8/30/2013 at 19:40 (3,891 days old) by crouzet951 () | ||
|
A new anti-twist suspension kit was installed. 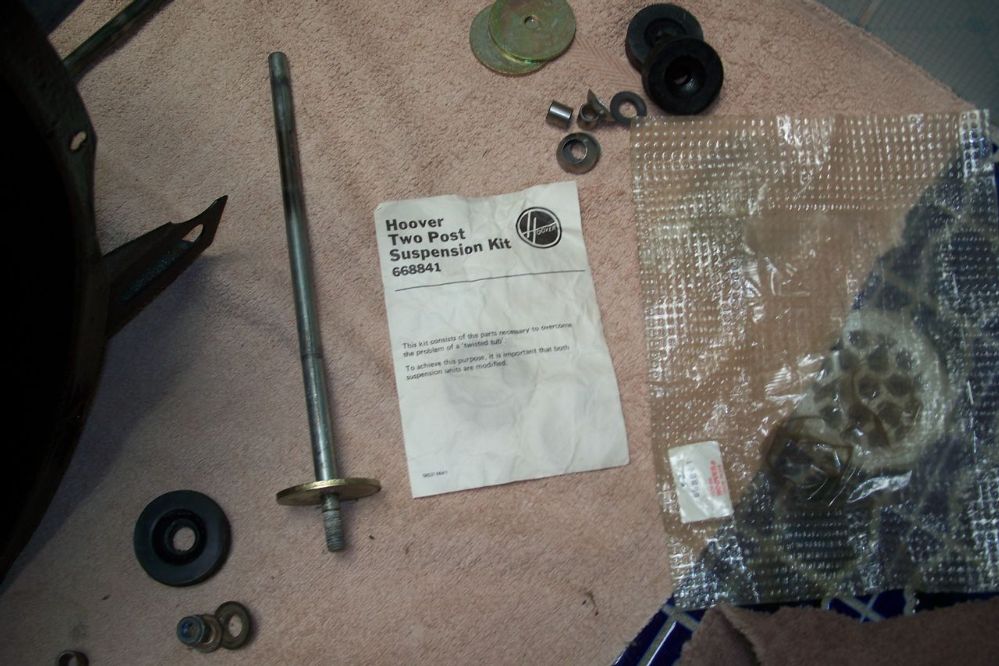
| ||
| Post# 700043 , Reply# 3 8/30/2013 at 19:41 (3,891 days old) by crouzet951 () | ||
|
Replacing the weight. New nyloc nuts were used. 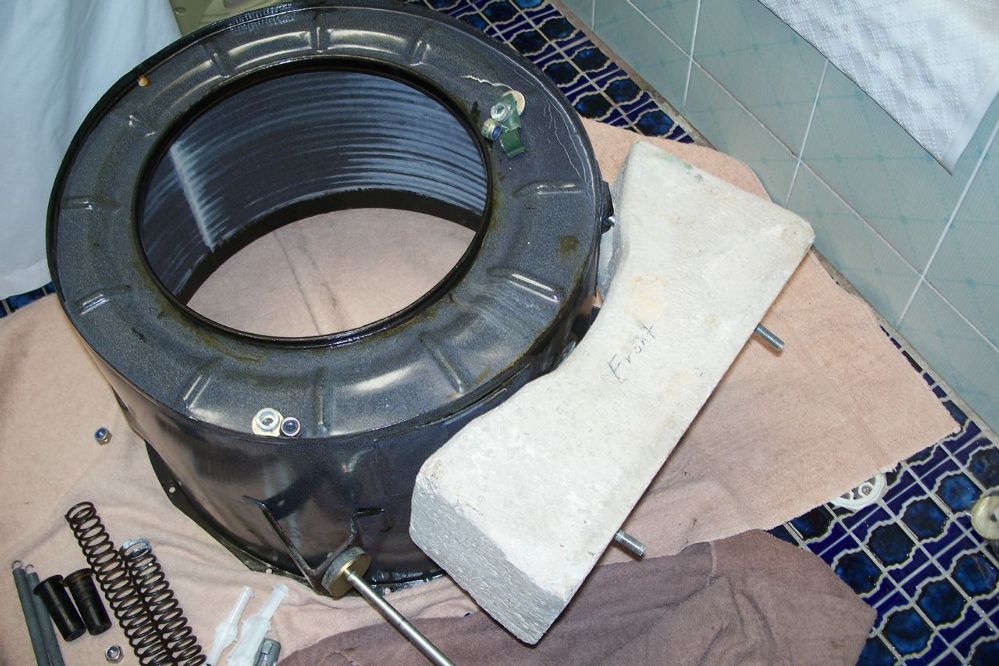
| ||
| Post# 700044 , Reply# 4 8/30/2013 at 19:44 (3,891 days old) by crouzet951 () | ||
|
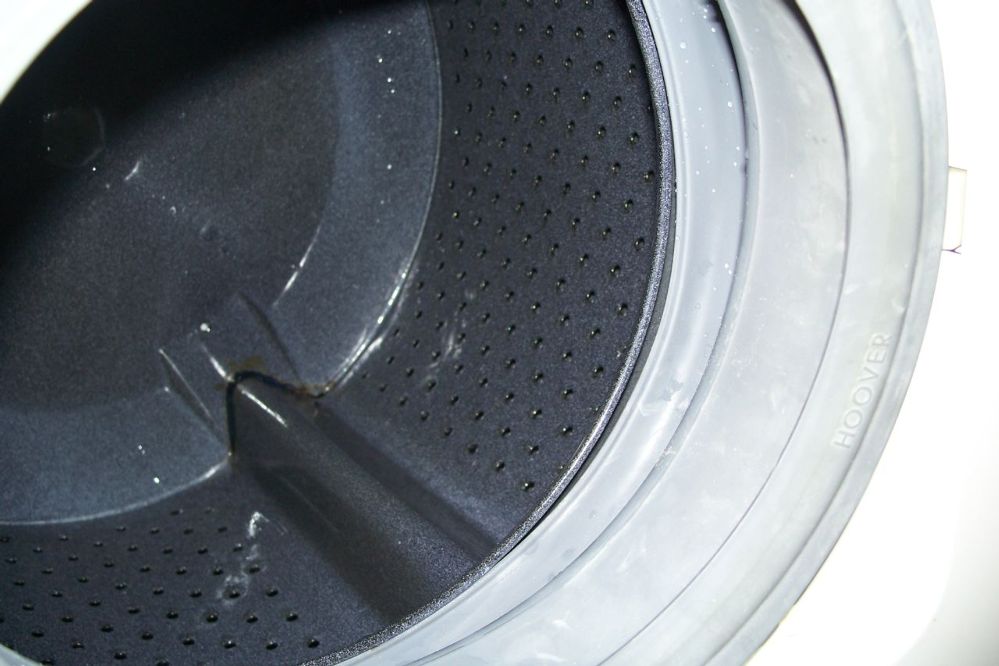
The drum ready to go back into the cabinet. The old rubber bands on the dampers trick worked a treat. 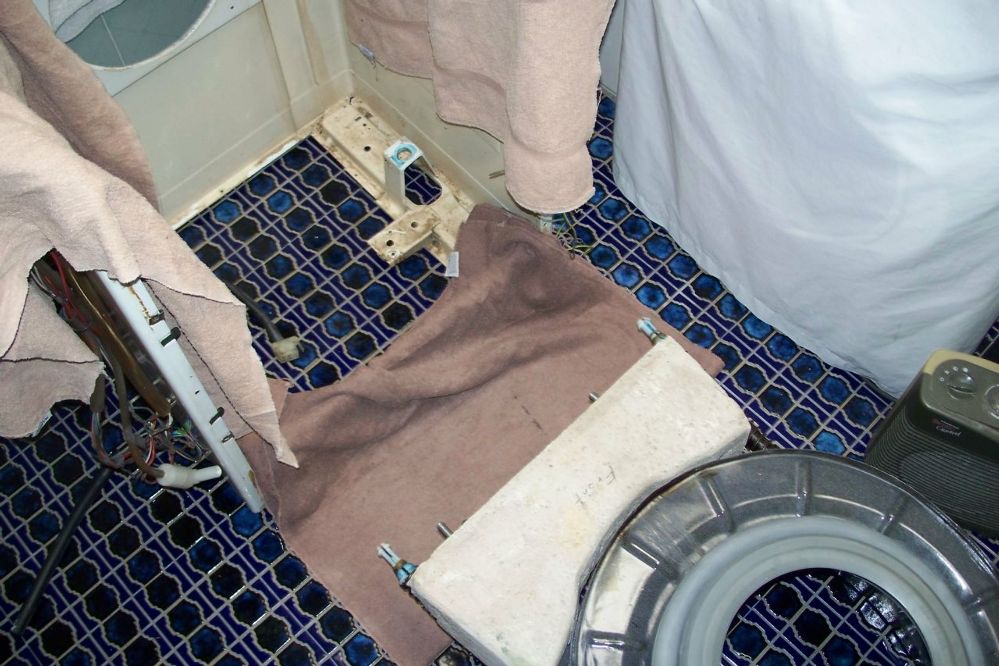
| ||
| Post# 700045 , Reply# 5 8/30/2013 at 19:45 (3,891 days old) by crouzet951 () | ||
|
Success! 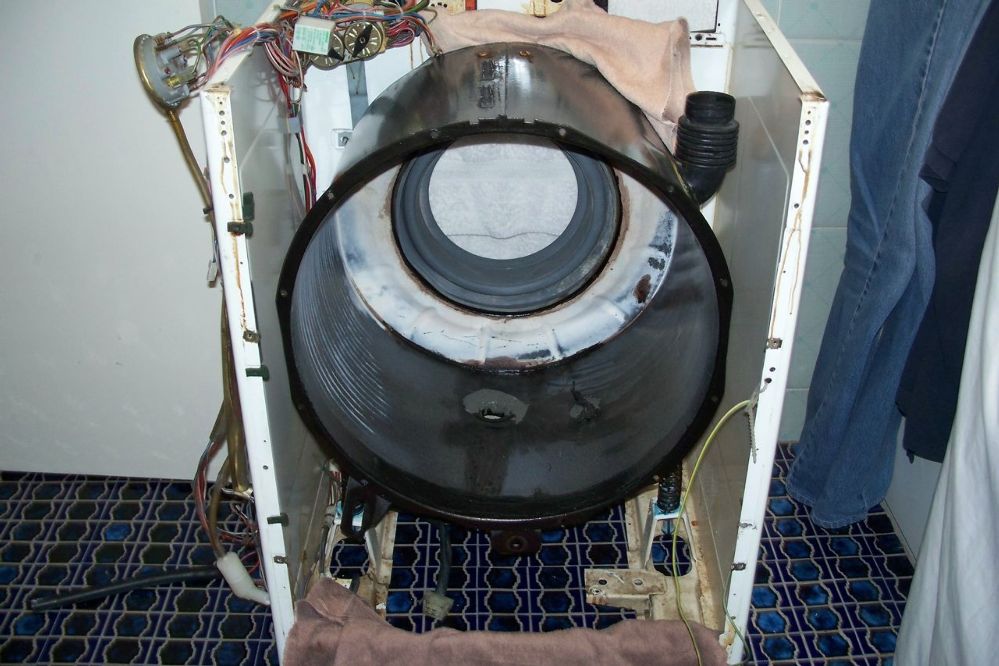
| ||
| Post# 700046 , Reply# 6 8/30/2013 at 19:46 (3,891 days old) by crouzet951 () | ||
|
I bought some multi-purpose grease and it's blue! 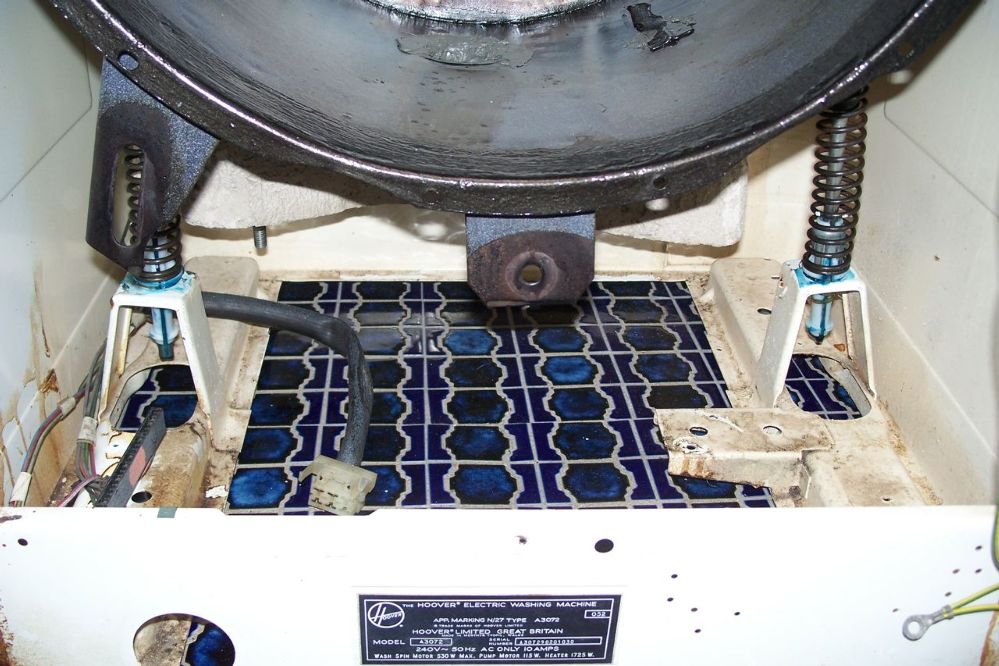
| ||
| Post# 700048 , Reply# 7 8/30/2013 at 19:49 (3,891 days old) by crouzet951 () | ||
|
The cleaned up drum and backplate ready to install. The thermostat was treated to a new seal. 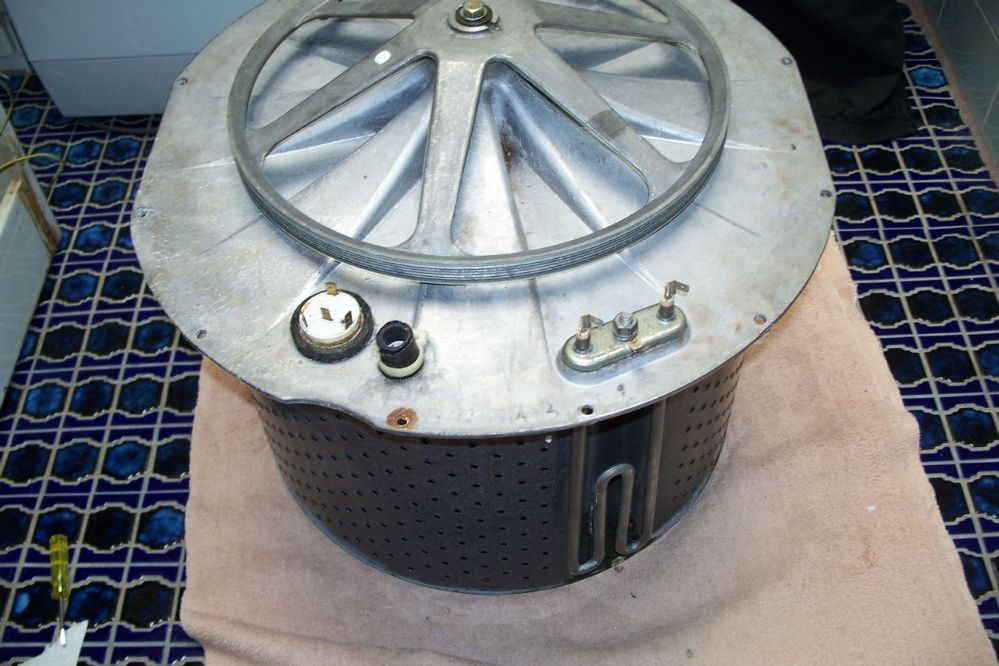
| ||
| Post# 700051 , Reply# 9 8/30/2013 at 19:59 (3,891 days old) by crouzet951 () | ||
|
The newly painted upper rear support was installed. 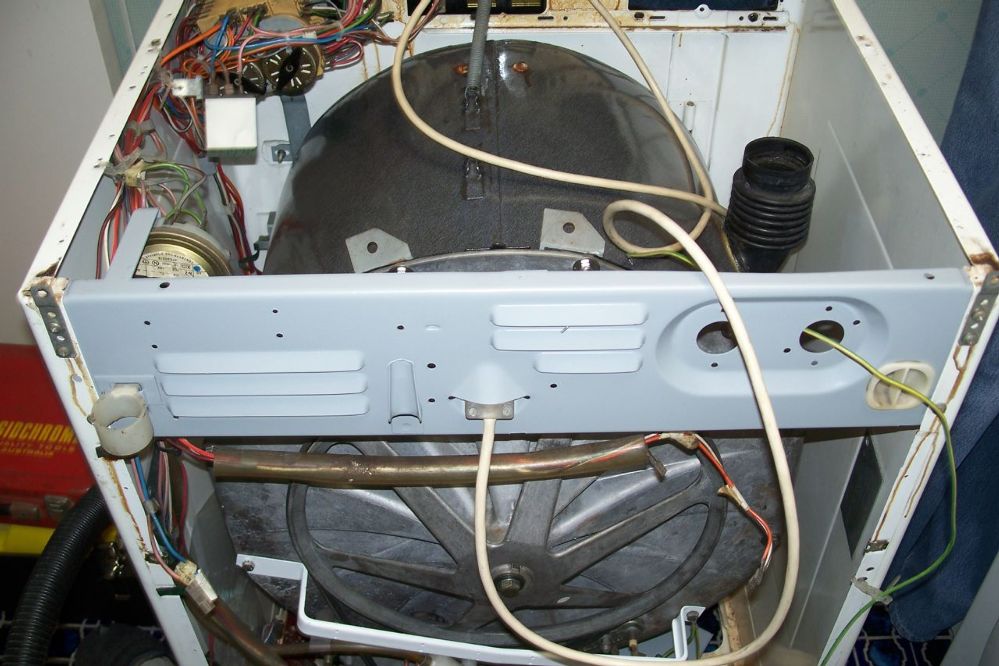
| ||
| Post# 700052 , Reply# 10 8/30/2013 at 20:01 (3,891 days old) by crouzet951 () | ||
|
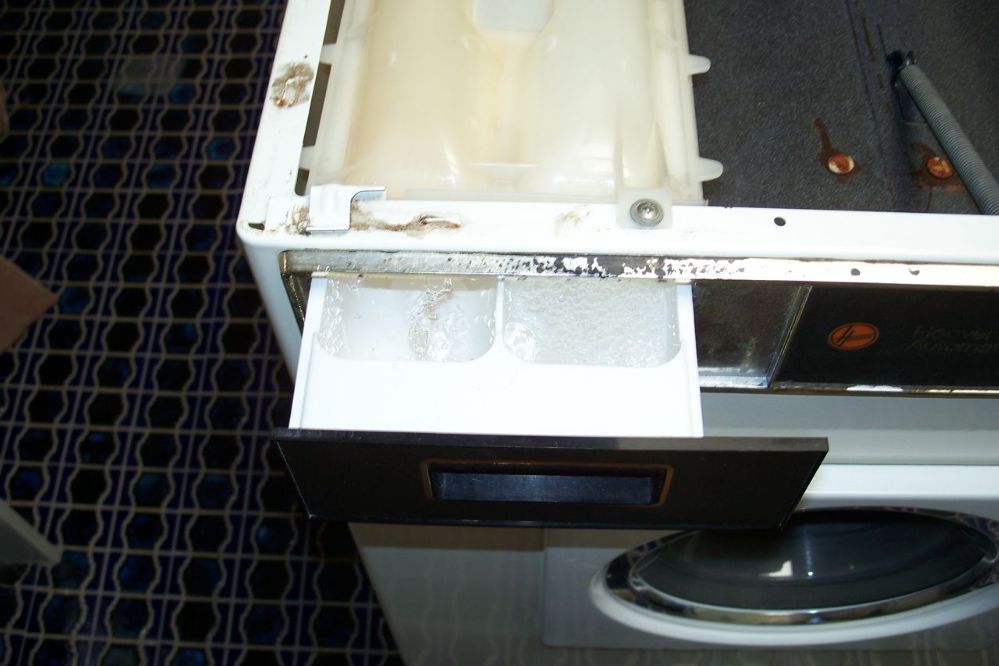
Installing the detergent dispenser, water inlet solenoids, and hoses. 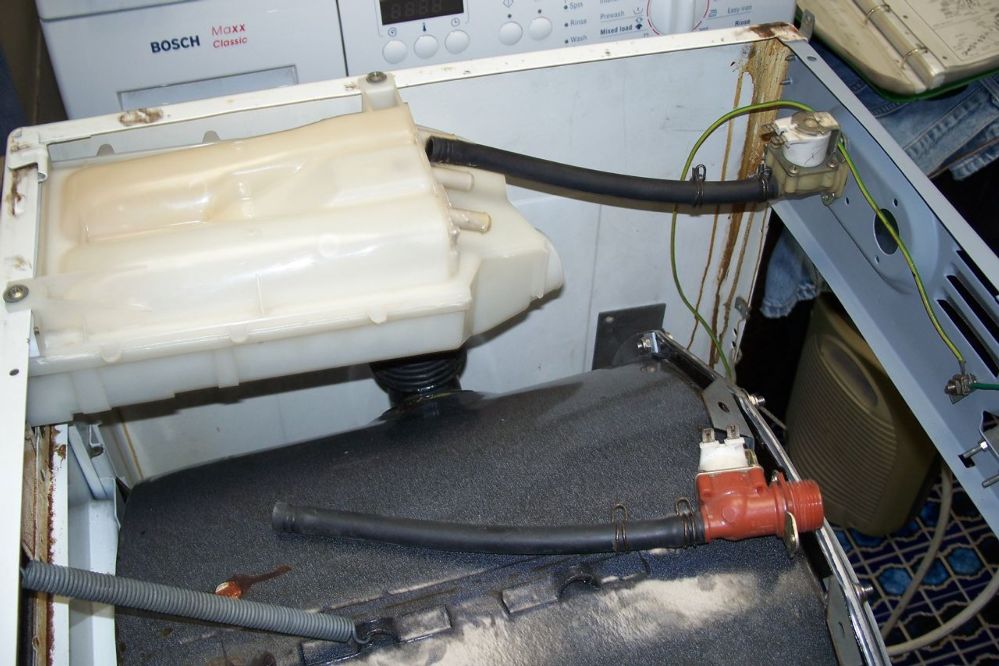
| ||
| Post# 700054 , Reply# 11 8/30/2013 at 20:03 (3,891 days old) by crouzet951 () | ||
|
Installing the door seal onto the cabinet lip. 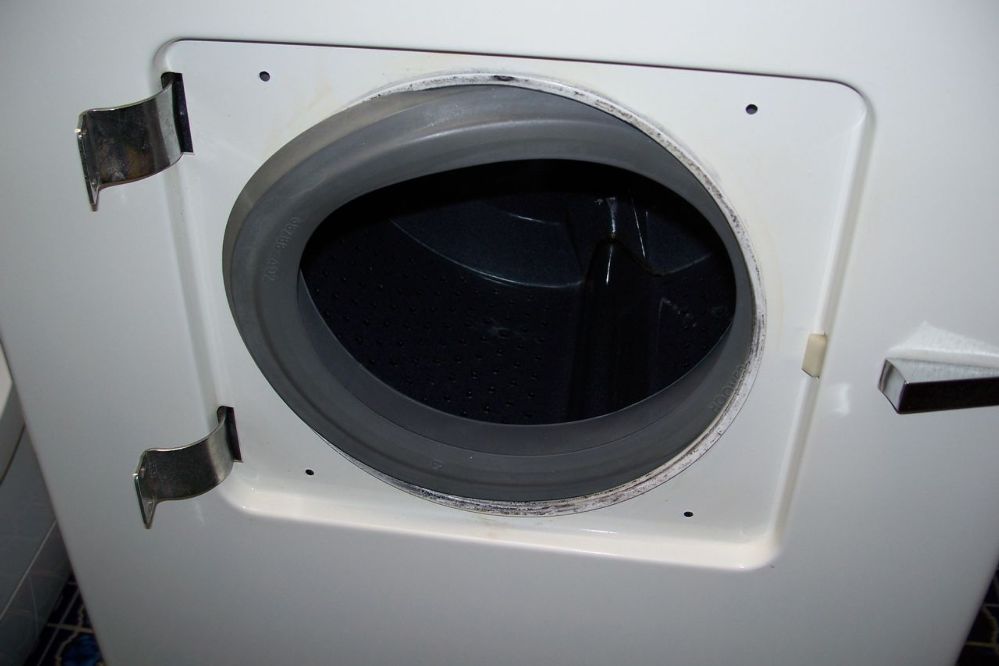
| ||
| Post# 700056 , Reply# 12 8/30/2013 at 20:08 (3,891 days old) by crouzet951 () | ||
|
I applied an approximately 100mm bead of silicon sealer between the glass and inner door, and between the inner and outer doors. Hopefully this will keep any water running down the door glass from entering and causing rust, when the door is opened after a wash. 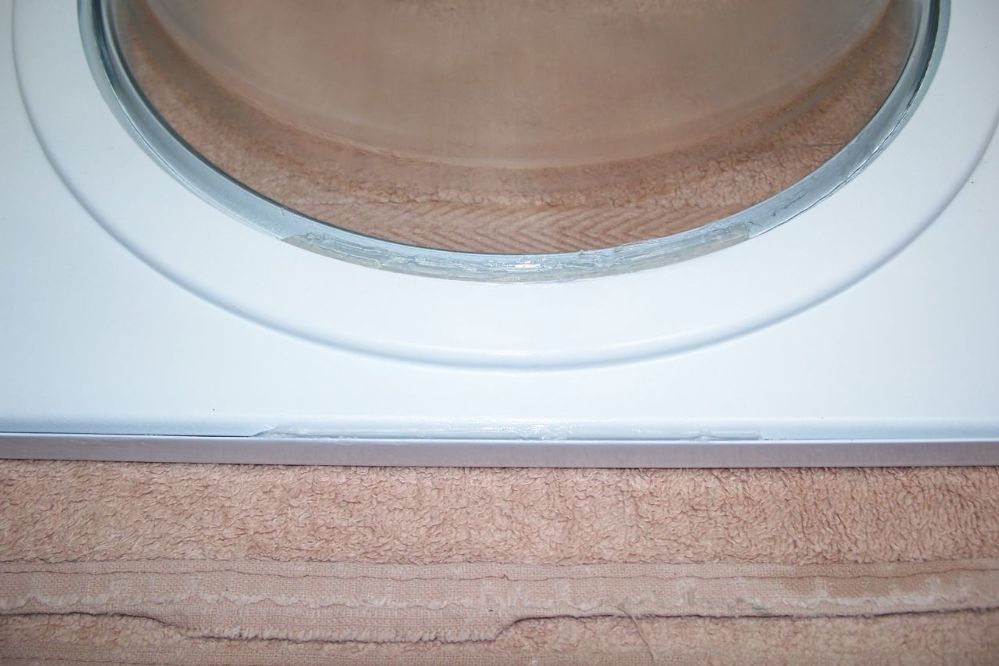
| ||
| Post# 700058 , Reply# 13 8/30/2013 at 20:11 (3,891 days old) by crouzet951 () | ||
|
Installing the freshly repainted door. I had previously installed and adjusted the door without the drum installed (much easier), and used a whiteboard marker to mark the positions of the hinges. 
| ||
| Post# 700060 , Reply# 14 8/30/2013 at 20:13 (3,891 days old) by crouzet951 () | ||
|
Connect the hoses after one final look around, and gingerly pull the control knob. 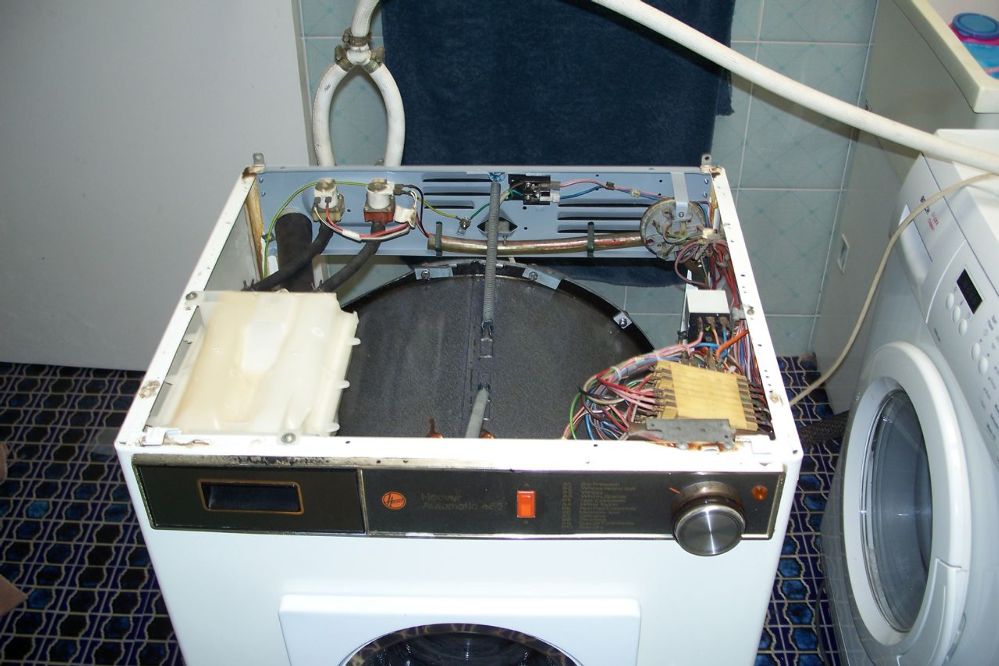
| ||
| Post# 700071 , Reply# 19 8/30/2013 at 20:41 (3,891 days old) by crouzet951 () | ||
|
I took the opportunity to reconnect the original drain hose from the machine, which was retrieved from my parents' house the week-end before. 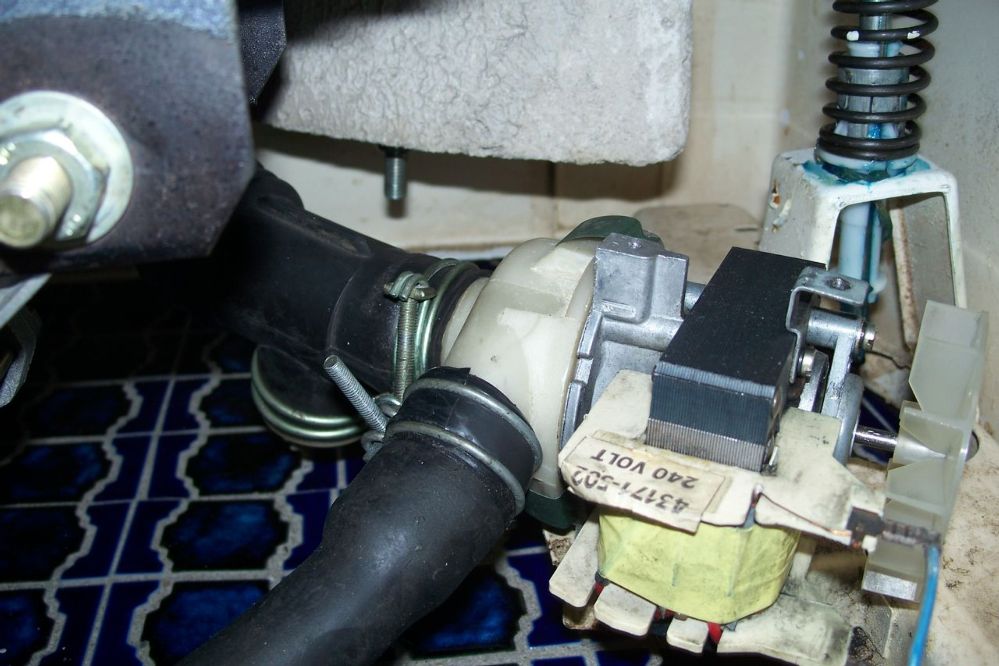
| ||
| Post# 700080 , Reply# 23 8/30/2013 at 21:41 (3,891 days old) by crouzet951 () | ||
|
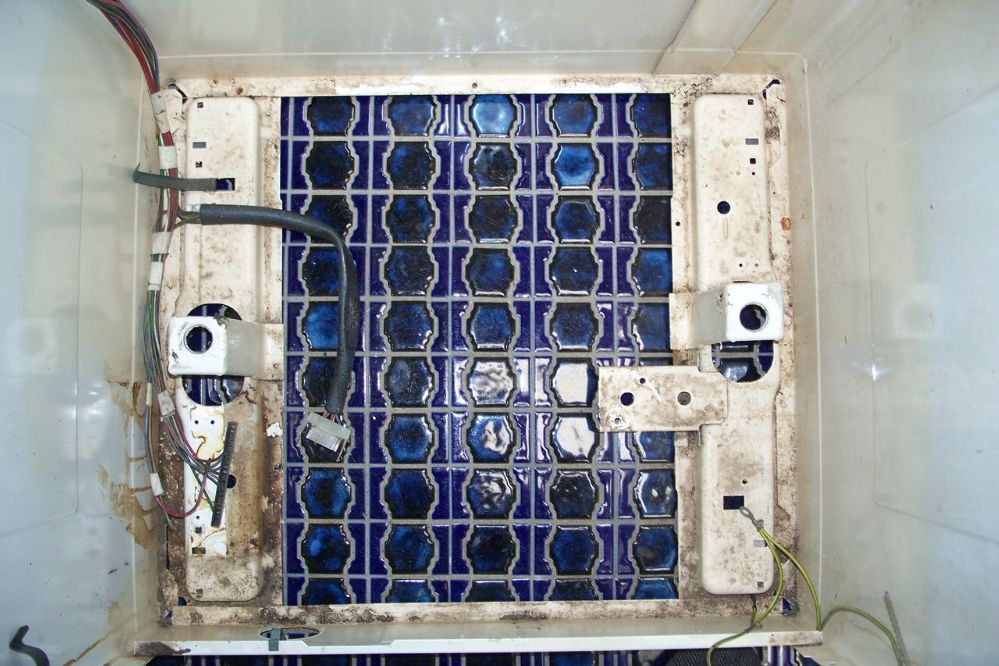
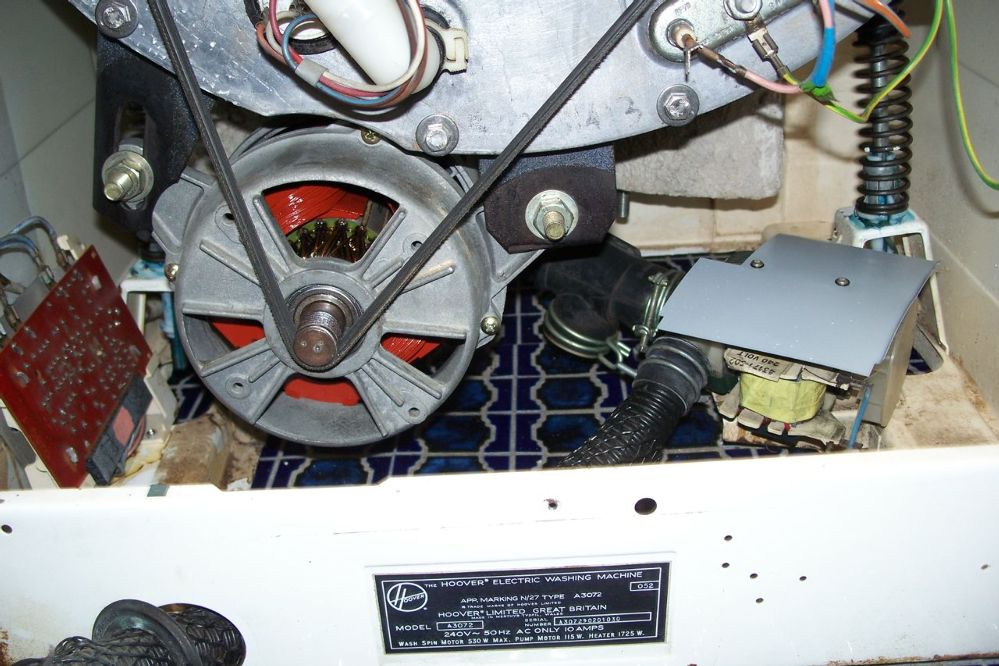
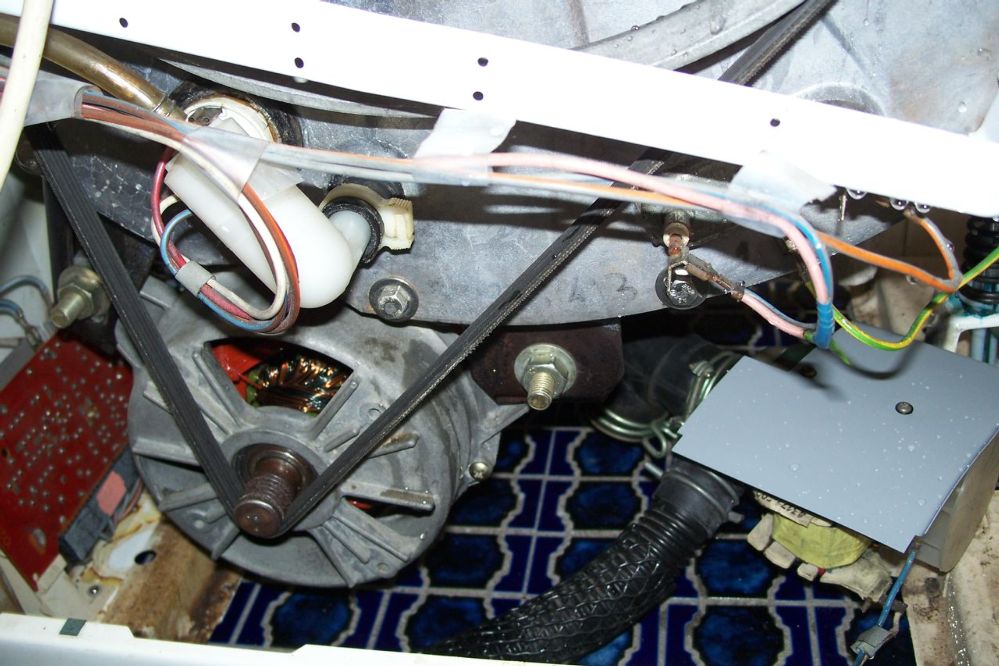
Some more images before closing the machine up. The new module guard turned out well. 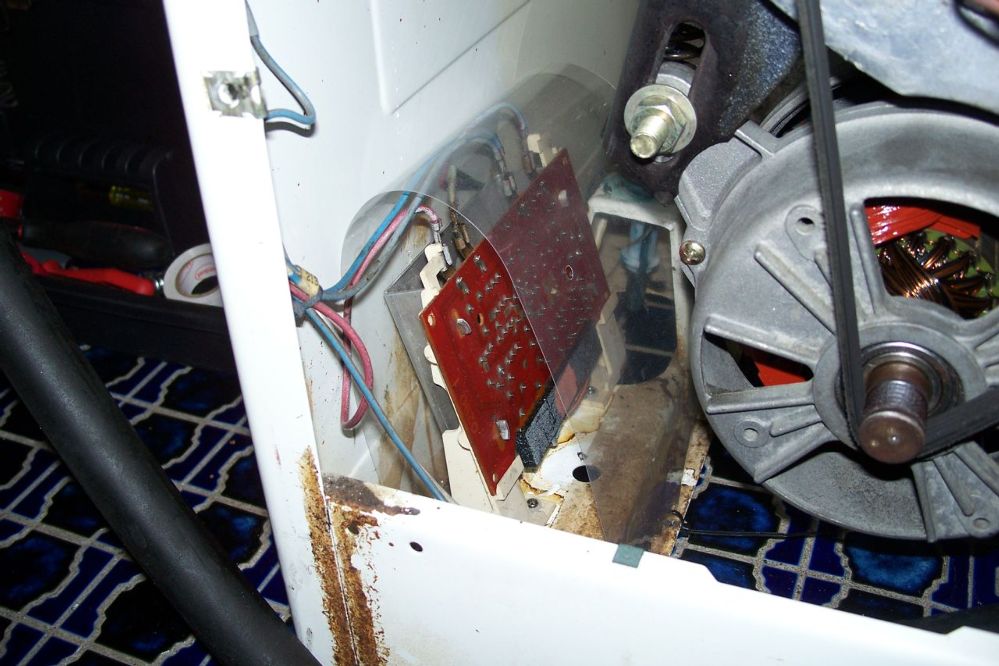
| ||
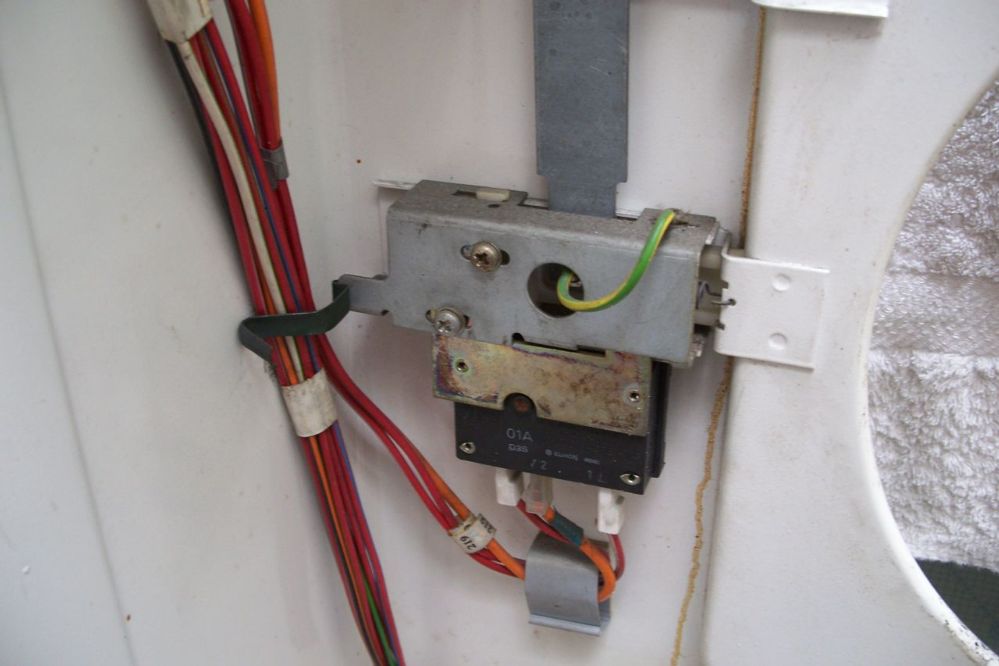
| Post# 700081 , Reply# 24 8/30/2013 at 21:44 (3,891 days old) by crouzet951 () | ||
|
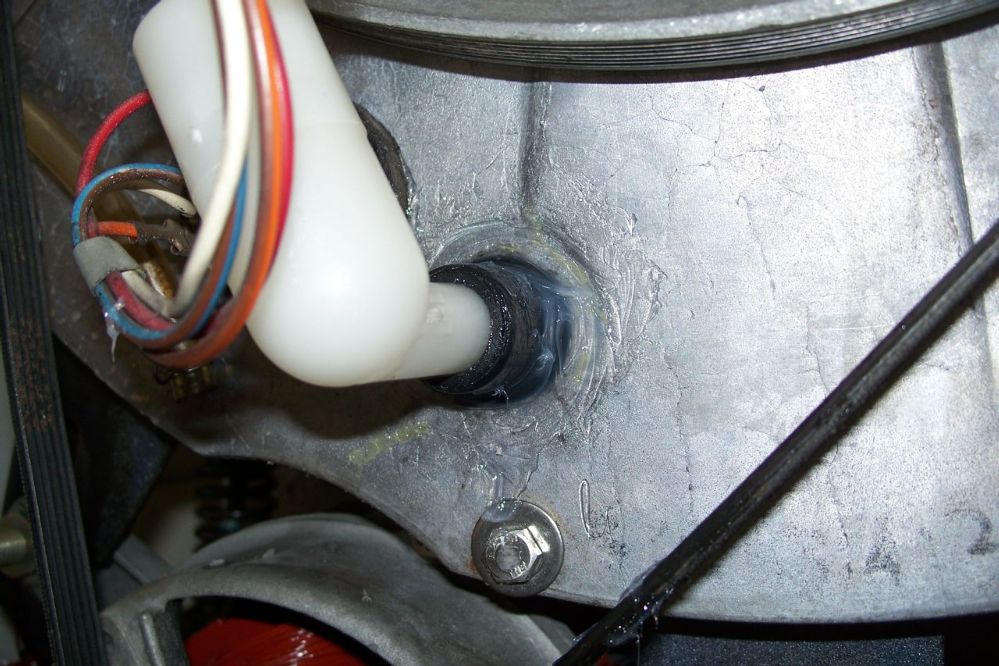
All looks good down here. Two more holes were drilled in the wire support to allow another cable tie for the thermostat wires. 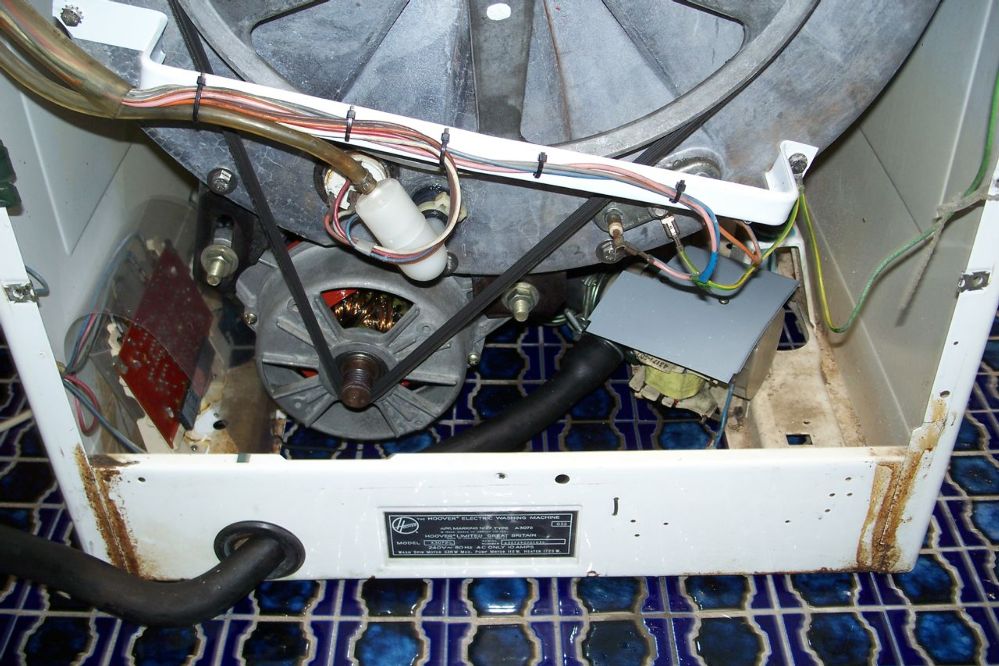
| ||
| Post# 700082 , Reply# 25 8/30/2013 at 21:45 (3,891 days old) by crouzet951 () | ||
|
Everything looks OK. 
| ||
| Post# 700083 , Reply# 26 8/30/2013 at 21:47 (3,891 days old) by crouzet951 () | ||
|
Before the rear panel is attached. 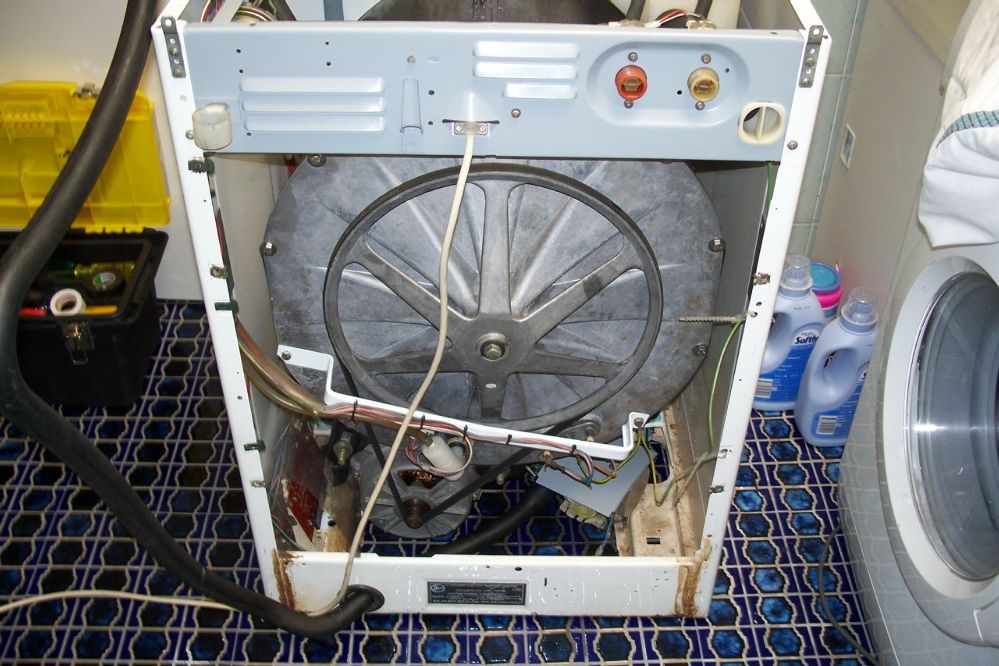
| ||
| Post# 700085 , Reply# 27 8/30/2013 at 21:49 (3,891 days old) by crouzet951 () | ||
|
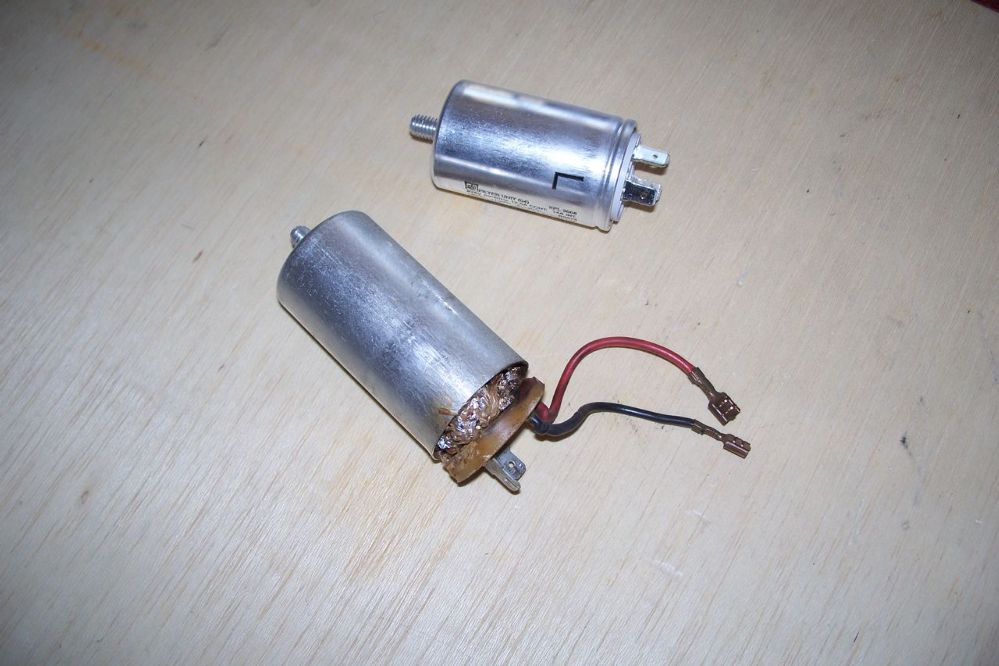
One last look inside from the front. There is supposed to be a suppressor on the rear upper panel, but the new one hasn't arrived yet. 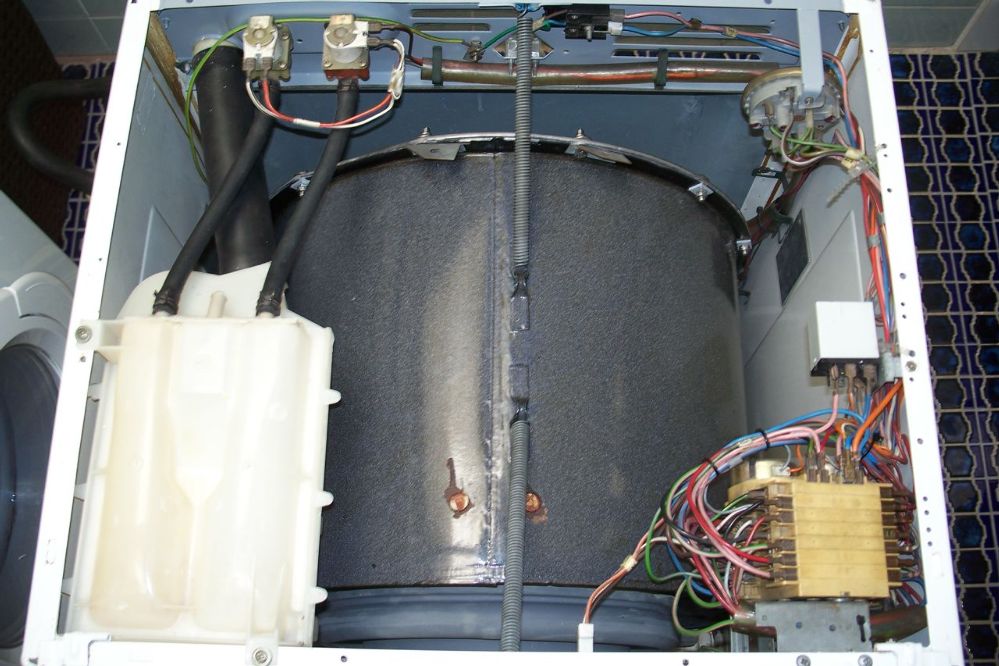
| ||
| Post# 700086 , Reply# 28 8/30/2013 at 21:50 (3,891 days old) by crouzet951 () | ||
|
From the rear with the back panel and lid installed. 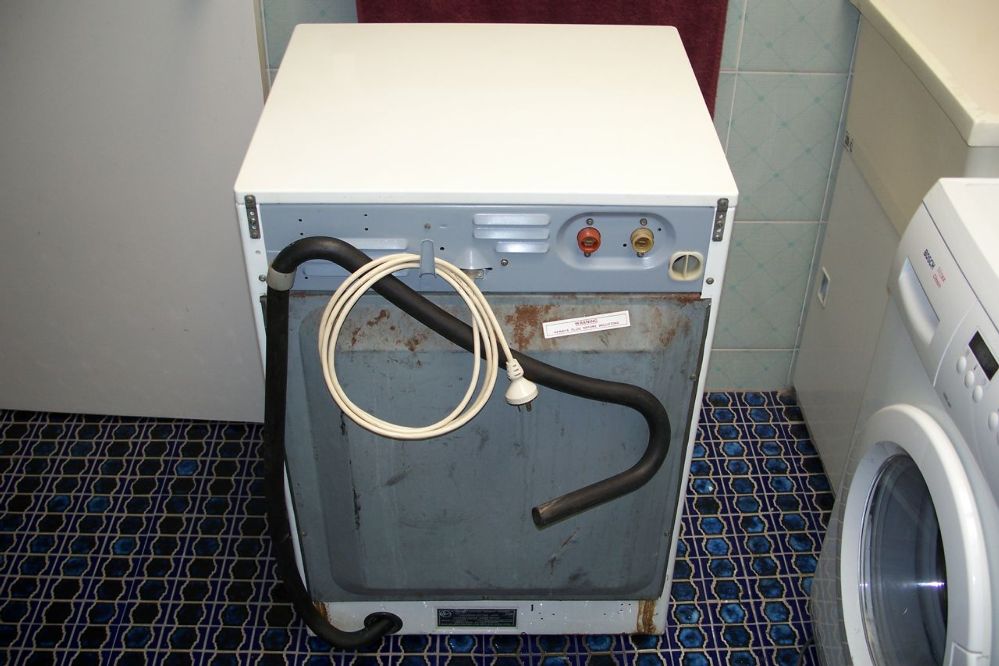
| ||
| Post# 700087 , Reply# 29 8/30/2013 at 21:51 (3,891 days old) by crouzet951 () | ||
|
Manufactured in February 1979. 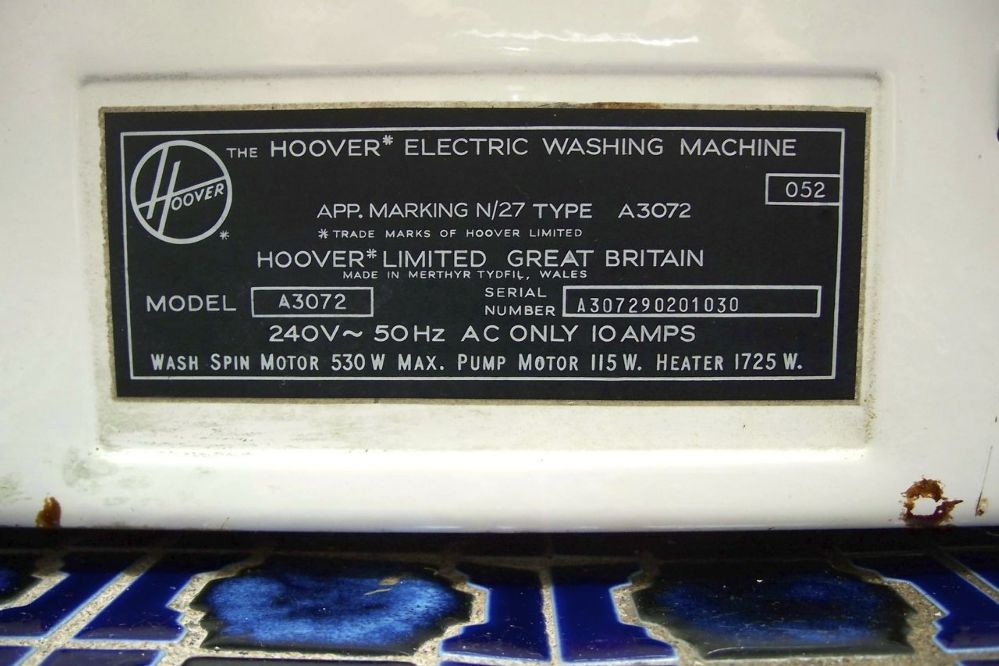
| ||
| Post# 700090 , Reply# 30 8/30/2013 at 21:54 (3,891 days old) by crouzet951 () | ||
|
To complete the olde worlde installation, new hoses were made from bulk hose using the original brass fittings. As can be seen, it's now running on hot and cold water 
| ||
| Post# 700093 , Reply# 31 8/30/2013 at 21:56 (3,891 days old) by crouzet951 () | ||
|
Finally, it's back in the correct space. The paint on the cabinet has yellowed slightly over the 34 years, so unfortunately the door colour is a little jarring. My bathroom has two enormous skylights, so perhaps the door paint will mellow too in the sunlight. 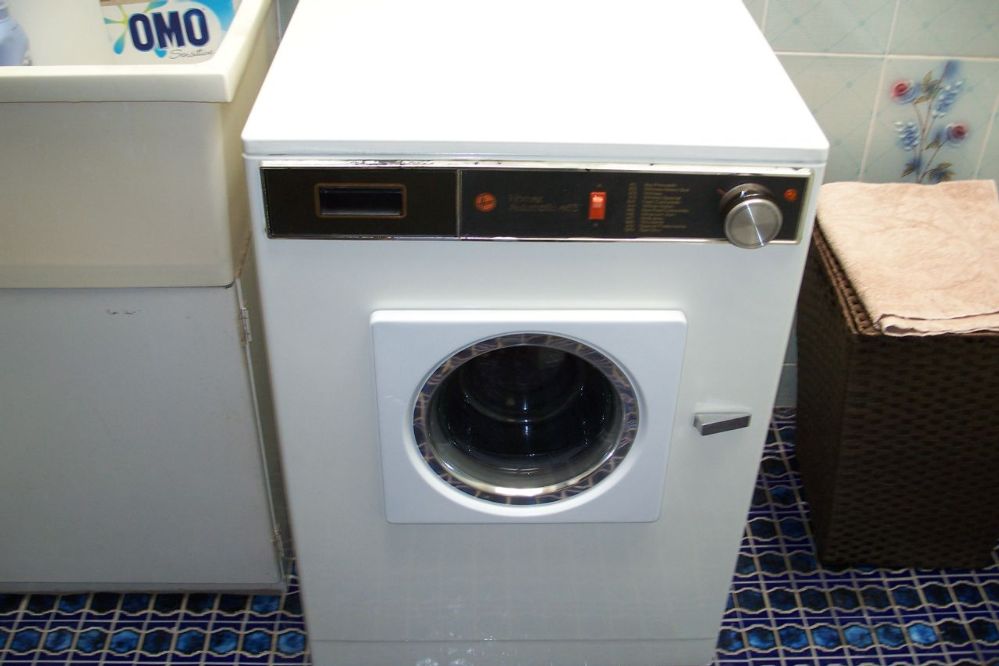
| ||
| Post# 700095 , Reply# 32 8/30/2013 at 22:00 (3,891 days old) by crouzet951 () | ||
|
That's it folks. Just one last thought, I know it's not very ecologically responsible, but it's sooooo nice to see the clothes actually tumbling in visible water. Thanks to everyone for their assistance. Best wishes John 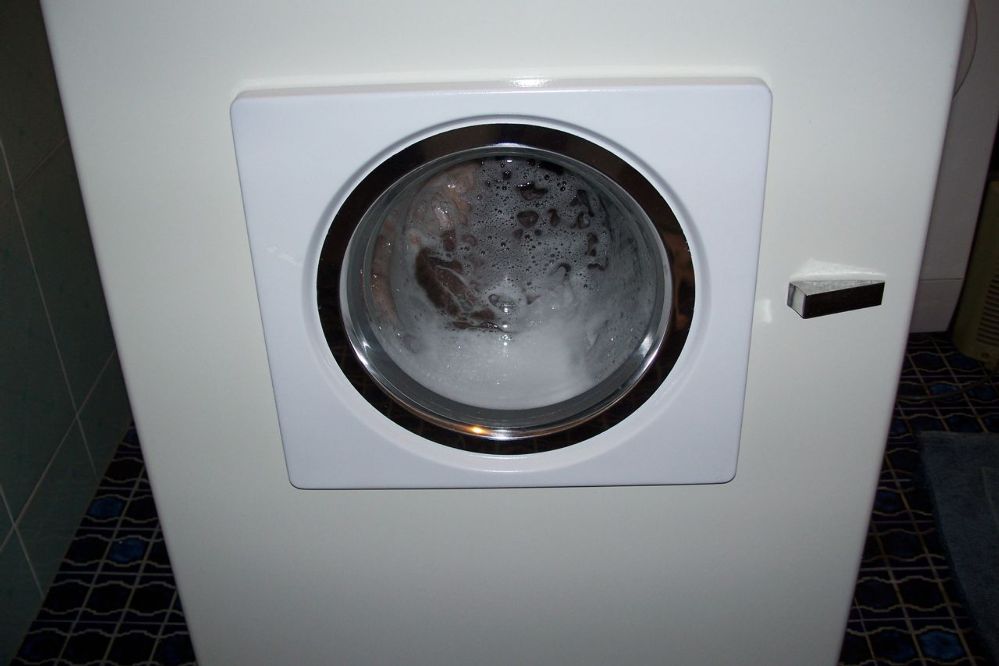
| ||
| Post# 700137 , Reply# 33 8/31/2013 at 01:14 (3,891 days old) by mrprojectionist () | ||
|
Fantastic! A great job! | ||
| Post# 700144 , Reply# 34 8/31/2013 at 02:12 (3,891 days old) by electron1100 (England) | ||
Well Done | ||
| Post# 700155 , Reply# 36 8/31/2013 at 05:17 (3,890 days old) by hotpoint95622 (Powys) | ||
hotpoint95622 | ||
Post# 700157 , Reply# 37 8/31/2013 at 07:02 (3,890 days old) by chestermikeuk  (Rainhill *Home of the RailwayTrials* Merseyside,UK) (Rainhill *Home of the RailwayTrials* Merseyside,UK) |
||
Hoover Oovah...
John, congratulations on a great restore and for taking the time to show the complete process, its a labour of love with any of these machines getting them up and running again - has the Bosch been retired ?
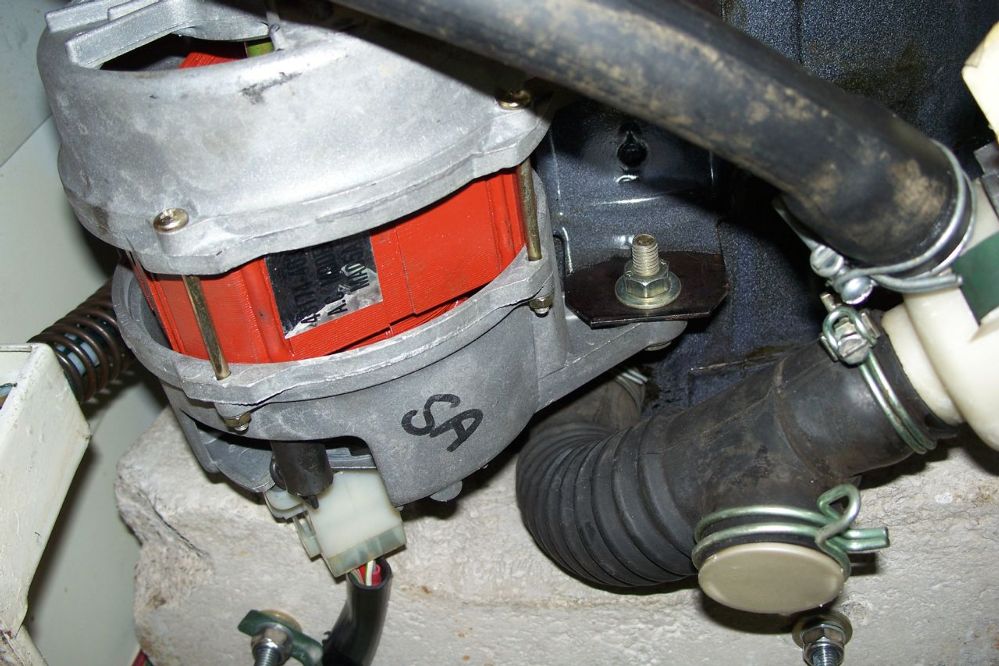
Cant get over how good the motor looks for a strip down and paint job - glad to hear its working as it should... What next - matching dryer on top? | ||
| Post# 700293 , Reply# 38 8/31/2013 at 20:22 (3,890 days old) by ronhic (Canberra, Australia) | ||
 | ||
| Post# 700492 , Reply# 40 9/1/2013 at 19:22 (3,889 days old) by optima (Cumbria England) | ||
Hoover A3072 | ||
| Post# 700621 , Reply# 41 9/2/2013 at 12:41 (3,888 days old) by sesteve (London, UK) | ||
Haynes manual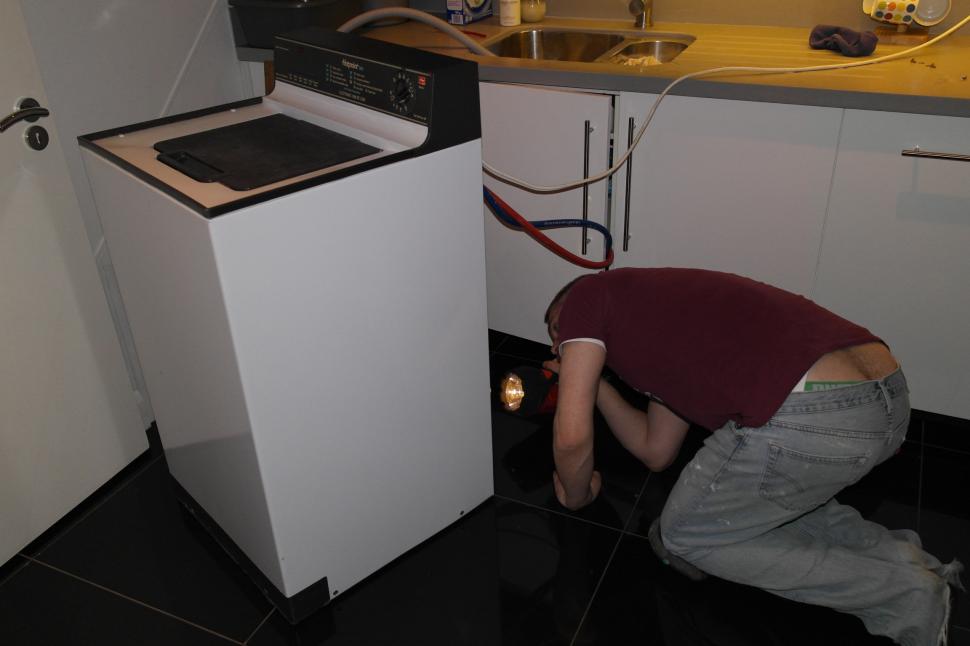
Hey John
This restoration has been fantastic and hope you are really pleased with the result. The thread has been like the Haynes manual for repair but much much better and in colour too. Well done and love the fact it has its original drain hose. That's one of my pet subjects lol Happy washing in it Steve :) | ||
|
Post# 700650 , Reply# 42 9/2/2013 at 15:21 (3,888 days old) by chestermikeuk (Rainhill *Home of the RailwayTrials* Merseyside,UK) |
||
|
"original drain hose | ||
| Post# 701185 , Reply# 44 9/4/2013 at 16:19 (3,886 days old) by supermaticjames (Donegal, Ireland) | ||
|
Congratulations on your big restoration job I'm proud of your patience, labour and effort! | ||
|
Post# 701304 , Reply# 45 9/5/2013 at 01:52 (3,886 days old) by mattywashboy (Perth, Western Australia) |
||
 | ||
| Post# 701913 , Reply# 47 9/8/2013 at 02:54 (3,883 days old) by crouzet951 () | ||
|
As mentioned before, I have some old matchbox washer wiring looms, so it was easy to make up a couple of correctly coloured leads with the proper insulators. 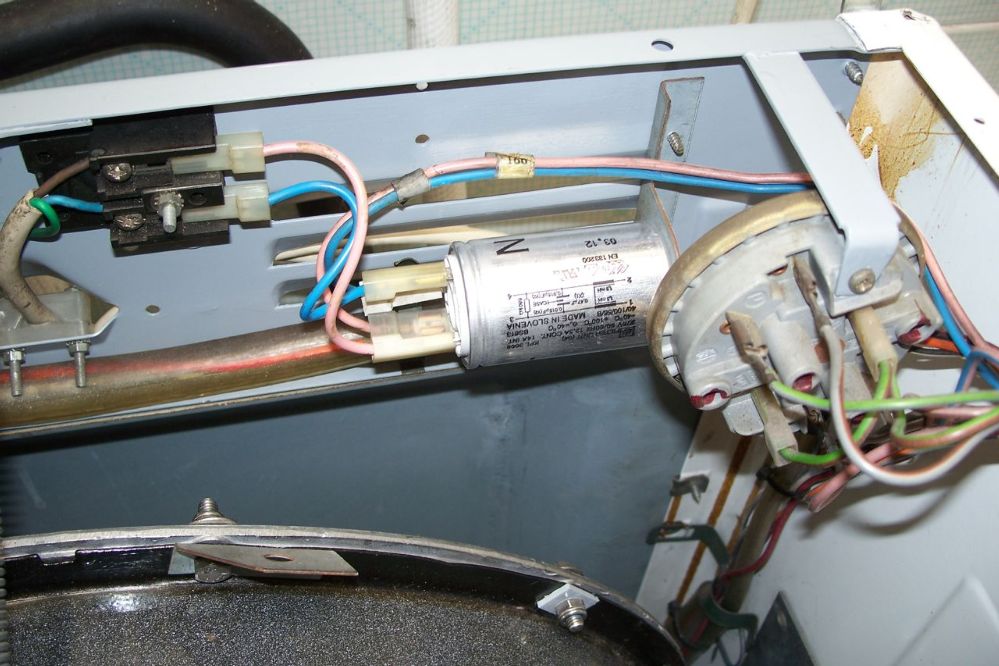
| ||
| Post# 701914 , Reply# 48 9/8/2013 at 03:03 (3,883 days old) by crouzet951 () | ||
|
I stood well clear when turning on the power, but the new suppressor didn't explode. Whew! The motor brushes have now fully bedded in, and the machine is running beautifully. Thanks for all the comments and encouragement. Kind regards John 
| ||
| Post# 702111 , Reply# 49 9/8/2013 at 19:07 (3,882 days old) by optima (Cumbria England) | ||
|
| ||
| Post# 703369 , Reply# 51 9/15/2013 at 09:42 (3,875 days old) by matchboxpaul (U.K) | ||
|
Below is the URL that takes you to the only image I had of a 455, prior to yours and Leon's machines surfacing. The hard to find newspaper archive part of google has some good adverts in them - happy searching! CLICK HERE TO GO TO matchboxpaul's LINK 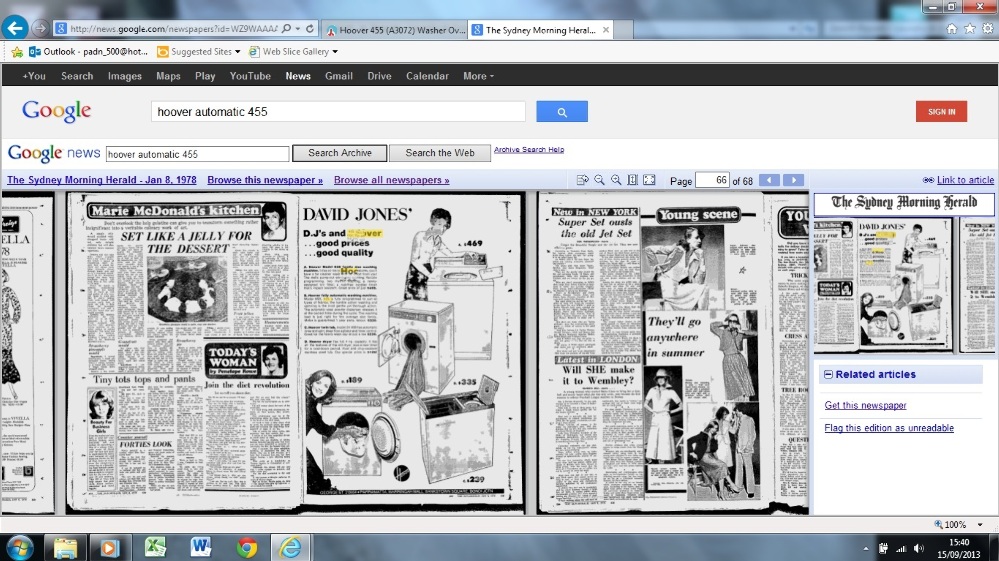
| ||
| Post# 703724 , Reply# 53 9/17/2013 at 18:35 (3,873 days old) by crouzet951 () | ||
|
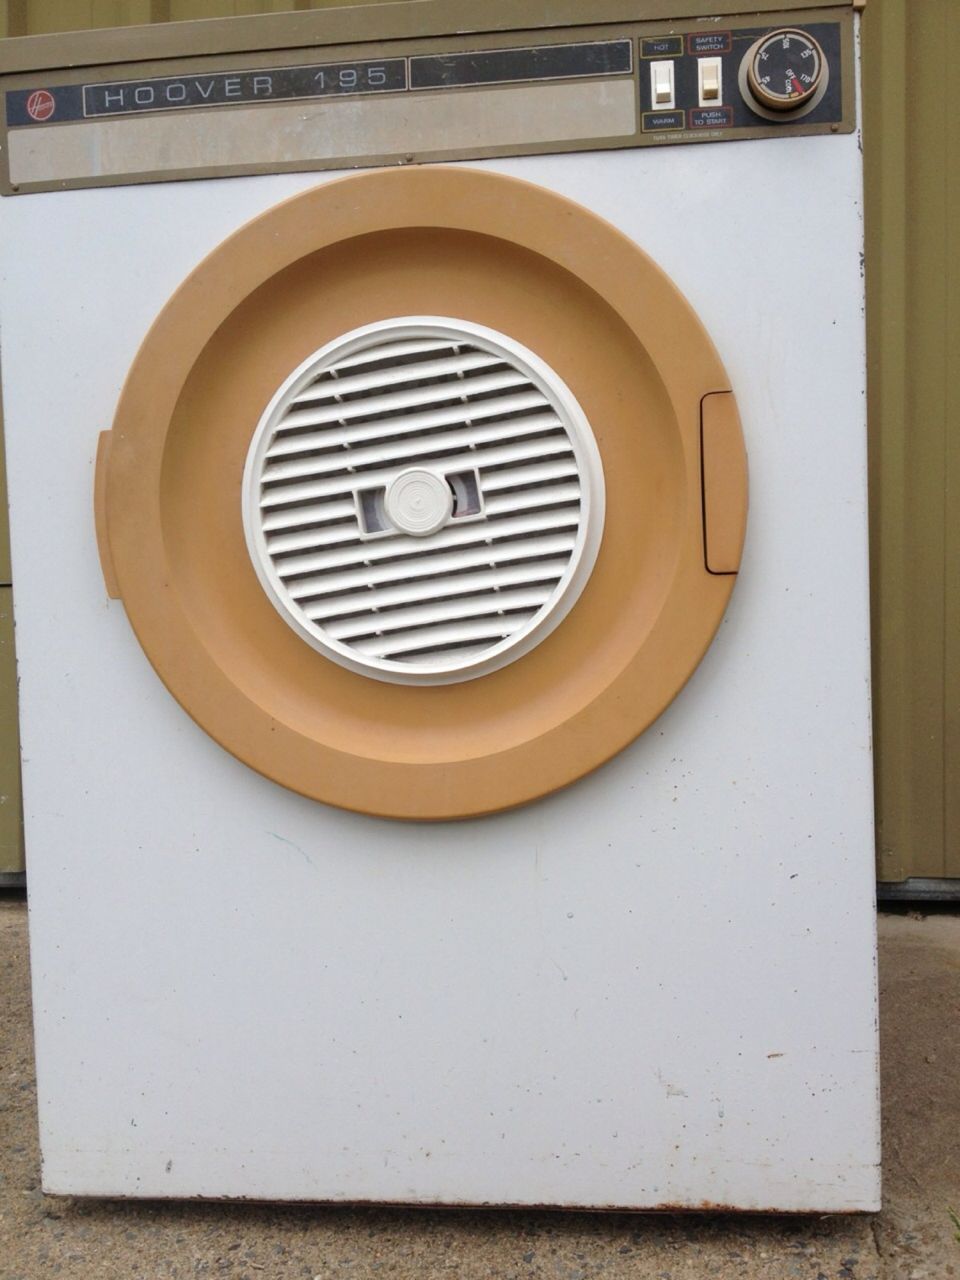
Hoover 195 image 2 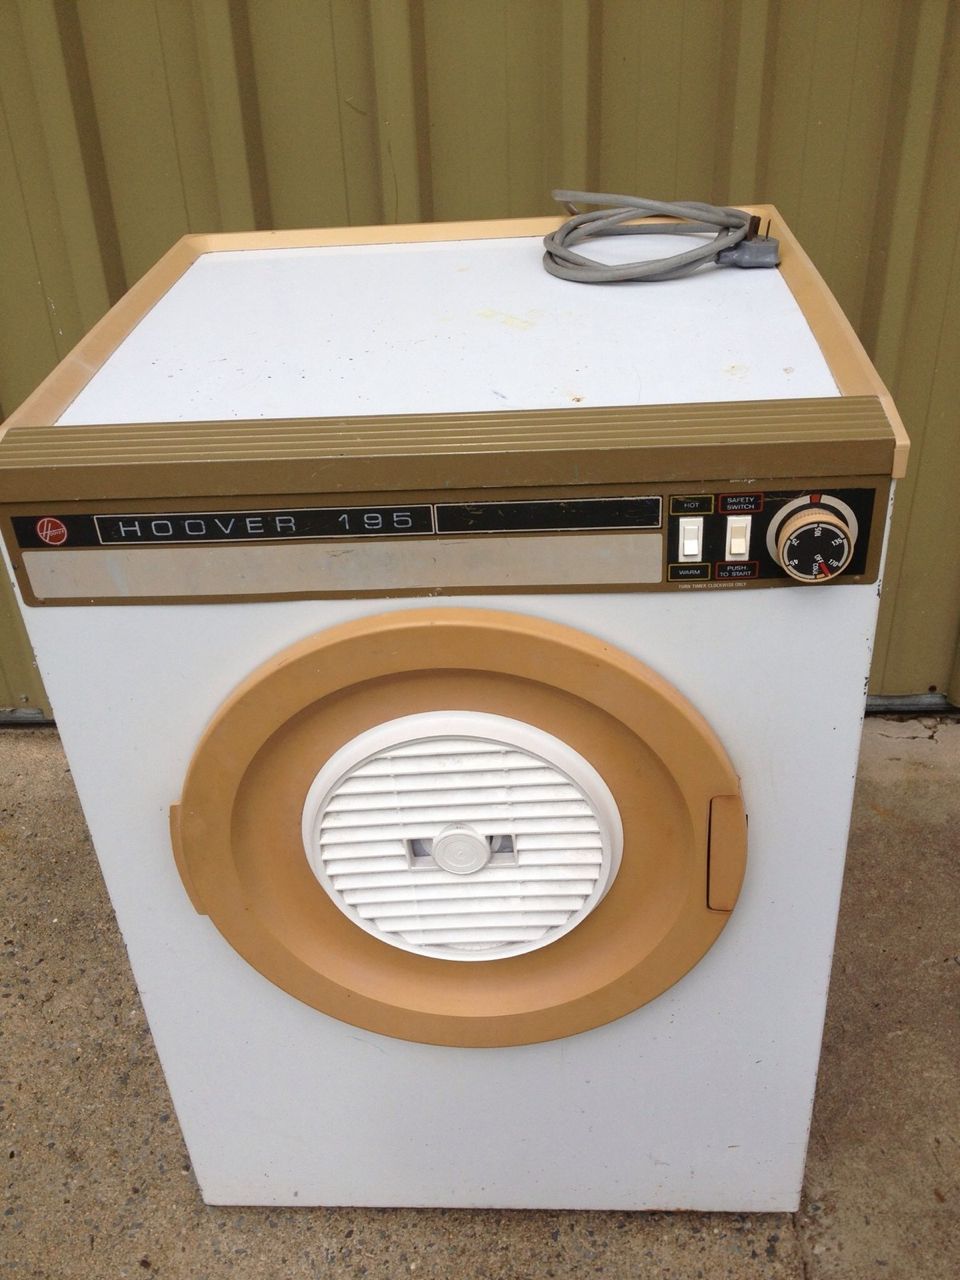
| ||
| Post# 703725 , Reply# 54 9/17/2013 at 18:36 (3,873 days old) by crouzet951 () | ||
|
Hoover 195 image 3 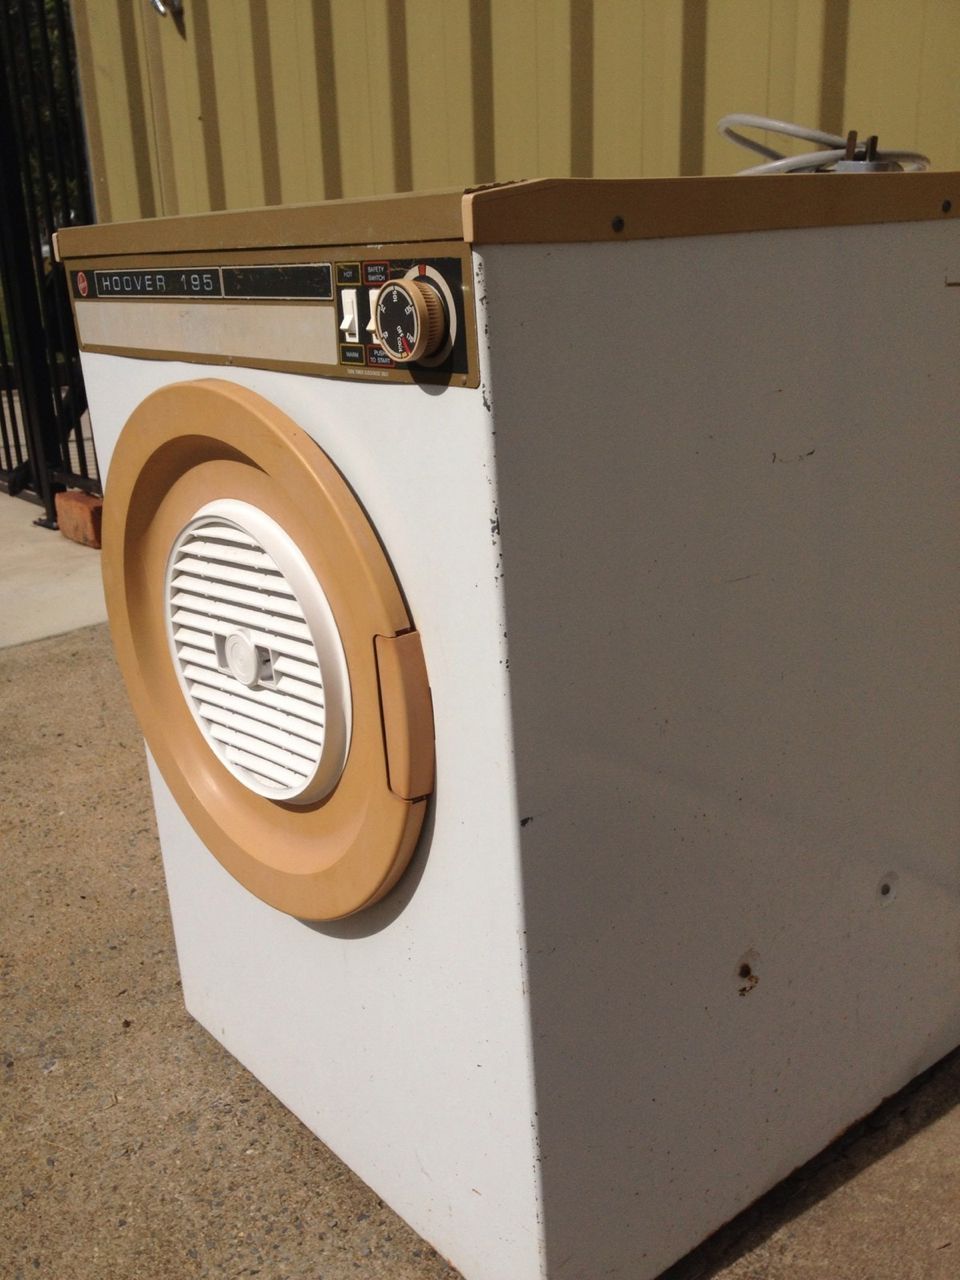
| ||
| Post# 703727 , Reply# 55 9/17/2013 at 18:40 (3,873 days old) by crouzet951 () | ||
|
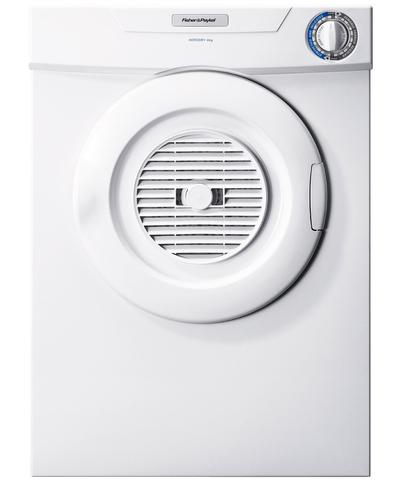
Hoover 195 image 4 Sorry folks, looking at the plate on the back it appears the dryer was made in New Zealand, and the model no is D6034. I should look at my own images before posting. Hehe. 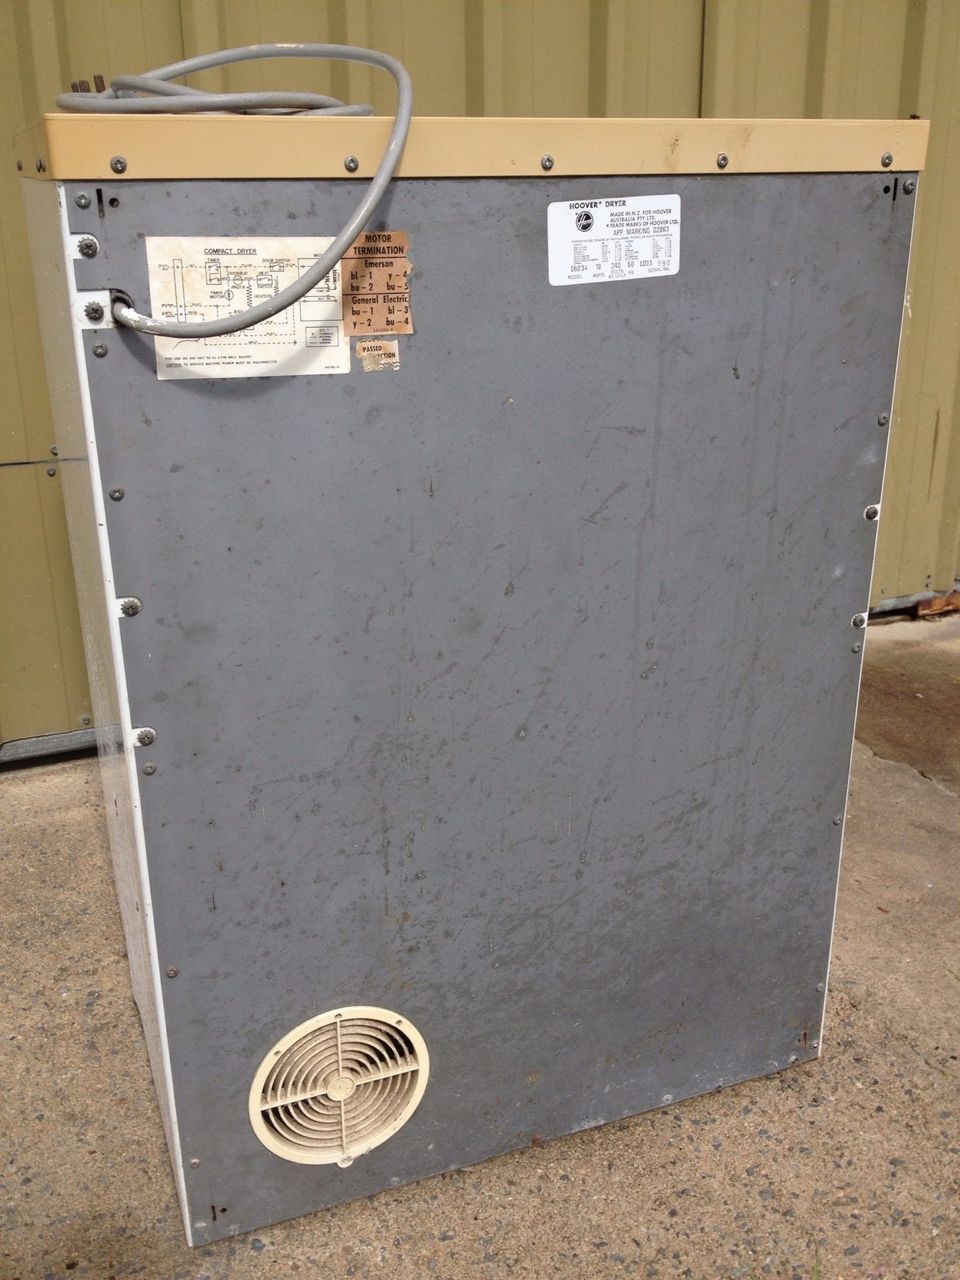
| ||
|
Post# 703819 , Reply# 56 9/18/2013 at 05:46 (3,872 days old) by chestermikeuk (Rainhill *Home of the RailwayTrials* Merseyside,UK) |
||
|
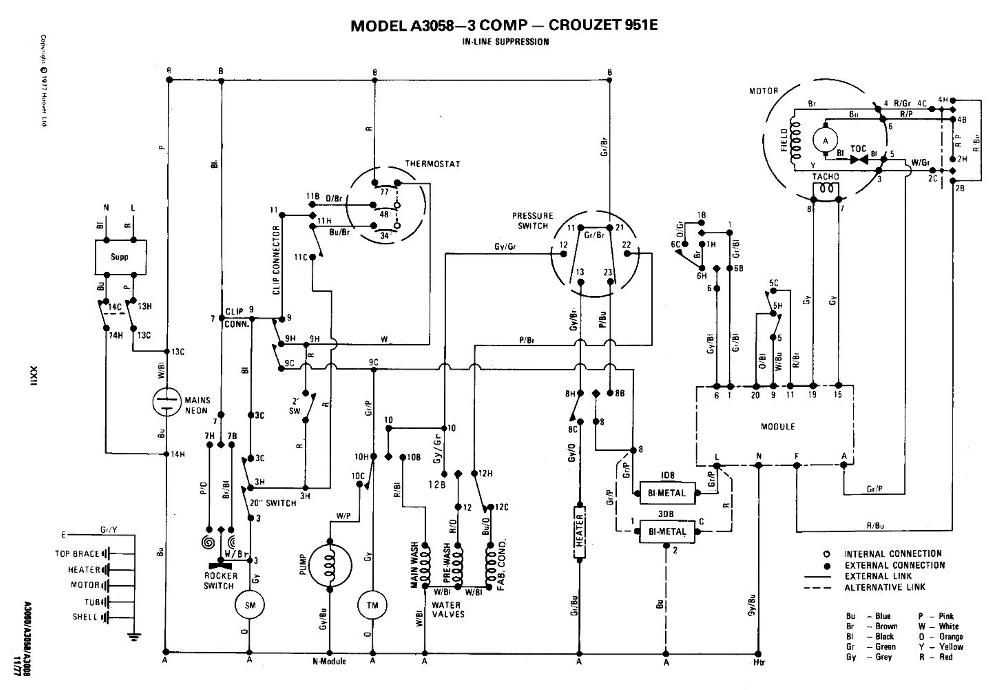
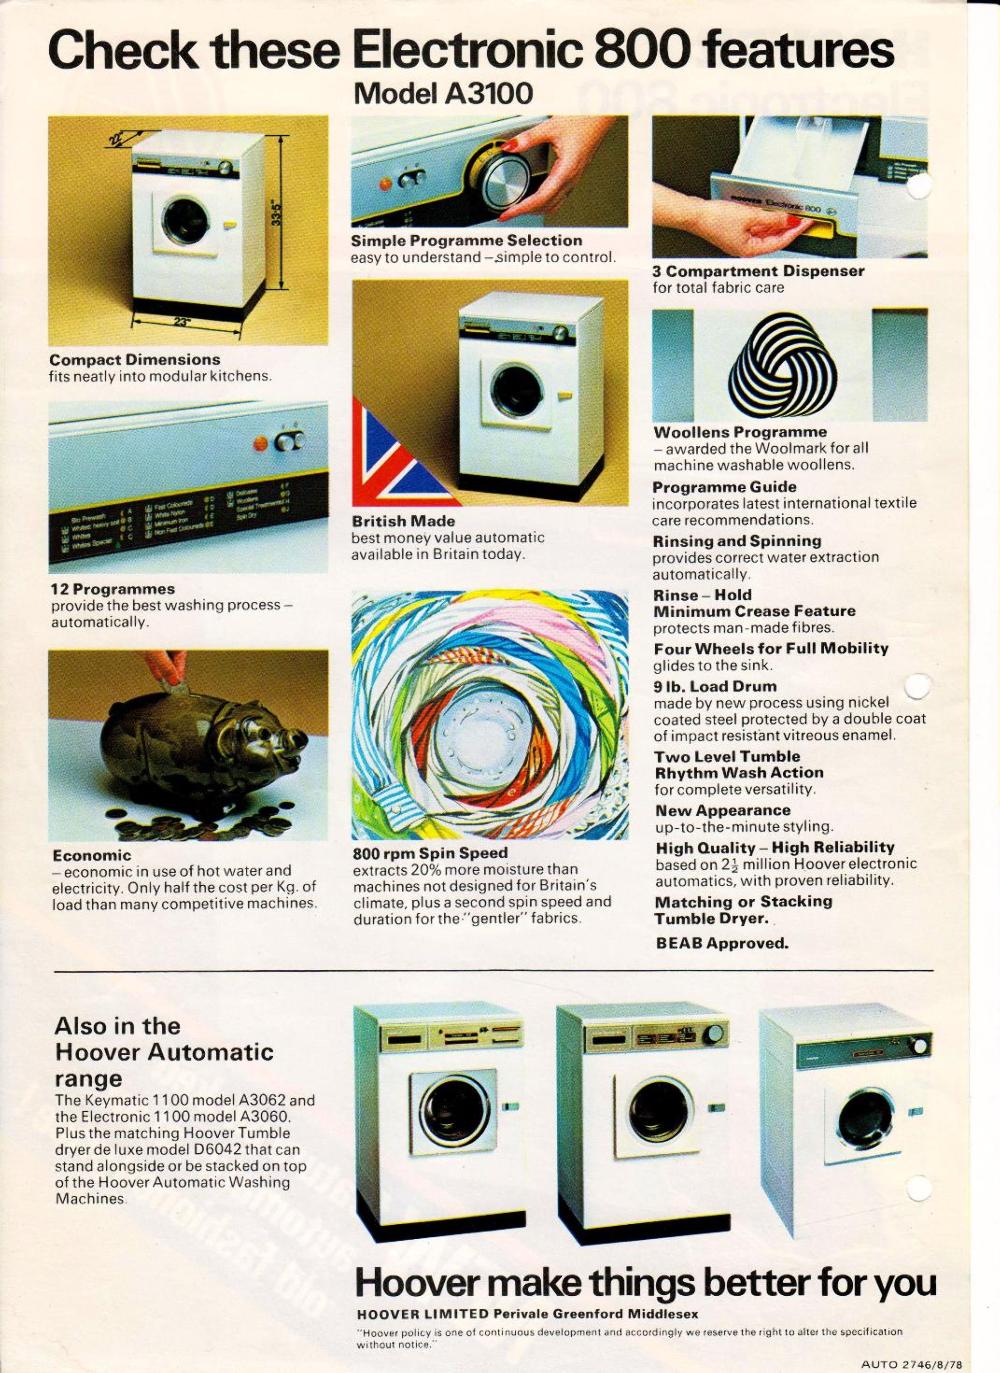
Hoover A3058 | ||
|
Post# 703827 , Reply# 57 9/18/2013 at 06:52 (3,872 days old) by chestermikeuk (Rainhill *Home of the RailwayTrials* Merseyside,UK) |
||
|
Hoover a3058 | ||
|
Post# 703828 , Reply# 58 9/18/2013 at 06:54 (3,872 days old) by chestermikeuk (Rainhill *Home of the RailwayTrials* Merseyside,UK) |
||
|
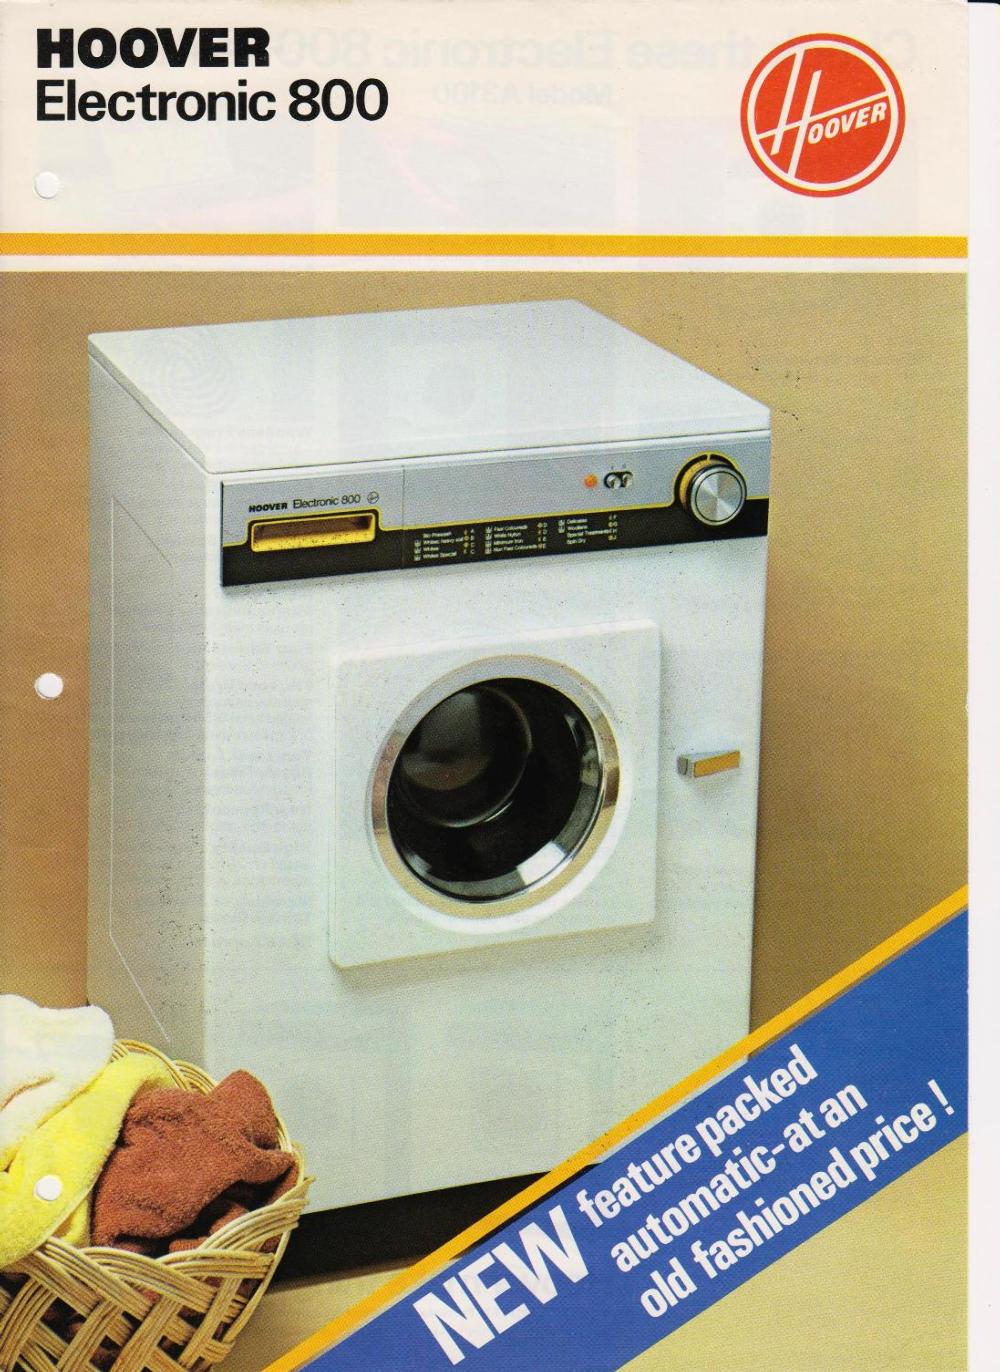
A3100 | ||
| Post# 703846 , Reply# 59 9/18/2013 at 09:13 (3,872 days old) by gizmo (Victoria, Australia) | ||
|
I'm pretty sure those NZ made Hoover dryers are actually Fisher and Paykel. | ||
|
Post# 704216 , Reply# 61 9/20/2013 at 08:01 (3,870 days old) by chestermikeuk (Rainhill *Home of the RailwayTrials* Merseyside,UK) |
||
|
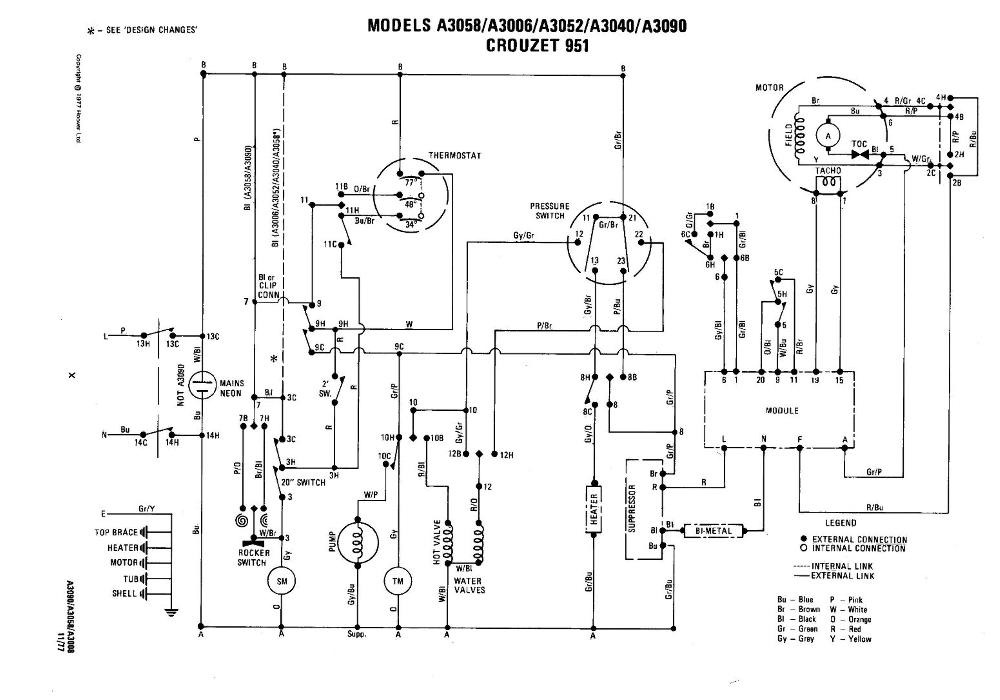
Crouzet Timer 951 | ||
|
Post# 704220 , Reply# 62 9/20/2013 at 08:09 (3,870 days old) by chestermikeuk (Rainhill *Home of the RailwayTrials* Merseyside,UK) |
||
|
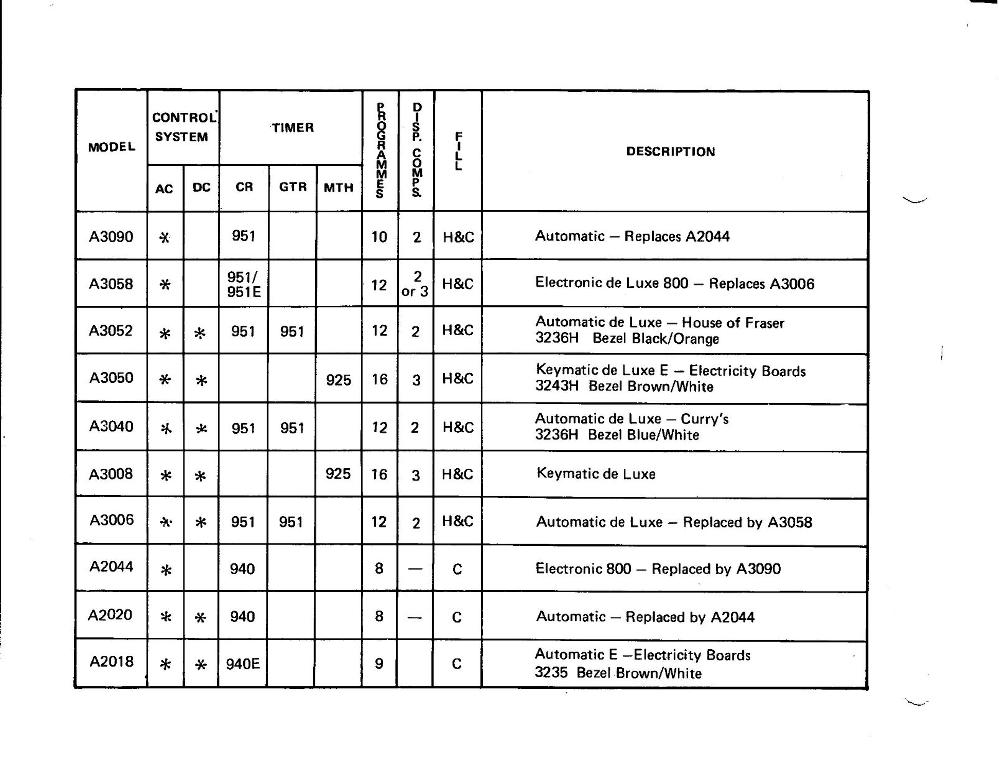
Hoover Timers Reference Sheet | ||
| Post# 704241 , Reply# 63 9/20/2013 at 10:58 (3,870 days old) by electron1100 (England) | ||
|
Poxy Door Interlocks | ||
| Post# 834422 , Reply# 65 7/29/2015 at 17:30 (3,193 days old) by mikeymatic (Manchester UK) | ||
Very impressive ! 
Just read your posts on your 455 refurb from a couple of years ago - what a fantastic job you've done.
Is it still going strong ? I've just started on a Hoover Logic A3670 - it's my first big overhaul - your posts have given me lots of inspiration and motivation, and some great tips. Would love to hear how the 455 is doing, being a fan of Hoover Washing Machines and Oz ! Mike. | ||
|
Post# 1160374 , Reply# 66 9/25/2022 at 11:40 (578 days old) by chetlaham (United States) |
||
|
| ||
|
Post# 1160488 , Reply# 67 9/27/2022 at 03:43 (577 days old) by Ricky5050 (Durham Britain) |
||
Photos. 
Hi when changing a timer take lots of photos from all angles. And draw a simple diagram of needed. Some times the cables are on blocks which is easier as they often only fit one way. Some are lord of wires. Some don�t need to come off until after the timer is or I�ve bridging wires so leave them until the timers out and on a bench
Good luck | ||
| Forum Index: | 
| Other Forums: |

|

|

|

|

|

 Comes to the Rescue!